HARDKORR BZRX Series Specification sheet
INSTRUCTION MANUAL
AND INSTALLATION GUIDE
2
In doing so, you now have the assurance and peace of mind that comes
from purchasing a product that has been manufactured to the highest
quality standards.
Our aim is for you to be completely satisfied with your purchase, and
therefore your new Hardkorr product is backed by a comprehensive
3-year warranty and an outstanding after-sales customer service team.
We hope you will enjoy using this product for many years to come.
If you require technical support, or in the unlikely event your purchase
appears to be faulty, please contact our support team for immediate
assistance. You can find up-to-date contact details on our website
hardkorr.com.
General Information and Safety Instructions ......................................4
Specifications.................................................................................5
InstallationInstructions..................................................................6-7
Accessories ....................................................................................8
Frequently Asked Questions ............................................................9
Warranty .................................................................................10-11
Congratulations on purchasing this high quality Hardkorr product.
INTRODUCTION
3
INTRODUCTION
PLEASE KEEP THIS MANUAL FOR FUTURE REFERENCE
This manual contains important safety instructions for your BZR-X Series
Driving Lights.
Do not install or operate the driving lights unless you have read and
understood this user manual. Pay particularly close attention to CAUTION
and WARNING statements.
Hardkorr recommends that the driving lights be installed by an appropriately
qualified professional.
DISCLAIMER
MODELS COVERED BY THIS MANUAL
While caution has been taken to ensure the accuracy of the contents of this
guide, Hardkorr assumes no responsibility for errors or omissions.
Please note that specifications and functionality may change without notice.
HKBZRX180
BZR-X SERIES 7”″LED DRIVING LIGHTS (PAIR W/HARNESS)
HKBZRX180-S
BZR-X SERIES 7”″LED DRIVING LIGHTS (SINGLE)
HKBZRX215
BZR-X SERIES 9”″LED DRIVING LIGHTS (PAIR W/HARNESS)
HKBZRX215-S
BZR-X SERIES 9”″LED DRIVING LIGHTS (SINGLE)

4
GENERAL INFORMATION &
SAFETY INSTRUCTIONS
WARNING
Failure to follow these instructions may result in personal/property injury,
and/or a reduced life of the product.
• Do not disassemble the lights.
• Do not look directly into the lights.
• Do not connect the light to 240V/110V power supplies.
• Do not run more than three lights off the one harness.
• Do not connect the light to a power source greater than 30V.
• Do not use a pressure washer to clean the lights. Do not use solvent-
based cleaners when washing the lights.
• Hardkorr recommends the installation of the lights to be performed by a
licensed auto electrician.
• Some vehicles will require a different piggyback adaptor than the ones
included, or may need to be hardwired into place. We recommend
checking with the vehicle manufacturer before installing the lights.
• Before mounting your lights, refer to your state/territory’s laws and
regulations around the use and installation of the lights.
• Ensure your lights are mounted tightly and securely.
• Improper installation of the wiring harness will affect the performance
and reliability of the light.
• Consider the airflow to the radiator before installing the lights.
• Do not install the driving lights in a place that may interfere with the
driver’s line of vision.
• The installation, positioning, and use of the driving lights is solely the
responsibility of the user.
5
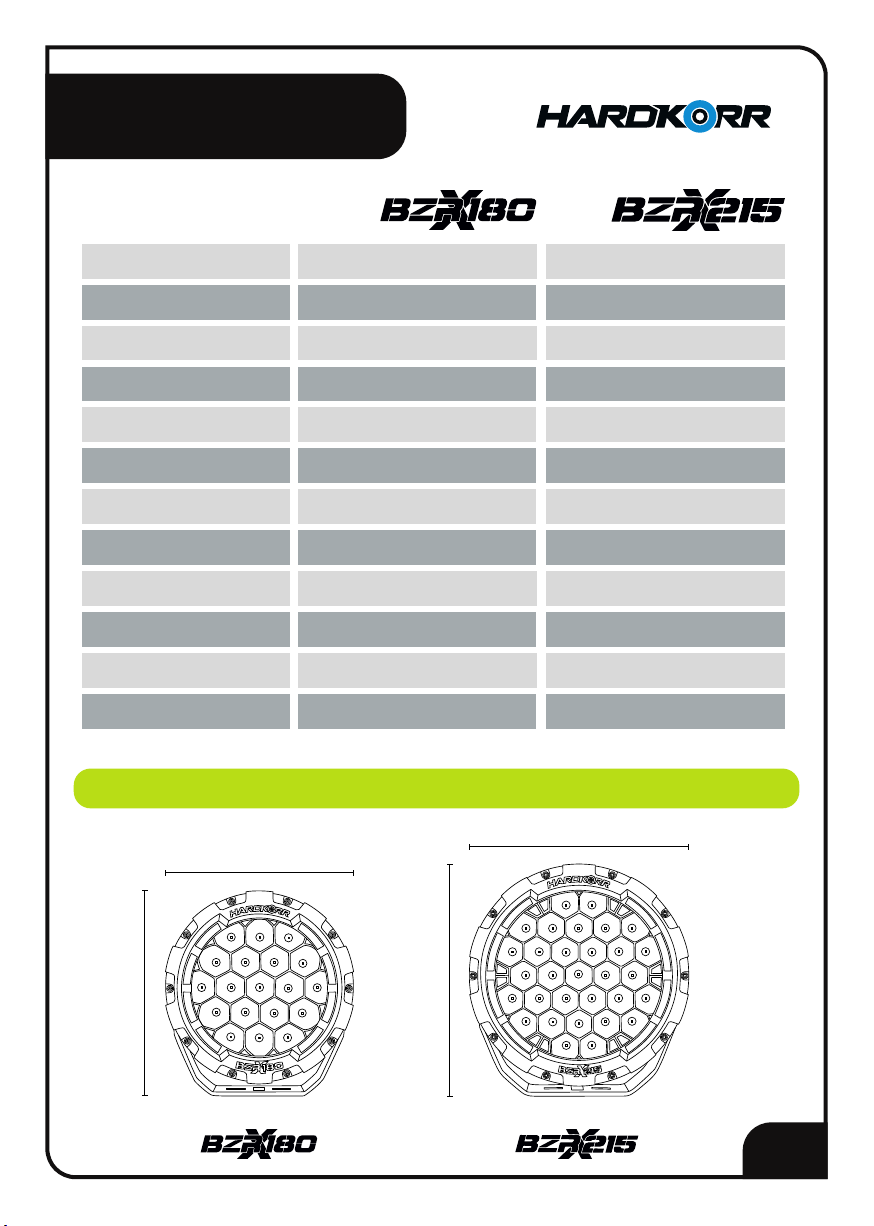
SPECIFICATIONS
LED MANUFACTURER
Genuine Lumileds ®
19 x 5W
1 lux @ 1,150m
22,588 Effective Lumens
LED NUMBER (EACH)
LUX (PAIR)
OUTPUT (PAIR)
Combination
IP68
1.9kg
BEAM
INGRESS PROTECTION
WEIGHT (EACH)
10-30v DC
7.7 @ 12V / 3.75A @ 24V
6000K
OPERATING VOLTAGE
CURRENT (EACH)
COLOUR TEMP.
50,000+ Hours
CE, RoHS, C-Tick, CISPR15
LED LIFESPAN
CERTIFICATIONS
Genuine Lumileds ®
31 x 5W
1 lux @ 1,460m
34,196 Effective Lumens
Combination
IP68
2.7kg
10-30v DC
10.6 @ 12V / 5.3A @ 24V
6000K
50,000+ Hours
CE, RoHS, C-Tick, CISPR15
190mm
175mm
Depth: 75mm
235mm
215mm
Depth: 75mm
DIMENSIONS

6
INSTALLATION
INSTRUCTIONS
• Prior to installing the lights on your vehicle, Hardkorr recommends
testing the lights and wiring harness outside of the vehicle.
• Disconnect the battery.
• If you do not have pre-drilled holes, sit the lights on the mounting
surface, mark where the holes will need to be placed, and then remove
the light and drill the holes. There are three mounting holes in each
bracket; you can choose to use either one or three bolts per light. Using
three bolts may provide additional stability in extreme conditions.
• Mount the bottom plate of the bracket through to the bullbar, roof rack
or other surface, with the rubber pad in-between.
• Connect the 3-pin Deutsch (triangular plug) cable from the LED lights to
the matching plugs on your Hardkorr wiring harness.
• Connect the white wire to the twin fuse adaptor, then remove the
accessories fuse in the fuse box. Plug the accessories fuse as well as the
supplied fuse into the adaptor, then insert the adaptor into the fuse box
slot from where you removed the accessories fuse.
• Remove the high beam plug from the back of your headlight and
connect it to the piggyback adaptor - the kit has a H3 and H4 adaptor
supplied, however other adaptors are available for purchase separately
if your vehicle has a different plug (note that some vehicles require a
model-specific puggyback adaptor). You’ll then need to connect the
adaptor to the white plug on the harness.
• Next, feed the switch to the inside of the cabin. This should be through
a rubber grommet that runs through the firewall. To do this, you’ll need
to note the order of the wires on the back of the switch, then remove,
reconnecting once in the cabin of your vehicle.
• Secure the relay to the body of the vehicle then connect the positive and
negative terminals from the harness to your battery.

7
FUSE
BOX
Insert twin fuse adaptor
into accessories fuse slot
(blade and micro blade
supplied)
High beam
piggyback adaptor Factory high
beam cable
Splitter cable
(incl. with single light)
12V or 24V
relay
Switch (mount inside
vehicle cabin)
Optional 3rd light
(sold separately)
to harness
to 2nd light
INSTALLATION
INSTRUCTIONS
DC BATTERY INPUT
SOLAR INPUT
OUTPUT/CHARGING VOLTAGE
OUTPUT CURRENT (DC)
OUTPUT CURRENT (SOLAR)
1 KG
5MM X 225MM
CE, FCC, ROHS
NOTE
If wiring up a third light, simply use the included piggy back adapter
(included in the single light kit) to connect from one of the triangular
plug connectors, then connect your third light from there.
If you are not qualified to install the lights yourself, Hardkorr
recommends the installation of our BZR-X Driving Lights to be
performed by a licensed auto electrician.
8
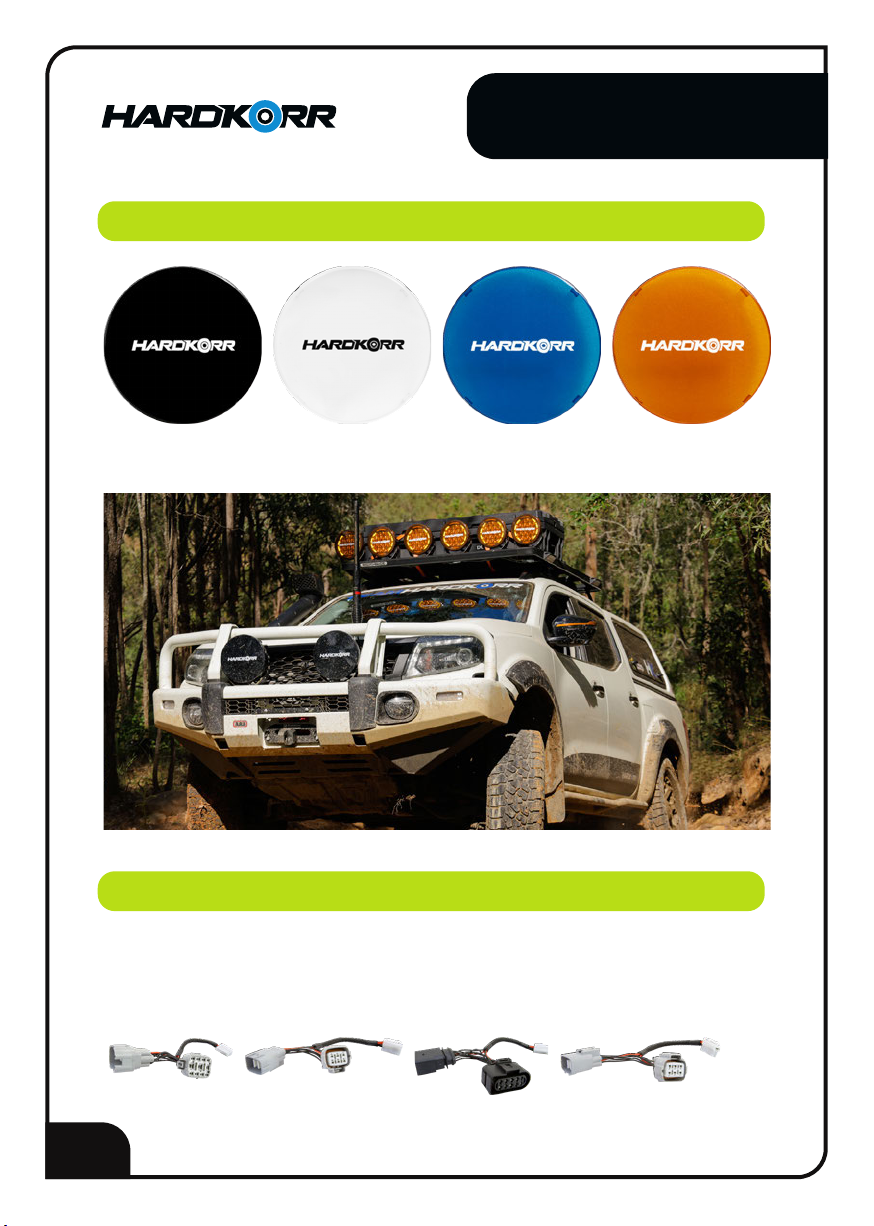
ACCESSORIES
Black Clear Blue Orange
Some newer vehicles require model-specific piggyback adaptors
to connect the lights to the high beam circuit. A range of these are
available for purchase from us.
LIGHT COVERS
PIGGYBACK ADAPTORS

9
FREQUENTLY ASKED
QUESTIONS
9
Q. How do I turn on my lights?
A. Wired correctly, the lights will require the high beams to be turned on
before the switch will activate the lights.
Q. How do I adjust the tilt of the driving lights?
A. Loosen the bolts either side of the lights to the point where the lights are
tiltable. From there you’ll be able to angle the light to your desired position.
Q. What’s the best way to clean my lights?
A. Keeping the lenses of the light clean will increase the performance of the
light. We recommend using a sponge and a bucket of warm soapy water to
wash the lights down. Please note, that using a solvent-based cleaner is not
recommended and may void the warranty of the light.
Q. My driving lights are working only while on the low beam setting.
Why is it doing this?
A. Depending on the make of your vehicle the lights may need to be wired
differently. In this case, we recommend contacting the manufacturer, or,
alternatively, getting an auto electrician to wire the lights in.
Q. The lights don’t seem to be working correctly. What do I do?
A. There are typically a few reasons why this would be the case:
1) The lights have been incorrectly wired up - we would recommend getting
a qualified auto electrician to get this set up for you.
2) Each vehicle is wired differently. For every installation, we recommend
contacting the manufacturer to check on the best way to wire the lights in.
3) Check the fuse and relays. For the fuse, if you’re seeing a gap in the wire
or a dark smear this’ll mean that it’s blown and needs replacing. To test the
relay, we recommend connecting it up to a multimeter.
Have another question for us? We’re happy to help.
You can get in contact with our support team via the email:
info@hardkorr.com
10
WARRANTY
Our goods come with guarantees that cannot be excluded under
the Australian Consumer Law. You are entitled to a replacement or
refund for a major failure and compensation for any other reasonably
foreseeable loss or damage. You are also entitled to have the goods
repaired or replaced if the goods fail to be of acceptable quality and
the failure does not amount to a major failure.
Hardkorr warrants that this product will be free from defects in
material and workmanship for three years. The warranty commences on the date of purchase
by the original purchaser, and is not transferable. To access the benefits of this warranty, you
must retain your proof of purchase and follow any other direction we reasonably give you
(e.g. completing and returning your warranty card if applicable).
3
TO BEGIN YOUR WARRANTY CLAIM
If you believe your Hardkorr product is defective, it must be returned to Hardkorr for
inspection by our warranty claims department.
1. You must have a Return Authorization (RA) number. To get your RA number, please
complete the form found on our website and wait for the warranty team to contact you.
2. Once you have an RA number, you must arrange for the product must be shipped at your
own expense back to Hardkorr (keep your receipt). The address for shipment will be
provided when we issue your RA number.
3. Please be sure that your RA number is clearly marked on the outside of the packaging
used for shipping.
Completing the steps as mentioned will ensure a faster process of your claim, so that Hardkorr
can get your product back to you as soon as possible.
Once we receive your returned product, our technicians will inspect it. We will then notify you
of the outcome of your claim.
If we accept your warranty claim, we will either repair, replace or refund the goods at our
discretion. We will also reimburse you for the shipping costs you incurred in sending the goods
back to us. Any products that we choose to replace or refund become the property of Hardkorr.
If we do not accept your claim, we will advise you of the reason and hold your product for
collection. You will need to arrange and pay for the product to be shipped back to you. If your
product is not collected within 30 days of your warranty claim being finalised, we may destroy
it.
11
WARRANTY
Your warranty is voided if we (at our sole discretion) determine that there is evidence of one or
more of the following:
• Negligence: Improper installation, improper or extreme use, use that contravenes this
instruction manual, etc.
• Abuse: Road hazards, Damage beyond the limits of “normal wear and tear.”
• Unauthorized Repair: Repair service performed by an unauthorised service centre.
• Disassembly: Any attempt to open, tamper with or otherwise compromise the integrity of
the product.
• Consequential damage: damage to this product caused by the failure of another
component of the vehicle or device in which this product is installed.
Exterior Finish: Hardkorr uses the highest quality materials available, but depending on location,
environment and exposure, the colour of exterior surfaces can fade. We will not approve any
warranty claims that relate to fade.
DISCONTINUED ITEMS
Discontinued items that are still under warranty will be reviewed by Hardkorr. If a discontinued
item is covered under warranty it may be replaced by an equivalent or superior item. If an
equivalent item is not available Hardkorr will determine terms of resolution on a case-by-case
basis.
HARDKORR.COM
This manual suits for next models
4
Table of contents
Popular Automobile Accessories manuals by other brands

Maddox
Maddox MB16-1 Owner's manual & safety instructions

Black Horse Off Road
Black Horse Off Road B046409-SP installation instructions

Prorack
Prorack K122 Fitting instructions

Corvette
Corvette A2D-C5 quick start guide

Skoda
Skoda 565 017 221 Fitting instructions

Whispbar
Whispbar K483W Fitting instructions

Jacka Industries
Jacka Industries JackaJay installation guide

Safe Fleet
Safe Fleet PRIME DESIGN AAL-8012-BLK manual

Davies Craig
Davies Craig TYREGUARD 400 operating instructions

Tar River Implements
Tar River Implements CSP Series Operator's manual

JBL
JBL smartbase quick start guide

Fiamma
Fiamma CARRY-BIKE PSA 02094-28A Installation and usage instructions


