Corvette A2D-C5 User manual

Courtesy of: DiscountCarStereo.com
Serving the internet community since 1995
A2D-C5(v 4.6.20)
QUICK START MUSIC STREAMING INSTALLATION GUIDE FOR 1997-04 CORVETTE WITH FUNCTIONING 12-DISC CD CHANGER

PRODUCT SAFETY & DISCLAIMER
READ ALL INSTRUCTIONS CAREFULLY BEFORE INSTALLING, FAILURE TO DO SO MAY CAUSE PERSONAL
INJURY OR DAMAGE TO PRODUCT AND/OR PROPERTY
•This installation guide is provided as a GENERAL installation guide; some vehicles vary and may
require additional steps. We do not accept responsibility for third party labor charges or
modifications. Exercise due-diligence when installing this product.
•We do not accept any responsibility for vehicle damage or personal injury resulting from the
installation of this product.
•Careless installation and operation can result in equipment damage.
Requirements:
1997-04 Corvette
Functioning 12-disc CD Changer in trunk/hatch
Introduction:
If your C5 has a functional 12-disc changer and looking to add music streaming; the
A2D-C5 is for you! Users may opt to connect module at the radio or 10-pin CD
changer plug at changer location in hatch/trunk. The required 12-disc CD
changer remains connected and operational; however, if vehicles 12-disc
changer malfunctions, this module will not work. To operate, simply pair
smartphone or tablet and enjoy GPS prompts, Apple music, Pandora and more on
the car system. All controls and display remain with audio device –C5 radio
buttons (except volume) do not apply.
See Frequently Asked question at the end of this guide.
Installation 1: (To radio using the PXHGM4 harness)
Warning: The PXHGM4 harness connects module to radio. The PXHGM2
harness connects module at the CD changer location.
Radio removal required. (
Click links below for radio removal video)
https://www.youtube.com/watch?v=Gcrlufo1ctc
https://www.youtube.com/watch?v=WTbWYNJTSDs
1. Press black release tab to disconnect 20-pin plug from radio. (See Fig. 1)
Fig. 1
2. Connect factory 20-pin plug (from step 1) to installation harness matting
20-pin white socket (See Fig. 2).
Fig. 2
radio install harness
3. Connect installation harness 20-pin black/gray plug (See Fig. 2) to radio 20-
pin socket vacated in step 1
4. Tuck and secure any extra wires away from moving parts and proceed to
“Pairing” on page 5.

Installation 2: (To 10-pin plug in trunk/hatch)
Warning: This installation option is completed at the rear and applies to
vehicles with CD changer. Changer remains connected and functional. If
vehicle does not have a CD changer or if malfunctions; this module will not
work.
1. Locate factory changer in trunk/hatch (See Fig.6) and disconnect 10-pin
plug (See Fig. 7). Many 12-Disc changers are mounted vertically (See
Fig, 6) obstructing 10-pin plug however, it is possible to “blindly”
disconnect plug by reaching underneath and pressing release tab or
simply dismounting changer from bracket.
Fig. 6
12-disc changer in hatch
2. Connect factory 10-pin plug (See Fig. 7) to installation harness to 10-pin
socket (white) (See Fig. 8)
Fig. 7
10-pin plug
Fig. 8
socket
3. Connect installation harness 10-pin plug (See Fig. 7) to 12-disc changer
socket vacated in step 1 (See Fig. 8a)
Fig. 8a
cd changer connector
4. Run accessory wire to suitable 12V+Acc supply at fuse panel.

Where to get 12V ACC/Switched power
Wiring for module power wire applies only to installs at the 10-pin
CD changer plug (PXHGM2 harness)
1997-03 vehicles have a 3-pin plug under passenger seat near BCM (may be
covered in black duct tape) -- See Fig.3 Yellow wire is ACC. If vehicle does not
have 3-pin plug; go to Alternate 12V Acc. supply.
Fig. 5
Note: 3-pin plug may not be present in all vehicles and may have been omitted
from model year 2004.
Alternate 12V Acc. supply:
Fuse #22 or #11 of interior fuse box (under passenger toe board) as
seen in Fig. 5 are good alternates.
The add-a-fuse mini-tap circuit seen in Fig. 4 is included for this purpose.
Fig. 6
fuse tap circuit
How to use the Add-a-fuse circuit connection
5. Strip 1/4- 3/8” insolation from included accessory wire.
6. Look inside blue connector to see where metal ends. Useful in step d.
7. Insert stripped wire to blue connector (See Fig. 4)
8. Hold wire in place and crimp down (crimping too, plyers etc.) After crimp,
pull wire to verify crimp integrity.
9. Remove fuse #22 or #11 (if present) from vehicle fuse box otherwise skip
to step g.
10. Insert factory fuse to empty slot on add-a fuse circuit
11. Insert add-a-fuse circuit to fuse slot #22 or# 11
Noteworthy: If they are no fuses in slots #22 or #11; the empty fuse slot on add-a-
fuse tap remains empty. To test your connection simply turn ignition “ON” and
verify LED (seen through peephole) is flashing, otherwise check voltage at fuse slot
and/or check crimp integrity,

Fig. 5
C5 interior fuse box (yours may be different)
Noteworthy: If streaming is interrupted when headlights, wipers, defroster,
A/C; the 12V circuit used to power module is somehow being drown down by
these accessories. To resolve find an alternate 12V ACC circuit to power
module.
Also, on rare instances if smartphone volume is set too high, it will “clip” and
module will un-pair and reconnect intermittently.
To resolve, lower volume on audio device.
The A2D-C5 with PXHGM2 harness turns does not work on retain
accessory power (RAP) and will turn on/off with ignition key.
12. Tuck and secure any extra wires away from moving parts and proceed to
“Pairing”
Pairing
Pairing process varies among devices but the process is the same. These steps are
done upon initial install and will not have to be repeated. The range on this device is
approximately 30 ft., so operation is possible if audio device is within range.
1. Turn Ignition and radio “ON”
Green LED inside module peephole will flash (pairing mode)
2. On A2DP device: Go to
Settings, Wireless & Networks, Bluetooth
Settings
3. Select
Bluetooth
and turn on.
4. Select Bluetooth settings
5. Tap
Scan (Search) for devices
.
6. Wait for Bluetooth device name (See below) to appear and select it.
Green LED inside module peephole will glow steady (paired)

Optional equipment
The following options are not required for the module to work; however, these
two options enhance user experience.
To add remote to order simply tick box on product page
1. Remote Control:
Wireless remote is not required for module to work, however instead of
fumbling audio device; you simply press the familiar remote-control buttons
while also keeping your eyes on the road.
Optional remote control allows users to:
1. Control music wirelessly
2. Track up/down
3. Volume up/down
Bluetooth remote does not control C5 radio functions.
Pairing Bluetooth remote:
Remote Control Operation:
Use wireless remote to perform the following functions on any iOS7.0 and higher or
Android 4.4 and higher.
Contents:

2. USB “Fast charge” Kit
Optional USB Kit provides a USB port for users to connect and charge those
power-hungry devices while on the road. Custom install USB port in a
convenient location and discover how this charger is a massive improvement
over many anemic aftermarket cigar lighter chargers.
To add USB charging kit, select installation harness with USB port.
For example:
1. PXHGM4 (to radio) + USB Charging Kit: connects module at radio and
includes USB charging port, extension cable and mounting plate
2. PXHGM4 (to radio) connect module at radio but DOES NOT include USB
charging Kit.
USB charging kit it not currently offered with PXHGM2 harness (to trunk/hatch).
Optional USB Charging port
Charging notes:
1. iPhone "Fast charge" kicks in when battery capacity is between 0% and 79%, but
stops when it reaches 80%. Fast charge is available on iPhone 8 and later.
2. Supports BC1.2, QC2.0, QC3.0, PE1.1, PE2.0, FCP, SFCP fast charge protocols
(Apple, Samsung, Huawei etc.)
USB kit Installation
A. Flush to dash/panel requires drilling a ¾” hole in the dash
B. Flush with Support bracket (use this option to mount USB terminal without
drilling)
A. Flush to Dash or Panel (drilling required)
1. Drill a ¾” hole to dash or panel using a step drill bit or equivalent (See Fig.
9)
Fig. 9
Step drill bit
2. Insert 3ft. USB cable (See Fig. 10) through ¾” hole created in step 1
connect to USB port on install harness (See Fig. 11)
Fig. 10
USB cable
Fig. 11

3. Snap USB head (See Fig. 12) to hole in panel until flush with surface (See
Fig. 13)
Fig. 12
USB head
Fig. 13
Flush mounted to dash
B. Bracket Mount (No drilling)
1. Locate a flat surface at location of choice within 3.2 ft. of radio to mount
USB support bracket (See Fig. 14)
2. Use tape backing or screws to secure bracket
Fig. 14
mounting bracket
3. Insert 3ft. through hole in bracket (See Fig. 15) and connect to USB port
on installation harness (See Fig. 11)
Fig. 15
4. Snap USB head to bracket until flush (See Fig. 16)
Fig. 16
Alternate: Connect audio device charging cable directly to USB port on harness
(See Fig. 11) and route the plug to dash area or where audio device will reside.

Test Operation
1. Turn radio “ON”
2. Press “AUX” button on radio
3. Launch audio streaming application.
4. Set initial volume control on audio device to 50%-- adjust as needed
based on playback quality (reduce if distorted). Use radio volume button
to set playback level.
Warning: Playlist and Track selection is *NOT* possible with C5 radio
button. Use audio device built-in controls or optional wireless remote to access
and control audio files and applications
Listening to the CD changer:
1. Press “AUX”button on radio
(Ensure at least one disc is loaded to the CD changer magazine)
2. Disable Bluetooth on audio device. CD playback is now enabled.
(Control CD from radio buttons as customary)
3. To resume streaming:
Re-enable Bluetooth in audio device settings. Once device pairs, you are
now back to streaming mode.
Note: Streaming has priority and remains until smart device is unpaired.
CD changer playback is only possible when Bluetooth is disabled or smart
device is no longer within range.
5. If correct operation is confirmed, tuck away any extra wires and enjoy!
Important:
1. Android users with optional wireless remote: Simply press play/pause button to
switch between music streaming and CD changer playback.
2. CD changer functionality is retained and at least one disc must be loaded to
changer magazine.
Feature comparison
Bluetooth Hands-free calls + audio streaming (A2DP)—See table 1. Audio streaming
only- See Table2
Table 1
Modules
A2DIY-C5CD
C5CD-HF
A2DIY-C5
C5-HF
Retains changer playback
YES
*
NO
NO
Requires working CD changer
YES
YES
NO
NO
Audio input jack (Aux in)
*
YES
YES
YES
USB charging port
*
included
*
included
Hands-free calling (HPF)
YES
YES
YES
YES
Music Streaming (A2DP)
YES
YES
YES
YES
Connection (To Radio)
YES
YES
YES
YES
Connection (trunk)
NO
NO
NO
NO
VR support
YES
YES
YES
YES
Wireless remote control
included
³
included
³
Controls from radio buttons
NO
NO
NO
NO
Table 2
Modules
A2D-C5
BLU-C5
A2D-C5FM
Retains changer playback
YES
NO
YES
Requires working CD changer
YES
NO
NO
Audio input jack (Aux in)
NO
²
YES
USB charging port
*
*
NO
Hands-free calling (HPF)
NO
NO
NO
Music Streaming (A2DP)
YES
YES
YES
Connection (To Radio)
YES
YES
YES
Connection (trunk)
YES
YES
NO
VR support (Google only)
**
**
NO
Wireless remote control
*
*
NO
Controls from radio buttons
NO
NO
NO
*Optional (Select from product order page)
** Google Voice recognition possible with optional remote control
² PX35 cable required (sold separately)
³ Optional media button available here

Frequently asked questions & troubleshooting
1. Does the A2D-C5 require a CD changer to work?
YES; Vehicle must have a fully functioning 12-disc Changer which remains
connected and operational. The A2D-C5 will not work if changer
malfunctions in any way. Please verify changer operation prior to
ordering.
2. The 12-disc changer in my C5 does not work, will I be able to use the
A2D-C5 or is there another solution for music streaming?
If vehicle does not have a functioning 12-disc changer, purchase our A2D-C5FM
audio streaming module.
3. Will I be able to install the A2D-C5 at the radio instead of trunk/hatch?
YES, The A2D-C5 connects to radio (PXHGM4 harness or 10-pin plug at cd
changer location (PXHGM2 harness). Required 12-disc changer remains
connected and functional
4. Can you explain what’s a CD changer?
Sure, CD changers are usually installed in remote areas (e.g., trunk, hatch,
armrest, glove box, under seat etc.) and as the name implies; they are capable
of holding multiple disc (3-15) into a magazine. In recent years many car
manufacturers have built the CD changer into the AM/FM radio (e.g. 6-CD
changer/radio). The C5 Corvette radio does not have a built-in CD changer,
therefore all references to CD changer herein are to the 12-disc changer in
trunk or hatch. To be clear; if only one disc can be loaded into radio, it is a
single CD player not a changer.
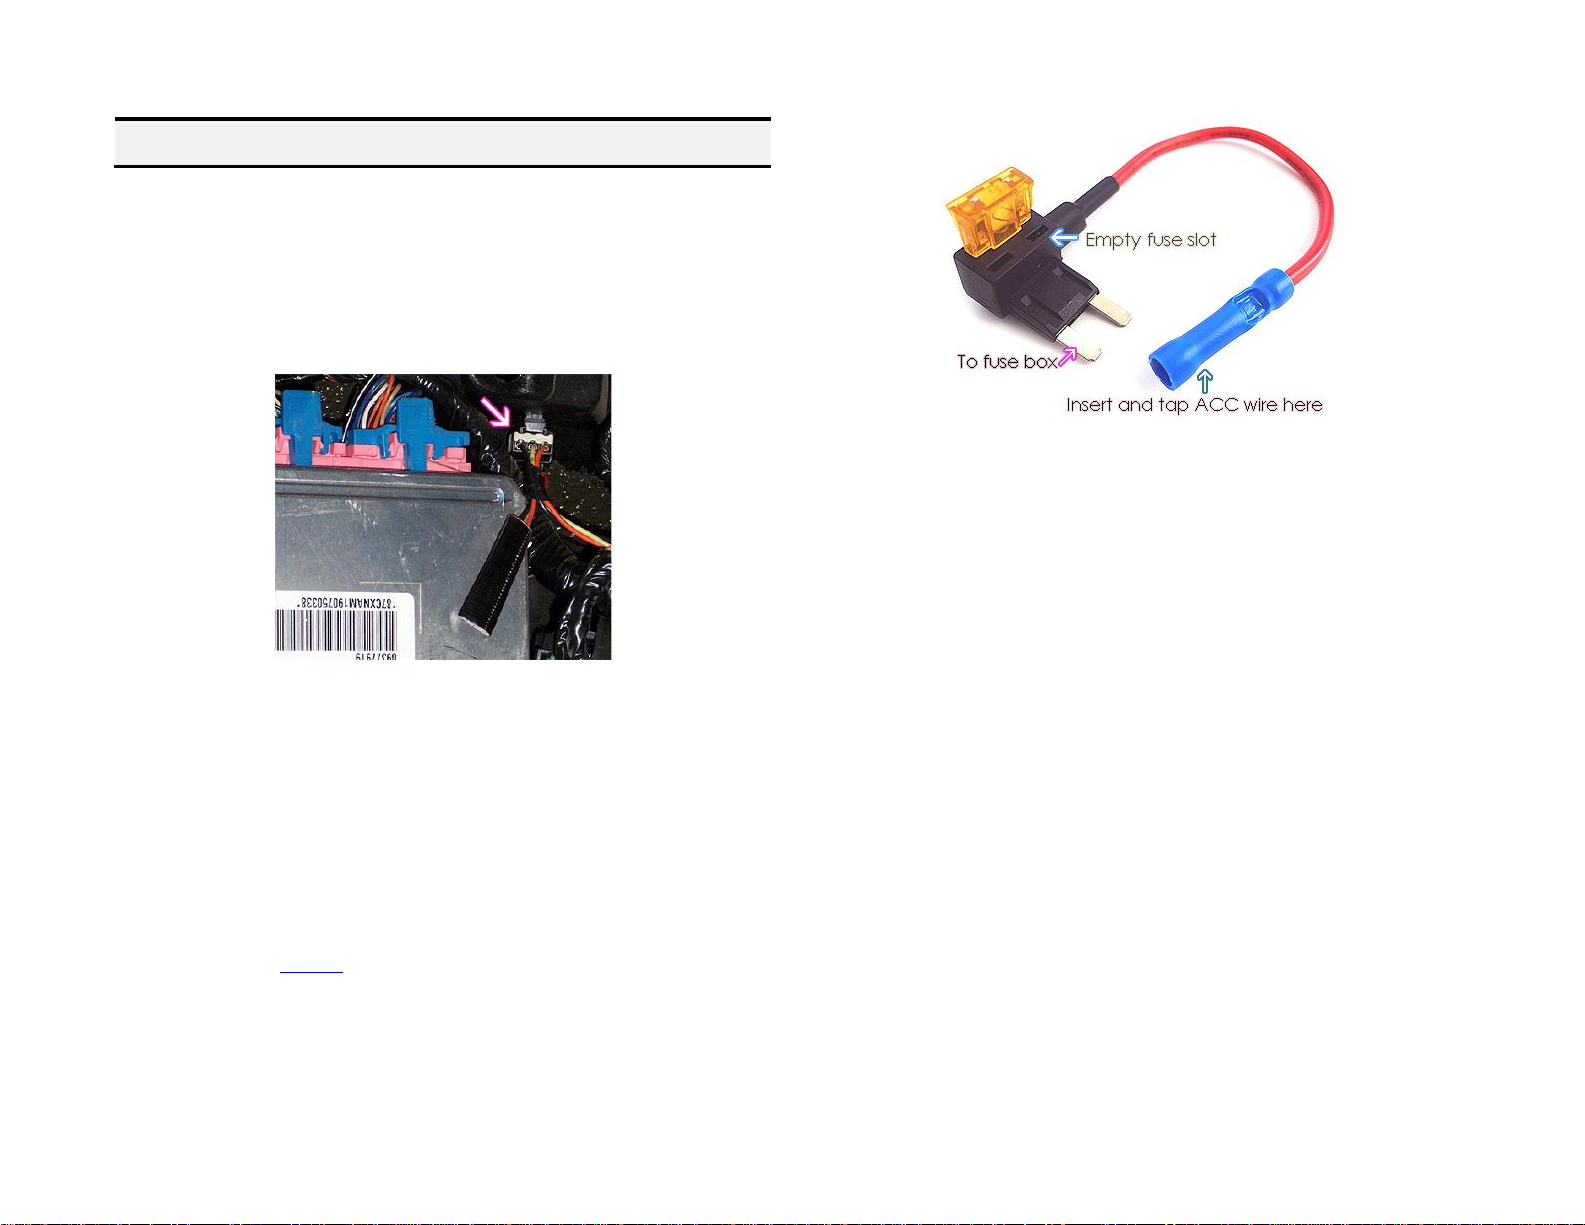
5. Why can’t the module get its power from the CD changer harness?
C5 do not have accessory wire on radio harness or at cd changer plug in
trunk/hatch. Installations to trunk/hatch with PXHGM2 harness requires
running a 12V accessory supply wire from trunk/hatch to fuse panel under
passenger front seat.
6. Does the A2D-C5 module support hands-free phone calls?
NO;The A2D-C5 does support Bluetooth streaming only. Purchase our A2DIY-
C5CD or C5CD-HF (requires and retains CD Changer)
7. Does the A2D-C5 work on all model/year Corvette radios?
NO; this module works on 1997-04 Corvette (C5) radios
with functional 12-disc changer (must have changer), otherwise
purchase our A2D-C5FM
8. Bluetooth plays until turn signals, wipers, headlights etc. are switched on
then Bluetooth cuts in/ out. Does this indicate a problem with module?
This is likely a fault in vehicles power supply or wiring. If Bluetooth playback is
interrupted only when an accessory (e.g. wiper motors, headlights, rear
defroster etc.) is turned on, this clearly indicated the added load is affecting
the circuit to which the module is connected. If this issue is present in your
C5, consider relocating module accessory wire to alternate ACC power supply
location or seek professional help.
9. How do I switch from streaming to CD changer playback?
Bluetooth streaming has priority (by default), and in order to listen to CD’s
(from changer), user must disable Bluetooth from audio device (e.g.
Smartphone) or press the Play/Pause button on optional remote control
(Android only). Once disabled, module switches to CD changer playback.
10. I have a single CD player radio plus trunk mounted CD changer. How do I
listen to the single CD player?
Accessing the single cd player does not change. Simply load DISC into player
slot and it should begin to play. If DISC is already loaded, simply press the “CD”
button. To access Bluetooth press CD/AUX button again: First press =single CD,
second press=Bluetooth/CD changer. If radio has no DISC, a single press of
the “CD/AUX” button enables Bluetooth/CD changer mode.
Disclaimer
• This product has no affiliation with GM or Apple
• When possible, professional installation is recommended
For additional questions, email support@discountcarstereo.com
© 1995-2022-05-26 Discount Car Stereo, Inc. All rights reserved. Information in this document is subject to
change without notice. Other products and companies referred to herein are trademarks or registered
trademarks of their respective companies or mark holders.
Table of contents
Other Corvette Automobile Accessories manuals
Popular Automobile Accessories manuals by other brands

Whispbar
Whispbar K571W Fitting Instructions for Basic Carrier

Thule
Thule RAPID SYSTEM 1213 Fitting instructions

Big Mikes Performance Parts
Big Mikes Performance Parts STO N SHO SNS 48 Installation procedures

Cruz
Cruz 912-20 Series Assembly instructions

RediRad
RediRad RR-FM owner's manual

Hollywood Racks
Hollywood Racks 1 Assembly and installation instructions