Hardy Barth cPH2 Series User manual

The smart Wallbox
cPH2
Installaon and operang manual
Installation and operating manual cPH2 charging station
Version: 1.0.9
English


Table of contents
Contact Details........................................................................................................2
Important Information..........................................................................................4
Safety notices in this manual.......................................................................................................................4
Safety instructions on the device...............................................................................................................5
General safety notices....................................................................................................................................5
Instructions for use / Maintenance...........................................................................................................7
Introduction..............................................................................................................8
Product description.........................................................................................................................................9
Identification of the product variant......................................................................................................10
Dimensional drawings and dimensions................................................................................................11
Scope of delivery............................................................................................................................................12
Available accessories and equipment (optional)...............................................................................12
Assembly and installation.................................................................................13
Requirements for the assembly site.......................................................................................................13
Wall mounting of the charging station.................................................................................................14
Electrical installation of the charging station......................................................................................15
Commissioning and charging.........................................................................18
Safety instructions for operation.............................................................................................................18
Loading process.............................................................................................................................................19
Charge control................................................................................................................................................21
RFID module (optional)...............................................................................................................................21
Operating status...................................................................................................22
Status LED........................................................................................................................................................ 22
Malfunctions and solutions........................................................................................................................23
Technical data........................................................................................................24
Standards & Guidelines...............................................................................................................................26
Warranty / Guarantee.........................................................................................27
Installation and operating manual cPH2 charging station
Version: 1.0.9 3

Important Information
Safety instructions in this manual
This instruction manual contains important information for installation and putting into
operation of all charging stations of type cPH2. Please make sure to read and follow the
provided safety notices in any circumstances.
In particular, the warnings and safety measures clearly marked in this manual must be
followed. The associated symbols carry the following meanings:
Danger!
Life threatening electrical voltages occur. Actions marked with this symbol MUST
NEVER be performed.
Caution!
Sections marked with this symbol indicate additional hazards that may result in damage
to the device or other consumers. Actions marked with this symbol must be performed
by qualified personnel and with SPECIAL CARE.
Notice!
Sections marked with this symbol indicate important information and particularities
which are necessary for a proper functioning device.
Installation and operating manual cPH2 charging station
Version: 1.0.9 4
Safety instructions on the device
Additional safety and operating instructions are attached to and inside the charging
station. These symbols have the following meaning:
Attention!
The charging station may only be opened by qualified personnel who are familiar with
the instruction manual (this document).
Attention!
Life-threatening electrical voltages occur inside the housing.
General safety notices
Before using the cPH2 charging station, read these operating instructions carefully and
follow all instructions and warnings.
Installation, commissioning, maintenance and repair of the charging station must only be
carried out by qualified personnel.
The eCharge Hardy Barth GmbH does not assume liability for any damage of property
or physical injuries caused by non compliance of the assembly and manual instructions,
by usage of non authorized replacement parts or accessories or by deploying non
qualified professional staff.
This charging station corresponds to the current state of the art and complies with all
current safety requirements, guidelines and standards. The safety instructions in this
manual are intended to ensure proper installation at the place of use and safe operation.
Non-compliance or failure to comply with the safety information and instructions
in these installation instructions may result in electric shock, fire or serious injury.
Usage of the charging station is only allowed if the installation has been carried out
flawlessly and professional staff has taken it into operation. Malfunctions which threaten
the safety of persons, connected users or the device itself must be removed by qualified
or authorized staff only.
Installation and operating manual cPH2 charging station
Version: 1.0.9 5

In case of a substandard installation or a malfunction caused by substandard installation,
please contact first the company that has carried out the installation. If the errors still
cannot be rectified, please contact the technical support of eCharge.
Via Mail [email protected]
Via phone +49 (0) 9666 – 188 00 50
Please make sure to store this manual in a safe and always accessible place.
The service case occurs when...
•...the housing has been mechanically damaged
•...the housing cover has been removed or can no longer be closed or locked.
•...adequate protection against splash water and/or foreign bodies no longer seems
to be provided.
•...the charging sockets and/or the external charging cables have been functionally or
visibly damaged.
•...the charging station does not function properly or has been damaged in some
other way.
Also note the following:
• The cPH2 is protected against spray and splash water according to IP 54. However,
it should not be installed in the immediate vicinity of flowing or jet water.
• The cPH2 charging station must not be installed in an environment with danger for
explosions (EX area).
• The charging station must not be installed in areas subject to flooding.
• Note that additional overvoltage protection may be required by a connected
vehicle and/or by national regulations.
• Please note that in some countries (other than Germany) and/or due to various
vehicle manufacturers, tripping characteristics of the fault current circuit breaker
(type B) can be required. Please contact your distributor to learn about the
requirements.
Installation and operating manual cPH2 charging station
Version: 1.0.9 6

Instructions for use / Maintenance
Observe the following instructions for use or maintenance of your charging station:
•This device must ALWAYS be connected to the protective conductor of the power
supply!
•Ensure that the rated voltage and current of the device comply with the specifications
for your local power grid and that the rated power is not exceeded during charging
operation.
•At all times, observe the locally applicable safety regulations for the country in which
you are operating the charging station.
•To disconnect the charging station completely from the mains, the supply line must
always be interrupted via the upstream circuit breaker(s).
•Never install and operate the charging station in confined spaces. In particular, it must
be ensured that vehicles can be parked at the prescribed distance from the charging
station for charging operation and can be connected to the charging cable without
tension.
•Make sure that the front housing cover of the charging station is always closed to
prevent unauthorized opening of the housing.
• DO NOT make any changes to the housing or the internal circuitry of the device!
Failure to do so fundamentally violates the terms of the warranty and voids the
warranty with immediate effect.
•There are no maintenance parts in the device for the user.
•Have the device repaired and/or installed by qualified personnel only.
ATTENTION!
This cPH2 charging station is intended for connection and operation at
230V / 400V and 50 Hz mains voltage. The supply line must be inserted
into the housing via the M32 cable gland provided for this purpose!
Installation and operating manual cPH2 charging station
Version: 1.0.9 7

•Use a dry or slightly damp, well wrung cloth to clean the charging station. Do not use
aggressive cleaning agents, waxes or solvents (such as cleaning gasoline or paint
thinner), as these can cloud the displays or damage the paintwork.
• DO NOT clean the cPH2 charging station with a high pressure washer or similar device
that applies high pressure to the surface of the housing.
•Check the charging sockets of your cPH2 charging station and the optionally available
charging cables at regular intervals for any damage. If the optionally available charging
cables show any damage, please have them replaced immediately: Further charging is
not permitted from this moment on.
DANGER!
If you notice any damage to the housing, the charging sockets or the
associated charging cables after installation, you must take the charging
station out of operation immediately. Contact the service department of
eCharge!
•The respective local regulations for the operation of electrical equipment apply at all
times.
Introduction
Thank you for choosing the cPH2 charging station from eCharge Hardy Barth GmbH!
With this Wallbox you invest in an innovative and future proof solution for the private
and public sector to charge your electric vehicle reliably and intelligently.
The Wallboxes of the cPH2 series are delivered pre configured for a minimum of
technical and temporal installation effort, for an appropriately prepared installation site.
Our charging stations are subject to permanent further development and comply with
the regulations and standards applicable throughout Europe for the charging of electric
vehicles. Please also read the section "Standards & Guidelines" on page 26.
Installation and operating manual cPH2 charging station
Version: 1.0.9 8

Product description
Your cPH2 charging station allows safe and convenient charging of electric vehicles in
accordance with the IEC 61851 1 standard, Mode 3. Depending on the variant in
question, the cPH2 is always designed for the fastest possible charging of the connected
electric vehicles in terms of circuit design, cable diameter and connections.
Thanks to access control via the Charge Controller, charging operations can be managed
easily and in a controlled manner. The versatile setting parameters thus facilitate, for
example, the charging operation of several vehicles by limiting the respective charging
current.
An integrated MID energy meter provides precise information about the current
charging power at each charging point. The determined data on active and past charging
operations can then be made available in real time on a smartphone, tablet or PC in the
internal network and can be transferred as required.
In combination with a compatible inverter or additional eCB1 MP+, the cPH2 Wallbox
also allows 100% use of solar power from an existing photovoltaic system for charging
your electric vehicle. Furthermore, in combination with a compatible smart energy meter,
such as our eCB1 MP+, the cPH2 enables dynamic load management, for example, to
avoid peak loads or limit the maximum current when using multiple charging points
simultaneously.
The two LED displays on the front of the housing inform the user at all times about the
current status of the Wallbox and the respective charging point.
Depending on the equipment variant, the cPH2 offers connection of the vehicle via
integrated charging cables type 2 or alternative charging sockets type 2 according to IEC
62196 2. Optionally, the cPH2 is also available with an additional protective contact
socket: For further information, please contact your sales partner.
With all our products, we place maximum emphasis on safety for the user. Therefore, in
addition to Welding Detection, the cPH2 offers DC residual current detection, which in
combination with the installation's protective devices ensures careful protection against
short circuits, electric shocks and other hazards.
Installation and operating manual cPH2 charging station
Version: 1.0.9 9
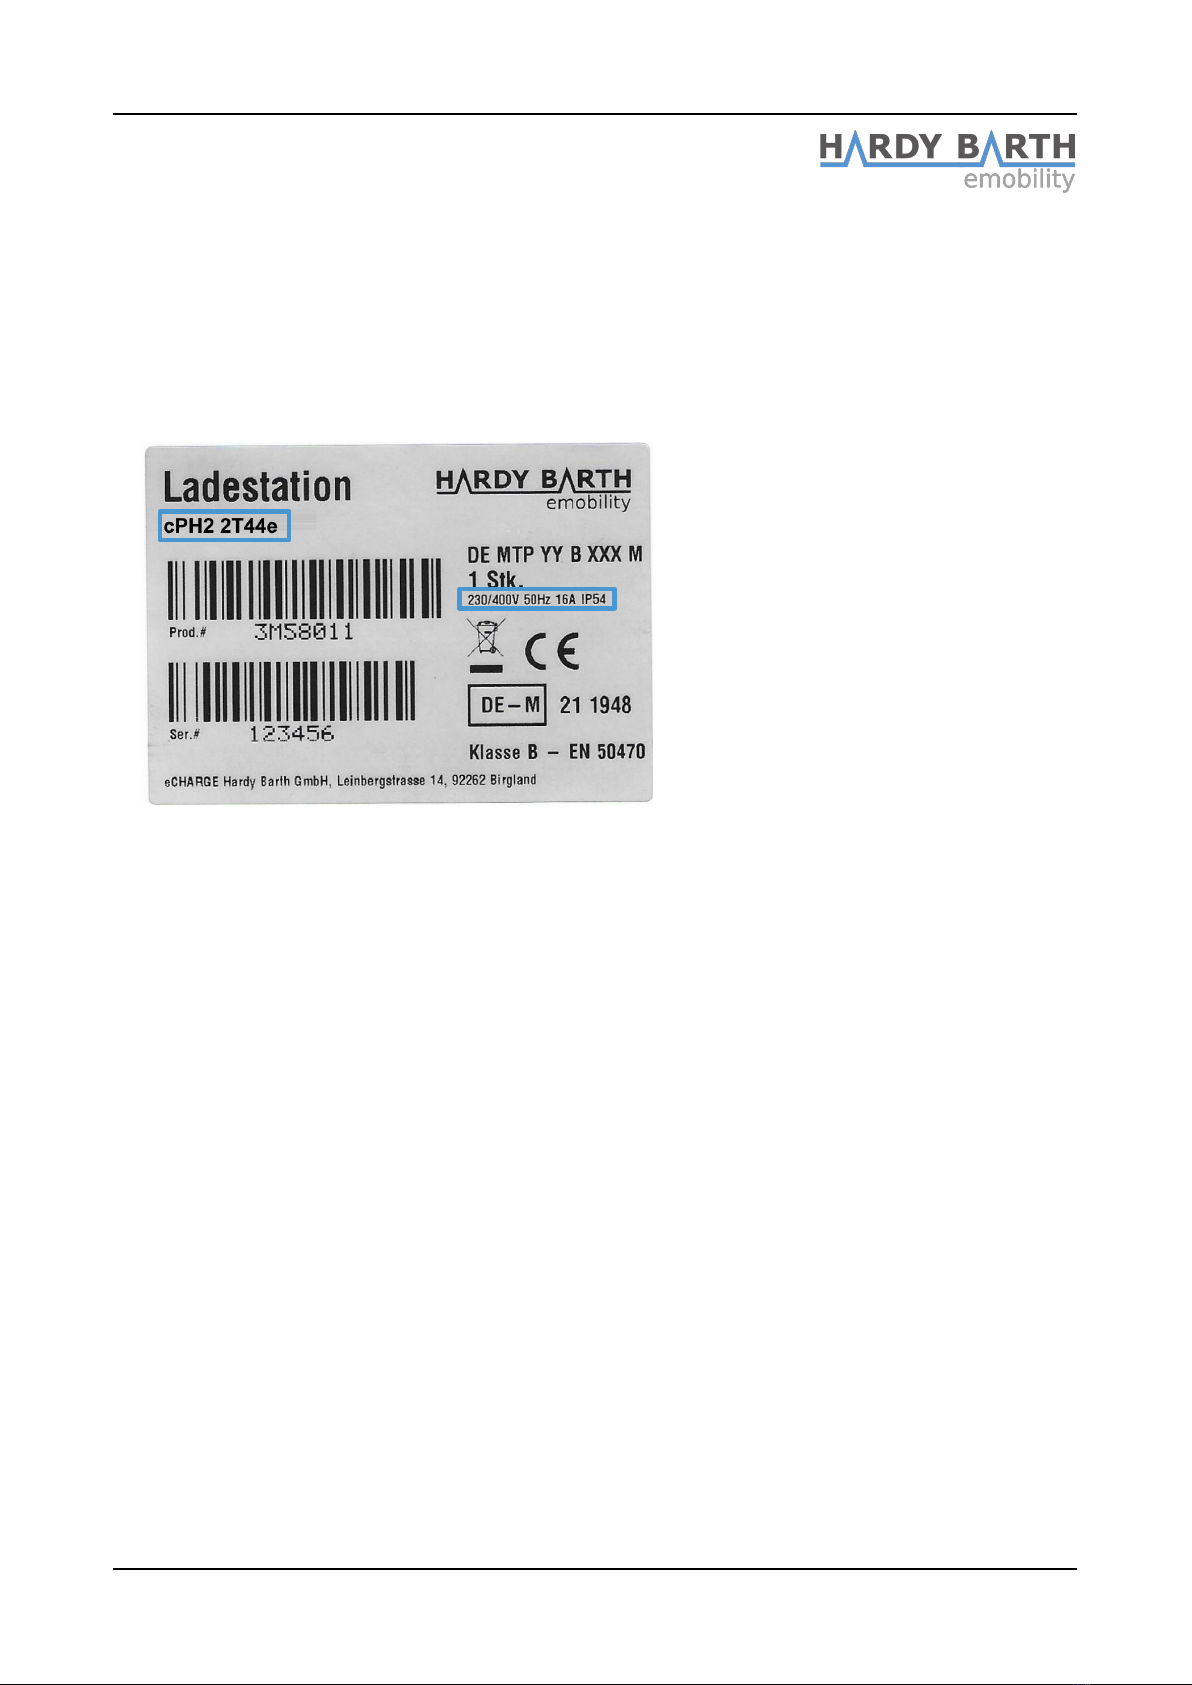
Identification of the product variant
The cPH2 series comprises several variants that differ in terms of charging sockets and
charging power and thus serve different application profiles. For identification of the
variant, there is a product type plate on the outside and inside of the housing.
CAUTION: The charging station may only be opened by qualified personnel.
The model designation (cPH2 xTyy..) and the values for the mains connection (voltage,
mains frequency, current) are particularly relevant for identification.
For detailed information on the cPH2 charging stations, please refer to the "Technical
data" section on page 24.
Installation and operating manual cPH2 charging station
Version: 1.0.9 10
Figure 1: Nameplate cPH2

Dimensional drawings and dimensions
The cPH2 Wallbox is delivered fully assembled and tested. All dimensions as well as the
mounting points are shown in the following dimensional drawings.
Top and side view of the cPH2 series
(all dimensions in mm)
Installation and operating manual cPH2 charging station
Version: 1.0.9 11

Scope of delivery
Your cPH2 charging station is delivered with various components that are necessary for
assembly and proper operation. Therefore, immediately after unpacking, check whether
the following basic components are included:
Components Quantity Description
cPH2 Wallbox 1 Charging station, consisting of plastic housing
with lockable cover, touch protection
Installation and
operating manual
1 Manual with information on the charging station,
instructions for mechanical and electrical
installation and commissioning of the Wallbox.
(this document)
Mounting accessories 4 Screws and dowels for wall mounting of the
Wallbox
Available accessories and equipment (optional)
eCharge Hardy Barth GmbH offers the following accessories for your cPH2 Wallbox.
For more information or information about available accessories and the further delivery
program of eCharge, please visit our website at: www.echarge.de
Components Description
RFID module
incl. 5 x RFID cards
Authentication and release of the loading process for an
authorized group of users
GSM communication
module
Backend connection, e.g. management of multiple
charging stations on different sites
eCB1 MP+
Smart energy meter as an alternative to a compatible PV
system, for example for PV overcharging or for limiting
the maximum current in the house connection.
Protective contact socket 230 V, 6A socket on the housing of the cPH2
Stele with concrete
foundation
For the safe assembly of the Wallbox without wall
mounting
Key switch Switch between eco/fast charging and charging stop
Installation and operating manual cPH2 charging station
Version: 1.0.9 12

Assembly and installation
Attention
Assembly, installation and initial commissioning of the charging station
may only be carried out by qualified personnel.
The cPH2 Wallbox is an electrotechnical device and is therefore subject to certain
specifications for indoor and outdoor installation. Although the housing of the cPH2
complies with the regulations described for protection class IP54, you must take the
following environmental conditions into account in particular:
•For safe operation of your charging station, minimum distances to other technical
installations must be taken into account: For more information, please contact
your electrical installation company or your sales partner.
•The charging station must be mounted so that it is freely accessible to persons
authorized to operate it.
•Select the mounting location so that you can easily reach the charging socket on
the vehicle with the optionally available charging cable of the cPH2. The cable
must NEVER be under tension when connected to the vehicle.
Requirements for the assembly site
The cPH2 charging station was developed for indoor and outdoor use. For proper
charging, you as the operator must observe the following specifications for the location
as well as for the installation:
• Observe all local regulations for electrical installations, fire prevention and accident
prevention.
• All specifications for the installation of low voltage systems according to
DIN VDE 0100.
• The mounting surface must have sufficient strength to withstand the mechanical
loads.
• A sufficiently dimensioned supply line for the power supply must be provided at the
mounting position. Depending on the equipment variant, 2 separate supply lines
are also possible.
• The cPH2 charging station should not be installed in areas with a high volume of
people or on thoroughfares. In particular, ensure that the charging cables are laid so
that they are clearly visible and that passers by or walkways are NOT obstructed by
the cables.
Installation and operating manual cPH2 charging station
Version: 1.0.9 13

• Basically, the cPH2 is designed for operation in high ambient temperatures.
Nevertheless, it is recommended to install the charging station, if possible, in a way
that it is protected from direct sunlight: this prevents excessive heating of the
housing. For more information on environmental conditions, refer to the "Technical
data" section on page 24.
• The charging points and holding devices for the charging plugs should be
between 0.4 m and 1.5 m above the ground.
Wall mounting of the charging station
For the assembly you need the following components:
• Drilling machine or cordless screwdriver (not included in the scope of delivery)
• Drill Ø 10 mm for the respective mounting surface (not included in the scope of
delivery)
• Torx screwdriver TX40 and Allen key 4 mm (not included in delivery)
• Four ASSY D dowel screws 8.0 80, partial thread, with matching nylon dowels 10 x
56 mm (included in delivery)
• Two M5x16 cylinder screws (included in delivery)
• cPH drilling template echarge.de/accessories or PDF (not included in delivery)
or optionally available cPH2 drill plate as eCharge accessory: Article 3M40777
• If necessary, spirit level (not included in the scope of delivery)
Proceed as follows:
1 Check the dimensions on the drilling template for correctness using a calibrated
meter measure BEFORE marking and drilling the holes.
2 Mark the four drill holes on the wall using the drilling template or drill plate and a
spirit level.
3 Drill the marked mounting holes (4x, Ø 10 mm).
4 Insert the dowels supplied.
5 Remove the housing cover of the charging station.
5.1 To do so, unscrew the two screws on the lower side of the cover.
5.2 Carefully lift off the housing cover and then the contact protection cover. To
do this, carefully disconnect the plug connection of the LED indicators on the
touch guard.
6 Place the charging station in position so that the pre drilled holes in the wall match
those of the cPH2.
7 Now insert the supplied fastening screws and tighten them hand tight.
This completes the mechanical assembly of the charging station.
Installation and operating manual cPH2 charging station
Version: 1.0.9 14
Electrical installation of the charging station
DANGER!
Danger to life due to electric shock!
Before working on the cPH2 charging station:
Disconnect the power supply and ensure that it remains permanently
disconnected during the work.
After completion of the mechanical installation, the charging station is ready to be
connected to the mains. Only the basic connection of the power supply line is described
below: The assembly and connection of optional accessories is not the subject of these
instructions, but is described in the instructions for the respective component.
NOTE!
For the fuse protection of the Wallbox, one type A RCD
RCD type A (residual current circuit breaker with 0.03A tripping current)
and a subsequent circuit breaker 32 A*, 3-pole (C characteristic
recommended) must be pre installed for each supply line.**
Special case:
In the case of a Wallbox with two charging points and only one supply line,
it is mandatory to pre install a type B or type EV RCD in the supply line.
We therefore recommend connecting one supply line per charging point.
* A C16A or C20A, 3 pole is specified for the cPH2 1T11.
** Deviating country specific standards (connection conditions) must be observed!
For the electrical assembly you need the following components:
• Allen key 4 mm (not included in the scope of delivery)
• Stripping pliers for supply cable (not included in scope of delivery)
NOTE!
The initial commissioning of the charging station MUST ALWAYS be
carried out by a qualified installer: This person can determine the correct
operation of the charging station or correct any malfunctions or
installation errors.
Installation and operating manual cPH2 charging station
Version: 1.0.9 15

Proceed as follows to connect the charging station to the mains:
1 Make sure again that all line circuit breakers and current circuit breakers in the
supply line are deactivated.
2 Remove the housing cover of the charging station.
2.1 Unscrew the two screws on the lower side of the lid
2.2 Carefully lift off the housing cover
2.3 Carefully lift off the touch guard and pull out the plug connection of the LED
indicators. You can then remove the touch guard.
3 Now switch off the circuit breaker in the charging station (switch position 0 OFF).
4 Insert the supply line from below into the corresponding cable gland. Then clamp
the stripped wires of the supply line into the supply line terminals according to the
terminal labeling (max.10 mm²). The underlined phases indicate the terminals for
the right-hand charging connection.
Incorrect connection of the wires can cause damage to the charging station!
Caution: In the case of a Wallbox with two charging points and only one supply
line, type B or type EV RCD must be pre installed in the supply line.
Observe jumpers!
Installation and operating manual cPH2 charging station
Version: 1.0.9 16
Figure 1: dual supply line
L1
L1 L1
L1 L2
L2 L2
L2 L3
L3 L3
L3 N
N N
N PE
PE PE
PE
Figure 1: single supply line
L1
L1 L1
L1 L2
L2 L2
L2
L3
L3 L3
L3 N
N N
N PE
PE PE
PE

Designation Core colour supply line Marking terminal block
Live conductor phase 1 BROWN L1
Live conductor phase 2 BLACK L2
Live conductor phase 3 GREY L3
Neutral BLUE N
Protective conductor GREEN YELLOW PE
DANGER!
The previously mentioned colour coding is NOT international binding: If
the individual wires in the supply cable are color coded differently, contact a
qualified electrical specialist company! Have the supply line checked and
replaced if necessary.
5 Now set the circuit breakers of the cPH2 charging station (switch position I ON).
6 Reattach the housing cover to the cPH2 charging station.
6.1 Reconnect the plug for the LED indicators and insert the Touch protection
cover in.
6.2 Hook the housing cover back onto the charging station from above.
6.3 Hand-tighten the two screws on the lower side of the housing cover.
7 Finally, activate the back up fuses installed in the supply line.
The LED indicators should now light up green.
This completes the electrical installation of your charging station.
After the mechanical and electrical installation, your charging station is ready for
operation.
Installation and operating manual cPH2 charging station
Version: 1.0.9 17

Commissioning and charging
Safety instructions for operation
Before you perform a charge with the cPH2, you must check the following points for your
safety:
•The cPH2 has been installed according to the specifications in this document: In
particular, ensure that the charging station is freely accessible, not exposed to direct
sunlight or rain if possible, and that an electric vehicle can be connected without the
charging cable being under tension or otherwise stressed.
•The cPH2 has been properly connected to the supply line.
•Ensure that the supply line is protected by suitable circuit breakers.
•Ensure that the cover of the cPH2 is always closed during normal operation.
•Ensure that the charging cable is not twisted and make sure that the cable, charging
couplings, housing and charging sockets have no visible damage.
For charging, your cPH2 has different connection options from the TYPE 2 plug
depending on the variant. Accordingly, you need an optionally available charging cable
to connect to your vehicle.
The type 2 charging socket of the cPH2 in accordance with IEC 62196 2 has three live
contacts, a neutral conductor, a PE protective conductor and two signal contacts (Control
Pilot and Proximity Pilot), which ensure safe connection and thus hazard free use.
As long as the plug of the external charging cable is not locked
in the charging socket of the cPH2, no voltage is output to the
charging cable via the current carrying contacts of the socket.
If the mains voltage fails, the charging socket is automatically
unlocked.
The charging socket of the cPH2 offers an electromotive
module with an intern RFID Module (available as an option) for
a fully controlled charging process.
The type 2 charging sockets of the cPH2 are each internally
equipped with a DC residual current module. This protection is a prerequisite especially if
your electric vehicle itself does not provide protection against DC fault current:
Information on this can be found in the manual for your vehicle and from the
manufacturer or Sales partner for your vehicle.
Installation and operating manual cPH2 charging station
Version: 1.0.9 18
Figure 2: Type 2 plug female

Loading process
The cPH2 is designed to charge your vehicle as quickly as possible. However, the
effective charging time depends on the vehicle battery, as well as the current residual
energy in the vehicle. A binding statement on the charging time is therefore not possible:
You can therefore only conclude the actual charging time yourself from your practical
experience values.
If a fault should occur during the charging process or afterwards, this is indicated via the
LED status display of the cPH2. The chapter Status LED, page 22, describes how to
recognize operating and error states and what measures are necessary.
To charge your vehicle, proceed as follows:
1. check the LED status indicators on the front of the cPH2:
When the charging station is ready for operation, the LEDs on the front of the charging
station light up green.
2. Open the charging socket on the vehicle.
3. Plug the charging coupling of the charging cable into the charging socket on the
vehicle.
The vehicle must be parked so that you can easily reach the socket on the vehicle.
The cable must not be under tension during the charging process.
4. if available on your model, open the cover of a charging socket on the cPH2 and insert
the type 2 charging plug.
NOTE!
If you equip your Wallbox with RFID authentication or an OCPP Backend
please note points 5 and 6. Otherwise, charging takes place immediately
after plugging in. (The LED changes from "green" to "yellow" (vehicle
connected) to "blue" (charge active).
5. Log on to the Wallbox with a valid RFID card (one of the 5 RFID cards supplied ex
works). Hold the card in front of the card reader of the Wallbox for approx. 3 seconds. A
short beep will sound to indicate that the card has been successfully recognized.
Immediately afterwards, you will hear another tone:
· short tone (approx. 1 second) for card accepted
· long tone (approx. 3 seconds) for card rejected
More information about the RFID module on page 21.
Installation and operating manual cPH2 charging station
Version: 1.0.9 19

6. Start of the charging process:
In the default configuration, the charging process starts immediately after the
authentication via RFID card has been successfully performed. When the charging
process starts, the color of the status LED of the associated charging socket changes
from yellow to blue.
7. the charging process is usually terminated only by the vehicle. The LED STATUS changes
from blue to yellow. After the charging process is completed, first pull the cable out of
the socket on the vehicle and then (if present) out of the Type2 socket on the Wallbox. If
the vehicle is not 100% charged in this case,
please check the settings in your vehicle. You usually have the option of setting a charge
limit (e.g. at 80%) in the vehicle's on board computer.
Installation and operating manual cPH2 charging station
Version: 1.0.9 20
This manual suits for next models
5
Table of contents
Other Hardy Barth Batteries Charger manuals


