Hypertech SMART SHORE MARINE Trollbridge 36 User manual

STEP BY STEP INSTALLATION INSTRUCTIONS
Trollbridge 36
36-Volt Charger/Combiner
Technical Support: 901.382.8888 M-F 8a-5p Central • Tech@SmartShoreMarine.com • SmartShoreMarine.com
© 2023 SmartShore Marine
Table Of Contents
How it Works................................................................................................................................................2
Features.......................................................................................................................................................2
Parts & Tools for Installation..........................................................................................................................2
Operating Modes.........................................................................................................................................3
Battery Chargers.......................................................................................................................................4-5
Safeguards.................................................................................................................................6
Installation.............................................................................................................................7-11
Troubleshooting.....................................................................................................................................12-13
Warranty.................................................................................................................................................14-15
Technical Support.......................................................................................................................................15

2
How The Trollbridge 36 Charger/Combiner Works
The SmartShore Marine Trollbridge 36™ Charger/Combiner allows you to charge your 36-Volt trolling
motor batteries from the 12-Volt alternator on your outboard. It will do the same with any single output
12-Volt charger, or even your trailer hookup. It works automatically by switching the battery connections
from 12-Volts (parallel) to charge, to 36-Volts (series) when you need to run the trolling motor.
Features
• Fully automatic changeover from running to charging
• Remote control to override Charge Mode to Trolling Mode while the outboard is running
or after the outboard is turned off
• Built in Combiner isolates starting battery from discharge
• Rated for 12-Volt charging sources up to 100-Amps
• Compatible with most 36-Volt trolling motors (up to 85-Amps)
• Can be congured to work with Lithium batteries or standard Lead-Acid batteries
• Batteries are charged in parallel to equalize their charge for longer life
• Green LED on the Trollbridge 36 shows when charging
• Compatible with, but eliminates the need for multiple output chargers
• Compact, waterproof design and included cables make installation easy
• Efcient electronics design requires no heat sink or cooling fan
• Withstands ambient temperature to over 175° F (80° C)
• Warranty information available at the end of these instructions
Parts & Tools For Installation
• 60-Amp circuit breaker with an on/off switch – To trolling motor
• Three (3) 100-Amp slow blow fuses – One (1) to each trolling motor battery positive (+) post
• Self-tapping screws
• 6- to 10-gauge wire for possible cable extensions
• Additional wire terminals for possible cable extensions
Trollbridge 36
Installation Instructions
Technical Support: 901.382.8888 M-F 8a-5p Central • Tech@SmartShoreMarine.com • SmartShoreMarine.com
© 2023 SmartShore Marine

3
Operating Modes
TROLLING MODE
The Trollbridge 36 automatically switches from Charging to Trolling Mode when it
detects that the alternator is no longer charging. To do this safely, there is a delay in the
transition to protect your batteries. This prevents quick switching if the outboard dies
and is restarted, or your charging source is erratic.
When the trolling motor is active the Trollbridge 36 powers off. While off, the Trollbridge
36 draws no power, so it can always remain connected to the batteries.
CHARGE MODE
When you start the outboard, or apply any charging source to the starting battery,
the Trollbridge 36 will delay charging the trolling motor batteries momentarily to ensure
the starting battery recharges after starting the engine. Once the starting battery holds
steady above 13.1-Volts (13.6-Volts for Lithium) the Trollbridge 36 will automatically
switch over to deliver the engine’s alternator charge to the trolling motor batteries. When
the charging condition is active the GREEN Charging LED is on. During the Charging
Mode the trolling motor cannot be used because the Trollbridge 36 has the batteries
congured for 12-Volts in parallel, so the trolling motor will not run.
NOTE: If the trolling batteries are low, the Trollbridge 36 may cycle on and off to
prevent overloading the alternator and preserve the starting battery.
OVERRIDE REMOTE CONTROL
The Trollbridge 36 comes with an override Remote Control which allows you
to manually switch from Charging to Trolling Mode immediately. With the GREEN
Charging LED on, simply press the Remote button to swap to Trolling Mode and
provide 36-Volts to your trolling motor. To release the charging override, hold the remote
button down for ~10 seconds. Charge Mode will now activate once the charging source
is above 13-Volts and the trolling motor is not running.
Trollbridge 36
Installation Instructions
Technical Support: 901.382.8888 M-F 8a-5p Central • Tech@SmartShoreMarine.com • SmartShoreMarine.com
© 2023 SmartShore Marine

4
Battery Chargers
Multi-Output Battery Charger (Shore Power Charger)
The Trollbridge 36 is compatible with multi-output chargers. You can congure your
multi-output charger two (2) ways to work; separate from, or through the Trollbridge 36.
Your multi-output battery charger can be left in place in the normal conguration with
each charger bank connected to an individual battery. Do NOT run your outboard
engine and the external multi-output battery charger at the same time. Damage could
occur. An alternative method to use your multi-output battery charger is to connect all
three (3) or four (4) positive and all three (3) or four (4) negative charger outputs to the
battery with the YELLOW wire on it. This makes your multi-output charger function like
a single output charger and allows the Trollbridge 36 to equalize the charge of all three
(3) or four (4) batteries which can extend their life.
Single Output Battery Charger (Shore Power Charger)
When a single output charger is connected to the starting battery, the Trollbridge 36 will
function as normal and charge all batteries again.
3 BATTERY SYSTEM
This conguration uses a large 12-Volt battery to start the engine and combine with two (2)
smaller 12-Volt trolling batteries to combine for 36-Volts. The starting battery should have a much larger
capacity than the other two (2) so you can still start the engine when batteries 2 & 3 are low. Batteries 2
and 3 should be matched for chemistry, capacity, and age for maximum life.
NOTE: For the 3 battery system, you will omit the starting battery and connect the main engine to
the battery with BLACK and RED cables. The YELLOW cable will go to the same terminal as RED
if using the starting battery for trolling.
Trollbridge 36
Installation Instructions
Technical Support: 901.382.8888 M-F 8a-5p Central • Tech@SmartShoreMarine.com • SmartShoreMarine.com
© 2023 SmartShore Marine

5
Trollbridge 36
Installation Instructions
Technical Support: 901.382.8888 M-F 8a-5p Central • Tech@SmartShoreMarine.com • SmartShoreMarine.com
© 2023 SmartShore Marine
4 BATTERY SYSTEM
This conguration uses the starting battery and three (3) separate trolling batteries to make 36-Volts.
The three (3) batteries should be dedicated to the 36-Volt motor and NOTHING else should connect to
them. For maximum life, the trolling batteries should be matched as closely as possible for age, capacity,
and chemistry. The trolling motor will never use power from the starting battery.
Battery Chargers (Cont’d)
5 BATTERY SYSTEM
This conguration uses the starting battery, house battery, and three (3) separate trolling batteries to
make 36-Volts. The three (3) batteries should be dedicated to the 36-Volt motor and NOTHING else
should connect to them. For maximum life, trolling batteries should be matched as closely as possible for
age, capacity, and chemistry. The trolling motor will never use power from the starting battery or house
battery. The house battery and starting battery will be connected together in parallel with a SmartShore
Marine Combiner (sold separately at SmartShoreMarine.com).

6
Trollbridge 36
Installation Instructions
Technical Support: 901.382.8888 M-F 8a-5p Central • Tech@SmartShoreMarine.com • SmartShoreMarine.com
© 2023 SmartShore Marine
Trollbridge 36 Safeguards
Safeguards
• Assistant - Have a second person who can come to your aid if necessary
• Soap and Water – Have soap and water nearby in case battery acid contacts skin, eyes, or clothing
• Protective Wear –
Use full eye/clothing protection. Do not touch your eyes while working near battery
• No Smoking – Never smoke while working near battery
• Metal Tools – Reduce the risk of dropping metal tools onto your battery as sparking,
a short circuit, an explosion, or other calamity may ensue
• Jewelry – Remove any metallic jewelry, watches, etc. before working on a battery
as touching these to a battery could cause burns or worse
• Frozen Battery – Never charge a frozen battery
• Corrosion – Avoid battery corrosion from contacting your eyes or skin
Care must be taken during the installation process of your Trollbridge 36.
Damage to the batteries and/or electrical equipment can occur if the Trollbridge 36 is
installed or congured incorrectly. Please read through these instructions completely
before installation.
This installation process will require you to work near multiple batteries. The utmost
caution is advised, so having a second person who can come to your aid is ideal.

7
Trollbridge 36 Installation
WARNING! Don’t Destroy Your Trollbridge 36
Our qualty control requires that each Trollbridge 36 is thoroughly tested and passes various
tests multiple times prior to shipment. If you install it improperly you can destroy it. The cost for a
replacement after improper installation can be up to half the original purchase price plus shipping to
replace. To avoid the risk of melted cables or re you SHOULD install a 60-Amp or less circuit breaker on
the positive connection to the trolling motor. We also recommend the installation of a 100 Amp in-line fuse
on the red wire from the Trollbridge 36 unit to the positive post on the rst trolling motor battery (+12V) and
a 100-Amp in-line fuse on the white wire from the Trollbridge 36 to the positive post of the second trolling
motor battery (+24V),
and a 100-Amp in-line fuse on the blue wire from the Trollbridge 36 to the positive
post of the third trolling motor
battery (+36V). These three (3) fuses will help to protect against wiring errors
during the installation. The recommended fuse holders and replacement fuses are available to purchase
in the Accessories section of our website (SmartShoreMarine.com).
Fuses And Circuit Breakers
The positive feed to the trolling motor should always have a circuit breaker, 60-Amp rating is
typical. For ultimate protection and ABYC compliance, the red, white, blue, and yellow wires to the battery
positive terminals could be tted with disconnect switches and 100-Amp slow blow fuses but if the wiring
is well protected from accidental damage they are typically omitted.
Wiring
The following connections do not have to be made right on the battery terminals. Any wire or cable
extensions between the battery and the Trollbridge 36 must be heavy enough to carry the trolling motor
and charging currents. We recommend 6- to 10-gauge size wires for this. Longer distances need heavier
wire sizes.
DO NOT bundle cables in plastic conduit, their current rating is only for open air. In conduit they
may overheat.
DO NOT operate the Trollbridge 36 with damaged wires.
DO NOT operate the Trollbridge 36 if it has been dropped or otherwise damaged in any way.
NOTE: SHORTENING ANY Trollbridge 36 SUPPLIED CABLES WILL VOID THE WARRANTY.
The Trollbridge 36 connects the trolling batteries together in parallel (+12V) when in Charge Mode.
When multiple batteries are connected in parallel there can be a very high current owing from the one
at a higher voltage to the one at a lower state of charge. The length and size of the leads supplied
provide a resistance to high currents which protects the Trollbridge 36 from damage when the batteries are
charging. Extending the wires with 6- to 10-gauge wire is OK. Cutting off existing terminals to make extensions
is OK.
Damage caused to the Trollbridge 36 by shortening the wires is not covered under warranty.
Trollbridge 36
Installation Instructions
Technical Support: 901.382.8888 M-F 8a-5p Central • Tech@SmartShoreMarine.com • SmartShoreMarine.com
© 2023 SmartShore Marine

8
Trollbridge 36
Installation Instructions
Technical Support: 901.382.8888 M-F 8a-5p Central • Tech@SmartShoreMarine.com • SmartShoreMarine.com
© 2023 SmartShore Marine
Trollbridge 36 Installation (Cont’d)
1. READ & UNDERSTAND INSTRUCTIONS BEFORE BEGINNING INSTALLATION
Read through these instructions and understand them before you begin installation
of the Trollbridge 36. If you have any questions about the operation or installation,
please call or email us before you proceed.
Technical Support: 901.382.8888 Mon. - Fri. 8am - 5pm, Central Time
Email: Tech@SmartShoreMarine.com
3. REMOVE ALL EXISTING CABLES FROM THE BATTERIES
If you have jumpers in place on your batteries, you must remove these rst.
Leaving the serial + to - jumpers in place it will INSTANTLY destroy the
Trollbridge 36 and could injure you and cause a re.
4. LABEL YOUR BATTERIES
The Trollbridge 36 output wires are color coded and must be connected to specic
battery terminals in your system for the unit to function properly. Use the supplied
stickers to label the battery terminals BEFORE you start making connections. Have
someone (friend, wife, etc.) check them BEFORE proceeding.
BLACK – Trolling Battery #1, Negative (-) RED – Trolling Battery #1, Positive (+)
YELLOW
– Starting Battery, Positive (+) PURPLE – Trolling Battery #2, Negative (-)
WHITE
– Trolling Battery #2, Positive (+) GREEN – Trolling Battery #3, Negative (-)
BLUE – Trolling Battery #3, Positive (+)
2. CONFIGURE FOR YOUR BATTERY CHEMISTRY
If you are installing your Trollbridge 36 on standard, Lead-Acid, AGM,
or Wet-Cell batteries, you must CUT the black wire shown in the photo to
the left BEFORE installation. If you are installing your Trollbridge 36 on LITHIUM
batteries, DO NOT CUT the black wire and proceed with the installation.
CLEAN BATTERY TERMINALS BEFORE CHARGING BATTERIES
Lead Acid – After the battery has been charged, ll each battery to the appropriate
level with distilled water. Do not add water to a discharged battery or it may result in
acid leaking which could cause injury or damage to your boat.
Check the battery uid level and terminals for corrosion every thirty (30) days.

9
Trollbridge 36 Installation (Cont’d)
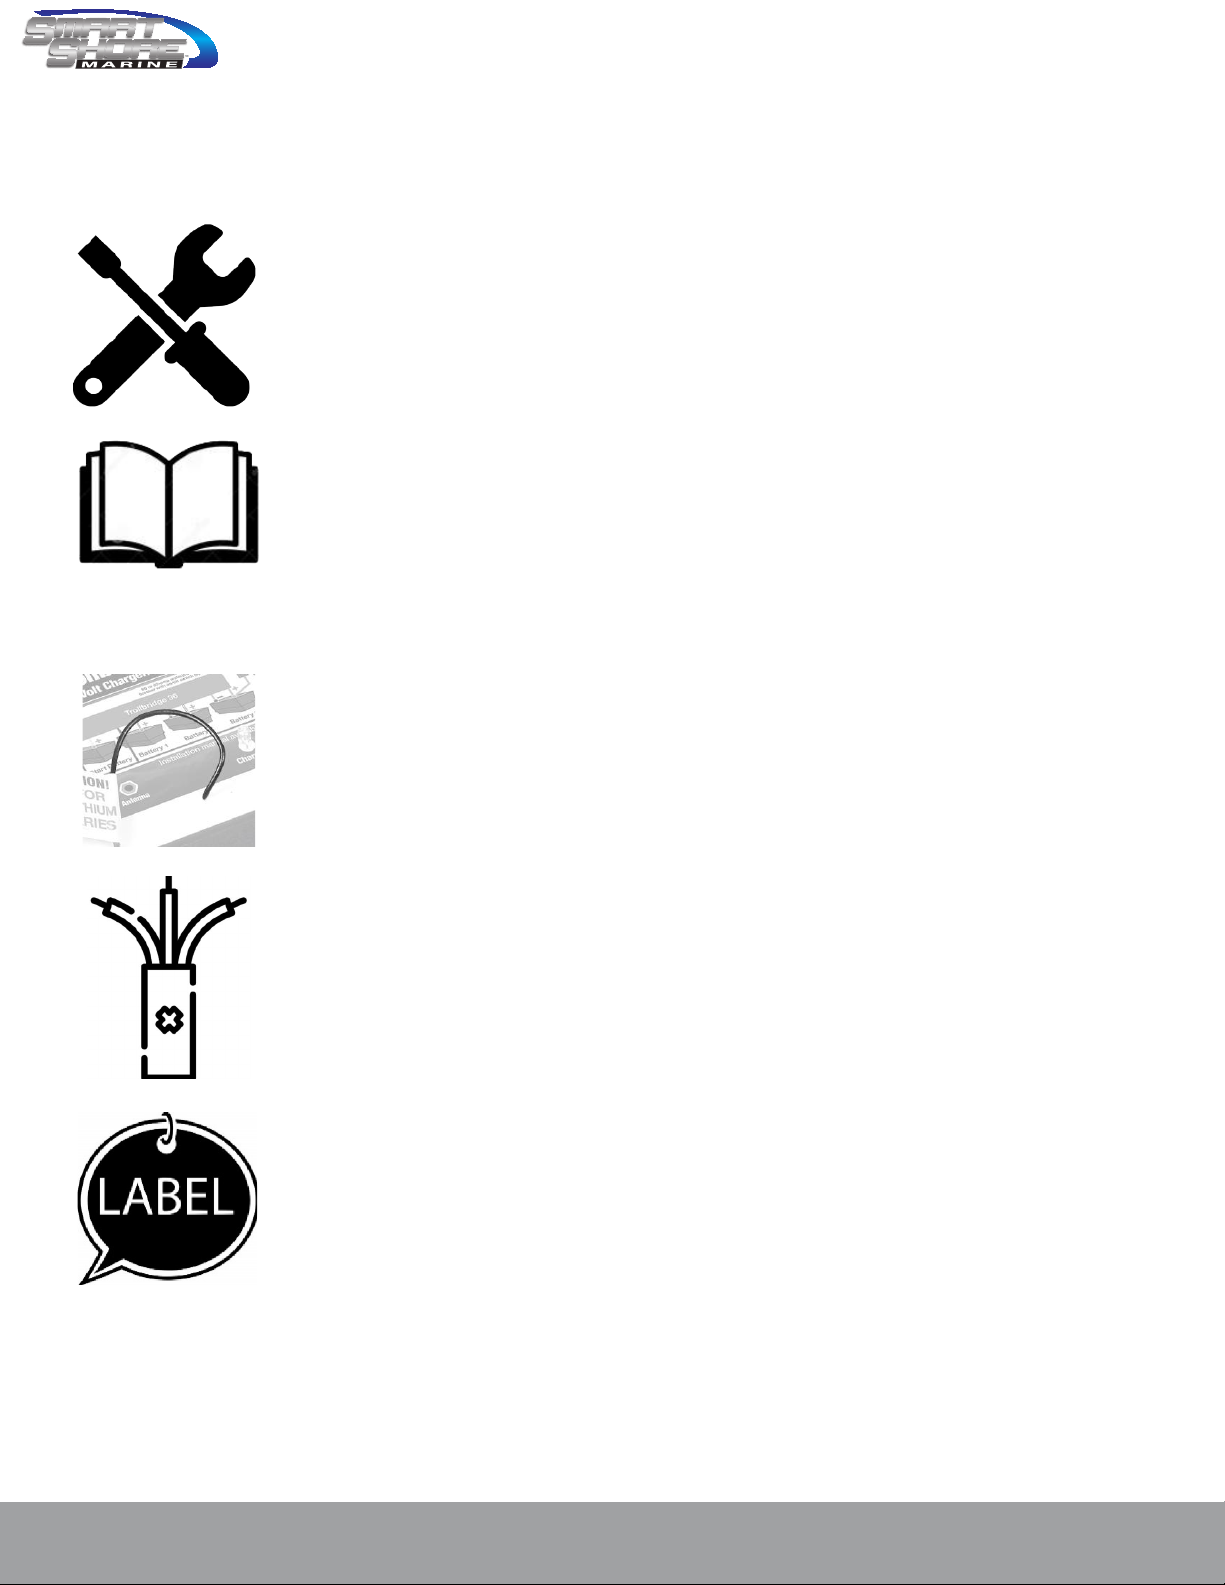
6. INSULATE YOUR TERMINALS
During installation, use the provided terminal booties to insulate the wire terminals crimped
to the end of each wire. Unconnected cables will have battery voltage coming from cables
that have already been connected. If these short out to anything or to each other,
you can melt wires, blow fuses, damage equipment, or cause a re.
7. VERIFY BEFORE COMPLETING THE INSTALLATION
Have the second person who is assisting with the installation verify the Trollbridge 36
wire color and the connection location (such as yellow wire terminal to positive post of
starting/cranking battery or black wire terminal to the negative post of the rst trolling motor
battery) before making the ring terminal to battery post and completing the connection for
each wire. Follow the suggestions under SAFEGUARDS on page 6 of this manual as
they are there to protect you, your boat’s equipment, and your new Trollbridge 36.
5. MOUNTING LOCATION
Mount the Trollbridge 36 such that you can see the green Charging LED. This will need
to be in an area that is away from a direct heat source, vibration, gas vapors, battery
gases, and above the boat waterline. The battery compartment will typically meet these
requirements. Use bolts/nuts/washers to securely mount the Trollbridge 36 in order to
withstand the pounding boats regularly endure on rough waters.
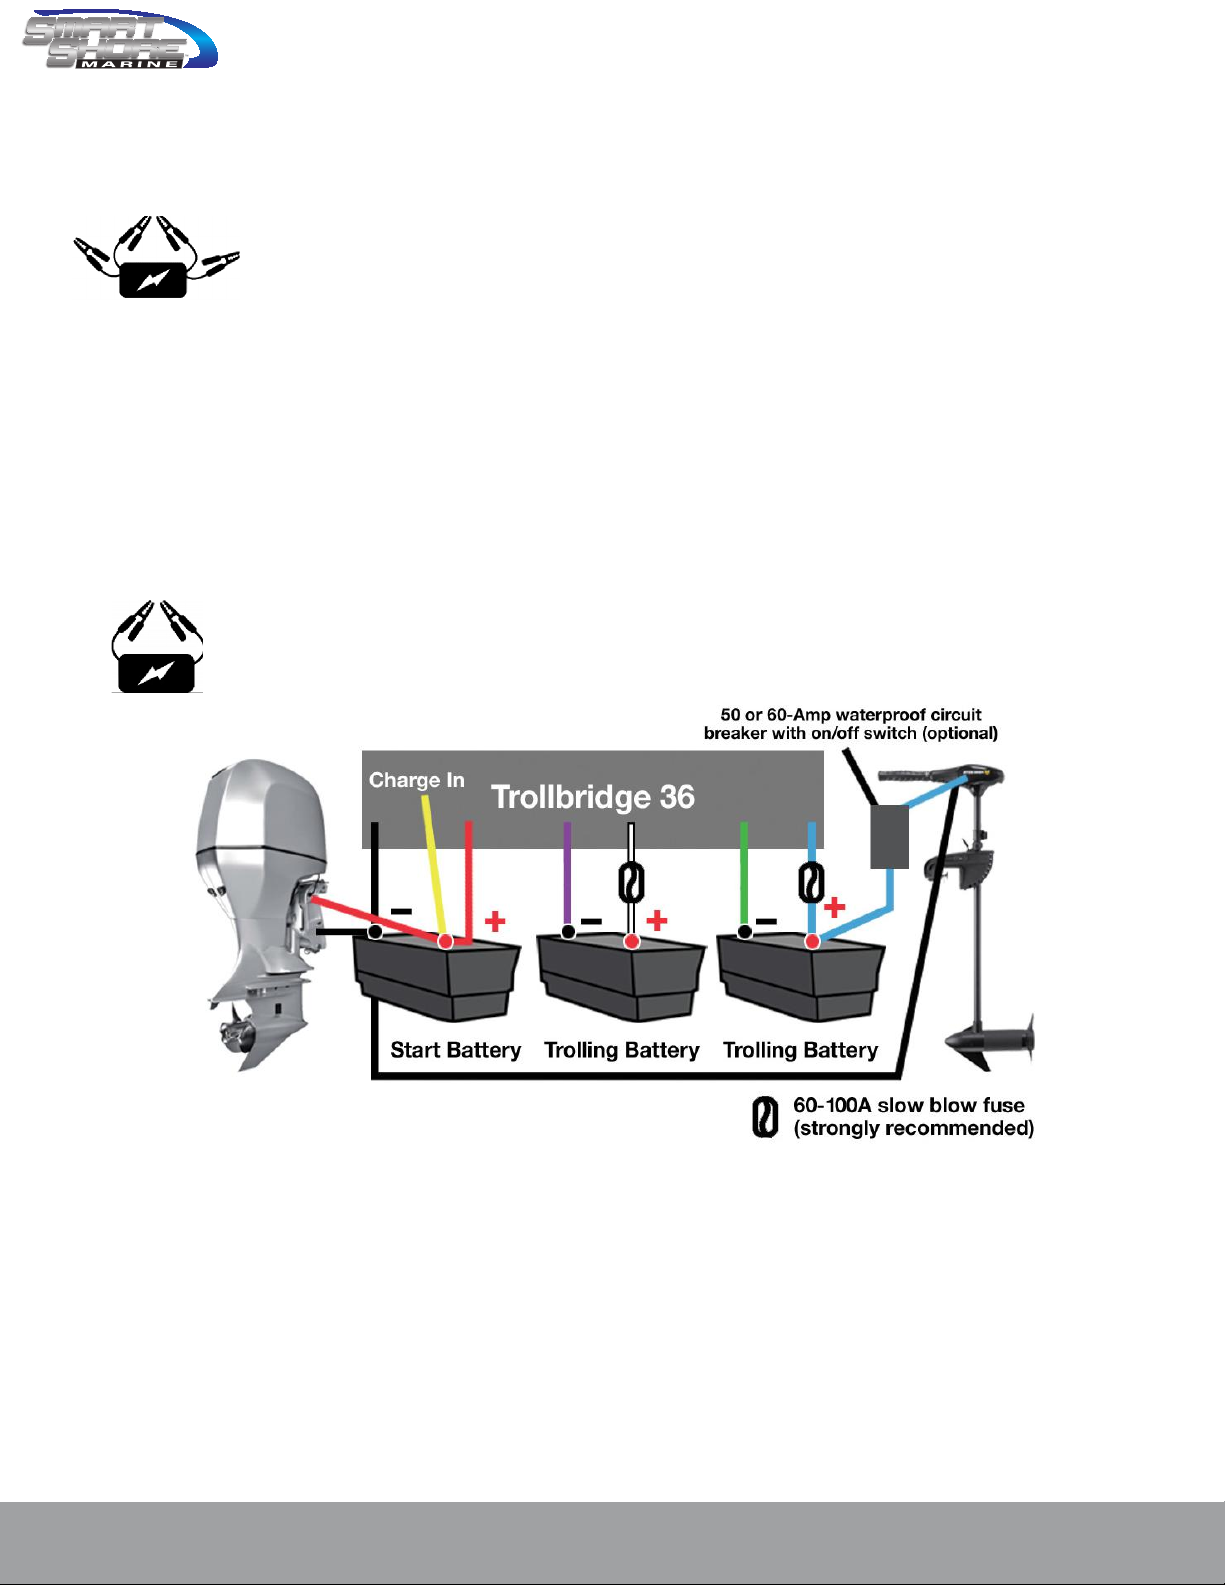
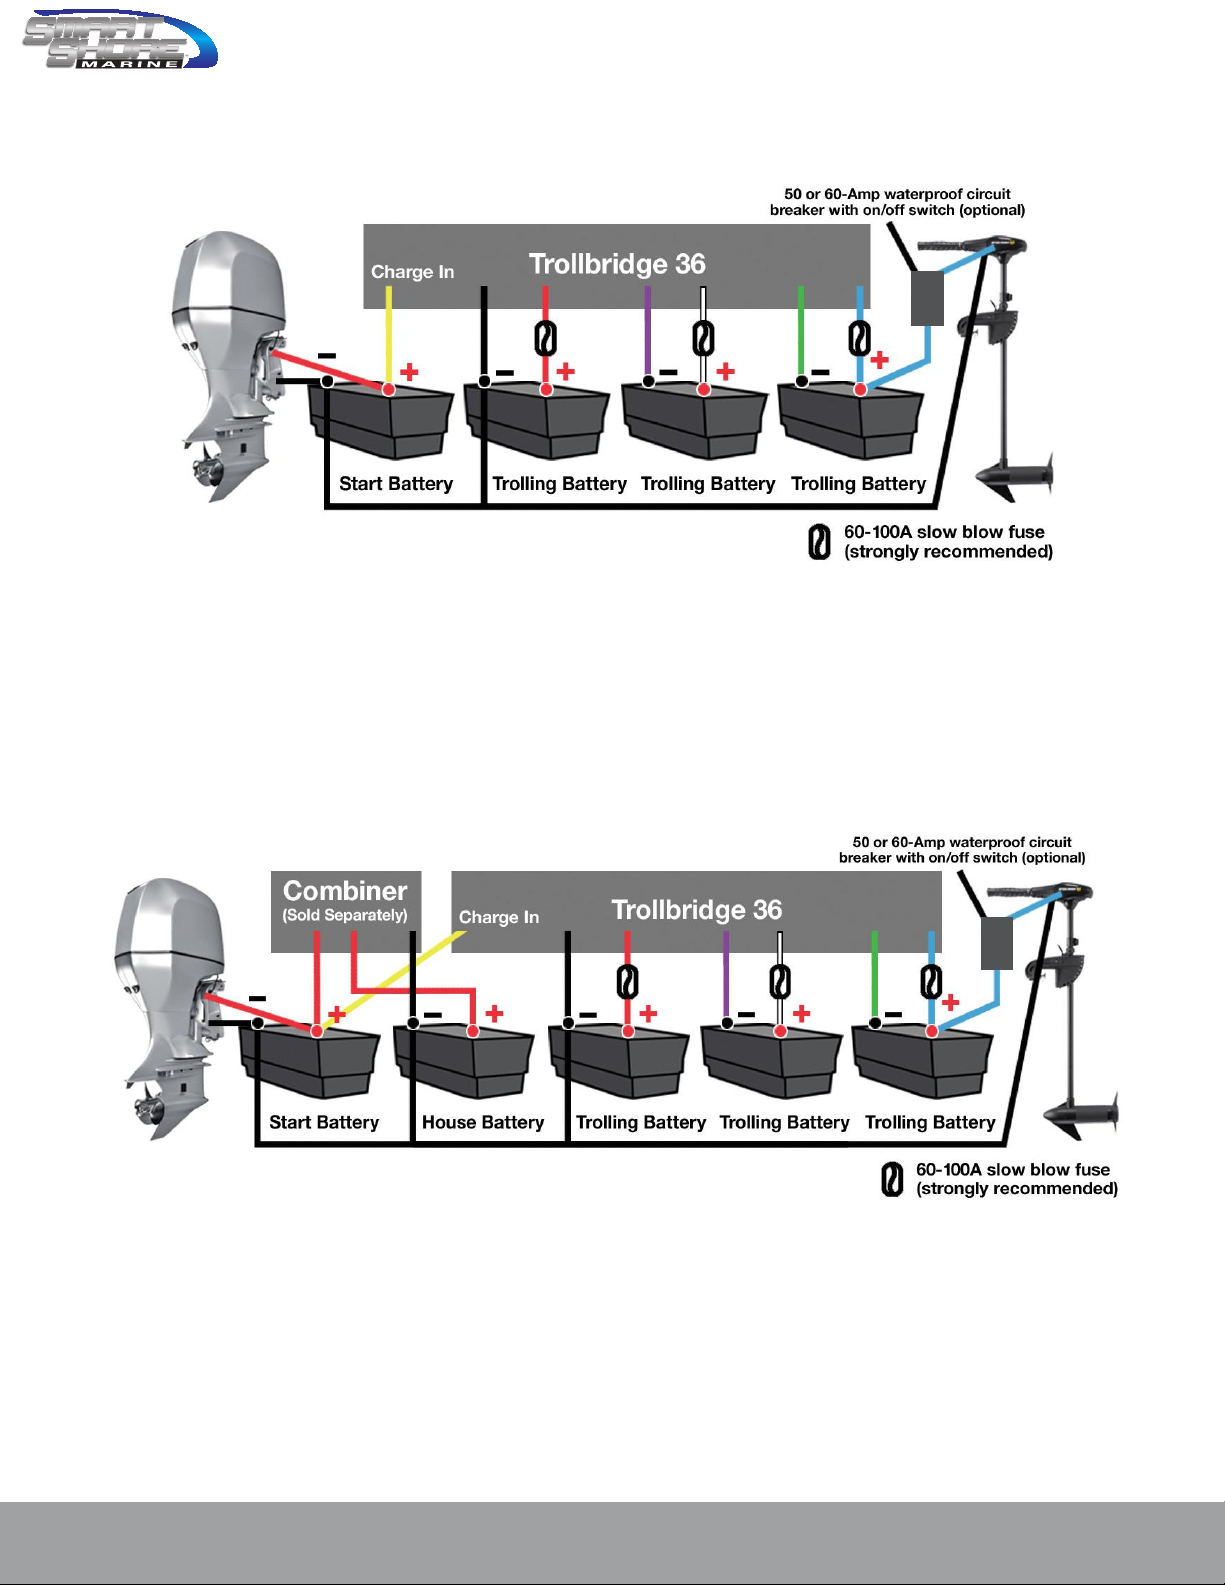
Important Information About The Wiring
See Fuses and Circuit Breakers section on pages 7 or 15. The following connections do not have
to be made right on the battery terminals but any wire or cable extensions between the battery and the
Trollbridge 36 must be heavy enough to carry the trolling motor and charging currents. The Trollbridge 36
terminals are designed to be permanently mounted to the batteries.
NOTE: SHORTENING ANY Trollbridge 36 SUPPLIED CABLES WILL VOID THE WARRANTY.
Extending with 6- to 10-gauge wire is OK. Cutting off existing terminals to make extensions is OK.
DO NOT bundle cables in plastic conduit, their current rating is only for open air. In conduit they
may overheat.
To avoid the risk of melted cables or re you SHOULD install a 60-Amp or less circuit breaker on the
positive connection to the trolling motor. We also recommend the installation of a 100-Amp in-line fuse on
the red wire from the Trollbridge 36 unit to the positive post on the rst trolling motor battery (+12V) and
a 100-Amp in-line fuse on the white wire from the Trollbridge 36 unit to the positive post of the second
trolling motor battery (+24V), and a 100-Amp in-line fuse on the blue wire from the Trollbridge 36 to the
positive post of the third trolling motor battery (+36V). These three (3) fuses will help to protect against
wiring errors during the installation. The recommended fuse holders and replacement fuses are available
to purchase in the Accessories section of our website (SmartShoreMarine.com).
Trollbridge 36
Installation Instructions
Technical Support: 901.382.8888 M-F 8a-5p Central • Tech@SmartShoreMarine.com • SmartShoreMarine.com
© 2023 SmartShore Marine

10
Trollbridge 36
Installation Instructions
Technical Support: 901.382.8888 M-F 8a-5p Central • Tech@SmartShoreMarine.com • SmartShoreMarine.com
© 2023 SmartShore Marine
Trollbridge 36 Installation (Cont’d)
11. The YELLOW cable is the incoming charging line and will be connected to the
positive (+) of the starting battery. When extending the wire length use no heavier
than 10 gauge up to ten (10) feet and 8 gauge over ten (10) feet. On a 3 battery
system connect YELLOW cable to the trolling motor battery 1 positve (+) post with
the red wire from the Trollbridge 36.
12. Connect the PURPLE cable to trolling motor battery 2 negative (-). Extending this
wire with 8- or 6-gauge wire can be done, if necessary.
8. On a 4 battery system with isolated starting battery, connect the negative (-) of the
starting battery to the negative (-) of trolling motor battery 1.
10. The RED cable is connected to the positive (+) terminal of trolling motor
battery 1. On 3 battery systems this is also the starter motor positive (+) connection.
Extending this wire with 8- or 6-gauge wire can be done, if necessary.
9. Connect the BLACK Trollbridge 36 ground wire to the negative (-) terminal of
trolling motor battery 1. This terminal also connects to the negative (-) of the starting
battery and the negative (-) side of the trolling motor. Extending this wire with 8- or
6-gauge wire can be done, if necessary.

11
13. Connect the WHITE cable to trolling motor battery 2 positive (+). Extending this
wire with 8- or 6-gauge wire can be done, if necessary.
14. The GREEN cable goes to trolling motor battery 3 negative (-). Extending this
wire with 8- or 6-gauge wire can be done, if necessary.
15. Connect the BLUE cable to the trolling motor battery 3 positive (+) terminal.
This is the +36-Volt supply to the trolling motor. Extending this wire with 8- or 6-gauge
wire can be done, if necessary.
16. TROLLING MOTOR CONNECTION
The positive (+) terminal of battery 3 will connect to the trolling motor positive
supply. 6-gauge wire is normal. A 60-Amp circuit breaker with an on/off switch is
recommended in this motor connection for protection against shorts, motor failure
and as a safety disconnect.
The negative (-) side of the trolling motor connects to the negative (-) terminal of
trolling motor battery 1 as stated above. 6-gauge wire is recommended.
Trollbridge 36 Installation (Cont’d)
Trollbridge 36
Installation Instructions
Technical Support: 901.382.8888 M-F 8a-5p Central • Tech@SmartShoreMarine.com • SmartShoreMarine.com
© 2023 SmartShore Marine
Remote “CHARGING” LED
The threaded terminal post (4-40) that extends from the Trollbridge 36 and labeled as LED+ provides
a current limited output (12 to 14 mA) for direct connection to a remotely installed LED or other 12V
rated indicator. The negative (-) lead of the LED or indicator should be connected to any boat ground or
negative (-) post of the starting battery. This remote LED or indicator will be activated along with the green
LED on the Trollbridge 36 when the Trollbridge 36 is in charging mode.
Antenna Extension
If the user has issues with communications between the remote key fob and the Trollbridge 36 unit,
the internal antenna in the Trollbridge 36 can be extended by connecting about 8 or 9 inches of wire to the
threaded terminal post (4-40) labeled ANTENNA. This will increase the communication range between
the key fob and the Trollbridge 36 unit.

12
Trollbridge 36
Installation Instructions
Technical Support: 901.382.8888 M-F 8a-5p Central • Tech@SmartShoreMarine.com • SmartShoreMarine.com
© 2023 SmartShore Marine
Troubleshooting
CHARGE MODE WON’T ACTIVATE
ARE THE CHARGING MODE CONDITIONS MET?
The Trollbridge 36 does not immediately switch from Trolling Mode into Charging Mode. There are
two (2) criteria that must be met to switch back to Charge Mode. When a charging source is detected,
the Starting battery must reach over 13-Volts for thirty (30) seconds. The total voltage of all three (3)
trolling batteries must also measure at least 30-Volts. Once these conditions are met, Charging Mode
will be activated, and the green “CHARGING” LED will illuminate. These safety measures are in place to
protect your starting battery and alternator from any bad batteries or wiring shorts.
IS YOUR TROLLING MOTOR ON?
Your trolling motor must be off to permit charging.
DO YOU HAVE A BAD BATTERY?
The Trollbridge 36 will detect a bad battery and will NOT enter charging mode to protect the starting
battery and alternator. You can use a volt meter to diagnose problems. First check the voltage across
each pair of battery terminals. Measure the voltage across all three (3) batteries with your meter (BLACK
wire to BLUE wire). If it is less than about 30-Volts you have a bad battery or a wiring problem.
REMOTE OVERRIDE
The Trollbridge 36 comes with an override Remote which allows you to manually switch from
Charging to Trolling mode immediately. With the GREEN Charging LED on, simply press the Remote
button to swap to Trolling Mode and provide 36-Volts to your trolling motor. To release the charging
override, hold the remote button down for ~10 seconds. Charge Mode will now activate once the charging
source is above 13-Volts and the trolling motor is not running.

Troubleshooting (Cont’d)
WHAT IS THE NORMAL BATTERY VOLTAGE MEASURMENTS?
You can check your battery voltages with a volt meter.
In Trolling Mode, the “CHARGING” LED is OFF. Check the wiring by putting the negative (-) meter lead on
the BLACK cable. You should measure +12-Volts on RED, +24-Volts on WHITE, and +36-Volts on BLUE.
LEAD-ACID – AGM – WET CELL BATTERIES
Starting Battery: YELLOW-to-Black: +12-Volts or higher
Trolling Motor Battery 1: RED-to-Black: +12-Volts or higher
Trolling Motor Battery 2: WHITE-to-Black: +24-Volts or higher
Trolling Motor Battery 3: BLUE-to-Black: +36-Volts or higher
LITHIUM BATTERIES
Starting Battery: Use Lead-Acid, AGM, or Wet-Cell batteries instead
of Lithium batteries for the starting/cranking battery
Trolling Motor Battery 1: RED-to-Black: +13.4-Volts or higher
Trolling Motor Battery 2: WHITE-to-Black: +26.8-Volts or higher
Trolling Motor Battery 3: BLUE-to-Black: +40.2-Volts or higher
In Charging Mode, the “CHARGING” LED is ON. Check the wiring by putting the negative (-) meter lead
on the BLACK cable. All battery positive (+) terminals should read nearly the same voltage as the starting
battery (13.0 to 14.2 depending on state of charge.).
For Lead-Acid Batteries: +12.8-Volts or higher
For Lithium Batteries: +13.8-Volts or higher
13
Trollbridge 36
Installation Instructions
Technical Support: 901.382.8888 M-F 8a-5p Central • Tech@SmartShoreMarine.com • SmartShoreMarine.com
© 2023 SmartShore Marine

14
Trollbridge 36
Installation Instructions
Technical Support: 901.382.8888 M-F 8a-5p Central • Tech@SmartShoreMarine.com • SmartShoreMarine.com
© 2023 SmartShore Marine
Warranty Information
Limited One (1) Year Warranty
The Trollbridge 36 is warranted to the original purchaser against defects in material and workmanship
appearing within one (1) year after the date of purchase. The unit will either be repaired or replaced,
free of charge. Shipping charges will be the responsibility of the purchaser.
This limited warranty does not apply to chargers used commercially, nor does it cover normal wear and
tear, blemishes that do not affect the operation of the charger, or damage caused by accidents, abuse,
alteration, modication, misuse or improper care or maintenance. The cost of normal maintenance or
replacement of parts which are not defective are the responsibility of the purchaser.
To obtain warranty service in the U.S., the charger and proof of original purchase with date, must be
presented upon request. Labor to remove and replace the unit for warranty service, shipping, or any other
similar items are the sole and exclusive responsibility of the original purchaser. Warranty service for the
original purchaser can be arranged by contacting Tech Support.
There are no express warranties other than these limited warranties. No implied warranties, including any
implied warranties of merchantability or tness for a particular purpose, extend beyond one (1) year from the
date of purchase. Incidental, consequential, or special damages are not covered under this limited warranty.
Voided Warranty
REMOVE EXISTING BATTERY JUMPERS PRIOR TO INSTALLATION
Your Trollbridge 36 unit can be destroyed due to faulty wiring connections during installation. We will
not provide free replacements for damaged units due to installation errors. Because we understand that
mistakes happen, we will warranty a unit that has been destroyed during installation, but there will be a
charge of up to half the original purchase price plus shipping both ways to replace your unit.
IF TYPICAL EXISTING BATTERY JUMPERS ARE NOT DISCARDED THE Trollbridge 36 WILL SELF
DESTRUCT AND VOID THE WARRANTY. Internal automatic switches in the Trollbridge 36 will take the
place of these jumpers as it switches between series and parallel.
NOTE: SHORTENING ANY Trollbridge 36 SUPPLIED CABLES WILL VOID THE WARRANTY.
Extending with 6- to 10-gauge wire is OK. Cutting off existing terminals to make extensions is OK.

Trollbridge 36
Installation Instructions
Technical Support: 901.382.8888 M-F 8a-5p Central • Tech@SmartShoreMarine.com • SmartShoreMarine.com
© 2023 SmartShore Marine
15
Warranty Information (Cont’d)
Fuses And Circuit Breakers - STRONGLY RECOMMENDED
To avoid risk of melted cables or re you SHOULD install a 60-Amp or less circuit breaker on the
positive connection to the trolling motor. We also recommend the installation of a 100-Amp in-line fuse on
the red wire from the Trollbridge 36 unit to the positive post on the rst trolling motor battery (+12V) and
a 100-Amp in-line fuse on the white wire from the Trollbridge 36 unit to the positive post of the second
trolling motor battery (+24V), and a 100-Amp in-line fuse on the blue wire from the Trollbridge 36 to the
positive post of the third trolling motor battery (+36V). These three (3) fuses will help to protect against
wiring errors during the installation. The recommended fuse holders and replacement fuses are available
to purchase in the Accessories section of our website (SmartShoreMarine.com).
The positive feed to the trolling motor should always have a circuit breaker with an on/off switch.
60-Amp rating is typical. For ultimate protection and ABYC compliance, the red, white, blue, and yellow
wires to the battery positive terminals could be tted with disconnect switches and 100-Amp slow blow
fuses but if the wiring is well protected from accidental damage they are typically omitted.
Technical Support
901.382.8888 Mon. - Fri. 8am - 5pm, Central Time
Email: Tech@SmartShoreMarine.com
This device complies with Part 15 of the FCC Rules. Operation is subject to the following two (2) conditions: One (1) this device may not cause
harmful interference, and two (2) this device must accept any interference received, including interference that may cause undesired operation.
Table of contents
Other Hypertech Batteries Charger manuals