Harman JBL TT350 Classic User manual

TT350 Classic - Turntable
Pg 2 – Quick Start Guide – Turntable
Pg 6 – Guide de démarrage rapide – Platine tourne disque
Pg 10 – Kurzanleitung – Plattenspieler
Pg 14 – Snelstartgids – Platenspeler
Pg 18 – Guida di avvio rapido – Giradischi
Pg 22 – Guía de inicio rápido – Tocadiscos
Pg 26 – Guia de início rápido – Toca-discos
Pg 30 – 빠른 시작 가이드 – 턴테이블
Pg 34 – -
Pg 38 – 快速入门指南 - 唱盘机
©JBL TT350 Classic QSG Multi – Harman International Industries, Incorporated.
Features, specifications, and appearance subject to change without notice.

Pg 2 JBL TT350 Classic QSG Multi
Thank you for choosing JBL
For over 75 years, JBL has been creating best in class audio equipment for concerts, studios, theaters, and homes
around the world. JBL is the trusted choice of leading recording artists and sound engineers.
The JBL TT350 is designed to provide you with reliable vinyl playback for decades to come, all with exceptional
musicality so you get the most enjoyment from your music.
Please note, the stylus is a wearable part that requires care when handling. Over extended use and time, it will
require replacement. If damaged, it should be replaced to avoid damage to vinyl records.
This handbook is a guide to installing and using the TT350 and includes information on its more advanced features.
In the unlikely event of any fault, or you require technical assistance, please contact our dedicated support teams
by email using [email protected]om, or by telephone using +44 1707 668012 or +1 888 691 4171. Or, if you
simply require further information about JBL products, our network of dealers will be happy to help you. Further
information can also be found on the JBL website at JBL.com.
Package Contents
JBL TT350 Turntable
Turntable Platter
Rubber Platter Matt
Counterweight
Headshell with MM Cartridge Fitted
2x Dust Cover Hinges
Region Specific Power Cords
Quick Start Guide
Safety and Compliance Document
Placing The Unit
Place the amplifier on a level, firm surface, avoiding direct sunlight and sources of heat or damp.
Do not place the TT350 on top of a power amplifier or other source of heat.
Do not place any other component or item on top of the turntable as this will damage the dust cover.
The normal function of the unit may be disturbed by strong electromagnetic interference. If this occurs, simply
reset the unit with the power button, or move the unit to another location.

Pg 3 JBL TT350 Classic QSG Multi
Assembly
1. Fit the platter to the spindle. 2. Place the platter matt on the platter
3. Fit the headshell and cartridge (the cartridge is
supplied fitted to the headshell).
Rotate the collar at the front end of the tonearm to
tighten or loosen the fitting.
4. Fit the counterweight.
Rotate the counterweight at the end of the tonearm
to adjust its position.
The numbers should be facing toward the front.
5. Fit the hinges to the dust cover.
6. Slot the hinges into the hinge brackets on the back of the plinth.

Pg 4 JBL TT350 Classic QSG Multi
Balance the Tonearm
1. To balance the tonearm, first fit the headshell with cartridge.
2. Ensure the arm rest lever is down and the Anti-Skate is set to zero (0).
3. Fit the counterweight all the way on the end of the tonearm.
4. Release the arm lock
Countweight
Includes loading dial which
turns seperately.
Cartridge
Appearance may differ.
Arm lock
Headshell
Arm rest
Arm lift lever
Anti-Skate dial
5. Rotate the counterweight slowly clockwise so it moves towards the back
6. As you rotate the counterweight, you will find a point at which the arm and cartridge begin to rise.
Dial the counterweight back to where the arm does not rise or fall – it should float.
7. With the arm floating, reseat it on the arm rest and close the arm lock.
8. Rotate the loading dial on the counterweight to show zero 0at the top center.
9. Now rotate the whole counterweight anti-clockwise until it shows 2at the top of the loading dial. You have now
applied a 2 gram tracking force to the cartridge.
10. Set the Anti-Skate dial to 2.
Note: Other cartridges require a different tracking force. Check the documents supplied with any alternative
cartridges used.

Pg 5 JBL TT350 Classic QSG Multi
Connecting the turntable
Connect the phono outputs
to the Phono input on your
amplifier.
Connect the ground cable
between the turntable and
your amplifier.
Consult your JBL dealer if
your amplifier does not
have a Phono input. You
may require a separate
Phono Stage.
Specifications
Model: JBL TT350
Plinth Materials: Natural Walnut veneered MDF with machined Aluminum front panel
Platter Materials: Damped Die-cast Aluminum
Tonearm Materials: Aluminum
Tonearm Features: Removeable Headshell
Adjustable Counterweight
Adjustable Anti-Skate
Vertical Track Adjustment
Cartridge Fitted: Audio Technica VM95E
Analog Outputs: 1x Stereo (RCA) pair
Motor Type: Direct Drive
Mains voltage AC IN 100V - 240V, ~50-60Hz
Maximum power consumption 36W
Standby power consumption <0.5W
Max. operating temperature 45°C
Dimensions (Including feet with dust
cover on and down):
6.0" H x 17.7" W x 14.0" D
(150mm x 449mm x 355mm)
Weight (net) 11.1 lbs. (7.5 kg)
Weight (gross) 15.5 lbs. (10.7 kg)
This equipment complies with European Commission Regulation (EC) No 1275/2008 and (EU) No 801/2013.
Standby: < 0.5 W Off: < 0.5 W
The power management function switches the equipment automatically into Standby mode in 20mins.
This equipment is a Class II or double insulated electrical appliance.

Pg 6 JBL TT350 Classic QSG Multi
Merci d'avoir choisi JBL
Depuis plus de 75 ans, JBL crée les meilleurs équipements audio pour les concerts, les studios, les théâtres et les
résidences du monde entier. Les produits JBL sont le choix unanime des artistes de studio et des ingénieurs du son les
plus renommés.
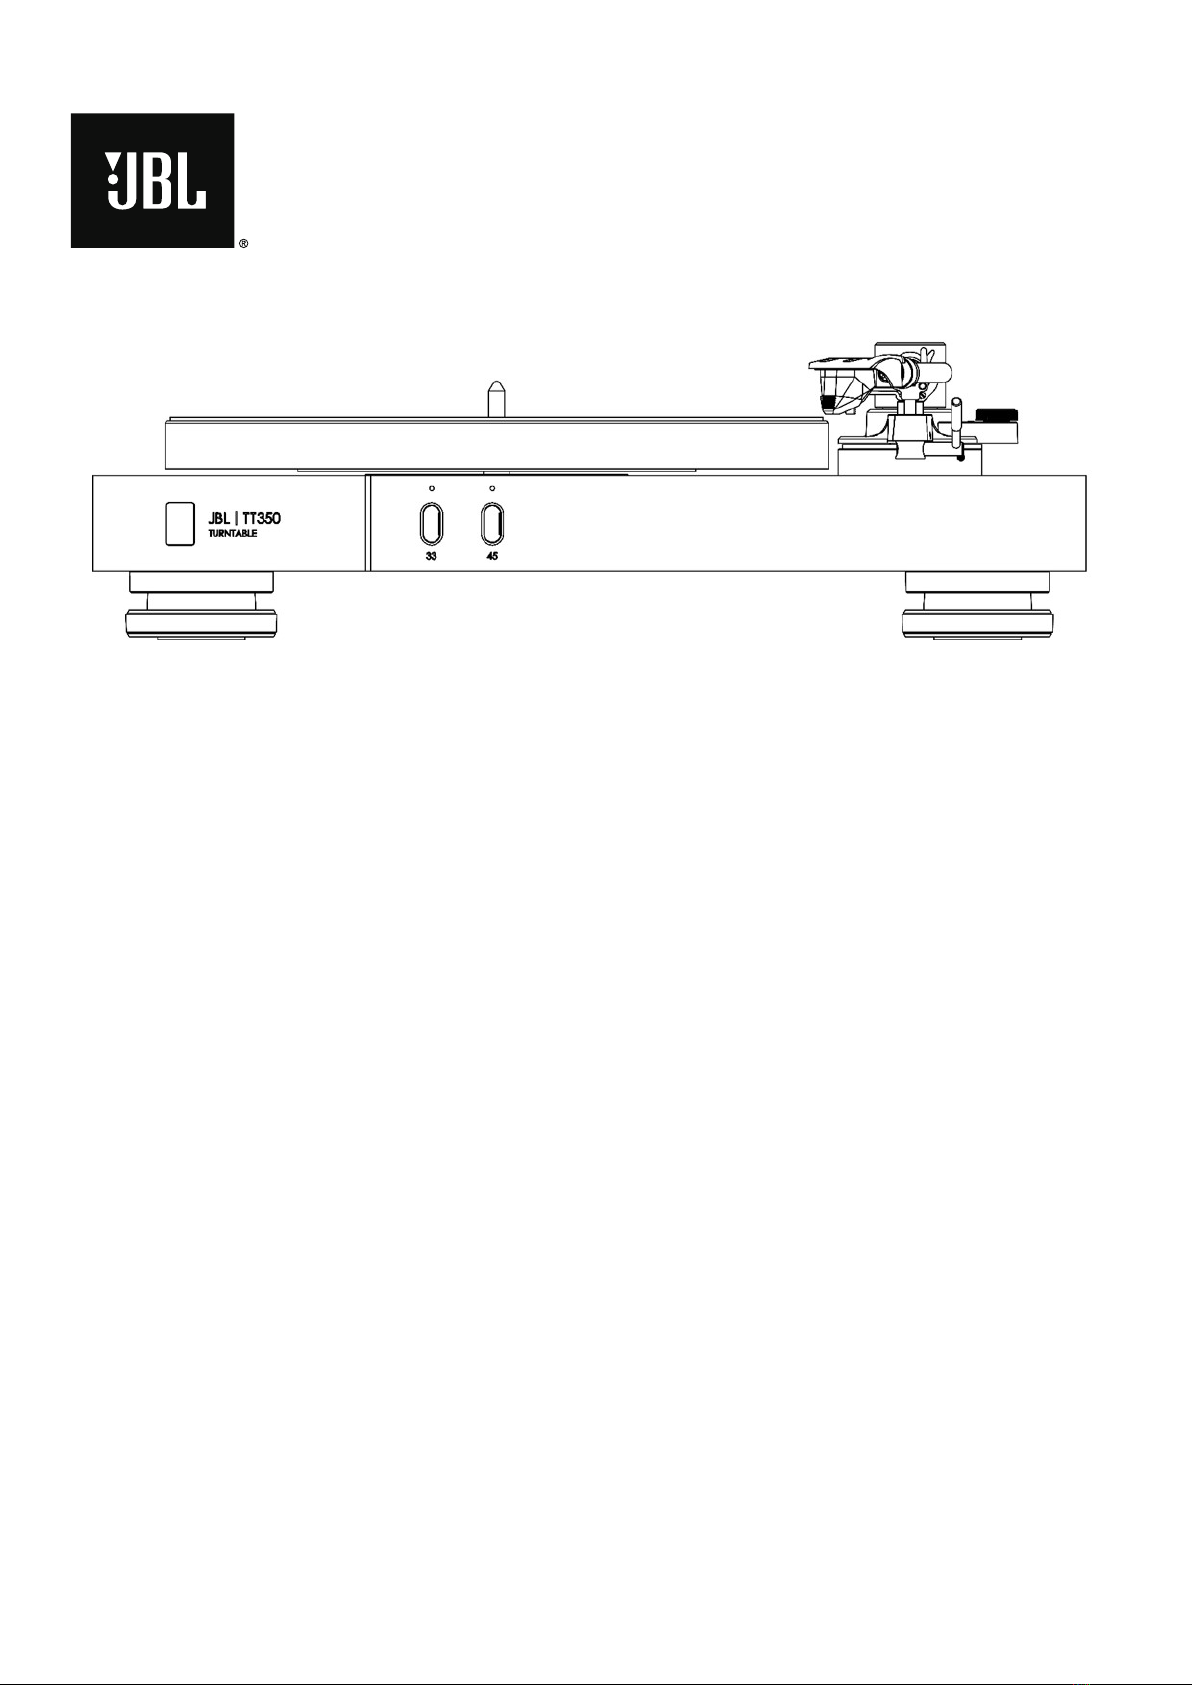
La JBL TT350 est conçue pour vous offrir une lecture des vinyles fiable durant les décennies à venir, et une musicalité
exceptionnelle afin que vous profitiez au maximum de votre musique.
Veuillez noter que le stylet est une pièce d’usure qui doit être manipulée avec précaution. Il devra être remplacé
après un certain temps. S'il est endommagé, il doit être remplacé pour éviter de dégrader les disques vinyles.
Ce manuel est un guide pour l'installation et l'utilisation de la TT350, il inclut des informations sur ses fonctions les
plus avancées.
Dans le cas peu probable d'un défaut, ou si vous avez besoin d'une assistance technique, veuillez contacter nos
équipes d'assistance dédiées par courriel à [email protected], ou par téléphone au +44 1707 668012 ou
au +1 888 691 4171. Ou, si vous avez simplement besoin d’informations complémentaires sur les produits JBL, notre
réseau de revendeurs se fera un plaisir de vous aider. Le site Web de JBL à l'adresse JBL.com contient également des
informations plus complètes.
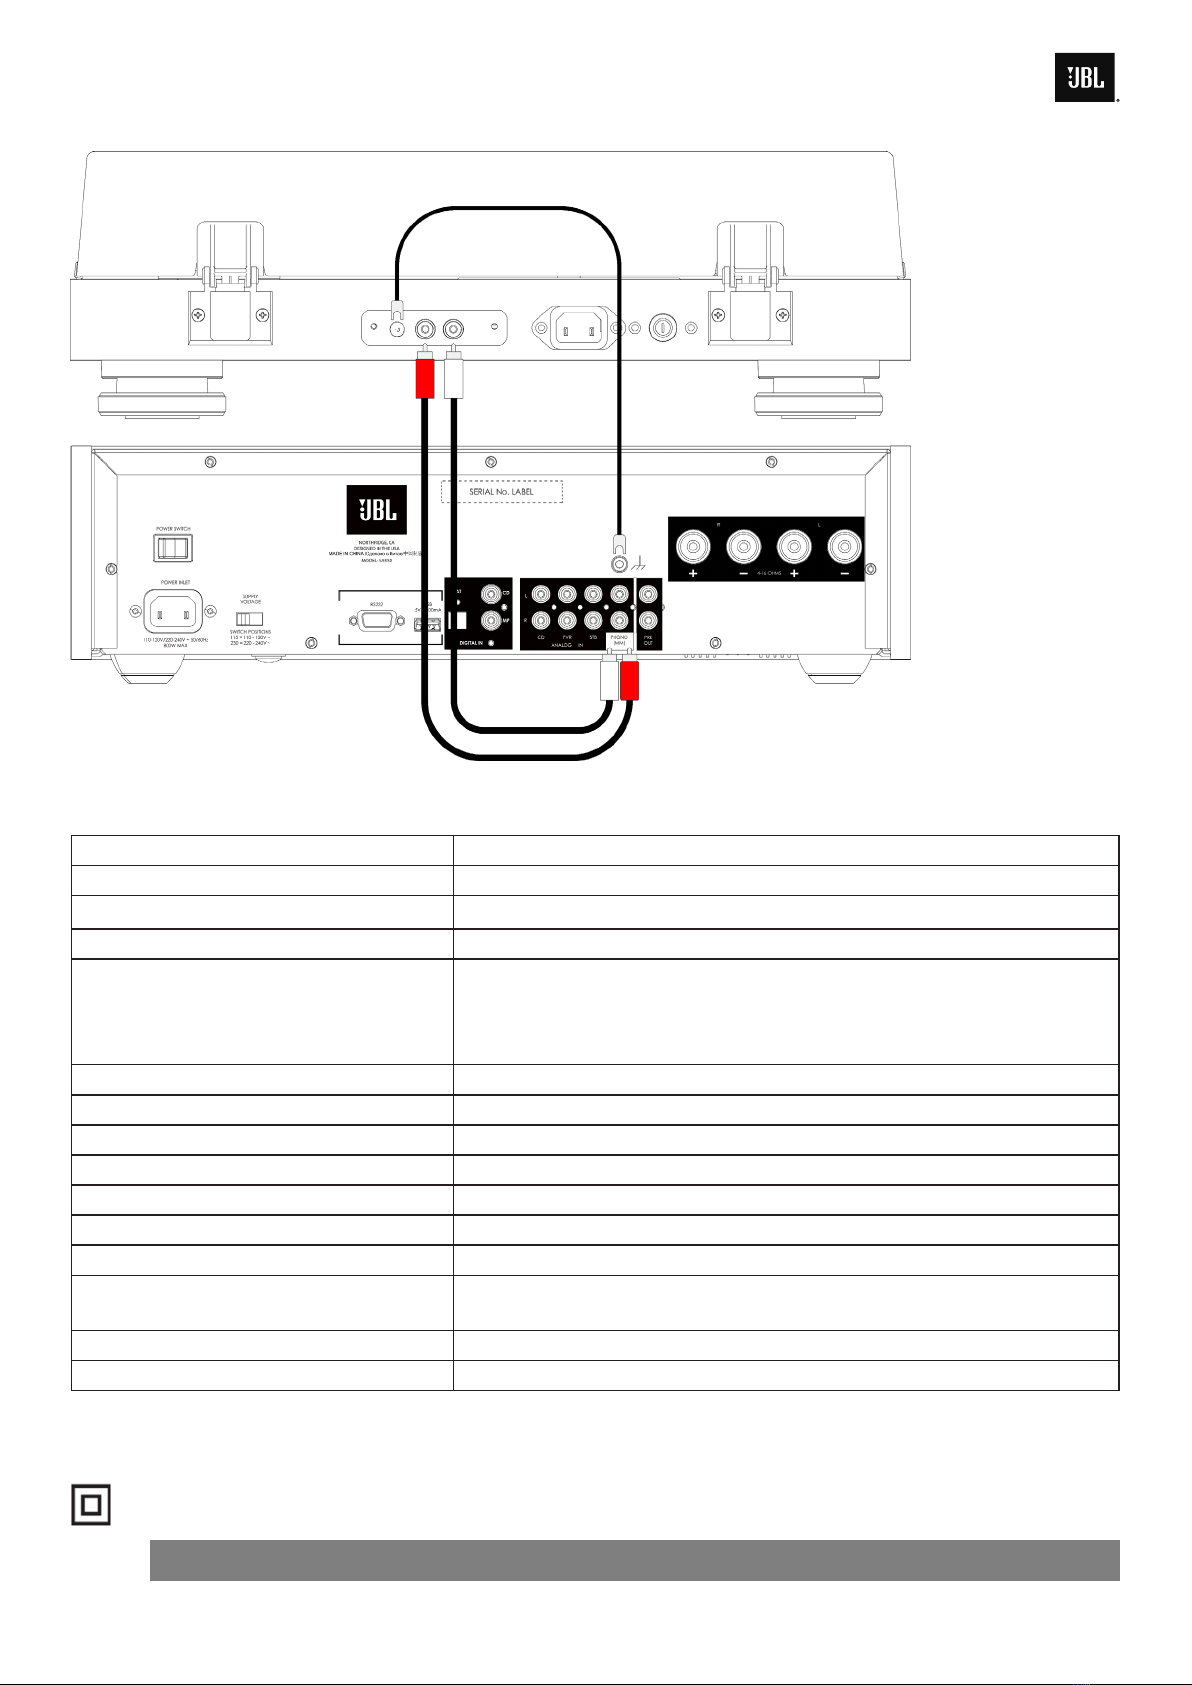
Contenu de l'emballage
Platine tourne disque JBL TT350
Plateau de platine tourne disque
Tapis de plateau en caoutchouc
Contrepoids
Porte-cellule avec cellule MM montée
2 charnières de couvercle anti-poussière
Cordons d'alimentation selon la région
Guide de démarrage rapide
Document de sécurité et de conformité
Positionnement de l’appareil
Placez l'amplificateur sur une surface plane et ferme, en évitant la lumière directe du soleil et les sources de
chaleur ou d'humidité.
Ne placez pas la TT350 sur un amplificateur de puissance ni sur une autre source de chaleur.
Ne placez aucun autre composant ni objet sur la platine, car cela endommagerait le couvercle anti-poussière.
Le fonctionnement normal de l'appareil peut être perturbé par des interférences électromagnétiques fortes.
Si cela se produit, réinitialisez simplement l'appareil avec son bouton d'alimentation ou déplacez-le vers un autre
emplacement.

Pg 7 JBL TT350 Classic QSG Multi
Assemblage
1. Montez le plateau sur l’axe. 2. Placez le tapis du plateau sur le plateau.
3. Montez le porte-cellule et la cellule (la cellule est
fournie montée sur le porte-cellule).
Tournez le collet de l'extrémité avant du bras pour
serrer ou desserrer le raccord.
4. Montez le contrepoids.
Tournez le contrepoids à l'extrémité du bras pour
ajuster sa position.
Les chiffres doivent être orientés vers l'avant.
5. Montez les charnières sur le couvercle anti-poussière.
6. Insérez les charnières dans les supports de charnière à l'arrière du socle.

Pg 8 JBL TT350 Classic QSG Multi
Équilibrage du bras
1. Montez d'abord le porte-cellule avec la cellule pour équilibrer le bras.
2. Le levier de repos du bras doit être abaissé et que l'antipatinage doit être réglé sur zéro (0).
3. Réglez le contrepoids à l’extrémité du bras.
4. Libérez le verrouillage du bras.
Contrepoids
Comprend un cadran de charge
qui tourne séparément.
Cellule
Son aspect peut être
différent.
Verrouillage du bras
Porte-cellule
Support du bras
Levier de levage du bras
Cadran de l’antipatinage
5. Tournez le contrepoids lentement dans le sens horaire pour qu'il se déplace vers l'arrière.
6. En tournant le contrepoids, vous trouverez un point où le bras et la cellule commencent à se lever.
Reculez le contrepoids à l'endroit où le bras ne monte ni ne descend – il doit flotter.
7. Le bras étant flottant, reposez-le sur son support et fermez le verrouillage du bras.
8. Tournez le réglage du contrepoids pour afficher zéro 0en haut et au centre.
9. Tournez ensuite tout le contrepoids dans le sens antihoraire jusqu'à ce que 2se trouve en haut du cadran de
charge. Vous avez maintenant appliqué une force d’appui de 2 grammes à la cellule.
10. Réglez le cadran de l’antipatinage sur 2.
Remarque : D'autres cellules requièrent une force d’appui différente. Consultez les documents fournis avec les autres
cellules utilisées.

Pg 9 JBL TT350 Classic QSG Multi
Branchement de la platine tourne disque
Connectez les sorties
phono à l'entrée Phono de
votre amplificateur.
Connectez le câble de
masse entre la platine
tourne disque et votre
amplificateur.
Consultez votre revendeur
JBL si votre amplificateur
n'a pas d'entrée Phono.
Vous pouvez avoir besoin
d'un étage phono séparé.
Caractéristiques
Modèle : JBL TT350
Matériaux du socle : MDF plaqué noyer naturel avec façade en aluminium usiné
Matériaux du plateau : Aluminium moulé amorti
Matériaux du bras : Aluminium
Caractéristiques du bras : Porte-cellule amovible
Contrepoids réglable
Antipatinage réglable
Réglage de l’appui vertical
Cellule montée : Audio Technica VM95E
Sorties analogiques : 1 paire stéréo (RCA)
Type de moteur : Entraînement direct
Tension secteur Entrée 100 V - 240 V CA, 50-60 Hz
Consommation électrique maximale 36 W
Consommation électrique en veille < 0,5 W
Température de fonctionnement max. 45 °C
Dimensions (avec pieds et couvercle anti-
poussière monté et abaissé) :
(6,0" H x 17,7" L x 14,0" P)
150 mm x 449 mm x 355 mm
Poids (net) (11,1 lbs.) 7,5 kg
Poids (brut) (15,5 lbs.) 10,7 kg
L'équipement est conforme aux règlements de la Commission européenne (CE) n° 1275/2008 et (UE) n° 801/2013.
Veille : < 0,5 W Arrêt : < 0,5 W
La fonction de gestion de l'alimentation met automatiquement l'équipement en veille après 20 minutes.
Cet équipement est un appareil électrique de classe II ou à double isolation.

Seite 10 JBL TT350 Classic QSG Multi
Vielen Dank für die Wahl von JBL
Seit über 75 Jahren stellt JBL erstklassige Audiogeräte für Konzerte, Studios, Theater und Privathaushalte in aller Welt
her. JBL ist die erste Wahl führender Musiker und Tontechniker.
Der JBL TT350 wurde entwickelt, damit du jahrzehntelang eine zuverlässige Vinyl-Wiedergabe mit außergewöhnlicher
Musikalität und deine Musik in vollen Zügen genießen kannst.
Bitte beachte, dass die Nadel ein Verschleißteil ist, das vorsichtig behandelt werden muss. Sie muss bei längerem
Gebrauch und mit der Zeit ersetzt werden. Wenn die Nadel beschädigt ist, muss sie ersetzt werden, um Schäden an
den Schallplatten zu vermeiden.
Dieses Handbuch ist ein Leitfaden für die Installation und Verwendung des TT350 und enthält Informationen über
seine erweiterten Funktionen.
Wende dich im unwahrscheinlichen Fall einer Störung oder falls du technische Unterstützung benötigst bitte per E-Mail
an [email protected] oder telefonisch unter +44 1707 668012 oder +1 888 691 4171 an unser engagiertes
Support-Team. Wenn du einfach nur weitere Informationen über JBL Produkte suchst, steht dir unser Händlernetz
gerne zur Verfügung. Weitere Informationen findest du auch auf der JBL Website unter JBL.com.
Lieferumfang
JBL TT350 Plattenspieler
Plattenteller
Plattenteller-Gummimatte
Gegengewicht
Headshell mit integriertem MM-Tonabnehmer
2x Scharniere für Staubschutzhaube
Regionalspezifische Netzkabel
Kurzanleitung
Dokument zu Sicherheit und Konformität
Aufstellung des Geräts
Stelle das Gerät auf eine ebene, feste Unterlage und vermeide Orte mit direkter Sonneneinstrahlung sowie in die
Nähe von Wärme- und Feuchtigkeitsquellen.
Platziere den TT350 nicht auf einen Leistungsverstärker oder eine andere Wärmequelle.
Stelle keine anderen Komponenten oder Gegenstände auf den Plattenspieler, da dies die Staubschutzabdeckung
beschädigen würde.
Die normale Funktion des Geräts kann durch starke elektromagnetische Störungen beeinträchtigt werden.
Setze das Gerät in diesem Fall einfach mit der Ein/Aus-Taste zurück, oder stelle es an einen anderen Ort auf.

Seite 11 JBL TT350 Classic QSG Multi
Zusammenbau
1. Montiere den Plattenteller auf der Spindel. 2. Lege die Plattenteller-Matte auf den Plattenteller.
3. Befestige Sie die Headshell und den Tonabnehmer
(der Tonabnehmer wird an der Headshell befestigt
ausgeliefert).
Drehe die Manschette am vorderen Ende des Tonarms,
um den Anschluss festzuziehen oder zu lockern.
4. Montiere das Gegengewicht.
Drehe das Gegengewicht am Ende des Tonarms, um
seine Position einzustellen.
Die Ziffern müssen nach vorne gerichtet sein.
5. Befestige die Scharniere an der Staubschutzhaube.
6. Stecke die Scharniere in die Scharnierhalterungen an der Rückseite der Basis.

Seite 12 JBL TT350 Classic QSG Multi
Tonarm auswuchten
1. Befestige zum Auswuchten des Tonarms zunächst die Headshell mit dem Tonabnehmer.
2. Überprüfe, ob der Hebel der Tonarmhalterung nach unten gedrückt ist und die Anti-Skate-Funktion auf Null (0)
eingestellt ist.
3. Befestige das Gegengewicht ganz am Ende des Tonarms.
4. Löse die Tonarmsperre.
Gegengewicht
Mit separat drehbarem
Belastungsrad.
Tonabnehmer
Das Erscheinungsbild
kann abweichen.
Armsperre
Headshell
Tonarmhalterung
Hebel zum Anheben des Arms
Anti-Skate-Skala
5. Drehe das Gegengewicht langsam im Uhrzeigersinn, damit es sich nach hinten bewegt.
6. Beim Drehen des Gegengewichts wirst du einen Punkt finden, an dem der Arm und der Tonabnehmer beginnen,
sich nach oben zu bewegen.
Drehe das Gegengewicht etwas zurück, damit sich der Arm weder hebt noch senkt – er sollte schweben.
7. Setze den schwebend gelagerten Arm wieder auf die Tonarmhalterung und schließe die Arretierung.
8. Drehe die Belastungsskala am Gegengewicht auf Null 0, wie in der oberen Mitte angezeigt.
9. Drehe nun das gesamte Gegengewicht gegen den Uhrzeigersinn, bis die Anzeige am oberen Ende der
Belastungsskala 2anzeigt. Jetzt wird eine Auflagekraft von 2 Gramm auf den Tonabnehmer ausgeübt.
10. Stelle den Anti-Skate-Regler auf 2ein.
Hinweis: Andere Tonabnehmer erfordern eine andere Auflagekraft. Lies dies in den Dokumenten nach, die mit den
verwendeten alternativen Tonabnehmern geliefert werden.

Seite 13 JBL TT350 Classic QSG Multi
Anschließen des Plattenspielers
Verbinde die Phono-
Ausgänge mit dem Phono-
Eingang deines Verstärkers.
Schließe das Erdungskabel
zwischen dem
Plattenspieler und deinem
Verstärker an.
Wende dich an deinen
JBL-Händler, wenn dein
Verstärker nicht über
einen Phono-Eingang
verfügt. Dann benötigst
du möglicherweise eine
separate Phono-Stufe.
Technische Daten
Modell: JBL TT350
Basismaterialien: Nussbaum-furnierte MDF-Platte mit gefräster Aluminium-Frontplatte
Plattentellermaterialien: Dämpfender Aluminium-Druckguss
Tonarm-Materialien: Aluminium
Tonarm-Merkmale: Abnehmbare Headshell
Einstellbares Gegengewicht
Einstellbares Anti-Skate
Einstellung der vertikalen Spur
Montierter Tonabnehmer: Audio Technica VM95E
Analoge Ausgänge: 1x Stereo (RCA-Cinch) Paar
Motortyp: Direktantrieb
Netzspannung AC-EINGANG 100–240 V, ~50/60 Hz
Max. Stromverbrauch 36 W
Stromverbrauch im Standby-Modus <0,5 W
Max. Betriebstemperatur 45 °C
Abmessungen (inkl. Füße mit aufgesetzter
und abgenommener Staubschutzhaube):
150 mm x 449 mm x 355 mm
Gewicht (netto) 7,5 kg
Gewicht (brutto) 10,7 kg
Dieses Gerät entspricht der Verordnung (EG) Nr. 1275/2008 und (EU) Nr. 801/2013 der Europäischen Kommission.
Stehen zu: < 0,5 W Aus: < 0,5 W
Durch die Energieverwaltungsfunktion wird das Gerät nach 20 Minuten automatisch in den Standby-Modus geschaltet.
Dieses Gerät ist ein Elektrogerät der Klasse II oder doppelt isoliert.

Pg 14 JBL TT350 Classic QSG Multi
Bedankt voor het kiezen van JBL
Al meer dan 75 jaar maakt JBL audioapparatuur van topklasse voor concerten, studio's, theaters en woningen over de
hele wereld. JBL is de vertrouwde keuze van toonaangevende artiesten en geluidstechnici.
De JBL TT350 is ontworpen om je de komende jaren te voorzien van betrouwbare weergave van vinyl, met een
uitzonderlijke muzikaliteit zodat je optimaal van je muziek kunt genieten.
Let op: de stylus is een draagbaar onderdeel dat voorzichtig moet worden behandeld. Na langdurig gebruik is
vervanging nodig. Als het beschadigd is, moet het worden vervangen om schade aan vinylplaten te voorkomen.
Dit is een gids voor het installeren en gebruiken van de TT350 en bevat informatie over de meer geavanceerde
functies.
In het onwaarschijnlijke geval dat er een storing optreedt of als je technische hulp nodig hebt, kun je contact
+44 1707 668012 of +1 888 691 4171. Of als je meer informatie over JBL-producten wilt, helpt ons netwerk van
dealers je graag verder. Meer informatie is ook te vinden op de JBL website op JBL.com.
Verpakkingsinhoud
JBL TT350 platenspeler
Draaiplateau
Rubber platenmat
Contragewicht
Headshell met gemonteerde MM-cartridge
2x scharnieren voor stofkap
Regio-specifieke netsnoeren
Snelstartgids
Veiligheids- en nalevingsdocument
Het apparaat plaatsen
Plaats de versterker op een vlakke, stevige ondergrond uit de buurt van direct zonlicht en warmte- of
vochtbronnen.
Plaats de TT350 niet op een eindversterker of een andere warmtebron.
Plaats geen andere onderdelen of voorwerpen op de platenspeler om schade aan de stofkap te voorkomen.
De normale werking van het apparaat kan worden beïnvloed door sterke elektromagnetische interferentie. Als dit
gebeurt, reset je het apparaat met de aan/uit-knop of verplaats je het apparaat naar een andere locatie.

Pg 15 JBL TT350 Classic QSG Multi
Montage
1. Plaats het plateau op de spindel. 2. Plaats de plateaumat op de schotel.
3. Monteer de headshell en cartridge (de cartridge
wordt geleverd met de headshell).
Draai aan de kraag aan de voorkant van de toonarm
om de fitting vaster of losser te maken.
4. Monteer het contragewicht.
Draai aan het contragewicht aan het uiteinde van de
toonarm om de positie aan te passen.
De cijfers moeten naar voren wijzen.
5. Monteer de scharnieren op de stofkap.
6. Steek de scharnieren in de scharnierbeugels aan de achterkant van de plint.

Pg 16 JBL TT350 Classic QSG Multi
Balanceer de toonarm
1. Om de toonarm te balanceren, eerst de headshell met cartridge monteren.
2. Zorg ervoor dat de toonarmhendel omlaag staat en dat Anti-Skate op nul (0) staat.
3. Plaats het contragewicht helemaal op het uiteinde van de toonarm.
4. Ontgrendel de toonarmvergrendeling.
Contragewicht
Inclusief oplegkrachtregelaar die
apart kan worden gedraaid.
Cartridge
Uiterlijk kan verschillen.
Toonarmvergrendeling
Headshell
Toonarmsteun
Toonarmhendel
Anti-Skate regelaar
5. Draai het contragewicht langzaam naar rechts zodat het naar achteren beweegt.
6. Als je het contragewicht draait, zul je een punt vinden waarop de arm en de cartridge naar boven komen.
Draai het contragewicht terug tot de arm niet meer stijgt of daalt - hij zou moeten zweven.
7. Als de toonarm zweeft, plaats je hem terug op de toonarmsteun en sluit je de toonarmvergrendeling.
8. Draai de oplegkrachtregelaar op het contragewicht naar 0bovenaan in het midden.
9. Draai nu het hele contragewicht naar links naar 2op de gewichtsregelaar. Je hebt nu een naalddruk van 2 gram
op de cartridge toegepast.
10. Zet de Anti-Skate regelaar op 2.
Opmerking: Andere cartridges vereisen een andere naalddruk. Controleer de documenten die bij andere cartridges
worden geleverd.

Pg 17 JBL TT350 Classic QSG Multi
De platenspeler aansluiten
Sluit de phono-uitgangen
aan op de phono-ingang
van je versterker.
Sluit de aardkabel aan
tussen de platenspeler en
je versterker.
Neem contact op met de
JBL-dealer als je versterker
geen Phono-ingang heeft.
Mogelijk heb je een aparte
Phono Stage nodig.
Specificaties
Model: JBL TT350
Materialen van behuizing: Natuurlijke walnoot gefineerd MDF met machinaal bewerkt aluminium voorpaneel
Materiaal draaiplateau: Gedempt gegoten aluminium
Materiaal toonarm: Aluminium
Eigenschappen toonarm: Verwijderbare headshell
Verstelbaar contragewicht
Verstelbare Anti-Skate
Verticale trackaanpassing
Gemonteerde cartridge: Audio Technica VM95E
Analoge uitgangen: 1x Stereo (RCA)-paar
Motortype: Directe aandrijving
Netspanning AC IN 100 V - 240 V, ~50-60 Hz
Maximaal stroomverbruik 36 W
Stand-by stroomverbruik <0,5 W
Max. bedrijfstemperatuur 45 °C
Afmetingen (inclusief voetjes
en gemonteerde stofkap):
6.0" H x 17.7" B x 14.0" D
(150 mm x 449 mm x 355 mm)
Gewicht (netto) 11.1 lbs. (7,5 kg)
Gewicht (bruto) 15.5 lbs. (10,7 kg)
Deze apparatuur voldoet aan de Europese Verordening (EG) nr. 1275/2008 en (EU) nr. 801/2013.
Standby: < 0,5 W Uit: < 0,5 W
De energiebeheerfunctie schakelt de apparatuur na 20 minuten automatisch in stand-bymodus.
Dit apparaat is een klasse II of dubbel geïsoleerd elektrisch apparaat.

Pg 18 JBL TT350 Classic QSG Multi
Grazie per aver scelto JBL
Da oltre 75 anni, JBL crea apparecchiature audio di prima classe per concerti, studi, teatri e case in tutto il mondo.
JBL è la scelta di fiducia dei migliori artisti di registrazione e ingegneri del suono.
Il JBL TT350 è progettato per offrirti una riproduzione in vinile affidabile per decenni a venire, il tutto con un'eccezionale
musicalità per ottenere il massimo dalla tua musica.
Si noti che lo stilo è un componente soggetto ad usura che richiede attenzione durante la manipolazione. Per un
utilizzo prolungato e duraturo, sarà necessario sostituirlo. Se danneggiato, sostituirlo per evitare di danneggiare i
dischi in vinile.
Questo manuale è una guida all'installazione e all'utilizzo del TT350 e contiene informazioni sulle sue funzioni più
avanzate.
Nell'improbabile eventualità di un guasto, o se si necessita di assistenza tecnica, contattare i nostri team di supporto
+1 888 691 4171. Oppure, se avete semplicemente bisogno di ulteriori informazioni sui prodotti JBL, la nostra rete di
rivenditori sarà lieta di aiutarvi. Ulteriori informazioni sono disponibili anche sul sito web JBL all'indirizzo JBL.com.
Contenuto della confezione
Giradischi JBL TT350
Piatto giradischi
Tappetino in gomma
Contrappeso
Portatestina con testina MM installata
2x cerniere per parapolvere
Cavo di alimentazione specifico per regione
Guida di avvio rapido
Documento sulla sicurezza e la conformità
Posizionamento dell’unità
Posizionare l'amplificatore su una superficie piana e solida, evitando la luce solare diretta e fonti di calore o
umidità.
Non posizionare il TT350 sopra un amplificatore di potenza o un'altra fonte di calore.
Non posizionare alcun altro componente o oggetto sopra il giradischi, in quanto si potrebbe danneggiare il
coperchio parapolvere.
Il normale funzionamento dell'unità può essere disturbato da forti interferenze elettromagnetiche. In questo caso,
è sufficiente ripristinare l'unità con il pulsante di accensione o spostare l'unità in un'altra posizione.

Pg 19 JBL TT350 Classic QSG Multi
Assemblaggio
1. Montare il piatto sul mandrino. 2. Posizionare il tappetino sul piatto.
3. Montare il portatestina e la testina (la testina viene
fornita montata sul portatestina).
Ruotare la ghiera sull'estremità anteriore del braccio
per serrare o allentare il raccordo.
4. Montare il contrappeso.
Ruotare il contrappeso all'estremità del braccio per
regolarne la posizione.
I numeri devono essere rivolti verso la parte anteriore.
5. Agganciare le cerniere al parapolvere.
6. Inserire le cerniere nelle staffe delle cerniere sul retro della base.

Pg 20 JBL TT350 Classic QSG Multi
Bilanciamento del braccio
1. Per bilanciare il braccio, innanzitutto montare il portatestina con la testina.
2. Assicurarsi che la leva alza-braccio sia abbassata e che l’anti-skate sia impostato su zero (0).
3. Montare il contrappeso a fine corsa sull'estremità del braccio.
4. Rilasciare il blocco del braccio.
Contrappeso
Include la ghiera di caricamento
che gira separatamente.
Testina
L'aspetto potrebbe
essere differente.
Blocca-braccio
Portatestina
Reggi-braccio
Leva di sollevamento braccio
Ghiera anti-skate
5. Ruotare lentamente il contrappeso in senso orario in modo che si sposti all'indietro.
6. Durante la rotazione del contrappeso, si troverà un punto in cui il braccio e la testina iniziano a sollevarsi.
Riportare il contrappeso nel punto in cui il braccio non si solleva o non si abbassa - dovrebbe fluttuare.
7. Con il braccio flottante, riposizionarlo sul reggi-braccio e chiudere il blocco del braccio.
8. Ruotare la ghiera di carico sul contrappeso per visualizzare zero 0in alto al centro.
9. A questo punto, ruotare l'intero contrappeso in senso antiorario fino a quando non mostra 2nella parte superiore
della ghiera di carico. È stata dunque applicata una forza di trazione di 2 grammi alla testina.
10. Impostare la ghiera anti-skate su 2.
Nota: Le altre testine richiedono una forza di trazione diversa. Controllare la documentazione fornita con eventuali
altre testine utilizzate.
Table of contents
Languages:
Other Harman Turntable manuals