HARO Skwad LT Configuration guide

Skwad LT
Owner’s Manual Supplement
WARNING:
Read this supplement and your
Haro Bikes Owner’s Manual.
Both contain important safety information.
Keep both for future reference.
English
1230 Avenida Chelsea Vista, CA 92081 1.800.289.4276 harobikes.com

Skwad LT
Owner’s Manual
Supplement
1230 Avenida Chelsea Vista, CA 92081 1.800.289.4276 harobikes.com

2
Table of Contents
Introduction..............................................................................................................3
Skwad LT App..........................................................................................................3
Using this manual....................................................................................................4
Anatomy of your bike...............................................................................................4
Tools and recommended torque values...................................................................5
Adjusting for comfort and safety .............................................................................6
Ensure all hardware is tightened properly ..............................................................8
Wheel Removal and Installation..............................................................................10
Battery information ..................................................................................................12
Removing and installing the battery ........................................................................13
Charging..................................................................................................................13
Operation.................................................................................................................16
Controls and operation ............................................................................................16
Riding range ............................................................................................................19
Parking, storage, and transport ...............................................................................19
Carrying loads safely...............................................................................................20
Maintenance............................................................................................................21
Safety checklists......................................................................................................22
Checking brakes & motor cutoff switches................................................................25
Tire and wheel care .................................................................................................26
Handlebar twist test.................................................................................................27
Guard against rust, corrosion, and water damage ..................................................27
Error detection.........................................................................................................28
Ride as safely as possible.......................................................................................29
Age and ability requirements...................................................................................29
Safety check before each ride.................................................................................30
Wear a helmet and appropriate safety gear ............................................................32
Limited warranty and other terms............................................................................32
Warranty ..................................................................................................................32
3
Introduction
Thank you for purchasing the SKWAD LT from Haro Bikes! We take pride in bringing you
a quality product that will offer years of enjoyment. Please read and understand this entire
manual fully before assembling and riding your bike; the latest version of your manual is
available at www.harobikes.com/manual. SAVE THESE INSTRUCTIONS, as they have
important safety information about hazards such as risk of re, electric shock, injury and/or
death.
Haro Bikes cares about your safety and the safety of those around you. We want you to
thoroughly enjoy your amazing ebike safely and reliably for many years to come.
Please read, understand, and follow all safety notices, cautions, and warnings in this
manual and for any accessories or attachments you add to make your ebike perfect for you.
If you’re not sure you have the skills, experience, and special tools required
for assembly and maintenance, get help from a local, certied, and reputable
bike mechanic. Be sure to check all hardware for correct torque (see the “Tools and
recommended torque values” section) during assembly. Before each ride, follow the
recommendations in the “Safety checklists” section. Finally, take care of your new SKWAD
LT by following the guidelines in “Recommended service intervals” section.
WE ARE HERE TO HELP! If you have questions after reading this manual, please contact
289-4276 or 760-599-0544. Thanks for riding Haro!
WARNING: DO NOT alter or modify anything in your ebike’s electrical system,
battery, digital controls, physical components, or drive train. Doing so will void your
warranty. Any such modications may result in damage to your bike, other property,
or injury or death to you or others.
WARNING: This ebike is not to be operated by anyone under the age of 16.
Children under the age of 16 may lack the necessary judgment and skill to safely
operate the ebike, potentially resulting in damage to the bike, damage to other
property, serious injury, and/or death. Please also check your local laws, which may
require a higher age.
Skwad LT App
1. Download the Skwad LT App at
2. Use the app to connect your Skwad LT bike to the app.
Features
The SKWAD LT App offers a wide array of features, including weather notication, battery
capacity, bike status, diagnostics, assistance mode, navigation, home page, and your
personal prole. The app will collect information about your total mileage, average speed,
and riding history record. The navigation feature includes a map function, route suggestion,
estimated time of arrival (ETA), and will calculate for battery capacity in regards to selected
route to make sure you have enough battery capacity for the ride.

4
Using this manual
This manual contains critical details about how to safely operate and maintain your SKWAD
LT. Read it carefully and familiarize yourself with your ebike before riding it. Pay special
attention to safety messages shown here.
NOTICE: A “notice” is important information that can help you avoid bike/property damage
or extend the life of parts and the bike.
CAUTION: A “caution” statement indicates a hazardous situation that, if not
avoided, could result in minor or moderate injury or property damage.
WARNING: A “warning” statement indicates a hazardous situation that, if not
avoided, could result in death, serious injury, or property damage.
DANGER: A “danger” statement indicates a hazardous situation that, if not
avoided, will result in death, serious injury, or property damage.
Riding any bike or other vehicle always involves some risk of serious injury or death. Your
safety depends on many factors including your bike knowledge, your bike’s maintenance,
foreseeable riding conditions, etc. There are also factors we cannot control or anticipate in
every situation or condition while riding. This manual makes no representations about the
safe use of bikes under all conditions. If you have any questions you should contact a Haro
authorized dealer immediately.
Assembly and rst adjustment of your bike from Haro Bikes requires special tools and
skills. We recommend that you have this done by a certied, reputable bike mechanic.
WARNING: Incorrect assembly, adjustments, maintenance, or use of your ebike can
cause component or performance failure, loss of control, serious injury, or death.
Even if you’re an experienced bike rider, you must read and understand the entire
manual and any documentation provided for subcomponents or accessories before
riding. If you are not sure you have the experience, skills, and tools to correctly
perform adjustment steps in the manual, consult a local, certied, reputable bike
mechanic.
Keep this manual and any other documents that came with your SKWAD LT. All content in
this manual is subject to change or withdrawal without notice. Visit www.harobikes.com/
manual to view and download the latest version. Haro Bikes makes every effort to ensure
the accuracy of its documentation and assumes no responsibility or liability if any errors or
inaccuracies appear within.
Anatomy of your bike
Battery
Charging Port Brake Lever
Handlebar
Display
Stem
Headlight
Fork
Tire Valve
Hub
Tire
Disc Brake Rotor
Rim
Chain
Sprocket
Pedal
Crank
Disc Brake Caliper
Disc Brake Caliper
Hub Motor
Cassette
Kickstand
Rear Derailleur
Tail Light
Seat
Grip

5
Tools and recommended torque values
The tool sizing listed below is a general guide, but it is possible that the head of a particular
bolt on your bike may vary, requiring a different tool (e.g., a 4 mm Allen wrench instead of a
5 mm Allen wrench). If so, use whatever tool ts the bolt head. Such differences will not
affect the recommended torque for that piece of hardware. If you are installing accessories
from Haro Bikes, any necessary instructions, important safety information, and torque
specications will come with your accessory and/or be available online at www.harobikes.com.
Tool Torque
Handlebar area Stem clamp bolts (two bolts that secure the
stem to the fork steerer tube)
6 mm Allen 20 N.m
Stem faceplate bolts (four bolts) 6 mm Allen 20 N.m
Headlight angle adjustment bolt 4 mm Allen 8 N.m
Locking grip adjustment bolt 2.5 mm Allen 8 N.m
Front fender mounting bolt 5 mm Allen 5 N.m
Front fender mounting arm eyelet bolts 4 mm Allen 6 N.m
Brake lever clamp bolts 4 mm Allen 8 N.m
Shifter clamp bolt 4 mm Allen 5 N.m
Brake area Brake area caliper to frame mounting bolt
(rear wheel)
5 mm Allen 6-8 N.m
Brake caliper mounting bolt (front) 5 mm Allen 6-8 N.m
Brake pads to calipers Needle-nose pliers 90° bend at
tip of cotter
pin
Brake rotor to hub T-25 Torx bit 7 N.m
Rear wheel and
dropout area
Rear axle nut
18 mm wrench
40 N.m
Derailleur mounting bolt 5 mm Allen 10 N.m
Derailleur hanger mounting bolt Built-in n/a
Rear fender mounting arm eyelet bolt 4 mm Allen 6 N.m
Derailleur/shift cable clamp bolt 5 mm Allen 6 N.m
Taillight mounting bolt 8 mm Allen 5 N.m
Kickstand mounting bolt 4 mm Allen 6 N.m
Bottom bracket,
crank, and seat
area
Pedal into crank arm 15 mm pedal wrench 35 N.m
Crank arm removal CCP-22 Park Tool n/a
Freewheel removal FR-1.3 Park Tool n/a
Crank arm bolt into bottom bracket spindle 8 mm Allen 35 N.m
Chainring bolts 5 mm Allen and
chainring nut wrench
10-14 N.m
Crank chainring guard 5 mm Allen 10-14 N.m
Seat angle bolts 5 mm Allen 10 N.m
Bottom bracket and cups BBT-22 Park Tool 60 N.m
6
Adjusting for comfort and safety
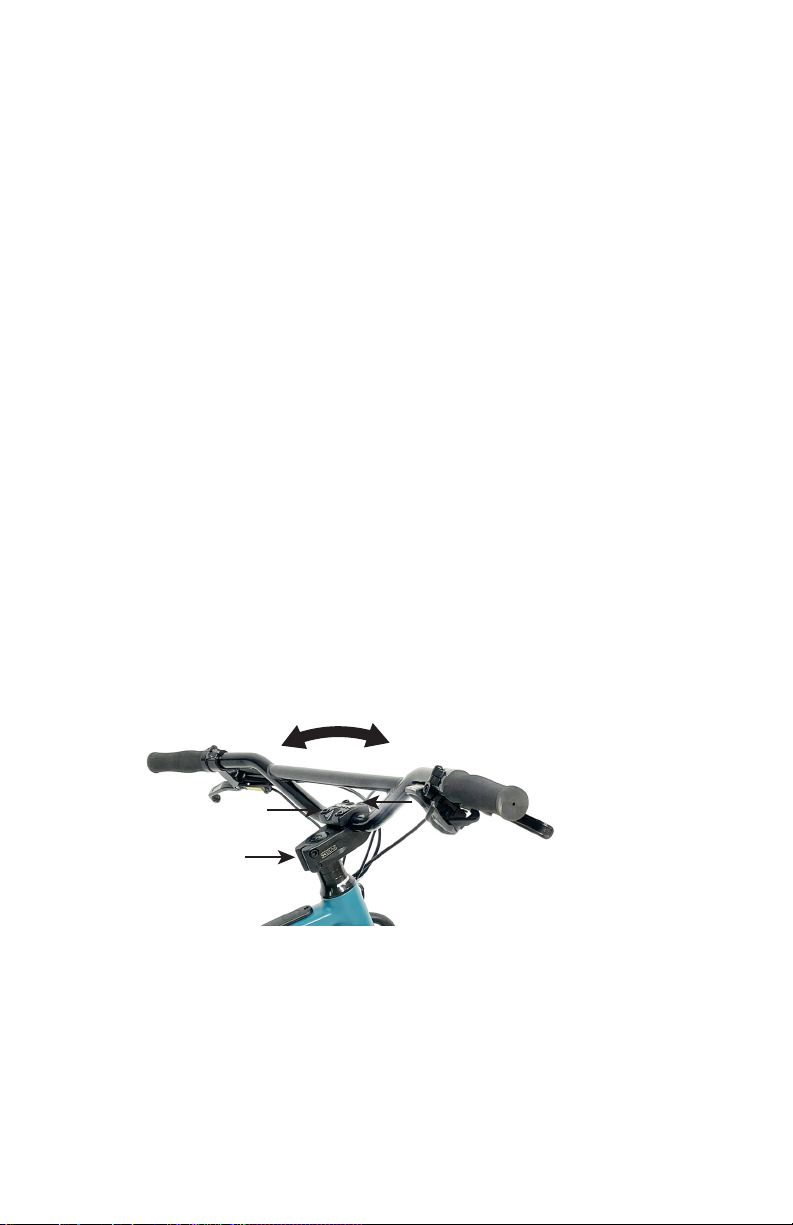
Adjusting the handlebar angle
Most riders will feel comfortable with the handlebar angled so that it is roughly parallel
with the front fork, as shown in the center position in the illustration below. Once you sit
on the bike, you may decide that you would like the handlebar to be angled slightly closer
to the seat. To change the angle, loosen the stem faceplate bolts just enough to allow
the handlebar to pivot, and position it as you prefer. Re-tighten the stem faceplate bolts
according to the value listed in the “Tools and recommended torque values” section.
Sit on the bike and test the t and positioning, making sure the handlebar can turn freely
without touching your body. Be sure the gap between the faceplate and stem is even and
torque all faceplate bolts according to the value listed in the “Tools and recommended
torque values” section. While seated you should be able to put your feet at on the ground.
If you cannot reach the ground with your feet at and stable Haro Bikes recommends you
do not operate this bike.
Fine-tune the brake lever positioning
The angle of the brake levers can be adjusted for the most comfortable hand position
possible. For most riders, this will allow them to rest two or three ngers comfortably on
each brake lever while keeping their wrists in a neutral position. To adjust the angle, follow
these steps:
1. Loosen the brake lever clamp bolt using the appropriate Allen wrench. See illustration on
below for bolt location. Ensure all hardware is tightened properly according to the values in
the “Tools and recommended torque values” section.
2. Adjust the angle of the brake lever so it’s comfortable for the rider.
3. Re-tighten the brake lever clamp bolt according to the value listed in the “Tools and
recommended torque values” section.
TIP! The locking grip adjustment bolts are located on both ends of each grip. If you need
to tighten, adjust or replace them, follow the value listed in the “Tools and recommended
torque values” section.
Stem pinch bolts
Stem top plate bolts

7
Adjusting the saddle
WARNING: Correct t is an essential element of bicycling safety, performance and
comfort. Making the adjustments to your bicycle which result in correct t for your
body and riding conditions requires experience, skill and special tools. Always have
your dealer make the adjustments on your bicycle; or, if you have the experience,
skill and tools, have your dealer check your work before riding.
WARNING: If your bicycle does not t properly, you may lose control and fall. If your
new bike doesn’t t, ask your dealer to exchange it before you ride it.
Saddle position
Correct saddle adjustment is an important factor in getting the most performance and
comfort from your bicycle. If the saddle position is not comfortable for you, see your dealer.
The saddle can be adjusted in three directions:
1. Up and down (saddle height) adjustment. To check for
correct saddle height:
• Sit on the saddle;
• Place one heel on a pedal;
• Rotate the crank until the pedal with your heel on it
is in the down position and the crank arm is parallel
to the seat tube. If your leg is not completely straight,
your saddle height needs to be adjusted. Use the
instructions below for “Adjusting the quick release
mechanism” to adjust your saddle height.
If your hips must rock for the heel to reach the pedal, the saddle is
too high. If your leg is bent at the knee with your heel on the pedal,
the saddle is too low. Once the saddle is at the correct height, make
sure that the seatpost does not project from the frame beyond its
“Minimum Insertion” or “Maximum Extension” mark.
WARNING: If your seat post projects from the frame beyond
the Minimum Insertion or Maximum Extension mark, the seat
post may break, which could cause you to lose control and
fall. This can result in serious injury and/or death.
2. Front and back (fore-and-aft) adjustment. The saddle can be
adjusted forward or back to help you get the optimal position on
the bike. Ask your dealer to set the saddle for your optimal riding
position and to show you how to make this adjustment.
3. Saddle angle adjustment. Most people prefer a horizontal saddle; but some riders like
the saddle nose angled up or down just a little. Your dealer can adjust saddle angle or
teach you how to do it. If you need to tighten, adjust or replace the bolt(s), follow the
value listed in the “Tools and recommended torque values” section.
Adjusting the quick release mechanism
The seat post on your Haro Skwad LT is held in place by the force of the quick-release cam
pushing against one side of seat clamp and pulling the tension-adjusting nut, by way of the
skewer, against the other side. The amount of clamping force is controlled by the tension
adjusting nut.
Turning the tension-adjusting nut clockwise while keeping the cam lever from rotating
increases clamping force; turning it counterclockwise while keeping the cam lever from
rotating reduces clamping force. Less than half a turn of the tension adjusting nut can
Minimum
insertion mark
Seat height

8
make the difference between safe clamping force and unsafe clamping force. It is crucial
you ensure the quick release mechanism is properly secured and positioned securely and
evenly against the seat clamp. Failure to do so could result in personal harm.
WARNING: After any saddle adjustment, be sure that the saddle adjusting
mechanism is properly tightened before riding. A loose saddle clamp or seat post
binder can cause damage to the seat post, or can cause you to lose control and fall.
A correctly tightened saddle adjusting mechanism will allow no saddle movement in
any direction. Periodically check to make sure that the saddle adjusting mechanism
is properly tightened.
If, in spite of carefully adjusting the saddle height, tilt and fore-and-aft position, your saddle
is still uncomfortable, you may need a different saddle design. Saddles, like people, come
in many different shapes, sizes, and resilience. Your dealer can help you select a saddle
which, when correctly adjusted for your body and riding style, will be comfortable.
WARNING: Some people have claimed that extended riding with a saddle which is
incorrectly adjusted or which does not support your pelvic area correctly can cause
short-term or long-term injury to nerves and blood vessels, or even impotence. If
your saddle causes you pain, numbness or other discomfort, listen to your body and
stop riding until you see your dealer about saddle adjustment or a different saddle.
Ensure all hardware is tightened properly
DANGER: A brake lever that can touch the handlebar grip when squeezed can
result in the brake caliper not pressing the pads into the brake rotor fully or at all,
which means that the brake will not function properly or at all. Not being able to
bring the bike to a complete stop puts the rider at a high risk of serious injury or
death. Always make sure that squeezing the brake lever does not cause it to touch
the handlebar grip. Also make sure that a squeeze of the brake lever to halfway
between the lever’s neutral position and the handlebar grip results in the brake
caliper pressing the brake pads against the brake rotor.
If you do not own a torque wrench or you do not have the skills to check the tightness of your
hardware, consult a local, certied, reputable bike mechanic for help. Ensure all hardware
is tightened properly according to the values in the “Tools and recommended torque values”
section. This is a critical safety step that you must not skip. See the illustration below for
additional information about adjusting brake lever clearance from the handlebar grip. If you
are not sure you have the experience, skills, and tools to correctly perform adjustment
steps in the manual, consult a local, certied, reputable bike mechanic.

9
Brake lever
Brake lever engaged
Brake lever engaged
Proper clearance from grip when engaged
Improper clearance from grip. Brake lever should never
touch grip when engaged
Fine read adjustor. Use a 2 mm
Allen wrench to adjust the reach of
the lever depending on the size of
your hands.
Brake lever clamp bolt
Locking grip
adjustment bolts
Clearance from grip is adjustable when disengaged
Adjusting the brake reach
10
Wheel Removal and Installation
You may need to remove and reinstall the front or rear wheel for service or to replace the
tube and tire. Haro always recommends seeing a local retailer for advice and repair, when
needed.
Wheel removal
1. If possible, begin by mounting your bike in a repair stand. If no stand is available, you
can loosen the wheel and then lift the bicycle by hand to remove the wheel. Once the
wheel is removed, you can set the bike on the left side (non-drive side).
NOTICE: Placing the bike on the non-drive side will keep the chain from getting
dirty and prevent any possible drivetrain damage. Ensure the rear brake rotor is not
contacting anything that could cause it to get bent or damaged. Never stand the
bike upright without the rear wheel in place, as this will damage the rear derailleur
and brake rotor.
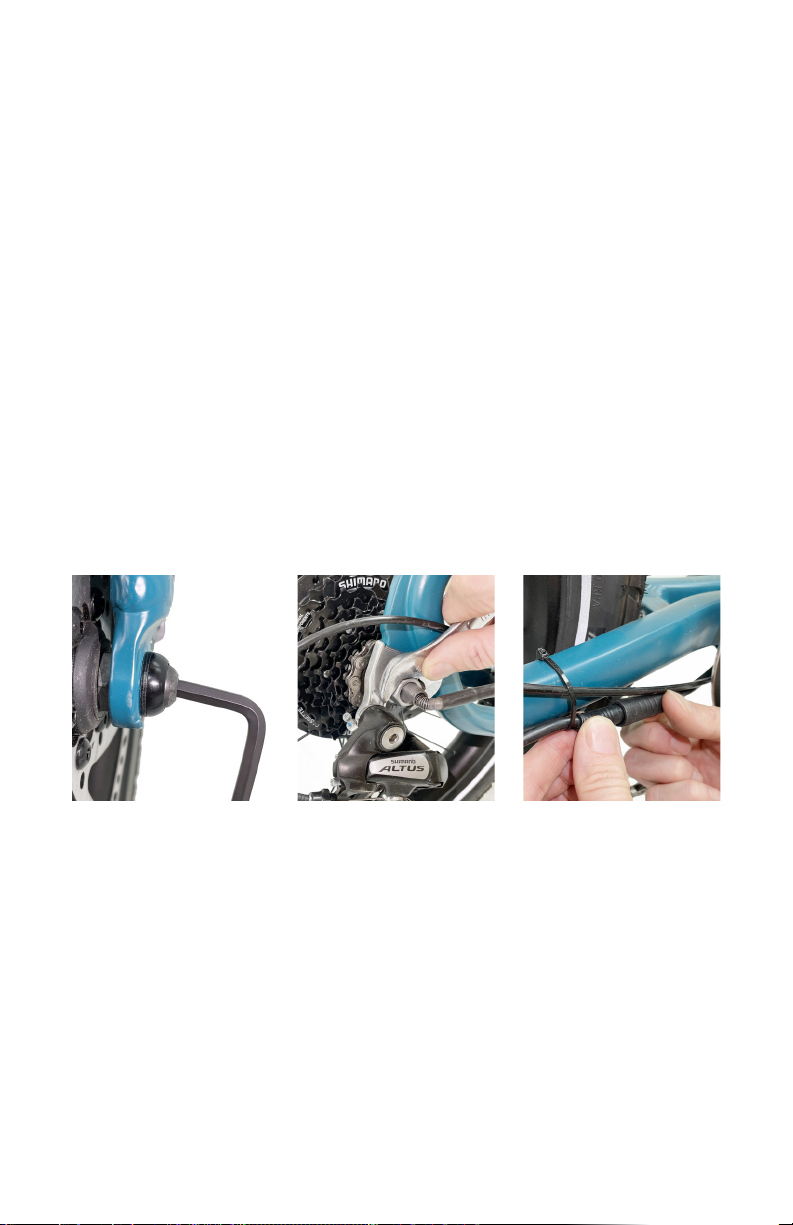
2. For front wheels: Use a 5 mm Allen hex to turn the axle bolts on the front wheel
counterclockwise to loosen them. Note that the axle bolts may have washers built in or
separate washers.
For rear wheels: You must rst disconnect the motor from the torque sensor system
found alongside the drive-side chain stay. Pull the two ends of the connector shown
in the image below. Make sure to shift the chain into the smallest cog on the rear
cassette. Use an 18 mm box wrench to turn the two axle nuts on each side of the wheel
counterclockwise. Loosen them a few turns on each side until the wheel can slip out of
the dropouts. Note that the axle nuts may have washers built in or separate washers.
3. Pull the wheel away from the bike, or lift the frame up and away from the wheel. For
rear wheels, pull back on the rear derailleur as you remove the wheel to release the
chain from the cassette.
Wheel installation
1. If the washer has teeth or knurling, these face the dropout to help secure the wheel. Be
sure to lubricate the axle threads with oil or grease.
2. It is easiest to install the front wheel when the bike is standing. This lets you push down
to ensure that the axle is fully inserted in both sides of the fork so that the axle bolts can
fully engage the dropouts.
3. Check that the axle nuts/bolts are securely threaded into the hubs axle by
approximately 5 mm, allowing for enough space for the wheel to slide into the forks
Loosen the front wheel
axle bolts
Loosen the rear wheel
axle nuts
Disconnect the motor at
the chain stay

11
dropouts. Check that nothing is obscuring the brake rotor
from inserting between the brake caliper pads.
WARNING: Never squeeze the brake lever when
the rotor is not inserted in the caliper. If you do, you
will need a pad spreader tool, which is available at
your local retailer. Do not pry them open with any
other tool or you can damage the brake pads, reduce
braking effectiveness and cause a crash, serious
injury, and/or death.
4. For front wheels: Install the front wheel between the
dropouts with the brake rotor on the non-drive side. Make
sure the wheel is even and fully contacts the dropouts.
Check that the washers go outside the dropouts. Use
a torque wrench with a 5 mm hex bit to tighten the axle
bolts to 20 N.m.
For rear wheels: Pull back on the rear derailleur to provide more chain clearance.
Place the smallest cassette cog on the rear wheel between the upper and lower
sections of the chain. Guide the wheel between the brake pads and make sure the
chain is on the smallest cog. Make sure the wheel is even and fully contacts the
dropouts Use a torque wrench with an 18 mm socket to tighten the axle nuts to
30 N.m.
5. Check the wheel centering in the fork by spinning the wheel. The wheel should be
centered between the dropouts. Inspect the brake alignment to make sure the brakes
are not rubbing, which can indicate the wheel is not centered. To adjust the wheel,
loosen the axle nuts/bolts slightly, move the wheel either left or right until the wheel
appears centered, then torque the axle nuts/bolts fully to the recommended torque
listed in the previous step.
WARNING: If the brake pads are not adequately centered over the rotor you may
need to adjust the brakes. If further attempts to align the wheel fail to adequately
center it in the frame, either the frame or wheel may be misaligned. Seek a
professional mechanic for help. Riding with improperly installed/aligned brakes is a
safety hazard and can lead to serious injury and/or death.
6. Double-check that the brake is fully functioning with proper stopping power prior to any
riding.
7. For rear wheels, make sure to reconnect the motor to the torque sensor system by
aligning the arrows and pins, then press the two ends of the connector directly together.
Insert the rotor between the
brake pads

12
Battery information
The battery that comes with your SKWAD LT is a state-of-the-art, lithium-ion battery
that’s designed to give you years of power with proper care and use. Follow the
recommendations here for the best possible performance.
• The battery should be fully recharged after each use. That way, you’ll get the maximum
range on your next ride and reduce the chance that you’ll over-discharge the battery, which
can reduce its lifespan. There is no memory effect on this type of battery, so charging after
short rides will not cause damage.
• Charging the battery after a ride generally takes 3 to 6 hours (see the “Estimated
charging time” section). In rare cases, charging may take longer to allow the battery
management system to balance the battery, particularly when the bike is new, after long
periods of storage, or if the battery has been completely depleted.
DANGER: RISK OF FIRE or ELECTRIC SHOCK. Never open the battery housing,
which will void the warranty and can result in battery damage. It can also expose
you to caustic substances and electrical shock or it could create a re hazard, which
can lead to serious injury or death.
WARNING: Using aftermarket battery accessories or products that have not been
tested by Haro Bikes for safety and compatibility may void your warranty, create an
unsafe riding condition, result in bike/property damage, or cause serious injury or
death. If you use products not tested and recommended by Haro Bikes, you do so
at your own risk.
WARNING: Never immerse or submerge the battery (including the battery mount) in
water or liquid, which can cause damage, serious injury, or death.
WARNING: RISK OF FIRE or ELECTRIC SHOCK. Using a damaged battery or
charger can create additional bike damage or a re hazard. Stop using your battery
and charger and contact Haro Bikes immediately if any of the following occur: (1)
Your charger’s exible power cord or output cable or any of the electrical cables on
your bike is frayed, has broken insulation, or any other signs of damage, (2) Your
battery or charger is physically damaged, non-functional, or performing abnormally,
(3) Your battery or charger experienced a signicant impact from a fall, crash, or
shipping damage, with or without obvious signs of damage, or (4) Your charger
becomes too hot to touch (it’s designed to get warm with normal use), makes an
unusual smell, or shows other signs of overheating. Store any damaged battery or
charger in a safe location and, as soon as possible, recycle or otherwise dispose
of it according to local rules. Contact Haro Bikes Product Services if you have any
questions or to purchase a compatible replacement battery or charger.
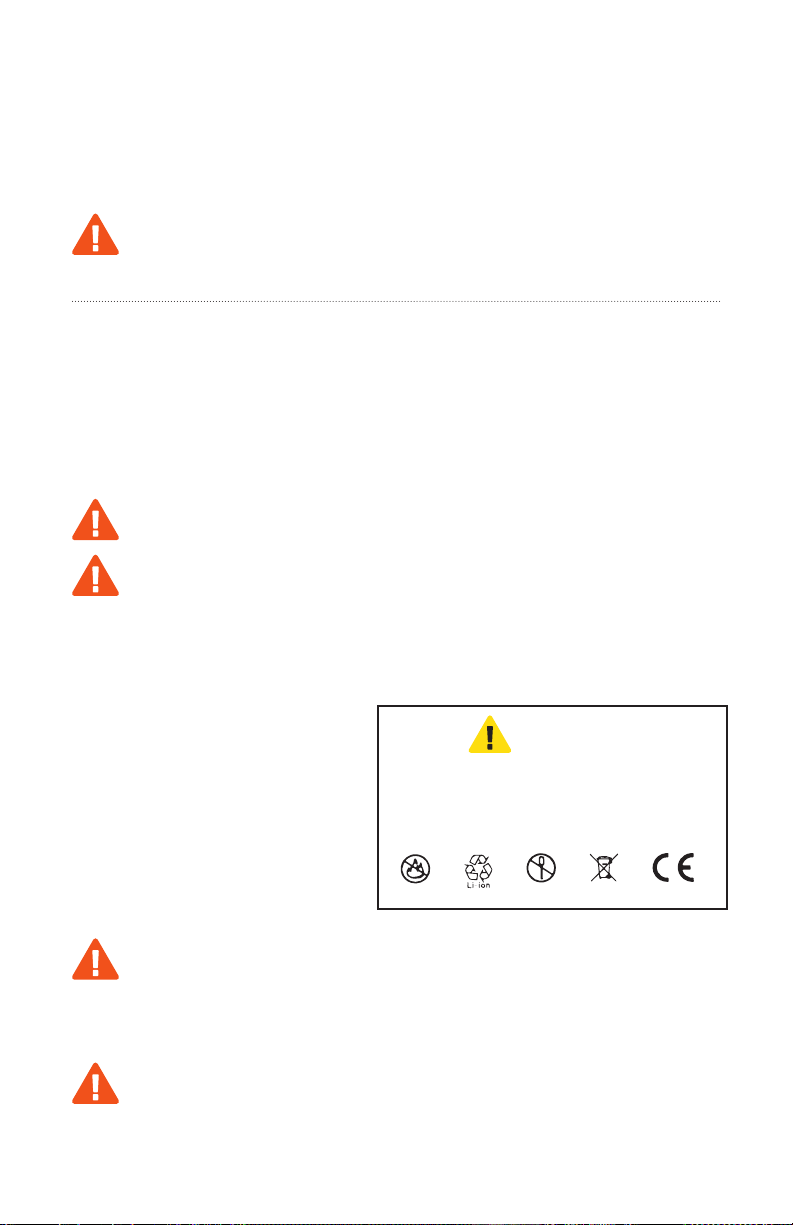
NOTICE: Always follow any safety information attached to the battery or charger. A sample
label for the battery that shipped with your bike is shown on the next page, although some
details may differ by manufacturing location.
NOTICE: Failure to follow the battery-charging best practices outlined here and in the
following sections could result in unnecessary wear to the charging components, battery,
and/or charger, and could lead to an under-performing or non-functional battery. Batteries
damaged due to improper care will not be replaced under warranty.
13
Removing and installing the battery
You must charge your battery on the bike. The Skwad LT comes equipped with a “in tube”
battery, which is not designed to be serviceable by the customer. If you need to remove
your battery from your bicycle for service, please see your local Haro dealer for assistance.
NOTICE: Do not remove the battery from the bicycle. Attempting to remove or removing the
battery may result in voiding your warranty.
WARNING: Inappropriate use including manipulation of the electric management
system poses a risk of electric shock or re.
Charging
Before you charge
Before you charge your battery, make sure to rst check the battery, charger, and electrical
cables for signs of damage. Store and use the charger indoors in a safe place—away from
children, direct sunlight, dirt, debris, liquids, tripping hazards (including electrical cords),
or any materials that could ignite in the unlikely event of a charger or battery malfunction.
Position the charger and battery where they’re not at risk for falls or other impacts. Always
follow the additional instruction contained on the label of the battery charger.
WARNING: RISK OF FIRE or ELECTRIC SHOCK. Letting the charger’s plug
contact metal objects could cause a power discharge (a spark), which could injure
you or create a re hazard.
WARNING: RISK OF FIRE or ELECTRIC SHOCK. Letting a battery charge
unattended increases the risk that a charging problem will go undetected and lead
to component damage or a re hazard. Always charge your battery where you can
monitor it. Your battery needs to charge at room temperature or a bit cooler (10°C to
25°C (50°F to 77°F)). It generates heat while charging, but it’s designed to air-cool;
keep it uncovered and the lights facing upwards on a at, stable, hard surface.
NOTICE: Charging your battery in
excessively hot conditions or interfering
with its ability to air-cool can damage
your battery or charger. Always charge
your battery at room temperature: 10°C
to 25°C (50°F to 77°F). Charging your
battery at low temperatures may slow
charging or prevent a full charge. Keep
the battery and charger uncovered, make
sure the charger is on a hard, at, stable
surface, and use the charger right-side-
up (with charging lights facing upwards).
WARNING: RISK OF FIRE or ELECTRIC SHOCK. This product must be grounded.
If it should malfunction and break down, grounding provides a path of least
resistance for electric current to reduce the risk of electric shock. This product is
equipped with a cord having an equipment grounding connector and a grounding
plug. The plug must be plugged into an outlet that is properly installed and
grounded in accordance with all local codes ordinances.
WARNING: RISK OF FIRE or ELECTRIC SHOCK. Improper connection of the
equipment grounding connector is able to result in a risk of electric shock. Check
with a qualied electrician if you are in doubt as to whether the product is properly
grounded. Do not modify the plug provided with the product - if it will not t in the
outlet, have a proper outlet installed by a qualied electrician.
Do not connect the positive and negative terminals of the battery.
Do not expose the battery to high temperature such as heating or in strong sunlight.
Do not submerge the battery in liquid of any kind and avoid drenching with rain.
Do not disassemble the battery without professional guidance.
Keep the battery in the cool and dry place and charge it for two hours every two
months if the battery is stored for a long time.
Use specied charger only.
Do not dispose of the battery in household waste and return to supplier or authorized
recycle base if the battery is out of use.
NOTICE

14
Charging procedure
To charge your battery, mind the advice in “Before you charge” on the previous page and
then follow these steps.
1. Ensure the battery power is off. Push the power button on the controller until the screen
goes blank.
2. Open the rubber cover on the charging port of the battery, located on the top of the
down tube (see image below) near the bottom bracket.
3. Connect the DC output plug from the charger (round barrel connector) to the charging
port of the battery.
4. Connect the charger input plug (120-volt plug) to the power outlet. Charging should
initiate and will be indicated by the LED charger light turning red. When charging is
complete, the indicator light will turn green.
5. Once fully charged, indicated by the charging indicator light turning green, unplug the
charger from the wall outlet rst and then remove the DC output plug (round barrel
connector) from the battery charging port. Be sure to pull gently on the plugs, not on the
cables themselves.
NOTICE: The charger is designed to stop charging automatically when the battery is full.
Nevertheless, leaving your battery charging longer than necessary can cause needless
wear. We recommend you remove the charger from the battery within one hour of the green
light indicating a complete charge. Store the charger carefully, making sure its plug does
not come in contact with liquids, dirt, debris, or metal objects, which can damage the plug
and interfere with future operation.
TIP! We recommend you follow these steps when plugging in and unplugging your charger.
To plug in your charger:
1. Start with the charger unplugged from both the power outlet and battery.
2. Plug the charger into the battery.
3. Plug the charger into the power outlet.
To unplug your charger:
1. Start with charger plugged into both the power outlet and battery.
2. Unplug the charger from the power outlet.
3. Unplug the charger from the battery.
WARNING: RISK OF FIRE or ELECTRIC SHOCK. Charging your battery with a
charger other than one supplied by Haro Bikes and designed for your specic bike’s
serial number can cause damage to your bike’s electrical system or create a re
hazard. Only use a battery charger designed for your bike and supplied by Haro
Bikes.
Charging
Port

15
Estimated charging time
The time the charger takes to fully charge the battery depends on distance traveled, riding
characteristics, terrain, payload, battery age, and other factors. The table below provides a
rough estimate of charge time based on battery capacity.
NOTICE: The battery may take longer to charge when fully depleted, when very new,
and after 3–5 years of regular use. If your battery doesn’t seem to be charging normally,
is taking longer to charge than expected, or you’re experiencing substantial reduction in
and/or give us a call on the phone 1-800-289-4276 or 760-599-0544.
Battery Capacity Recharge time
16% ~1 hour
32% ~2 hours
48% ~3 hours
64% ~4 hours
80% ~5 hours
100% ~6 hours
Long-term battery storage
If storing your bike for longer than two weeks at a time, follow the recommendations below
to maintain the health and longevity of your battery.
• Power off the battery and keep the battery installed on the bike for storage.
• Store the battery in a dry, climate controlled, indoor location between 10°C to 25°C (50°F
to 77°F).
• We recommend that you store your battery at approximately 40-75% charged. Check the
battery’s charge level monthly. If necessary, charge the battery to about 40-75% charged.
• Storing your battery for long periods at full charge can cause range decline over time.
• Storing your battery for long periods at very little or no charge can cause permanent
range decline or a non-functional battery.
NOTICE: Incorrect storage of your battery can result in a damaged or non-functional
battery. Follow the above recommendations to reduce such risk.
CAUTION: Always charge your battery in a clean, clear, dry and safe space, away
from direct sunlight. Do not cover or leave unattended. Never charge for more than
8 hours at a time.
16
Operation
How the electrical system works
Your SKWAD LT is equipped with a pedal assist
system (PAS) to use power assistance from the
motor to propel the bike forwards.
How Pedal Assist works
Engaging pedal assist while pedaling will call
up assistance from the motor to help propel
the bike forwards. Pedal assist uses a torque
sensor built into the drivetrain of the bike. The
torque sensor detects when you pedal and
signals the electric motor to provide the level
of pedal assistance (0-3) you have selected.
When at a stop, be careful not to put pressure on the pedals or the bike will move forward.
To reduce this risk, always keep at least one hand ready to squeeze the brake lever to cut
off power to the motor. When you dismount, power off the bike before moving it.
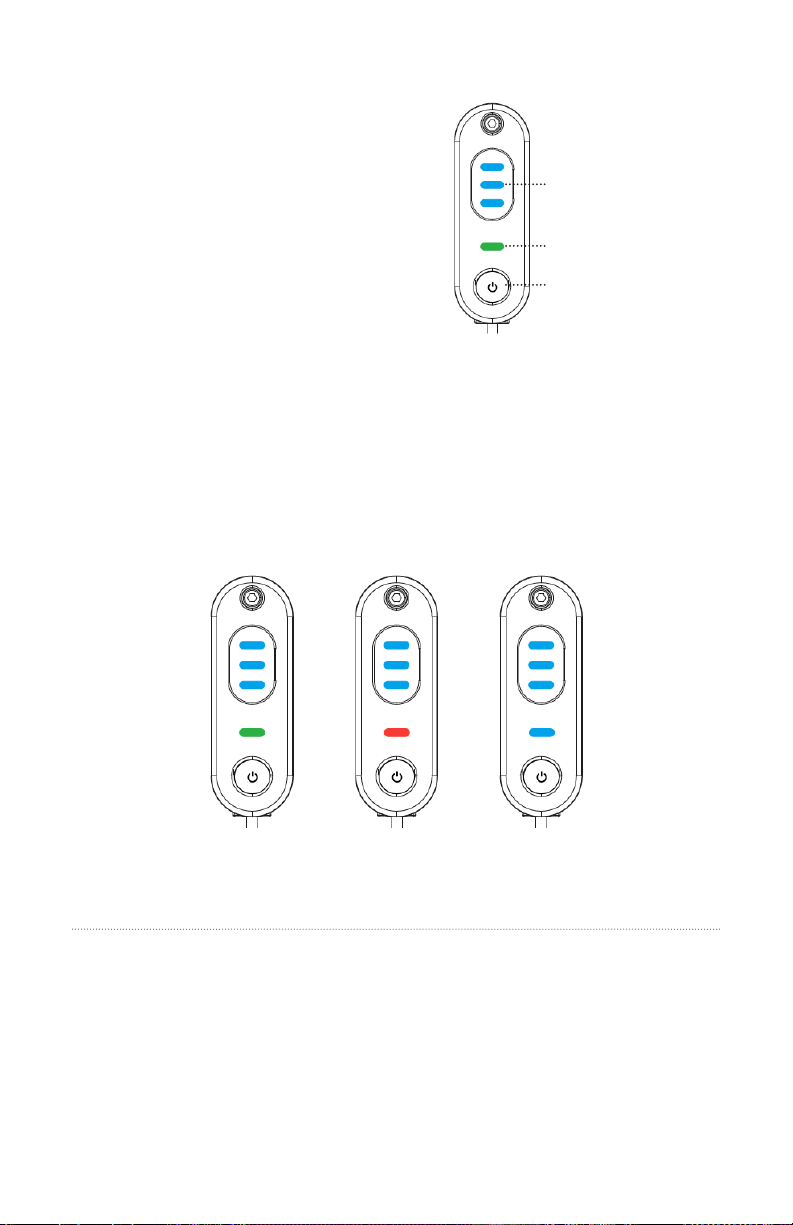
How the Display works
The display or “control panel” is on the top tube of the bike. Each area of the display is
multi-functional. See the illustration above.
Display modes
It has three different modes: Normal mode, Error mode, and BlueTooth mode. To toggle
between these modes, quickly press the power/function button.
Controls and operation
Start-up procedure
After you have read this manual, your bike has been assembled according to the assembly
instructions, all components are secured correctly, and you are wearing proper safety gear,
follow the steps below to power on the bike and select a pedal assist level.
Normal mode Error mode BlueTooth mode
Battery capacity and
pedal assistance level
Status and mode indicator
Power button and
function key

17
Powering On:
Press and hold the power button for one second
to turn the bike on. The green LED will illuminate
to indicate the system is running without any
errors.
Powering Off:
Press and hold the power button for more than
two seconds to turn the bike off. The LED will no
longer be illuminated.
Selecting Pedal Assistance
With the bike powered on, press the power
button quickly for no more than a half of a
second to enter “Adjustment” mode. Continue
to press quickly to toggle between the desired
amount of pedal assistance. There are four
modes of assistance: OFF, ECO, TOUR, and
SPORT. Once your desired level of assistance is
selected, simply wait 3 seconds and the control panel will return to “Normal” mode.
Level 0 provides no pedal assistance, level 1 provides the lowest amount of pedal
assistance, and level 3 provides the highest amount. Start in PAS level 0 or 1 and increase
PAS levels one at a time as you get comfortable.
WARNING: Engaging the pedal assist feature, especially at a high setting, will
cause acceleration that may be greater than expected, especially for relatively new
riders, and that can cause loss of control, serious injury, or death. To reduce risk,
always start at PAS level 0 or 1.
First ride
Begin riding carefully. With the proper safety gear you may now operate your bike. Begin by
pedaling on at ground, clear of obstacles and people, with the bike in an easy (low) gear
and at pedal assist level 0 or 1. The rear derailleur is controlled by the right shifter (the side
with the crank or if sitting on bike). The function of the rear derailleur is to move the drive
chain from one gear sprocket to another. The smaller sprockets on the gear cluster produce
higher gear ratios. Pedaling in the higher gears requires greater pedaling effort but takes you
Power On Power Off
Normal
mode
Adjustment
mode/
Assistance
OFF
ECO TOUR SPORT

18
a greater distance with each revolution of the pedal cranks. The larger sprockets produce
lower gear ratios. Using them requires less pedaling effort but takes you a shorter distance
with each pedal crank revolution. Moving the chain from a smaller sprocket of the gear cluster
to a larger sprocket result in a downshift. Moving the chain from a larger sprocket to a smaller
sprocket result in an upshift. In order for the derailleur to move the chain from one sprocket to
another, the rider must be pedaling forward.
WARNING: Use extra caution when operating the bicycle near children. This ebike
is not to be operated by anyone under the age of 16. Children under the age of 16
may lack the necessary judgment and skill to safely operate the ebike, potentially
resulting in damage to the bike, damage to other property, serious injury, and/or
death. Please also check your local laws, which may require a higher age.
Brake light & headlight features and operation
Your SKWAD LT is equipped with a headlight & taillight/brake light that
is integrated into the electrical system. For safety purposes, the default
when the bike is powered on will automatically turn the lights on. Haro
recommends you always leave the lights on for safety. If the lights are off,
you can turn the lights on with the procedure below.
To turn the lights on:
• With the bike powered on and the control panel in the “Adjustment” mode,
press and hold the power button for more than two seconds.
• Both the headlight and taillight will illuminate to make you more visible to
other vehicles. Any time the bike is powered on, squeezing one or both
brake levers on the handlebar will activate the brake light, causing the
taillight to illuminate additional areas.
To turn the lights off:
• With the bike powered on and the control panel in the “Adjustment” mode,
press and hold the power button for 2 seconds.
• The lights will turn off, however, the brake light will still illuminate when the brake levers
are squeezed.
Battery capacity display
The display features a battery capacity gauge (like a fuel gauge on a car). To view battery
capacity, you must be in “Normal” mode. The remaining battery charge display is based on
the current battery power output (instantaneous voltage reading), and can uctuate while
riding as power demand and/or output changes. When only one bar is illuminated, you
should charge the battery as soon as possible. At lower states of charge, the bike may limit
power output to make the remaining power last a little bit longer. When the battery is fully
depleted, the last bar will begin to ash, alerting you that you’re about to lose all electrical
power. Any time your power is off or depleted, you can still propel your bike by pedaling it.
0-5% 6-40% 41-80% 80-100%
Adjustment
mode

19
Riding range
We suggest that you select a lower pedal assistance level when you’re getting to know your
SKWAD LT and travel routes. Once you become familiar with your range requirements and
the capabilities of your bike, you can adjust your riding characteristics if you desire.
The table below provides range estimates under example conditions to help you
understand the factors that can increase or decrease range. Haro Bikes makes no claims
about the range that you might experience in a particular situation.
Range Estimates Under Example Conditions
35 km (21 mi): • Hilly terrain • Light pedaling • High pedal assist level
• Windy • Heavy payload
45 km (27 mi): • Flat terrain • Light pedaling • Low pedal assist level
• Not windy • Heavy payload
55 km (34 mi): • Flat terrain • Moderate to • Low pedal assist level
• Not windy heavy pedaling
• Normal payload
Best practices for extending range and battery life
Follow the best practices listed below to help extend your range and battery life.
• Whenever possible, avoid applying thumb throttle assist when the bike has slowed to
very low speeds, has stalled, or is stopped.
• Reduce your use of pedal/throttle assist whenever possible.
• Avoid climbing hills steeper than 15% in grade.
• Avoid sudden starts and stops.
• Accelerate slowly.
Parking, storage, and transport
Please follow these tips to ensure your bike is well cared for when you’re not using it.
PARKING AND STORAGE
• Park in accordance with local rules and regulations.
• Park indoors whenever possible. If you must park outdoors in rain or wet conditions, do
not do so for an extended period of time, and afterwards park in a dry location to allow
the bike systems to dry out. When any bike is exposed to wet conditions, it will need a
more frequent maintenance schedule to prevent rust and corrosion and to ensure all
systems work safely.
• Avoid parking or storing your bike in direct sunlight, which can cause damage to the
display.
• Do not park or store your bike in excessive heat, such as inside of a parked car on a hot
day. Never exceed the temperature range of: -20°C to 60°C (-4°F to 140°F).
• Register your bike at harobikes.com to increase the chance you’ll get your bike back in
the unfortunate event it’s stolen.
• Lock up your bike to reduce risk of theft. Consult a local, certied, and reputable bike
shop for more information how to protect your bike from theft.
Table of contents


