Harper HTM50 User manual
MANUEL D’UTILISATION
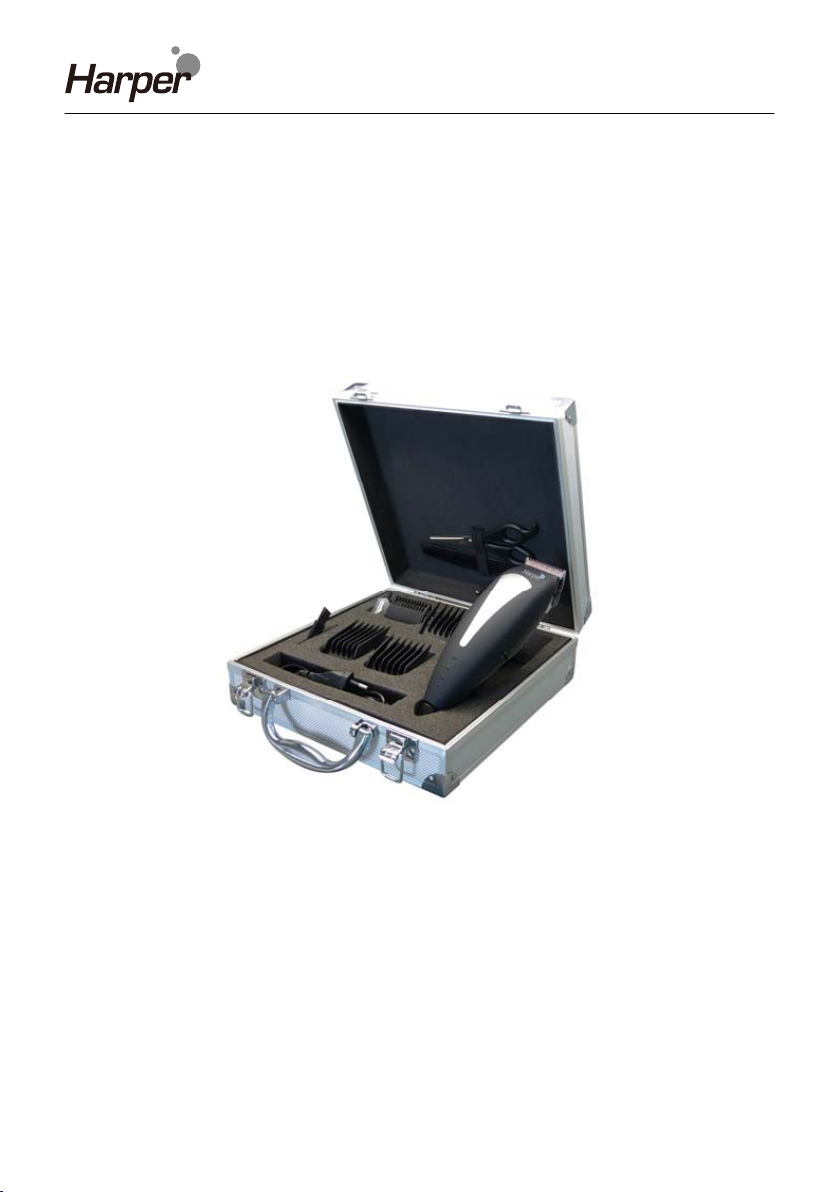
COFFRET COIFFURE
HTM50
Lisez attentivement ce mode d'emploi avant d'utiliser l'appareil et
conservez-le pour un usage ultérieur
POUR USAGE DOMESTIQUE UNIQUEMENT
2
Tondeuse electrique
LISEA TOUTES LES INSTRUCTIONS AVANT D’UTILISER CE PRODUIT ET
CONSERVEZ CES INSSTRUCTIOS
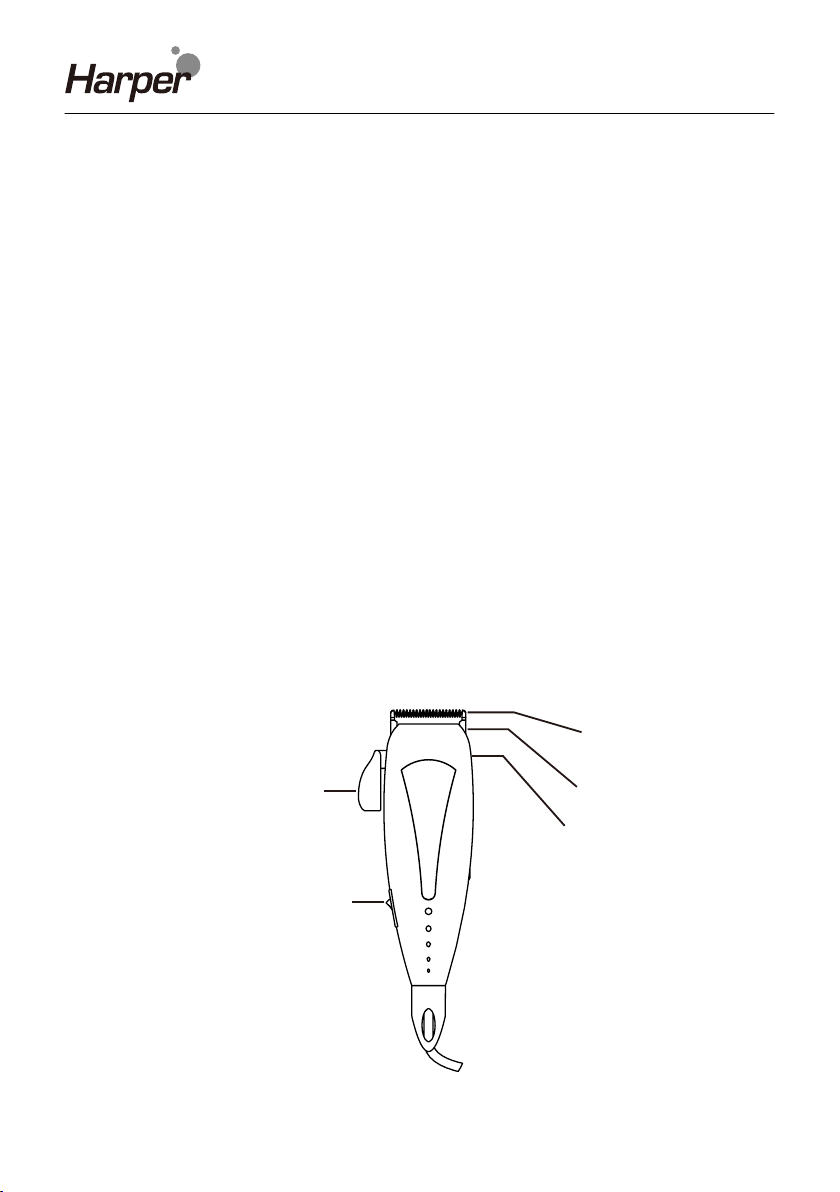
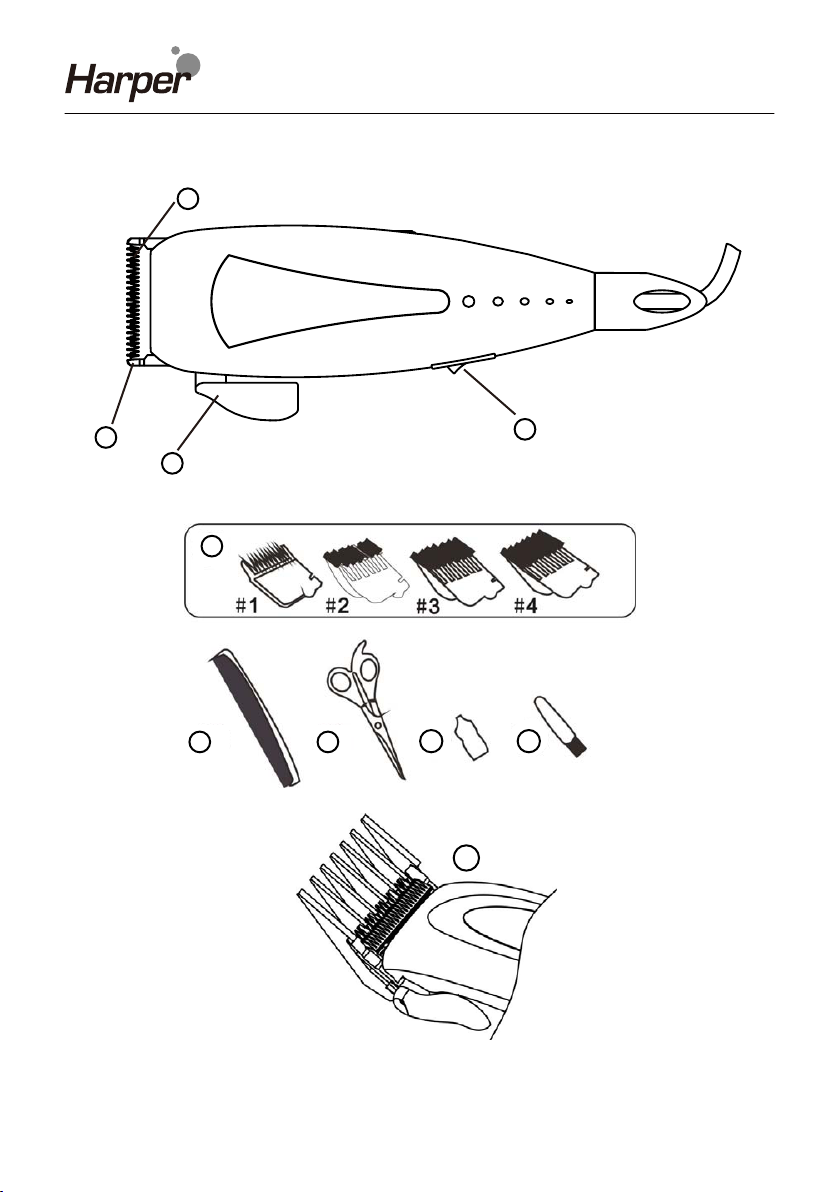
NOMS DES PIECES
1.
1
2
3
4
5
Levier de lame
2. Interrupteur Marche/Arrêt
3. Bas de lame
4. Haut de lame
5. Glissière de lame
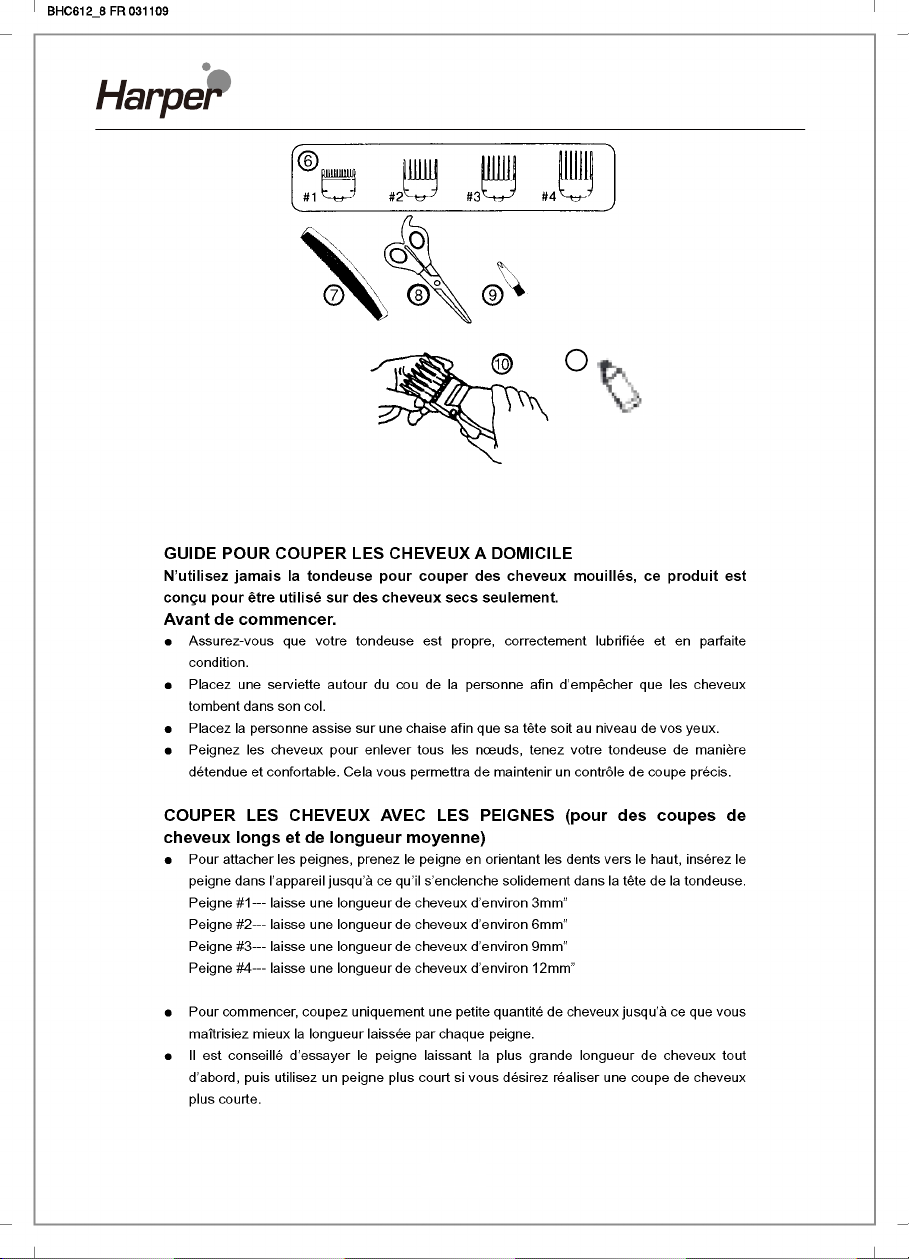
6. 4 sabots de 3,6,9,12mm
7. Peigne
8. Ciseaux
9. Brosse de neoyage
10. Assemblage
11. Huile de lubrificaon
Coffret aluminium de rangement
3
11

4
5
6

7

DENI DE RESPONSABILITÉ
Les mises à jour des composants matériels sont effectuées régulièrement. Par conséquent,
certaines des instructions, les spécifications et les photos dans cette documentation peuvent
légèrement différer de votre situation spécifique. Tous les éléments décrits dans ce manuel à
titre indicatif seulement peuvent ne pas s’appliquer à la situation particulière. Aucun droit
légal ou autres droits ne peuvent être obtenus d’après les descriptions effectuées dans ce
manuel.
8
Description of parts
9
1
2
3
4
7
8 9 10 11
12
10
13 14 15
16 17 18
19 20 21
22
11
23
25
27
24

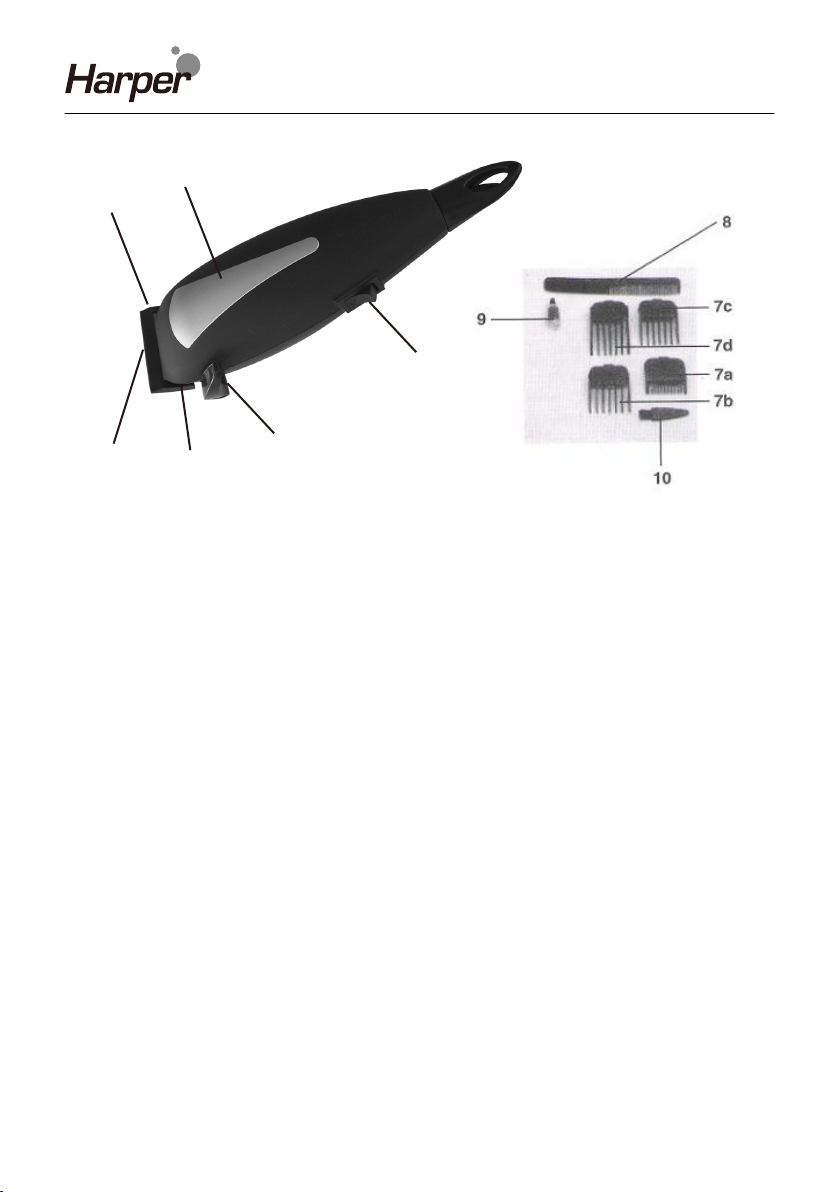
PART NAME
1. Blade lever 2. On/Off switch 3. Bottom blade
4. Top blade
ACCESSORIES
7. 4 cutting length accessories 8. Comb 9. Scissors 10. Oil 11. Brush
GUIDE FOR CUTTING HAIR HOME
Never use the produce to cut wet hair,
It is designed to work in condition only.
Before you begin
·Make sure that your clipper is clean, property oiled and in perfect
working condition.
·Place a towel around the neck of the person to prevent hair form failing
down inside the collar.
·Position the person whose hair is to be cut on a chair so that his/her
head is at your eye’s level.
·Comb the hair to remove all tangles, hold the clipper in a relaxed.
Comfortable grip.
This will help you to maintain an accurate cutting control.
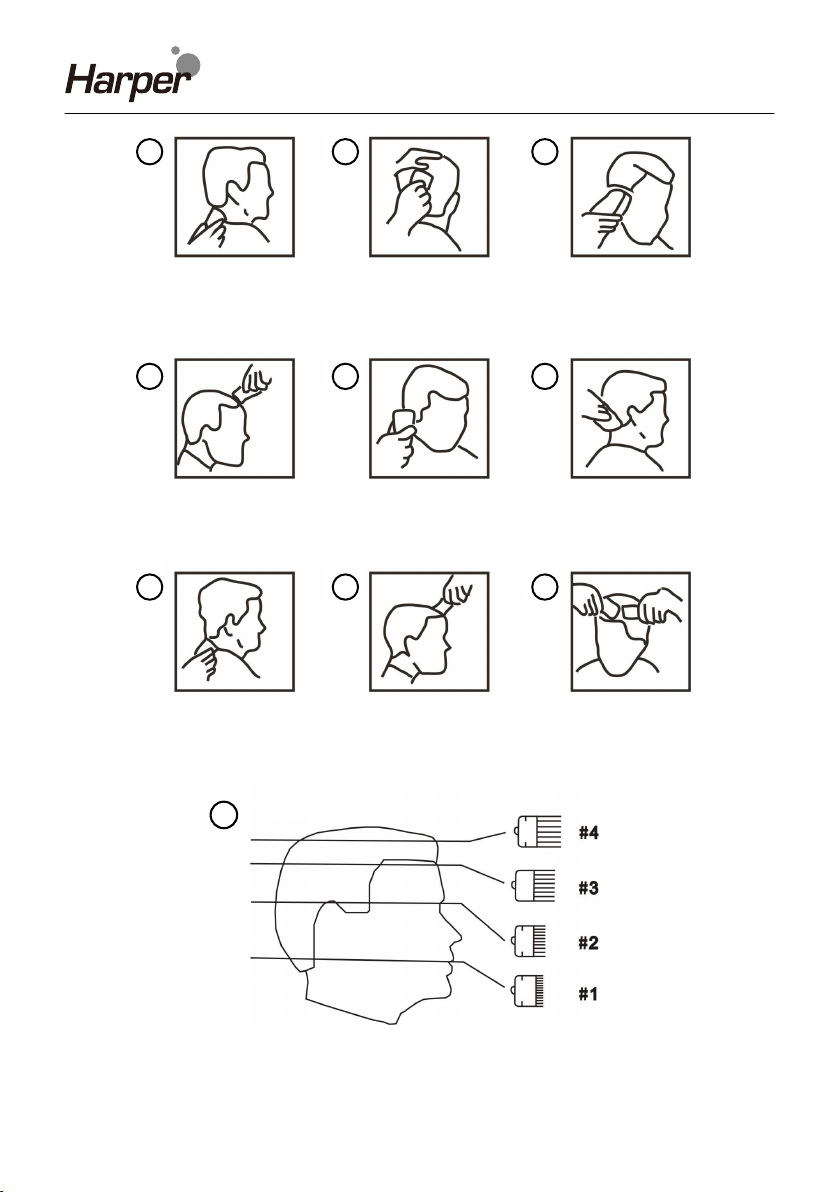
CUTTING HAIR WITH THE ATTACHMENT COMBS
(For medium to long cut)
·To attach combs, hold comb with teeth up, snap comb attachment
firmly to the bottom of the clipper blade. (Fig.12)
Attachment comb # 1---leaves hair approx . 3mm* in length
Attachment comb # 2---leaves hair approx . 6mm* in length
Attachment comb # 3--- leaves hair approx . 9mm* in length
Attachment comb # 4--- leaves hair approx . 12mm* in length
Special angle comb is available. (Fig . 7)
·At the beginning ,cut only a small amount of hair until you become
accustomed to the length each attachment comb leaves the hair .
·And it is suggested to try the longest attachment comb on the clipper
first , then use the shorter one if the desired length is shorter.
·For uniform cutting, never push or force the clipper through the hair at
a fast rate. The clipper works most efficiently when it works at its own
speed.
12

·Start by combing the hair in its natural direction.
·Place the fargest, attachment comb onto your clipper and start by
trimming the sides from the bottom upwards. Hold the clipper lightly
against the hair with teeth of the attachment comb pointing up but flat
against the head. Slowly lift the clipper up and outward through the
hair cutting only a small amount at a time. (Fig. 13)
·Repeat around sides and back of head. (Fig. 14)
·If you desire shorter hair , either change to a lower number attachment
comb or apply more pressure and less lift away from head with the
present attachment comb.
·This entire procedure requires practice, and it is always better to leave
too much hair the first few haircuts. (Fig. 15)
·For the top of the head, you will give a fairly short cut if you use the # 4
attachment comb. With the teeth flat against the head ,slowly start
trimming from the front to the back. Again, it is better to leave the hair
longer the first few haircuts. (Fig. 16)
Outlining
·Outlining requires no attachments. Take the clipper and push the lever
up to the close-cut position.
·Comb hair into the style. Position clipper between the side burns and
the ear. (Fig.17)
·Make sure the corner edge of the blade is against the hairline. With the
outline of the hair as your guide , slowly move the clipper over around
and behind the ears. (Fig. 18)
·For the back of the neck and the sideburns, hold the clipper upside
down, (see sketch) and holding it against the skin at the length desired,
move downwards.
Short cuts to perfect flat tops, crew cuts.
·Always cut from the back of the neck to the crown, using the longest
attachment comb. Holding it flat against the head, slowly move the
13

clipper up through the hair.
·Use the same technique for the sides, cutting from the bottom to the
upper side of the head. (Fig. 19)
·For the front to the crown, cut the hair against the direction in which if
grows. Then even it up with the sides. (Fig. 20)
·For a flat top, use a flat comb, not the attachment comb. Just cut hair
on top of the head over it .
·To taper hair down to the neckline, use closer cutting attachment
combs. Comb hair and check for uneven spots and outline sideburns
and neckline. (Fig. 21)
·If a short tapered cut on the sides and back is desired follow the Fig.22
·The four basic areas illustrated on the hair cutting guide are you “road
map” to easy do-it-yourself hair cutting.
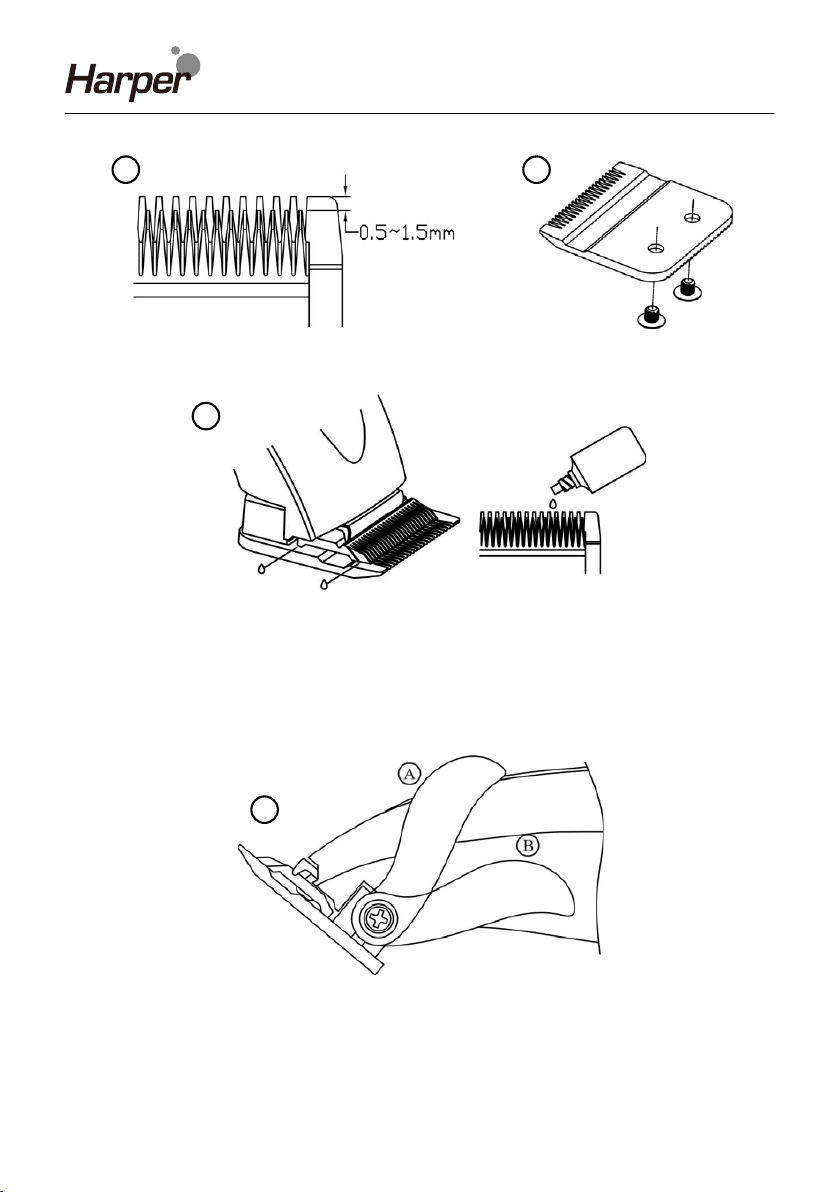
MAINTENANCE
·Your clippers were carefully examined to ensure that the blades were
oiled and aligned before leaving our factory.
·Blades must be realigned if they have been removed for cleaning or
replacement.
To realign the blades, simply match the upper and bottom blades teeth
up, point for point. (End of top blade teeth should be approximately
1.2mm back from bottom blade. Compare your clipper blades with the
sketch.) (Fig. 23)
·If blade alignment is incorrect, add a few drops of oil to the blades, turn
clipper on for a few moments, turn off and unplug. Loosen screws
slightly and adjust. Tighten screw after blade is aligned. (Fig. 24)
Oil
·To maintain your clipper in peak condition, the blades should be oiled
every few haircuts.
·Do not use hair oil, grease oil mixed with kerosene or any solvent. As
the solvent will evaporate and leave the thick oil which may slow down
the blades motion. (Fig. 25)
14

Adjustable lever
·The lever is conveniently located near you thumb(if you’re right handed)
so it can easily be adjusted while the clipper is in your hand.
·The lever adds versatility to your clipper by allowing you to gradually
change the closeness of your cut without an attachment comb.
·When the lever is in the uppermost position, the blades will give you
the closest cut and leave the hair every short. Pushing the lever
downward gradually increases the cutting length.
·In its lowest position, the lever will leave the hair approximately the
same length as a # 1 comb.
·The lever will also extend the use of your blades since a different
cutting edge is used in each setting.
·In addition, if extremely heavy hair cutting has jammed the blades, it
will help you remove hair that has become wedged between the two
blades without removing the blades. (Fig. 27)
A . Close cut
B . Longer cut
While the clipper is running , rapidly move the lever from “close cut” to “longer cut” a couple
of time. Dong
this each time after; you have finished using your clipper will
help to keep the blades clear of cut hair. If your clipper stops cutting and
this does not help, your cutting blades are dulled. Replace them with
new blades.
IMPORTANT SAFEGUARDS
When using electrical appliances, especially when children are
present, basic safety precaution should always be followed,
15

including the following:
To reduce the risk of death or injury by electric shock:
·Unplug this appliances before cleaning.
·Do not place or store appliance where it can fall or be pulled into a tub
or sink.
·Do not used while bathing or in a shower.
·Do not reach for an appliance that has fallen into water. Unplug
immediately.
To reduce the risk of burns, electrocution, fire, or injury to persons:
·Use this appliance only for its intended use as described in this manual.
·Do not use attachments not recommended by the manufacturer.
·This appliance should never be left unattended when plugged in.
·Close supervision is necessary when this appliance is used by, on, or
near children or invalids.
·Never operate this appliance if it has a damaged cord or plug, if it is not
working properly.
·Keep the cord away from heated surfaces.
·Do not pull, twist, or wrap line cord around appliance.
·Never drop or insert any object into any opening on this appliance.
·Before use, make certain blades are aligned properly.
·Do not place appliance with a damaged or broken comb nor with teeth
missing from the blades as injury may occur.
·Do not use outdoors or operate where aerosol (spay) products are
being used or where oxygen is being administered.
·This appliance is not intended for use by persons (including children) with
reduced physical, sensory or mental capabilities, or lack of experience and
knowledge, unless they have been given supervision or instruction
concerning use of the appliances by a person responsible for their safety.
Children should be supervised to ensure that they do not play with the
appliance.
If the supply cord is damaged, it must be replaced by the manufacturer or
its service agent or a similarly qualified person in order to avoid a hazard.
For domestic use only.
TECHNICAL SEPCIFICATION
·Main supply :AC 230V; 50Hz
·Power output : 10W
15

Algemene veiligheidsinstructies
*Gebruik het apparaat uitsluitend privé en uitslutend voor de
voorgeschreven toepassing. Dit apparaat is niet geschikt voor
commercieel gebruik(tenzij het bedoeld is voor beperkt gebruik in de
buitenlucht). Bescherm het tegen hitte, directe zonnestralen,vocht(i
geen geval in vloeistoffen dompelen) en scherpe kanten. Gebruik het
apparaat niet met vochtige handen. Bij vochtig of nat geworden
apparaat comiddellijk de stroomtoevoer onderbreken. Niet in het water
grijpen.
*Schakel het apparaat uit en onderbreek altijd de stroomtoevoer(trek
aan de steker, nooit aan de kabel) wanneer u het apparaat niet gebruikt,
hulpstukken aanbrengt, reinigt of wanneer storingen optreden.
*Laat het apparaat nooit ingeschakeld zonder toezicht. Bescherm
kinderen tegen gevaren en zorg ervoor dat kabels nooit los omlaag
hangen en dat het apparaat buiten het bereik van kinderen blijft.
*Controleer regelmatig of het apparaat beschadigingen vertoont. Een
beschadigd apparaat mag niet in gebruik worden genomen.
*Repareer het apparaat nooit zelf ,maar breng het naar een
geautoriseerde vakman. Voorkom gevaren en laat een defecte kabel
altijd alleen door de fabrikant, onze technische dienst of een eender
gekwalificeerde persoon vervangen door een soortgelijke kabel.
*Gebruik alleen originele reserveonderdelen.
*Neem de conderstaande “Speciale veiligheidsinstructies” in acht.
Speciale veiligheidsinstructies voor dit apparaat
Met dit apparaat alleen droge haren knippen
Dit apparaat alleen gebruiken voor het knippen van haren
Gebruik het apparaat niet in de nabijheid van
water(bijv,badkuip,wastafel of andere met water gevulde voorwerpen).
16
Overzicht van de bedieningselementen
1. Regeling vande kniplengte 2.AAN/UIT-schakelaar
3. Ondermesje 4. Bovenmesje 5.Messenstrip
6. Spanningscompensatie(apparaten met netvoeding)
7a-d. Voorzetstukken 7a. 3mm 7b. 6mm 7c.9mm 7d. 12mm
8. Kam 9. Olie voor de mesjes 10. Kwast
Gebruik van het apparaat
Fijne afstemming van de spanning(nettoestellen)
Bij spanningsschommelingen in het stroomnet kan het nodig zijn, het
apparaat ann te passen. U schakeit het apparaat in en draait met
behulp van een schroevendraaier de schroef voor de
spanningscompensatie (6) zodanig, dat het apparaat zo rustig mogelijk
loopt.
Gebruik met netadapter (toestellen met batterijvoeding)
U sluit de netadapter op het apparaat aan. Sluit het apparaat aan op
een correct geïnstalleenrde en geaarde contactdoos 230V 50Hz. Zo
kunt u het apparaat ook zonder geladen batterijen gebruiken.
Laden van de batterij
Voordat u het apparaat zonder stroomtoevoer kunt gebruiken, moet de
batterij worden opgeladen. Verbind daartoe het nettoestel met de bus
17
1
2
3
4
5
6

via de ophanghaak van het apparaat met een correct geïnstalleerde en
geaarde contactdoos 230V 50Hz. Het laadlampje brandt nu. De eerste
laadperiode duurt ca. 12 uren, latere ladingen 5 uren. Na het laden het
nettoestel verwijderen.
Voorbereidingen voor het knippen
1. U kamt de haren eerst even door
2. U verwijdert het beschermkapje van het mesje
3. Vet de mesjes iets in.
4. Plaats een hulpstuk al naargelang de gewenste lengte. Wanneer u
nog zeker weet, welke lengte u witt, begint u met 12 mm. Schuif
hiertoe de mesjes in de uitsparing en druk het hulpstuk vast tegen
de mesjesrail.
5. Sluit het apparaat aan op een correct geïnstalleerde en geaarde
contactdoos 230V,50Hz, schakel het apparaat in en beweeg het
apparaat met de kam langzaam en gelijkmatig “tegen de haren in”.
De geleiding moet daarbij vlak liggen.
Knippen zonder voorzetstukken
Is geschikt voor het afsnijden van de haren. De snijlengte kan traploos
worden ingesteld van ca. 0 tot 12 mm.
Op moeilijk bereikbare plaatsen kunt u de schaar gebruiken.
BELANGRIJKE AANWIJZING: Gebruikt u het apparaat niet langer dan
10 minuten achtereen. Voordat u het opnieuw gebruikt, moet het 10
minuten afkoelen.
Reiniging:
U onderbreekt de stroomtoevoer.
U reinigt het apparaat na het gebruik met een half vochtige doek.
Vervolgens nog eens droog nawrijven.
De mesjes en de voorzetten reinigt u met de kwast.
Dit apparaat is gekeurd conform de op dit moment van toepassing
zijnde CE-richtlijnen zoals bijvoorbeeld elektromagnetische
compatibiliteit en laagspanningsvoorschriften en is geconstrueerd
volgens de nieuwste veiligheidstechnische voorschriften.
Technische wijzigingen voorbehouden !
18

Indicaciones generales de seguridad
Solamente utilice el aparato para el uso privado y para el fin
previsto. Este aparato no está destinado para el uso profesional. No
lo utilice al aire libre(en excepto que esté destinado para el uso
limitado al aire). No lo exponga al calor, a la entrada directa de
reyos de sol, a la humedad( en ningún caso sumerja el aparato en
agua) y a los cantos agudos. No utilice el aparato con las manos
húmedas. En caso de que el aparato esté húmedo o mojado retire
de momento la clavija de la caja de enchufe. No tocar el agua.
Desconecte el aparato y siempre retire la clavija de la caja de
enchufe (tire de la clavija no del cable), cuando no quiera utilizar el
aparato, montar piezas o en caso de limpieza o defectos.
Nunca deje el aparato sin supervisión de una persona. Para evitar
que los niños se hagan daños eléctricos, siempre tenga atención,
que el cable no cuelgue hacia abajo y que los niños no tengan
acceso al aparato.
Controle regularmente si el aparato o el cable tiene defectos. No
ponga en servicio un aparato defecto.
No repare el aparato por su cuenta, sino vaya a un establecimiento
autorizado. Para evitar peligros, deje sustituir un cable defecto por
uno de la misma calidad solamente por el fabricante, nuestro
servicio al cliente o una similar persona cualificada.
Solamente utilice accesorios originales.
Por favor tenga atención a las “Indicaciones especiales de
seguridad…” indicadas a continuación.
Consejos especiales de seguridad
*Corte sólo cabellos secos con este aparato.
*Utilice este aparato sólo para cortar cabellos.
* No utilice el aparato en la proximidad de agua (p.ej. bañeras, lavabos
u otros recipientes que contengan agua).
19
Table of contents
Languages:


