HARTE TECHNOLOGIES eZ80 User manual
Revision 0.7 Page 1 of 15 6/28/2007
Copyrighy © 2007 Harte Technologies, LLC.
eZ80 Single-Board Computer
Installation Guide
Revision 0.7
June 28, 2007
Howard M. Harte

Revision 0.7 Page 2 of 15 6/28/2007
Copyrighy © 2007 Harte Technologies, LLC.
Preliminary Review Copy (January 2007)
The following paragraph does not apply to the United Kingdom or any country where
such provisions are inconsistent with local law:
HARTE TECHNOLOGIES, LLC PROVIDES THIS PUBLICATION “AS IS”
WITHOUT WARRANTY OF ANY KIND, EITHER EXPRESS OR IMPLIED,
INCLUDING, BUT NOT LIMITED TO, THE IMPLIED WARRANTIES OF
MERCHANTABILITY OR FITNESS FOR A PARTICULAR PURPOSE. Some states
do not allow disclaimer of express or implied warranties in certain transactions, therefore,
this statement may not apply to you.
This publication could include technical inaccuracies or typographical errors. Changes
are periodically made to the information herein; these changes will be incorporated in
new revisions of the publication. Harte Technologies, LLC may make improvements
and/or changes in the products and/or the programs described in this publication at any
time.
© Copyright 2007, Harte Technologies, LLC. All rights reserved.

Revision 0.7 Page 3 of 15 6/28/2007
Copyrighy © 2007 Harte Technologies, LLC.
Table of Contents
Table of Contents................................................................................................................3
Revision History .................................................................................................................4
Initial Hardware Configuration...........................................................................................5
Install the eZ80SBC USB Device Controller Firmware..................................................... 6
Upgrade the eZ80SBC USB Device Controller Firmware .................................................7
Install the Zilog eZ80F91 Ethernet Module........................................................................8
Zilog eZ80F91 Ethernet Module ....................................................................................8
Install the Zilog eZ80F91 Ethernet Module (Continued)...................................................9
Zilog eZ80F91 Mini Enet Module..................................................................................9
Program CP/M Into the eZ80F91 .....................................................................................10
Picture 3– Connecting the ZDI CableProgram CP/M Into the eZ80F91 (Continued) ....10
Program CP/M Into the eZ80F91 (Continued).................................................................11
USB Device Support.........................................................................................................12

Revision 0.7 Page 4 of 15 6/28/2007
Copyrighy © 2007 Harte Technologies, LLC.
Revision History
Revision Date By Description
0.5 2007-01-14 HMH Initial Publicly Release
0.51 2007-01-14 HMH Added pictures.
0.6 2007-05-07 HMH Added USB Firmware Upgrade Procedure
0.7 2007-06-28 HMH Added USB Printing Support Instructions.

Revision 0.7 Page 5 of 15 6/28/2007
Copyrighy © 2007 Harte Technologies, LLC.
Initial Hardware Configuration
1. Start with the eZ80SBC Board without the Zilog eZ80F91 Module installed. The
USB Microcontroller should be programmed before this module is installed.
2. Connect the Silicon Labs USB Debug Adapter to the USBD_DEBUG connector on
the eZ80SBC.
3. Connect the Silicon Labs USB Debug Adapter to a USB port on your computer.
4. Power the eZ80SBC either via the USB Device port on the rear of the eZ80SBC, or
by the 5V power jack on the back of the eZ80SBC.
a. Make sure JP9 is set to USB (middle and USB pin of JP9 shorted with a
jumper) if you are using the USB cable to power the eZ80SBC.
b. Make sure JP9 is set to EXT (middle and EXT pin of JP9 shorted with a
jumper) if you are using an external 5V Power Supply to power the eZ80SBC
through J2 of the eZ80SBC.
5. Verify that LED D9 is illuminated. This indicates that power is supplied to the
eZ80SBC.
6. Connect a serial terminal or PC running Hyperterminal or another serial
communication program to the lower port of P2. If connecting to a PC, you will need
a Null-modem cable. The communication settings are as follows:
57600 Baud
No Parity
8-data bits.
1-stop bit.
No Flow Control (neither Hardware Flow Control nor XON/XOFF)
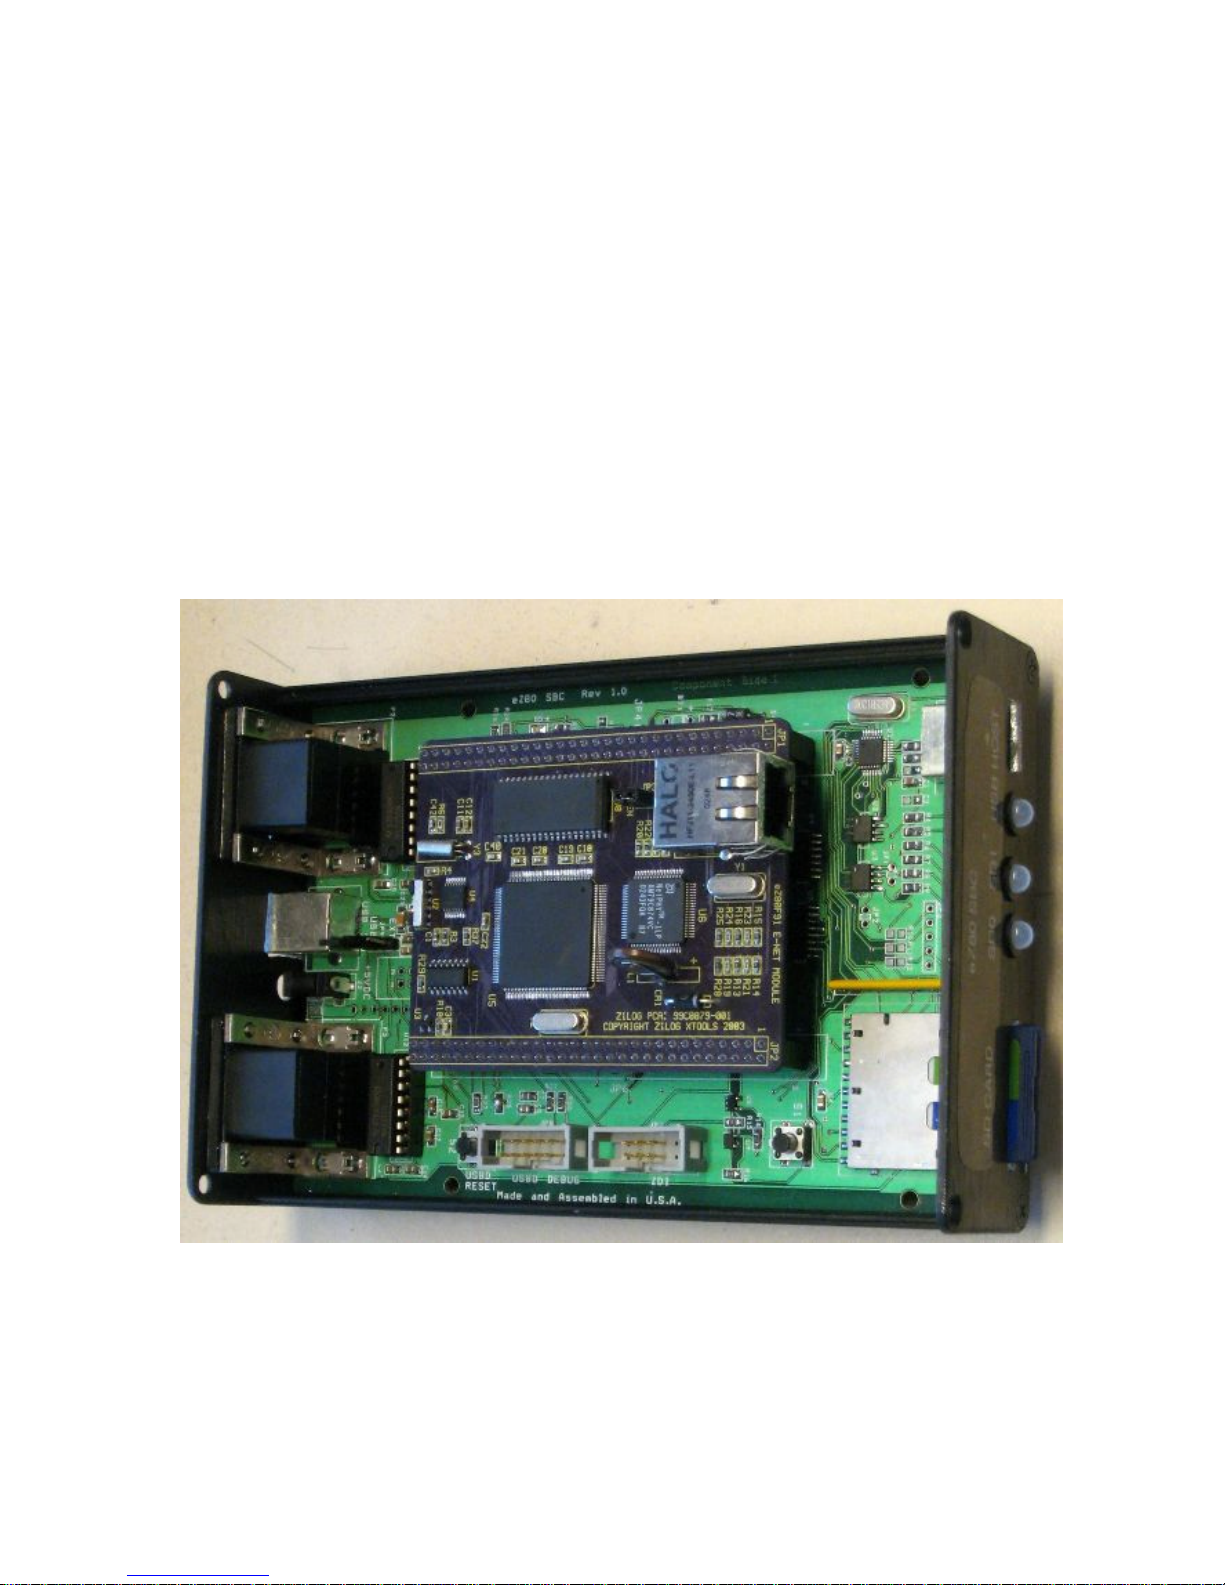
Your eZ80SBC should look similar to this:
Picture 1 – Ready for USB Device Controller Firmware Download

Revision 0.7 Page 6 of 15 6/28/2007
Copyrighy © 2007 Harte Technologies, LLC.
Install the eZ80SBC Software Distribution
1. Install the eZ80SBC distribution, by running the eZ80sbc_Setup.msi Windows
Installer Package:
a. Accept all of the default options, and keep clicking Next until finished.
i. This will install all eZ80SBC-related software in: C:\Program
Files\HarteTec\ez80sbc\
Install the eZ80SBC USB Device Controller Firmware
If the USB Device Controller on your eZ80SBC has not been previously programmed, or
if the version of the firmware on your eZ80SBC is less than build 1355, then you will
need to download the USB Device Controller Firmware using a Silicon Laboratories
Debug Adapter. If your eZ80SBC already has firmware build 1355 or above, then you
can upgrade the firmware according to the instructions under “Upgrade the eZ80SBC
USB Device Controller Firmware.”
1. Run the Firmware Download Utility:
Start Menu →All Programs →eZ80sbc →FLASH Upgrade via SiLabs
Debug Adapter
2. Click on the Connect button. Then click Download. This will download the
firmware to the USB Microcontroller. When the download is complete, click
Exit.
3. At this point, you should see a sign-on on in the serial communication program
similar to the following:
USB 2.0 eZ80 SBC Interface Debug Port
$Revision: 1007 $ of $Date: 2006-11-16 10:33:09 -0800 (Thu,
16 Nov 2006) $
Reset Source: 01
USBH Interrupt enable
Type 'h' for help.
>

Revision 0.7 Page 7 of 15 6/28/2007
Copyrighy © 2007 Harte Technologies, LLC.
Upgrade the eZ80SBC USB Device Controller Firmware
1. Run the Firmware Upgrade Utility:
Start Menu →All Programs →eZ80sbc →FLASH Upgrade via USB
‘
2. Click on the OPEN button. Browse to the location:
C:\Program Files\HarteTec\ez80sbc\Firmware
3. Select and open the file:ez80sbcfw.hex and click Open.
4. Press theFLASH button to upgrade the FLASH.
5. When the download is complete, click Exit.
Revision 0.7 Page 8 of 15 6/28/2007
Copyrighy © 2007 Harte Technologies, LLC.
Install the Zilog eZ80F91 Ethernet Module
The eZ80SBC supports two different versions of the Zilog eZ80F91 Ethernet Module.
One is the eZ80F91 Ethernet Module, and the other is the eZ80F91 Mini Enet Module.
The Ethernet Module has two 2x30 0.1” spacing headers that provide connection to the
eZ80SBC. The Mini Enet Module has two small surface-mount 56-pin connectors that
connect it to the eZ80SBC. Depending on the module that you have, follow one of the
sections below:
Zilog eZ80F91 Ethernet Module
This module plugs into connectors JP5 and JP6 on the eZ80SBC. Pin 1 of the module’s
JP1 connector plugs into pin one of JP5 on the eZ80SBC. Pin 1 is numbered on the
eZ80SBC, and numbered, and marked with a square around it on the eZ80F91 Ethernet
Module. When the module is installed correctly, the module’s Ethernet port will face the
front (SD Card Slot end) of the eZ80SBC. See the following picture for details:
Picture 2 – eZ80SBC with eZ80F91 Ethernet Module, ready for eZ80 CP/M
Download

Revision 0.7 Page 9 of 15 6/28/2007
Copyrighy © 2007 Harte Technologies, LLC.
Install the Zilog eZ80F91 Ethernet Module (Continued)
Zilog eZ80F91 Mini Enet Module
This module plugs into connectors JH1 and JH2 on the eZ80SBC. Pin 1 of the module’s
J1 connector plugs into pin one of JH1 on the eZ80SBC. Pin 1 is numbered on the
eZ80SBC, and numbered, on the bottom of the Mini Enet Module. Be very careful to
ensure that the Mini Enet Module is installed correctly, with all pins on the module
inserted into the eZ80SBC’s JH1 and JH2 sockets. When the module is installed
correctly, the module’s Ethernet port will face the front (SD Card Slot end) of the
eZ80SBC. See the following picture for details:
Picture 3 – eZ80SBC with Mini Enet Moduel, ready for eZ80 CP/M Download

Revision 0.7 Page 10 of 15 6/28/2007
Copyrighy © 2007 Harte Technologies, LLC.
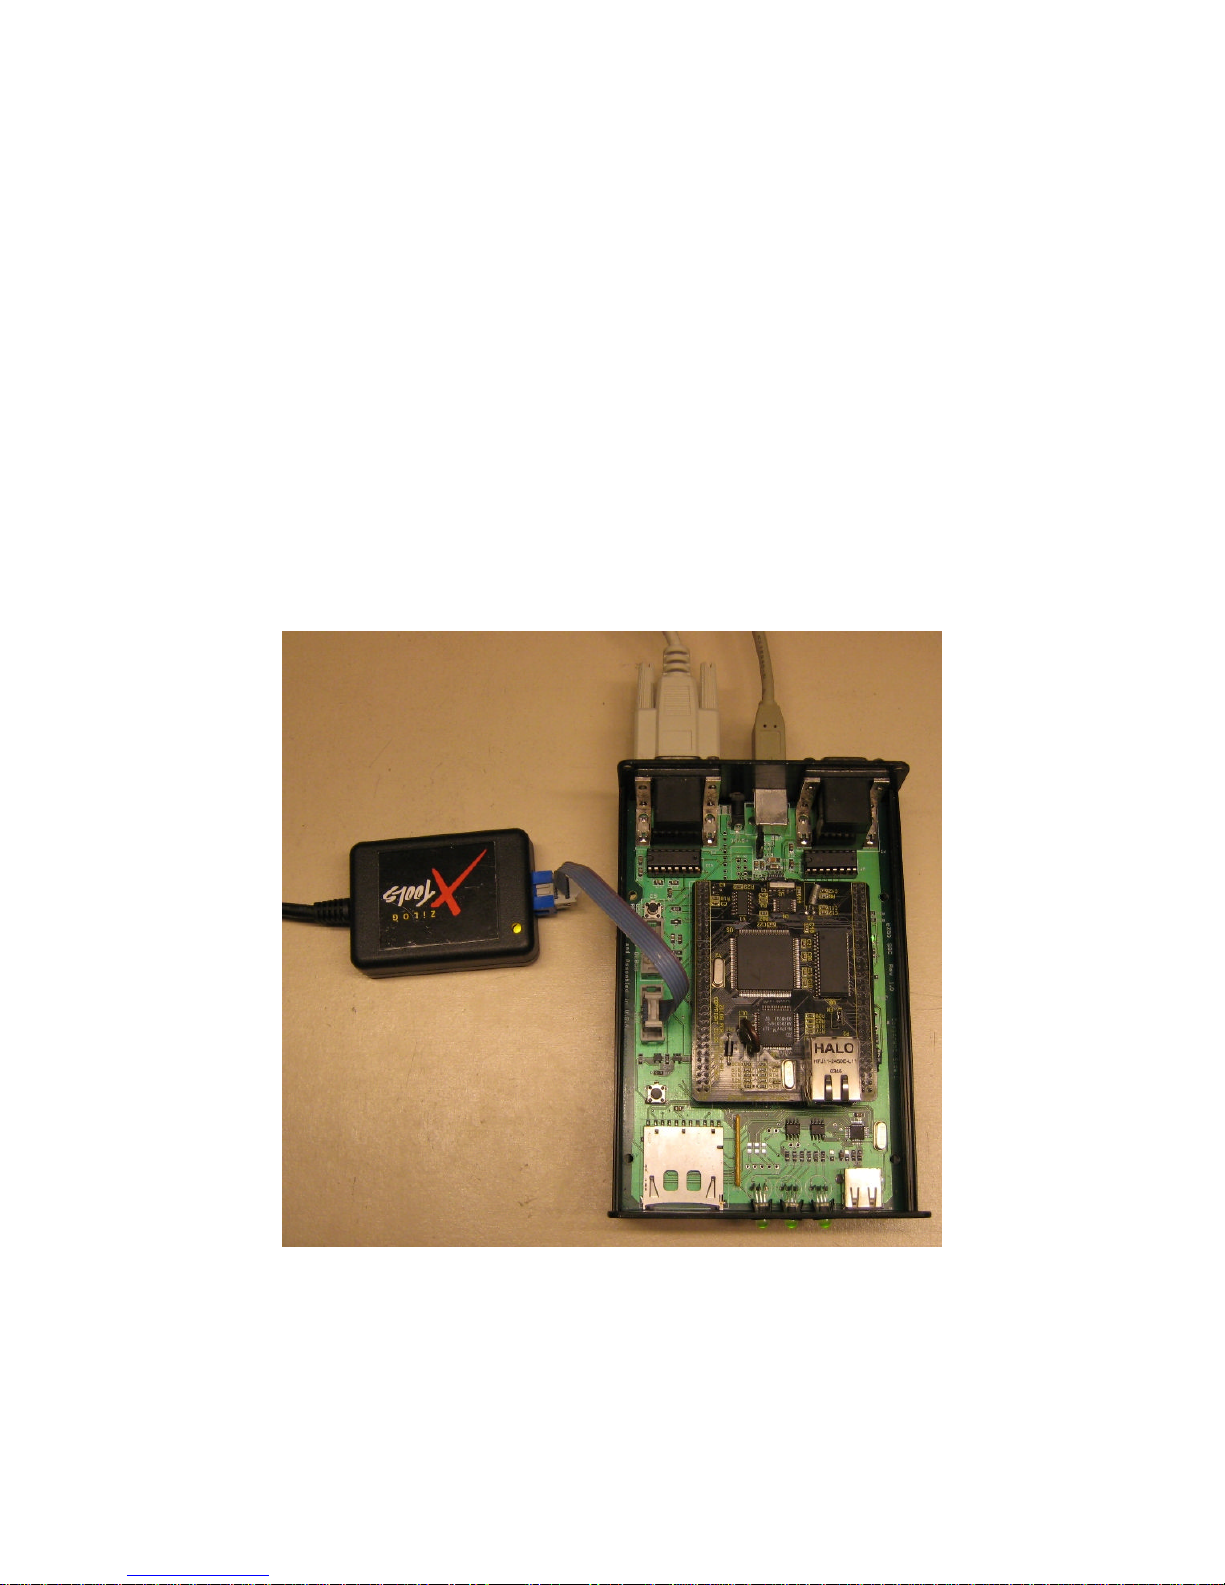
Program CP/M Into the eZ80F91
1. Pluga Zilog USB Smart Cable into a free USB port on your computer. Install the
drivers for the USB Smart Cable if the “Found New Hardware” wizard comes up.
2. Plug the six-pin ribbon cable from the Zilog USB Smart Cable into the connector
marked ZDI on the eZ80SBC. Note that the connector is keyed to prevent
incorrect connection. See Picture 3.
3. Download and Install the Zilog Smart Flash Programmer v2.0.1 from
www.zilog.com.
4. Run the Smart Flash Programmer:
Start Menu →All Programs → Zilog Smart Flash Programmer 2.0.1 →
Smart Flash Programmer 2.0.1
5. Open the Flash Project File:
File →Open Project
6. In the Project File Selection dialog box, navigate to the folder containing the
CP/M image: C:\Program Files\HarteTec\ez80sbc\eZ80CPM
7. If you are using the Zilog eZ80F91 Ethernet Module, opencpm30_plt.zfpproj
project. If you are using the Zilog Mini Enet Module, open the cpm30.zfpproj
project.
8. In the leftmost portion of the Smart Flash Programmer screen, select
Communication.
9. Make sure communication type is set to USB, and then check the box next to the
serial number of your attached USB Smart Cable.
10. Click Program/Verify to program the eZ80F91’s FLASH.
11. When programming completes, disconnect the 6-pin ribbon cable from the
eZ80SBC’s ZDI connector.
Picture 3 – Connecting the ZDI Cable

Revision 0.7 Page 11 of 15 6/28/2007
Copyrighy © 2007 Harte Technologies, LLC.
Program CP/M Into the eZ80F91 (Continued)
12. Connect a serial terminal or PC running Hyperterminal or another serial
communication program to the lower port of P3. If connecting to a PC, you will
need a Null-modem cable. The communication settings are as follows:
115200 Baud
No Parity
8-data bits.
1-stop bit.
No Flow Control (neither Hardware Flow Control nor XON/XOFF)
13. Press the eZ80 Reset button (S1) on the eZ80SBC.
14. You should see a sign-on message in the serial communication program similar to
the following:
64K CP/M V3.1 - eZ80F91 Rev 2 CBIOS v1.0.0.1450 of 2007-06-28 [PLT,
RELEASE]
Copyright (C) 1982, Digital Research
Copyright (C) 2000-2007, Howard M. Harte
A>

Revision 0.7 Page 12 of 15 6/28/2007
Copyrighy © 2007 Harte Technologies, LLC.
USB Device Support
The eZ80SBC has a USB Host Controller that is interface to Full- or Low-Speed USB
Devices. These devices include:
USB to Parallel Port Adapter (USB Printing Support Class)
USB Hubs
USB Mass-Storage Devices (thumb drives, card readers, USB hard drives, etc.)1
USB Floppy Drives1
USB HID-Class Devices1
1These devices are recognized by the eZ80SBC but full software support is in
development.
Currently, USB Hubs and Parallel Port Adapters are supported. The interface to CP/M is
rudimentary at present, and requires a NULL-modem serial cable to connect the USB
Microcontroller to the eZ80. This NULL-modem cable must be connected between the
TOP two Serial Ports at the rear of the eZ80SBC.
You will also need to connect both the USB Microcontroller Console serial port and the
eZ80 Console serial port to terminal devices operating at 115200 baud.
You can use the following steps to print in WordStar:
1. Plug a USB Parallel Port Adapter into the USB Host port at the front of the
eZ80SBC.
2. Plug the USB Parallel Port Adapter into a Parallel Printer (I have successfully
used a modern Laser Printer with excellent results.)
3. On the USB Microcontroller Console port, type ‘b’ to enumerate the USB device.
4. At the CP/M C> prompt, set the device mapping for the LST: device to the AUX
port: DEVICE LST:=AUX
5. Run WordStar..com
6. Print wsprint.tst, a WordStar printer test document, which is three pages in length.
Use the HPLJET printer setting, and make sure you set “Use Form Feeds” to “Y”

Revision 0.7 Page 13 of 15 6/28/2007
Copyrighy © 2007 Harte Technologies, LLC.
On the USB Microcontroller Console serial port:
USB 2.0 eZ80 SBC Interface Debug Port
Build 1.0.0.1450 of 2007-06-28
Reset Source: 01
USBH Interrupt enable
Type 'h' for help.
>b
Enumerating X:0x0205, index 0
USBH: Device Address set to 1.
Manufacturer: Belk USB Printing Support
Product: IEEE-1284 Controller
>
On the eZ80SBC Console serial port:
64K CP/M V3.1 - eZ80F91 Rev 2 CBIOS v1.0.0.1450 of 2007-06-28 [PLT,
RELEASE]
Copyright (C) 1982, Digital Research
Copyright (C) 2000-2007, Howard M. Harte
A>C:
C>DEVICE LST:=AUX
Physical Devices:
I=Input,O=Output,S=Serial,X=Xon-Xoff
CON 19200 IOSX AUX 19200 IOSX
Current Assignments:
CONIN: = CON
CONOUT: = CON
AUXIN: = AUX
AUXOUT: = AUX
LST: = AUX
C>WS

Revision 0.7 Page 14 of 15 6/28/2007
Copyrighy © 2007 Harte Technologies, LLC.
WordStar, CP/M Edition, Release 4
OPENING MENU
D open a document L change logged drive/user
N open a nondocument C protect a file
P print a file E rename a file
M merge print a file O copy a file
S check spelling of document Y delete a file
I index a document F turn directory off
T table of contents Esc shorthand
X exit WordStar R run a program
J help
DIRECTORY Drive C
ASCII.WS HELP.HLP PROFILE.SUB README.BAK README.TXT
SPL.TXT TEST.BAK TEST.TST TEST.TXT VIDATT.Z80
WSPRINT.TST WSREADME.TXT
P WordStar, CP/M Edition, Release 4
To skip further questions, press the Esc key at any point. Press RETURN
at any question to use the default answer.
Document to print? WSPRINT.TST
RETURN done Backspace or ^H erase left
^U cancel Del erase char
Number of copies? 1
Pause between pages (Y/N)? N
Use form feeds (Y/N)? Y
Starting page? 1
Ending page?
Nondocument (Y/N)? N
Name of printer? HPLJET

Revision 0.7 Page 15 of 15 6/28/2007
Copyrighy © 2007 Harte Technologies, LLC.
C:WSPRINT.TST P02 #01 Align
PRINTING
P pause ^U cancel printing
C continue after pausing
Table of contents


