Hatsuyuki HB600A User manual

INSTRUCTIONMANUAL
MODEL:HB600A
BLOCKICESHAVER

1
FOR SAFETY
●Before operating the machine please read the following "Instructions for Safety" in the
manual very carefully, and operate the machine correctly.
●Each instruction specified in the manual is very important for safety, so be sure to follow
each instruction as specified.
●Attention marks and their meanings are as follows:
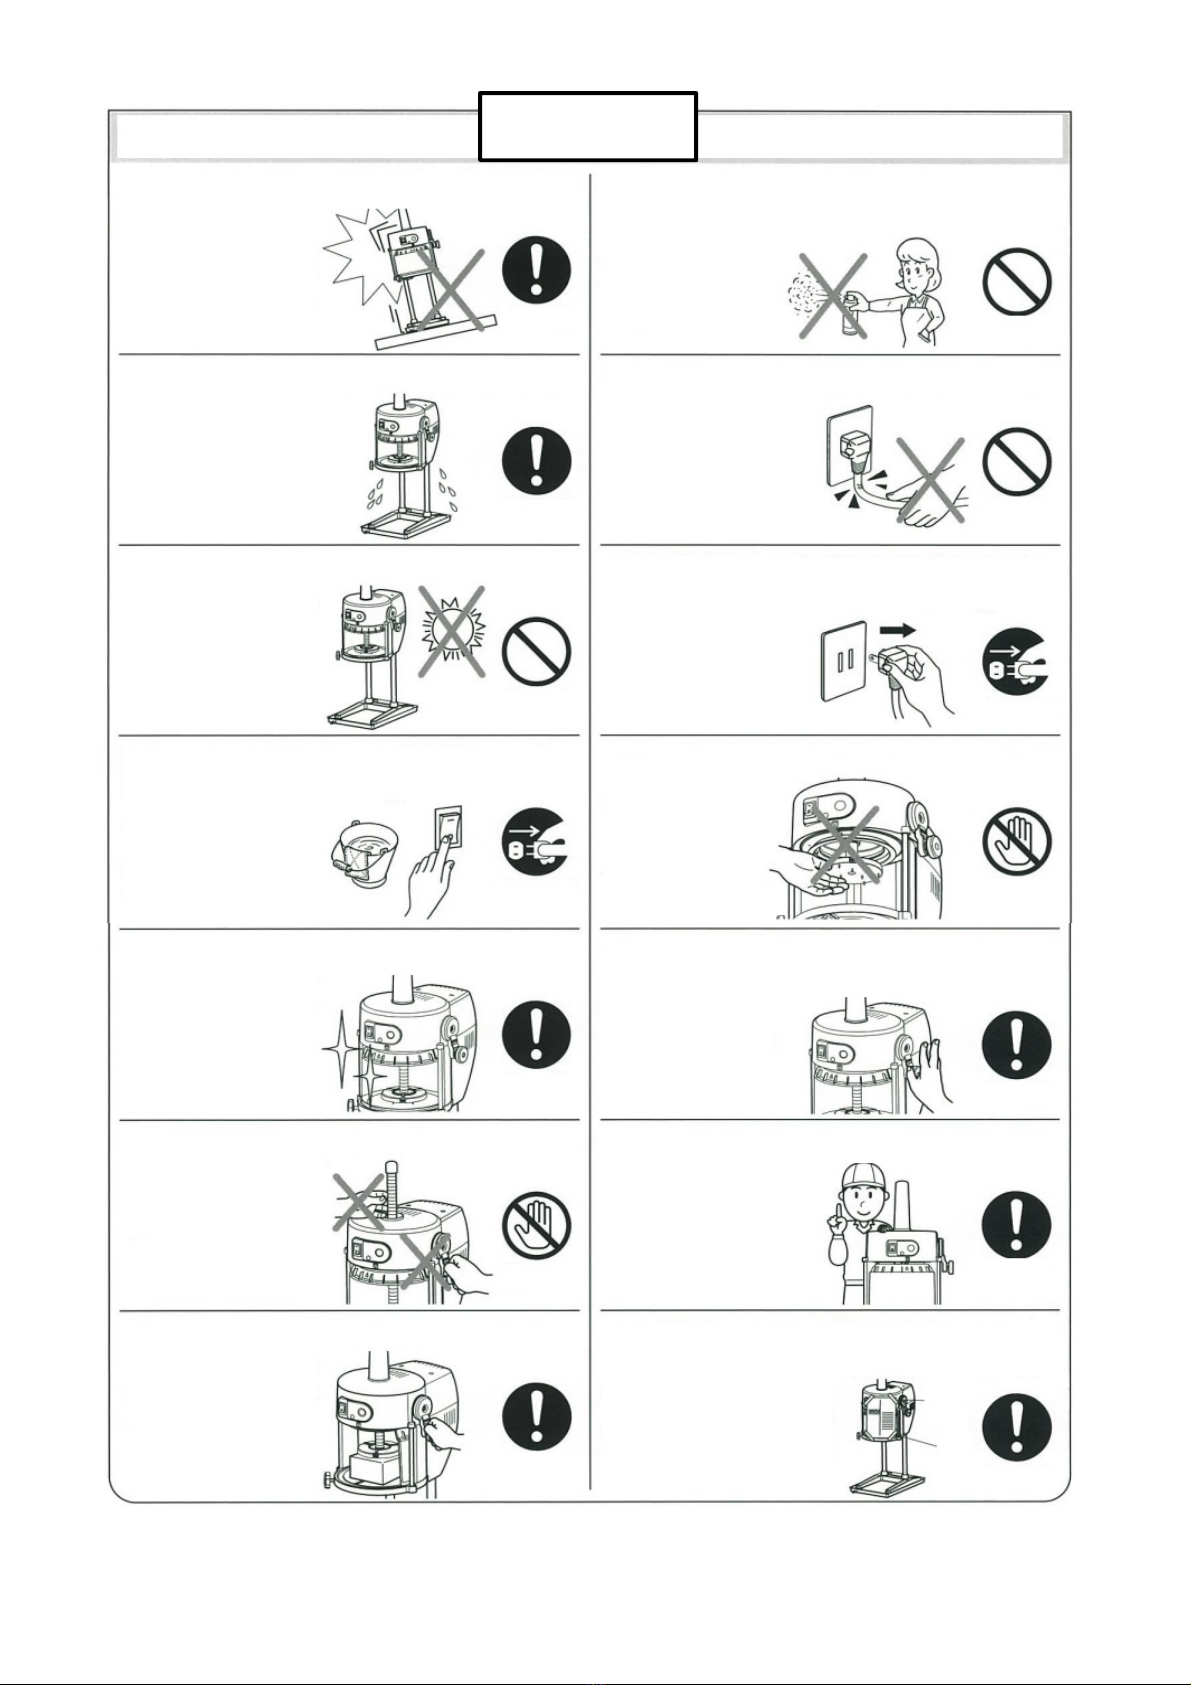
WARNING
●Confirm that the machine has no transportation
damage as soon as it is delivered.
If it has any damage,
contact the supplier
with the information.
It can cause injury by using
the damaged machine.
●Be sure to ground (earth) the machine.
Never connect a ground wire
(earthing) to gas pipes, water
pipes, lightning rods or
telephone cord/grounding wires.
An incomplete grounding
(earthing) is dangerous and can
cause severe electric shock.
●Dedicated (Exclusive-use) outlet.
Always use an outlet dedicated to
each machine. Never use extension
cords or connect the unit to other
power supply cords. Never connect
several or many plugs into the same
outlet. It may cause power supply
cord to overheat and melt/burn or
electric shock or fire.
PLUG
●This machine is for “COMMERCIAL USE”.
●Do not install/place the machine close to any
heating appliance.
●Do not install the machine in a damp or wet place.
It can cause electric bleeding
or electric shock.
It can cause melting
and/or burning of
plastic cover.
Children shall not play with
the appliance. It can cause
electric shock or injury.

2
WARNING
●Do not pour water over the machine or immerse
machine in water.
It can cause a short circuit
or electric shock, as well
as rust and other water
related problems.
●Do not open the sliding door or put your hand
into the chamber during the operation.
●Do not touch any electrical parts (such as plug
or switch) with wet hands.
●Keep plug clean and plug into outlet correctly.
●Do not damage power supply cord. ●Should accidents or irregular operation occur,
TURN OFF the main switch and unplug from outlet.
●In the event of circuit breaker moving to “OFF”
position, please contact the machine vendor.
●For cleaning inside the chamber or changing
blades, be sure to TURN OFF the main switch
and always put on gloves while cleaning/changing
blade works.
●When cleaning inside the shaving chamber,
lower the blade behind the surface of the shaving
table and wipe it in a counterclockwise direction.
●Do not operate the machine
outside.
●Do not attempt to alter the machine in any way.
●Never try to disassemble or repair the machine
by yourself.
●Never touch blades directly when placing the
ice.
It can cause electric shock.
Always keep plug clean and
plug into outlet correctly.
Dirty plugs or imperfectly
connected plugs can cause
electric shock or fire.
Never work on power cord and
never pull it, twist or bundle
it. Do not place a heavy thing
on it. It can damage the power
cord and can cause electric
shock or fire.
The blades are very
sharp and can cause
injury.
Continued operation
of a faulty machine
can/will cause
electric shock or fire.
Incorrect repair will likely
cause irregular operation or
electric shock, fire or injury.
Switching breaker to
“ON” position
incorrectly or by force
can cause electric
shock or fire.
Incorrect cleaning can
cause injury.
It can cause electric shock or fire.
It may cause injury.
Operating the machine
outside or in the rain will
cause electric bleeding or
electric shock.
The blades are very sharp and
can cause injury.
PLUG
3
CAUTION
●Always install the machine on a stable and flat
surface.
●When you sell or give the machine to a 3rd party,
make sure that this “Operation Manual” goes
with the unit for safety
and correct operation.
●Grip the ice firmly.
●When you unplug the unit, be sure to hold the
plug while you pull it out of the outlet.
●Install the machine in a location unaffected by
occasional dripping of water.
●Do not touch the rotary parts (main shaft and
crank handle) during
the operation.
●For disposal of disused unit, please contact local
disposal experts or
the nearest vendor.
●Clean the shaving chamber before use.
●Be sure to switch OFF and unplug the unit
before cleaning and maintenance.
●Keep the machine away from direct sunlight.
●Never use inflammable sprays near the machine
and never place volatile or inflammable materials
close to the machine.
●Adjust the tension bolt properly so that when
you do not support it with your hand, the ice
holder does not descend.
●Do not touch the prongs with your fingers.
●After the day’s business is finished, be sure to
switch OFF and unplug the unit for safety.
The ice could jump out if it is
not positioned firmly.
It can cause injury. Abandoned machines are
dangerous. Treat blade on
machine as a dangerous item
when disposing machine.
Melting ice will drop and can
drip onto things surrounding
the machine.
Never pull the power
cable. It may damage the
plug/cable and can cause
electric shock or fire.
Irregular or imperfect
installation can cause the
unit to tip or fall and is
therefore dangerous.
Sparks from the
switch could possible
cause fire.
Otherwise it could increase
the chance of contamination
and could be the cause of
illness.
It may cause injury.
It can cause damage to plastic
parts.
Cleaning with the power or
switch in is very dangerous
and can cause electric shock or
injury.
Scotch
Tape
Operation
Manual
4
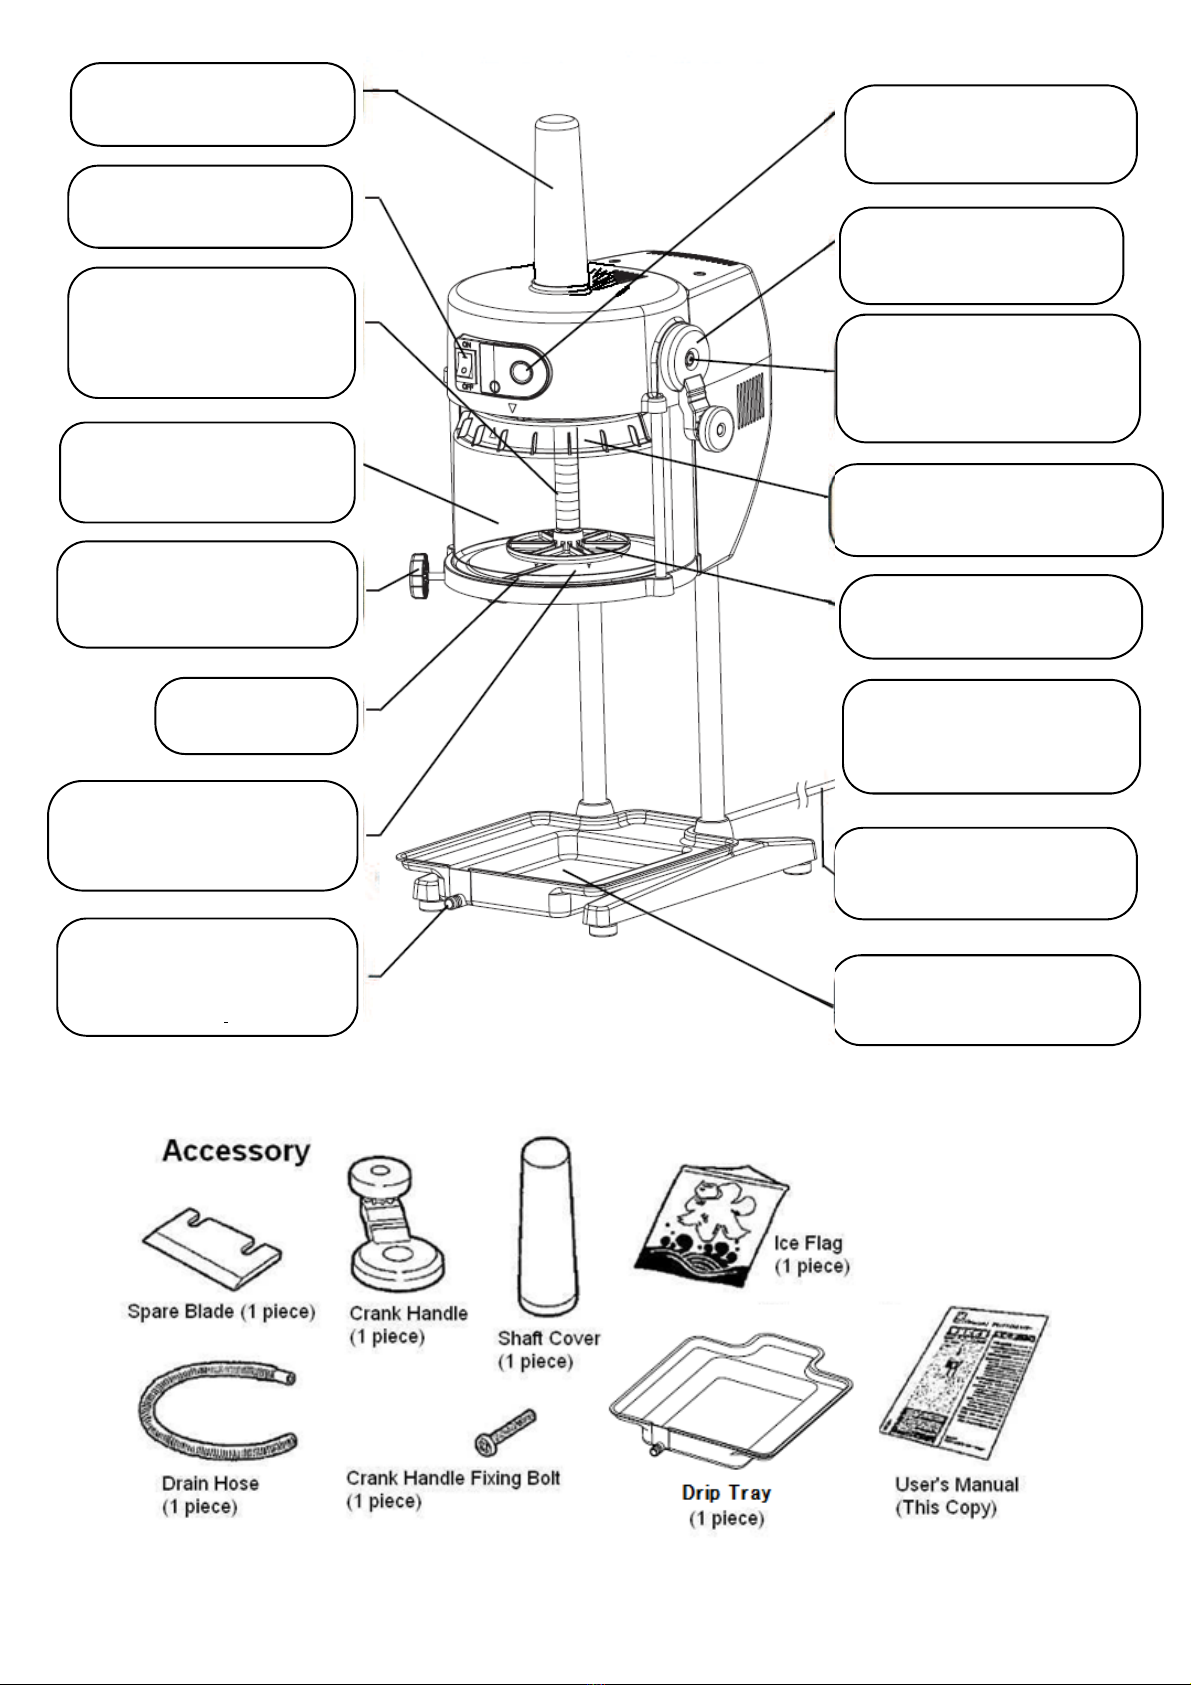
ShaftCover(Accessary)
Tocoverthemainshaftfor
safety.
PowerSwitch
Toswitchonandoff.
MainShaft
Itrotatesduringoperation,
andtransmitsthepowerto
presstheice.Iceholderis
mountedonthelowerend.
ShavingChamber
Placeablockiceinthe
Chamberforshavingice.
BladeAdjustmentKnob
Toturntheknobtocontrol
te
x
tu
r
e
of
t
h
e
s
h
a
v
ed
i
ce
.
Blade
Toshavetheice.
ShavingTable
Placeforicetobeshaved.
Bladeismountedonbackside
o
f
thetable.
HoseConnector
Todrainwaterofthedriptray.
Connectthehose(accessary)
tothisconnector.
TensionAdjusting Bolt
Toadjustthepowertopress
ice.
CrankHandle (Accessory)
Toraise/lowertheshaft
andiceholder.
FixingScre
w
for Crank
Handle(Accessory)
Tofixthecrankhandletothe
mainunit.
SlidingCover
Safetyshavingstartswhenthiscover
iscompletelyclosed.
IceHolder
Ithasspikesonthebottomto
gripice.
GroundingWire
Besuretoarrangegrounding
worktoavoidelectricshock
PowerCable
Toconnectthisplugtosocket
ofthespecifiedvoltage.
DripTra
y
Toholddewcondensationwater
andwaterbymeltedice.
5
Check before Operation
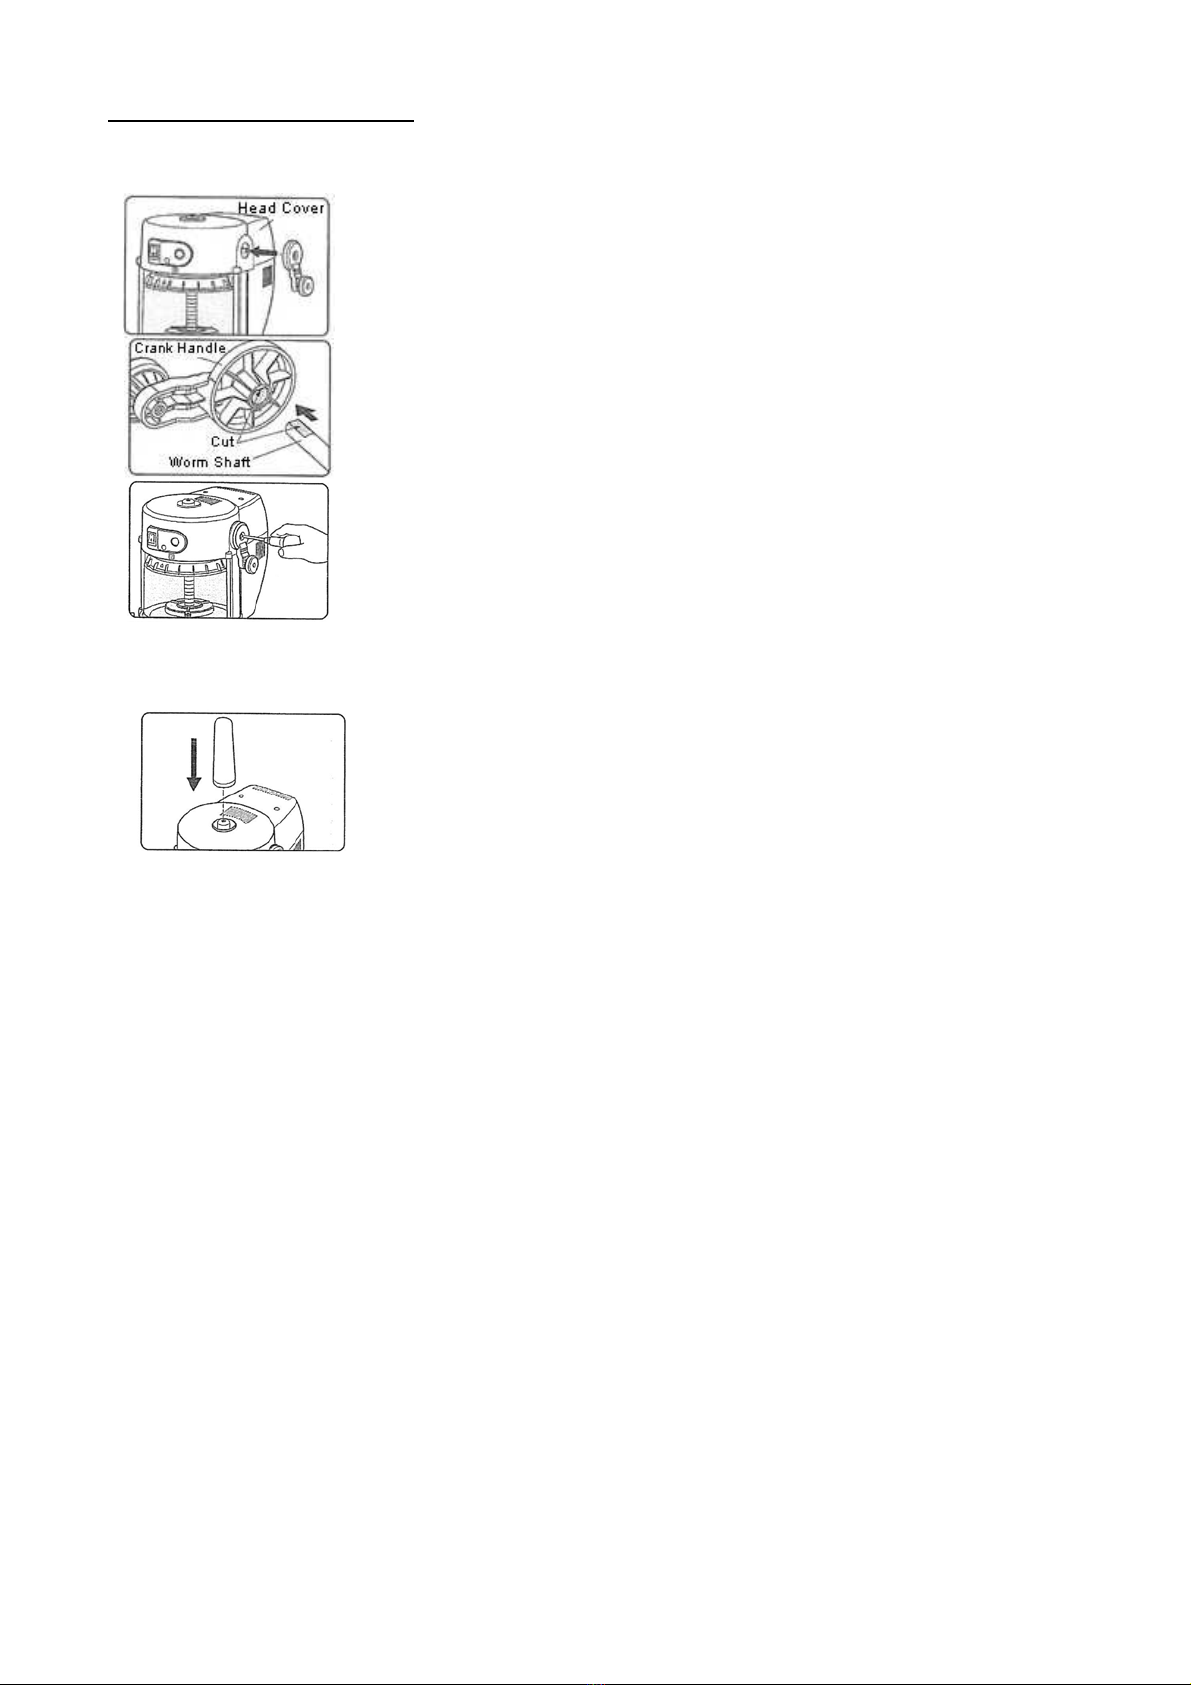
-Attach the enclosed crank handle in the following manner.
1) There is an opening on the right side of the head cover. Attach the
crank handle to the body through the hole to connect the worm shaft
inside.
2) In attaching the crank handle on paragraph 1, connect them aligning
the cut of the worm shaft with the cut of the crank handle.
3) Put the crank handle to the body using Philips bolt and fasten it by
screwdriver firmly. Check the handle if it raises the main shaft upwards
and downwards smoothly.
-Attach the enclosed shaft cover in the following manner.
Insert the shaft cover to the hole in the top of the head cover to hide the
main shaft.
-Connect the drain hose to the drip tray. And place a bucket as a receptacle of drip water through
the drain hose.
-Connect the unit to the socket of the appropriate electricity specified on the machine plate.
Refrain from using a generator. It is out of warranty.
-Clean the food zone such as the ice shaving area especially for the first operation after the
purchase. There could be dust in the chamber.
Remarks:
1) Very cold smoky color ice is not appropriate for shaving because it is too cold and hard. Use
transparent ice at an appropriate temperature when it looks transparent. Smoky color ice
will not produce soft and fluffy shaved ice. It could damage the blade tip and the blade will
not shave ice soft. Use transparent ice to extend the life of blade.
2) Do not put things on the unit. It may falls down as the unit vibrates during the operation.
It would be dangerous.

6
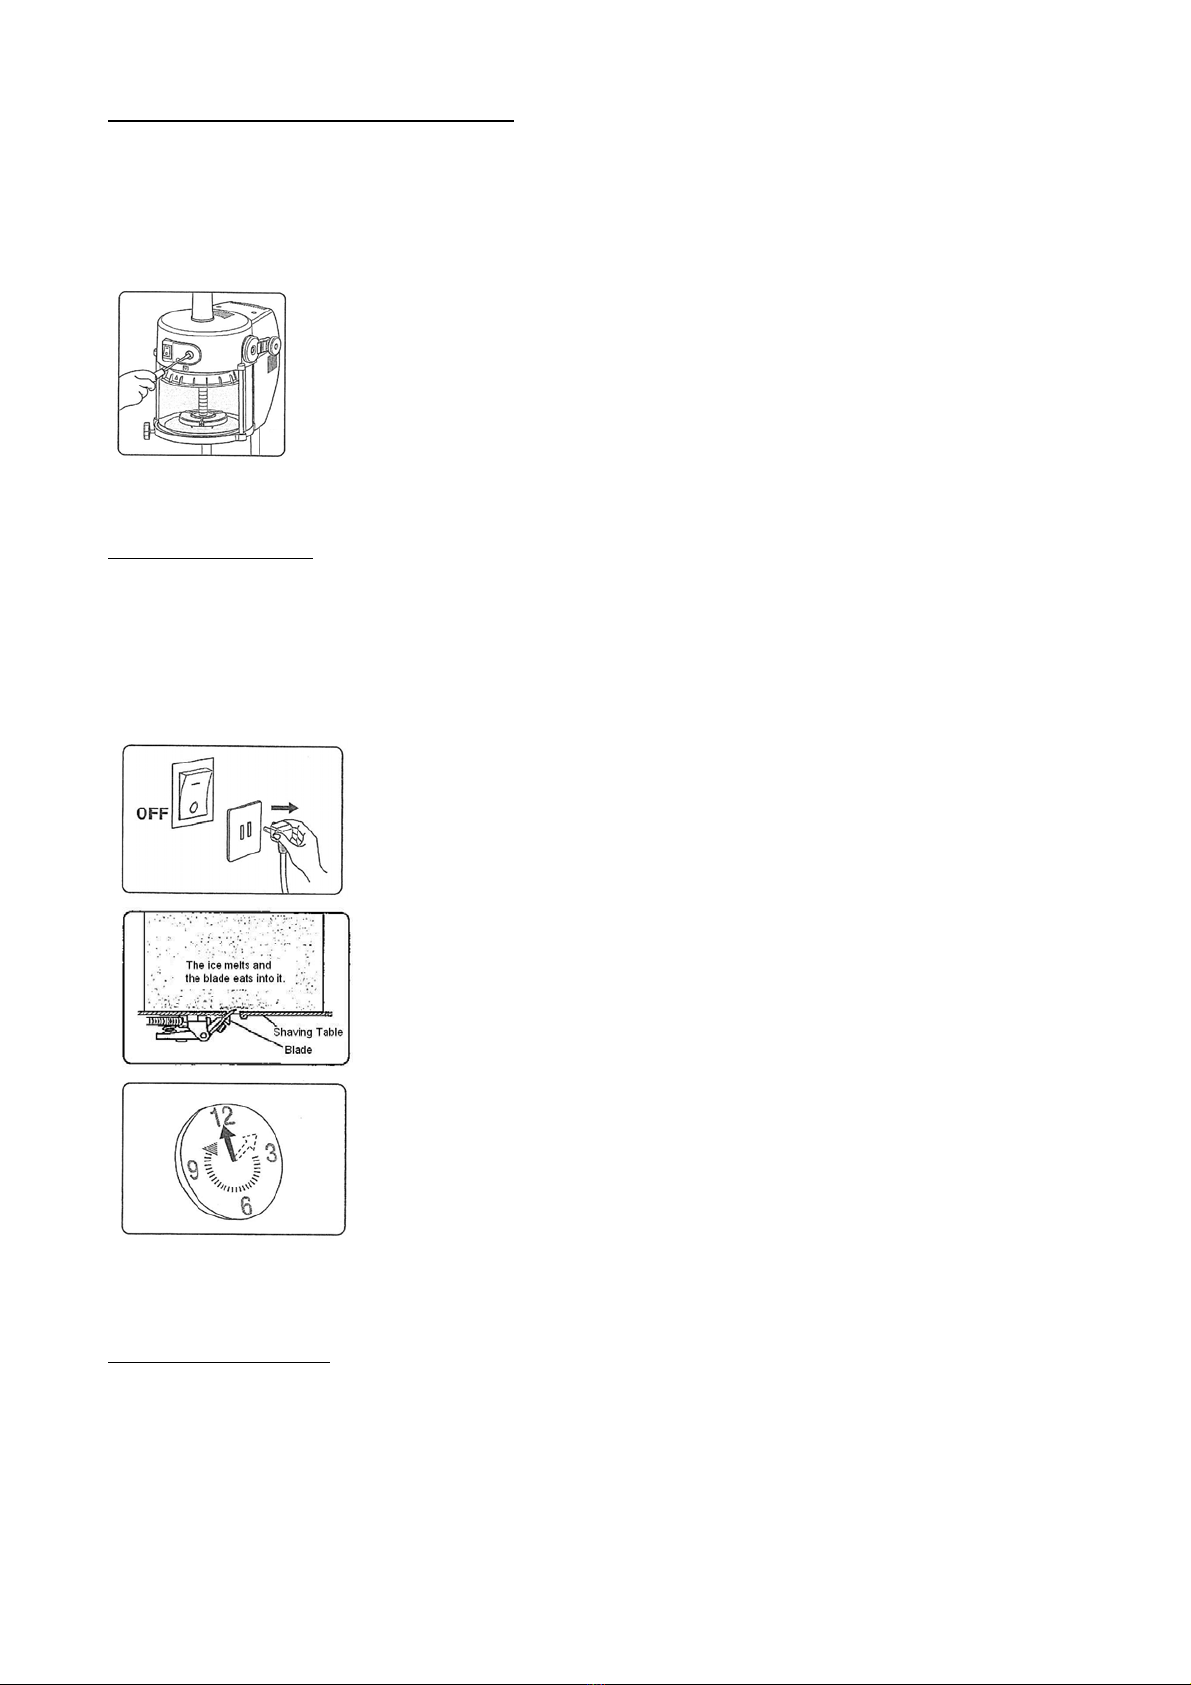
Operation
Plug in the shaver.
Make sure that power switch is turned to off position
before plugging in the unit.
Slide the sliding cover to the right to open.
Turn the crank handle clockwise to raise the ice holder.
Make sure that the ice holder does not descend when
the crank handle is free from your hand. If it falls
down, turn the tension bolt clockwise to hold the
position so as to avoid accident.
Place a block ice on the center of the shaving table.
The ice should not exceed the area of the shaver blade.
Otherwise ice cannot be shaved well or shaved
improperly and jumps out.
Turn the crank handle counterclockwise to lower the
ice holder. Make sure that the ice is gripped by spikes
of the holder firmly.
Insufficient gripping could cause the ice to fly out of
the chamber.
Turn the sliding cover to the left to close until the cover
contacts the stopper. If it is not fully closed, the safety
switch activates the unit not to work even when it is
switched on.
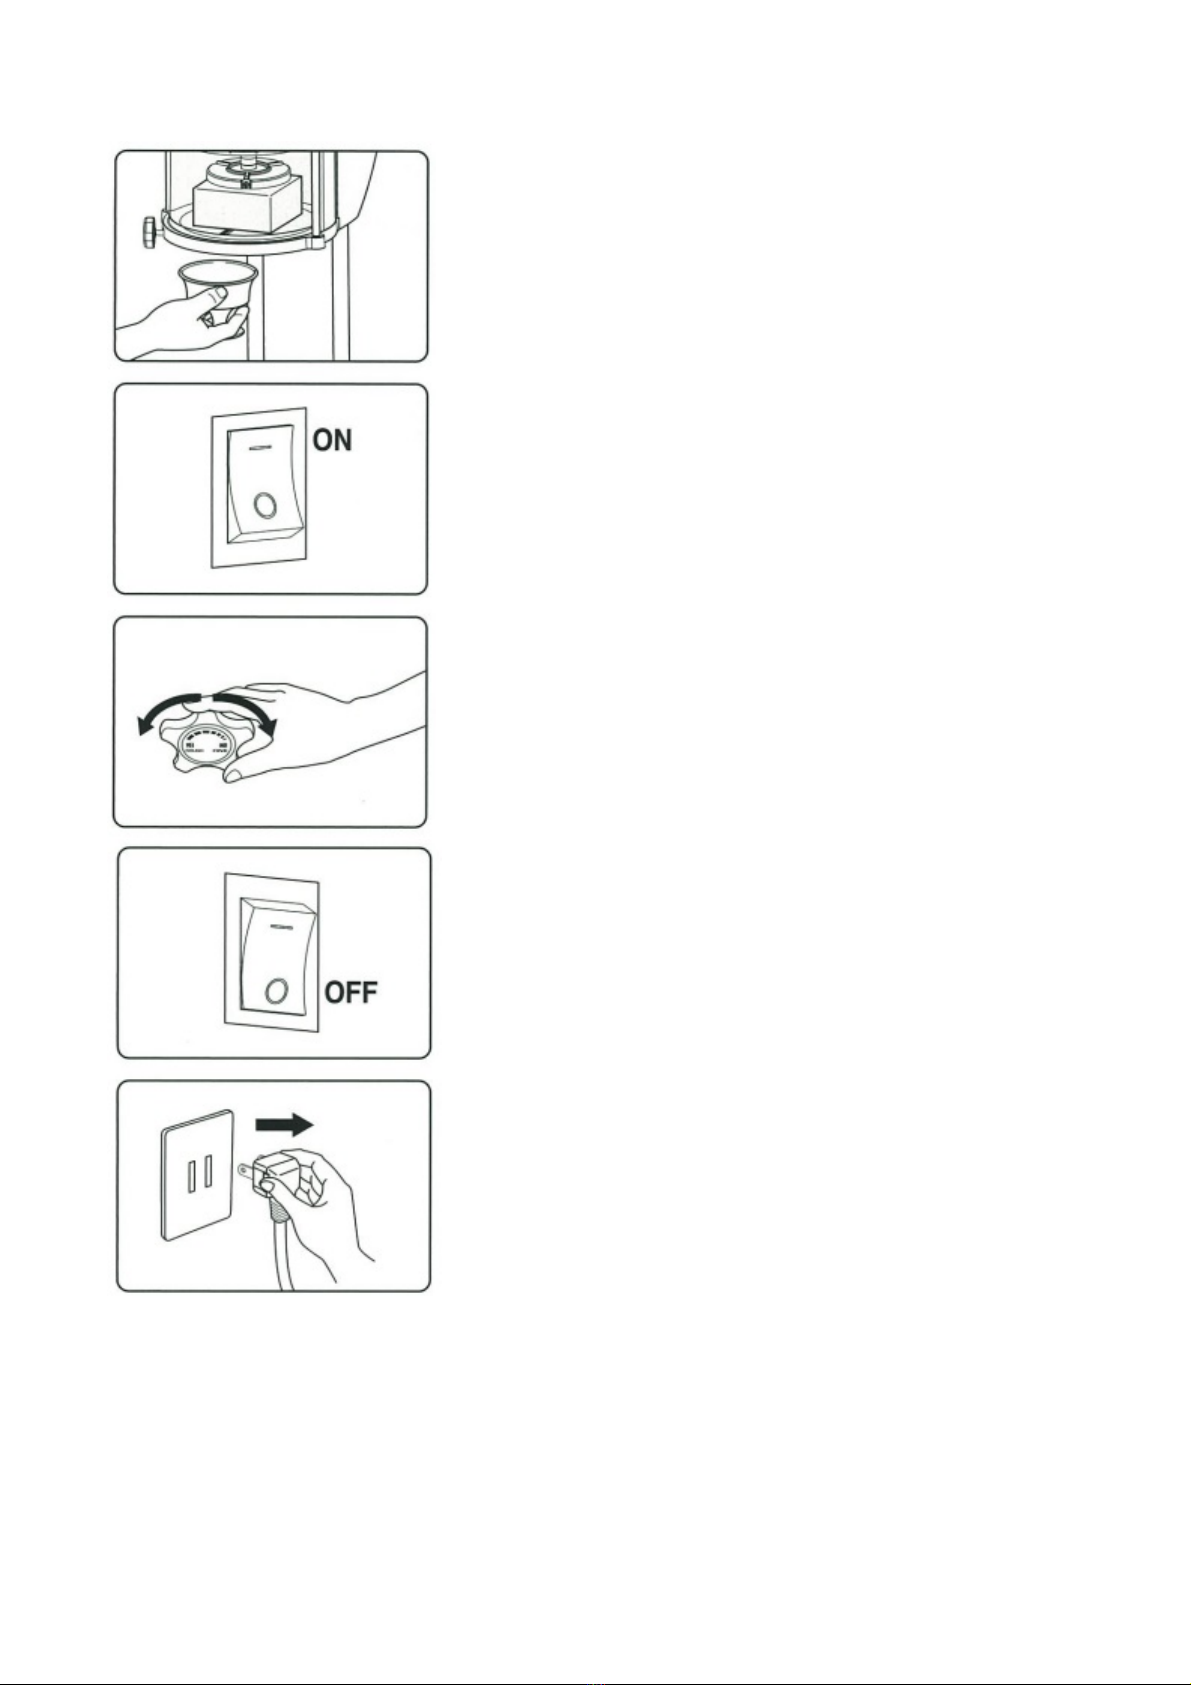
7
Prepare a cup under the shaving table to receive the
shaved ice.
Switch ON. Shaving ice begins.
Adjust the texture of shave ice.
Turn the blade adjustment knob for the desired
texture. For finer texture, turn the knob clockwise. or
turn it counterclockwise for coarser.
Switch OFF. (Stop working.)
Turn off the switch.
Unplug the unit.
Pull out the plug from the outlet when the job is
finished for the day.

8
Taking the ice from the shaving table.
-Do not touch the blade tip in placing and taking out ice. It could cause injury.
-Do not touch the prongs of the ice holder. They could cause injury.
-
About Safety Switch
-When the sliding cover (shaving shield) is opened, the safety switch activates the unit to stop
operation for safety.
-Do never use the safety switch for power switch purpose. The machine could break down.
1) Switch the unit off.
And turn the crank handle clockwise to raise the ice
holder.
2) Confirm that the ice holder does not descend when a
supporting hand is removed from the crank handle.
3) Move the sliding cover to the right to open.
4) Take out the ice from the shaving table.
5) Turn the crank handle counter-clockwise to keep the
ice holder to the lowest level. Close the sliding cover
(shaving shield).
This is for safety reasons.
9
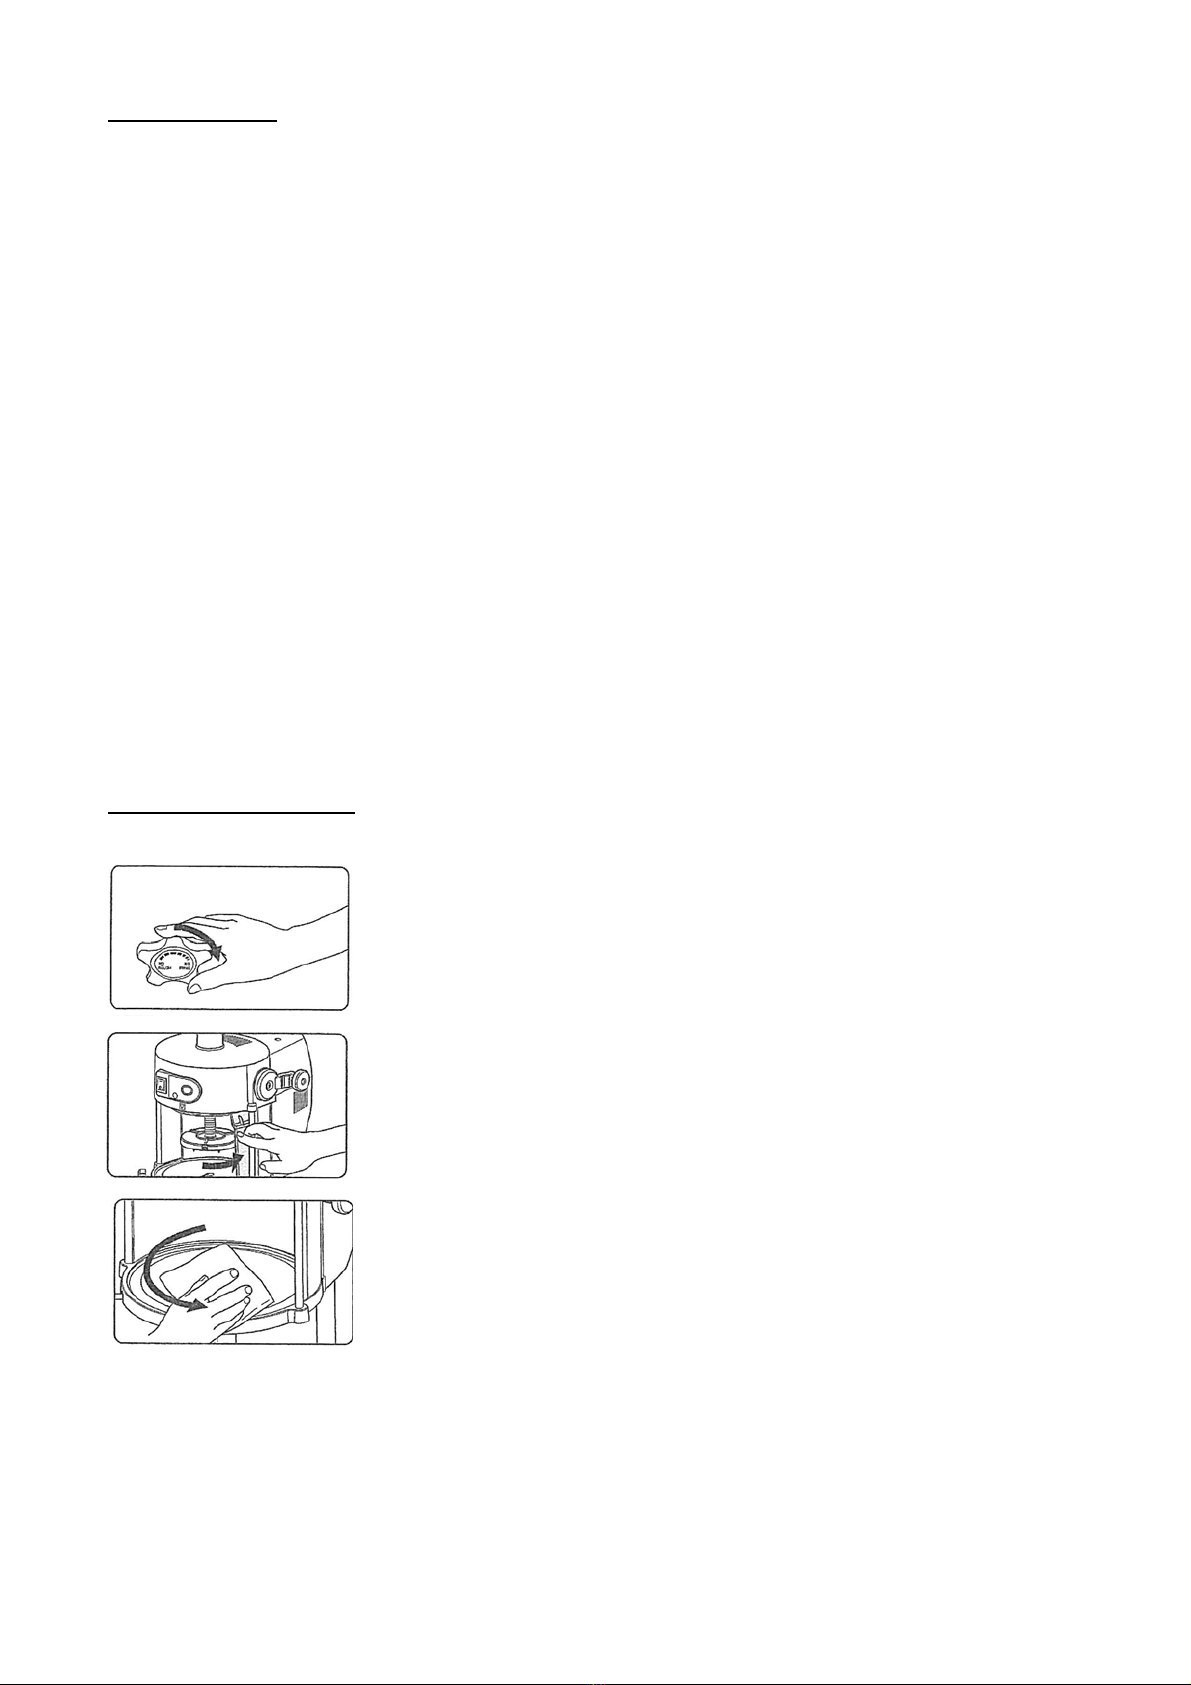
About Tension Adjustment Bolt
Adjust the tension adjustment bolt not to descend when you remove supporting hand from the
holder. Otherwise it could cause injury.
It adjusts the power to hold the ice.
-Use a slotted screw driver.
-Turn the tension adjusting bolt clockwise for stronger tension of gripping ice
or counterclockwise for weaker.
Confirm the adjustment by turning the crank handle. Recommended tension is
such that the ice block holder does not descend when you remove a supporting
hand from the crank handle, yet it does not feel heavy or tight when the
handle is moved to raise the holder.
About Protector
-When the motor is overloaded, the protector causes the shaver to stop automatically.
-When the motor is overheated under a certain period of continuous run, the protector reacts it
to stop the operation. The protector also reacts to overload of the motor.
-The motor has a protector built in.
-Follow the instructions below when the protector works.
1. Turn off the power switch and unplug the unit.
2. Remove a cause of the overload
(e.g., when the blade catches the ice too deeply by raising the blade too
high, it may obstruct rotation of the motor.).
Lower the blade and reposition the ice.
3. Leave the shaver switched off for an hour and then it restores itself.
The machine will automatically reactivate.
If the protector works often, please consult with the distributor.
Changing Blades
Switch OFF and unplug the unit at the time of changing blades, cleaning, maintenance, etc.
Work with gloves on and do not touch the blade tip directly. Otherwise it could cause injury.

10
Removing Blade and Attaching Blade
1) Switch off and unplug the unit.
2) Move the sliding cover to the right to open.
3) Turn the crank handle clockwise to raise the ice holder.
4) Turn the blade adjustment knob counterclockwise until the blade
protrudes the surface of the shaving table slightly.
5) Slightly loose the two Phillips screws that fasten the blade. Do not
take out the screws.
6) Pull the blade upward through the opening of the shaving table.
7) Position a new blade that the engraved mark "初雪(Hatsuyuki in
Japanese)” faces the ice holder. And insert it between the blade holder
and the ice receiver from the opening of the shaving table.
8) Position the blade tip and the shaving table at the same height and
level. Then fasten them firmly.
9) Turn the blade adjustment knob counter-clockwise for the desired
shaved ice texture (turn it clockwise for a coarser texture).
11
Maintenance
-Be sure the unit switched off and unplugged before cleaning. Wear protective gloves when
cleaning the inside of the chamber and when changing blades. Do not touch the blade tip
directly.
-Be sure to lower the blade below the surface of the shaving table when cleaning the inside of the
shaving cabinet, and wipe the table counterclockwise (against the blade tip direction).
-Do not put immerse the unit in water or put water over the unit. It could cause an electric short
circuit, rust, or permanent damage to the unit.
-Do not touch or operate the power switch, plug, and other electric parts by wet hand.
-Do not use a spray with inflammable gas or do not place volatile or combustible material near
the shaver.
-Do not wash the shaver with water in temperature more than 40°Celsius, with dish washer,
dryer, sterilizing storage. These could deform the plastic parts.
-Do not use followings for plastic parts: benzine, alcohol, petroleum, powered soap, polishing
powder, alkaline detergent, acid, hypochlorous acid, scrub brush, etc. For using chemical cloth,
follow the instructions on manual.
-Do not brush the shaving table by a hard thing as it is treated with rust-resistant coating.
Daily Maintenance
Inside Ice Shaving Chamber (Shaving Table, Sliding Cover etc.)
1) Turn the blade adjustment knob clockwise to the end so that the
blade tip is positioned below the surface of the shaving table.
It could cause an injury during cleaning if the blade tip is extruded over
the shaving table.
2) Move the sliding cover to the right to open.
3) Clean the shaving table using a damp cloth counter-clockwise.
Do not clean in a clockwise direction; this could cause injury inflicted
by the blade.

12
How to Detach/Attach the Sliding Cover
1) Move the sliding cover to the right until its triangle mark meets the
triangle mark on the head cover.
2) In the position that both triangle marks meets, pull out the sliding
cover to the front to remove it.
Cleaning the heavy dirt on covers
- Wipe covers by a dry soft cloth.
- Clean the hardened dirt using a damp cloth and warm water. A gentle dish detergent can be used.
Be sure to completely remove any traces of detergent with a damp cloth.
Monthly Maintenance
-Lubrication - Use a natural mineral oil for food machinery.
1) Turn the ice holder clockwise completely to the bottom. And remove
the Phillips screw fastening the crank handle.
2) Turn the shaft cover counterclockwise until it stops. Then lift up
the cover to remove it.
3) Remove the two screws Nos. 1 and 2 fastening the head cover by
Phillips screw driver.
To find the screw No. 2, peel off a circle shaped label. And remove it.
Remove the screw No. 3 to take out the crank handle.
Remove the head cover.
4) Temporarily insert the crank handle through the worm gear shaft.
(Refer to page 5 about detaching/attaching the crank handle.)
Lubricate the following parts rotating the crank handle;
A) 2 holes of the worm gear shaft holder upper part
B) Contact of Y-brake and the worm gear.

13
5) Mount the head cover and assemble the crank handle into the
crank handle shaft. Put the gear oil to lubricate bearing and the
main shaft while moving the main shaft up and down.
After lubrication, mount the shaft cover. (Refer to the explanation of
the shaft cover on page 5.)
Yearly Maintenance
-Periodically confirm there is no dust on the plug prongs and blade attachments. And plug in the
unit to the socket to check it works.
Improper connection could cause a fire or electric shock.
-Do not scratch the power cord. Keep it clean.
If it is stretched, folded, placed under a heavy thing, pinched, stained, or processed, the power
cord could be damaged. It could cause a fire or electric shock.
Maintenance of Grounding the Machine
-Check if the earth wire is not cut or disconnected from the terminal.
Should there be any defects, contact the distributor or an authorized mechanic.
Check of Plug
-Use an exclusive socket.
-Confirm there is no dust on the plug prongs or the socket.
-Do not use the power cord which is scratched, folded, placed under a heavy thing, pinched or
stained. Should there be anything irregular, contact the distributor or an authorized mechanic.
Preservation
To keep the machine for more than one week, dry it completely and keep the machine in a place free
from moisture.

14
Trouble Shooting
- The machine should be serviced and repaired by authorized mechanic or the distributor.
A) The machine does not start.
Is the plug connected to the socket? Connect to the socket.
Is the protector working? See page 9
–
A
bout Protector.
Is the belt mounted properly? Contact the distributor.
Is the slide cover (shaving shield) open? Close the slide cover (shaving shield) firmly.
Is the motor loaded heavily? Switch OFF. Remove the cause of heavy load.
B) The machine works but it does not shave ice well.
Isn’t the blade dull? Replace the blades. (See Page 10)
Is the blade adjusted properly? Turn the blade adjustment knob clockwise to
raise the blade.
Isn’t the tension bolt loose? Turn the bolt clockwise for heavier tension.
C) Ice moves away from the ice holder during shaving.
Isn’t the tension adjustment loose? Turn the tension adjustment bolt clockwise.
Do the prongs of the ice holder catch ice? Drop ice holder a bit stronger so the prongs grip
the ice firmly.
Transfer and Disposal
- When selling or transferring this product to a third person, tape this instruction manual on the
noticeable area of the product. This is to ensure that the new owner reads and understand all
instructions.
-Refer to a qualified service or your local dealer when discarding the product.
Abandoned products are dangerous and can result in a risk of injury. Blades are dangerous and
require proper disposal.

15
Specifications
Type Block Ice Shaver
Mode No. HB-600A
Power
A
C115V, 1ph., 60Hz
AC230V, 1ph., 50/60Hz.
Rating Power Consumption 225
/
230
/
205W
Shaving Capacity 1.8/2.2kg/minute
Max. Shaving Diameter 213mm
Unit Dimensions (W) 348mm X (D) 477mm X (H) 896mm
( 710mm up to the head cover )
Weight 19kgs.
Standard
A
ccessories Spare Blade ...1 pce.
Crank Handle........1 pce.
Drain Hose..... 1 pce.
User's Manual ...... 1pce.
Screw (M6 X 16 with Anti-loosening
mechanism ) ......... 1 pce
Flag.... 1 pce.
Shaft Cover..... 1pce.
Drip Tray..... 1pce.
Table of contents


