Haupon TM-73 User manual

ORIGIONAL INSTRUCTIONS
HVLP PAINT SPRAYER
TM-73
PLEASE READ AND SAVE THIS INSTRUCTION MANUAL ENGLISH
W
ARNING
TO REDUCE THE RISK OF INJURY, USER MUST READ AND UNDERSTAND
INSTRUCTION MANUAL. KEEP CHILDREN AWAY FROM WORKING AREA.
MADE IN TAIWAN
2
Specifications:
Voltage 100V-120V 220V-240V 50 Hz / 60 Hz
WATTS 300-420 watts
Air supply 67cu.ft./min. (1.9 m3/min.)
Container capacity 11 oz (0.3 L)
Weight 2.2 lbs. (1kg)
Motor speed 34,000 rpm
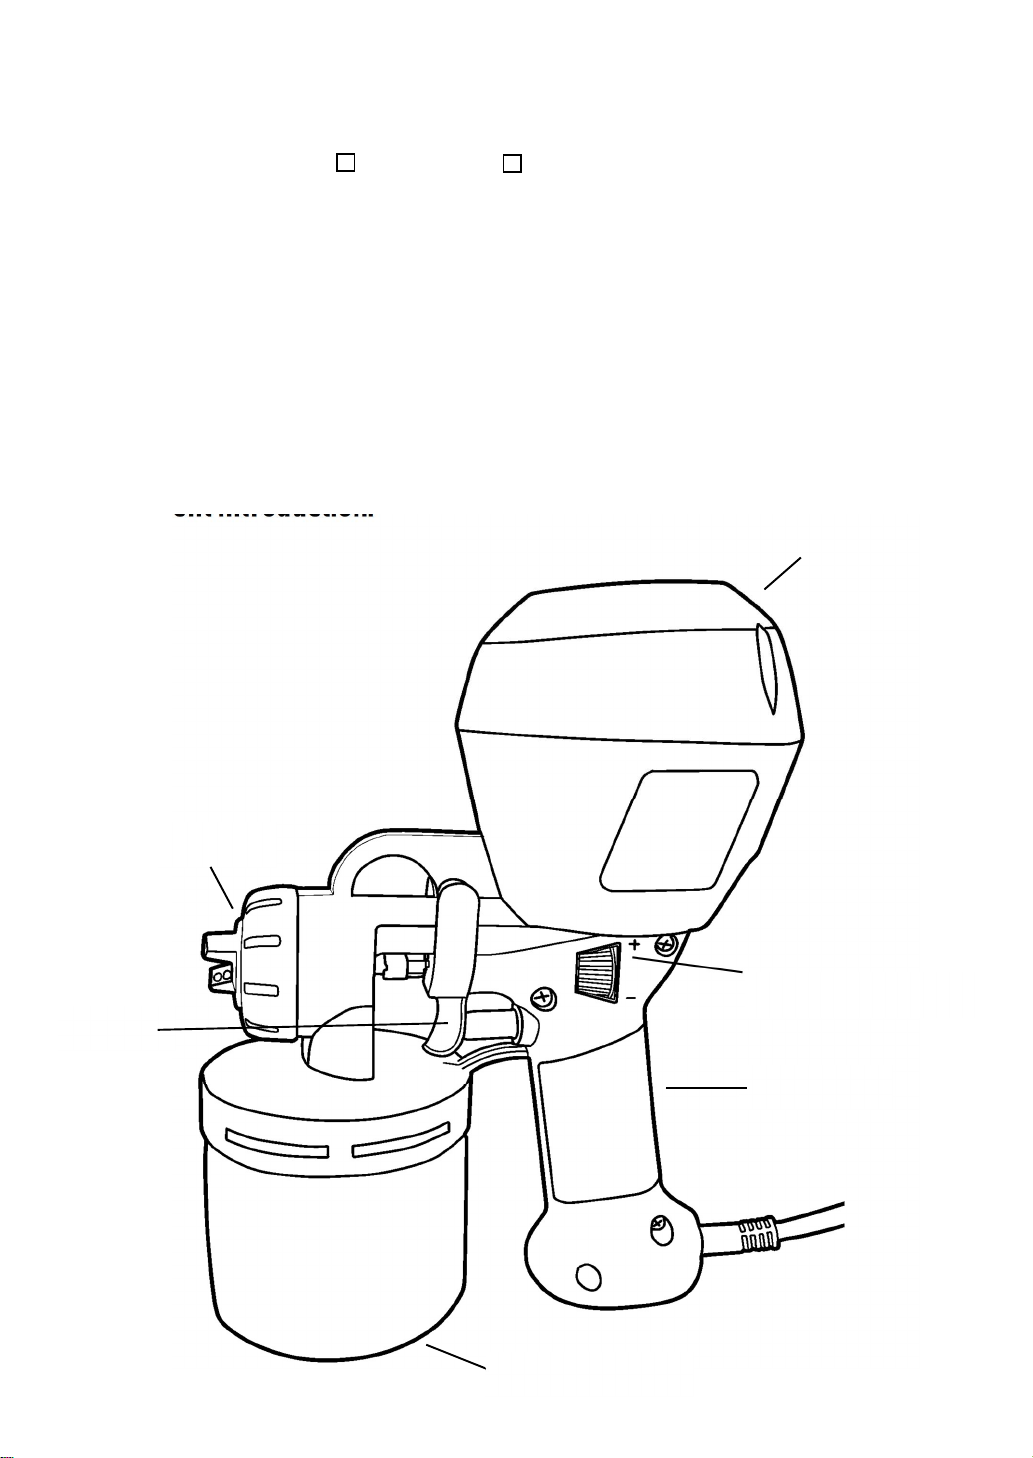
Component Introduction:
Motor Lid
Air Cap
Trigger
Paint Control Nut
Handle
Paint Container

3
Read instruction manual before operating and observe all warning.
WARNING:
DO NOT aim sprayer at yourself or anyone else at all times, in the event of an injury
occurring seek expert medical consultant immediately.
DO NOT allow any part of the body to come in contact with the fluid stream.
DO NOT cover the nozzle with any part of your body, high velocity jet could cause
accidental injuries.
DO NOT spray any hazardous materials (for example: easy flammable, very toxic, toxic,
less toxic, corrosive or irritating substances).
DO NOT spray any textured materials containing particles or fibers such as asbestos
fibers.
DO NOT spray flammable liquid.
DO NOT clean guns with flammable solvents.
DO NOT spray any material where the hazard is not known.
DO NOT use the spray gun outside when it is raining to reduce the risk of electric shock.
DO NOT use the spray gun at any stuffy area. Ensure adequate ventilation at all time when
using the unit.
DO NOT disassemble the sprayer without skill’s direction for avoiding danger.
DO NOT tamper with electrical motor, switch wiring or plug.
DO NOT leave your sprayer unclean or allow paint to dry in the gun. An unclean sprayer
will not work next time and you could void the one-year warranty.
DO NOT use the power tool if the switch does not turn it on and off.
NEVER immerse the sprayer into water or other liquids for preventing electric shock.
ALWAYS place the sprayer upright (do not place the sprayer upside down or on its side) to
prevent liquid or paints flow into motor.
ALWAYS wear mask, goggles, ear protectors and eye protectors while operating the
sprayer.
ALWAYS unplug the cord to prevent accidental spraying when you stop spraying or
servicing.
ALWAYS keep children and bystanders away.
USE fluids with a flashpoint above 55 degrees C.

4
FOR SAFE OPERATIONS:
1. Keep work area clean
Cluttered or dark areas and benches invite accidents.
2. Consider work area environment
Do not operate power tools in explosive atmospheres, such as in the presence of
flammable liquids, rain, gases or dust. Keep work area well lit. Avoid working with
power tools in damp or wet areas or when perspiring. Store tools away from
moisture. Do not use power tools where there is risk to cause fire or explosion. Power
tools create sparks which may ignite the dust or fumes.
3. Guard against electric shock
Avoid body contact with earthed or grounded surfaces (e.g. pipes, radiators, ranges,
refrigerators).
4. Store idle tools
When not in use, tools should be stored in a dry, high or locked up place, out of reach
of children.
5. Do not force the tool
It will do the job better and safer at the rate for which it was intended.
6. Dress properly
Rubber gloves and non-skid footwear are recommended when working outdoors.
7. Do not abuse the cord
Never carry the tool by the cord or yank it to disconnect it from the socket.
Keep the cord away from heat, oil and sharp edges.
8. Do not overreach
Keep proper footing and balance at all times.
9. Disconnect tools
When not in use, before servicing or when changing accessories.
10. Use outdoor extension leads
When use the tool outdoors, use only extension cords intended for outdoor use.
11. Stay alert
Watch what you are doing. Use common sense. Do not operate tool when you are tired
or under the influence of drugs, alcohol or medication.
12. Have your tool repaired by a qualified person
This electric tool is in accordance with the relevant safety requirement. Repairs
should only be carried out by qualified persons using original spare parts, otherwise
this may result in considerable danger to the user.
13. Do not use guns for spraying flammable materials.
14. Do not clean guns with flammable solvents.

5
15. If operating a power tool in a damp location is unavoidable, use a residual current
device (RCD) protected supply. Use of an RCD reduces the risk of electric shock.
16. Prevent unintentional starting. Ensure the switch is in the off-position before
connecting to power source and/or battery pack, picking up or carrying the tool.
17. Remove any adjusting key or wrench before turning the power tool.
18. If devices are provided for the connection of dust extraction and collection facilities,
ensure these are connected and properly used.
19. Maintain power tools.
Check for misalignment or binding of moving parts, breakage of parts and any other
condition that may affect the power tools operation. If damaged, have the power tool
repaired before use.
20. Use the power tool, accessories and tool etc. in accordance with these instructions,
taking into account the working conditions and the work to be performed.
Notes:
Please use the check valve to prevent paint from flowing into motor.
Practice before painting. Practice spraying water on cardboard, and adjust the paint
flow and turn the wings of the tip to get the desired spray pattern. (see Page 8 & 9.)
Keep spray tip, needle tip and check valve clean.
Check spray tip, needle tip and check valve for dried paint before each use.
Before each use, lightly push the check valve by bamboo skewer or slender object
to check if air can pass through. (See Check Valve, page 10)
Make sure paint tube is inserted tightly into the intake port.
Always clean check valve after each use. (see Check Valve, Page 10.)
Always clean the sprayer after each use. (see Clean Up, page 11.)

6
Noise/Vibration Information
Measured sound values determined according to EN 60745-1 and EN 50580.
Typically, the A-weighted noise levels of the product are:
Sound pressure level 86 dB(A);
Sound power level 96 dB(A).
Uncertainty
K=3 dB.
Wear hearing protection!
Vibration total values (triax vector sum) determined according to EN 60745-1 and
EN50580:
Vibration emission value ah <1.5 m/s2,
Uncertainty K =1.5 m/s2.
SERVICING OF A DOUBLE-INSULATED PRODUCT:
1. A product provided with a 2-blade polarized attachment plug shall be provided with the
following instructions or the equivalent: This appliance has a polarized plug (one blade is
wider than the other). This plug will fit in a polarized outlet only one way. If the plug does
not fit fully in the outlet, reverse the plug. If it still does not fit, contact a qualified
electrician to install the proper outlet. Do not change the plug in any way.
2. In a double-insulated product, two systems of insulation are provided instead of
grounding. No grounding means is provided on a double-insulated product, nor should a
means for grounding be added to the product. Servicing of a double-insulated product
requires extreme care and knowledge of the system, and should be done only by qualified
service personnel. Replacement parts for a double-insulated product must be identical to
those parts in the product.
The double-insulated product shall be marked with « DOUBLE INSULATION » or «DOUBLE
INSULATED » and « ».

7
The Choice of Spray Tip Set Size
* Ø 2.0mm is Included with TM-73
Optional Spray Tips: Ø 1.0mm, Ø 1.5mm, Ø 2.0mm, Ø 2.5mm, Ø 3.0mm, Ø 3.5mm, Ø 4.0mm
Large spray tip sets are for water-based paint (latex paint); small spray tip sets are for oil-based paint.
PAINT PREPARATION:
Most oil-based paint should be thinned with thinner before
spraying. (Figure A) It might include dry paint particles which
could block the spray tip. Strain the paint after thinning. Strain the
paint through a fine metal sieve or nylon stocking to remove
particles or fibers which could block the spray gun. (Figure B)
When spraying lumps, no spray or thick spray pattern, it might be
necessary to thin paint to achieve optimum spray pattern.
THE IDEAL CONSISTENCY FOR VARIOUS PAINTS:
* This guide can offer only general information.
Thinning should be followed according to the stain or paint manufacturer’s guideline.
Spray Tip Size Recommended Material
Ø 1.0mm Coating, Photocatalyst, Sealer, Lacquer, Adhesive, Wood paint, Enamel paint
Ø1.3mm* Sealer, Lacquer, Red Lead Primer, oil-based paint,
Sealer, Enamel paint, Wood paint
Ø
1.5mm
Sealer, Lacquer, Red Lead Primer, oil-based paint, Paint with hardener
Ø2.0mm Solvent based Waterproof paint, Oil-based paint, Red Lead Primer,
Anti-rust primer, PU paint
Ø2.5mm
Ø
3.0mm
Latex Paint, Waterproof paint, PU paint, Super Glue, Paint with hardener,
Ready-mixed paint, Wood paint
Ø3.5mm
Ø
4.0mm
Recycle paint, Faux stone paint,
High viscosity paint
Water based paint 20-35 sec.
Oil-based paint 20-30 sec.
Coating 20-30 sec.
Enamel paint 20-25 sec.
Wood stain 20-30 sec.
Metallic Paint 20-30 sec.
Clear Sealer No thinning required
Polyurethane No thinning required
Primer 30-45 sec.
Stain No thinning required
Varnish 20-45 sec.
A
B
C
8
The choice of needle and spray tip for different paints:
Latex paint (All water-based paint): Ø 2.5mm (or larger)
needle tip & spray tip.
All oil-based paint: Ø 1.5mm (or smaller size) needle tip &
spray tip for fine spray pattern.
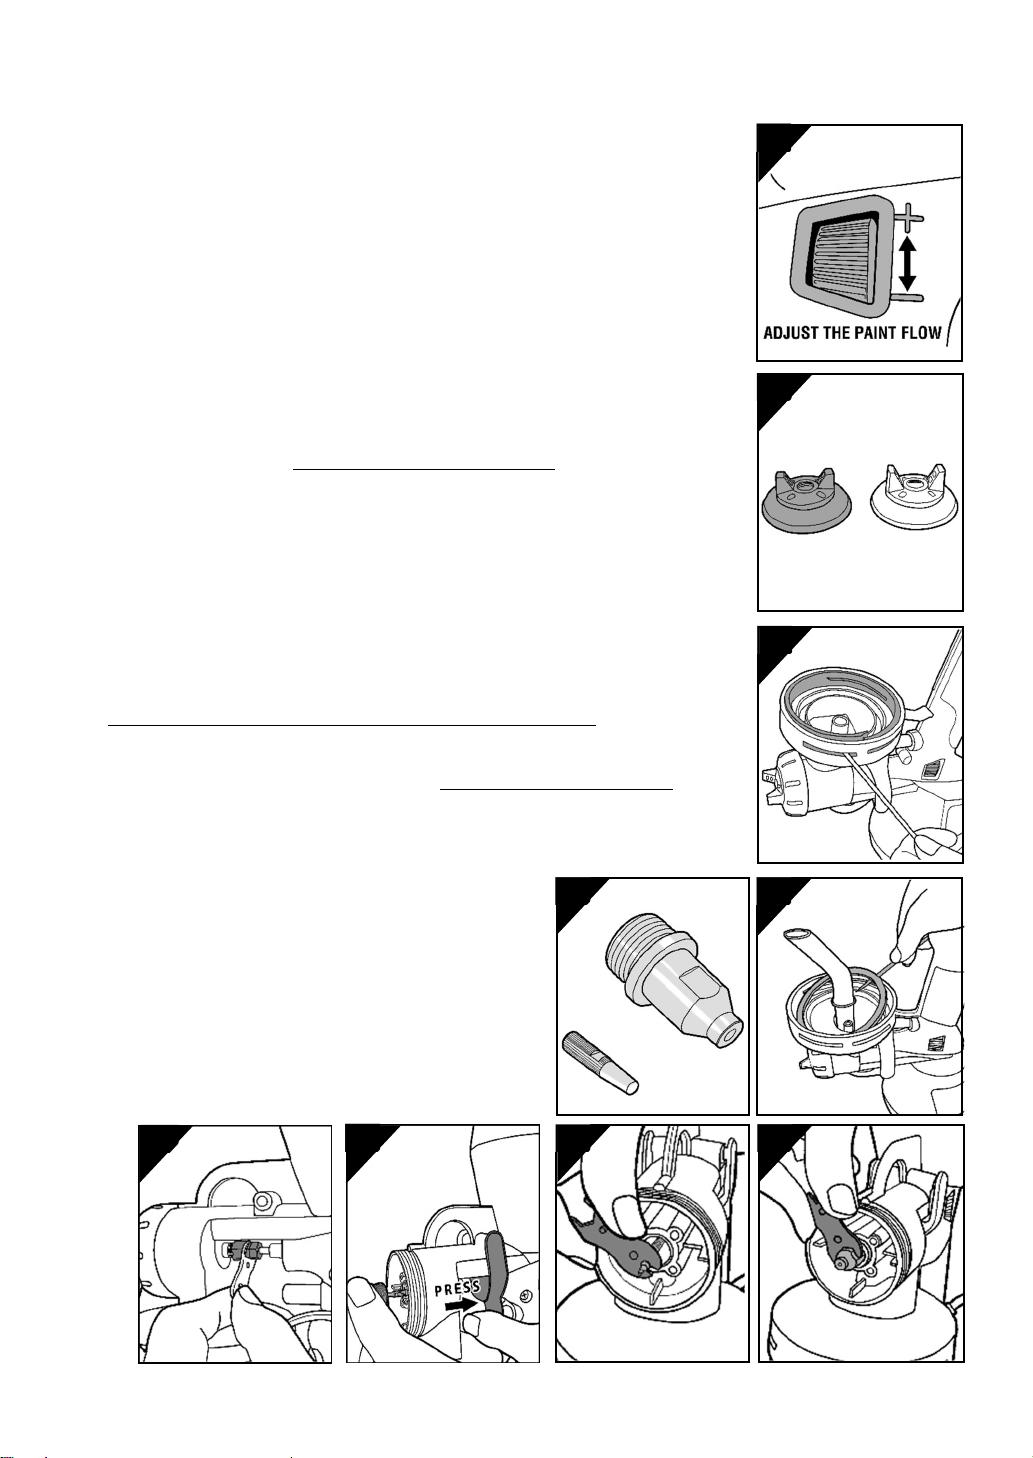
Adjust the paint flow
(+) Turn the paint control clockwise for more flow.
(lager spray pattern)
(-) Turn counterclockwise for less flow (finer spray pattern).
(Figure A)
The choice of air cap (Blue air cap is optional part)
Blue air cap: Wide spray pattern. (Figure B)
Black air cap: Narrow spray pattern, fine spray pattern. (Figure B)
Disassemble Threaded Insert and Lid Washer
- Use a wooden chip to remove the threaded insert from lid
(Figure C), and then take the lid washer out of lid (Figure D).
- Follow the direction to assemble them back.
Take notice of the direction of the threaded insert.
Disassemble Spray Tip and Nozzle (Please unplug the sprayer)
- When replacing spray tip, make sure the spray tip and needle tip
are in the same size. (Figure E)
- Use the included wrench to loosen and
tighten the spray tip and needle tip.
- Do not overtighten to prevent needle from
breaking. (Figure F & G)
- When assemble the nozzle, pull the trigger
and snug the nozzle with wrench. (Figure H)
- The wrench can also be used to loosen and
tighten the needle nut. (See Figure I)
A
B
C
D
F
E
G
H
I
9
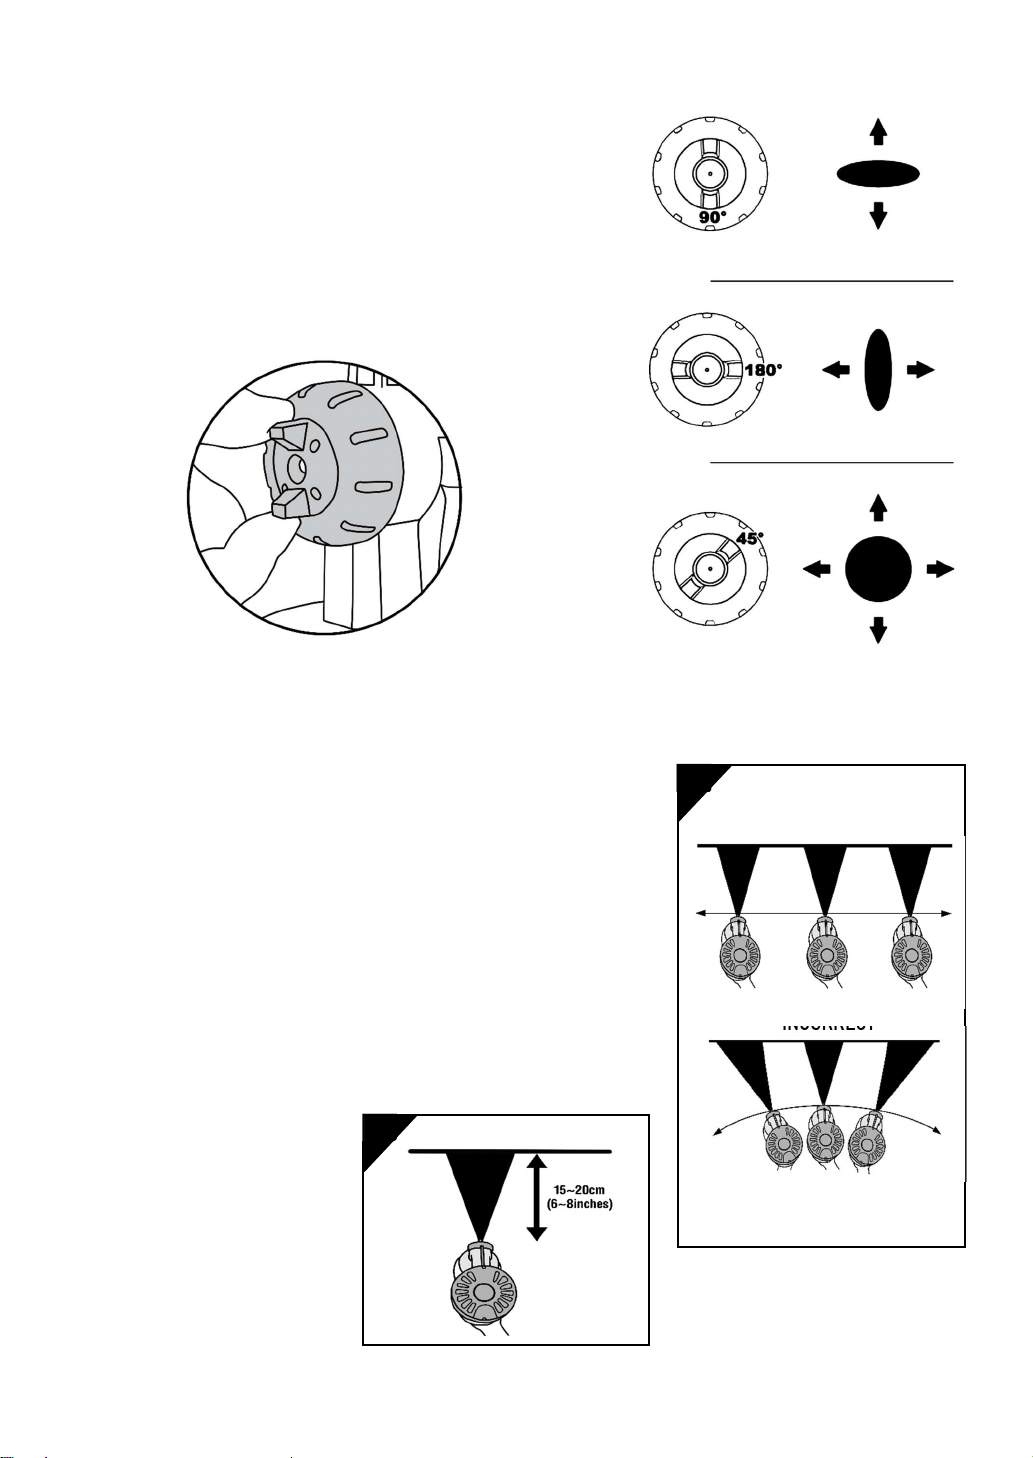
HOW TO OPERATE SPRAY GUN PROPERLY?
Adjust the Air-Cap
Slacken off the air-cap nut, turn the air-cap to the
required position to produce a horizontal or vertical or
round spray pattern. The horizontal spray is generally
used when painting up and down, and vertical spray
when painting across, and round spray when painting
on the strip.
Practice before painting
1. Always hold spray gun upright and spray parallel to the
painting surface. (Figure A)
2. The sprayer is with two-stage trigger design.
When press the trigger, motor will start running, then
paint will be spray out when press the trigger harder.
3. Test your sprayer on cardboard or scrap wood
especially when you operate the sprayer first time. 15–
20 cm (6–8 inches) is the best distance for spraying.
(Figure B)
VERTICAL
SPRAY
HORZONTAL
SPRAY
HORZONTAL
OR
VERTICAL
SPRAY
CORRECT
IN
CORRECT
B
A
10
HOW TO OPERATE YOUR SPRAY GUN PROPERLY? (CONTINUED)
4. When spraying overhead (e.g. ceilings) or floors, be sure
to adjust the angle of paint tube, or the sprayer may fail to
get the paints from the container due to tilting. The
vertical inclination should be not more than 70° to avoid
paints running up into the motor through the air inlet.
(Figure C)
5. The warm air from sprayer might cause the paint dried on
the spray tip and needle tip easily, so always keep the
brass needle clean with wet tissue or cloth to enable it to
work longer.
(Figure D)
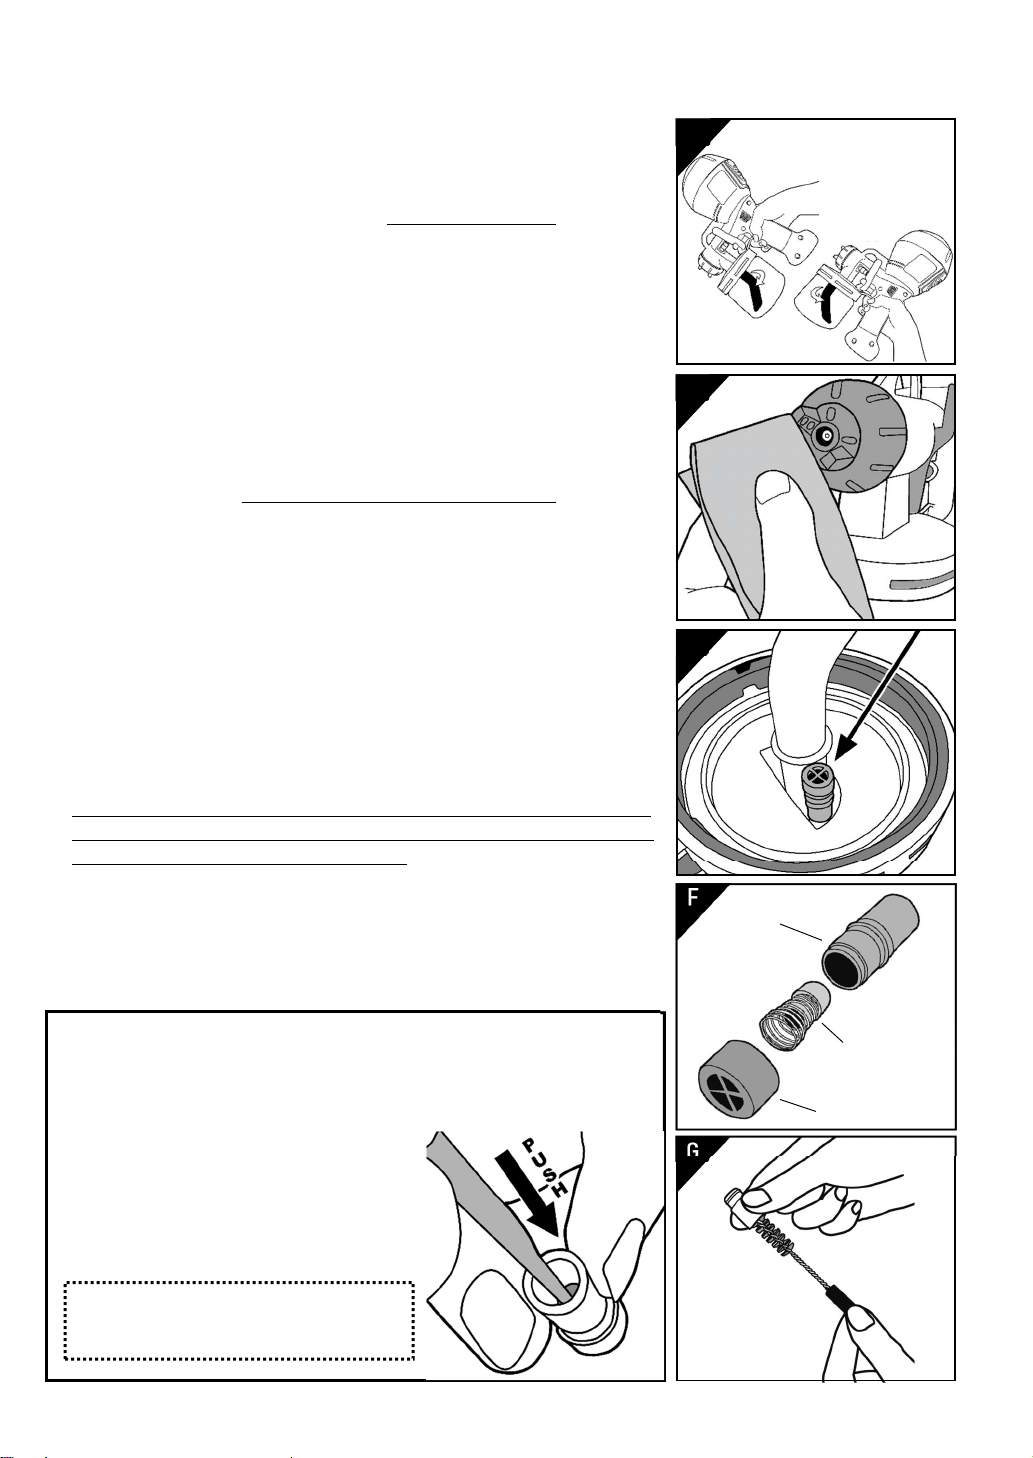
CHECK VALVE (Please use it when spraying)
Check valve prevents paint from entering the motor and
causing damage to motor while tipping sprayer over.
How to assemble?
See Figure E for the assemble position. To prevent difficulty of
disassembling, lightly fix it on the port.
How to Clean?
Unscrew the lid then clean the check valve and sleeve.
(see Figure F & G)
DO NOT leave check valve uncleaned or allow paint dried in it.
The dried paint can cause check valve stick on the sleeve, so
the sprayer will not work next time.
Notes:
When the check valve is used on the sprayer, to prevent paint
from leaking out of the nozzle, loose the paint container to
release pressure inside while changing spray tip set.
C
D
F
G
Before each use, lightly push the check valve by bamboo
skewer or slender object to check if air can pass through.
Always make sure the check valve does not stick on the
sleeve before use.
Sleeve
Check Valve
Lid
E
< 70°
Push from the other side of the
sleeve. No need to take off the lid.

11
CLEANING UP
After the project has been completed or when you are going to take a longer rest, it is
necessary to clean up the sprayer to prevent the paint from dried out and causing damage
to the unit.
Cleaning steps:
1. Unplug sprayer from electrical outlet.
2. Empty the remaining material in the container. (Figure A)
3. Fill container with some solvent (for oil-based paints) or soapy
water (for water based).
4. Plug spray into an electrical outlet.
5. Spraying towards the recycling bucket for about 1~3 minutes
(can’t spray towards the flammable area) till the paints inside
the circuit is fully clean. (Figure B)
6. Unplug sprayer and discard the remaining cleaning solution.
7. Disassemble nut, air-cap, suction tube, cup etc. Clean up them
with the above cleaning solution thoroughly and then
reassemble all components to the gun. (Figure C & D & E)
8. Put a small amount of light oil such as WD-40 or 3-in-one etc.
into the below position (Figure F) and trigger sprayer briefly.
Always clean and lubricate piston and cylinder after spraying
your sprayer with water or paint for avoiding rust. (Figure F)
9. Clean the unit not enough and lubricate it with no lubricating oil
which will cause cylinder rusted to seize, failure to follow the
above steps will void your guarantee.
**DO NOT remove the check valve while
cleaning the paint sprayer. This can prevent
water from flowing into motor.
Clean the check valve after the sprayer is
cleaned.
Clean Air Filter
Clean or replace air filter frequently.
An excessively dirty filter might cause
damage to the unit. (Figure G)
A
B
C
D
F
G
E

12
TROUBLE SHOOTING GUIDE
TROUBLE CAUSE REMEDY
Sags or runs
Too much paint.
Gun moved too slowly.
Paint too thin.
Gun held at incorrect angle or too close to
painting surface.
Spray overlaps too much.
Turn the adjust nut counterclockwise.
Move gun faster.
Add
unthinned paint to achieve correct time
through viscosity test cup.
Hold gun at right angle to surface and at a
distance of 15-20 cm.
Overlap spray about 1/3 width of spray
pattern
.
Dry spray
Insufficient paint coming from the spray
gun.
Gun held too far from surface.
Overspray from a preceding section when
gun is not held at right angle to painting
surface.
Spray patterns not well overlapped.
Air cap holes partially blocked.
Turn the adjust nut clockwise.
Hold gun at a distance of 15-20 cm surface or
closer for small objects.
Hold gun at right angle to the painting
surface.
Pay attention to the gun movement path.
Determine if obstruction is on air cap or paint
tip by
making a test pattern, rotating air cap half
turn, and spraying another test pattern. If the
defect is inverted, obstruction is on air cap.
Spitting or
spraying
lumps
Solid particles in paint.
Downward spraying angle more than 90°.
Filter paint
Do not downward the angle too much.
Motor is
running but no
spray
Paint not thin enough.
Check Valve dirty.
Air partition cap missing/dirty.
Loose paint container.
Lid washer missing/dirty.
Motor is running but the trigger
does
not pull the needle.
Loose needle.
Low volume of paint from spray gun.
Paint or glue causes needle to stick, so
trigger cannot pull it.
The needle tip drops from the needle, so
needle tip is jammed tight in spray tip.
Obstruction on paint tip or dirt on air cap seat
or paint tip seat.
Add the appropriate amount of solvent to the
paint. Add only a small amount of solvent to
the paint at one time.
Clean check valve.
Replace/clean air partition cap.
Tighten paint container.
Replace/clean lid washer.
Increase pressure on the trigger to pull
needle to shoot paint out.
Tighten needle.
Turn the adjust nut clockwise
,
the release
amount becomes bigger or Clean spray tip &
needle to restart the trigger.
Clean spray tip & needle.
Take out needle tip and install needle tip in
the needle.
Clean air cap with non-metallic instrument. If
obstruction is on paint tip, check for fine
burring which can be removed with 600 wet
or dry sandpaper. For dried paint inside, open
and wash.
Fluttering
spray
Jamming needle.
Needle nut not seated properly.
Blocked paint passages or Slide pipe not
seated properly.
Loose slide pipe & switch spring.
Pull and then release trigger quickly (2
-
3
times) to make sure needle is seated
properly.
Tighten needle nut.
Clean paint passages or Lubricate slide pipe to
make
sure slide pipe is seated properly.
Ensure slide pipe has to clasp
spring
properly.
Paint leaking
from the paint
container
Loose paint container.
Loose lid washer or worn lid washer.
Tighten paint container
.
Tighten lid washer or replace lid washer .
Paint leaking
from the
nozzle
Loose nozzle.
Needle nut is too tight, so the needle not
seated properly.
Tighten
nozzle.
Loosen needle nut.
13
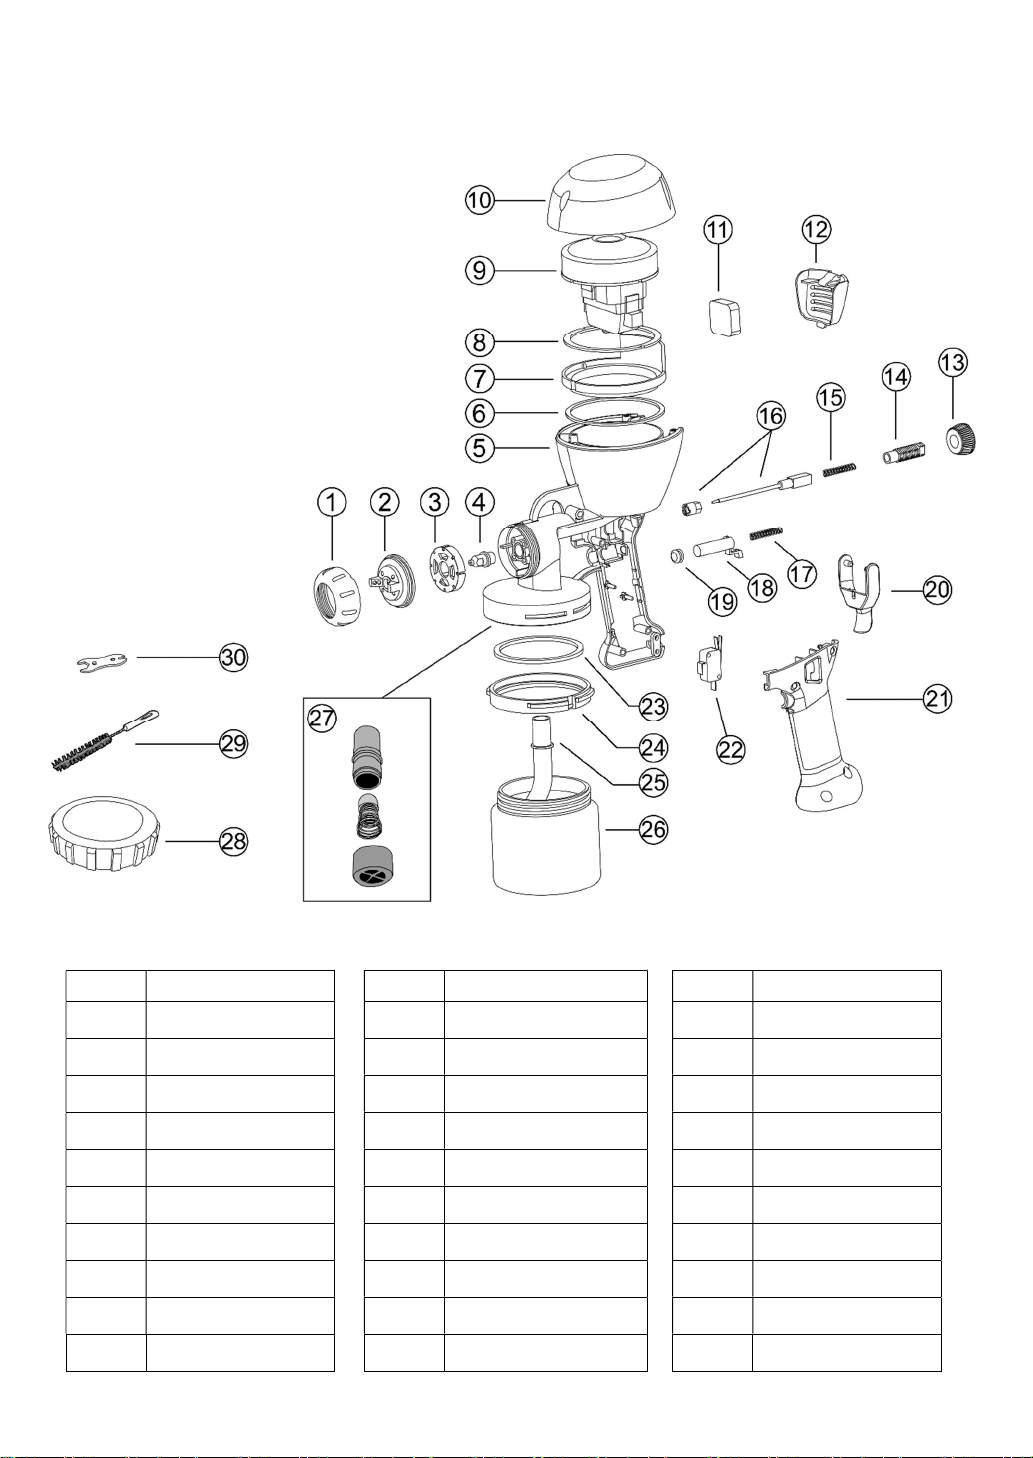
PARTS LIST
ITEM DESCRIPTION
1 RETAINING NUT
2 AIR CAP
3 AIR PARTITION CAP
4 SPRAY TIP
5 GUN BODY
6 MOTOR WASHER
7 MOTOR PARTITION
8 MOROR WASHER
9 MOTOR
10 MOTOR LID
ITEM DESCRIPTION
11 FILTER
12 FILTER LID
13 ADJUST NUT
14 SLIDE PIPE
15 NEEDLE SPRING
16 NEEDLE
17 SPRING FOR SLIDE PIPE
18 SLIDE FOR SWITCH
19 SEAL
20 TRIGGER
ITEM DESCRIPTION
21 HANDLE HOUSING
22 SWITCH
23 LID WASHER
24 THREADED INSERT
25 PAINT TUBE
26 PAINT CONTAINER
27 CHECK VALVE
28 CONTAINER LID
29 CLEANING BRUSH
30 WRENCH
14
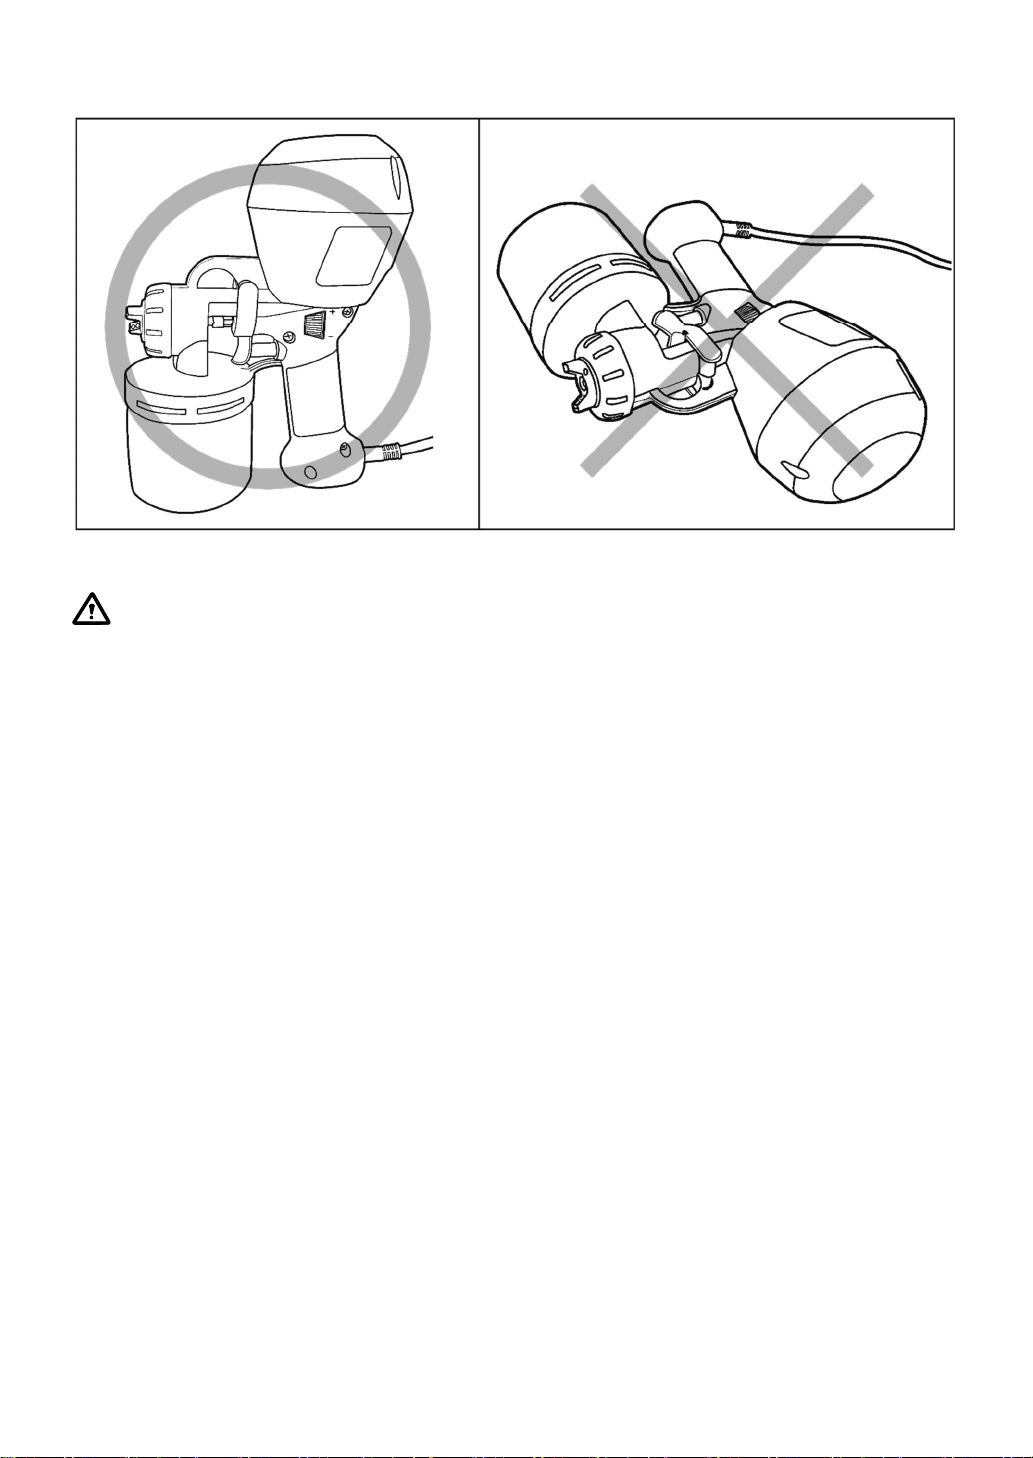
CAUTION: DO NOT PLACE THE SPRAYER UPSIDE DOWN.
ALWAYS place the sprayer upright to prevent liquid from entering internal wiring or
motor and causing electric shock or damage.
Use the cleaning brush to clean the inlets, do not allow water flow into motor.
15
WEEE and RoHs
Do not dispose of electrical appliances as unsorted municipal waste,
use separate collection facilities. Contact your local government for
information regarding the collection systems available. If electrical
appliances are disposed of in landfills or dumps,
hazardous substances
can leak into the groundwater and get into the food chain, damaging
your health and well-being.
When replacing old appliances with new ones, the retailer is legally
obligated to take back your old appliance for disposal at least for fr
ee of
charge.
EC Declaration of Conformity
We declare that the unit spray gun TM-500/TM-663 conforms to
2006/42/EC, 2006/95/EC, 2004/108/EC, EN 50144-1:1998+A1:2002+A2:2003,
EN 50144-2-7:2000
Jonkun Huang-General Manager

Website
YouTube
Tsung Mao Ind. Co., Ltd
tsungmao@haupon.com.tw
MADE IN TAIWAN
Rev B 20191217
Table of contents
Other Haupon Paint Sprayer manuals


Popular Paint Sprayer manuals by other brands


Parkside
Parkside PFS 100 B2 Operation and safety notes

SNOWJOE
SNOWJOE POWERJOE 24V-PS1-RM Operator's manual

Bosch
Bosch PFS 55 Original instructions

RevolutionAIR
RevolutionAIR Graffity - HVLP 600W instruction manual

Mi Swaco
Mi Swaco MONGOOSE PRO Installation and operation manual

Raven
Raven AutoBoom installation manual


