Hauppauge MediaMVP User manual

MediaMVP device and stand. The
Wireless MediaMVP version has a built-in
802.11G transmitter and receiver and an
external antenna.
Ethernet cable for connection between
the MediaMVP and your Access Point,
Router, Hub or Switch. This uses RJ-45
connectors and is 1.5 meters long. The
Wireless MediaMVP can also be connected
by using an Ethernet cable.*
Video cable set to connect the MediaMVP
to your TV set. The cable set includes
Composite video (yellow RCA jack), Left
Audio (white RCA jack), Right Audio (red
RCA jack).
In Europe, a SCART cable is supplied
instead of the video cable set. The SCART
connector on the MediaMVP has composite,
S-Video and RGB output, in addition to
stereo audio output.
Remote control transmitter with 2 AAA
batteries
MediaMVP Installation CD-ROM with:
MediaMVP Server application
MediaMVP User Interface application
Search for Media application
* Note: you can purchase longer Ethernet cables at most computer retail stores. Cat5
cable, as the cabling is commonly called, is available to lenghts of 300 ft.
1
Wireless MediaMVP
Quick Installation Guide
Contents of the MediaMVP package
Hauppauge! ®
M-MediaMVP-v2.7A-ENG 4/01/06

MediaMVP bridges the home PC with television sets. MediaMVP is located at the TV
set, and through your home local area network receives digital audio (MP3, WMA and WAV
music), digital video (MPEG-1, MPEG-2 or DivX video), digital pictures (JPEG, BMP and
GIF digital pictures) and Internet radio from a PC. MediaMVP then decodes the digital
media and displays the decoded media on a TV set, TV monitor or plasma monitor. On
your TV set, MediaMVP lists media which can be played.
The wired MediaMVP connects to local area networks via its built-in Ethernet
10/100Mbps connection. It can also connect to Ethernet based LAN adapters such as
Home Plug or wireless game adapters. The PC where both the MediaMVP software is
loaded plus where your media files are located needs to be on the same network node as
the MediaMVP. In general, if you have the PC and the MediaMVPs connected to the same
network hub, Access Point or router, this requirement is satisfied.
The wireless MediaMVP connects to your wireless network via 802.11G
To support video playback, the Wireless MediaMVP needs the higher speed provided by
802.11G networks. The Wireless MediaMVP first connects to your 802.11G Access Point
(AP), and then through the Access Point connects to your PC which is running the
MediaMVP server application. A wireless application loader resides in flash memory in the
Wireless MediaMV, which loads the MediaMVP application via the wireless network. In addi-
tion, a network setup utility is inlcuded in the MediaMVP to allow network configuration.
Up to 12 MediaMVPs can be connected on a network. This means you can have a
MediaMVP connected to the TV in your bedroom, one to the TV in the living room, one in
the den, etc. The only limitation is that all the MediaMVPs need to be on the same network
segment as the PC where the MediaMVP “server” is located.
Internet radio is played by having the PC connect to an Internet radio station and then
2
Overview of MediaMVP

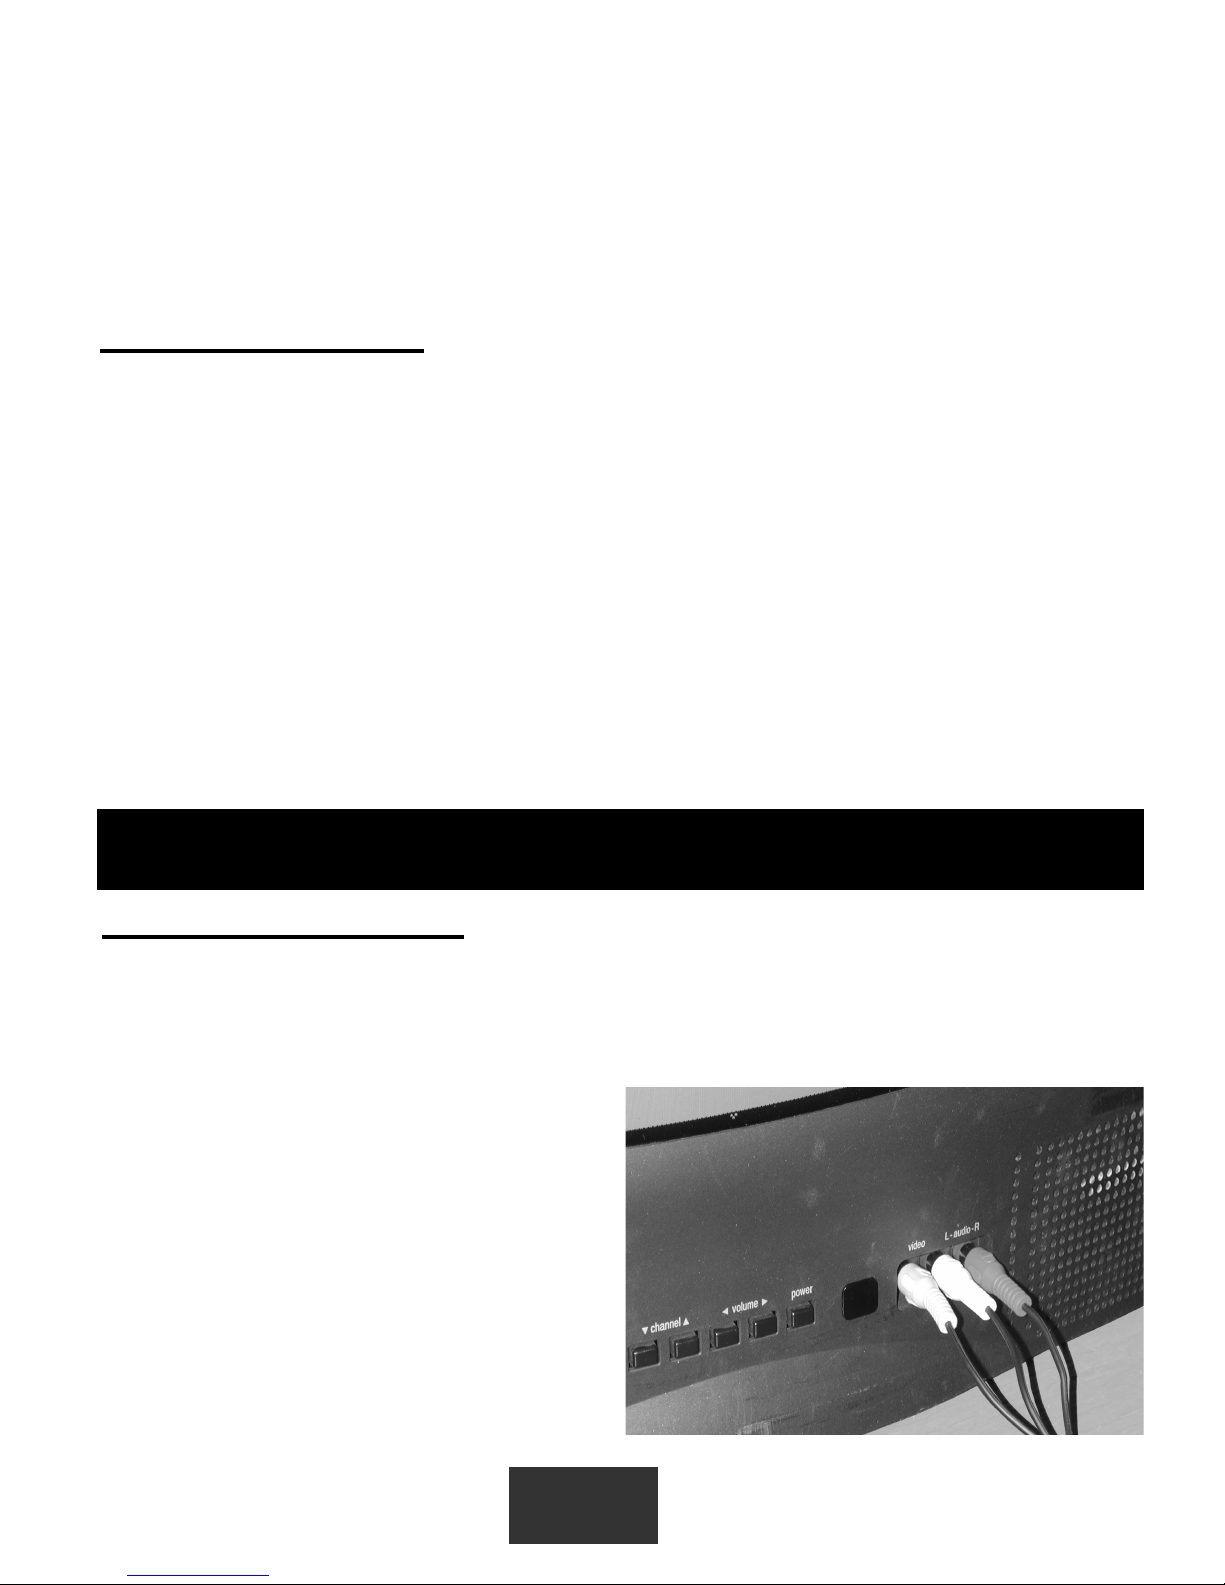
Connecting to a TV set:
Note: Your TV set needs to have A/V input jacks. If your TV only has RF inputs (normally
from a TV antenna), then you will need to use a Video-to-RF modulator, which can be
purchased from RadioShack.
Using the supplied Video cable set, connect one end of the Composite video (yellow
RCA jack) cable to the yellow jack on the
MediaMVP and connect the other end to the
Video Input jack on your TV set.
Connect one end of the Left Audio (white
RCA jack) cable to the white jack on the
MediaMVP, and connect the other end to the
Left Audio input on your TV set.
Connect one end of the Right Audio (red
RCA jack) cable to the red jack on the
MediaMVP, and connect the other end to the
3
Step 1: Connecting MediaMVP to your TV set
send streaming MP3 or WMA audio from the radio station to the MediaMVP. Only internet
radio stations which are directly accessable via the Internet are supported.
DivX video playing is done via a transcode process. When you chose to play a DivX video,
your PCs processor first decodes the DivX video in software, then reencodes the video into
a high bit-rate MPEG-1 format. The PC then transmits the high bit-rate MPEG video over
your network to the MediaMVP, where it is decoded and played on your TV set.
Technically speaking
MediaMVP’s CPU engine (a 350 DMIPS PowerPC) runs the Linux operating system, plus
has dedicated multimedia hardware for decoding MPEG video, audio plus MP3 music.
Digital pictures are decoded by the PowerPC processor in software.
MediaMVP runs in a client/server system, where the server can be a PC running either
Windows XP Home, XP Professional or Windows2000. The PC can be used for normal
tasks while acting as the MediaMVP server. The application running on the MediaMVP is
loaded from the PC when you turn on MediaMVPs power, therefore allowing undateable
software via Internet downloads.
MediaMVP decodes full CCIR601 resolution NTSC and PAL encoded MPEG-2 bit
streams in real time, up to and including 720x480 (NTSC) or 720x576 (PAL). MPEG video
rates range from 1.5 Mbps to 8 Mbps (higher in bursts), limited by the LAN bandwidth.
MediaMVP will upscale 320x240 (320x288 for PAL video) VCD video to full screen. A tun-
able Anti-Flicker Filter is included to improve the video quality on the TV sets.

4
Step 2: Installing the MediaMVP software on your PC
When you have made all your network and TV connections, boot your PC and run the
MediaMVP Setup program from the MediaMVP Installation CD-ROM.
Navigate to your CD-ROM drive and run SETUPE.EXE or MediaMVPSetup_###.exe
(where ### is the version number of the setup program).
This installation should take a few minutes. You will be asked if you would like MediaMVP to
be allowed to schedule a recording via a Hauppauge WinTV. This is optional.
Right Audio input on your TV set.
Note: If your TV set has only one audio input, use just MediaMVPs Left audio cable.
On your TV set:
To display video from the MediaMVP, you need to select the Video Input on your TV set.
Each TV set does this differently, but many TV sets have a button marked “TV/Video”.
Clicking this button normally switches from the TV tuner inside your TV set to the
Audio/Video inputs being used by MediaMVP. Some TV sets have a TV/Video button on
the remote.
If you cannot find a way to switch to Video Input on your TV set, refer to the TV set manual.
Plug in the supplied power adapter to a wall socket, and plug the 6volt power plug into the
Wireless MediaMVP. You will see the following screens:
Step 3: Turn on the Wireless MediaMVP

5
The first time you power up Wireless MediaMVP, it needs to be setup for your wireless net-
work. You will see a list of wireless Access Points (SSID) which the MediaMVP can “see”.
Make sure you hit the right cursor button on
the Hauppauge remote control for each WEP
key you enter.
When you have finished entering the WEP
key (if necessary), hit OK.
You will now be in the MediaMVP Wireless
Settings menu.
Cursor down to Apply and hit OK.
Use your MediaMVP remote control.
Cursor down and choose your Access Point.
Click OK. In this example, we are using the
Access Point named WMVP.
If you have enabled an access code (WEP)
on your Access Point, you need to enter the
WEP key. Use the keypad on the MediaMVP
remote control to enter the WEP key.

6
The wireless MediaMVP will now load its
application software from the wireless net-
work. It takes approximately 2 minutes to
boot the MediaMVP network from a cold
start.
After you click Apply, about 15 seconds later
you will be in the main Network Setup
menu. Cursor to Server Profile and hit OK.
Once you are back in the Network Setup
menu, cursor to Go and hit OK.
You need to select the Computer Name
where you have installed the MediaMVP
server software (most networks only have
one server). Chose your server and hit OK.
You will then see the main MediaMVP
menu.
Note: If you shut down MediaMVP with the
green ‘Power’ button on your MediaMVP
remote control, the next time you turn on
MediaMVP by hitting the green ‘Power’ but-
ton, MediaMVP should start within a minute.
Note: if you need to reboot MediaMVP,
remove the power plug from MediaMVP,
wait 5 seconds and plug it back in.

7
The transmission of video over wireless networks requires the 54Mbit/sec 802.11G network.
The biggest problem with playing wireless video on MediaMVP is making sure there are no
802.11B devices slowing down your 802.11G network. There are several symptoms of a
wireless network not running at the full 54 Mbits/sec:
- you will see jerky video or stuttering video when playing Videos
- you will get a loss of connection to your media server when playing videos and will
see a message ‘Contacting server’
Make sure your network is really running 802.11G only. Most wireless networks will
back down to the slower 801.11B speed if there is any device on the network which is run-
ning with 802.11B. For example, if your laptop is running at 802.11B speeds (max datarate:
11Mbits/sec), your entire network will run at the slower 802.11B speed and you will not be
able to play videos.
In order to optimize a wireless network for high speed video operation, here are a few
things you can do:
- choose another wireless channel: most Access Points come programmed to use
channel 2 or 6, but you might find the default channel is being used by other wireless
Access Points in your area. Therefore, change the setting on your Access Point to
another channel (the preferred channels are channel 1, 6 or 11). Changing channels is
done through the setup program on your Access Point.
- Set your Access Point to 802.11G only. Some access points can run at either
802.11B or 802.11G. This is also done via the setup program on your Access Point.
- add another Access Point just for video: Access Points are relatively inexpensive,
and adding another Access Point to your network, with a different channel number,
might significantly increase your network performance.
Microsoft has a good web page which talks about improving your wirelss network perform-
ance. The link to this page is here:
http://www.microsoft.com/athome/moredone/wirelesstips.mspx
Tips on optimizing your wireless network for MediaMVP

8
Many people install firewalls on PC networks to prevent unauthorized access to data in your
PC. If you have a firewall such as Zone Alarm, you will need to configure the firewall to
allow the MediaMVP to access a server application running on your PC.
ZoneAlarmPro Firewall
There are four firewall alert menus which pop up during the first use of MediaMVP. For each
of these alerts, you should allow access by clicking Yes. Examples of warning messages are
in the Troubleshooting section. To avoid warning messages from popping up each time
you use MediaMVP, select ‘Remember this answer’.
There are two MediaMVP services which will require access to your network: HcwSMS.exe
and MVPMedia.exe Grant access to both of these programs.
The built-in WindowsXP Firewall
Currently you need to disable this firewall for the MediaMVP to work correctly. Instructions
to do this are in the Troubleshooting section. Please check our web site for updates
which might allow the WindowsXP Firewall to operate at the same time as the MediaMVP.
If you have a Firewall on your network
You can also connect the MediaMVP via a Cat5 wired Ethernet network. Just run a Cat5
cable from your access point and plug it into the LAN jack on the wireless MediaMVP. The
wireless MediaMVP will detect that the LAN jack has been plugged in and will use a wired
setup which only requires the selection of the MediaMVP Preferred Server.
If you cannot get beyond Contacting DHCP Server, you are not connected to your
hub, router or access point, or your cabling is defective. If you are directly connecting your
MediaMVP to a PC and you get this message continuously, then you might be using a
straight through Ethernet cable instead of the crossover cable.
If you cannot get beyond Contacting MediaMVP Bootserver, your PC might be pro-
tected by a firewall, or the MediaMVP services have not started on your PC. Turn off your
firewall to see if this is causing this problem, and if so, you need to reconfigure your firewall
to allow the MediaMVP to access your PC (see Troubleshooting section).
Configuring your wireless MediaMVP for a wired
Ethernet network

9
After installing the MediaMVP, there are two ways of finding media on your PC. You can
either manually search for media from the TV set using MediaMVPs Settings menu, or you
can automatically search for media using the MediaMVP Search for Media program on
your PC.
To start the Search
Folders program
from the PC, click
Windows Start, then
Programs, and
under Hauppauge
MediaMVP run the
Search Folders
program.
You will see a
menu which allows
you to select the
Media Type
(music, videos, pic-
tures) and the
directories to be searched. Select the Media Type and the Search In directory (chose
“My Computer” to look in all directories) and click Search.
Once you start the search, any directory with the media type selected will appear in the
Search Results box. To add a directory, click on it and then click Add. Click Save before
you move to another media type.
Note: right click your mouse in the Favorites list, then click Add to manually add a specific
path (for example: when you already know where your music is on your disk drive, add that
directory). To delete a directory, right click your mouse on a directory, then click Remove.
When you are finished searching for your media, click Save then close the Search applica-
tion. The directories selected will be listed MediaMVP’s Video, Music and Picture menus.
Searching for media from the MediaMVP
You can also choose directories for music, digital pictures and videos from the MediaMVP
“Settings” menu. For instructions, in the section entitled “MediaMVP menus”, look at the
Settings menu.
Note: the first time you enter a directory, it takes a long time (as long as several minutes)
while thumbnail images are created. The next time you enter the directory, the response will
be immediate. You can also turn off thumbnailing in the Settings/Configuation menu.
Searching for media on your PC

10
Music menu
The Music menu will show MP3 files, WMA audio or Music Playlists which are located in
selected directories on your PC. You can play a music file (indicated by the music icon next
to the file name) by
either clicking the “Play”
button or the “OK” but-
ton on the remote con-
trol.
To navigate to a sub
menu (indicated by the
‘folder’ icon), cursor to
the folder by using the
arrow buttons on the
Remote control and click
the “OK” button on the
remote.
Playlists are indicated by
the ‘playlist’ icon. To
MediaMVP Main menu (the Go menu)
MediaMVP’s main menu
guides you to Music, Videos,
Pictures and Radio. Also,
through Settings, the user can
navigate to media stored on
their PC.
Note: your PC must be run-
ning and both the PC and
MediaMVP must be connect-
ed to the network before the
Main menu will be displayed
on your TV set.
Note: To access the Main
menu at any point, click “Go”
on the remote control.
MediaMVP menus

11
play a playlist, simply cursor to a playlist and click “OK” on the remote control. Supported
playlists are: M3U, PLS, B4S, and ASX.
If you click the “Menu” button on the remote control, a pop up menu will appear which will
allow the sorting of the music by date or name, or a random order of music files. A “Play
all” option is available, which will play all of the music located in the current directory.
To stop music, click the “Stop” button on the remote control.
To mute music, click the “Mute” button on the remote control.
Note: Music playlists can also include video files, but you can only play a video playlist
from a directory listed in Music.
Playing WMA audio files
To play WMA files (Windows Media Audio) with the MediaMVP, the installation of Windows
Media Player 9 is required. MediaMVP will not play encrypted WMA files (those files which
use Windows DRM).
Playing a Picture Slideshow while listening to music
After selecting music, either an individual music title, a playlist or by using Play All, you can
play Picture files by clicking the “Go” button on the remote control, right arrow to Pictures,
and then entering the Pictures menu by clicking the “OK” button.
To mute the audio while watching a slideshow, click the “mute” button on the remote.
Creating music playlists
You can either automatically create playlists in an application such as Musicmatch, or you
can manually create a playlist. If you want to create manual playlists, you can use either
M3U or ASX files.
When playing a music playlist, the Skip button on the remote control will skip the current
track and start playing the next track. Hitting one of the Quick Jump buttons on the remote
(the 0 to 9 buttons) will move you to 10%, 20%, etc in your music playlist.
M3U is pretty simple to create. Here is an example. Just create the file in any text editor and
save it into your music directory with an M3U extension.
C:\Documents and Settings\My Documents\My Music\Sara Mclachlan - Take your .mp3
C:\MyMusic\04-R.E.M. _ Everybody Hurts.mp3
C:\MyMusic\11-Bruce Hornsby & The Range _ The Way It Is.mp3
C:\MyMusic\06-Pink _ Family Portrait.mp3
Here is an example of an ASX playlist. Just create the file in any text editor and save it into
your music directory with an ASX extension.

12
<ASX Version="3.0">
<ENTRY>
<REF HREF="C:\MyMusic\06-Pink _ Family Portrait.mp3"/>
</ENTRY>
<ENTRY>
<REF HREF="C:\Documents and Settings\My Documents\My Music\Sara
Mclachlan - Take your .mp3"/>
</ENTRY>
<ENTRY>
<REF HREF="C:\MyMusic\04-R.E.M. _ Everybody Hurts.mp3"/>
</ENTRY>
<ENTRY>
<REF HREF="C:\MyMusic\11-Bruce Hornsby & The Range _ The Way It
Is.mp3"/>
</ENTRY>
<ENTRY>
<REF HREF="C:\MyMusic\04-Avril Lavigne _ I´m With You.mp3"/>
</ENTRY>
</ASX>
Pictures menu
The Pictures menu will show JPG, JPEG, BMP or GIF files which are located in selected
directories on your PC. You can play a picture file (indicated by the thumbnail of the pic-
ture) by either clicking the “Play” button or the “OK” button on the remote control.
To navigate to a sub menu (indicated by the ‘folder’ icon), cursor to the folder by using the
arrow buttons on the
Remote control and and
click the “OK” button on
the remote.
If you click the “Menu”
button on the remote
control, a pop up menu
will appear which will
allow the sorting of the
pictures by date or
name, or a random
order.
“Play slideshow” will play
a slideshow of all of the
pictures located in the

13
current directory.
To return to the Pictures menu while viewing a picture, click the “Back” button on the
remote control.
While running a slideshow, you can hit “Pause” to pause the slideshow. Hit either “Pause”
again or “Play” to resume the slideshow.
When viewing pictures, the Skip ahead button on the remote control will move 6 pictures for-
ward, while the Skip back button will skip back 6 pictures.
Videos menu
The Videos menu will
show MPEG-1, MPEG-2
or DivX videos which are
located in selected direc-
tories on the PC. You
can play a video file
(indicated by the video
icon or the video
thumbnail) by either
clicking the “Play” button
or the “OK” button on the
remote control.
Types of video files sup-
ported are MPEG1 and
MPEG2, from less then 1
Mbit/sec up to 8
Mbits/sec, or DivX
movies. The maximum data rate might be limited by your local area network speed.
To navigate to a sub menu (indicated by the ‘folder’ icon), cursor to the folder by using the
arrow buttons on the Remote control and and click the “OK” button on the remote.
If you click the “Menu” button on the remote control, a pop up menu will appear which will
allow the sorting of the videos by date or name, or a random order.
To return to the Video menu while watching a video, click the “Stop” button on the remote
control.
Use the Quick Jump 0 to 9 buttons to quickly move through a video. When playing
videos, the number keys moves to 10% when you hit the ‘1’ key, 20% when you hit the ‘2’
key, etc.
To fast forward through a video, click the remotes “Fast forward” button.

14
To pause the video while playing, click the “Pause” button on the remote.
To rewind through the video, click the “Rewind” button on the remote.
While playing videos, the audio volume can be adjusted through the Vol+ and Vol - keys.
Tips for playing DivX videos
- simultaneous playback of DivX videos are not possible from multiple MediaMVPs
- DivX playback requires a minimum 1.8 Gigahertz Pentium4 processor or faster in your
PC. If your PC is too slow to "transcode" the DivX video at its current frame size, video
will stutter or you will lose lip synch as you watch your videos. One solution is to paly
smaller frame size DivX videos. For example, if you see jerky video or stuttering audio
with 640x480 DivX videos, try playing 320x240 size DivX videos instead.
- MediaMVP can scale DivX videos up to full screen, but can only do this on videos of
exactly 320x240 or 640x480. If your videos are another format, they will be “letter-
boxed” on your TV set.
- After using the Fast-Forward and Fast-Rewind buttons a loss of speech synchronization
may occur.
- your DivX videos need to have a .AVI file extension in their names
- Once DivX videos are playing, they will typically consume most of the CPU power avail-
able on your PC. Therefore, you should not expect to be able to do other tasks on your
PC while playing DivX videos.
Radio menu
MediaMVP allows you to listen to Internet Radio stations through your TV set. MediaMVP
accomplishes this by opening a special link on your PC to the Internet radio station, and
then “streams” the Internet audio over your home network to the MediaMVP, where the
audio is output to the TV set. Note: your PC must be able to access the Internet.
To play an Internet radio station through the MediaMVP, the Internet radio station must do
two things:
- it must transmit audio in either MP3 or in WMA formats. Some radio stations transmit
using Real audio, which the MediaMVP cannot currently play.
- the Internet radio station must be accessable via a direct Internet link. In other words,
you need to be able to put a URL in Internet Explorer and reach the Internet radio sta-
tion directly without going through any levels of indirection. An example of a website
which has direct links to Internet radio stations is Shoutcast.
Here is how you can listen to Internet radio using MediaMVP:

15
Step 1: Create a link to
an Internet radio sta-
tion on your PC
Open Internet Explorer and
go to a page with Internet
Radio stations. Shoutcast is
one example:
http://www.shoutcast.com
RReemmeemmbbeerr::you
must be selecting
Internet radio sta-
tions which can be directly
accessed by your browser
(and not via a redirected
URL). There are many
Internet radio stations which
do not allow a direct link to
the station. These Internet
radio stations cannot be played by
MediaMVP.
Choose an Internet Radio station or pro-
gram and use your RIGHT mouse button
to click on the button which allows you to
listen to a station (for example, the Tune In
button in Shoutcast). When you click your
RIGHT mouse button, a
Pop-Up Menu will appear.
Choose Add to MVP
Favorite Radio Stations.
A window will pop up enti-
tled MVP Radio Station.
You will be asked to enter
Radio station name. You
can do so if you like, or
leave the default. You can
also place the radio station
in a category (you will see
these categories on your
TV set via the MediaMVP).
When you are finished

16
naming your radio station, click OK.
Step 2: Add radio stations to the MediaMVP media list
Now we need to add the Internet Radio station directory to the MediaMVP media list so that
the MediaMVP can "see" them.
On your Windows screen, click Start / Programs /HauppaugeMediaMP then Search for Media.
(this program also can be found in Program Files/Hauppauge MediaMVP directory)
Under Media Type: choose Radio
Stations and click on Search. After a
few moments, you will see a list of
directories on your local hard disks
which have MediaMVP links to Internet
Radio stations. Click on those directo-
ries you would like to have MediaMVP
list on your TV set, click Add and then
click on Save.
Step 3: Playing an Internet
radio station on the
MediaMVP
Click the Go button on the MediaMVP
remote. Click on the Radio button. If you have set up the directories (the paragraph above),
you will see a MyRadio listing. Go to this directory. In the directory, you will see a list of
Internet radio stations you have made links to.
To start playing an Internet radio station, use your remote control to select the station
and then click the Play button.
Note: If you click on a radio station and the audio does not start within a few seconds,
the radio station cannot be accessed by the MediaMVP. One reason for this is that
this station cannot be accessed directly (it uses redirection to get to the station).
Another reson might be that the radio station does not transmit audio in one of the formats
MediaMVP can play (currently MP3 and WMA).
How the Internet radio stations are named, stored and played by the
MediaMVP:
When you are browsing Internet radio stations while in Internet Explorer, and you right click
on a link to an Internet radio station, the MediaMVP application running on the PC makes a
note of the URL the link is pointing to. The MVP Radio Station pop up menu then is run,
allowing you to name the link and also put the link into a category (for example: Jazz), and
then a file is created in the My Radio directory with that name. The file extension is .MVP,

17
and within the file is the URL of the radio station.
When you want to play a radio station, the MediaMVP application running on the PC opens
that file, goes to the URL within the file and then streams the audio over your network to the
MediaMVP, where the audio is then played out to your TV set.
If the file holds a link which is not valid (a
link which does not directly point to an
Internet radio station), then the
MediaMVP radio software waits for about
1 minute before it senses that it cannot
open the URL and find a radio station.
Mediamvp will then return to the Radio
menu.
Settings menu
Directories for Music, Videos,
Pictures and Internet radio
The Settings menu is where you can chose the directories on your PC where your Music,
Video and Pictures media are stored. Also, the Settings menu has a Configuration
menu where you can set the video format (NTSC or PAL), video size (4:3 or 16:9), and flick-
er reduction (none, low, medium, high) for your TV set.
When you enter the Settings:Music, Settings:Video or Settings:Pictures menus, you
will see a listing of directories (such as My Documents) and drives (disk drives, floppy
drives or CD-ROM drives) on your PC.
To find media within a drive, scroll down to the directory (C:\ for example) and then click the
OK button on your remote control. This will bring the contents of the selected directory onto
your TV screen. To select subdirectories, scroll down to the subdirectory and hit the OK but-
ton. You will see if the media type you are looking for (music, videos, pictures) exists in the
directory chosen by having any existing media listed.
To add a directory, hit the green button on the remote.
If you would like to delete a directory from the list you see when entering Videos, Music or
Pictures from the Main menu, hit the red button on the remote.
Configuration menu
Video thumbnails
In the Configuration menu, you can turn thumbnails on or off. Thumbnails are small images
of your digital pictures or a small image taken from the first frame of a video when browsing
through lists of Videos or Pictures. Thumbnails are only viewable if your PC is running

18
Windows XP and has suitable MPEG decoders installed.
Note: if your PC slows down when viewing directories of Vidoes or Pictures, you should
turn Thumbnails off.
Flicker filter
The flicker filter removes flickering which might appear on some TV sets when displaying
text and pictures. High end TV sets can use the filicker filter turned off, while normal TV sets
might look better if flicker filter is set to medium or high. There are four settings: off, low,
medium, high.
Scheduling a WinTV recording from MediaMVP
MediaMVP has the ability to set up a scheduled recording using a Hauppauge WinTV in the
PC server. This sets up a recording session using WinTV-Scheduler.
The format of the recording is set by the WinTV application. For example, if you have a
WinTV-PVR-250 in your PC and want to record using DVD-LongPlay, you need to have set
the WinTV application to record using DVD-LongPlay.
Here are the requirements to record:
- your PC needs to have a WinTV
installed
- you need to have password permis-
sion to record on your PC
- your PC needs to have the WinTV-
Scheduler installed
The MediaMVP scheduler can be found
in the Settings menu. Go to Settings:Scheduler.
If you have no recordings scheduled, you
will see a message “There are no sched-
uled recordings”. Click the green button
on your remote control to add a sched-
uled record item.
Use the arrow keys to move to the fields
in ‘Schedule Item’. When you are fin-
ished setting up your recording, click the
green button on your remote.

19
Power button: the Power button will bring the MediaMVP into a standby mode and will turn
off the video output. It will not turn off the MediaMVP completely. When you click the Power
button again, the MediaMVP will resume from standby and turn on its video output.
If you want to reset MediaMVP, you need to
remove the power plug for a few seconds, then
reconnect it.
Go button: displays the Main menu. When in
any menu, clicking the Go button will bring up the
Main menu.
OK button: the OK button is similar to the Enter
key.
Menu button: brings up the Sub menu. For
example, when in the Music menu, clicking the
Menu button will bring up the sub menu allowing
the selection of Play all / Sort by date / Sort by
name / Shuffle.
Back button: goes back to the previous menu.
For example, if you have entered a directory and
you’d like to return to the previous directory, click
Back.
Pause button: will pause the music, video or
slideshow currently playing. Click Play or Pause
again to continue playing from where you left off.
Vol- and Vol+ buttons: you can control the
audio volume by using internal hardware in the
MediaMVP. This means you can adjust the audio
volume without having to use your TV sets’
remote control.
Skip ahead and Skip back: the Skip buttons
are used to skip 6 items ahead or backwards
when in the media lists (music, videos and pic-
tures) or when viewing pictures. When playing
videos, Skip advances the video 30 seconds.
Quick Jump 0 to 9 buttons: When viewing lists of media, or when playing videos, the
number keys moves to 10% when you hit the ‘1’ key, 20% when you hit the ‘2’ key, etc.
When viewing lists, the number buttons will move you to positions within the list. For exam-
Remote control
Power
button
Quick
Jump
0 - 9
buttons
Audio mute
Menu
Volume
up/dn
Fast
forward
Fast
rewind
Stop
Pause
Play
Skip
ahead
Skip
back
Green
button
Go menu
Videos
menu
Music
menu
Pictures
menu
Record

20
You can connect the MediaMVP directly to a PC or laptop via Ethernet. Since the direct
connection from a MediaMVP to a PC is very fast, you will get maximum performance. To
connect MediaMVP directly to your PC, you will need a 'crossover' cable which you can
either buy at a computer store or make yourself.
Here is how you connect the MediaMVP directly to your PC or laptop:
1. Purchase or make a crossover Ethernet cable. Examples of a crossover cable are
the Belkin CAT 5e Crossover Cable for computer-to-computer connection
2. Connect one end of the crossover cable to the LAN port on the MediaMVP, and
the other end to the LAN port on your PC or laptop
3. Make sure the MediaMVP software is installed on your PC or laptop. See
“Installing the MediaMVP soft-
ware” section. Leave your PC
turned on.
4. Connect the MediaMVP to
the TV set, and turn on the
MediaMVP.
If using a wireless MediaMVP:
You will be brought into the
Network Setup menu on the TV
set. On the PC, you should see a
Windows massage say 'Ethernet
connection found' and a minute
or so later “Local Area
Connection”.
On the MediaMVP, in the Network
Setup menu, select ‘Wired’, and move to Apply and hit OK. Once you are back in the
main Network Setup menu, move to Server Profile. Select your server and hit OK. Move to
Go! and hit OK.
Connecting MediaMVP directly to a laptop or PC
Cross over cable
MediaMVP
TV set
Laptop
ple, if you are looking at a list of videos in the Music menu, hitting the “5” button will move
you to 50% of the way through the list.
When watching a video, you can quickly skip through the video by hitting the 0-9 buttons.
When you hit one of these keys, you will skip to, for example, 10% of the video file when
you hit the '1' key, 20% of the video file when you hit the '2' and so forth.
Other manuals for MediaMVP
1
Table of contents