Havis TSD-201 User manual

Owner’s Manual
12.5" Capacitive Touch Screen Display
with Integrated Hub
TSD-201
TSD-201_0MN_11-20

Before Beginning
Havis is pleased to provide this Owner’s Manual to aid in the proper installation and use of the TSD-201, 12.5" Capacitive
Touch Screen Display with Integrated Hub.
For questions regarding the set-up of your TSD-201, 12.5" Capacitive Touch Screen Display with Integrated Hub , please
contact Havis at 1-800-524-9900 or visit www.havis.com for additional product support and information.
This Owner’s Manual applies to the following Part Numbers:
TSD-201
•NEVER STOW OR MOUNT THE TOUCH SCREEN DISPLAY DIRECTLY IN A VEHICLE AIRBAG DEPLOYMENT ZONE.
•DO NOT USE THE TOUCH SCREEN DISPLAY WHILE DRIVING.
•READ ALL INSTRUCTIONS THOROUGHLY BEFORE BEGINNING INSTALLATION.
•TOUCH SCREEN DISPLAY MUST BE CONNECTED TO VEHICLE POWER THROUGH SUPPLIED LIND POWER SUPPLY
WITH CABLES PROVIDED.
•DO NOT OPERATE TOUCH SCREEN DISPLAY WITH SHARP OBJECTS OR DAMAGE TO DISPLAY MAY OCCUR.
•ONLY CLEAN TOUCH SCREEN DISPLAY WITH NON-ABRASIVE/NON-HARSH CLOTHS/CLEANING SOLUTIONS OR
DAMAGE TO DISPLAY MAY OCCUR.
•REFER TO SUPPLIED LIND POWER SUPPLY REFERENCE GUIDE FOR SPECIFIC INSTALLATION AND OPERATION OF
POWER SUPPLY.
Precautions
•Do not place metal objects or containers of liquid on top of the Touch Screen Display.
•If a malfunction occurs, immediately unplug the Power Supply.
•Use only the specified Power Supply with this Touch Screen Display.
•Do not connect cables into ports other than what they are specified for.
•Do not leave the Touch Screen Display in a high temperature environment (greater than 70°C, 158°F)
for a long period of time.
•Do not store the Touch Screen Display where water, moisture, steam, dust, etc. are present.

Specifications
Power Supply Input 11-16 V DC-In
Dimensions 9.58” (24.3 cm) H x 12.44” (31.6 cm) W x 1.51” (3.84cm) D
Weight 2.66 lbs. (1.2 kg)
Operating Environment -29°C to 63°C (-20.2°F to 145.4°F)
Storage Environment -51°C to 70°C (-59.8°F to 158 F)
Display Size 12.5” diagonal screen size; Gorilla Glass
Max Resolution (Aspect Ratio) 1920 x 1080 (16:9)
Brightness 1200 NITS
Viewing Angle 85 degrees from all sides
FCC 47CFR, Part 15 compliance: This is an FCC Class B device. Any changes or modifications to the model TSD-201 not expressly approved by Havis, Inc.
could void the user's authority to operate this equipment.
Certifications
EU DECLARATION OF CONFORMITY [CWN1]
Manufacturers Name: Havis, Inc.
Manufacturers Addresses: 75 Jacksonville Road, Warminster, PA, 18974, USA
This declaration of conformity is issued under the sole responsibility of the manufacturer.
Product name: 12.5" Capacitive Touch Screen Display with Integrated Hub
Model: TSD-201. May be followed by any alphanumeric characters which describe product options.
Product Options: This declaration covers all options of the above product which bear the CE Marking.
Is in conformity with the following directives, standards, or other normative documents:
UN ECE Regulation 10 UNECE Regulation 10.05, Paragraph 3.2.9; Clauses 6.5, 6.6, 6.7, 6.9; “Uniform provisions concerning the approval of vehicles
with regard to electromagnetic compatibility”
EMC Directive 2014/30/EU EN 50498:2010, “Electromagnetic compatibility (EMC) -Product family standard for aftermarket electronic equipment in vehicles”
RoHS Directive 2011/65/EU EN 50581:2012, “Technical documentation for the assessment of electrical and electronic products with respect to the restriction
of hazardous substances”
The object of the declaration described above is in conformity with Directive 2011/65/EU of the European Parliament and[CWN2] of the Council of 8 June 2011 on
the restriction of the use of certain hazardous substances in electrical and electronic equipment.
UKCA DECLARATION OF CONFORMITY
Manufacturers Name: Havis, Inc.
Manufacturers Addresses: 75 Jacksonville Road, Warminster, PA, 18974, USA
This declaration of conformity is issued under the sole responsibility of the manufacturer.
Product name: 12.5" Capacitive Touch Screen Display with Integrated Hub
Model: TSD-201. May be followed by any alphanumeric characters which describe product options.
Product Options: This declaration covers all options of the above product which bear the UKCA Marking.
Supplementary Information:
The object of the declarations described above is in conformity with the relevant Union harmonization legislation.
This product requires the use of a recommended E Marked automotive power supply when used within vehicles.
Signed for and on behalf of Havis, Inc:
75 Jacksonville Road, Warminster, PA, 18974, USA, November 13, 2020 Bruce Jonik, Director of Engineering , Havis, Inc.
CAN ICES-3 (A)/NMB-3(A)
Electromagnetic Compatibility Regulations 2016 BS EN 50498 “Electromagnetic compatibility (EMC) -Product family standard for aftermarket
electronic equipment in vehicles”
The Restriction of the Use of Certain Hazardous Substances
in Electrical and Electronic Equipment Regulations 2012
BS EN 63000:2018, “Technical documentation for the assessment of electrical and electronic
products with respect to the restriction of hazardous substances”

Parts Included
12.5” CAPACITIVE TOUCH SCREEN
Power
Button
VESA 75
Mounting
(4x M4 thread)
Strain Relief
Anchor Points
Power
Indicator
Speaker (left)
Volume
Control
(- and +)
Brightness
Control
(- and+)
Speaker (right)
2-Point Multi-Touch
Capacitive Screen
Input
Switch
Strain Relief
Anchor Points

(Havis Part #HW-EL-0143)
(Havis Part #HW-EL-0006)
(Havis Part #HW-EL-0078)
POWER SUPPLY, CABLES, & MOUNTING HARDWARE
Parts Included (continued)
DISPLAY HARDWARE
This Hardware Kit includes:
1. Zip Ties (8)
2. M4 x 0.7 x 010mm long Pan Head Screws (5)
3. Washers, M4 (5)
4. Split Lock Washers (5)
Tools required for installation:
• #2 Phillips (For M4 Pan Head Screws)
USB2.0, 2m. Long (male - female)
for optional Keyboard or Accessory
USB2.0, 20ft. Long (male - male)
to External PC
HDMI, 20ft. Long(male - male)
to External PC
CABLES
Power Supply Hardwareincludes:
1. Zip Ties (2)
2. #10-16 x 3/4” long
Drill Point Hex Head Screws (4)
Tools required for installation:
•5/16” HexSocket
EXTENDING THE 20 FOOT USB CABLE IS NOT
RECOMMENDED UNLESS AN ACTIVE
(INDEPENDENTLY POWERED) REPEATER IS USED.
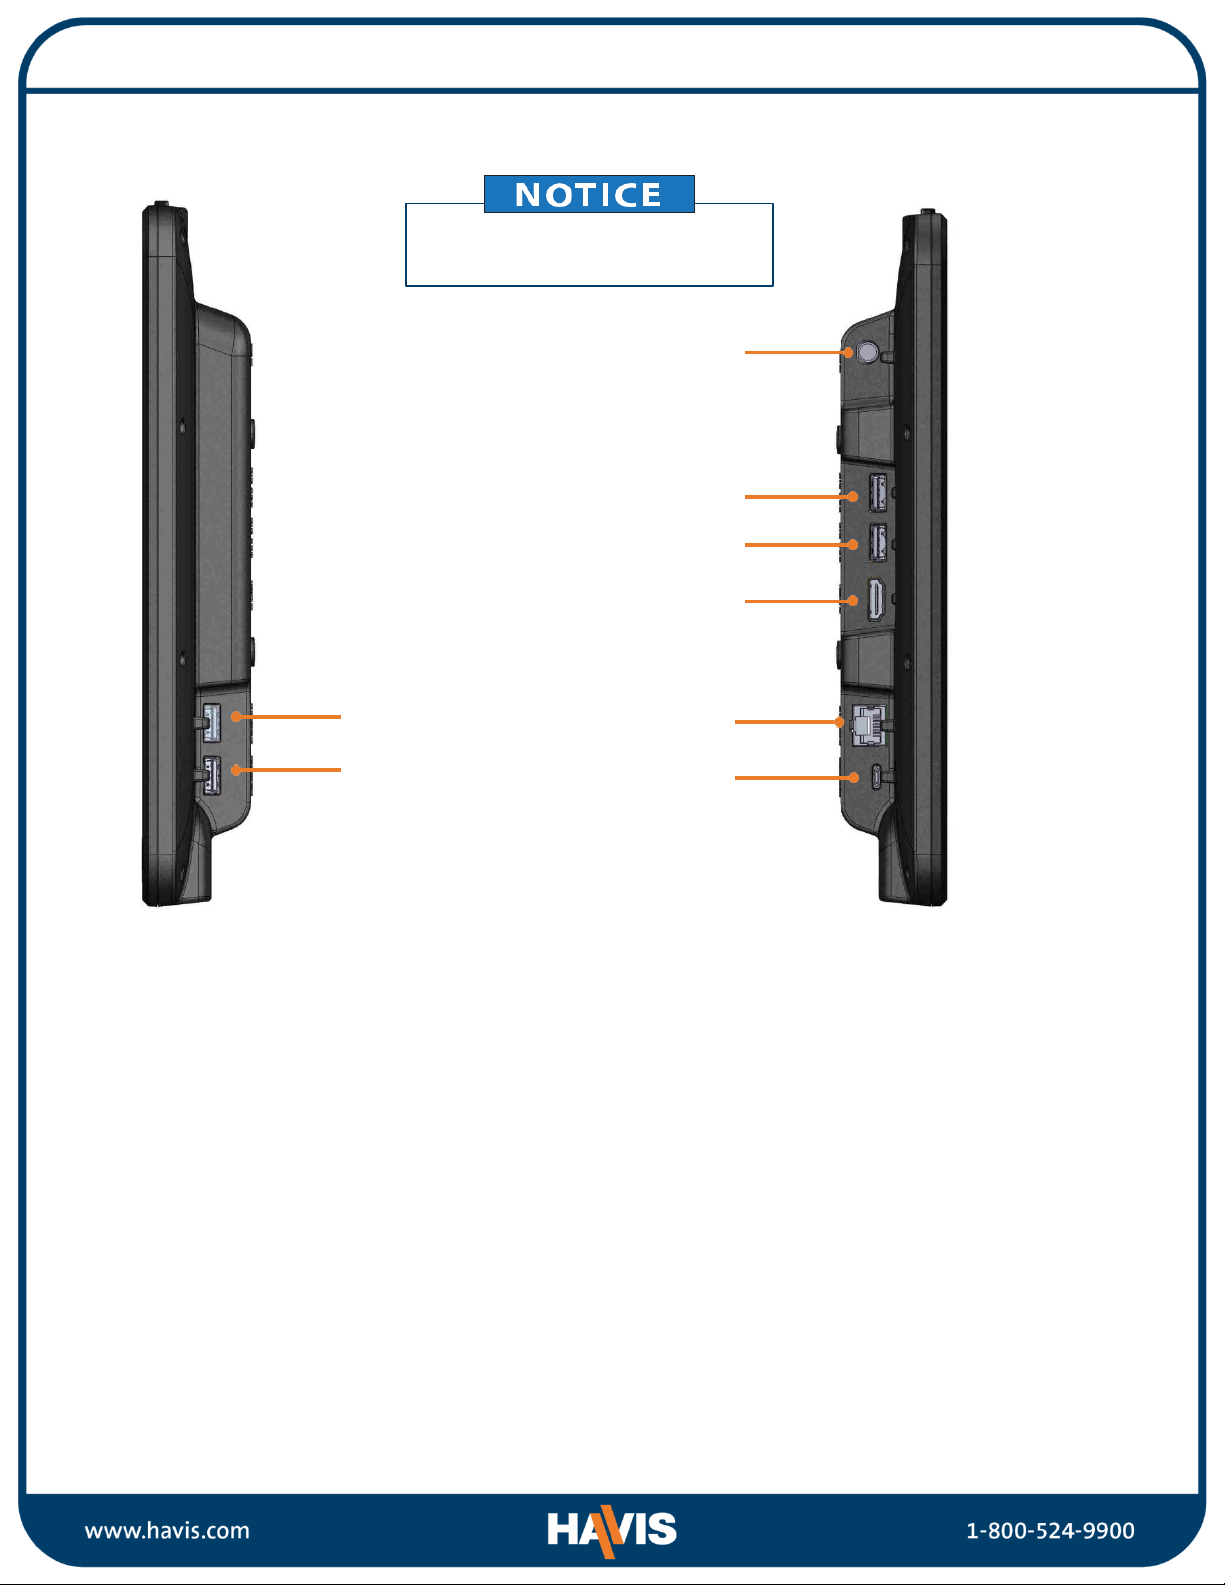
Port Identification
RIGHT HAND
SIDE VIEW
USB 3.0
(to Printer/ Other)
USB 3.0
(to Mouse/ Other)
ETHERNET
HDMI
(to External PC)
USB TYPE-C
(to Phone, Laptop,
or Tablet)
USB 3.0
(to External PC)
USB 3.0
(to Keyboard/ Other)
POWER (12V DC IN)
LEFT HAND
SIDE VIEW
BE CERTAIN TO CONNECT THE USB CABLES TO THE
CORRECT USB PORTSON THE TOUCH SCREEN
DISPLAY AS OUTLINED IN SIDE VIEW.

1. Connect threaded end of the DC input cable to the Touch Screen Display and the other end to
the Lind Power Supply.
2. Connect one end of the cigarette lighter power cable to the Lind Power Supply.
3. Plug into cigarette lighter receptacle connected to vehicle power.
4. The LED on the Lind Power Supply will illuminate green and the power indicator on the
Touch Screen Display will illuminate amber to indicate that power is connected.
Installation
CONNECTING TO POWER
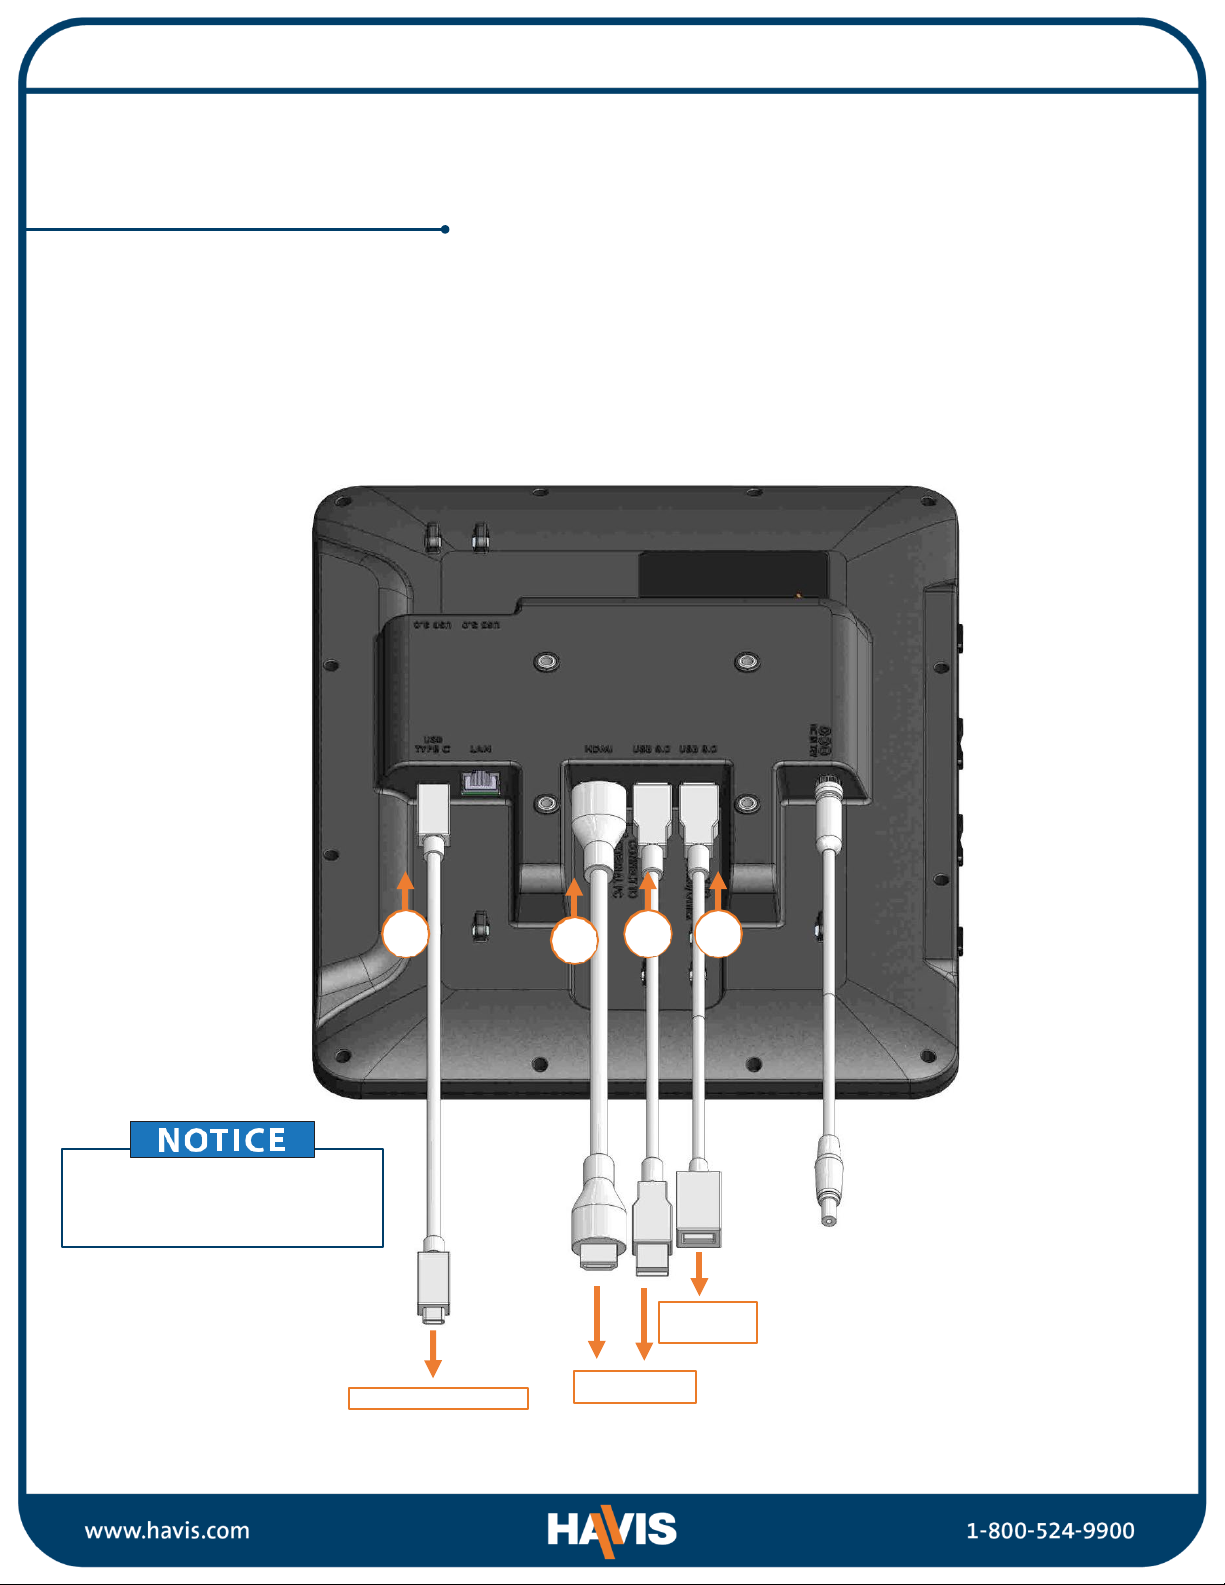
1. Connect one end of the USB 2.0 cable (male-female) to Touch Screen Display and the other end
to the optional keyboard or other accessory (not included).
2. Connect one end of the USB 3.0 cable (male-male) to Touch Screen Display and the other end
to the external PC.
3. Connect one end of the HDMI cable (male-male) to Touch Screen Display and the other end to
the external PC.
4. Connect one end of the USB TYPE-C cable (male-male) to Touch Screen Display and the other
end to phone, tablet, or PC.
1
Installation
CONNECTING TO EXTERNAL PC, PHONE, AND OPTIONAL
KEYBOARD/ACCESSORIES (NOT INCLUDED WITH TSD-201, 12.5" CAPACITIVE
TOUCH SCREEN DISPLAY WITH INTEGRATED HUB )
BE CERTAIN TO CONNECT THE USB CABLES
TO THE CORRECT USB PORTSON THE TOUCH
SCREEN DISPLAY AS OUTLINED IN SIDE VIEW
ON THE PORT IDENTIFICATION PAGE
2
3
4
Phone, Tablet, PC External PC
Optional
Keyboard
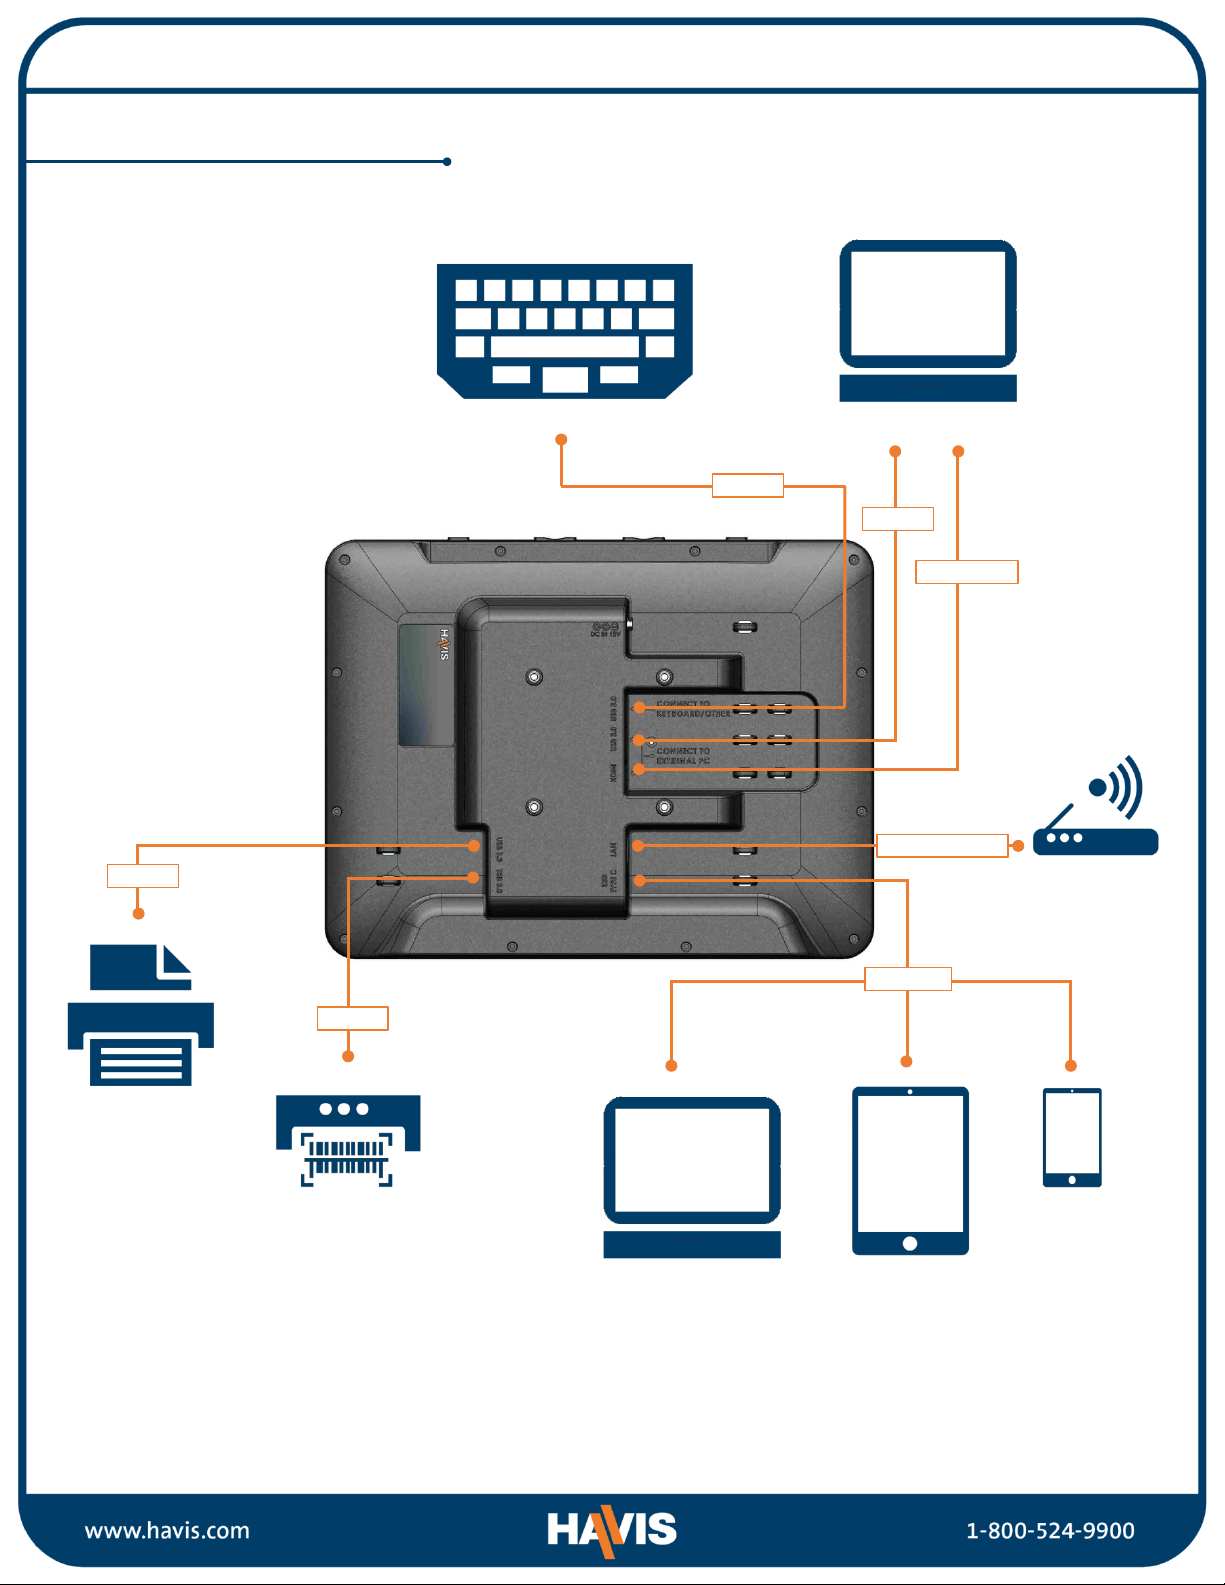
Installation
EXAMPLE INSTALLATION
External PC
External PC Tablet
Phone
Router
Keyboard
Scanner
Printer
LAN/ETHERNET
HDMI
USB 3.0
USB 3.0
USB 3.0
USB 3.0
USB-C
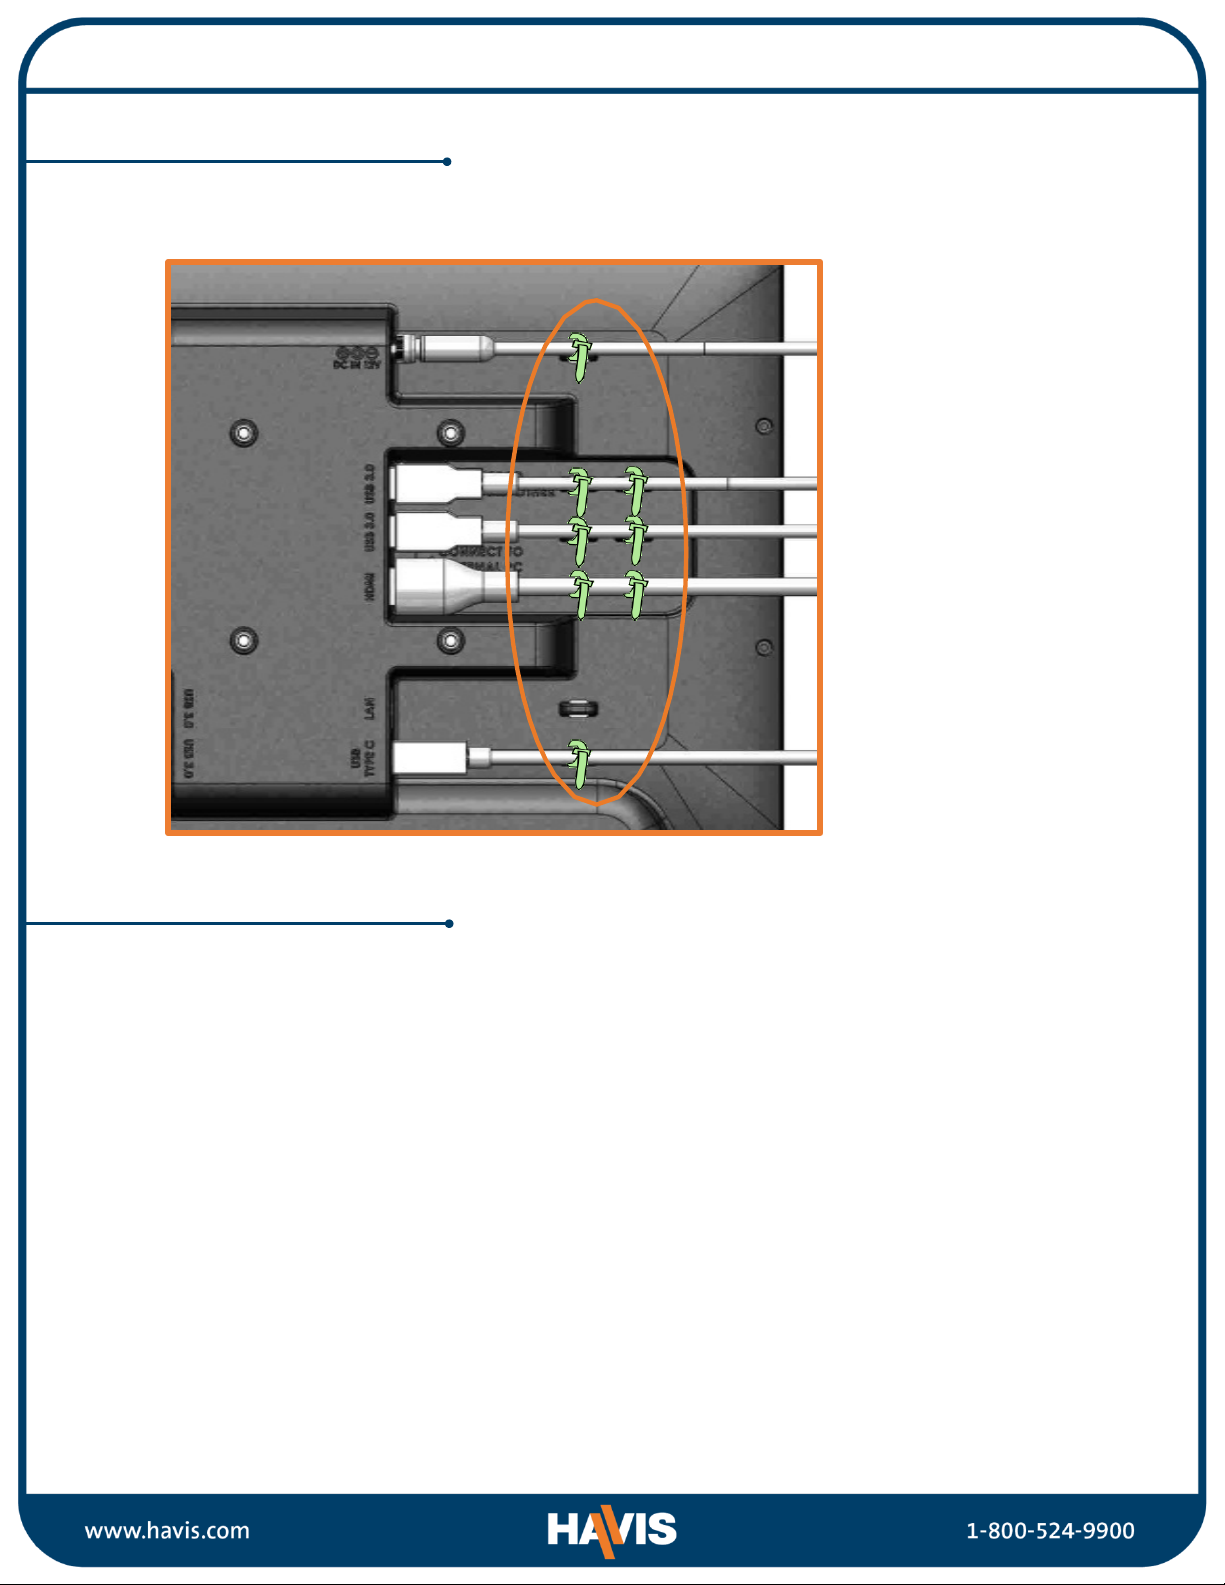
Installation
1. Use provided Zip Ties to secure each cable at the strain relief points.
1. Havis provides a variety or mounting solutions including vehicle-specific mounting
solutions for the TSD-201. To check availability of a mounting solution for your vehicle, go
to www.havis.com or call 1-800-524-9900 for more information.
2. Be sure to follow all installation instructions included with your mounting solution.
CABLE MANAGEMENT
VEHICLE MOUNTING
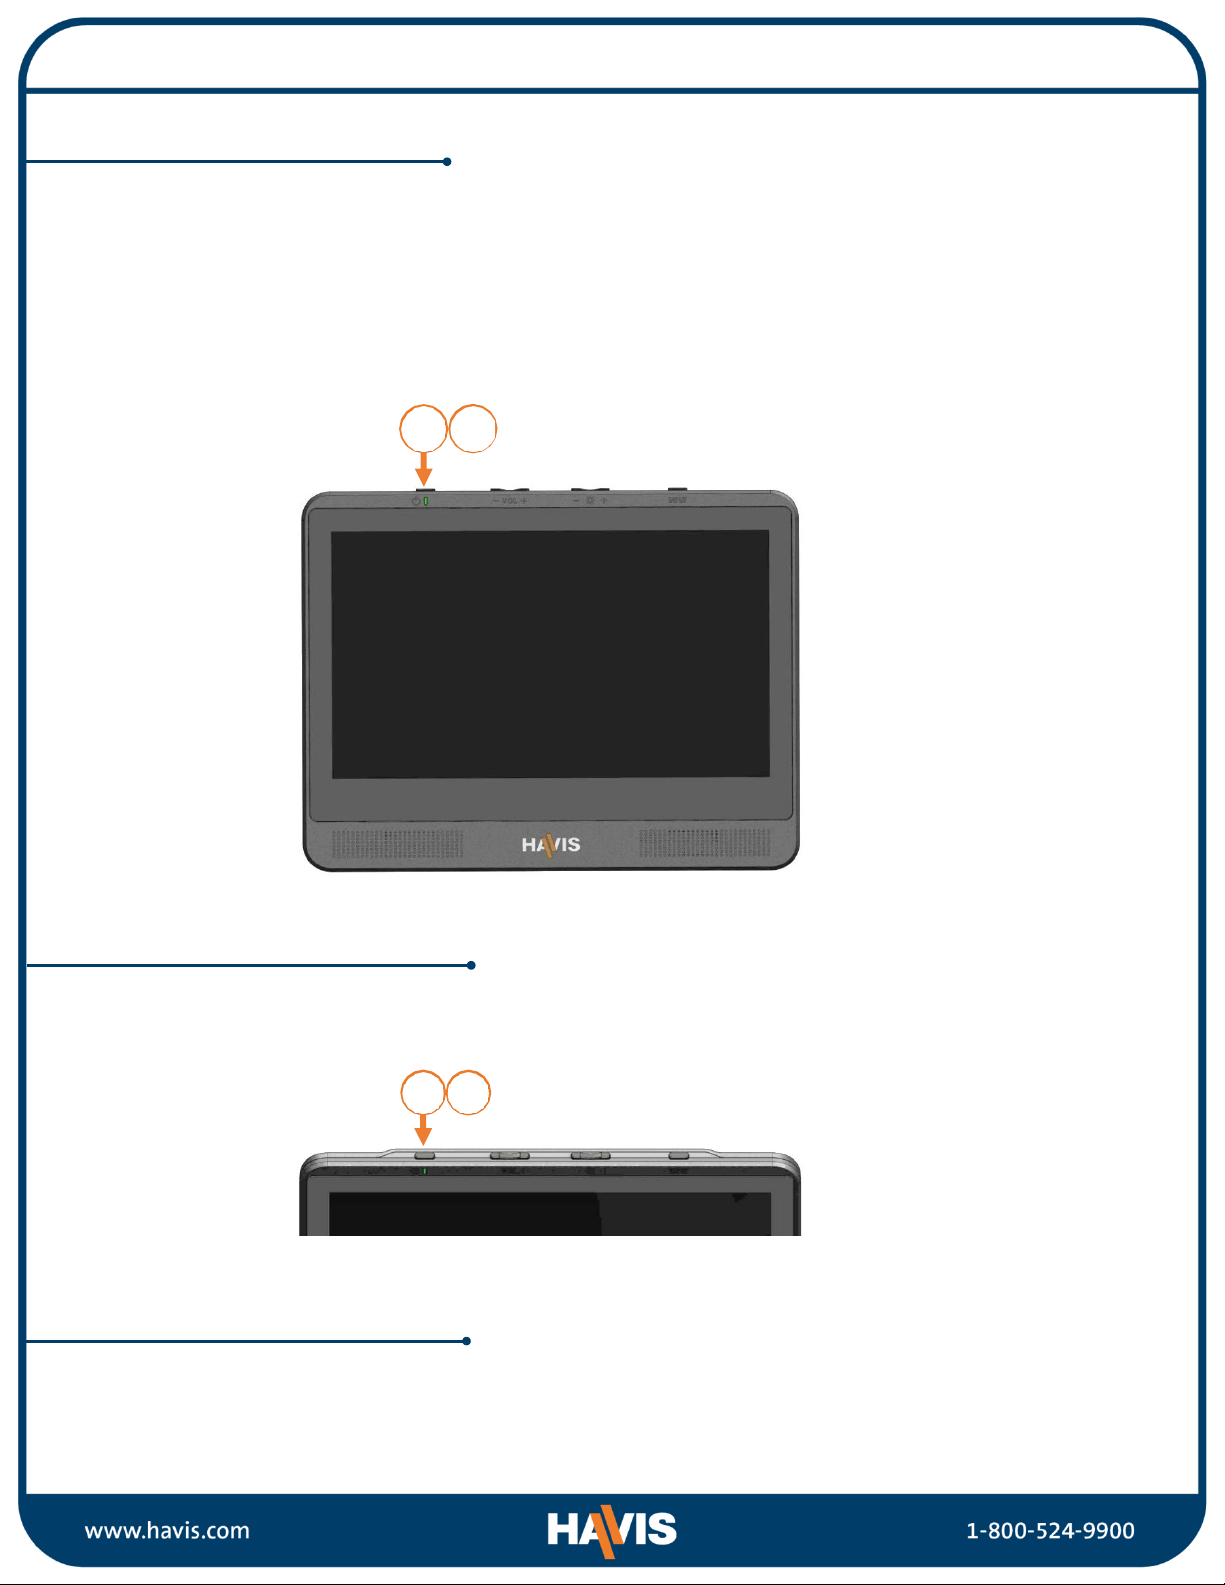
Operation
1. With the Touch Screen Display connected to the Lind Power Supply and the Input Device, press the
Power Button.
2. The Power Indicator will illuminate green (Powered ON Mode).
3. The Touch Screen Display receives data from the system and displays the output on the screen. If
Power Indicator illuminates amber, Touch Screen Display has power (Standby Mode), but is not
receiving signal from input device. Verify Settings on input device (duplicate or extend monitor) or
check connections and retry.
4. Press the Power Button to turn off the Touch Screen Display. Power Indicator is not illuminated.
Using the Touch Screen
1) Tap the screen with your finger or fingers to communicate with the system.
2) Pinch-Zoom Capable Screen
TURNING ON/OFF
USING THE TOUCH SCREEN
14
1. When the display is on, press the Power Button to enter Blackout mode. Blackout mode blanks the
screen.
2. A second press of the Power Button will allow the display to resume from the previous state.
ACTIVATING BLACKOUT MODE
12
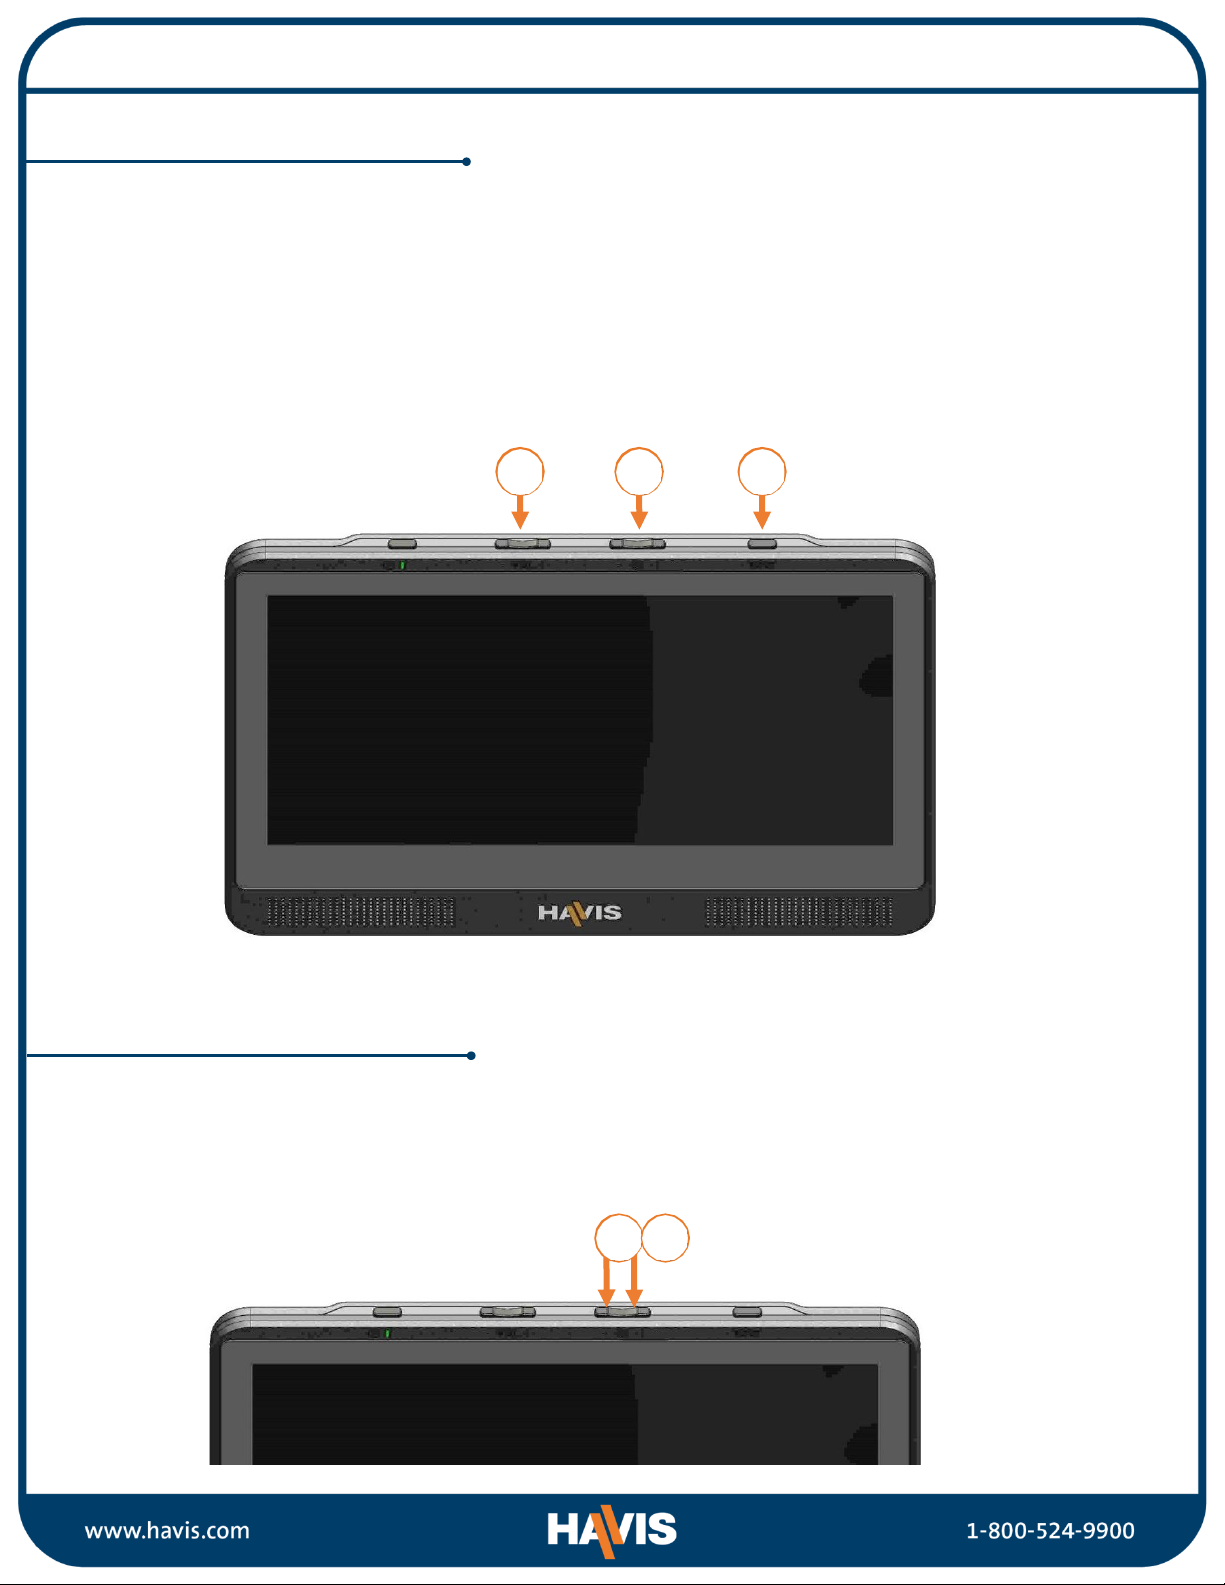
Operation
1. Volume:Press and hold either button (VOL+ or VOL-) until the volume OSD appears on the screen.
Then, press (+) to increase, or (-) to decrease the volume.
2. Brightness: Press and hold either button (+ or -) until the brightness OSD appears on the screen. Press
(+) to increase, or (-) to decrease the brightness.
3. Input: Press button to toggle between input source. Notification on touch screen will identify which
input source is selected (HDMI or USB-C video).
1. Press both the (+) and (-) Brightness buttons simultaneously to activate Night Mode.
2. In Night Mode, the display will switch to a red monochrome color scheme to reduce eye strain in
dark environments.
3. Press both the (+) and (-) Brightness buttons simultaneously once again to deactivate Night Mode.
ACTIVATING NIGHT MODE
USING CONTROL BUTTONS
1 2 3
1 3
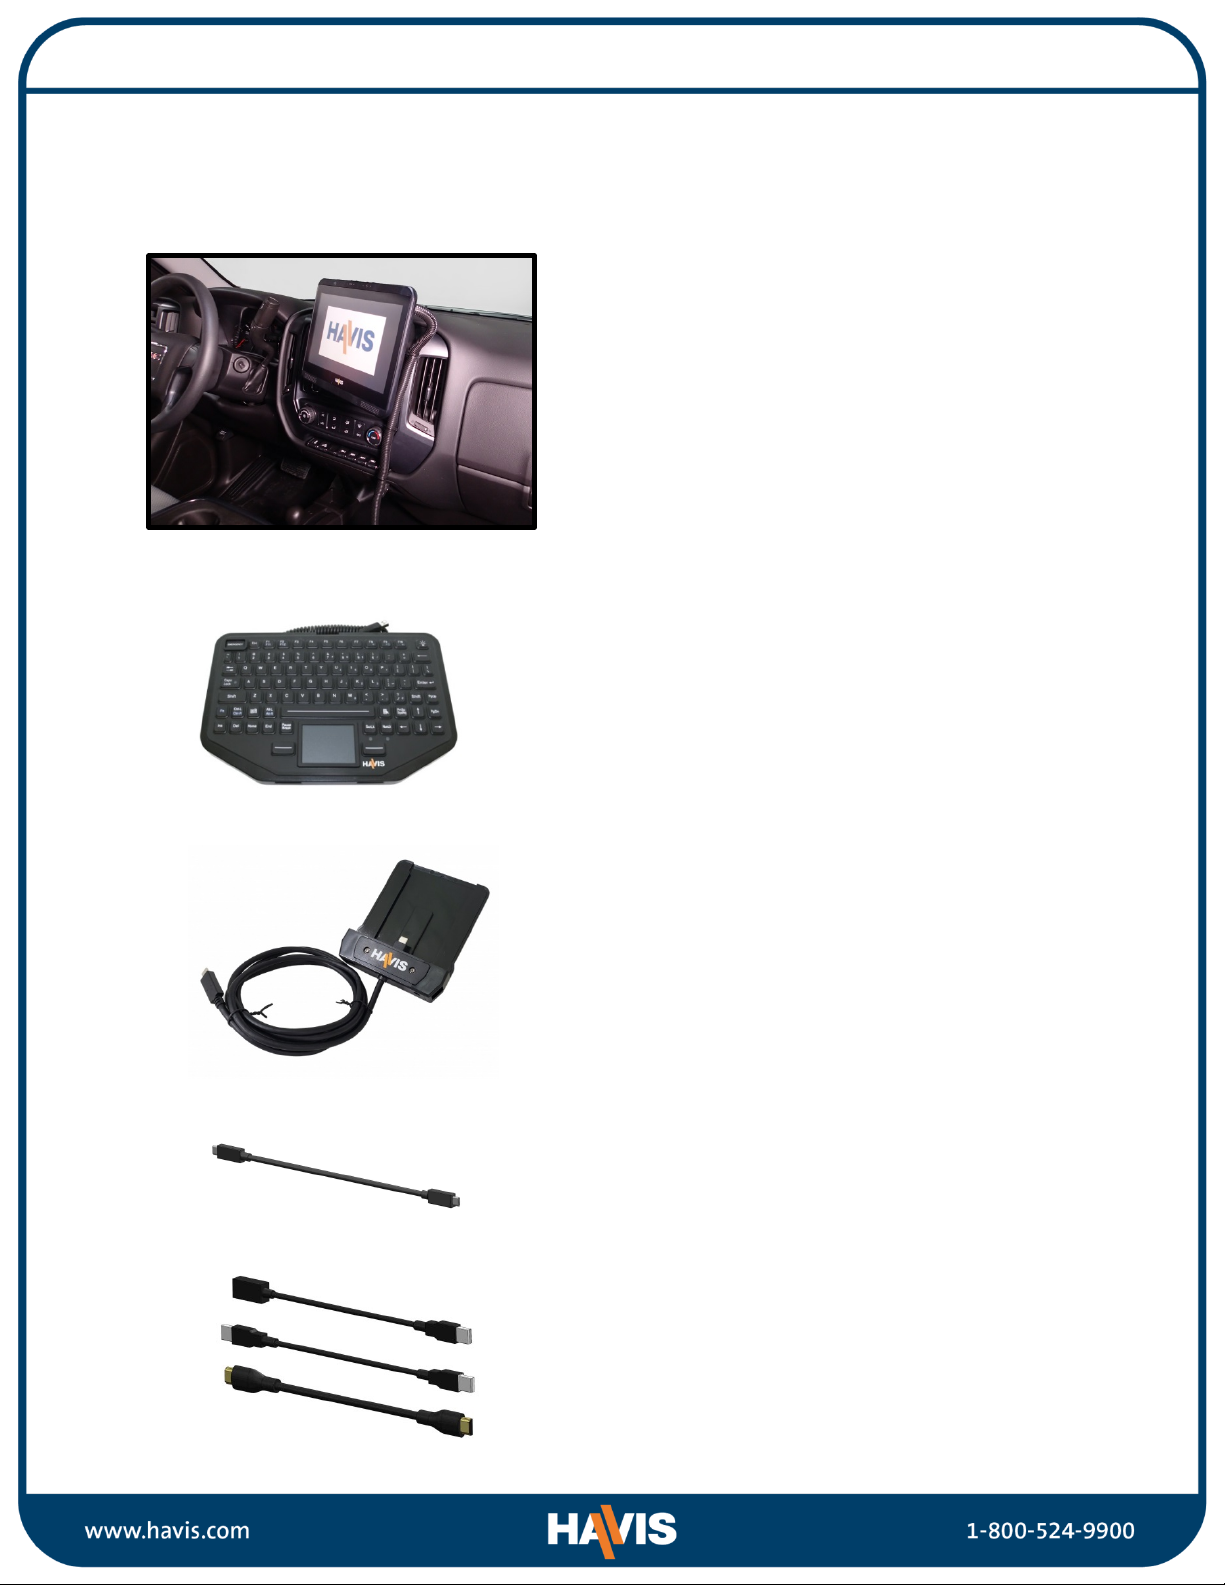
Related Products
TSD Mounting Solutions
Havis offers a variety of mounting solutions, including
light-weight motion devices and vehicle-specific
mounting solutions for the TSD-201, 12.5" Capacitive
Touch Screen Display with Integrated Hub. Visit
www.havis.com or call 1-800-524-9900 to browse
available mounting solutions, including our vehicle-
specific C-DMM series.
KB-108
Havis Rugged Backlit USB Keyboard with Integrated
Touch Pad and Emergency Key.
Havis offers a wide variety of accessory products specifically for use with your TSD-201.
For more information or to order, please visit www.havis.com.
DS-DA-331
Replacement cable, USB3.1 Type C Male to Male,5
Gbps, 6.6 FT .
DS-PD-101
Convenient docking for DeX equipped Samsung
smartphones. Includes embedded USB-C connection
with 6' cable.
TSD-R-0001
Replacement Cable Kit, 20ft USB-A, Male to Male
Cable; 20ft HDMI Cable; 2m USB 2.0, Male to Female
Cable.
Table of contents
Other Havis Touch Panel manuals


 quick start guide")


