Hayward TracVac W3HSCTRACCU User manual

TracVac
Suction-Side Pool Cleaner
Owner's Manual
ISSCTV100 RevA
W3HSCTRACCU
Safety Information......................1
Overview.....................................2
Installation.................................3
Maintenance..............................6
Troubleshooting..........................7
Warranty...................................10
Hayward Industries
1415 Vantage Park Dr., Suite 400
Charlotte, NC 28203
Phone: (908) 355-7995
www.hayward.com
Scan the QR code and follow the link
to view helpful videos showing how to
setup and operate your new TracVac!
USE ONLY HAYWARD GENUINE REPLACEMENT PARTS

IMPORTANT SAFETY INSTRUCTIONS
Basic safety precautions should always be followed, including the following: Failure to follow
instructions can cause death and/or severe injury.
• READ AND FOLLOW ALL INSTRUCTIONS
• If your pool has a dedicated suction port (“vac port”) for vacuuming or for an automatic
pool cleaner, it must be covered when not in use. If not already installed, use a spring
loaded Safety Vac-Loc cover on the suction port to prevent entrapment and injury.
• If the cover provided does not t, purchase one that does from your local pool store and
install it instead. The cover should conform to IAPMO SPS4-99A.
• Always stop the pump before attempting to clean or service the pool vacuum.
• DO NOT use to remove large debris in new pools.
• REMOVE the cleaner before chemically shocking your pool.
• DO NOT allow swimmers in pool while pool cleaner is operating.
• Store the cleaner in a shaded safe area.
• Hoses must be stored straight. DO NOT coil the hoses.
• Keep away from children and pets.
• REMOVE cleaner when performing backwash.
SAVE THESE INSTRUCTIONS
1
USE ONLY HAYWARD GENUINE REPLACEMENT PARTS

Overview
Features
Hollow Turbine
This cleaner utilizes a hollow turbine which enables flow to bypass the blades in the event of large
debris blockage. This ensures the pool system is always provided flow.
Steering System and Hose Swivel
The tracked suction cleaner has an internal programmed steering system, allowing it to turn and
then move into another direction. This steering system has 6 different programmed turns settings
at various degrees that allow the cleaner to fully navigate the entire pool. The external hose swivel
allows the cleaner to turn freely without interference from the hose due to debris buildup as well
as unwanted hose coiling.
Robust Tracks
The TracVac’s patented track system and unique underbody ensures that the cleaner can easily
negotiate main drains, uneven surfaces, strange shapes and steep corners on both the deep and
shallow ends of the pool. This makes the Cleaner ideal for all pool surfaces and shapes.
Wall Climbing
The TracVac will only climb walls on pools with sufficient floor to wall radius. The cleaner has pat-
ented adjustable skirts that allow the cleaner to maintain optimal suction under the machine even
when it encounters obstacles. When the cleaner encounters an obstacle, one or more of the skirts
will lift up (adjust) over the obstacle while maintaining suction under the cleaner.
What’s Included
Flow Regulator Valve
Regulator Cap
Float
Hose Cone
Adaptor
Connector Hoses (11 sections)
Leader Hose
Double Hose Clip
Flow Gauge
TracVac
USE ONLY HAYWARD GENUINE REPLACEMENT PARTS
2
MAXIMUM FLOW
MINIMUM FLOW

Installation
IMPORTANT: Pools with Variable Speed Pumps - The cleaner requires a minimum & maximum
rate of flow to operate optimally. If the variable speed pump has multiple speeds programmed, use
the Flow Gauge to calibrate the recommended flow rate at the pump’s highest programmed speed.
This can be done by the using the Flow Regulator Valve and adjusting pump speed manually to
attain the correct flow at the highest preset speed. See page 5 for more information. By using the
highest preset speed, you'll ensure that all other settings will never exceed the recommended
maximum flow rate.
IMPORTANT: Pools with Solar Heating - Solar Heating must be turned OFF whenever the Trac-
Vac is in use. If using Solar Heating and the TracVac, always alternate schedules.
Pool Preparation
Manually remove very large and excessive debris from pool
(ie. post- storm, spring cleaning/pool opening situations).
Perform a backwash or clean filter cartidges, clean your
filter, skimmer baskets and pump basket.
Check that chemical balance is correct. If not, take the time
to correct it before using the TracVac. If you chemically
shock the pool, wait 1-2 days before continuing.
Point all your return fittings downward to maximize cleaner
pool coverage.
3
USE ONLY HAYWARD GENUINE REPLACEMENT PARTS

IMPORTANT: Turn OFF Pool Pump before you begin the next steps.
IMPORTANT: Ensure that your dedicated suction port is fitted with a Safety Vac-
Lock fitting (not included). If not, obtain one from your local pool store and have it
installed first.
Dedicated Suction Port Connection
1. With the pump turned off, insert
the adjustable Flow Regulator
Valve with the Regulator Cap into
the skimmer. Use the Hose Cone
Adapter to make a proper seal, if
necessary.
USE ONLY HAYWARD GENUINE REPLACEMENT PARTS
4
Flow
Regulator
Knob
Regulator Cap
Flow Regulator
Valve
Hose Cone
Adapter
Skimmer
Safety Vac-Lock
1st Section of
ConnectorHose
Dedicated
Suction Port
2. Install one section of hose into
the Safety Vac-Lock fitting of
your dedicated suction port, as
shown. If your pool does not
have a dedicated suction port,
go to Skimmer Only Connection.

Skimmer Only Connection
If your pool does not have a
dedicated suction port, install one
section of hose into the skimmer
together with the Flow Regulator
Valve, as shown. If necessary, use
the Hose Cone Adapter to provide
a proper seal. NOTE: the Regulator
Cap is not used in this installation.
Connecting the Hoses
1. Attach the Float to the Leader Hose (the single section of hose that will connect to the
cleaner). The Float should be placed 20-24” (50cm - 60cm) from the cuff. Do not connect
cleaner at this time.
2. From the first section of hose at the suction source, connect together as many hose sections
as needed to reach the farthest point of the pool and then add the Leader Hose. Refer to the
diagram below and the top of page 6.
Skimmer
Flow Regulator
Valve
Hose Cone
Adapter
1st Section of
Connector Hose
Flow
Regulator
Knob
5
USE ONLY HAYWARD GENUINE REPLACEMENT PARTS
20 - 24”
Float Do not connect
cleaner at this time
Suction End
LEADER HOSE
Hose Connection

Use Flow Gauge to Check Water Flow
1. Submerge the entire length of hose to expunge all air.
2. Insert the Flow Gauge into the end of the Leader Hose.
3. Attach one end of the Double Hose Clip to the Leader Hose and the other end to the first sec-
tion of hose at the vacuum source. This will form a loop in the pool as shown below.
4. With the air out of the entire hose, verify that the Leader Hose and Flow Gauge are underwa-
ter and turn the pump ON. Adjust Flow Regulator Valve knob “faster” or “slower” until the disc
indicator in the Flow Gauge settles between “Maximum” and “Minimum” flow. NOTE: If you
have an extraordinarily strong pump, you may need to open the main drain slightly.
5. Turn off the pump. Remove the Double Hose Clip and Flow Gauge from the Leader Hose.
Submerge the TracVac cleaner to remove all air and then connect the cleaner to the Leader
Hose. Cleaner installation is now complete.
USE ONLY HAYWARD GENUINE REPLACEMENT PARTS
6
Leader Hose
Leader Hose
Suction Source in Center of Pool
Suction Source in Corner of Pool
Double
Hose Clip
Hose “Loop” in Pool
Flow Gauge
(Shown between
“Min” and “Max”
markings)
Leader Hose
MAXIMUM FLOW
MINIMUM FLOW
1st Connector Hose
(To Suction)
Waterline

Operation
Before You Use The TracVac
Understanding how the TracVac works will help ensure the proper operation and maintenance of
your cleaner.
• Before every use, visually inspect the TracVac and always check that the turbine moves freely
and is not obstructed by debris. Water flowing through the turbine drives the tracks and
moves the cleaner. If the TracVac moves slowly or stalls, the turbine may be partially or fully
blocked with debris. Refer to “Removing Debris from the Turbine” on the following page.
• Check that the pool’s system is configured in a manner to maximize flow through the cleaner.
Ensure that pool filter is clean, allowing for maximum flow. Make sure that supply and return
valves are positioned properly and that the pump is running at the proper speed.
• The TracVac’s cleaning performance is optimized when operating at a flow rate that has been
set with the Flow Gauge (Step 5 on previous page). This flow rate will ensure that the TracVac
moves at the proper speed (see Cleaner Speed). Note that the TracVac draws debris from
the pool floor and moves it to the pool filter where it’s trapped and later cleaned out through
backwashing or cartridge cleaning. If the pool has a high debris load, you may notice a slow
down in cleaner speed which is most commonly caused by the filter getting dirty. In these
cases, you may have to clean your filter before the pool is entirely clean. Refer to your filter’s
pressure gauge and speed of the cleaner to determine when it’s time for a filter cleaning.
Cleaner Speed
If the Flow Gauge is not available or you want to quickly check for proper operation, you can
measure the TracVac’s speed as an indication for proper water flow. To do this, raise the TracVac
off of the pool floor and hold it by the handle just beneath the pool water surface. Be sure to
Min Flow: 26.5 RPM
Max Flow: 32 RPM
If the RPM is below 26.5, adjust the Flow Regulator
Valve (rotate knob clockwise) and check cleaner
speed again.
If the RPM is higher than 32, adjust the Flow
Regulator Valve (rotate knob counterclockwise) and
check cleaner speed again.
keep the cleaner under the surface so that it does
not draw in any air. Stay clear of moving parts. Now
count the number of full rotations made by the large
RIGHT wheel over a period of 30 seconds (the left
wheel speed varies for steering and can't be used).
The number of rotations multiplied by 2 will give you
the revolutions per minute; or RPM’s. The TracVac’s
normal speed range is:
7
USE ONLY HAYWARD GENUINE REPLACEMENT PARTS
Count RPMs

If adjustments are ineffective, refer to TroubleShooting section of this manual.
Removing Debris from the Turbine
To clean debris out from the TracVac, perform the
following:
1. Turn off the filter pump and remove the TracVac
from the pool.
2. A clog could be visable by looking into the turbine
from where the leader hose connects. If no clog is
seen, position the cleaner with the buckle facing
you and attempt to rotate the left side track for-
ward. If the wheels rotate smoothly there probably
is no obstruction. If the track feels "locked", there
is most likely a blockage.
3. To clear an obstruction, place the TracVac on a
flat work surface. Refer to image A. Open the
buckle on the front of the cleaner by pressing it
and lifting the lid. Lift the front of the lid up and
then firmly pull it forward. This will separate the
lid from the cleaner body and you will now be
able to lift the lid straight up from the cleaner
chassis.
4. Pull the turbine cover straight up and off of the
cleaner chassis. Refer to image B. Inspect the
turbine cover for debris or obstructions.
5. With the turbine cover off, you have full access to
the turbine. You should be able to see and remove
any visible obstructions from the turbine.
6. Install the turbine cover back onto the chassis by
reversing Step 4.
7. Visually inspect the rest of the cleaner and
remove any debris that may be in the gears, drive
shafts, swivel assembly, etc.
8. Repeat step 2 (turning the left track) to insure that the cleaner runs smoothly.
9. Place the lid over the swivel assembly.
10. Align the tabs on the back side of the top cover with the slots on the back side of the chassis,
push down to engage the tabs. Firmly push the top cover backwards to fully engage the tabs.
USE ONLY HAYWARD GENUINE REPLACEMENT PARTS
8
A
Buckle
Lid
B
Turbine Cover
Swivel
Assembly

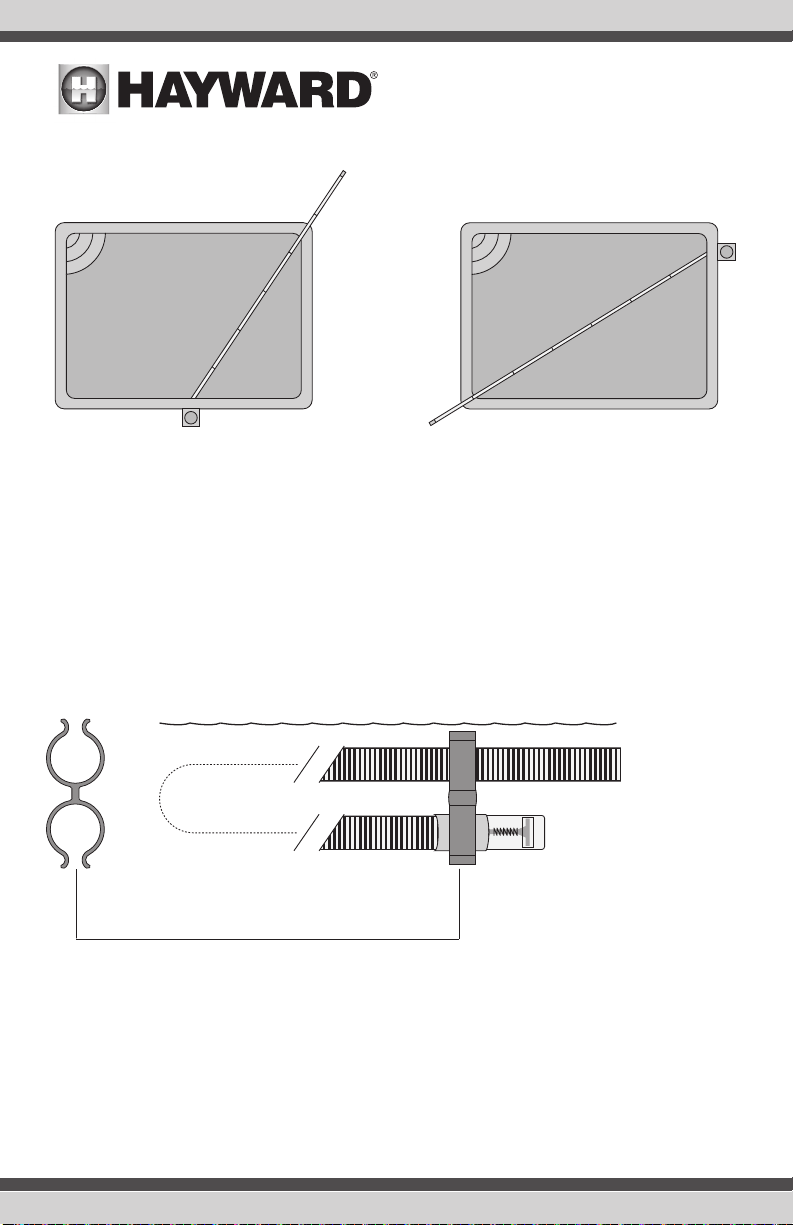
11. Lock the top cover onto the cleaner chassis with the locking buckle on the front of the
cleaner.
Troubleshooting
IMPORTANT: Always disconnect cleaner before servicing.
Problem Solution
Cleaner is not moving or is
moving too slowly.
• Check flow with Flow Gauge and if necessary, adjust the Flow Regu-
lator Valve.
• Check for debris inside the cleaner itself.
• Check that pump is running at desired speed and is fully primed. If
pump has lost prime, disconnect and wait for prime.
• Check if the pool filter needs cleaning or backwashing.
• Check to be sure that the main drain and all suction lines are
closed, except for the vacuum or suction line to which the cleaner
is attached.
• Check for leaks or obstructions in the system (e.g. debris in the
filter, pump basket or pump impeller).
Cleaner’s left track will not
turn when rotated by hand. • Check for obstructions inside the cleaner (see page 8).
Cleaner stays in one end
of the pool.
• Hose may be limiting movement. Adjust the hose and remove any
loops or coils.
• Check that hose is long enough (see page 5-6).
• Check flow with Flow Gauge and if necessary, adjust the Flow Regu-
lator Valve (see page 6).
• Check the direction of the return line water flow. If it is interfering
with the path of the cleaner, redirect to a different direction.
• Check the Leader Hose for float placement. The float may be in the
wrong position.
• Be sure that the swivel assembly (at top of cleaner) rotates
smoothly. If not, clean the area as described on page 8.
Cleaner climbs the wall
too much or climbs out
of pool.
• Check flow with Flow Gauge. You may need to decrease the flow
using the Flow Regulator Valve.
Cleaner won’t climb the
pool walls.
• Check to be sure that the cleaner tracks are not excessively worn.
Excessively worn tracks will not provide the grip necessary for your
cleaner to climb pool walls.
• Check flow with Flow Gauge. You may need to increase the flow
using the Flow Regulator Valve - do not exceed the maximum Flow
Gauge setting.
• Check the Leader Hose for float placement. The float may be in the
wrong position.
Cleaner stays on the main
drain.
• Check to be sure that main drain is closed. May need assistance
from a pool professional.
• Check to be sure a main drain grate is installed.
9
USE ONLY HAYWARD GENUINE REPLACEMENT PARTS

Cleaner falls on its side.
Takes long time to recover
if on its side.
• Check the Leader Hose for float placement. The float may be in the
wrong position.
• Check that the hose is long enough to reach the furthest point in
the pool.
• Check the direction of the return line water flow. If it is interfering
with the path of the cleaner, redirect to a different direction.
The left track wheel skips
teeth when rotated forward
by hand (looking from the
front).
• Wheel hub or right drive shaft gear worn/damaged.
The loops in the hoses
won’t come out.
• Do not store hose in coiled position.
• Lay hose straight and in sunlight.
• Clean swivel on turbine. Reposition leaf canister if installed. It may
be in wrong position or not floating.
• Total length of hose too long for your pool configuration.
The cleaner turns in
circles, it won’t go straight
at all.
• Wheel hub and/or long drive shaft gear and/or steering slide as-
sembly and/or left drive gear are worn or damaged.
The cleaner does not clean
the entire pool.
• The hose is too short.
• The float may be in the wrong position on Leader Hose. Verify that it
is 20-24” from cleaner head.
• Clean swivel on turbine.
• Check the direction of the return line water flow. If it is interfering
with the path of the cleaner, redirect to a different direction.
If cleaner is behaving er-
ratically while installed on
pool with solar heating.
• Operate suction cleaner and solar heating on alternating schedules.
Remove TracVac when not in use on these type of pools.
USE ONLY HAYWARD GENUINE REPLACEMENT PARTS
10

14
10
13
2
9
1
3
11
12
17
18
6
4
20
5
15
19
18
6
8
7
5
20
4
16
15
11
USE ONLY HAYWARD GENUINE REPLACEMENT PARTS

COUNT DESCRIPTION P/N
1 Top Cover Kit (Top cover including handle and balancing weights) HSXTV100
2 Turbine Cover Swivel Kit (Turbine Cover/Swivel) HSXTV101
3 Buckle/Latch Kit HSXTV102
4 Track Kit (Set of 2) HSXTV103
5 Front Small Wheel Kit (Set of 2, including bearings and mushroom insert) HSXTV104
6 Rear Large Wheel Kit (Set of 2, including bearings and mushroom insert) HSXTV105
7 Roller Kit (Set of 4 rollers) HSXTV106
8 Roller Bar kit (Set of 2) HSXTV107
9 Left Drive Kit (Long drive shaft & Bearing Housing) HSXTV108
10 Right Drive Kit (Short Drive Shaft & 2 bearings) HSXTV109
11 Cam Kit (Cam & 1 reduction gear) HSXTV110
12 Cam Reduction Gear Kit (5 reduction gears and SS Shaft) HSXTV111
13 Turbine Kit (Just the Turbine) HSXTV112
14 Drive gear Kit (3x drive side gears) HSXTV113
15 Bearing kit (Set of 8) HSXTV114
16 SS Shaft Kit (5x) HSXTV115
17 SS Screw Kit (6x internal SS Shaft Screws) HSXTV116
18 Wheel Screw Kit (4x SS Screws for the wheels) HSXTV117
19 Chassis kit (Chassis with balancing weights & latch spring installed) HSXTV118
20 Side Covers (2x), Left-Right HSXTV119
21 Accessory Kit HSXTV120
USE ONLY HAYWARD GENUINE REPLACEMENT PARTS
12

13
USE ONLY HAYWARD GENUINE REPLACEMENT PARTS

USE ONLY HAYWARD GENUINE REPLACEMENT PARTS
14

For further information or consumer
technical support, visit our website at
www.hayward.com
Hayward is a registered trademark of Hayward Industries, Inc. © 2023 Hayward Industries, Inc.
All other trademarks not owned by Hayward are the property of their respective owners.
Hayward is not in any way affiliated with or endorsed by those third parties.
USE ONLY HAYWARD GENUINE REPLACEMENT PARTS