HBM HBM 300 User manual


WARRANTY
This HBM Machines product complies with the highest standards of workmanship,
durability and safety. HBM Machines guarantees original buyers a faultless operation of
its products for a one year period with respect to material and construction.
This warranty is null and void in case of defects occurring due to the following causes:
Normal wear
Lack of attention, ignorance, unsafe working procedures, lack of care during
transport or storage.
Lack of maintenance or maintenance carried out against the rules laid down in this
booklet
Use of the product for any work for which it was not intended; exceeding the rated
capacity. Transport without proper care
Shifting machinery without making use of proper lifting/ carrying gear
Failure to read and/ or understand the rules and guidelines explained in these
instructions.
Every use for which the product was not designed. These instructions state very
clearly all goals for which the product can be used. All other work is prohibited!
Operation of the machinery by persons who have not or insufficiently been educated
or instructed in its operation or who do not or insufficiently understand its
operation.
Operation of the machinery by persons without sufficient experience, in case of
Their working without direct supervision by a teacher.
Operation of the machinery by persons under the influence of medicines which
impair one’s ability to react, or by persons under the influence of alcohol or drugs.
Operation of the machinery by persons under the age of 16, or by persons aged
between 16 and 18 without direct supervision by a teacher.
Repairs which are or have been made without prior written consent by HBM
Machines.
Any change or alteration made in the machinery by the customer (owner).
Accidents or damage, caused by all causes from without, including damage during
transport, during storage on the clients’ premises, damage caused by objects or
persons falling on or knocking against the machinery. Damages caused by acts of
God are also excluded from the warranty. Please note that the examples of external
causes are not comprehensive.
In no case shall HBM Machines be liable for the death or injuries of persons, for damages
to goods or to the machinery itself, which was caused by operation of machinery supplied
by HBM Machines.

MAKING USE OF WARRANTY
To use your right to warranty you should send the machinery or its part tuo us,
postage paid. Please include a proof of purchase and explain your complaint to us.
In case our customer service finds a fault, we shall repair or replace said machinery
or its part. In case this proves impossible or impractical, or cannot be don within a
reasonable term, we will refund your purchase price. The cost of returning the
machinery or its part to you shall be borne by HBM Machines.
In case of our customer service ascertaining that there is no fault in the machinery
or its part, or when it is established that the fault or damage arose because of events
or causes not included in the warranty (see list above) the client is bound to pay the
fees for transport and safe keeping.
PLEASE ACT RESPONSIBLY
It’s impossible to enumerate all possible uses for which a given product is NOT suited. All
these dangerous, ill-advised or hazardous uses have been captured under the phrase Use
of the product for any work for which it was not intended. If you should be in doubt whether
a specific use of the product would be allowed or not, you are advised to:
Ask for advice from an expert user. This can’t do any harm. Who starts operating a
machine without having the necessary experience or education may be taking a
serious risk and will be held responsible for all consequences!
Ask HBM Machines for advice.
Study the EC legislation with respect to machinery and safety
Read Books about the subject of proper use and design of machinery.
Please maintain your machine well. By doing so you can extend its lifetime considerably.
Regular maintenance will prevent premature wear and promotes precision. Moreover, a
well maintained machine will be safer than an ill-maintained one.
Please note –where machines or machinery is mentioned, the text also applies to
tools.
© HBM Machines 2009. All Rights reserved.

SAFETY MEASURES
1. Only well trained personnel is allowed to operate this machine. In case you are unfamiliar with this type of
machine, please get educated before you start operating it!
2. All safety shields must remain intact and in place. Removal of safety shields is strictly prohibited. You are
responsible for keeping all safety measures in proper working condition!
3. DO NOT STAND UNDER A SUSPENDED LOAD. KEEP HANDS AWAY FROM MOVING PARTS! Do not lift
unstable loads. DO NOT use the lift to permanently support a load. Shift the load to a rigid, safe and fixed means of
support.
4. You must prevent the machine from being inadvertently switched on.
5. Never force a machine. Never exceed the rated capacity!
8. RELEASE the cylinder pressure before you start any maintenance or repair job.
9. REGULARLY CHECK for damaged parts. Broken parts can be dangerous. Check if operation is not impeded.
Replace worn and damaged parts as soon as possible. Do not operate machine before such parts have been replaced.
10. Never leave a working machine unattended. Shut off first. Release pressure!
11. Keep the workshop clean. Rubbish promotes accidents!
12. Never use machinery under hazardous conditions./ Make sure of proper lighting and ventilation. Do not expose
machinery to moisture, rain and snow. Don’t operate a machine when you are tired, ill o rare using medicines
which affect your reaction abilities. Never operate a machine when under the influence of alcohol or drugs!
13. Keep children and visitors at a safe distance.
14. Workshops are danger areas for children. Please lock up after you leave. Prevent children and laymen from
entering the workshop without your consent. Use multiple switches to prevent machines being switched on by the
ignorant.
15. BEWARE! Please wear anti slip footwear. If your hair is long, put it under your clothes. If necessary or
applicable, wear eye protection, ear protection or a face mask. Normal
spectacles will not protect your eyes!
17. Never reach across or through machines, in particular when in
operation. Ensure a safe body posture.
19. Never try to adjust a working machine!
20. Please read and heed the safety stickers on the machine. Keep them legible
and replace them when necessary. Removing such warning stickers is a crime
and could lead to legal actions!
21. These instructions for use are not a substitute for proper education.
22. In case you do not comply with any of the rules, guidelines and
warnings given here and on the machine, you are taking the risk of accidents, injury and damages which may even
result in death. You will be held responsible!

ON DELIVERY
Please check if the product arrives (1) without damage and (2) complete –see the parts list
or packing list. If you notice the case/ crate has sustained real damage contact the
haulage company and (if possible) do not accept your delivery. In case your product arrives
in damaged condition (whatever the cause) but the packing case is intact, contact HBM
Machines. In case of doubt, ring HBM Machines. In case of obvious damage, always take
photographs –a proof of your statement about damage may be required.
IN CASE OF COMPLAINTS RE DAMAGE, ACT WITH DUE DILIGENCE!
In case a claim is made after too long a time interval, this will not be entertained (unless
you can provide a reasonable explanation for the delay).
UNPACKING AND ASSEMBLY (also read HOISTING and LIFTING, below))
1. Read the Instructions for Use in full before assembling, commissioning and using this
product. If you have any question after having read these instructions, please ask HBM
Machines for advice. Then follow the instructions.
2. Please note that Instructions for Use contain sufficient information about the product,
enabling normal operation according to its intended use.
3. Please note that products are meant to be used by experienced users only. In case you
fail to meet this requirement, please get educated or acquire more experience before
using our product.
4. Please note –the user/ owner of this product is fully responsible for any damage or
accident caused by a lack of knowledge or experience in the use of such a product!
5. This product should be installed in a place free from shocks, vibrations etc. Keep the
installation site clean, well ventilated (use a dust extractor if necessary) and well lit.
6. Follow the rules for assembly. Keep the instructions for use near the site where the
product is used, which makes consulting them easier.
7. After a product has been installed in its intended site, please check if measures taken/
adjustments made, intended for transport, lifting and hoisting only, must be undone or

rectified before using the product.
HOISTING AND LIFTING
1. Heavy products are here defined as products weighing over 25 kilograms, the
accepted limit for a weight that can be comfortably lifted and shifted by hand. If you
(attempt to) lift or shift loads heavier than 25 kilograms without proper lifting or
hoisting machinery, you do so at your own risk and you will be responsible for all
consequences. This also applies to products under 25 kilograms when shifted by
any means (by hand or using lifting or hoisting machinery).
2. Heavy products are always delivered in a packing crate or with a pallet or base that
can be moved using e.g. a fork lift, chain hoist, etc.. of sufficient capacity. This is for
good reasons. After arrival the new owner is expected to use proper appliances and
machines of sufficient capacity to move the product. This is not just to prevent
damage to the product, but also for reasons of personal safety.
3. In case of damage, injury or death resulting from moving and/or lifting heavy
products as defined under 1 without use of proper lifting or hoisting appliances, or
use of such devices without sufficient capacity, as defined under 2, the client will be
entirely responsible.
4. In case of hoisting heavy products using aids (fork lift, chain hoist, etc.) the rules as
given below MUST BE COMPLIED WITH. If not, the client/ owner/ user will be
entirely responsible.
SAFETY RULES FOR LIFTING AND MOVING HEAVY LOADS
1. NEVER stand under or near a load that is suspended or being lifted. Keep spectators
at a safe distance. In particular keep children away!
2. When lifting a load, follow the manufacturer’s guidelines concerning the points
where hooks, straps, bars, chains etc. are to be attached, and also concerning the
protection of the product from damage (e.g. to the paint) resulting from the use of
hoisting and lifting devices. If you don’t comply, you will be responsible for all
consequences.

3. Follow the manufacturer’s advice about fixing and securing movable parts or any
other measures to be taken during transport and lifting. If you don’t comply, you will
be responsible for all consequences.
4. Handle lifted or suspended loads with due caution. Keep them well balanced. Do not
move loads suddenly. Prevent swinging a load. Use approved straps, chains, hooks,
etc. Check hoisting materials for wear on a regular basis and replace them when
necessary. Do not knock against other objects. Let down on the floor gently. Let a
heavy load down only on a floor able to carry its weight.
5. Loads must be lifted/ shifted/ moved only by people having sufficient education and
experience. If you don’t comply, you will be responsible for all consequences.
6. It is strictly forbidden for persons to be lifted/ moved/ carried along with a load.

SPECIFICATIONS
Capacity 1000lb
Width 680mm
Minimum Height 175mm
Maximum Height 750mm
Air Inlet Fitting 1/4inch NPT
Air Pressure 120-200PSI
ASSEMBLY
Unpack the lift and check contents with list below. Should there be any damaged or
missing parts, contact your
supplier immediately.
Packing List
·Main Assembly
·Sliding Plate
·Leading Plate
·Vice
·Lift Foot Pedal
·Release Foot Pedal
·Locking Bar
·Bolts, Washers, Nuts, Cotter Pins
ASSEMBLY
Place the sliding plate(36) to the platform(35) to cover the rear wheel removal aperture.
Attach leading plate(37) to end of platform using washers(23) and R-pins(04).
Fit the front wheel vice assembly(34) to the front of the platform using bolts(33),
washers(23) and nuts(30).
Fit the baffle plate (32) using bolts (33), washers (23) and nuts (30).
Fit the lift foot pedal(11) to the pump piston spindle(09)and fit the release foot pedal(10) to
the release valve spindle(05).

BEFORE FIRST USE
Leave the pump for one hour to allow the oil to settle before purging the system.
NOTE: Failure to allow sufficient time for the oil to settle could result in air remaining in
the oil. In this event, the pump will not purge completely first time and a second purge will
be required.
Connect the quick coupler-male into the air supply hose quick coupler-female and fully
press the release foot pedal (10), then turn on the air valve(P37) letting the pump work for
20 seconds to eliminate any air in the hydraulic system.
Test the lift without load by raising it to full height and then lowering it. Depress release
foot pedal (10) slowly to control the rate of descent.
OPERATING INSTRUCTIONS
WARNING! Ensure that you read, understand and apply the safety instructions and
warnings before use.
WARNING! Do not attempt to overload the lift.
Position the lift in a suitable area, checking that the surface on which the lift will stand is
solid and flat.
Turn the adjusting screw assy(18) down to raise the castors off the ground to prevent the
lift from moving.
Wheel the motorcycle up the leading plate and onto the platform..
NOTE: There is a choice of mounting holes for the vice to cater for various sizes of
motorcycle.
Clamp front wheel in vice to prevent any movement of the motorcycle.
Strap the motorcycle securely to the platform.
Connect the quick coupler-male into the air supply hose quick coupler-female, then turn
on the air valve to raise the lift. When air source is not available, pump the lift foot
pedal(11) to raise the lift.
When the platform has been raised to the working height, turn off the air valve (or stop
pumping) and pass the locking bar (22) through the holes in the front lifting arm(38) so
that the lift cannot be inadvertently lowered.
When work is done, check under the lift to ensure that there are no obstructions and that
it is safe to lower the unit. Remove the locking bar and then SLOWLY press the release foot
pedal to GENTLY lower the lift.

NOTE: The speed of lowering is controlled by the release valve. The more the valve is
opened the more rapidly the lift descends. Ensure the decent is slow and controlled.
When the lift is fully lowered, unstrap the motorcycle, open the vice jaws and remove the
cycle from the lift.
MAINTENANCE
When not in use, the lift must be stowed in the lowest position in a dry location to
minimize ram and piston corrosion.
Keep the lift clean and wipe off any oil or grease. Lubricate all moving parts.
Periodically check the ram and piston for signs of corrosion. Clean exposed areas with a
clean oiled cloth.
Before each use check all parts. If any part of the lift is damaged or suspect, remove the lift
from service and take necessary action to repair.
Check the hydraulic oil level. If not adequate, remove the filler plug(P33) on the pump and
add hydraulic oil as necessary.
DO NOT use brake fluid or any other improper fluid. Only a good quality hydraulic jack oil
can be used.
When lift efficiency drops, purge away air from the hydraulic system as described
PUMP

PARTS LIST FOR PUMP
PARTS
DESCRRIPTION
Q'TY
PARTS
DESCRIPTION
Q'TY
NO.
NO.
P01
BASE
1
P24
AIR MOTOR
1
P02
STEEL BALL
3
P25
AIR HOSE
1
P03
SPRING
1
P26
AIR VALVE
1
P04
SCREW
2
P27
NYLONG RING
1
P05
"O"RING
1
P28
CYLINDER
1
P06
RELEASE WALVE
1
P29
O-RING
1
P07
SPRING
1
P30
NYLONG RING
1
P08
SCREW
1
P31
PISTON ROD
1
P09
UNION NUT
1
P32
NYLON RING
1
P10
SPRING
1
P33
TOP NUT
1
P11
STEEL BALL
1
P34
O-RING
1
P12
SCREW
1
P35
SPRING
1
P13
SCREW
1
P36
REGULATING
PLUG
1
P14
STELL BALL
1
P37
SEALING RING
1
P15
BALL CUP
1
P38
PUMP PISTON
1
P16
SPRING
1
P39
NUT
1
P17
SCREW
1
P40
UNION NUT
1
P18
"O"RING
1
P41
STEEL BALL
1
P19
SCREW
1
P42
SPRING
1
P20
SCREW
PROTECTOR
1
P43
STEEL BALL
1
P21
NYLON RING
1
P44
SPRING
1
P22
RESERVOIR
1
P45
SCREW
1
P23
FILLER PLUG
1
P46
SCREW
1
P47 NYLON\ RING 1
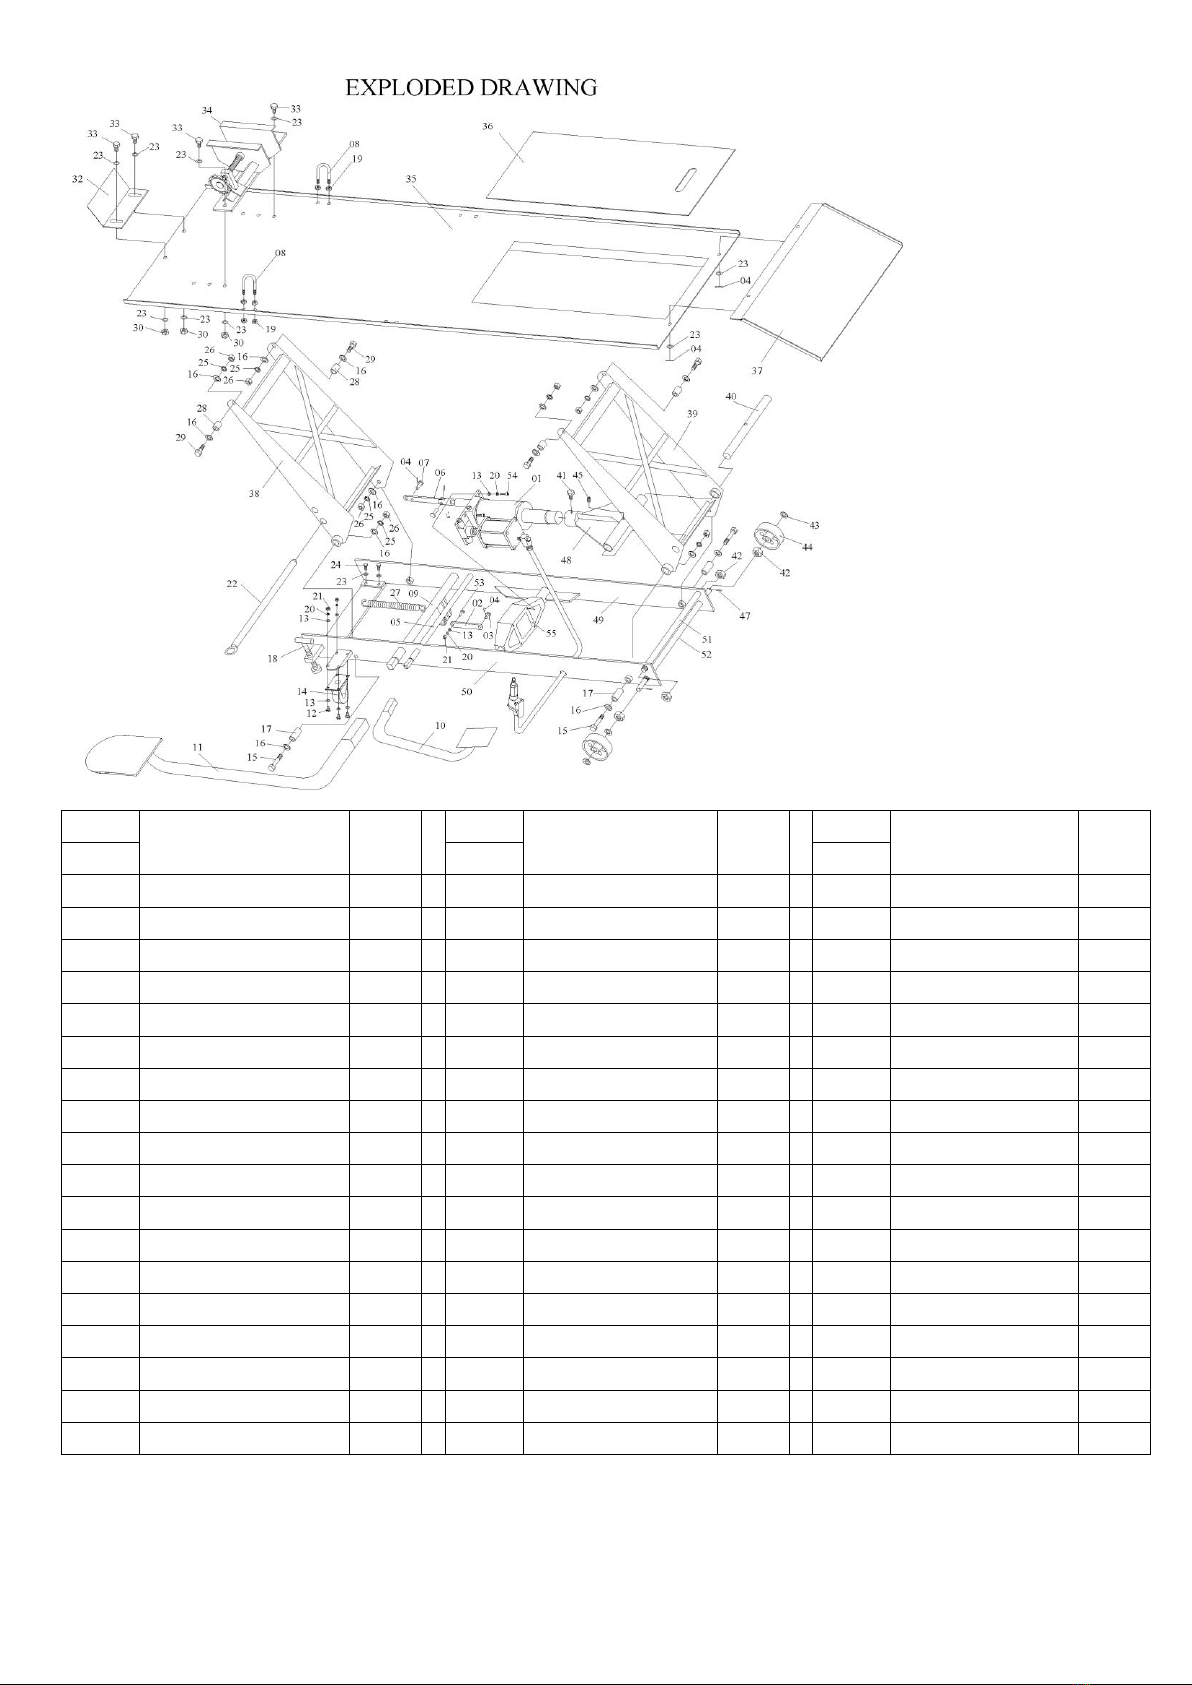
PARTS
DESCRRIPTION
QNTY
PARTS
DESCRIPTION
QNTY
PARTS
DESCRIPTION
QNTY
NO
NO
NO
01
Air pump
1
19
Nut M8
8
38
Front lifting arm
1
02
Link
1
20
Lock washer 6mm
13
39
Rear lifting arm
1
03
Pin
1
21
Nut M6
9
40
Lifting arm spindle
1
04
R-pin
5
22
Locking bar
1
41
Bolt M8x12
2
05
Release valve spindle
1
23
Washer 10mm
14
42
Nut M16
4
06
Link
1
24
Bolt M10x12
4
43
Washer 14mm
2
07
Pin
2
25
Lock washer 12mm
8
44
Front wheel
2
08
U-bolt
2
26
Nut M12
8
45
Set screw M8x10
1
09
Pump piston spindle
1
27
Spring
1
47
Cotter pin
2
10
Release foot pedal
1
28
Bush
4
48
Connection
1
11
Lift foot pedal
1
29
Bolt M12x65
4
49
Frame assy(RH)
1
12
Bolt M6x70
8
30
Nut M10
4
50
Frame assy(LH)
1
13
Washer 6mm
21
32
Baffle plate
1
51
Lifting arm top rod
1
14
Castor fork assy
2
33
Bolt M10x25
4
52
Front spindle
1
15
Bolt M12x70
4
34
Vise assy
1
53
Bolt M6x30
1
16
Washer 12mm
8
35
Platform
1
54
Bolt M6x25
4
17
Bush
4
36
Sliding plate
1
55
Pump base
1
18
Adjusting screw assy
2
37
Leading plate
1

HBM MACHINES B.V.
Grote Esch 1010 - NL 2841 MJ Moordrecht.
Tel. +31 / (0)1 82 / 52 54 68 - Fax. +31 / (0)1 82 / 63 51 19
EG –DECLARATION OF CONFORMITY
Certificate of Compliance
In Compliance with:
EG-Machinery Ruling 2006/42/EC
We hereby state that the machinery concerned, its layout and construction all comply with applicable EC
rulings concerning health and safety. Any change to this machinery without prior permission in writing
issued by ourselves will make any and every guarantee to said machinery NULLAND VOID.
Desccription and nature of the Machine: Motorcycle lift
Model and series: HBM 300 Pneumatic
Year of construction: 2011
Harmonised EC rulings which are applied: EN ISO 12100-1:3003
EN ISO 12100-2:2003
EN ISO 14121-1:2007
EN ISO 13857:2008
EN 349:1993+A1:2008
EN 982:1996+A1:2008
EN 849-1:1997+A1:2008
EN 1027:1995+A1:2008
EN 1494:2000+A1:2008
EN 1570:1998+A1:2004
Date and Place: 01-01-2011-NL2841MJMoordecht.
Signature/ Stamp: Herman Buitelaar
( Directer )
This manual suits for next models
2
Table of contents
Other HBM Lifting System manuals

Popular Lifting System manuals by other brands

Challenger Lifts
Challenger Lifts 44060 Installation, operation & maintenance manual

RITE-HITE
RITE-HITE Hydra-Rite RHH-4000 owner's manual

Terex
Terex Genie S-60 FE Service and repair manual

BraunAbility
BraunAbility A2 Series Service manual

Nußbaum Hebetechnik
Nußbaum Hebetechnik 4.40H Instructions and Documentation

Parkside
Parkside P-SA 1200 Operation and safety notes


