HDX HDX50LSLWN User manual

USEAND CAREGUIDE
Question,Problems,missingparts?Beforereturningtothestore,
callHDXCustomerService
8a.m-6p.m,EST,Monday-Friday
WeappreciatethetrustandconfidenceyouhaveplacedinHDXthroughthepurchaseofthispneumaticnailer.
Westrivetocontinuallycreatequalityproductsdesignatedtoenhanceyourhome.Visitusonlinetoseeourfulllineofproductsavailablefor
yourhomeimprovementneeds.ThanksyouforchoosingHDX!
Item#
Model#HDX50LSLWN
1000817779
2-IN-1FLOORING NAILER
1-800-514-6729
HOMEDEPOT.COM
1-800-514-6729
HOMEDEPOT.COM
Guardeestemanualparafuturasconsultas
Preguntas,problemas,opiezasfaltantes?Antesderegresaralatienda,llamaal
ServicioalClientedeHDX
delunesaviernesentre8a.m.y6p.m.,
(horadelEetedeEE.UU.)
REFIMX200500AV-E/F10/14.#

WARNING:Thisproductoritspowercordmaycontain
chemicalsknowntotheStateofCalifornia tocause
cancerandbirthdefectsorotherreproductiveharm.
Washhandsafterhandling.
Donotnailontop ofanothernail.Thiscancausethenail
tobedeflectedandhit someone,orcausethetoolto
reactandresultinariskofinjurytopersons.
Alwaysweareyeprotection.Operatorandothersin
theworkareashouldalwayswearANSI-approved
safetygoggleswithsideshields.Eyeprotectionis
usedtoguardagainstflyingfastenersanddebris,
whichmaycausesevereeyeinjury.
Alwayswearhearingprotectionwhenusingthetool.
Prolongedexposuretohighintensitynoisemaycause
hearingloss.
Usesafetyequipment.Adustmask,non-skidsafety
shoesandahardhatmustbeusedfortheapplicable
conditions.Wearafullfaceshieldifyouareproducing
metalfilingsorwoodchips.
Dressproperly.Donotwearlooseclothingorjewelry.
Containlonghair.Keepyourhair,clothing,andgloves
awayfrommovingparts.Looseclothes,jewelry,or
longhaircanbecaughtinmovingparts.
Stayalert,watchwhatyouaredoingandusecommon
sensewhenoperatingapowertool.Donotusetool
whiletiredorundertheinfluenceofdrugs,alcohol,or
medication.Amomentofinattentionwhileoperating
thetoolmaycauseseriousinjury.
KeepproperfootingandbalanceatalltimesProper
footingandbalanceenablesbettercontrolofthetool
inunexpectedsituations.
Donotuseonaladderorunstablesupports.Stable
footingonasolidsurfaceenablesbettercontrolofthe
toolinunexpectedsituations.
Makesurethehoseisfreeofobstructionsorsnags.
Entangledorsnarledhosescancauselossofbalance
orfootingandmaybecomedamaged,resultingin
possibleinjury.
Donotoverreach.Keepproperfootingandbalanceatall
times. Properfootingand balanceenablesbettercontrol
ofthetoolinunexpectedsituations.
.
TableofContents SafetyInformation
Readoperator smanualToreducetheriskofinjury,
usermustreadandunderstandoperatorsmanual
beforeusingthisproduct.
:
EyeprotectionAlwayswearsafetygogglessafety
glasseswithsideshieldsorafullfaceshieldwhen
operatingthisproduct
:,
,
.
RisktohearingAlwayswearearprotectionwhen
usingthistoolFailuretodosomayresultin
hearingloss
:
.
.
RiskofseriouspersonalinjuryNeverplacehands
oranyotherbodypartsinthefastenerdischarge
areaofthenailerthetoolmightejectafastener
andcouldresultindeathorseriouspersonalinjury
:
,.
KeeptheworkareacleanandwelllightedCluttered
benchesanddarkareasincreasetherisksofaccidents
Donotoperatethetoolinexplosiveatmospheres,such
asinthepresenceofflammableliquids,gases,ordust
Thetoolcreatesasparkwhichmayigniteflammable
liquids,gasesordust
Keepbystanders,children,andothersawaywhile
operatingthetoolDistractionscouldresultinimproper
useandcauseinjury
Avoidunintentionalmisfires
..
.
.
.
..Alwaysusecautiontoavoid
accidentallyfiring.Donotpointtowardsyourselfor
anyonewhetheritcontainsfastenersornot.
SYMBOLS
WORKAREASAFETY
1.
2.
3.
4.
WARNING:Instructionspertainingtoariskoffire,
electricshock,orinjurytopersons.
1.
2.
3.
4.
5.
6.
7.
8.
9.
PERSONALSAFETY
WARNING:Toavoidseriouspersonalinjury,donot
attempttousethisproductuntilyou readthemanual
thoroughly andunderstanditcompletely.Savethis
manualandreviewfrequently forcontinuingsafe
operationandinstructingotherswhomayusethis
tool.
WARNING:Whenusingtools,basicprecautions
shouldalwaysbefollowed,includingthefollowings.
HOMEDEPOT.COM
Pleasecontact1-800-514-6729forfurtherassistance.
3
2
TableofContents-------------------------------------------------2
SafetyInformation------------------------------------------------3
--------------------------------------------------------3
------------------------------------------------3
-------------------------------------------------3
-----------------------------------------------4
----------------------------------------------------5
-------------------------------------------------------5
-------------------------------------------------------5
------------------------------------6
------------------------------------------------6
Warranty-----------------------------------------------------------7
Unpacking---------------------------------------------------------7
Specification------------------------------------------------------8
Features-----------------------------------------------------------8
Operation----------------------------------------------------------9
9
9
9
-----------------------------------------10
----------------------------------------10
---------------------------------------------10
--------------------------------------------------11
Maintenance-----------------------------------------------------12
--------------------------------------------------12
----------------------------------------------------12
-------------------------------------------------------13
---------------------------------------13
RecommendedHookup----------------------------------------13
Troubleshooting-------------------------------------------------14
Symbols
Workarea
Personalsafety
Tooluseandcare
Toolservice-
Airsource
Operation
Airsupplyandconnections
Loadingthetool
Preparethetool--------------------------------------------------
LoadingLcleatnails--------------------------------------------
Loadingstaples---------------------------------------------------
Changethefootplate
Settingtheairpressure
Operatingthetool
Clearingjams
Anti-dustcap
Lubrication
Cleaning
Coldweatheroperation
safety
10.

4 5
SafetyInformation(Continued) SafetyInformation(Continued)
Donotattachthehoseortooltoyourbody.Attachthe
hosetothestructuretoreducetheriskofloss ofbalance
ifthehoseshifts.
Alwaysassumethatthetoolcontainsfasteners.Donot
pointthetooltowardyourselforanyonewhetherit
containsfastenersornot.
Washhandsafterhandling.Thisproductoritspower
cordmaycontain chemicalsknowntotheStateof
Californiatocausecancerandbirthdefectsorother
reproductiveharm.
11.
12.
13.
TOOLUSEANDCARE
WARNING:Disconnectthetoolfromtheair source
beforemakingadjustments,doingtoolmaintenance,
clearingjams,touchingthesafetyyoke,leavingwork
area,orunloadingthetool.Suchprecautionary
measuresreducetheriskofinjurytopersons.
Checkoperationofthetoolbeforeuse.
Donotforcetool.Usethecorrecttoolforyour
application.Thecorrecttoolwilldothejobbetterand
saferattherateforwhichitisdesigned.
Useclampsoranotherpracticalwaytosecureand
supporttheworkpiecetoastableplatform.Holdinga
toolbyhandoragainstthebodyisunstableandmay
leadtolossofcontrol.
Keepthetoolanditshandledry,cleanandfreefrom
oilandgrease.Alwaysuseacleanclothwhen
cleaning.Neverusebrakefluids,gasoline,petroleum-
basedproducts,oranystrongsolventstocleanyour
tool.
Donotusethetoolasahammer.
Neverusethistoolinamannerthatcouldcausea
fastenertobedirectedtowardanythingotherthanthe
workpiece.
Neverusegasolineorotherflammableliquidstoclean
thetool.Neverusethetoolinthepresenceofflammable
liquidsorgases.Vaporscouldignitebyasparkand
causeanexplosionwhichwillresultindeathorserious
personalinjury.
Alwaysfit toolwith afittingorhosecoupling onornear
thetoolinsuchamannerthatallcompressedairinthe
toolisdischargedatthetimethefittingorhosecoupling
isdisconnected. Donotuseacheckvalveoranyother
fittingwhichallowsairtoremaininthetool.Deathor
seriouspersonalinjurycouldoccur.
Neverplacehandsoranyotherbodypartsinthefastener
dischargearea ofthetool.Thetoolmightejectafastener
andcouldresultindeathorseriouspersonalinjury.
Nevercarrythetoolbytheairhoseorpullthehoseto
movethetooloracompressor.Keephosesawayfrom
heat,oil andsharpedges.Replaceanyhosethatis
damaged, weakorworn.Personalinjuryortooldamage
couldoccur.
Alwaysassumethetoolcontainsfasteners.Respectthe
toolasaworkingimplement;nohorseplay.
Alwayskeepothersatasafedistancefromtheworkarea
in caseofaccidentaldischargeoffasteners.Donotpoint
thetooltowardyourselforanyonewhetheritcontains
fastenersornot.Accidentaltriggeringofthetoolcould
resultindeathorseriouspersonalinjury.
Donotdrop orthrowthetool.Dropping orthrowingthe
toolcanresultindamagethatwillmakethetool
unusableorunsafe.Ifthetoolhasbeendroppedor
thrown,examinethetoolclosely forbent,crackedor
brokenpartsandairleaks.STOPandrepairbeforeusing,
orseriousinjurycouldoccur.
Avoidusingthetoolwhenthemagazineisempty.
Acceleratedwearonthetoolmayoccur.
8.
9.
10.
11.
12.
13.
14.
Knowthistool.Readmanualcarefully,learnits
applicationsandlimitations,aswellasthespecific
potentialhazardsrelatedtothistool.
Useonlyfastenersthatarerecommendedforyour
models.Donotusethewrongfastenersorloadthe
fastenersincorrectly.
Useonlyaccessoriesthatareidentifiedbythe
manufacturerforthespecifictoolmodel.Useof
unauthorizedpartsorfailuretofollowmaintenance
instructionsmaycreateariskofinjury.
Useonlythosefastenersrecommended forusewiththis
tool.Fastenersnotidentifiedforusewiththistoolbythe
toolmanufacturerareabletoresult in ariskofinjuryto
personsortooldamagewhenusedinthistool.
Checkformisalignmentorbindingofmovingparts
breakageofpartsandanyotherconditionthatmay
affectthetool'soperation.Ifdamaged,havethetool
servicedbeforeusing.Manyaccidentsarecausedby
poorlymaintainedtools.
Maintaintoolswithcare.Keeptoolclean.A
properlymaintainedtoolreducestheriskofbinding
andiseasiertocontrol.
Storetoolsoutofthereachofchildrenandother
untrainedpeople.Toolsaredangerousinthehandsof
untrainedusers.
,
,
the
the
1.
2.
3.
4.
5.
6.
15.
16.
17.
18.
19.
20.
TOOLUSEANDCARE(CONTINUED)
Cleanand checkallairsupplyhosesand fittingsbefore
connectingthetooltoanairsupply.Replaceany
damagedorwornhosesorfittings.Toolperformance or
durabilitymaybereduced.
Donotusethetoolifitleaksairordoesnotfunction
properly.
Donotoperatethetoolifitdoesnotcontainalegible
warninglabel.
Alwayscarrythetoolbythehandle.Nevercarrythetool
bytheairhose.
22.
23.
24.
25.
TOOLSERVICE
Useonlyaccessoriesthatareidentifiedbythe
manufacturerforthespecifictoolmodel.
Whenservicingatool,useofunauthorizedpartsoffailure
offollowingmaintenanceinstructionsmaycreatearisk
ofinjury.
Useonlythelubricantssuppliedwiththetoolor
specifiedbythemanufacturer.
Toolservicemustbeperformedonlybyqualifiedrepair
personnel.
1.
2.
3.
4.
Respectthetoolasaworkingimplement.
Neverengageinhorseplay.
Keepothersasafedistancefromthetoolwhiletool
isinoperationasaccidentalactuationmayoccur,
possiblycausinginjury.
OPERATION
Donotdrivefastenersnearedgeofmaterial.The
workpiecemaysplitcausingthefastenertoricochet,
injuringyouorpeoplearound.
Duringnormalusethetoolwillrecoilimmediatelyafter
drivingafastener.Thisisanormalfunctionofthetool.
Donotattempttopreventtherecoilbyholdingthe
toolagainstthework.Restrictiontotherecoilcan
resultinasecondfastenerbeingdrivenfromthetool.
Gripthehandlefirmlyandletthetooldothework.
Failuretoheedthiswarningcanresultinserious
personalinjury.
Donotdrivefastenersontopofotherfastenersor
withthetoolatanoverlysteepangleasthismay
causedeflectionoffastenerswhichcouldcauseinjury.
Donotactuatethetoolunlessyouintendtodrivea
fastenerintotheworkpiece.
Alwayshandlethetoolwithcare:
1.
2.
3.
4.
5.
AIRSOURCE
Neverconnecttoanairsourcethatiscapableof
exceeding200psi.Overpressurizingthetoolisableto
resultinbursting,abnormaloperation,breakageofthe
toolorseriousinjurytopersons.Useonlyclean,dry,
regulated compressedairattheratedpressureorwithin
theratedpressurerangeasmarkedonthetool.Always
verifypriortousingthetoolthattheairsourcehasbeen
adjustedtotheratedairpressureorwithintheratedair-
pressurerange.
Neveruseoxygen,carbondioxide, combustiblegasesor
anybottled gasasanairsourceforthetool.Suchgases
arecapableofexplosionandseriousinjurytoperson.
1.
2.
7.
PERSONALSAFETY(CONTINUED)
HOMEDEPOT.COM
Pleasecontact1-800-514-6729forfurtherassistance.
21.

SafetyInformation(Continued)
AIRSUPPLYANDCONNECTIONS
Theconnectoronthetoolmustnothold pressurewhen
airsupplyisdisconnected.Ifanincorrectfitting isused,
thetoolcanremainchargedwithairafterdisconnecting
andthuswill beableto driveafastenerevenaftertheair
lineisdisconnected,possiblycausinginjury.
Donotuseanytypeofreactivegases,including, butnot
limitedto,oxygenandcombustiblegases,asapower
source.Usefiltered,lubricated, regulatedcompressedair
only.Useofareactivegasinsteadofcompressedairmay
causethetooltoexplodewhichwillcausedeathor
seriouspersonalinjury.
Useonlyapressure-regulatedcompressedairsourceto
limittheairpressuresuppliedtothetool.Theregulated
pressuremustnotexceed115psi.Iftheregulatorfails,
thepressuredeliveredtothetoolmustnotexceed200
psi.Overpressurizingthetoolisabletoresult inbursting,
abnormaloperation,breakageofthetoolorseriousinjury
topersons.Useonlyclean,dry,regulatedcompressedair
attheratedpressureorwithin theratedpressurerange
asmarkedonthetool.Alwaysverifypriortousingthe
toolthattheairsourcehasbeenadjustedtotheratedair
pressureorwithintheratedair-pressurerange.
Alwaysdisconnectairsource:
1.
2.
3.
4. Beforeunloadingormakingadjustments.
Whenmaintainingthetool.
Whenclearingajam.
Whentoolisnotinuse.
Whenmovingtoadifferentworkarea.
Warranty
6 7
LOADINGTHETOOL
Donotloadthetoolwithfastenerswhenanyoneofthe
operatingcontrolsisactivated.
Neverplaceahandoranypartofbodyinfastener
dischargeareaoftool.
Neverpointtoolatanyone.
1.
2.
3.
Suchprecautionarymeasuresreducetheriskofinjuryto
persons.
Thiswarranty coversdefectsin workmanship ormaterialsinthisHDXpneumaticnailerfortheone-yearperiod fromthedatef
purchase.Thiswarrantyisspecifictothispneumaticnailer.WarrantiesforotherHDXproductsmayvary.
Thiswarrantyappliesonlytotheoriginalretailpurchaserandmaynotbetransferred.Thiswarrantydoesnotcovernormal
wearandtearoranymalfunction,failureordefectresultingfrommisuse,abuse,neglect,alteration,modificationorrepairby
otherthanaservicecenterauthorizedtorepairbrandedairnailer.Expendablematerials,suchasO-rings,bumpers,driver
blades,seals,etc.arenotcoveredbythiswarranty.Thiswarrantydoesnotapplytousedinindustrialapplication
orforrentalpurposes.makesnowarranties,representationsorpromisesastothequality orperformanceofits
otherthanthosespecificallystatedinthiswarranty.
HDX pneumaticnailer
HDXpneumatic
nailer
o
HDXPNEUMATICNAILERLIMITEDONE-YEARWARRANTY
ADDITIONALLIMITATIONS
Totheextentpermittedbyapplicablelaw,allimpliedwarranties,includingwarrantiesofmerchantability orfitnessforaparticular
purpose,aredisclaimed.Anyimpliedwarranties,includingwarrantiesofmerchantabilityorfitnessforaparticularpurpose,that
cannotbedisclaimedunderstatelawarelimitedtooneyearfromthedateofpurchase.HDXisnotresponsiblefordirect,
indirect,incidental,specialorconsequentialdamages.Ifthisisusedforcommercialpurposes,thewarrantywill
applyforninety(90)daysfromthedateofpurchase. Somestatesdonotallowlimitationsonhowlong animplied warrantylasts
and/ordonotallowtheexclusionorlimitationofincidentalorconsequentialdamages,sotheabovelimitationsmaynotapplyto
you.Thiswarrantygivesyouspecificlegalrights,andyoumayalsohaveotherrights,whichvaryfromstatetostate.
pneumaticnailer
1.
4.
2.
3.
5.
Thistoolhasbeenshippedcompletelyassembled
Carefullyremovethetoolandanyaccessoriesfromthe
box
Inspectthetoolcarefullytomakesurenobreakageor
damageoccurredduringshipping
Donotdiscardthepackingmaterialuntilyouhave
carefullyinspectedandsatisfactorilyoperatedthetool
Ifanypartsaredamagedormissingpleasecall
1-800-514-6729.
.
.
.
.
,
WARNING:Ifanypartsaremissing,donotoperatethe
tooluntilthemissingpartsarereplaced.Failuretodo
socouldresultinpossibleseriouspersonalinjury.
Unpacking
WARNING:Donotattempttomodifythetoolor
createaccessoriesnotrecommendedforusewith
thetool.Anysuchalterationormodificationis
misuseandcouldresultinhazardouscondition
leadingtopossibleseriouspersonalinjury.
WARNING:Thewarningsandprecautionsdiscussed
abovecannotcoverallpossibleconditionsand
situationsthatmayoccurItmustbeunderstoodby
theuserthatcommonsenseandcautionare
factorswhichcannotbebuiltintothisproductbut
mustbesuppliedbytheuser
.
,
.
HOMEDEPOT.COM
Pleasecontact1-800-514-6729forfurtherassistance.

8 9
Revolutionary2in1design
ForusewithStaples,L-Cleats.
Non-marringdesign
Providesincreasedprotectionfrommarringwhen
workingwithafinishedflooringsurface.
Durableconstruction
Lightweightanddurablyconstructedofhigh-strength
aluminumandheattreatedsteelparts.
Malletincluded
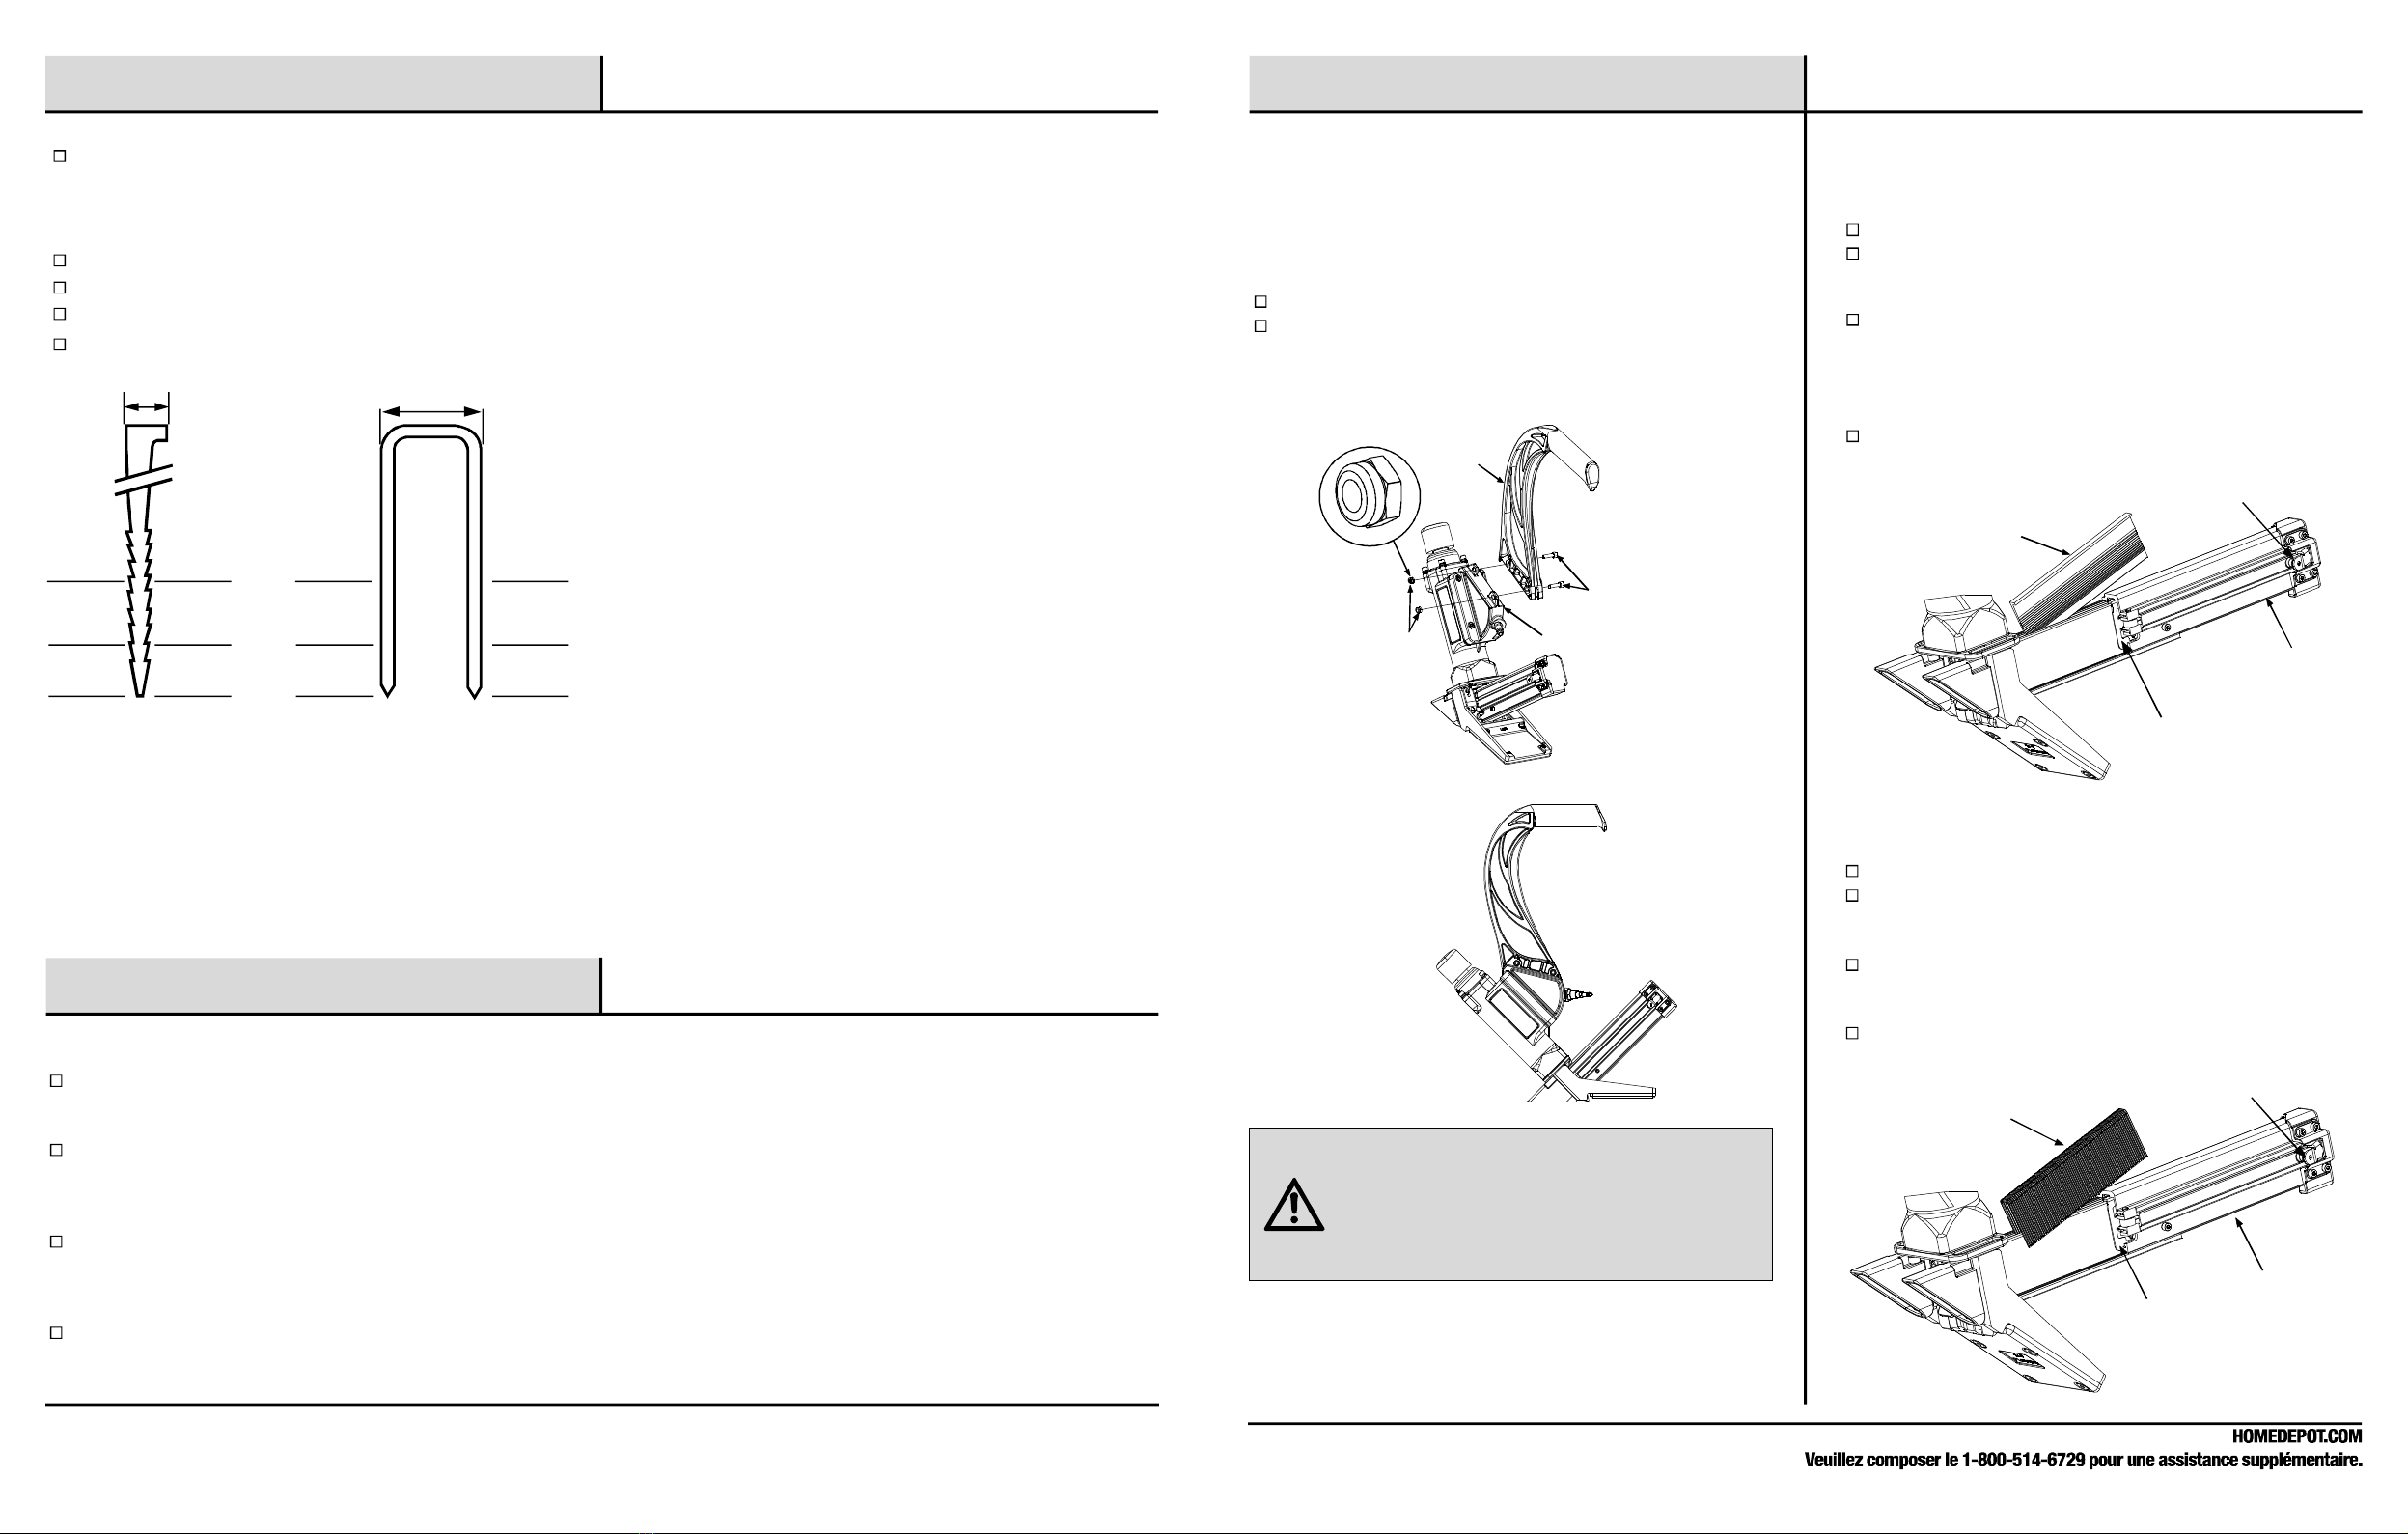
Operation
Preparethetool
1
Thetoolisshippedwiththearm(A)partdetached fromthe
Mainbodypart.
LoadingLcleatnails
2Connectthetooltotheairsource.
Pressdownonthelatchbutton(F).Pull themagazine
cover(D)backtotheendofthemagazine.
Placefullclipofdesiredfastenersintomagazinefromthe
side.Upto100cleatnailscanbeloaded intomagazine.
Benotedthat,whenloadingtheLcleatnails,theside
withtheLheadshouldbeintheleftofthemagazine
pusher(E).
Pushthemagazinecover(D)forwarduntilmagazine
pusher(E)popsup.
WARNING:Ifanypartsaremissing,donotoperatethis
tooluntilthemissingpartsarereplaced. Beforeusing
thistool,make surethearmpartandthemainbody
partarescrewedtogethertightly.Failuretodoso
couldresultinpossibleseriouspersonalinjury.
HOMEDEPOT.COM
Pleasecontact1-800-514-6729forfurtherassistance.
Specifications
Features
Followtheseinstructionstopreparethetoolforusing.
Setthearm(A)againsttheHandle.
Wrench-tightenthenuts(B)until thearm(A)andHandle
(C)aresecuredandthearm(A)islockedagainstHandle
(C).
Nut(B)
Hex.Bolt
Arm(A)
Handle(C)
Prepared
FlooringNailer
Magazine
pusher
(E)
Magazine
cover
(D)
Latchbutton(F)
Loadingstaples
3Connectthetooltotheairsupply.
Pressdownthelatchbutton(F),thepullthemagazine
cover(D)backtotheendofthemagazine.
Placeafullclip of1/2in.crownstaplesinthemagazine
fromthetop. Upto90staplescanbeloadedinto
magazine.
Pushthemagazinecover(D)forwarduntil themagazine
pusher(E)popsup.
Loadstaples
fromthetop
Magazinecover
(D)
Latchbutton(F)
Magazine
pusher
(E)
.
Airinlet:1/4inchNPT
Magazinecapacity:
LCleats:100pcs,Staples:90pcs
Weight:88lbs
Maximumpressure:115psi
Pressurerange:70psi–115psi
Pinsizerange:1-1/2inchto2inch
CompatibleWithGenericBrandsof15.5GaugeStaples&16
GaugeL-Cleats.
(16Ga.LCleats)
7.2mm(9/32”)
38mm
45mm
50mm
1-1/2”
1-3/4”
2”
(15.5Ga.Staples)
12.7mm(1/2”)
38mm
45mm
50mm
1-1/2”
1-3/4”
2”
LCleathead
direction
OperationContinued)(
10 11
WARNING:Thetoolmayfirewhenitfirstconnectedto
theairsource.Alwaysconnectthetooltotheair
sourcebeforeloadingfastenerstopreventinjuryfrom
unintendedcycling.Alwaysmakesurethetool's
magazineisemptyatthebeginningofeachwork
session,beforeconnectingtoanairsource.
WARNING:Useonlythosefastenersrecommended
forusewith thistool.Fastenersnotidentifiedforuse
withthistoolbythetoolmanufacturerareable to
resultinariskofinjury topersonsortooldamage
whenusedinthistool.
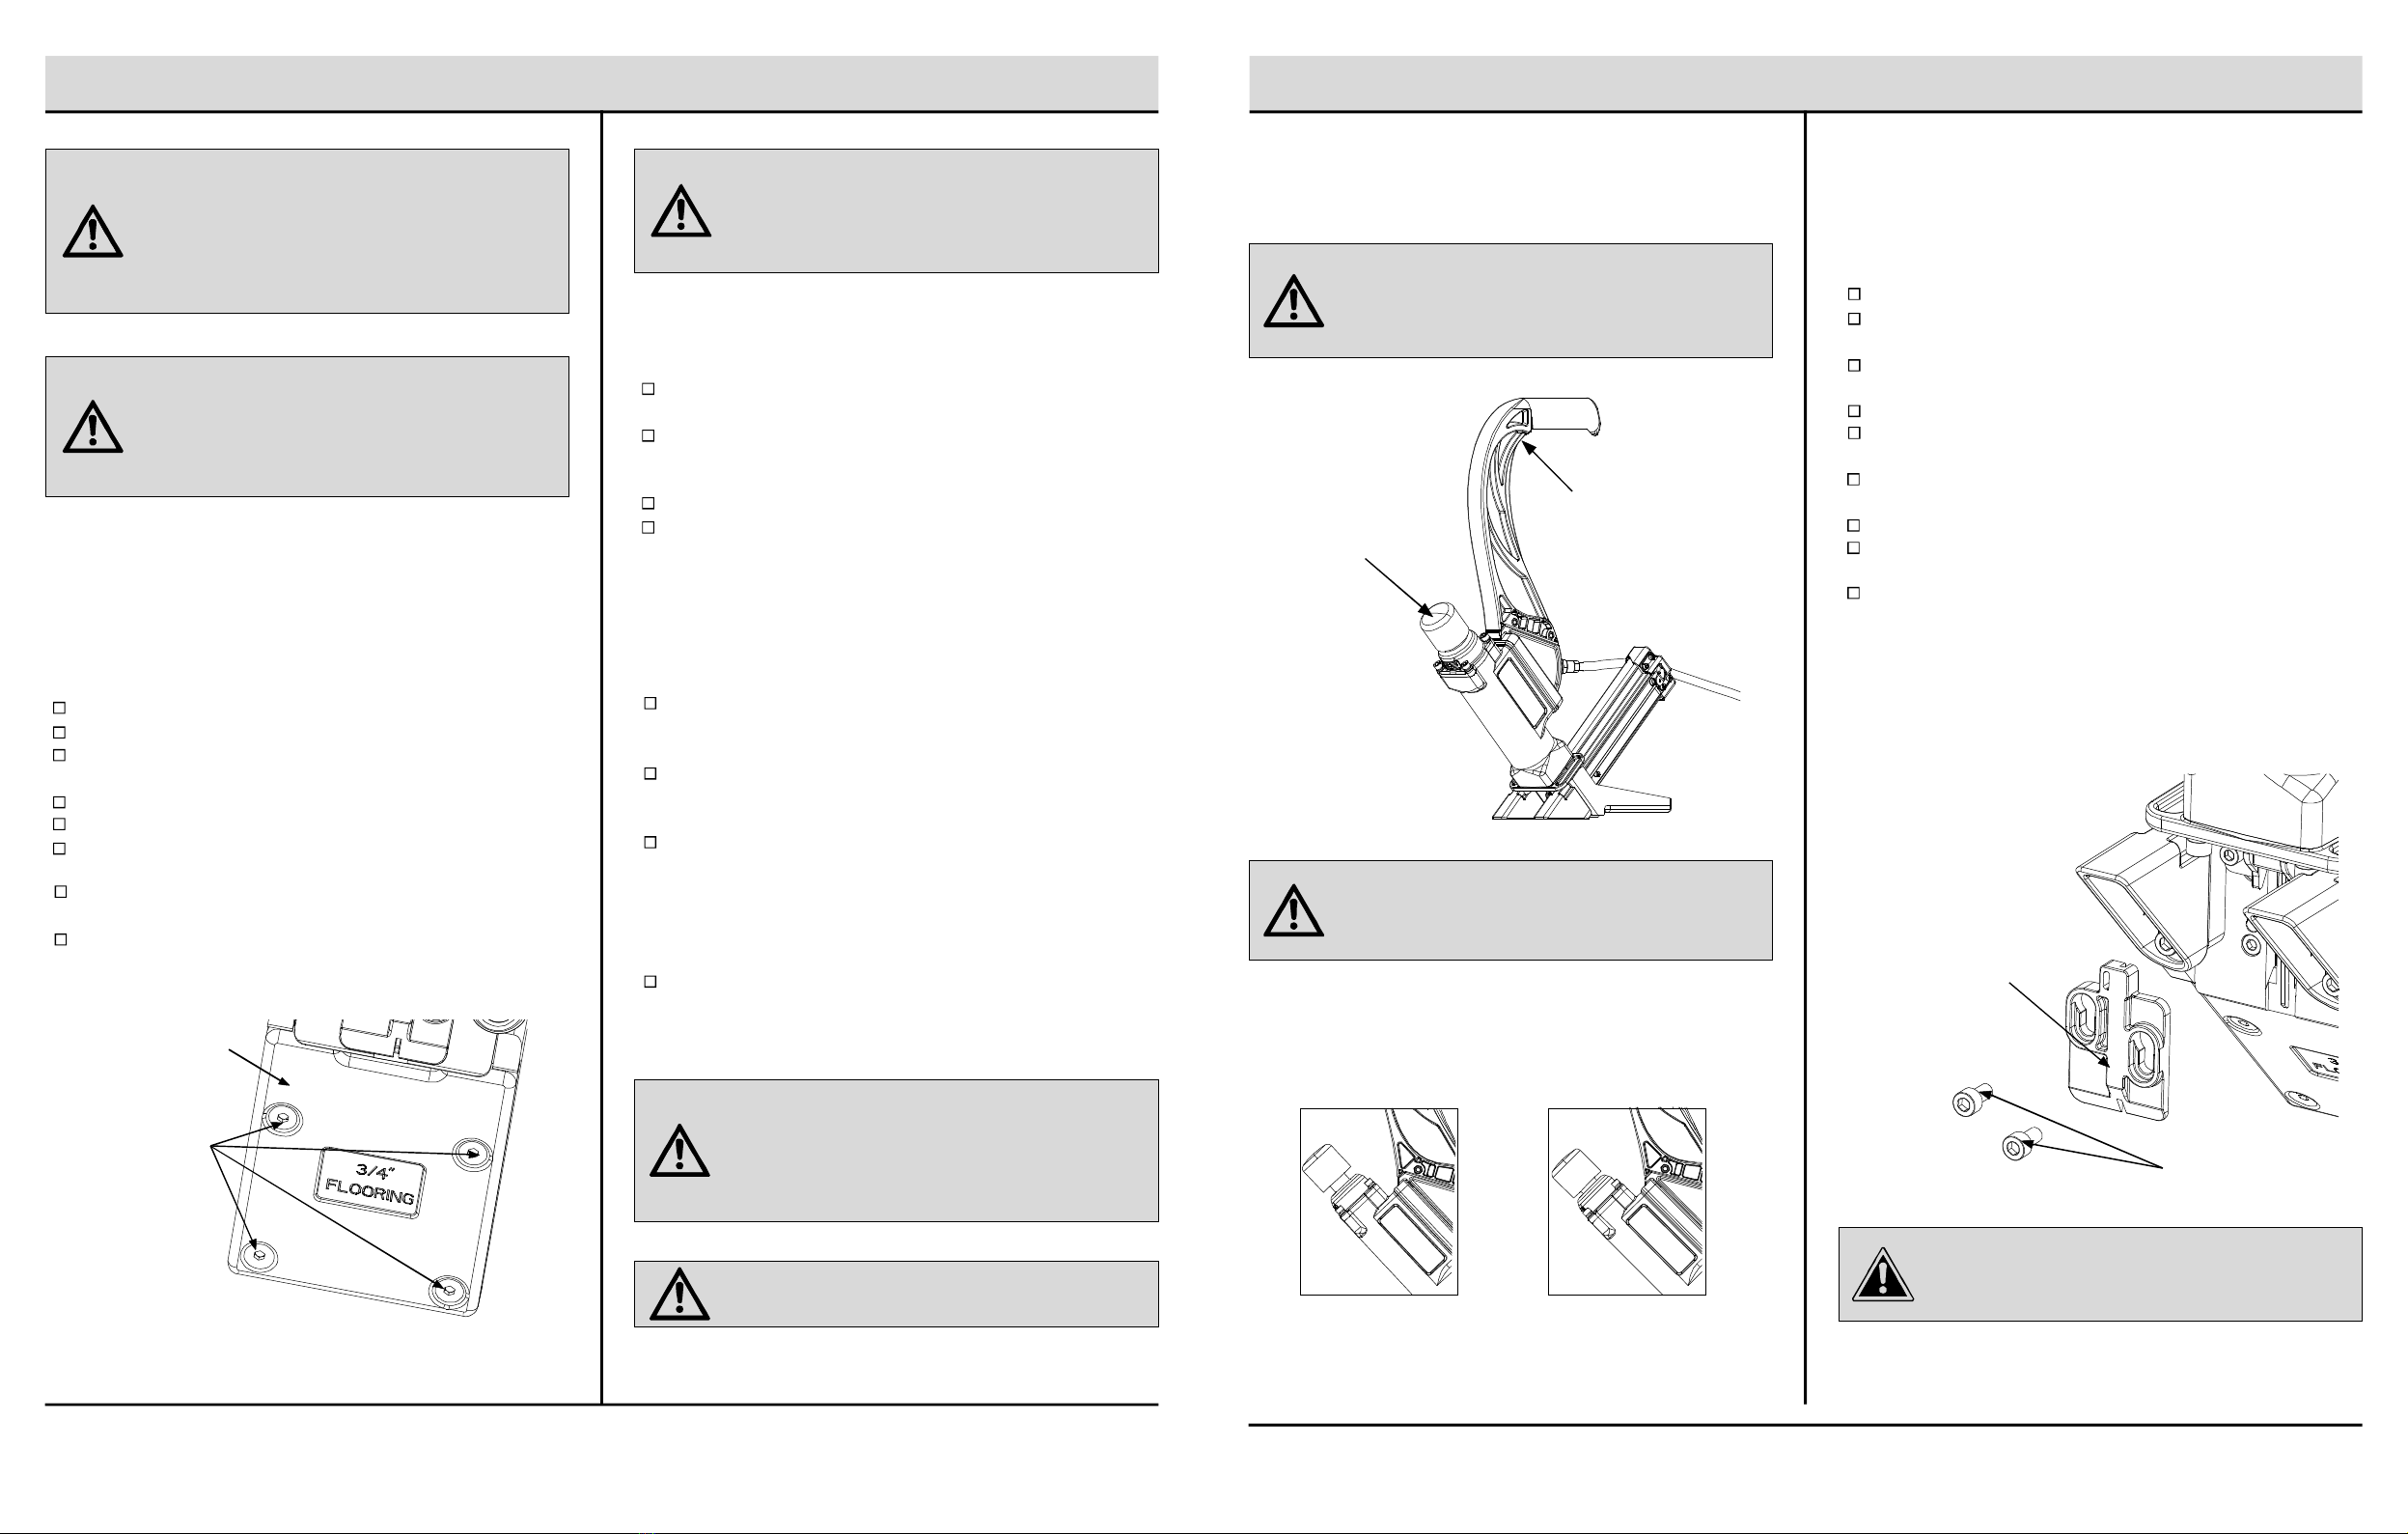
Changethefootplate
4
Thetoolisequippedwithafactorypre-installed3/4in. Foot
Plate(G).Andanadditionaluninstalled 5/8in.footplate. To
changetheplate:
Disconnectthetoolfromtheairsource.
Emptythemagazinecompletely.
Firethetoolintoapieceofscrapwoodtoensurethereis
nocompressedairorfastenersleftinthetool.
Setthetoolonitssidetoexposethefourscrews(H).
Removethefourscrews(H),then,removethefootplate.
Alignthefourscrewholesinthereplacementfootplate
withthefourthreadedmountingholes.
Usingthefourscrewsyouremoved justnow, securethe
replacementfootplatetothetool.
Ensurethecorrectfootplateisinstalledbyfiringintoa
scrappieceofflooringand checkingforproperfastener
placement.
WARNING:Disconnectthetoolfromtheair source
wheneverchangingthefootplate.
Makesurethereisnofastenerinthemagazinebefore
changingthefootplate.
Settingtheairpressure
5Theamountofairpressurerequireddependsonthesize
ofthefastenersandtheworkpiecematerial.
Begintestingthedepthofdrivebydrivingatestnailinto
thesame typeofworkpiecematerialused fortheactual
job.
Driveatestfastenerwiththeairpressuresetat90-95psi.
Raiseorlowertheairpressuretofindthelowestsetting
thatwillperformthejobwithconsistentresults.
OperationContinued)(
Operatingthetool
6Attachthetooltotheairsource.Startyourcompressor
andcheckthepressure,makingsureitissetbetween70-
115psi.Donotexceedthemaximum115psi
Holdthearm(A)securely andpressfootplate(G)to the
worksurface.Makesuretheplateisoverthefastener
targetposition.
Pressdownhardsothatthefootplate(G)isfirmly
contactingtheworksurface.Then,usingthemallet
packetwiththetool,strikethehammercap(I)firmlyto
drivethefastenerintoworksurface.Liftthetooloffthe
worksurface.Repeatthisprocessuntilthejobis
completed.
Whenfinished, makesuretostorethetoolinaclean,dry,
safelocationoutofreachofchildrenandother
unauthorizedpeople.
WARNING:Keepyourfeetoffthetool.
WARNING:Beforeusingthetoolonafloor,testthe
toolonascrappieceofwood.Adjustthedrivingdepth
byprovidingmoreorlessairpressure.Neverexceed
115PSI.
CAUTION:Makesurethereisnofastener inthe
magazinebeforeclearingajam.
HOMEDEPOT.COM
Pleasecontact1-800-514-6729forfurtherassistance.
Screws(E)
Footplate(D)
WARNING:Extremecautionmustbeusedwhenever
thistoolisconnectedtoan airresource.Ifthetoolis
dropped,orifthehammercap(I)isaccidentallystruck,
thenthetoolwill fireafastener,potentially causing
SERIOUSPERSONALINJURY.
HammerCap(I)
Arm (A)
WARNING:Animproperlyfunctioningtoolmustnotbe
used.Donotactuatethetoolunlessthetoolisplaced
firmlyagainsttheworkpiece.
Clearingjams
7
Occasionally,fastenersmaybecomejammedin thefiring
mechanismofthetool,makingthetoolinoperable.To
removeajammedfastener,followthestepsbelow:
Disconnectthetoolfromairsource.
Emptythemagazine.Makesureallfastenersare
removed.
Trytofirethetoolintoapieceofscrapwoodorflooringto
makesurethatit sincapableoffiringanyfasteners.
Setthetoolonitssidetoexposethenosebolts(J).
Removenosebolts(J)anddriverguide(K)toexposethe
jammedfastener.
Removejammedfastener,usingplierorascrewdriverif
required.
Replacethedriverguide(K)andnosebolts(J).
Reconnecttooltotheairsource,thenreloadthetoolwith
fasteners.
Pressthedriveguide(K)againstapieceofwood,and
testfirethefastenersseveraltimestocheckforproper
operation. Ifthetoolisproperlyfiring, youmaycontinue
usingthetool.Ifthetoolfailstoperformproperly,
immediatelydiscontinueuseandhavethetoolrepaired
byaqualifiedservice technician.
DriverGuide(K)
Hex.Bolts(J)
NOTE:Makesurethehammercapontheflooringnailerisin
theuppositionbeforeaddingtheairhose,ifnot, thenailer
maycycle(Seebelow):
HammerCap
(UpPosition) HammerCap
(DownPosition)
Operatingthetool(Continued)
6

12 13
Maintenance
ANTI-DUSTCAP
WARNING:Anytimeinspection,maintenance,and
cleaningaredone:
Disconnectthetoolfromtheairsource.
Emptythemagazinecompletely.
Eachtoolispackedwithananti-dustcapontheair
connector,checkitafterunpacking.
Keeptheanti-dustcapcoveringtheairconnectorwhen
thetoolisnotinuse.
LUBRICATION
Frequent,butnotexcessive,lubricationisrequiredforbest
performance.Oilforthetooladdedthroughtheairline
connectionaddwilllubricatetheinternalparts.Donot
detergentoiloradditivesastheselubricantswillcause
acceleratedweartothesealsandbumpersinthetool,
resultingin poortoolperformanceandfrequenttool
maintenance.
CLEANING
Avoidusingsolventswhencleaningplasticparts.Most
plasticsaresusceptibletodamagefromvarioustypesof
commercialsolventsandmaybedamagedbytheiruse.
Usecleanclothstoremovedirt,dust,oil,grease,etc.
WARNING:Donotatanytimeletbrakefluids,
gasoline,petroleum-basedproducts,penetrationoils,
ect.comeincontactwithplasticparts.Chemicals
candamage, weakenordestroyplasticwhichmay
resultinseriouspersonalinjury.
COLDWEATHER
Forcoldweatheroperation,nearandbelowfreezing,the
moistureintheairlinemayfreezeandpreventtool
operation.Werecommendtheuseofairtoollubricantor
permanentantifreeze(ethyleneglycol)asacoldweather
lubricant.
CAUTION:Donotstoretoolsinacoldweather
environmenttopreventfrostoriceformationonthe
tool soperatingvalvesandmechanismsthatcould
causetoolfailure
.
Maintenance(Continued)
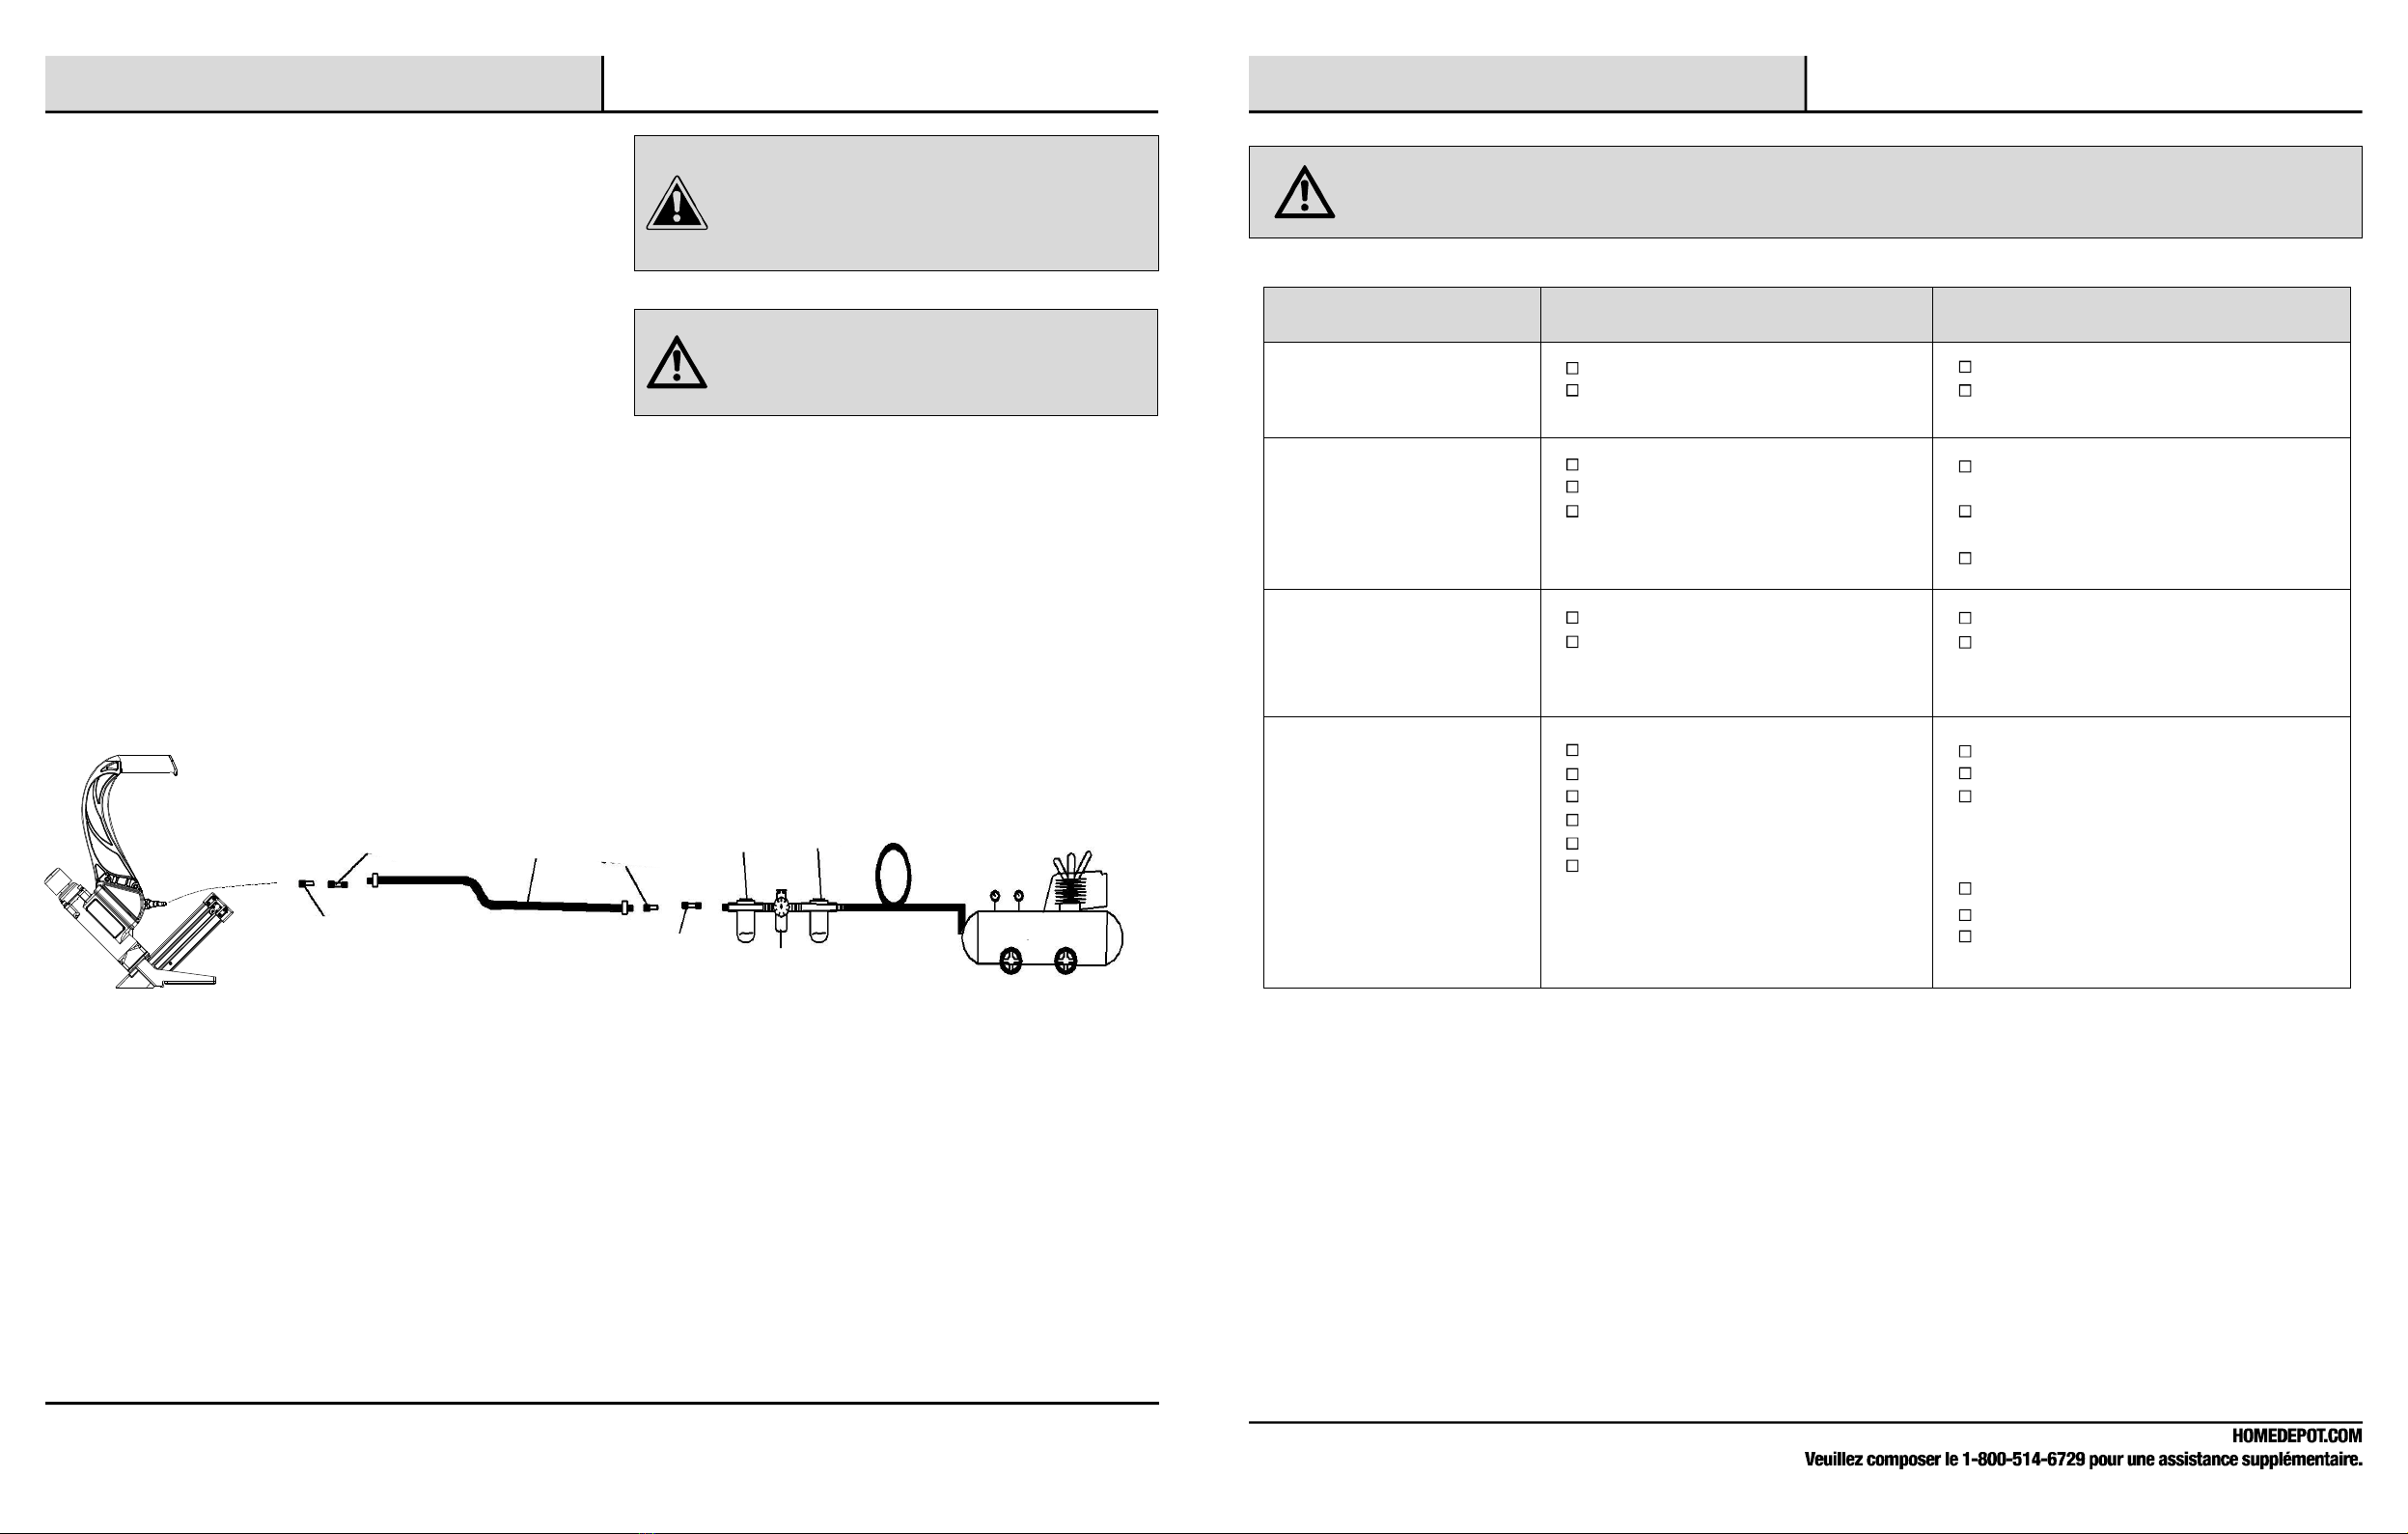
Theaircompressormustbeabletomaintainaminimum
of70psiwhenthetoolisbeingused. Aninadequateair
supplycancausealossofpowerandinconsistent
driving.
Anoilercanbeusedtoprovideoilcirculationthroughthe
tool.Afiltercanbeusedtoremoveliquidandsolid
impuritieswhichcanrustorgumupinternalpartsofthe
tool.
Alwaysuseairsupply hoseswithaminimumworking
pressureratingequaltoorgreaterthanthepressurefrom
thepowersourceifaregulatorfails,or150psi,whichever
isgreater.Use3/8in.airhoseforrunsupto50ft.anduse
a3/8quickcouplerontheairhose.
Useapressureregulatoronthecompressor,withan
operatingpressureof0-125psi.Apressureregulatoris
requiredtocontroltheoperatingpressureofthetool
between70psiand115psi.
in.
1.
2.
3. WARNING: Donotconnectwithaircompressorwhich
canpotentiallyexceed200psi.Astoolmayburst,
possiblycausinginjury.
CAUTION:Theaircompressormustbeabletomaintain
aminimumof70psiwhenthetoolisbeingused.An
inadequateairsupplycancausealossofpowerand
inconsistentdriving.
4.
Airhose Quick
connector Oiler
Regulator
Filter
Compressor
Quick
coupler
Quick
coupler
Quick
connector
HOMEDEPOT.COM
Pleasecontact1-800-514-6729forfurtherassistance.
Disconnecttheairsupplyfromthetooltoaddlubricant.
Turnthetoolso theairinletisfacing up. Place2-3drops
ofpneumaticfasteningtooloil intoairinlet.Donotuse
detergentoils,oiladditives,orair-tooloilsasthese
lubricantswill causeacceleratedweartothesealsand
bumpersinthetool,resultinginpoortoolperformance
andfrequenttoolmaintenance.
Afteraddingoil,runtoolbriefly.Wipeoffanyexcessoil
fromthecapexhaust.
CAUTION:Lubricatetoolonlywithspecified
lubricants.
Recommendedhookup

Troubleshooting
Airleakinginheadcap. Loosescrews.
Wornor damagedO-ringsorseals. Tightenscrews.
Installoverhaulkit.
Lackofpower.
Slowtocycle. Toolistoodry.
Airpressuretoolow.
Exhaustblocked.
Addabout2-3dropsoflubrication
intotheairconnector.
Makesuretheaircompressoris
setbetween70psiand115psi.
Cleanexhaustchannel.
Drivechannelisworn.
Pistonisbrokenorworn.
Bentfasteners.
Dirtymagazine.
Loosemagazine.
Wrongfasteners.
Fastenersarejammed
inthetoolfrequently.
Possiblecause(s) Correctiveaction
Fixthedrivechannel.
Replacethepiston.
Removethebentfasteners,
replacewiththe15.5ga.1/2in.
crownstaplesor1-1/2to2
Lcleatnails.
Cleanmagazine.
Tightenscrews.
Verifythatfastenersarethecorrect
size.
in.in.
14
Problems
Question,Problems,missingparts?Beforereturningtothestore,
callHDXCustomerService
8a.m-6p.m,EST,Monday-Friday
1-800-514-6729
HOMEDEPOT.COM
Retainthismanualforfutureuse.
Damagedpusherspring.
Wrongsizeoffasteners.
Notshootingfasteners. Replacespring.
Use1/2in.crownstaplesor
1-1/2in.to2in.Lcleatnails

17Fr
Questions,probl mes,pi cesmanquantes?
Avantderetourneraumagasin,veuillezcommuniqueravec
leserviceàlaclient leHDX
entre8h00et18h00,HNE,dulundiauvendrediau.
Nousvousremercionsd'avoirfaitconfiance HDXenachetantcecloueusedepneumatique.
Nousnousefforçonsenpermanencedecréerdesproduitsdequalitéconçuspourperfectionnervotremaison.
Vouspouvezvisiternotresiteenlignepourconsulternotregammecomplètedeproduitspourvosbesoinsderénovationrésidentielle.
Mercid’avoirchoisiHDX!
Article#1000817779
Modèle#HDX50LSLWN
Tableaudesmatières
Tableaudesmatiè-----------------------------------------------17
Consignesdesécurité------------------------------------------18
------------------------------------------------------18
--------------------------------------18
------------------------------------------18
-------------------------------19
---------------------------------------------20
------------------------------------------------------20
------------------------------------------------------20
-----------------------------21
------------------------------------------21
Garantie----------------------------------------------------------22
Déballage--------------------------------------------------------23
Spécification-----------------------------------------------------24
Caractéristiques-------------------------------------------------24
Utilisation--------------------------------------------------------25
------------------------------------------25
--------------------25
--------------------------------------25
------------------------26
----------------------------------26
-------------------------------------26
--------------------------------------27
Entretien---------------------------------------------------------28
------------------------------------------------28
---------------------------------------------------28
-----------------------------------------------------29
-----------------------------29
Raccordrecommandé-----------------------------------------30
Dépannage-------------------------------------------------------31
Symbole
Sourd air
Utilisation
Chargementdel outil
Préparationdel outil
ChargementdesclouslespointestêtesL
Chargementdesagrafes
Remplacementdelaplaqued assise
Réglagedelapressiond air
Fonctionnementdel outil
Nettoyagedesblocages
Antipoussières
Lubrification
Nettoyage
Fonctionnementpartempsfroid
Sécuritézonedetravail
Sécuritépersonnelle
Utilisationetentretiendeloutil
Entretiendel outil
Alimentationenairetconnexions
CLOUEUSE ÀPLANCHER2EN1

Consignesdesécurité(Continué)
WDH100401AV-S10/10
18Fr 19Fr
ManueldelopérateurRead:Pourréduirelesrisques
deblessures,utilisateurdoit lireetcomprendrele
manueld utilisationavantd utiliserceproduit.
Protectiondesyeux:Porteztoujoursdeslunettesde
sécurité,deslunettesdesécuritéavec écranslatéraux
ouun écranfacialcompletpourfairefonctionnerce
produit.
Risquepourlouïe:Toujoursporterdesprotections
auditiveslorsdel utilisationdecettetool.Failuredele
fairepeutentraînerlaperted audition.
Risquedeblessuresgraves:Nepasmettrelesmains
outouteautrepartieducorpsdanslazonede
déchargedefixationdelacloueuse.Loutilpeut
éjecterunprojectileetpeutentraînerlamortoudes
blessuresgraves.
Garderlazonedetravailpropreetbien éclairée.
Des établisencombrésetdesendroitssombres
présententdesrisquesd accidents.
N'utilisezpasloutil enprésencedevapeursexplosives
(commecellesdégagéespardesliquides,desgazoudes
poussièresinflammables).Les étincellesgénéréespar
loutilpeuventenflammerlesliquides,lesgazoules
poussièresinflammables.
Éloignezlescurieux,lesenfantsetlesvisiteursdelazone
detravail lorsqu onutiliseloutil.Unedistractionpeut
entraîneruneutilisationinappropriéeetcauserdes
blessures.
Évitezlesdéclenchementsaccidentels. Afind éviter
ledéclenchementaccidentel,soyeztoujours
prudent.Nepointezjamaisl outilversvousouvers
dautrespersonnes,qu ilcontienneounondes
attaches.
Consignesdesécurité
SYMBOLES
1.
2.
3.
4.
AVERTISSMENT:Pour évitertoutrisquedeblessure
grave, netentezpasd utiliser cetoutilavantd avoirlu
entièrementle manueletdelavoir compris.
Conservezcemanueletconsultez-lefréquemment
pouruneutilisationsécuritairepartoutepersonnequi
utilisecetoutil.
AVERTISSMENT:Lorsdelutilisationdesoutils,il est
toujoursessentieldesuivrelesmesuresdesécurité
debase,ycompriscellesquisuivent:
SCURIT ZONEDETRAVAIL
WDH100401AV-S10/10
AVERTISSMENT:Cetoutilousoncordon
d'alimentationpeutcontenirdesproduitschimiques
reconnusparlÉtatdeCaliforniecommecausantdes
cancersetdesmalformationscongénitalesoucomme
étantnocifsausystèmereproducteur.Selaverles
mainsaprèslamanipulation.
AVERTISSMENT:
àInstructionsrelativesaurisque
dincendie,lélectrocutionouaurisquedeblessures.
SCURIT PERSONNELLE
Nenfoncezpasuncloupar-dessusunautreclou. Le
cloupourraitdévieretheurterquelqu unou
provoquerunmouvementbrusquedel outil,cequi
peutentraînerdesrisquesdeblessure.
Porteztoujoursdeslunettesdesécurité.L opérateur
etlesautrespersonnessetrouvantdanslazonede
travail doiventtoujoursporterdeslunettesde
sécuritéavec des écransdeprotectionlatéraux
conformesauxstipulationsdel ANSI.Leslunettesde
protectionassurentuneprotectioncontreles
attachesetlesdébrispouvantcauserdesblessures
gravesauxyeux.
Porteztoujoursdesprotecterusauriculaireslorsque
vousutilisezloutil.Uneexpositionprolongée àdes
bruitsdegrandeintensitérisquedecauseruneperte
auditive.
Portezun équipementdeprotection.Ilfaututiliserun
masqueantipoussières,deschaussuresdesécuritéà
semelleantidérapanteetun casque,enfonctiondes
conditionsdetravail.Portezun masque
completsivousproduisezdelalimailleoudes
copeauxdebois.
Portezdesvêtementsappropriés. Évitezdeporter
desvêtementsamplesoudesbijoux.Attachezles
cheveuxlongs.Gardezlescheveux,lesvêtementset
lesgants àl écartdespiècesmobiles.Lesvêtements
amples,bijouxoucheveuxlongspourraientse
prendredanslespiècesmobiles.
Demeurezvigilant,faitesattention àcequevousfaiteset
faitespreuvedejugementlorsquevousutilisezunoutil
électrique.Nutilisezpasloutilsivous êtesfatiguéou
lorsquevousavezprisdeladrogue,delalcooloudes
médicaments.Degravesblessurespeuventrésulterd un
momentd inattentionlorsdel utilisationdel outil.
Gardezlespiedsausoletconservezvotre équilibreen
touttemps. Lastabilitéetunbon équilibrepermettentde
mieuxcontrôlerl outildansdessituationsinattendues.
1.
2.
3.
4.
5.
6.
SCURIT PERSONNELLE(CONTINU )
Nutilisezpasloutilsurune échelleousurune
surfaceinstable.Lastabilitésurunesurfacesolide
permetdemieuxcontrôlerl'outildansdes
situationsinattendues.
Assurez-vousqueletuyaunestpasobstruéou
partiellementbouché.Destuyauxemmêlésou
enchevêtrésrisquentdevousfaireperdreléquilibreou
tomber,d endommagerl outiletdecauserdesblessures.
Netendezpastrop lesbras. Gardezlespiedsausol
etconservezvotre équilibreentouttemps.La
stabilitéetunbon équilibrepermettentdemieux
contrôlerl outildansdessituationsinattendues.
Nattachezpasletuyauouloutil àvotrecorps.Attachez
letuyau àlastructurepourréduirelerisquedeperte
déquilibresiletuyaubougeait.
Assumeztoujoursqueloutilcontientdesattaches.Ne
pointezjamaisloutilversvousouversdautres
personnes,qu ilcontienneounondesattaches.
Lavezvosmainsaprèsavoirmanipuléloutil.Cetoutilou
soncordondalimentationpeutcontenirdesproduits
chimiquesreconnusparlÉtatdeCaliforniecomme
causantdescancersetdesmalformationscongénitales
oucommeétantnocifsausystèmereproducteur.
9.
10.
11.
AVERTISSMENT:Débranchezloutildelasource
dairavantdeprocéderauréglage, àlentretien
ouaudéblocagedeloutil,ainsiqu avantde
toucheraumandrindesécurité,dequitterlaire
detravailoudedéchargerl outil.Cesprécautions
réduisentlesrisquesdeblessure.
UTILISATIONETENTRETIENDELOUTIL’
Nutilisezquelesfixationsrecommandéespourcetoutil.
Lutilisationdefixationsquinesontpasrecommandées
parlefabricantdeloutil peutentraînerdesrisquesde
blessureoudedommages.
Vérifiezlalignementetlabsence dejeudespièces
mobiles,ledegrédusuredespiècesainsiquetoutautre
facteursusceptibledenuireaubonfonctionnementde
loutil.Silestendommagé,faitesréparerloutilavantde
lutiliser.Desoutilsmalentretenussontlacausede
nombreuxaccidents.
Prenezsoindevosoutils.Gardezvosoutilspropres.Un
outilbienentretenuréduitlerisquedeblocageetestplus
facileàcontrôler.
Rangezloutilhorsdelaportéedesenfantsetdetoute
autrepersonnequinenconnaîtpaslefonctionnement.
Lesoutilssontdangereuxdansdesmains
inexpérimentées.
Vérifiezlefonctionnementdel outilavantdel utiliser.
Neforcezpasloutil.Utilisezlebonoutilpourvotre
application.Loutilappropriéferamieuxletravailetde
façonplussécuritaire àlavitessepourlaquelleila été
conçu.
Utilisezdespincesouunautremoyenpratiquedeteniren
placeetdesupporterl ouvragesuruneplateformestable.
Maintenirl outilavecvotremainoucontrevotrecorpsest
instableetrisquedecauserlapertedecontrôledel outil.
Assurez-vousquelespoignéessontsèches,propreset
exemptesd huileetdegraisse.Utiliseztoujoursunchiffon
proprepourlenettoyage.N utilisezpasdeliquidedefrein,
d'essence,deproduits àbasedepétroleoutoutautre
diluantpuissantpournettoyervotreoutil.
Nutilisezpasl outilcommeunmarteau.
Nutilisezjamaiscetoutillorsqu uneattacheestdirigée
versautrechosequ unepièceàtravailler.
Nutilisezjamaisdessenceoudautresliquides
inflammablespournettoyerloutil.Nutilisezjamaisloutil
enprésence deliquidesoudegazinflammables.Une
étincellepourraitenflammerlavapeur,cequirisqueraitde
causeruneexplosionqui pourraitsesolderparmort
dhommeoudesblessuresgraves.
Attacheztoujours àloutilunraccorddefaçon àceque
toutlaircomprimésoitretirédeloutil lorsquelejoint
daccouplementestdéconnecté.Nutilisezpasdeclapet
denon-retouroutoutautretuyauqui permet àlairde
demeurerdansloutil.Celapourraitsesolderparmort
dhommeoudesblessuresgraves.
Neplacezjamaisvosmainsoutouteautrepartieducorps
danslazonedéjectiondesattachesdeloutil.Loutil
pourrait éjecteruneattaché,cequipourraitsesolderpar
mortd hommeoudesblessuresgraves.
4.
5.
6.
7.
13.
12. 8.
9.
10.
11.
12.
13.
14.
15.
16.
Apprenez àconnaîtrecetoutil.Lisezattentivementle
manuel,familiarisez-vousaveclesapplicationsetles
limites,ainsiqu aveclesrisquespotentielsliésàcetoutil.
Nutilisezquelesattachesrecommandéespourvotre
modèle.Chargezcorrectementlesattachesetnutilisez
pasd attachesinappropriées.
Nutilisezquelesaccessoiresrecommandésparle
fabricantpourcemodèledoutil.Lutilisationdepièces
nonautoriséesetlenon-respectdesinstructionspour
lentretienpeuvententraînerdesrisquesdeblessures.
1.
2.
3.
8.
7.

WDH100401AV-S10/10
20Fr 21Fr
WDH100401AV-S10/10
Netransportezjamaisl outilenletenantparletuyaud air.
Netirezjamaissurletuyaupourdéplacerloutil ouun
compresseur. Gardezlestuyaux éloignésdessourcesde
chaleur, delhuileetdesbordscoupants. Remplaceztout
tuyauendommagé,fragileouusé.Celapourraitcauser
desdommagesàl outiloudesblessures.
Assumeztoujoursqueloutilcontientdesattaches. Votre
outilestuninstrumentdetravail,pasunjouet.
Gardeztoujourslesautres àunedistancesécuritairedela
zonedetravail encasdéjectionaccidentelledattaches.
Nepointezjamaisloutilversvousouversdautres
personnes,qu ilcontienneounondesattaches.Le
déclenchementaccidenteldel outilpourraitsesolderpar
mortd hommeoudesblessuresgraves.
Nelaissezpastomberloutiletnelelancezpas.Faire
tomberoulancerl outilpourraitl endommageretlerendre
inutilisableounonsécuritaire.Sil outilesttombéoua été
lancé,vérifiezqu ilneprésenteaucunepiècepliée,
fissuréeoubriséeetqu ilnyapasdefuitedair.Cessez
dutiliserloutiletfaites-leréparerafindéviterles
blessuresgraves.
Évitezdutiliserloutillorsquelemagasinestvide.Cela
entraînelusureaccéléréedeloutil.Nettoyezetvérifiez
touslestuyauxd airetraccordsavantdeconnecterl outil
àunesourcedalimentationenair. Remplaceztouttuyau
ouraccordendommagéouusé.
Négligerdelefairepourraitcontribuer àréduirela
performanceouladurabilitédel outil.
Nutilisezpasloutilsilaunefuitedairousilne
fonctionnepascorrectement.
Nutilisezpasloutilsiaucune étiquettedavertissement
lisiblenyestapposée.Neportezjamaisloutilparlex
tuyaysd air.
UTILISATIONETENTRETIENDEL’OUTIL()CONTINU
17.
18.
19.
20.
25.
24.
23.
22.
21.
Consignesdesécurité(Continué)Consignesdesécurité(Continué)
ENTRETIENDELOUTIL’
Nutilisezquedesaccessoiresrecommandésparle
fabricantpourvotremodèled outil.
Lutilisationdepiècesnonautoriséesoulenon-respectdes
instructionsdentretienpourraitcauserunrisquede
blessure.
Nutilisezqueleslubrifiantsfournisavecl outilouprécisés
parlefabricant.
Loutilnedoitêtreréparéquepardupersonnelqualifié.
SOURDAIR’
1.
2.
3.
4.
1.
2.
Neraccordezjamaiscetarticle àunesource
dalimentationenairdontlapressionpeutexcéder13,79
bar.Unesurpressiondel outil estcapabledeconduire à
léclatement,unfonctionnementanormal,larupturede
loutiloudesblessuresgravesauxpersonnes.Utilisez
uniquementpropre,sec,laircomprimérégléàla
pressionnominaleouauseindelaplagedepression
nominaleindiquéesurloutil.Toujoursvérifieravant
dutiliserloutilquelasourced'aira étéajustée àla
pressiondairnominaloudanslaplagenominalede
pressiond air.
Nutilisezjamaisdoxygène,dedioxydedecarbone,de
gazcombustibleni toutautregazembouteillécomme
sourcedairpourloutil.Cesgazsontsusceptiblesde
provoqueruneexplosionpouvantcauserdesblessures
graves.
UTILISATION
Nenfoncezpasd attachesprèsduborddelapièce.
Lapièce risquedesefendre,defairericocher
lattacheetdeblesserlopérateurouuneautre
personne.
Danslecadred uneutilisationnormale,l outil auradu
reculimmédiatementaprèsavoirenfoncéune
attache.Cestunefonctionnormaledeloutil.Ne
tentezpasdempêcherlerecul enretenantloutil
contrelouvrage.Larestrictiondurecul pourrait
causerléjectiondunesecondeattache.Tenez
fermementlapoignéeetlaissezl outil faireletravail.
Ne pastenircomptedecettemiseengardepourrait
entraînerdesblessuresgraves.
Nenfoncezpasdattachessurdautresattachesou
avec l outil àunangletropaigu.Cecipourraitcauser
lericochetdesattachesetprovoquerdesblessures.
Nactionnezpasloutil àmoinsdevouloirenfoncer
uneattachedanslapièce.
Utiliseztoujoursl outilavec précaution:
1.
2.
Respectezvotreoutilentantquinstrumentdetravail.
vitezdejoueravec.
Gardezlesautres àunedistancesécuritairedeloutil
lorsquevouslutilisez.Uneactivationaccidentelle
pourraitseproduireetentraînerdesblessures.
É
ALIMENTATIONENAIRETCONNEXIONS
3.
4.
1.
2.
Avantdeprocéderaudéchargementoudefairedes
ajustements.
Lorsquevousentretenezl outil.
Lorsquevouslibérezdesattachescoincées.
Lorsquevoustouchezlepalpeurdesécurité.
Lorsquel outiln estpasutilisé.
Lorsquevoustransportezloutilduneairedetravail à
uneautre.
Cesprécautionspermettentderéduirelesrisquesde
blessure.
Leconnecteurdel outilnedoitpasretenirlapression
lorsquelalimentationenairestdéconnectée.Siun
mauvaisraccordestutilisé,loutilpourraitdemeurer
chargédairaprèsavoir étédébranchéet êtreen
mesuredenfonceruneattachemêmeaprèsle
débranchementdutuyaud air, pouvantainsientraîner
desblessures.
Nutilisezpasdoxygène,degazcombustiblesni
dautresgazembouteilléscommesource
dalimentationpourcetoutil.Uneexplosionpourrait
seproduireetcauserdesblessuresoumêmelamort.
Utilisezuniquementunesourcedaircompriméà
régulationdepressionafin delimiterlapressiondelair
acheminéàloutil.Lapressionréguléenedoitpas
excéder7,92bar.Silerégulateurnefonctionnepas,la
pressiondelairacheminéàloutilnedoitpasexcéder
13,79bar.
Déconnecteztoujourslasourced alimentationenair:
CHARGEMENTDELOUTIL’
Ne chargezpasdattachesdansloutil lorsquelune
descommandesestactivée.
Ne placezjamaisvosmainsoutouteautrepartiedu
corpsdanslazoned éjectiondesattachesdel outil.
Ne pointezjamaisl outilversquiconque.
3.
1.
2.
AVERTISSMENT:Lesmisesengardeetles
précautionsdontil estquestionprécédemmentdans
cemanuelnecouvrentpastouteslesconditionsetles
situationspossibles.L utilisateurdoitcomprendrequ il
estimpératifdefairepreuvedejugementetde
prudence.
3.
4.
5.

22Fr 23Fr
Garantie
GARANTIELIMIT EDEUNANSURLESCECLOUEUSEPNEUMATIQUEHDX
Dansleslimitesdelaloiapplicable,touteslesgarantiesimplicites,ycomprislesgarantiesdequalitémarchandeoud adaptation
àunusageparticulier,sontexpressémentdésavouées.Touteslesgarantiesimplicites,ycomprislesgarantiesdequalité
marchandeoud adaptation àunusageparticulier,quinepeuventfairepartied'uneclaused'exonérationenvertudelaloid un
étatsontlimitées àun an àpartirdeladatedachat.HDXnassume aucuneresponsabilitéquantauxdommagesdirects,
indirects,accessoires,particuliersouconsécutifs.Sicecloueusepneumatiqueestutiliséàdesfinscommerciales,lagarantieest
limitéeàquatre-vingtdix(90)joursàcompterdeladated'achat.CertainsÉtatsouprovincesnepermettentpaslarestrictiondela
duréedunegarantieimpliciteetl'exclusionoularestrictiondesdommagesaccessoiresouconsécutifs,parconséquentles
restrictionsetexclusionscitéesci-dessuspeuventnepassappliquer àvotrecas.Envertudelaprésentegarantie,vous
bénéficiezdedroitsjuridiquesparticuliers;toutefois,d autresdroitspeuventégalements appliquer,selonl Étatoùvousrésidez.
AUTRESRESTRICTIONS
Cettegarantiecouvretouslesdéfautsdefabricationoudematériauxqui pourraientaffectercecloueusepneumatiqueHDX
pendantunepériodedeunan àpartirdeladatedachat.Laprésentegarantieviseuniquementcemodèledecloueuse
pneumatique.Lesgarantiescouvrantd autresproduitsHDXpeuventêtredifférentes.
Cettegarantienes appliquequ à l acheteuroriginaletn estpastransférable.Laprésentegarantienecouvrepasl usurenormale
ni lescasdemauvaisfonctionnement,lespannesoulesdéfautsrésultantdunemauvaiseutilisation,d un usageabusif, dune
négligence,d unealtération,d unemodificationoud uneréparationeffectuéeparunepersonneouuncentreautrequ uncentre
deservice autoriséàréparerlescloueusepneumatiquedelamarqueHDX.Lesconsommablestelsquelesjointstoriques,
tampon,d entraînement,lesjoints,etc.,nesontpascouvertsparlaprésentegarantie.Cettegarantienecouvrepascecloueuse
pneumatiquesil estutilisédansdesapplicationsindustriellesouloué.HDXnoffreaucunegarantie,déclarationoupromesse
quant àlaqualitéouaurendementdesescloueusepneumatiqueautrequecellesspécifiquementstipuléesdanslaprésente
garantie.
Cetoutil a étéexpédiéentièrementassemblé.
Retirezsoigneusementl outil etlesaccessoiresdela
boîte.
Inspectezattentivementloutil pourvousassurer
qu aucunbrisoudommagenestsurvenu pendant
lexpédition.
Ne jetezpaslemballagetantquevousnavezpas
inspectéattentivementloutil etquevousnelavez
pasutilisédefaçonsatisfaisante.
Encasdepiècesmanquantesouendommagées,
veuillezcomposerle:1-800-514-6729.
3.
4.
1.
2.
5.
Dballageé
AVERTISSMENT: Encadepiècesmanquantes,
nutilisezpasloutilavantdelesavoir
remplacées.Toutmanquementpeutentraîner
desblessuresgraves.
AVERTISSMENT:Netentezpasdemodifiercetoutilou
decréerdesaccessoiresdontlutilisationnestpas
recommandéeaveccetoutil.Toutealtérationou
modificationestconsidéréecommeuneutilisation
abusiveetrisquedecréerunesituationdangereuse
pouvantentraînerdesblessuresgraves.
12,7mm(1/2”)
38mm
45mm
50mm
1-1/2”
1-3/4”
2”
7,2mm(9/32”)
38mm
45mm
50mm
1-1/2”
1-3/4”
2”
25Fr
Spécification
Admissiond air:6,3mm(1/4po)NPT
Capacitédumagasin:
100attachesdelousàtêteenLdecalibre16
90attachesdeagrafesdecalibre15,5
Poids:4,0kg
Pressionmaximale:7,92bar
Plagedepression:4,82bar-7,92bar
Tailledelabroche:38mm(1-1/2po)à50mm(2po)
c
Compatibleaveclesagrafesdecalibre15.5,lesclous àtête
enLdecalibre16etdemarquesgénériques.
Caractéristiques
Concept2en1révolutionnaire
Àutiliseraveclesagrafes,lesclousàtêteenL
Conceptn éraflantpaslesproduits
Procureuneprotectionlorsquevoustravaillezsurdes
surfacesderevêtementdesolfinies.
Fabricationdurable
Légeretdurable,construitd'aluminiumdehaute
résistanceetdepiècesenaciertraitéesthermiquement.
Mailletinclus
24Fr
Utilisation
(Agrafesde
calibre15.5)
(Clousàtêteen
Ldecalibre16)
Préparationdel'outil
1
Lorsquel'outilestenvoyé,leBras(A)estdétachédelapartie
principale.
Suivezcesinstructionspourvousprépareràutiliserl outil.
ChargementdesclouslespointestêtesL
2Connectezl outilàlasourced alimentationenair.
AppuyezsurleBoutonduverrou(F).Tirezsurle
Couvercledemagasin(D)versl'arrièrejusqu auboutdu
magasin.
Placezuncollierentierdattachesdanslemagasin
depuislecôtéJusqu à 100clous/pointespeuvent être
chargésdanslemagasin.Veuilleznoterquelorsquevous
chargezlespointestêtesL,lecôtéoùsetrouvelatête«L»
doitêtreplacéàlagauchedelaPoussoirdumagasin(E).
PoussezleCouvercledumagasin(D)versl avantjusqu à
cequelePoussoirdumagasin(E)sesoulève.
AVERTISSEMENT:Sil yadespiècesmanquantes,
nutilisezpascetoutilavantd'avoir reçu lespiècesde
rechange.Avantdutilisercetoutil,assurez-vousque
lebrasetla partieprincipalesontvissésensemble
fermement,sinonvousrisquezdevousblesser
gravement.
AppuyezleBras(A)surlapoignée.
Serrezles Écrous(B) àl aided unecléjusqu à cequeles
Bras(A)etPoignée(C)soientbienenplaceetqueleBras
(A)soitfixéàlaPoignée(C).
crous(B)
Boulon
Hexagonal
Bras(A)
Poignée(C)
Préparécloueuse
àplancher
DirectiondetêteL
Poussoir dumagasin
(E)
Couverclede
magasin
(D)
Boutonduverrou(F)
Chargementdesagrafes
3Connectezl outilàlasourced alimentationenair.
AppuyezsurleBoutonduverrou(F).Tirezsurle
Couvercledemagasin(D)versl'arrièrejusqu auboutdu
magasin.
Placezuncollierentierdagrafesencouronnede12,7
mm (1/2po)danslemagasin àpartirdudessus.Entre90
attachespeuventêtrechargéesdansl outil.
PoussezleCouvercledumagasin (D)versl avantjusqu à
cequelePoussoirdumagasin(E)sesoulève.
Placezagrafesà
partirdudessus
Lacubierta
delcargador
(D)
Boutonduverrou(F)
Empujadorde
cargador
(E)

26Fr 27Fr
AVERTISSEMENT:Loutilpourraitsedéclencher la
premièrefoisqu ilestbranchéàlalimentationenair.
Brancheztoujoursloutil àl'alimentationenairavant
dechargerlesfixationsafindéviterdesblessures
dues àundéclenchementimprévu.Assurez-vous
toujoursquelemagasindeloutilestvideavant
chaqueséance detravail,avantdele brancher à
lalimentationenair.
AVERTISSEMENT:Nutilisezquelesfixations
recommandéespouruneutilisationaveccetoutil.
Lutilisationdefixationsquinesontpasconçues
expressémentpourcetoutilpar sonfabricantpeut
entraînerdesrisquesdeblessureou dedommages à
loutil.
Remplacementdelaplaqued’assise
4
Loutilestmunid uneplaqued assise(G)de1,90cm (3/4po)
préinstalléeenusine.Ilyauneplaquedassise
supplémentairede1,58cm(5/8po).
Pourremplacerlaplaque:
Déconnectezl outildel alimentationenair.
Videzentièrementlemagasin.
Déclenchezloutilenvisantdesretaillesdeboispour
vousassurerqu ilnyrestepasdaircompriméoude
fixations.
Posezl outil surlecôtédemanièreàcequelesquatrevis
soientvisibles(H).
Retirezlesquatrevis(H),puislaplaqued assise.
Alignezlesquatretrousdesvisdelaplaqued assisede
rechangeaveclesquatretrousdemontagefiletés.
Àlaidedesquatrevisquevousvenezderetirer,fixezla
plaqued assisederemplacementsurl outil.
Assurez-vousquelabonneplaquedassiseestinstallée
enladéclenchantentirantversdesretaillesdeboisdu
revêtementdesoletEnvérifiantsilafixationestplacée
convenablement.
AVERTISSEMENT:Débranchezl outil delasourced air
lorsquevousremplacezlaplaqued assise.
Assurez-vousqu ilnyaaucunefixationdansle
magasinavantderemplacerlaplaqued assise.
Réglagedelapressiond’air
5Lapressiondairrequisedépenddeladimensiondes
fixationsetdumatériaudelapièceaveclaquellevous
travaillez.
Commencezpar évaluerlaprofondeurenenfonçantun
cloudessaidansun matériaudumêmetypequecelui
quevousutiliserezlorsquevoustravaillerezréellement.
Enfoncezunefixationd essaiavecunepressiondairde
6,20bar-6,55bar.
Haussezetbaissezlapressiond airpourtrouverleplus
basréglagepoureffectuerlatâcheavecdesrésultats
constants.
Fonctionnementdel’outil
6Raccordezloutil àlalimentationenair.Mettezvotre
compresseurenmarcheetvérifiezlapressionenvous
assurantqu ellesesitueentre4,82bar-7,92bar.Ne
dépassezpaslapuissancemaximalede7,92bar.
Tenezfermementlapoignée(A)etappuyezsurlaPlaque
dassise(G)contrelasurfacedetravail.Assurez-vous
quelaplaqueestau-dessusdelapositiondelaciblede
lafixation.
Appuyezsolidementverslebasdemanière àcequela
Plaquedassise(G)soitfermementencontactavecla
surfacedetravail.Ensuite, àlaidedumailletemballé
avecloutil,frappezfermementsurleCapuchondu
marteau(I)pourenfoncerlafixationdanslasurfacede
travail.Soulevezloutilpourledécollerdelasurfacede
travail.Répétezces étapesjusqu à cequelatâchesoit
terminée.
Lorsquevousavezterminé,assurez-vousderanger
loutildansunendroitpropre,secetsécuritairehorsdela
portéedesenfantsetdespersonnesnonautorisées.
Vis(H)
Plaqued assise
(G)
AVERTISSEMENT:Vousdevezfairepreuvedune
extrêmeprudencelorsquecetoutilestraccordéàune
sourced alimentationenair.Sil outiltombeparterre,
ousile capuchondumarteau(I)estfrappé
accidentellement,loutil sedéclencheraettireraune
fixation,cequipourraitcauserdeGRAVES
BLESSURES.
AVERTISSEMENT:Gardezl'outilloindevospieds.
AVERTISSEMENT:Avantdutiliserloutilsurun
plancher,essayez-lesurdesretaillesdebois.Réglezla
profondeurdenfoncementenaugmentantouen
baissantlapressiond air.Nedépassezjamais7,93bar.
ATTENTION:Assurez-vousqu il nyaaucunefixation
danslemagasinavantdenettoyerunblocage.
Capuchondu
marteau(I)
Poignée(A)
AVERTISSEMENT:Unoutilquinefonctionnepas
correctementnedoitpas êtreutilisé.Nepasactiver
loutilàmoinsqu il soitplacébienfermementsurla
pièce.
Nettoyagedesblocages
7
Ilarriveparfoisqu unefixationsecoincedanslemécanisme
dedéclenchementdel outil,cequilerendinutilisable.Pour
retirerunefixationbloquée,suivezlesétapessuivantes:
Débranchezl outildel alimentationenair.
Videzlemagasin.Assurez-vousquetouteslesfixations
sontretirées.
Tentezdedéclencherloutilenlorientantversdes
retaillesdeboisouleplancherpourvousassurerqu ilne
peuttirerdefixations.
Posezl'outilsurlecôtédemanière àcequelesdeux
Boulons(J)soientsouslesexposé.
RetirezcesdeuxBoulons(J)etlesTigeDentraînement
(K)pourexposerattachescoincées.
Retirezlattachecoincéeenutilisantdespincesou
tournevissinécessaire.
RemettezlaTigeD entraînement(K)etlesBoulons(J)en
place.
Reconnectezlasourcedalimentationdair àloutil,
Rechargezlesattachesdansl outil.
AppuyezlaTigeDentraînement(K)contreunboutde
bois,puistirezplusieurscoupsd essaiaveclesfixations
pourvérifiersiloutil fonctionnebien.Siloutil tirebien,
vouspouvezcontinuerdel utiliser.Sil outil nefonctionne
pasadéquatement,arrêtezimmédiatementdel utiliseret
faites-leréparerparuntechnicienqualifiéenréparation.
Tiged entraînement
(K)
Boulons «nez »(J)
Utilisation()ContinuéUtilisation()Continué
Plancher
de1,9cm
REMARQUE:Sassurerquelebutoirdecaoutchoucdela
cloueusedeparquetestenpositionrelevéeavantd ajouter
leboyaudair,sinonlacloueusepourraitcycler.(Voirplus
bas)
Capuchondumarteau
(Enpositionverslehaut) Capuchondumarteau
(Enpositionverslebas)
Fonctionnementdel’outil
()
Continué
6

WDH100401AV-S10/10
Entretien
WDH100401AV-S10/10
28Fr 29Fr
Déconnectezloutil delasourcedalimentationenair à
ajoutezlubrifiant.
Tournezl'outildefaçon àcequel'entréed'airsoit
orientéeverslehaut.Appliquez2ou3gouttesdhuile
pneumatiqued'outil defasterner.N'utilisezpasd'huile
détergenteoud'additifspuisqueceslubrifiants
causerontuneusureaccéléréedesgarnitures
d'étanchéitéetdestampons àl'intérieurdel'outil, cequi
entraîneraunmauvaisfonctionnementdel'outiletdes
réparationsplusfréquentes.
Aprèsavoirajoutél'huile,faitesbrièvementfonctionner
l'outil.Essuyeztoutexcédentd'huiledelasortied'airdu
couvercle.
ATTENTION:Lubrifiezloutiluniquementavec les
lubrifiantsindiqués.
AVERTISSMENT:Chaquefoisqu uneinspection,qu un
entretienouqu unnettoyageesteffectué:
Déconnectezl outildelasourced alimentationen
air.
Videzcomplètementlemagasin.
Chaqueoutil estdoted un couvercleantipoussièressur
leconnecteurair.
Placezlecouvercleantipoussièressurleconnecteur
airlorsquevousn utilisezpasl outil.
àà
Unelubrificationfréquente,sans êtreexcessive,estrequise
pourun rendementoptimal. Lhuilepourl outilajoutéparle
raccorddelaconduitedairpermetdelubrifierlespièces
internes.Najoutezpasdhuiledétergentenidautres
additifs:ceslubrifiants.accéléreraientlusuredesjointset
desbutoirs.deloutil,cequi nuirait àsonrendementet
augmenteraitlafréquencedesentretiens.
ANTIPOUSSIÈRES
LUBRIFICATION
Évitezdutiliserdessolvantspournettoyerlespiècesde
plastique.Laplupartdesplastiquesrisquentdêtre
endommagésparlemploidesdifférentstypesdesolvants
commerciaux.Utilisezunchiffonproprepourretirerlasaleté,
lapoussière,l huile,lagraisse,etc.
AVERTISSMENT: Leliquidedefreins,lessence,les
produitsàbasedepétrole,leshuilesdepénétrationet
autresnepeuventenaucuncasentrerencontactavec
lespiècesdeplastique.Lesproduitschimiques
peuventendommager, affaiblir oudétruirele plastique
etainsicauserdesblessuresgraves.
NETTOYAGE
Pargeloutempératureprochedugel,l humiditédansle
tuyaudairpeutgeleretnuireaufonctionnementde
loutil. Nousrecommandonsd utiliserunlubrifiantouun
antigelpermanent(éthylèneglycol)pouroutil
pneumatiqueenguisedelubrifiantpartempsfroid.
ATTENTION:Nerangezpaslesoutilsdansun
environnementfroidafin déviterlegeloulaformation
deglacesurlesvalvesdecommandeetles
mécanismesdeloutil,ce quipourraitentraîner une
panne.
FONCTIONNEMENTPARTEMPSFROID
Entretien()Continué
WDH100401AV-S10/10
30Fr
AVERTISSMENT: Cessezimmédiatementdutiliser loutil silundesproblèmessuivantssurvient.Celapourraitentraînerdes
blessuresgraves.Lesréparationsetlesremplacementsdoivent êtreeffectuéspardu personnelqualifiéouuncentredeservice
autorisé.
Dépannage
Problème Causepossible Mesuresàprendre
Del airfuitparlechapeauà
tête. Desserrezlesvis.
Lesjointstoriquesoulesjointssont
usésouendommagés.
Serrezlesvis.
Installezunetroussederemiseenétat.
Manqued énergie.
Lecycleestlent. Loutilesttropsec.
Lapressiond airesttropfaible.
Léchappementestbloqué.
Ajoutez2ou3gouttesdelubrifiantdansle
connecteurd air.
Assurez-vousquelecompresseurd airest
régléentre4,82-7,92Bar.
Nettoyezlaconduited évacuationd air.
Lesfixationsnes éjectent
pas. Leressortdupoussoirestendommagé.
Lesfixationsnesontpasdelabonne
dimension.
Remplacezleressort.
Utilisezdesagrafesàcouronnede12,7mm
oudesclousde38mm(1-1/2po)
à50mm(2po).
àtêteenL
Lesfixationsrestentsouvent
coincéesdansl outil. Réparezlaconduited entraînement.
Remplacezlepiston.
Retirezlesfixationsquinesontpasdroites
etremplacez-lespardesagrafesà
couronnede12,7mmoudesclous
Nettoyezlemagasin.
Serrezlesvis.
Vérifiezquelesfixationssontdelabonne
dimension.
àtête
enLde38mm(1-1/2po)à50mm(2po).
Laconduited entraînementestusée.
Lepistonestbriséouusé.
Lesfixationsnesontpasdroites.
Lemagasinestsale.
Lemagasinestdesserré.
Lesfixationsnesontpaslesbonnes.
Lecompresseurdoit êtreenmesuredemaintenirune
pressionminimalede4,82Barlorsqueloutilestutilisé.
Unemauvaisealimentationenairpourraitcauserune
pertedepuissanceetundéclenchementirrégulier.
Unréservoirdhuilepeut êtreutilisépourpermettrela
circulationdhuiledansloutil.Unfiltrepeut êtreutilisé
pourretirerlesimpuretésliquidesetsolidessusceptibles
decorroderoud encrasserlespiècesinternesdel outil.
Utiliseztoujoursdestuyauxd alimentationenairavecune
pressiondairminimale équivalenteousupérieure àla
pressiondelasourcedalimentationafin déviterune
défaillancedurégulateur.Ou10,34bar,Lequelestplus
élver. Utilisezuntuyaud airde9,53mm(3/8po)pouvant
allerjusquà 15,24m(50pi),etutilisez9,53mm (3/8po)
raccordrapidesurletuyaud air.
Utilisezunrégulateurdepressionsurlecompresseur
d'unepressiondefonctionnementde0psi à8,62bar.Un
régulateurdepressionestnécessairepourcontrôlerla
pressiondefonctionnementdeloutilentre4,82baret
7,92bar.
1.
2.
3.
4.
Raccordrecommandé
AVERTISSMENT:Neconnectezpasloutilsurun
compresseurpouvantdépasser13,79 bar.Loutil
pourraitexploser,cequipourraitentraînerdes
blessures.
ATTENTION:Lecompresseurdoit êtreenmesurede
maintenir unepressionminimalede4,82bar lorsque
loutilestutilisé.Unemauvaisealimentationenair
pourraitcauserunepertedepuissanceetun
déclenchementirrégulier.
Raccordà
branchement
rapide
Dispositif
dattache
rapide
Dispositif
dattache
rapide
Tuyaud air Graisseur Filtre
Raccordà
branchement
rapide Régulateur
Compresseur
31Fr
This manual suits for next models
1
Table of contents
Languages:
Other HDX Nail Gun manuals

Popular Nail Gun manuals by other brands


Makita
Makita AN250HC user manual

Central Pneumatic Professional
Central Pneumatic Professional 92918 Assembly and operating instructions

REICH
REICH 3534 Technical data spare parts

PROPOINT
PROPOINT 8561110 user manual

Central Pneumatic
Central Pneumatic Central Pneumatic Air Nailer/Stapler 2-in-1 Kit... Assembly and operating instructions

Central Pneumatic
Central Pneumatic 92359 Assembly and operating instructions