Healsio KN-H24VMA User manual

KN-H24VMA KN-H24VMA
The Healsio logo and HEALSIO are trademarks of Sharp Corporation.
的标志以及HEALSIO,是夏普株式会社的商标。
Logo Healsio dan HEALSIO ialah tanda dagangan Sharp Corporation.
Household Use
Operation Manual
Electric Cookware
KN-H24VMA
Contents Page
Important Safety Instructions …………… en-1
What this appliance can do……………… en-2
Instructions for use ……………………… en-3
Names of parts and accessories ……… en-5
Control panel/Display …………………… en-7
Before operating ………………………… en-8
Automatic/Manual cooking ……………… en-9
Tips for manual cooking …………………en-13
Reheat ……………………………………en-14
Keep warm ………………………………en-14
Timer ………………………………………en-15
Care and Cleaning ………………………en-16
• Inner pot/Drip tray ………………………en-16
• Inner lid……………………………………en-17
• Steam vent cover ………………………en-18
• Stirring unit ………………………………en-19
• Main unit/Control panel/Temperature sensor/
Thermo plate/Power Cord ………………en-19
Trouble shooting …………………………en-20
Specications ……………………………en-22
TINS-A006KRRZ-VM71
PRINTED IN CHINA
SHARP CORPORATION
Kegunaan Isi Rumah
Buku Panduan Operasi
Alat Memasak Elektrik
Kandungan Halaman
Arahan Keselamatan Penting…………… ms-1
Perkara yang boleh dilakukan oleh perkakas ini
ms-2
Arahan penggunaan …………………… ms-3
Nama bahagian dan aksesori ………… ms-5
Panel kendalian/Paparan ……………… ms-7
Sebelum beroperasi……………………… ms-8
Memasak secara automatik/manual ms-9
Panduan untuk memasak secara manual
ms-13
Memanaskan ………………………… ms-14
Sentiasa panas ………………………… ms-14
Waktu …………………………………… ms-15
Penjagaan dan pembersihan ………… ms-16
• Periuk dalam/Dulang titisan ………… ms-16
• Penutup dalam ……………………… ms-17
• Penutup lubang wap ………………… ms-18
• Unit pengadun ……………………… ms-19
•
Unit utama/Panel kendalian/Suhu sensor/
Pinggan haba/Kabel bekalan kuasa .......
ms-19
Penyelesaian masalah………………… ms-20
Spesikasi ……………………………… ms-22
使用说明书
家 用
目录 页
重要安全注意事项 ⋯⋯⋯⋯⋯⋯⋯⋯⋯ zh-1
该产品能够做到的事情 ⋯⋯⋯⋯⋯⋯⋯ zh-2
使用注意事项 ⋯⋯⋯⋯⋯⋯⋯⋯⋯⋯⋯ zh-3
各部分名称、附属品 ⋯⋯⋯⋯⋯⋯⋯⋯ zh-5
操作部·显示部 ⋯⋯⋯⋯⋯⋯⋯⋯⋯⋯ zh-7
操作前 ⋯⋯⋯⋯⋯⋯⋯⋯⋯⋯⋯⋯⋯⋯ zh-8
自动/手动烹饪 ⋯⋯⋯⋯⋯⋯⋯⋯⋯⋯⋯ zh-9
手动烹饪使用方法要点 ⋯⋯⋯⋯⋯⋯⋯ zh-13
重新加热 ⋯⋯⋯⋯⋯⋯⋯⋯⋯⋯⋯⋯⋯ zh-14
保温 ⋯⋯⋯⋯⋯⋯⋯⋯⋯⋯⋯⋯⋯⋯⋯ zh-14
预约 ⋯⋯⋯⋯⋯⋯⋯⋯⋯⋯⋯⋯⋯⋯⋯ zh-15
维护与清洁 ⋯⋯⋯⋯⋯⋯⋯⋯⋯⋯⋯⋯ zh-16
·内胆/接水盘 ⋯⋯⋯⋯⋯⋯⋯⋯⋯⋯⋯ zh-16
·内盖 ⋯⋯⋯⋯⋯⋯⋯⋯⋯⋯⋯⋯⋯⋯ zh-17
·蒸汽阀 ⋯⋯⋯⋯⋯⋯⋯⋯⋯⋯⋯⋯⋯ zh-18
·搅拌部件 ⋯⋯⋯⋯⋯⋯⋯⋯⋯⋯⋯⋯ zh-19
·主机/操作部/温度传感器/
加热盘/电源线
⋯⋯⋯⋯⋯⋯⋯⋯⋯⋯⋯
zh-19
是否出故障了? ⋯⋯⋯⋯⋯⋯⋯⋯⋯⋯ zh-20
规格参数 ⋯⋯⋯⋯⋯⋯⋯⋯⋯⋯⋯⋯⋯ zh-22
电炖锅
KN-H24VMA.indb 1 2017/03/07 14:30:14

en-1
en-2
KN-H24VMA KN-H24VMA
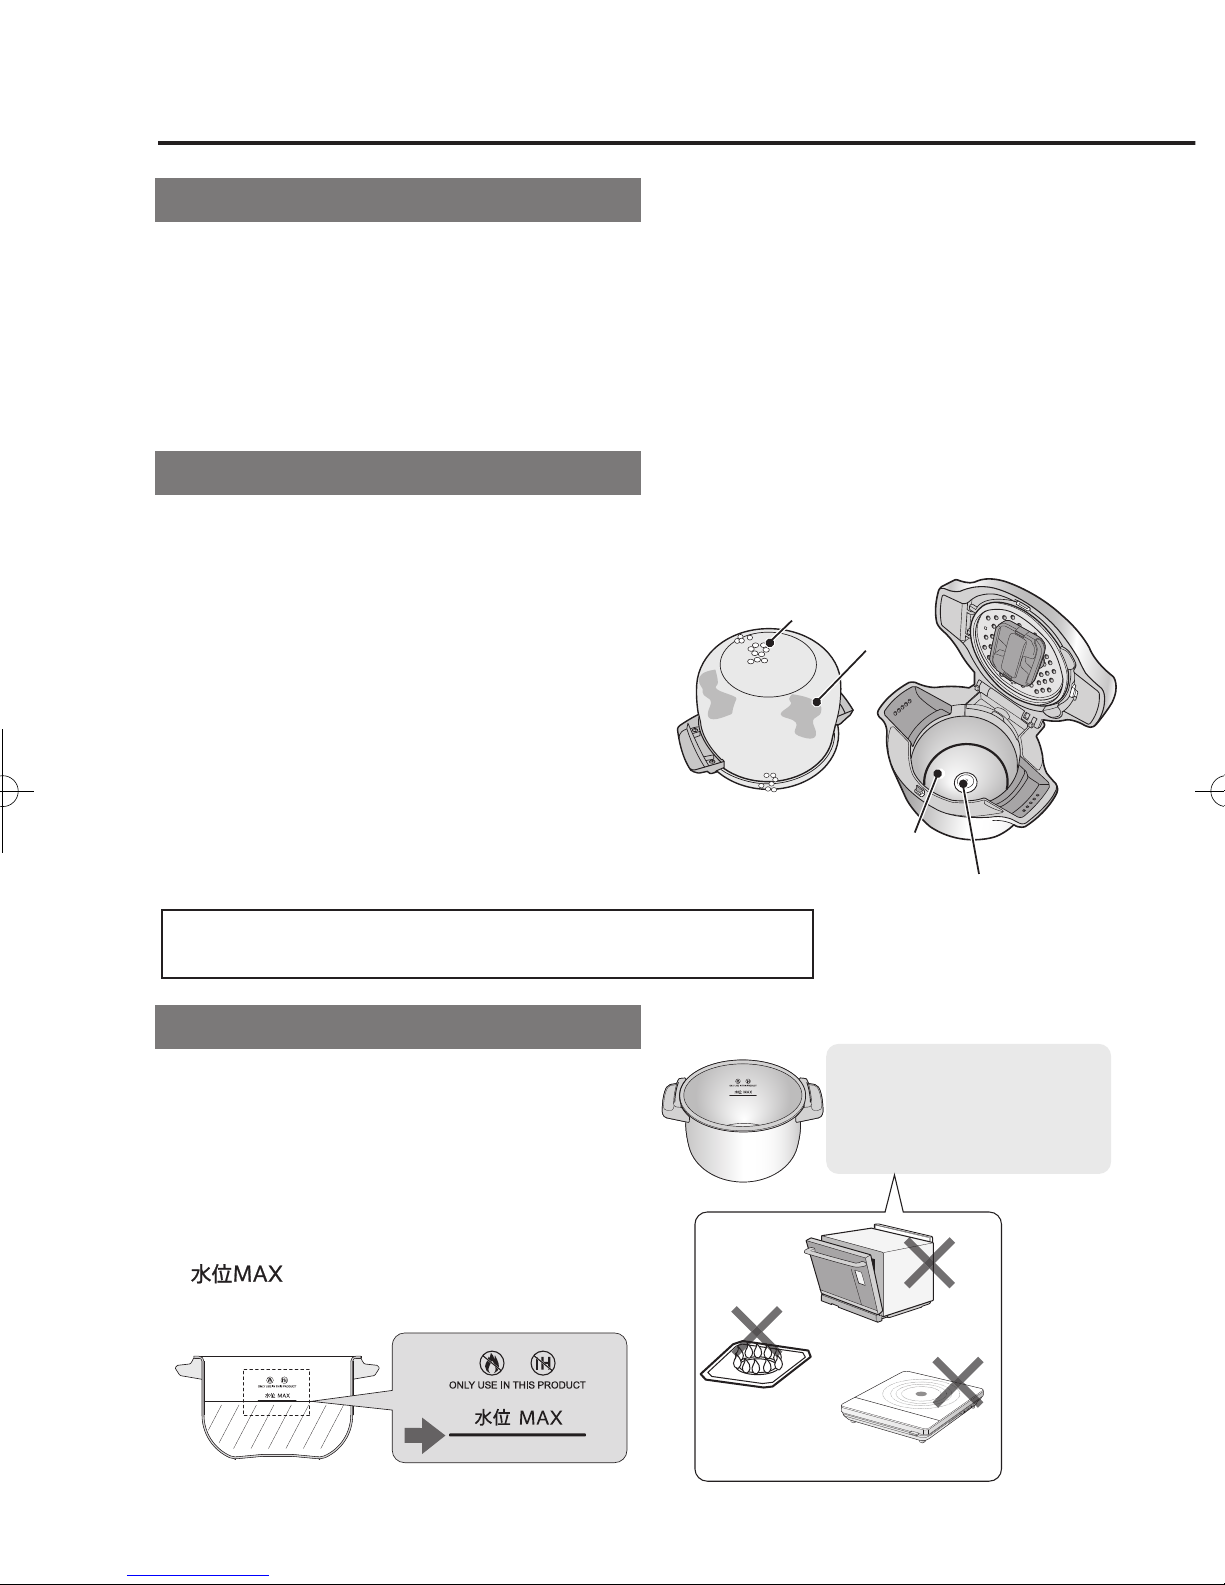
WHAT THIS APPLIANCE CAN DO
Cooking without water
You can basically cook without water. The
appliance uses the water contained in vegetables
and other ingredients to simmer or boil the food.
This limits the outow of nutrients and
taste (umami) from ingredients, and the result
is delicious.
Cooking with stirring
Stirring wings move automatically.
This prevents burning, and ensures
consistent avor.
Stirring wings
IMPORTANT SAFETY INSTRUCTIONS
IMPORTANT SAFETY INSTRUCTIONS: READ CAREFULLY AND KEEP FOR FUTURE REFERENCE
1. Cleaning and user maintenance shall not be performed by children without supervision.
2. Children should be supervised to ensure that they do not play with the appliance.
3. This appliance is not intended for use by persons (including children) with reduced physical,
sensory or mental capabilities, or lack of experience and knowledge, unless they have been given
supervision or instruction concerning use of the appliance by a person responsible for their safety.
4. Place the appliance on a at and sturdy surface. Do not place the appliance on or near a hot gas
or electric burner, or a heated oven. See page en-2 for the installation.
5. If the power supply cord is damaged, it must be replaced by a special cord available from the
manufacturer or its service agent.
6. This appliance is intended to be used in household use only. It is not intended for use in environ-
ments such as staff kitchens areas in shops, ofces, farm houses or other working environments.
Nor is it intended to be used by clients in hotels, motels, bed and breakfasts and other residential
type environments.
7. Do not immerse the appliance in water or other liquid to protect against re, electric shock and
injury to persons.
8. See instructions for cleaning the surface in contact with food on page en-16.
9. Keep to clean around the inlet plug to avoid spillage.
10. Unplug from outlet when not in use and before putting on or taking off parts, and before cleaning.
Allow to cool before putting on or taking off parts, and before cleaning the appliance.
11. Do not operate any appliance with a damaged cord or plug or after the appliance malfunctions, or
has been damaged in any manner. Contact a SERVICE CENTER APPROVED BY SHARP.
12. Never adjust, repair or modify the appliance by yourself.
13. Do not use this appliance for any other purpose than that described in the manual.
14. Do not touch the plug with wet hands when inserting or removing from the outlet. Plug securely
into the electric wall socket and remove by gripping the plug. Never pull on just the cord when
unplugging from the wall.
15. Do not place your hands and face near the steam vent.
16. Do not touch heating elements while the appliance is in use or after cooking.
17. The use of accessory attachments not recommended by the appliance manufacturer may result in
re, electric shock or injury to persons.
18. Do not touch hot surfaces.
19. When disposing of the device, follow the rules of waste electrical appliances, established by law
in your country.
20. Do not add water exceeding the MAX water level on the inner pot for cooking.
21. The temperature of accessible surfaces may be high when the appliance is operating.
22. This appliance is not intended to be operated by means of an external timer or separate
remote-control system.
23. This symbol means that the surfaces of the appliance are liable to get hot during use.
1. Before the rst use, check all parts and accessories. The protective sheet under the inner pot is
not necessary. Be sure to remove it before use. Then wash each part. Refer to Water washable
parts. See page en-5-6.
2. Do not damage the cord or bend it unreasonably, pull, twist, or bundle it, place heavy objects on
it, interpose it between other devices, modify it, or place it near hot parts of the appliance.
3. Do not use if the plug is loose in the electric wall socket.
4. Wipe off dust on the power plug and the inlet plug regularly.
5. Do not let anyone lick the power plug and the inlet plug.
6. Do not let cord hang over edge of table or counter, or touch hot surfaces.
7. Allow the appliance to cool completely before moving.
8. Do not open the lid with your face close to the appliance. Do not leave your hand on top of the lid.
Steam from the appliance may cause burns.
9. Do not insert any objects in the steam vent or the gap.
10. Do not use this appliance for any other purpose than that described in the manual. The examples
of preparations for which the appliance should not be used are following.
-Foods that uses baking soda, etc. that may suddenly foam up
-Foods using a large amount of oil
-Heating of foods in a plastic bag
Other warnings
1. Make sure that the voltage indicated on the appliance corresponds to the local mains voltage.
Securely connect the plug to a standard earthed (grounded) household electrical outlet. It is
recommended that a separate circuit serving only this appliance be provided.
2. Place the appliance on a at and sturdy surface. Do not place the appliance on or near a hot gas
or electric burner, or a heated oven.
3. Do not place or use the appliance anywhere water may splash onto it.
4. Do not place or use the appliance on a carpet or near furniture.
5. Do not place or use the appliance under direct sunlight.
6. Do not use the appliance outdoors.
Installation
KN-H24VMA.indb 1 2017/03/07 14:30:14

en-1
en-2
KN-H24VMA KN-H24VMA
WHAT THIS APPLIANCE CAN DO
Cooking without water
You can basically cook without water. The
appliance uses the water contained in vegetables
and other ingredients to simmer or boil the food.
This limits the outow of nutrients and
taste (umami) from ingredients, and the result
is delicious.
Cooking with stirring
Stirring wings move automatically.
This prevents burning, and ensures
consistent avor.
Stirring wings
IMPORTANT SAFETY INSTRUCTIONS
IMPORTANT SAFETY INSTRUCTIONS: READ CAREFULLY AND KEEP FOR FUTURE REFERENCE
1. Cleaning and user maintenance shall not be performed by children without supervision.
2. Children should be supervised to ensure that they do not play with the appliance.
3. This appliance is not intended for use by persons (including children) with reduced physical,
sensory or mental capabilities, or lack of experience and knowledge, unless they have been given
supervision or instruction concerning use of the appliance by a person responsible for their safety.
4. Place the appliance on a at and sturdy surface. Do not place the appliance on or near a hot gas
or electric burner, or a heated oven. See page en-2 for the installation.
5. If the power supply cord is damaged, it must be replaced by a special cord available from the
manufacturer or its service agent.
6. This appliance is intended to be used in household use only. It is not intended for use in environ-
ments such as staff kitchens areas in shops, ofces, farm houses or other working environments.
Nor is it intended to be used by clients in hotels, motels, bed and breakfasts and other residential
type environments.
7. Do not immerse the appliance in water or other liquid to protect against re, electric shock and
injury to persons.
8. See instructions for cleaning the surface in contact with food on page en-16.
9. Keep to clean around the inlet plug to avoid spillage.
10. Unplug from outlet when not in use and before putting on or taking off parts, and before cleaning.
Allow to cool before putting on or taking off parts, and before cleaning the appliance.
11. Do not operate any appliance with a damaged cord or plug or after the appliance malfunctions, or
has been damaged in any manner. Contact a SERVICE CENTER APPROVED BY SHARP.
12. Never adjust, repair or modify the appliance by yourself.
13. Do not use this appliance for any other purpose than that described in the manual.
14. Do not touch the plug with wet hands when inserting or removing from the outlet. Plug securely
into the electric wall socket and remove by gripping the plug. Never pull on just the cord when
unplugging from the wall.
15. Do not place your hands and face near the steam vent.
16. Do not touch heating elements while the appliance is in use or after cooking.
17. The use of accessory attachments not recommended by the appliance manufacturer may result in
re, electric shock or injury to persons.
18. Do not touch hot surfaces.
19. When disposing of the device, follow the rules of waste electrical appliances, established by law
in your country.
20. Do not add water exceeding the MAX water level on the inner pot for cooking.
21. The temperature of accessible surfaces may be high when the appliance is operating.
22. This appliance is not intended to be operated by means of an external timer or separate
remote-control system.
23. This symbol means that the surfaces of the appliance are liable to get hot during use.
1. Before the rst use, check all parts and accessories. The protective sheet under the inner pot is
not necessary. Be sure to remove it before use. Then wash each part. Refer to Water washable
parts. See page en-5-6.
2. Do not damage the cord or bend it unreasonably, pull, twist, or bundle it, place heavy objects on
it, interpose it between other devices, modify it, or place it near hot parts of the appliance.
3. Do not use if the plug is loose in the electric wall socket.
4. Wipe off dust on the power plug and the inlet plug regularly.
5. Do not let anyone lick the power plug and the inlet plug.
6. Do not let cord hang over edge of table or counter, or touch hot surfaces.
7. Allow the appliance to cool completely before moving.
8. Do not open the lid with your face close to the appliance. Do not leave your hand on top of the lid.
Steam from the appliance may cause burns.
9. Do not insert any objects in the steam vent or the gap.
10. Do not use this appliance for any other purpose than that described in the manual. The examples
of preparations for which the appliance should not be used are following.
-Foods that uses baking soda, etc. that may suddenly foam up
-Foods using a large amount of oil
-Heating of foods in a plastic bag
Other warnings
1. Make sure that the voltage indicated on the appliance corresponds to the local mains voltage.
Securely connect the plug to a standard earthed (grounded) household electrical outlet. It is
recommended that a separate circuit serving only this appliance be provided.
2. Place the appliance on a at and sturdy surface. Do not place the appliance on or near a hot gas
or electric burner, or a heated oven.
3. Do not place or use the appliance anywhere water may splash onto it.
4. Do not place or use the appliance on a carpet or near furniture.
5. Do not place or use the appliance under direct sunlight.
6. Do not use the appliance outdoors.
Installation
KN-H24VMA.indb 2 2017/03/07 14:30:14
en-3
en-4
KN-H24VMA KN-H24VMA
INSTRUCTIONS FOR USE
●
Place the appliance on a flat, level surface strong enough to support it’s weight plus the
heaviest item likely to be cooked.
(Risk of the appliance falling and causing injuries or burns)
*Maximum weight is approx. 12kg (with food and water inside a inner pot)
●Do not use in direct sunlight (It may cause discoloration)
●Make sure the steam does not go into the power plug socket
(It may cause breakage)
Temperature sensor
Thermo plate
Dirt
Stains
The placement of the appliance
Use
Inner pot
IH (induction)
Microwave oven
CORRECT WRONG
Gas stove
(direct flame)
The inner pot is intended
for use in this appliance only.
Do not use with the other
heating devices.
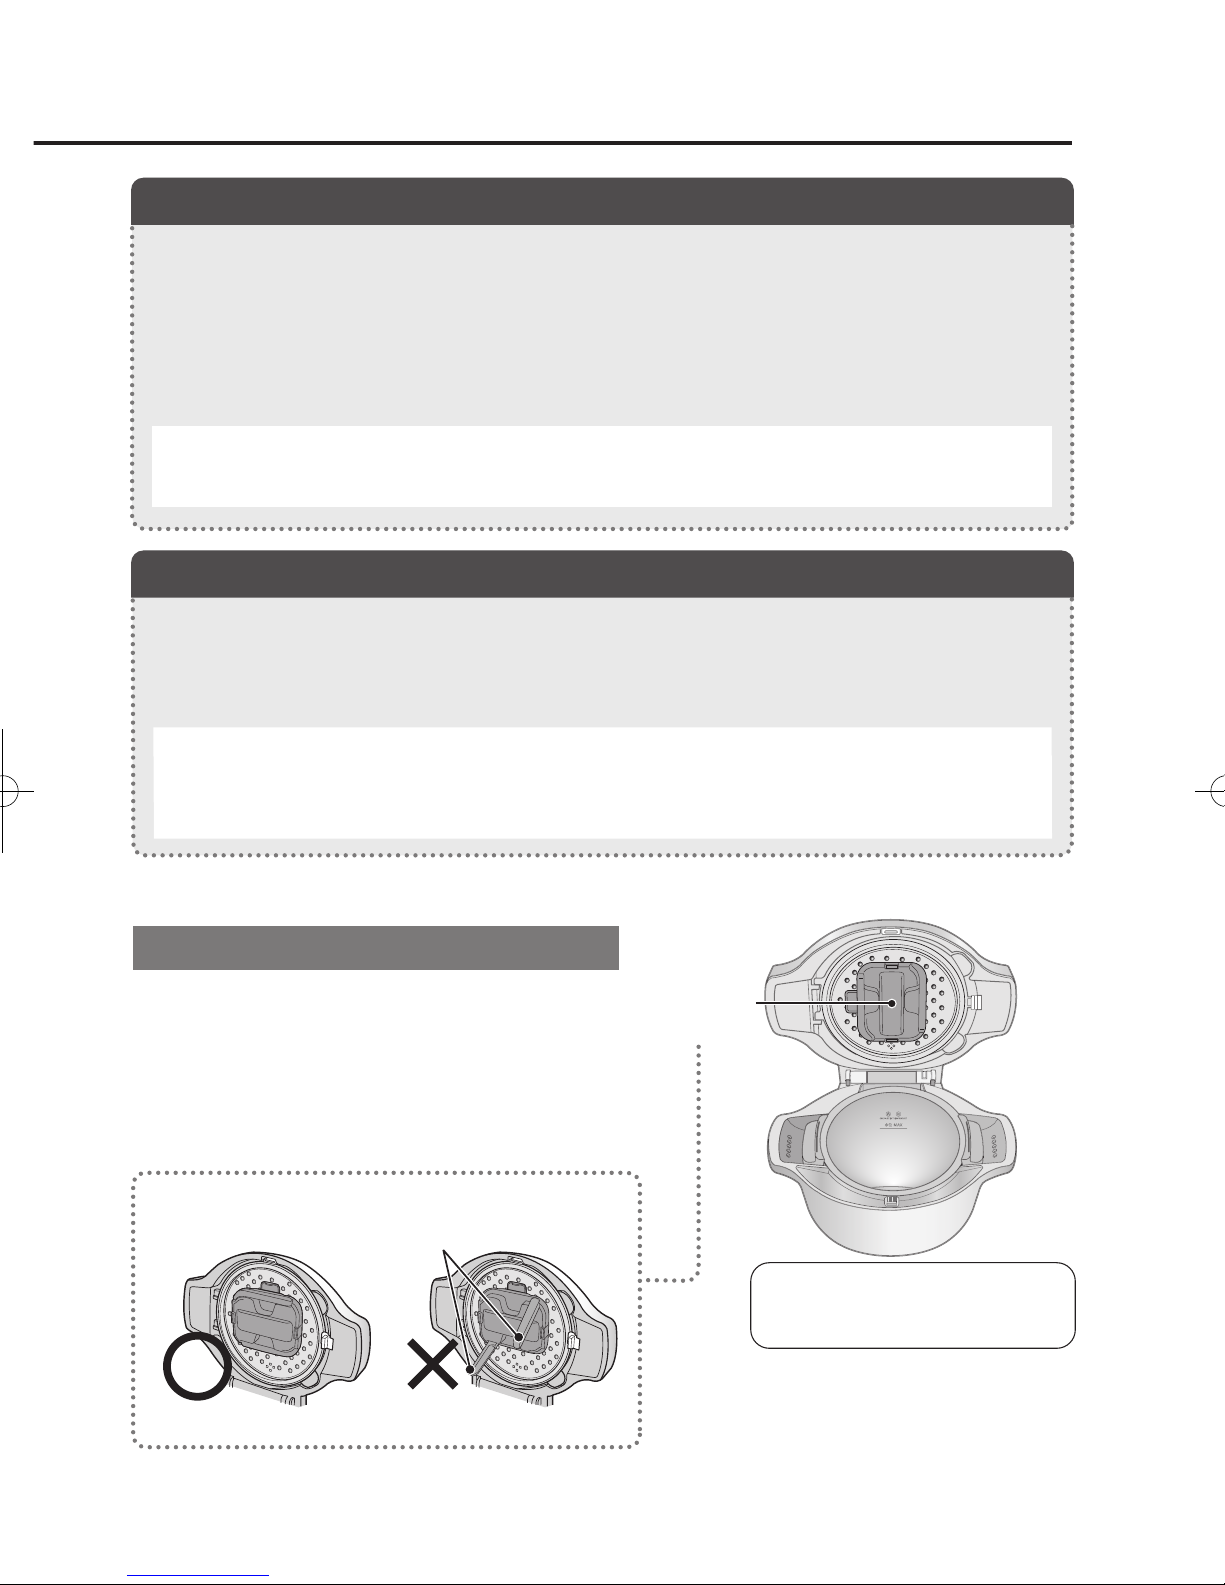
Stirring unit
Stirring
unit
To attach/remove the unit, see
CARE AND CLEANING on
page en-19.
●
Do not place the inner pot on a gas stove, heat in
a microwave oven, or use on an IH (induction) stove
●
Do not scrape hard objects or drop on the pot
●
Do not wash with a hard sponge or metallic scrub
●
Ingredients should not touch the stirring unit
when the lid is closed.
●
Do not put amounts of water or sauces above
" " line. (水位 : water level)
Attach the stirring unit if selected menu displays
[STIR]. If you forget to attach the stirring unit and begin
cooking, error message [U1] will ash and a reminder
sound beeps.
●Securely attach the stirring unit
(Otherwise the unit may fall in the food or break)
●Do not put anything on the appliance or cover the appliance with a towel etc.
(It may cause deformation, discoloration or breakage)
●Do not carry the appliance with the lid open
(It may cause the appliance or food to fall and cause burns)
●Do not operate the appliance when empty
(It may cause breakage)
●Wipe off the outside of the appliance, never
use when it is dirty.
(It may lead cooking to fail or the appliance to break)
●Be careful when taking the inner pot out
immediately after cooking, as the handles may be hot.
●Be careful after removing the inner pot, as the thermo plate
and temperature sensor in the bottom of the
device will be hot.
When cooking several times in succession, keep the lid open for
5 minutes to let the appliance cool before starting.
The material of Stirring unit is SPS
(syndiotactic polystyrene), which is
commonly utilized in reusable chopsticks
used in restaurants.
●
Do not leave or store food with strong flavor in the appliance for long time. Wash the
stirring unit, inner lid, steam vent cover, drip tray, inner pot and steam plate as soon as
the appliance cools down.
●If the smell persists, try followings:
To prevent ingrained smells
Pour 600mL of water in the inner pot and heat for 30 minutes using the manual cooking setting [4] STEAM.
You can place the stirring unit inside the inner pot while heating. You can also cut a lemon
into 8 pieces and put them into the water for more effect. See page en-11 for how to operate manual cooking.
For long use of the inner pot and lid
See page en-16 for Cleaning tips if something becomes stuck on the pot, or discoloration
(iridescent or white patches) or rust develops.
Even though both the inner pot and lid are made of stainless steel, the minerals contained in water
may cause rust. Wash and dry carefully after each use.
●Do not leave salty or oily ingredients (cooking oil, butter, mayonnaise etc.) on the pot or lid.
●
Do not leave metallic items such as iron or aluminum in the pot. Rust from such items may stick
in the pot,
causing itself to rust as well.
●Do not scratch the surface with sharp objects.
Stirring wings
●Attach the unit with the stirring wings closed.
KN-H24VMA.indb 3 2017/03/07 14:30:15
en-3
en-4
KN-H24VMA KN-H24VMA
INSTRUCTIONS FOR USE
●
Place the appliance on a flat, level surface strong enough to support it’s weight plus the
heaviest item likely to be cooked.
(Risk of the appliance falling and causing injuries or burns)
*Maximum weight is approx. 12kg (with food and water inside a inner pot)
●Do not use in direct sunlight (It may cause discoloration)
●Make sure the steam does not go into the power plug socket
(It may cause breakage)
Temperature sensor
Thermo plate
Dirt
Stains
The placement of the appliance
Use
Inner pot
IH (induction)
Microwave oven
CORRECT WRONG
Gas stove
(direct flame)
The inner pot is intended
for use in this appliance only.
Do not use with the other
heating devices.
Stirring unit
Stirring
unit
To attach/remove the unit, see
CARE AND CLEANING on
page en-19.
●
Do not place the inner pot on a gas stove, heat in
a microwave oven, or use on an IH (induction) stove
●
Do not scrape hard objects or drop on the pot
●
Do not wash with a hard sponge or metallic scrub
●
Ingredients should not touch the stirring unit
when the lid is closed.
●
Do not put amounts of water or sauces above
" " line. (水位 : water level)
Attach the stirring unit if selected menu displays
[STIR]. If you forget to attach the stirring unit and begin
cooking, error message [U1] will ash and a reminder
sound beeps.
●Securely attach the stirring unit
(Otherwise the unit may fall in the food or break)
●Do not put anything on the appliance or cover the appliance with a towel etc.
(It may cause deformation, discoloration or breakage)
●Do not carry the appliance with the lid open
(It may cause the appliance or food to fall and cause burns)
●Do not operate the appliance when empty
(It may cause breakage)
●Wipe off the outside of the appliance, never
use when it is dirty.
(It may lead cooking to fail or the appliance to break)
●Be careful when taking the inner pot out
immediately after cooking, as the handles may be hot.
●Be careful after removing the inner pot, as the thermo plate
and temperature sensor in the bottom of the
device will be hot.
When cooking several times in succession, keep the lid open for
5 minutes to let the appliance cool before starting.
The material of Stirring unit is SPS
(syndiotactic polystyrene), which is
commonly utilized in reusable chopsticks
used in restaurants.
●
Do not leave or store food with strong flavor in the appliance for long time. Wash the
stirring unit, inner lid, steam vent cover, drip tray, inner pot and steam plate as soon as
the appliance cools down.
●If the smell persists, try followings:
To prevent ingrained smells
Pour 600mL of water in the inner pot and heat for 30 minutes using the manual cooking setting [4] STEAM.
You can place the stirring unit inside the inner pot while heating. You can also cut a lemon
into 8 pieces and put them into the water for more effect. See page en-11 for how to operate manual cooking.
For long use of the inner pot and lid
See page en-16 for Cleaning tips if something becomes stuck on the pot, or discoloration
(iridescent or white patches) or rust develops.
Even though both the inner pot and lid are made of stainless steel, the minerals contained in water
may cause rust. Wash and dry carefully after each use.
●Do not leave salty or oily ingredients (cooking oil, butter, mayonnaise etc.) on the pot or lid.
●
Do not leave metallic items such as iron or aluminum in the pot. Rust from such items may stick
in the pot,
causing itself to rust as well.
●Do not scratch the surface with sharp objects.
Stirring wings
●Attach the unit with the stirring wings closed.
KN-H24VMA.indb 4 2017/03/07 14:30:15

en-5
en-6
KN-H24VMA KN-H24VMA
NAMES OF PARTS AND ACCESSORIES
Washable parts
Inner pot
■Main unit
*The picture differs slightly from the actual product
※Packaged separately when shipped from the factory
Inner lid
Steam vent cover
Stirring unit
Drip tray
(page en-18)
(page en-19)
(page en-16)
(page en-3)
(page en-17)
"FRONT" text
Water level line
※
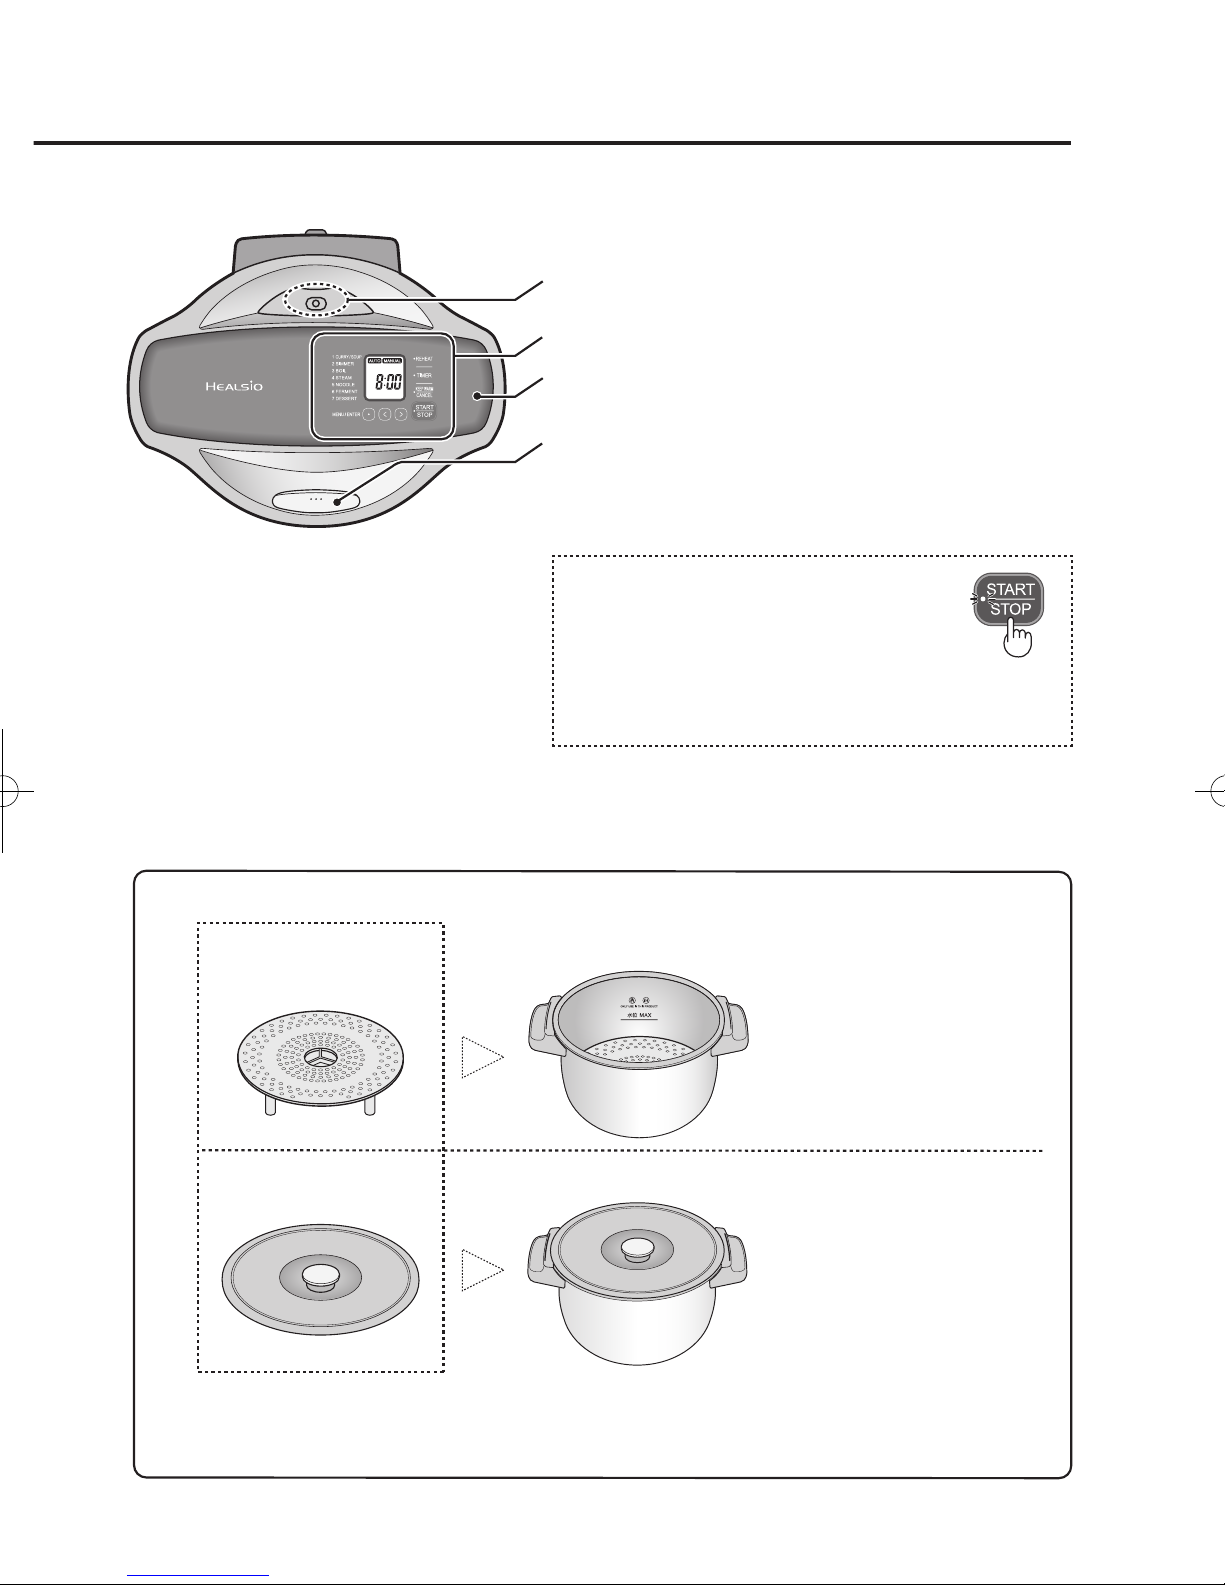
Top side (lid)
Open button
Press to open. The appliance has a lock function during
cooking or when the Timer cooking is set.
Handle When carrying, please hold both sides with
the lid closed.
Steam vent
Do not place hands or face near the appliance during cooking
Control panel/Display (page en-7)
Steam plate
Inner pot lid
Designed to be used for this appliance only.
[How to use]
[How to use]
■Accessories (1 each)
Operation manual / Menu book / Warranty card
Pour 200mL of water,
and then put the steam plate.
Take the inner pot out from the
appliance and put the inner pot
lid on.
The pot can be temporarily
stored in a refrigerator.
WTo unlock, press the STOP button and wait
for the beep to the end before opening the lid.
(It may cause the steam to escape and affect
cooking results)
Timer setting is canceled by opening the lid.
Resetting is necessary after closing the lid.
Washable parts
Power plug
Insert the power plug
in the outlet.
Stirring wings
Inlet plug
Insert in the socket
on the main unit
Connecting the power cord
Power cord
Temperature sensor
Thermo
plate
❶
❷
KN-H24VMA.indb 5 2017/03/07 14:30:16
en-5
en-6
KN-H24VMA KN-H24VMA
NAMES OF PARTS AND ACCESSORIES
Washable parts
Inner pot
■Main unit
*The picture differs slightly from the actual product
※Packaged separately when shipped from the factory
Inner lid
Steam vent cover
Stirring unit
Drip tray
(page en-18)
(page en-19)
(page en-16)
(page en-3)
(page en-17)
"FRONT" text
Water level line
※
Top side (lid)
Open button
Press to open. The appliance has a lock function during
cooking or when the Timer cooking is set.
Handle When carrying, please hold both sides with
the lid closed.
Steam vent
Do not place hands or face near the appliance during cooking
Control panel/Display (page en-7)
Steam plate
Inner pot lid
Designed to be used for this appliance only.
[How to use]
[How to use]
■Accessories (1 each)
Operation manual / Menu book / Warranty card
Pour 200mL of water,
and then put the steam plate.
Take the inner pot out from the
appliance and put the inner pot
lid on.
The pot can be temporarily
stored in a refrigerator.
WTo unlock, press the STOP button and wait
for the beep to the end before opening the lid.
(It may cause the steam to escape and affect
cooking results)
Timer setting is canceled by opening the lid.
Resetting is necessary after closing the lid.
Washable parts
Power plug
Insert the power plug
in the outlet.
Stirring wings
Inlet plug
Insert in the socket
on the main unit
Connecting the power cord
Power cord
Temperature sensor
Thermo
plate
❶
❷
KN-H24VMA.indb 6 2017/03/07 14:30:16
en-7
en-8
KN-H24VMA KN-H24VMA
CONTROL PANEL/DISPLAY
BEFORE OPERATING
Use to reheat.
•Use this button to cancel the operation. If pressing this button
during operation, heating stops.
•
Use this button to keep food warm. The light turns ON
during Keep Warm. Keep Warm is automatically turned off after 12 hours.
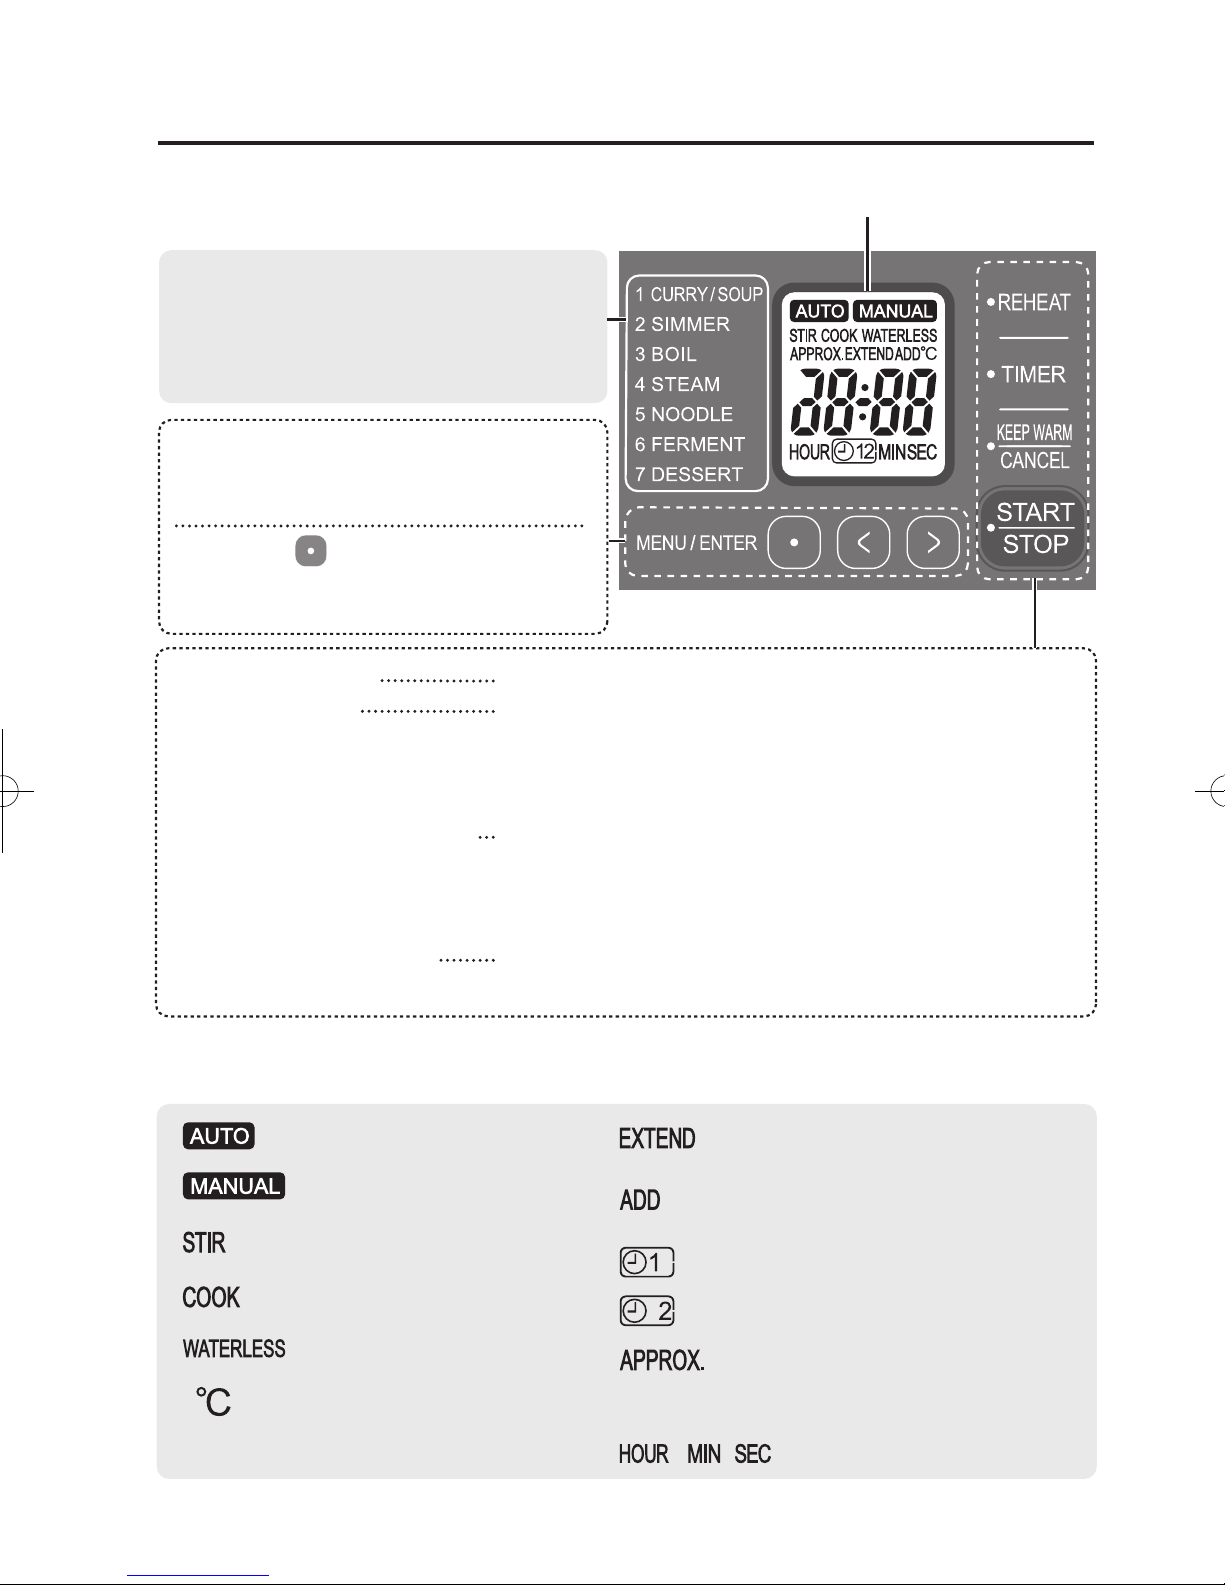
■Control panel
MENU / ENTER buttons
Use when selecting the menu, cooking
time and other settings.
Pressing the button during cooking,
the selected menu number is shown on the
display.
•Use to start the appliance.
•Use to pause the appliance during operation.
NOTE: A reminder sound beeps when you do not operate for 30 seconds.
REHEAT button
Use for food to be ready at a preset time.
The timer can be set up to 12 hours beforehand. Consult
the Menu book for suitable dishes for using the timer.
(Timer can be used if the TIMER button light blinks during menu selection)
TIMER button
KEEP WARM / CANCEL button
START / STOP button
Displayed when the menu item
using the stirring unit.
Automatic cooking.
(TIMER 1)
(TIMER 2)
Manual cooking.
Heating (cooking) is in operation.
Displayed for waterless menu.
Displayed when setting the
temperature for [6] FERMENT
Blinks during cooking when it is time to
add ingredients.
Displayed for 3 minutes after cooking is
complete. Cooking time can be extended.
Displayed when pre-set timer is in use.
The factory default setting is
6AM (TIMER 1) or 6PM (TIMER 2).
Displayed the estimated time remaining.
When the remaining time is xed,
the indicator disappears and the exact time
remaining is displayed.
, ,
■Display
Display
ENTER
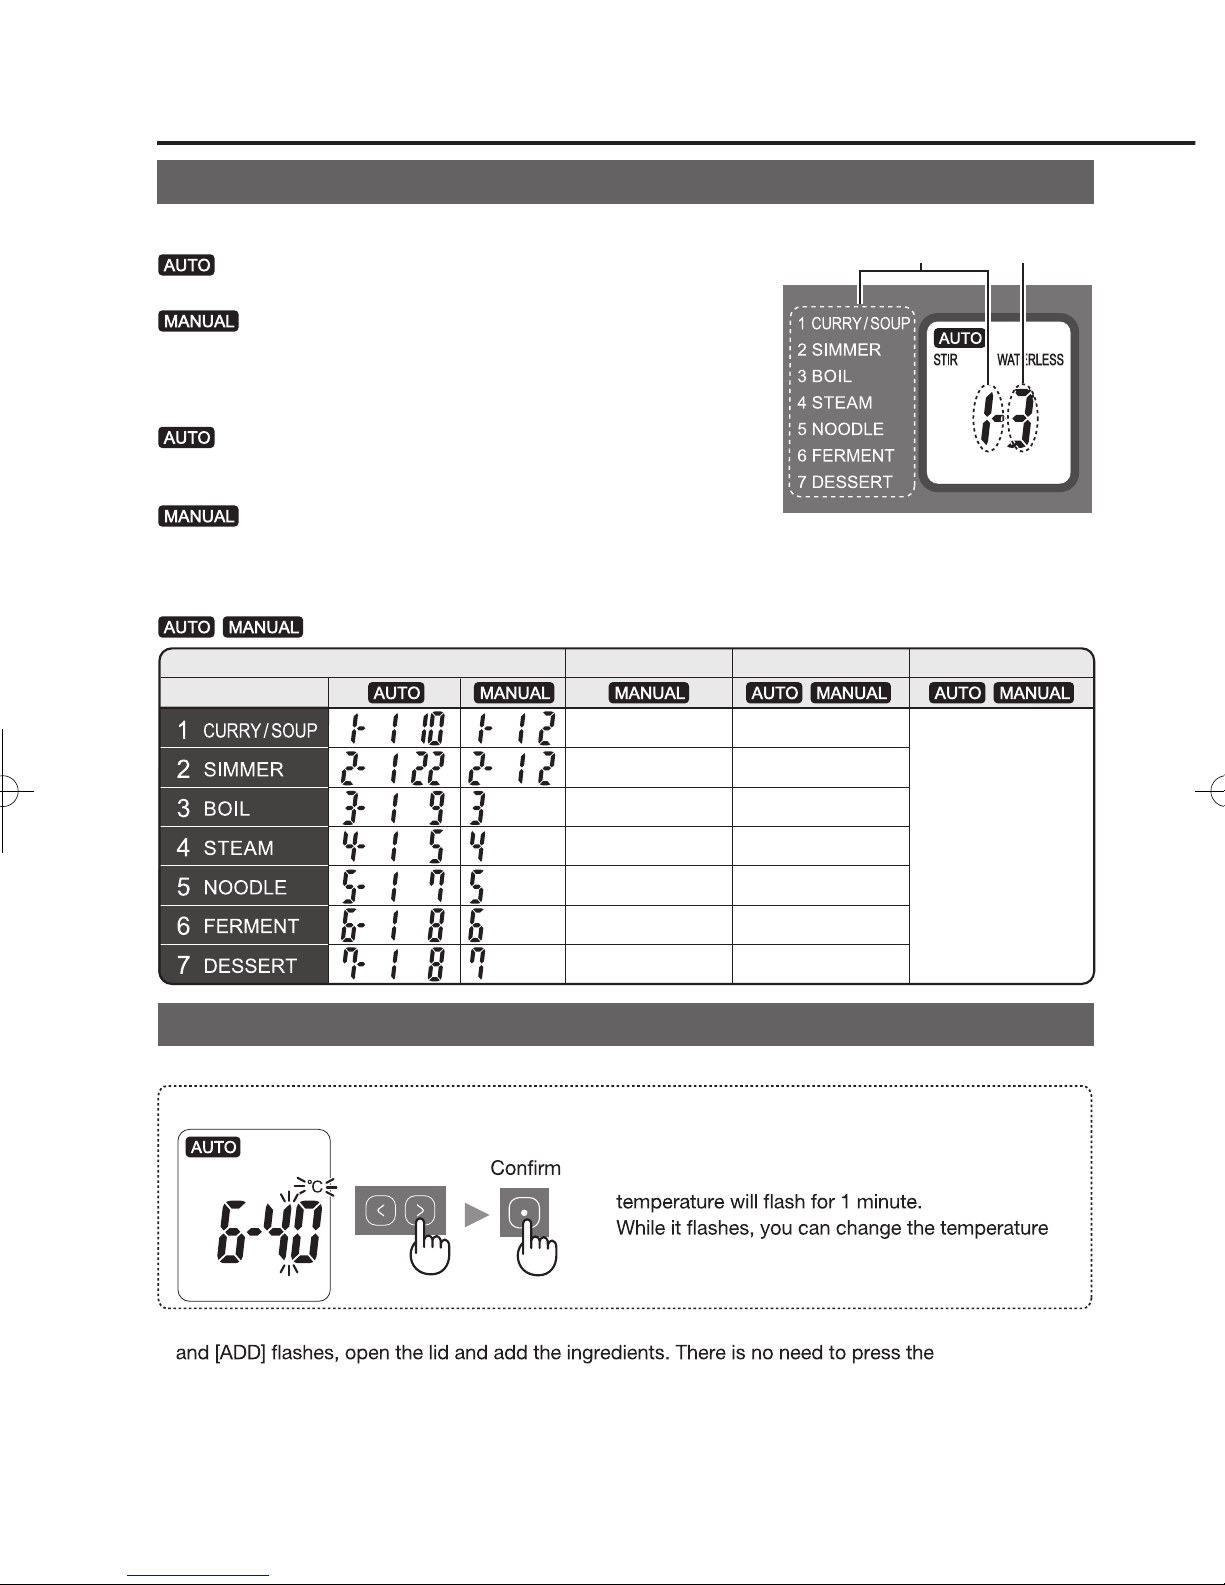
7 cooking categories
It is possible to choose automatic or manual
cooking from each category. See the Menu
book and select the menu number.
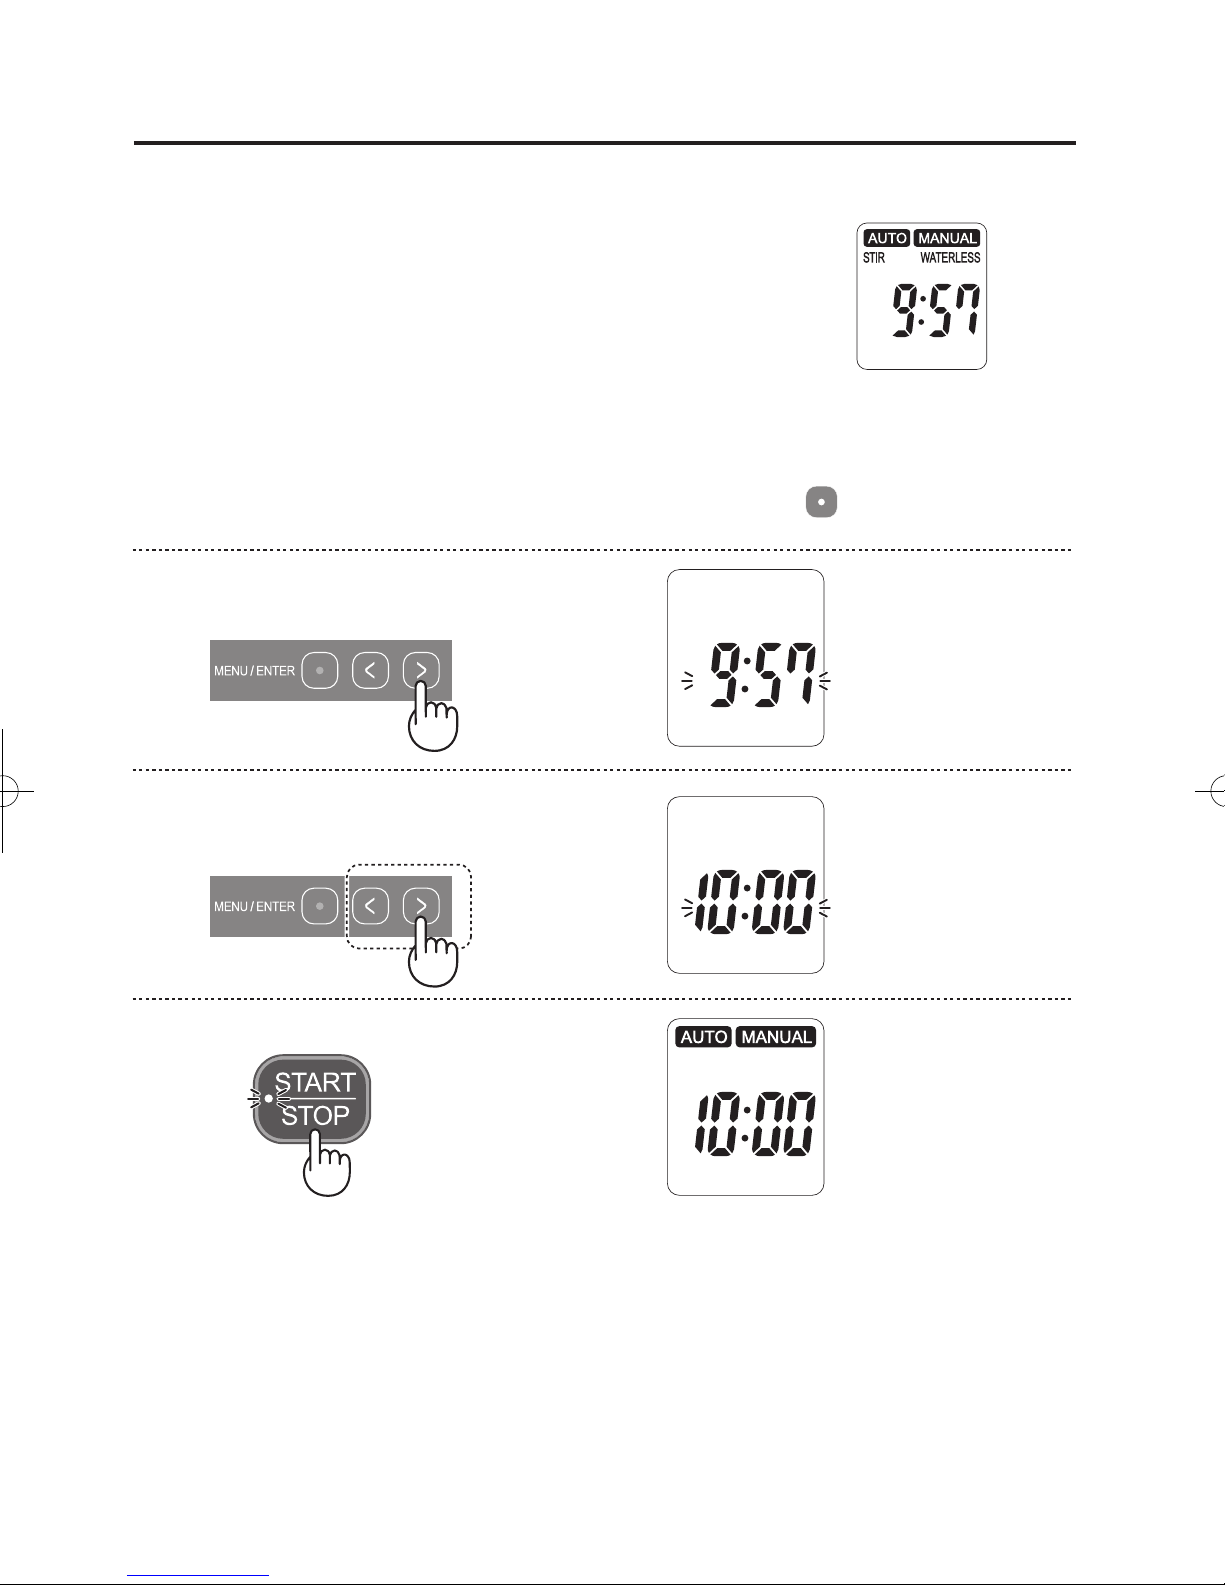
■CLOCK SETTING
[The display when working
by the internal battery]
This appliance has a 24 hour clock.
The clock works by the internal battery when the power plug is
disconnected from an outlet.
Make sure the displayed time is correct when setting the timer.
* Suppose you want to set the present time of day 10:00.
1
Insert the inlet plug in the socket on the main unit, then plug the appliance into an outlet.
[STIR] and [WATERLESS] will disappear, and the ENTER button will ash on and off.
Press and hold for four seconds until
a short beep sounds.
The time of day
will stop ashing.
Set the time of day.
Keep the button pressed to fast forward.
Conrm the setting.
4
3
2
The time will
ash on and off.
■SOUND SETTING
You can disable the sound when the display shows the time of day.
Before operating, insert the inlet plug in the socket of the main unit, then plug the appliance into an outlet.
T
o disable the sound, press and hold the TIMER button for four seconds until two audible signals sound.
To restore the sound, press and hold the TIMER button for four seconds until an audible signal sounds.
NOTE : The sounds for notication during the cooking or error cannot be disabled.
KN-H24VMA.indb 7 2017/03/07 14:30:16
en-7
en-8
KN-H24VMA KN-H24VMA
CONTROL PANEL/DISPLAY
BEFORE OPERATING
Use to reheat.
•Use this button to cancel the operation. If pressing this button
during operation, heating stops.
•
Use this button to keep food warm. The light turns ON
during Keep Warm. Keep Warm is automatically turned off after 12 hours.
■Control panel
MENU / ENTER buttons
Use when selecting the menu, cooking
time and other settings.
Pressing the button during cooking,
the selected menu number is shown on the
display.
•Use to start the appliance.
•Use to pause the appliance during operation.
NOTE: A reminder sound beeps when you do not operate for 30 seconds.
REHEAT button
Use for food to be ready at a preset time.
The timer can be set up to 12 hours beforehand. Consult
the Menu book for suitable dishes for using the timer.
(Timer can be used if the TIMER button light blinks during menu selection)
TIMER button
KEEP WARM / CANCEL button
START / STOP button
Displayed when the menu item
using the stirring unit.
Automatic cooking.
(TIMER 1)
(TIMER 2)
Manual cooking.
Heating (cooking) is in operation.
Displayed for waterless menu.
Displayed when setting the
temperature for [6] FERMENT
Blinks during cooking when it is time to
add ingredients.
Displayed for 3 minutes after cooking is
complete. Cooking time can be extended.
Displayed when pre-set timer is in use.
The factory default setting is
6AM (TIMER 1) or 6PM (TIMER 2).
Displayed the estimated time remaining.
When the remaining time is xed,
the indicator disappears and the exact time
remaining is displayed.
, ,
■Display
Display
ENTER
7 cooking categories
It is possible to choose automatic or manual
cooking from each category. See the Menu
book and select the menu number.
■CLOCK SETTING
[The display when working
by the internal battery]
This appliance has a 24 hour clock.
The clock works by the internal battery when the power plug is
disconnected from an outlet.
Make sure the displayed time is correct when setting the timer.
* Suppose you want to set the present time of day 10:00.
1
Insert the inlet plug in the socket on the main unit, then plug the appliance into an outlet.
[STIR] and [WATERLESS] will disappear, and the ENTER button will ash on and off.
Press and hold for four seconds until
a short beep sounds.
The time of day
will stop ashing.
Set the time of day.
Keep the button pressed to fast forward.
Conrm the setting.
4
3
2
The time will
ash on and off.
■SOUND SETTING
You can disable the sound when the display shows the time of day.
Before operating, insert the inlet plug in the socket of the main unit, then plug the appliance into an outlet.
T
o disable the sound, press and hold the TIMER button for four seconds until two audible signals sound.
To restore the sound, press and hold the TIMER button for four seconds until an audible signal sounds.
NOTE : The sounds for notication during the cooking or error cannot be disabled.
KN-H24VMA.indb 8 2017/03/07 14:30:16
en-9
en-10
KN-H24VMA KN-H24VMA
( )
AUTOMATIC/MANUALCOOKING①
●Attach the stirring unit before cooking for menu number [1-1] and [2-1].
●Use the stirring unit and steamplate depending on the menu.
●The temperature range for category [6] is 35-65°C (1°C per step)/65-90 ℃(5°C per step)
●The total cooking time has two parts, so the actual cooking time will take longerthan the time you set.
When you cook recipes which are not listed in the menu book, enterthe time referring to the similar
menu.
* Category [1]~[5]:The time to a boil.
Category [6]:The time to reach the temperature you set.
Category [7]:The time to reach the temperature forbaking cake and bread.
NOTE : The time will differ depending on the categoryand the food quantity.
● Menu number
The menu number consists of a categoryand a menu.
Choose the category, and then select the menu.
● After pressing the START button, approximate cooking time will be shown.
● Some menus are necessary to add ingredients during the cooking. When reminder sounds beep
STOP button
before opening the lid.
Openthe lid and add ingredientscarefully to prevent steamburns. To continue the cooking, close
the lid and press the START button.
● For the categories [3] and [5]: Reminder sounds will beep every 1 minute for 3 times if the lid is not
opened after cooking.
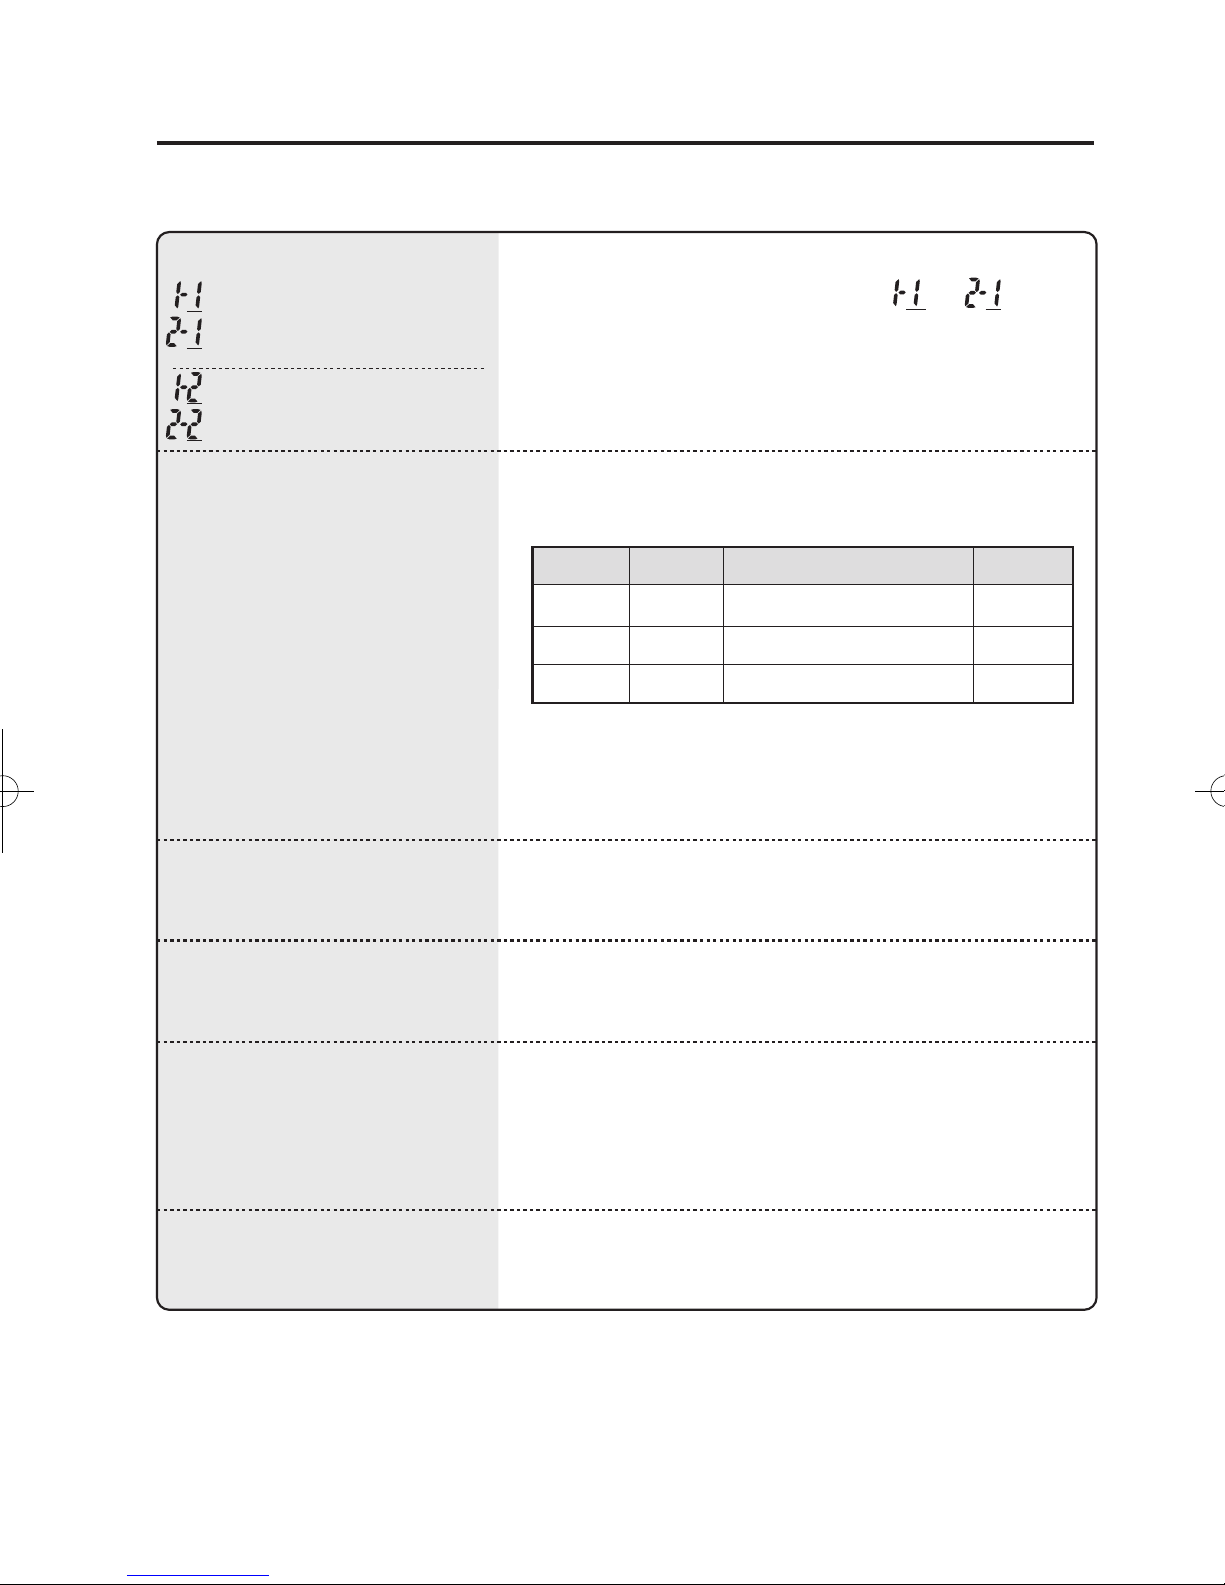
Categories [1] and [2] have two optionsof stir or no-stir.
[1-1]、[2-1]:STIR
[1-2]、[2-2]:no-stir
● Cookingtime
Once you enter the menu number and press the START button,
the cooking time will be determined automatically depending
on the food quantity and temperature.
● Extension
See the table below.
Enterthe desired cooking time after choosing the menu number.
The time range differs depending on the categories.
See the table below.
See the Menu bookattached and Tips for Manual Cooking on page en-13 before cooking.
CategoryMenu
(Menu number)
e.g. AUTO menu[1-3] keema curry
Cooking is
completed
The time to reach
the preset temperature*The time you set.
Totalcooking time
will be
shown.
The remaining time
will be shown.
MENU NUMBER, COOKING TIME and EXTENSION
AUTOMATIC COOKING
~
~
~
~
~
~
~
~
~
~
~
~
~
~
0~120 min.
0~120 min.
0~60 min.
0~60 min.
0~30 min.
0~12 hours
0~60 min.
0~30 min.
0~30 min.
0~30 min.
0~10 min.
0~10 min.
0~6hours
0~30 min.
1min.
6 FERMENT only:
~1 hour:1min.
1 hour~:1hour
Forthe category[6] only :
When pressing the START button, the preset
at the range of ± 3°C.
To change the ferment temperature
Change
MANUAL COOKING
Menu number
Category
Time range Extended time Input step
● Some menus are necessary to add ingredients during the cooking. When reminder sounds beep
STOP button
before opening the lid.
Openthe lid and add ingredientscarefully to prevent steamburns. To continue the cooking, close
the lid and press the START button.
● For the categories [3] and [5]: Reminder sounds will beep every 1 minute for 3 times if the lid is not
opened after cooking.
KN-H24VMA.indb 9 2017/03/07 14:30:17

en-9
en-10
KN-H24VMA KN-H24VMA
( )
AUTOMATIC/MANUALCOOKING①
●Attach the stirring unit before cooking for menu number [1-1] and [2-1].
●Use the stirring unit and steamplate depending on the menu.
●The temperature range for category [6] is 35-65°C (1°C per step)/65-90 ℃(5°C per step)
●The total cooking time has two parts, so the actual cooking time will take longerthan the time you set.
When you cook recipes which are not listed in the menu book, enterthe time referring to the similar
menu.
* Category [1]~[5]:The time to a boil.
Category [6]:The time to reach the temperature you set.
Category [7]:The time to reach the temperature forbaking cake and bread.
NOTE : The time will differ depending on the categoryand the food quantity.
● Menu number
The menu number consists of a categoryand a menu.
Choose the category, and then select the menu.
● After pressing the START button, approximate cooking time will be shown.
● Some menus are necessary to add ingredients during the cooking. When reminder sounds beep
STOP button
before opening the lid.
Openthe lid and add ingredientscarefully to prevent steamburns. To continue the cooking, close
the lid and press the START button.
● For the categories [3] and [5]: Reminder sounds will beep every 1 minute for 3 times if the lid is not
opened after cooking.
Categories [1] and [2] have two optionsof stir or no-stir.
[1-1]、[2-1]:STIR
[1-2]、[2-2]:no-stir
● Cookingtime
Once you enter the menu number and press the START button,
the cooking time will be determined automatically depending
on the food quantity and temperature.
● Extension
See the table below.
Enterthe desired cooking time after choosing the menu number.
The time range differs depending on the categories.
See the table below.
See the Menu bookattached and Tips for Manual Cooking on page en-13 before cooking.
CategoryMenu
(Menu number)
e.g. AUTO menu[1-3] keema curry
Cooking is
completed
The time to reach
the preset temperature*The time you set.
Totalcooking time
will be
shown.
The remaining time
will be shown.
MENU NUMBER, COOKING TIME and EXTENSION
AUTOMATIC COOKING
~
~
~
~
~
~
~
~
~
~
~
~
~
~
0~120 min.
0~120 min.
0~60 min.
0~60 min.
0~30 min.
0~12 hours
0~60 min.
0~30 min.
0~30 min.
0~30 min.
0~10 min.
0~10 min.
0~6hours
0~30 min.
1min.
6 FERMENT only:
~1 hour:1min.
1 hour~:1hour
Forthe category[6] only :
When pressing the START button, the preset
at the range of ± 3°C.
To change the ferment temperature
Change
MANUAL COOKING
Menu number
Category
Time range Extended time Input step
● Some menus are necessary to add ingredients during the cooking. When reminder sounds beep
STOP button
before opening the lid.
Openthe lid and add ingredientscarefully to prevent steamburns. To continue the cooking, close
the lid and press the START button.
● For the categories [3] and [5]: Reminder sounds will beep every 1 minute for 3 times if the lid is not
opened after cooking.
KN-H24VMA.indb 10 2017/03/07 14:30:17
en-11
en-12
KN-H24VMA KN-H24VMA
CategoryMenu
(Menu number)
e.g. AUTO menu[1-3] keema curry
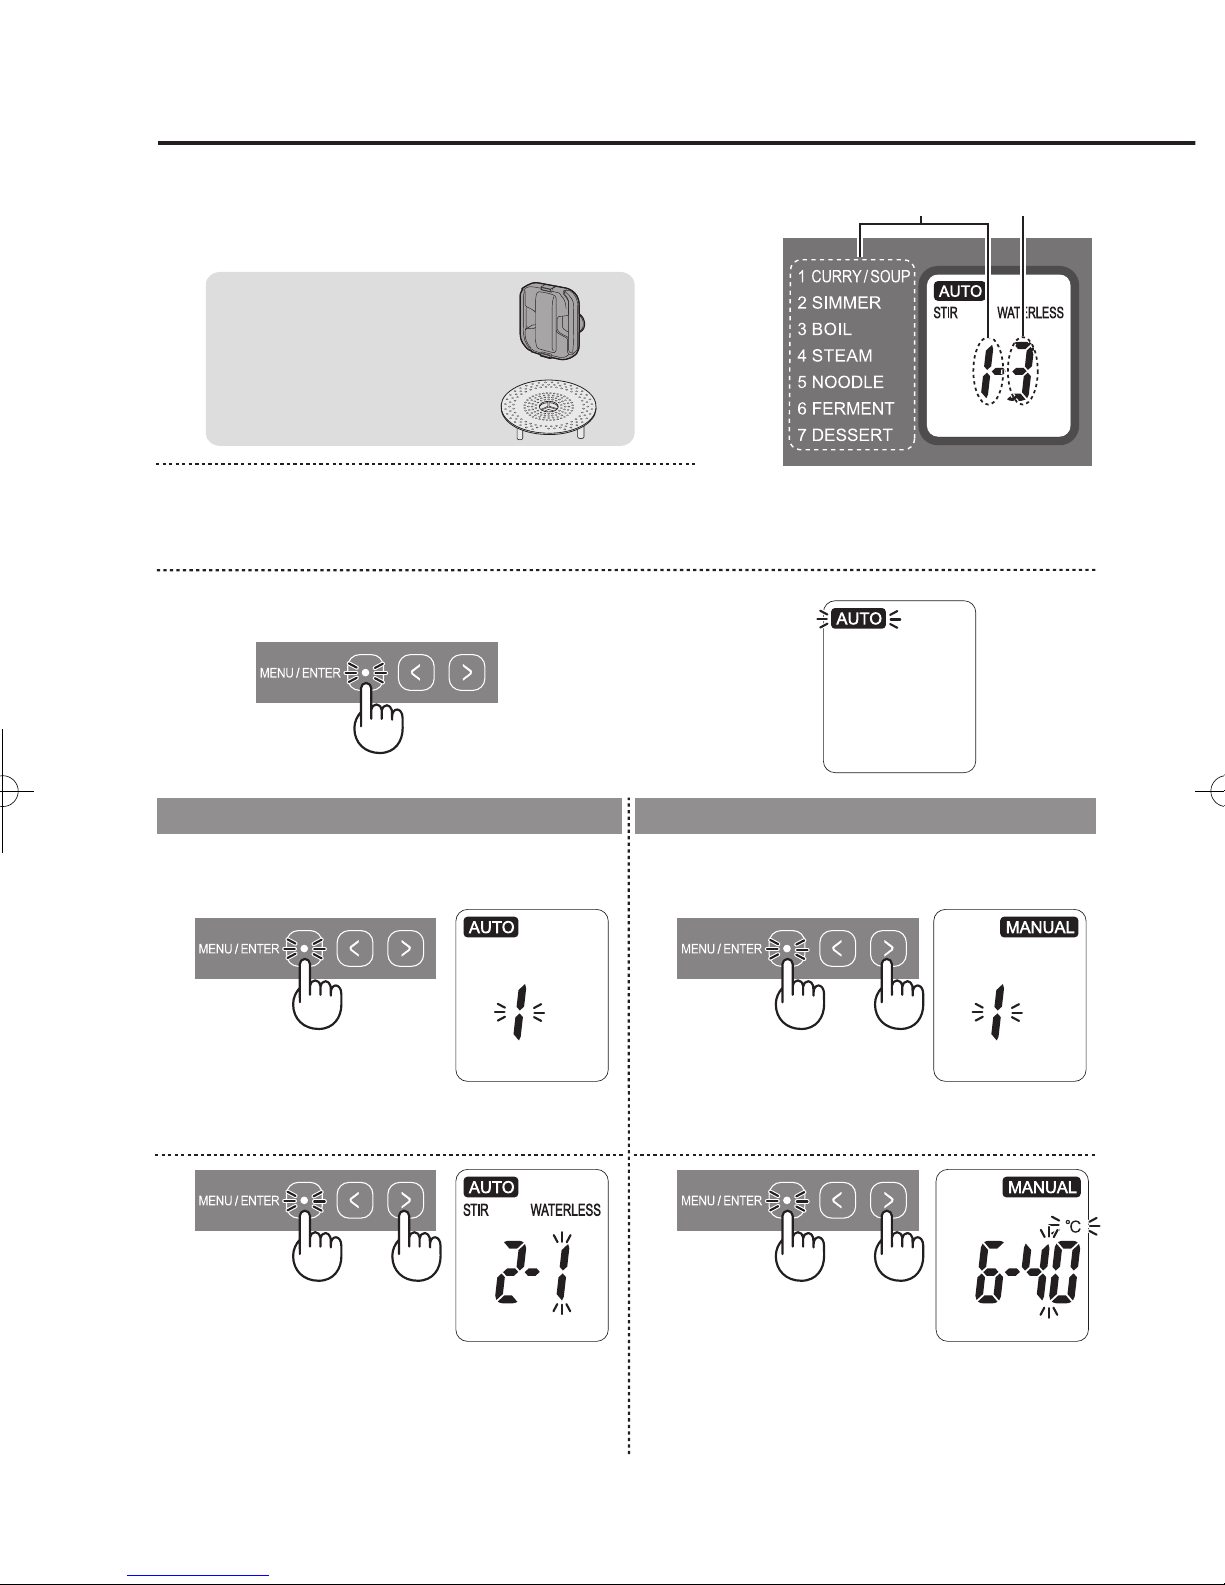
Use accessories depending on the menu.
1
・Stirringunit
・Steam plate
Insert the inlet plug in the socket onthe mainunit,
then plug the appliance into an outlet.
②
①
②
①Select [MANUAL]
①
Select the category [2].
②
Conrm the category [2].
The category [1] will ash.
2
3
AUTOMATICCOOKING
*Suppose you want to cook the menu number
[2-18] ratatouille .
MANUAL COOKING
*Suppose you want to ferment bread dough for
8 hours at 45°C
using the menu number [6].
The category [1] will ash.
The menu [1] will ash.
NOTE : You can skip ①when selecting the category [1].
The fermentation temperature [40°C]
will ash.
NOTES :1. You can skip ①when selecting the category [1].
2. Proceed to the step ❺except for the category [6].
①
Select the category [6].
②
Conrm the category [6].
Put ingredients in the inner pot. Place the inner pot
in the main unit and close the lid.
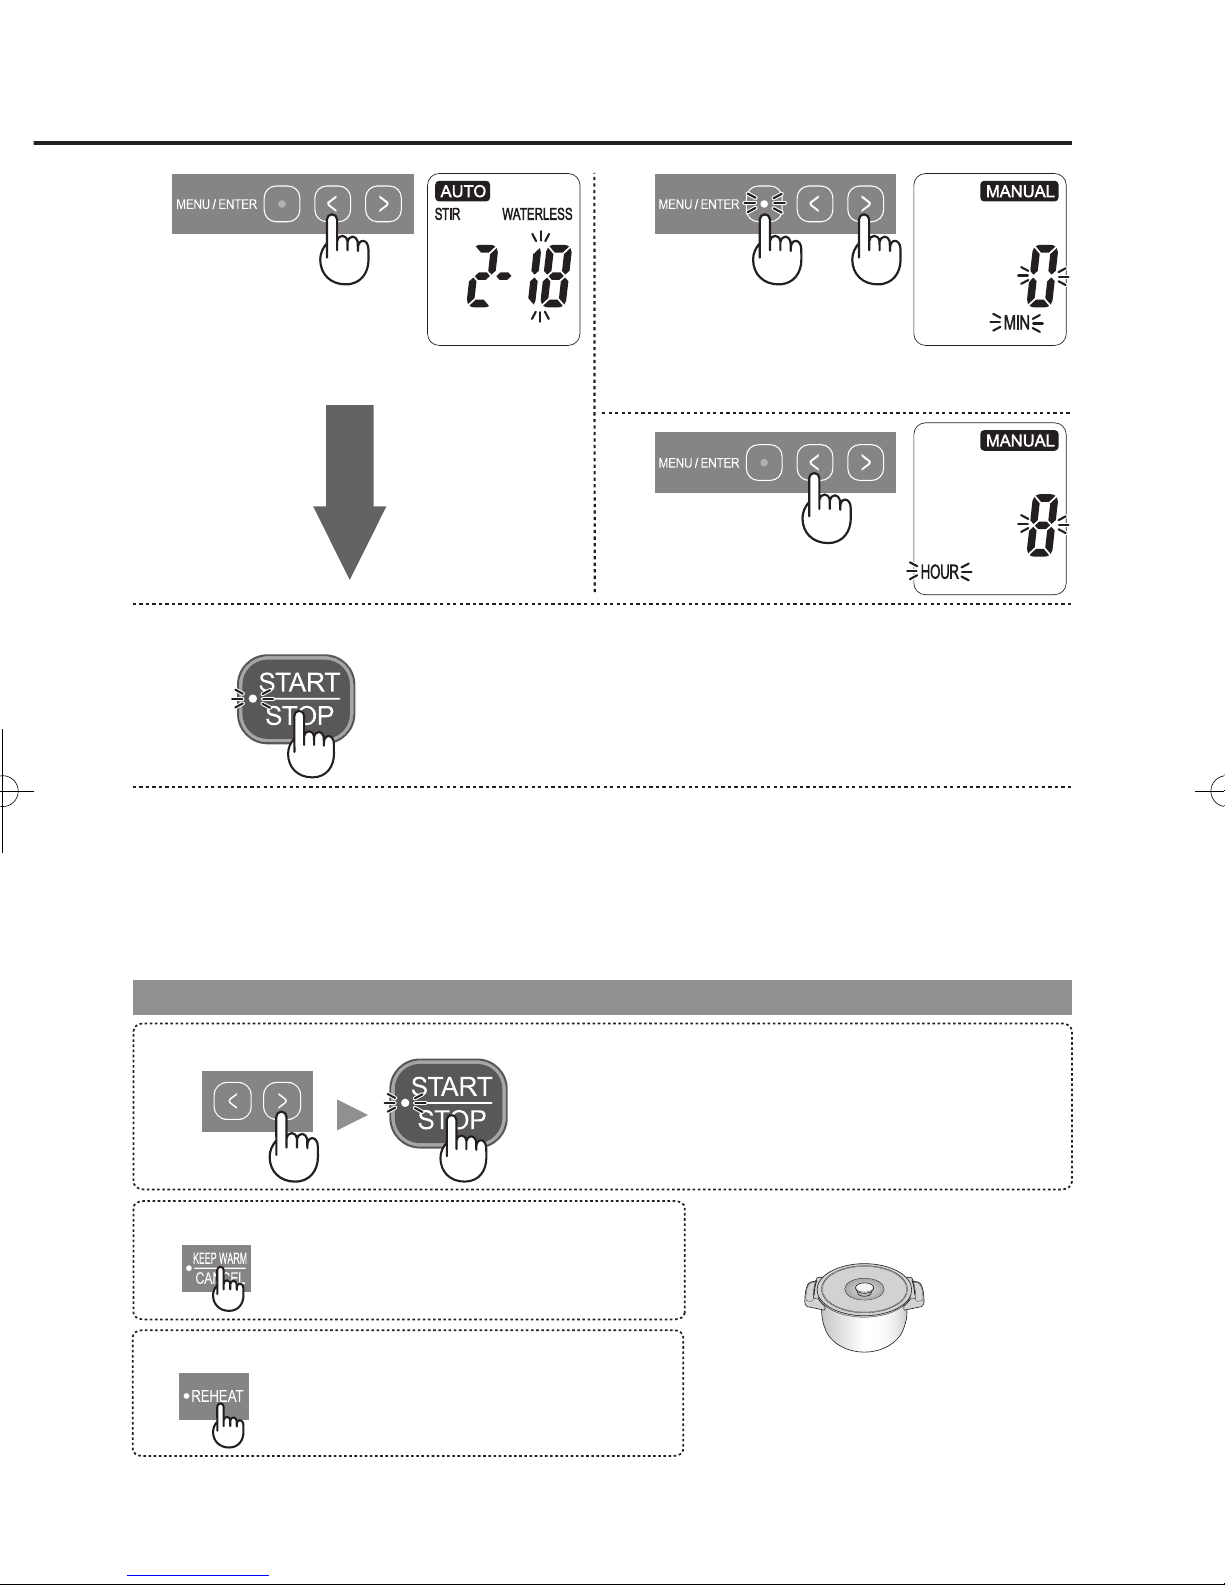
Set the cooking mode.
Start cooking.
Cooking is completed.
Cooking time can be extended.
Extend the cooking time
Keep WarmKeeping in a refrigerator
Reheat
Conrm [AUTO].
Conrm [MANUAL]
AUTOMATIC/MANUALCOOKING②
See the Menu bookattached and Tips for Manual Cooking on page en-13 before cooking.
Attachthe unit with the
stirring wings closed.
①
②
①
②
①
②
NOTE :
NOTES :
After use, turn the appliance off.
Unplug and then remove the
inlet plug fromthe main unit.
1. Do not open the lid with your face close.
Do not leave your hand on top of the lid.
Steamfrom the appliance may cause burns.
2. The inner pot, inner lid and stirring unit will be hot.
If you forget to press the START button,
reminder sounds will beep.
After cooking
4
5
①
Enter the heating time
[8 HOUR].
②Conrm the temperature [45
°C
].
Select the fermentation
temperature [45°C].
The heating time [0 MIN] will ash.
Take the inner pot from the main unit, put
the inner pot lid on and store in a refrigerator.
*Be sure to wait until the pot cools down.
Thisis to keep warm for up to 12 hours.
*The appliance will automatically switchto
Keep Warm after the Timercooking.
Select the menu [18].
The food canbe reheated up to suitable
temperatures.
Cooking results may vary depending on roomtemperature,
initial food temperature or other factors.You can adjust
cooking results by adding cooking time.
When cooking is nished, the displayed will show [EXTEND].
It isonlypossible to add time within 10 minutes after opening
the lid.
❶
❷
❸
❷
❸
❹ ❹
❺
KN-H24VMA.indb 11 2017/03/07 14:30:17
en-11
en-12
KN-H24VMA KN-H24VMA
CategoryMenu
(Menu number)
e.g. AUTO menu[1-3] keema curry
Use accessories depending on the menu.
1
・Stirringunit
・Steam plate
Insert the inlet plug in the socket onthe mainunit,
then plug the appliance into an outlet.
②
①
②
①Select [MANUAL]
①
Select the category [2].
②
Conrm the category [2].
The category [1] will ash.
2
3
AUTOMATICCOOKING
*Suppose you want to cook the menu number
[2-18] ratatouille .
MANUAL COOKING
*Suppose you want to ferment bread dough for
8 hours at 45°C
using the menu number [6].
The category [1] will ash.
The menu [1] will ash.
NOTE : You can skip ①when selecting the category [1].
The fermentation temperature [40°C]
will ash.
NOTES :1. You can skip ①when selecting the category [1].
2. Proceed to the step ❺except for the category [6].
①
Select the category [6].
②
Conrm the category [6].
Put ingredients in the inner pot. Place the inner pot
in the main unit and close the lid.
Set the cooking mode.
Start cooking.
Cooking is completed.
Cooking time can be extended.
Extend the cooking time
Keep WarmKeeping in a refrigerator
Reheat
Conrm [AUTO].
Conrm [MANUAL]
AUTOMATIC/MANUALCOOKING②
See the Menu bookattached and Tips for Manual Cooking on page en-13 before cooking.
Attachthe unit with the
stirring wings closed.
①
②
①
②
①
②
NOTE :
NOTES :
After use, turn the appliance off.
Unplug and then remove the
inlet plug fromthe main unit.
1. Do not open the lid with your face close.
Do not leave your hand on top of the lid.
Steamfrom the appliance may cause burns.
2. The inner pot, inner lid and stirring unit will be hot.
If you forget to press the START button,
reminder sounds will beep.
After cooking
4
5
①
Enter the heating time
[8 HOUR].
②Conrm the temperature [45
°C
].
Select the fermentation
temperature [45°C].
The heating time [0 MIN] will ash.
Take the inner pot from the main unit, put
the inner pot lid on and store in a refrigerator.
*Be sure to wait until the pot cools down.
Thisis to keep warm for up to 12 hours.
*The appliance will automatically switchto
Keep Warm after the Timercooking.
Select the menu [18].
The food canbe reheated up to suitable
temperatures.
Cooking results may vary depending on roomtemperature,
initial food temperature or other factors.You can adjust
cooking results by adding cooking time.
When cooking is nished, the displayed will show [EXTEND].
It isonlypossible to add time within 10 minutes after opening
the lid.
❶
❷
❸
❷
❸
❹ ❹
❺
KN-H24VMA.indb 12 2017/03/07 14:30:18
en-13
en-14
KN-H24VMA KN-H24VMA
TIPS FOR MANUAL COOKING
REHEAT
KEEP WARM
STIR:
Quickly heats up to
boiling point, and after that
slowly stirs at low heat.
(No stir):
Cooks at low
heat without stirring.
Do not heat the following items with or .
●Ingredients that are soft and easily fall apart (sh, tofu etc.)
●
Thin ingredients that become entangled easily (shaved burdock etc.)
●
Dishes with many ne ingredients (thinly cut vegetables, meat etc.)
under little liquid condition.
●Ingredients in big pieces heavier than 200g
●Always pour approx. 200mL of water in the inner pot when
using the steam plate.
●Choose STIR or no stir according to the menu item.
●When boiling multiple ingredients simultaneously, or using
ingredients not available in the automatic recipes, refer the
approximate heating time in the below table.
●Sterilize the inner lid and pot with a cleaning alcohol or by
boiling water before use.
(Attach the stirring unit to the inner lid for dishes that require it)
[If boiling] Pour approx. 200mL of water in the inner pot, heat for
20 minutes on manual cooking [4] STEAM. Take the inner pot out of
appliance, dispose of the hot water,
put the inner pot lid on and cool it.
*When you extend cooking time, make sure to add 1-3 tablespoons
of water in the inner pot if there is no water left.
Lack of water may cause the food burnt.
*Do not open the lid during heating. Steam will escape and the food
will not be cooked properly.
Do not cook the following kinds of dishes, unless it is instructed in the Menu book because they
will cause boil-over.
● Fishcake that swell when heated.
● Dishes using baking paper or kitchen wrap.
NOTE :
Type
Approximate
heating time
Amount of
water to add
●Pour 2L of water (do not put the noodles) and start heating.
Add noodles once a reminder sound beeps.
How to put, size etc.
Fruit
vegetables
Root
vegetables
Leaf
vegetables
1-2 minutes
3-5 minutes
15-20 minutes
Approx. 1 tbsp
Approx. 3 tbsp
None
Bite-size
Cut to 4-5cm pieces
Put in the inner pot with
the moisture left from washing.
You can steam some food
with pouring water in the inner pot.
Vegetables can be boiled with
water contained in the
ingredients or a small amount
of water (This can prevent loss
of nutrients and avor).
Use manual cooking when no similar dish is available in automatic cooking.
You can boil the noodles in your
favorite set time.
Keeps food in the selected
temperature (35-90°C)
Heats at a temperature
suitable for baking cake or bread.
●Use automatic cooking for custard cream, jams and other
thick dishes.
[1] CURRY/SOUP, [2] SIMMER
[4] STEAM
[3] BOIL
[5] NOODLE
[6] FERMENT
[7] DESSERT
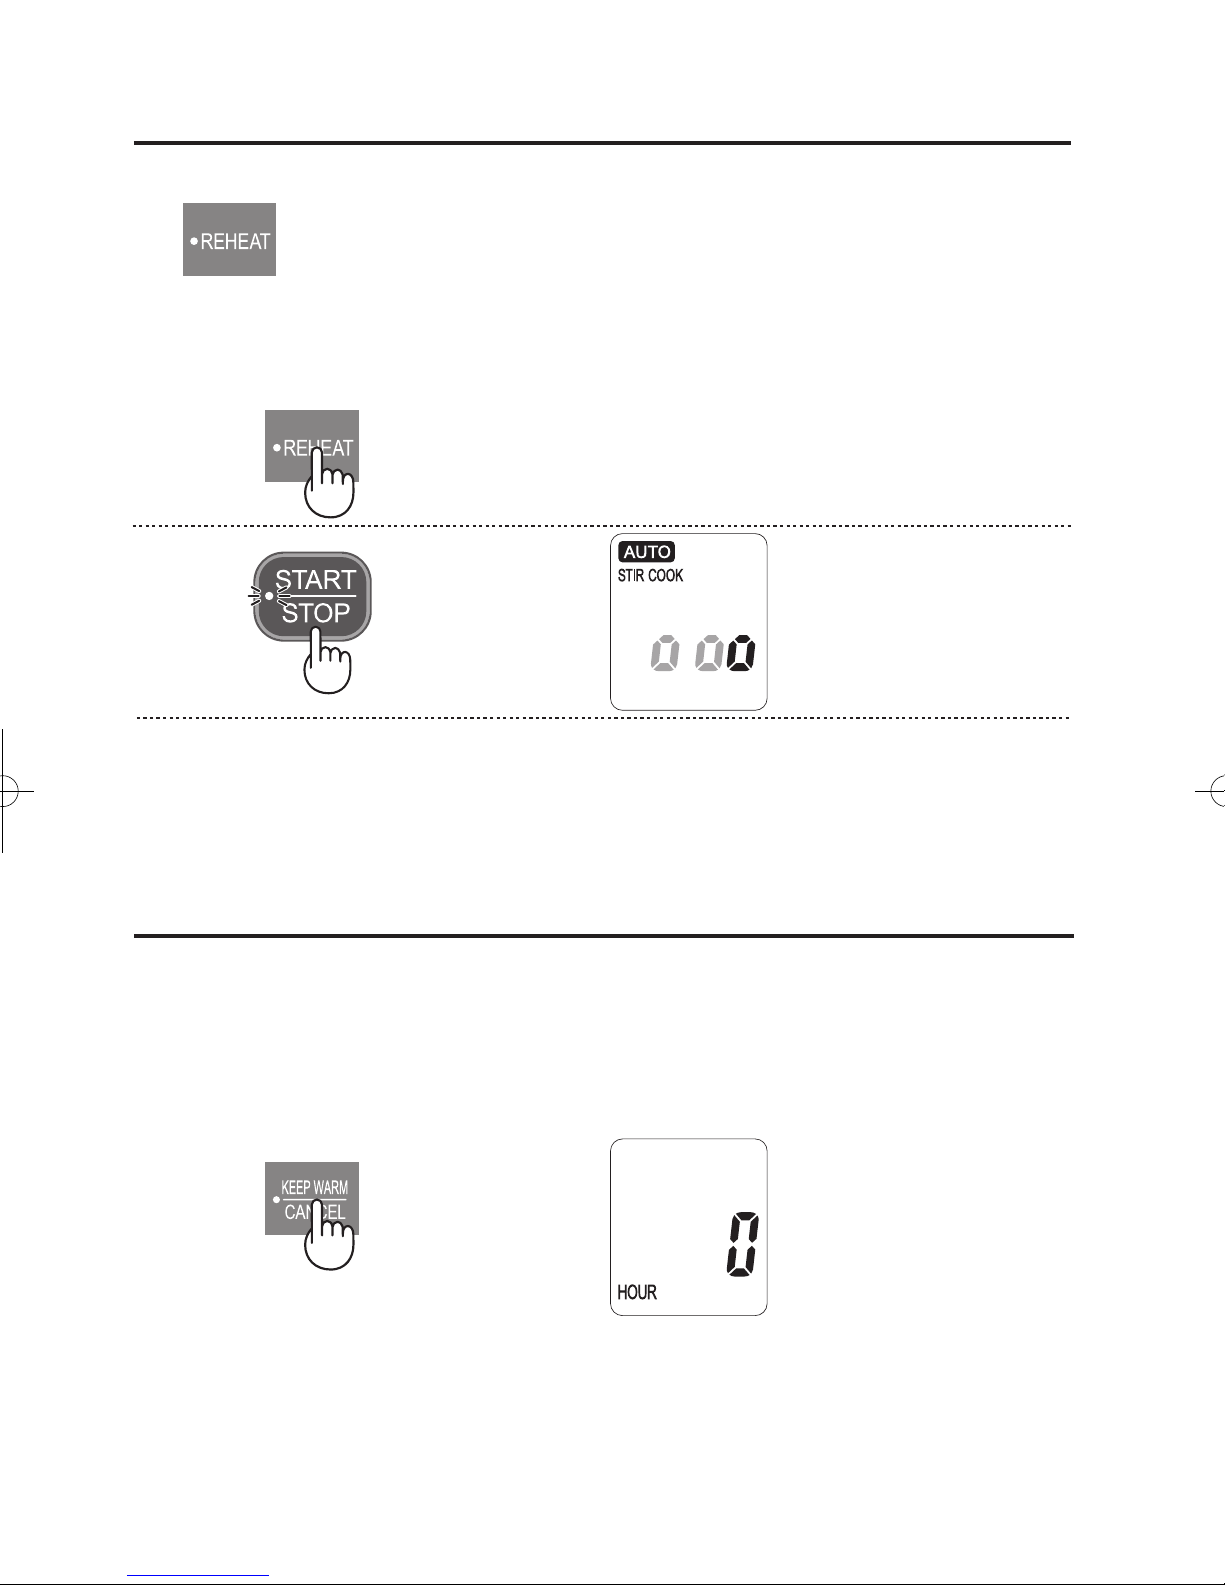
The appliance can reheat food.
Press once :Reheat with no stir.
Press twice :Reheat with STIR (Attach the stirring unit)
* Suppose you want to reheat 4 servings (approx. 800g) of stew that has been stored in
a refrigerator. (With STIR. The heating time is approx. 20 min.)
1
Press twice.
Press once.
Before operating, make sure to connect the power cord correctly.
・The foods that are soft and easily fall apart should be
reheated with no stir.
・The foods such as curry, soup and sauce are recommended
to reheat with STIR for shorter the heating time.
2
The remaining time
will appear during reheating.
1
The display will count
every hour.
After 12 hours an audible
signal will sound, and the
display will show the time
of day, [AUTO] and
[MANUAL].
The appliance can keep food warm after cooking.
Press the KEEP WARM button and the lamp will light up. Food will be kept at about
75℃. Food can be kept warm for up to 12 hours.
1. Keep Warm will stop when the lid is opened. It will start again once the lid is closed.
2. The appliance will automatically switch to Keep Warm after Timer cooking completes.
3. Depending on the menu, the avor may be affected if keep warm is set for long time.
NOTES :
* Suppose you want to keep food warm.
Before operating, make sure to connect the power cord correctly.
After use, turn the appliance off. Unplug and then remove the inlet plug from the main unit.
3
Reheating is completed.
Heating time cannot be extended.
After use, turn the appliance off. Unplug and then remove the inlet plug from
the main unit.
KN-H24VMA.indb 13 2017/03/07 14:30:18
en-13
en-14
KN-H24VMA KN-H24VMA
TIPS FOR MANUAL COOKING
REHEAT
KEEP WARM
STIR:
Quickly heats up to
boiling point, and after that
slowly stirs at low heat.
(No stir):
Cooks at low
heat without stirring.
Do not heat the following items with or .
●Ingredients that are soft and easily fall apart (sh, tofu etc.)
●
Thin ingredients that become entangled easily (shaved burdock etc.)
●
Dishes with many ne ingredients (thinly cut vegetables, meat etc.)
under little liquid condition.
●Ingredients in big pieces heavier than 200g
●Always pour approx. 200mL of water in the inner pot when
using the steam plate.
●Choose STIR or no stir according to the menu item.
●When boiling multiple ingredients simultaneously, or using
ingredients not available in the automatic recipes, refer the
approximate heating time in the below table.
●Sterilize the inner lid and pot with a cleaning alcohol or by
boiling water before use.
(Attach the stirring unit to the inner lid for dishes that require it)
[If boiling] Pour approx. 200mL of water in the inner pot, heat for
20 minutes on manual cooking [4] STEAM. Take the inner pot out of
appliance, dispose of the hot water,
put the inner pot lid on and cool it.
*When you extend cooking time, make sure to add 1-3 tablespoons
of water in the inner pot if there is no water left.
Lack of water may cause the food burnt.
*Do not open the lid during heating. Steam will escape and the food
will not be cooked properly.
Do not cook the following kinds of dishes, unless it is instructed in the Menu book because they
will cause boil-over.
● Fishcake that swell when heated.
● Dishes using baking paper or kitchen wrap.
NOTE :
Type
Approximate
heating time
Amount of
water to add
●Pour 2L of water (do not put the noodles) and start heating.
Add noodles once a reminder sound beeps.
How to put, size etc.
Fruit
vegetables
Root
vegetables
Leaf
vegetables
1-2 minutes
3-5 minutes
15-20 minutes
Approx. 1 tbsp
Approx. 3 tbsp
None
Bite-size
Cut to 4-5cm pieces
Put in the inner pot with
the moisture left from washing.
You can steam some food
with pouring water in the inner pot.
Vegetables can be boiled with
water contained in the
ingredients or a small amount
of water (This can prevent loss
of nutrients and avor).
Use manual cooking when no similar dish is available in automatic cooking.
You can boil the noodles in your
favorite set time.
Keeps food in the selected
temperature (35-90°C)
Heats at a temperature
suitable for baking cake or bread.
●Use automatic cooking for custard cream, jams and other
thick dishes.
[1] CURRY/SOUP, [2] SIMMER
[4] STEAM
[3] BOIL
[5] NOODLE
[6] FERMENT
[7] DESSERT
The appliance can reheat food.
Press once :Reheat with no stir.
Press twice :Reheat with STIR (Attach the stirring unit)
* Suppose you want to reheat 4 servings (approx. 800g) of stew that has been stored in
a refrigerator. (With STIR. The heating time is approx. 20 min.)
1
Press twice.
Press once.
Before operating, make sure to connect the power cord correctly.
・The foods that are soft and easily fall apart should be
reheated with no stir.
・The foods such as curry, soup and sauce are recommended
to reheat with STIR for the shorter heating time.
2
The remaining time
will appear during reheating.
1
The display will count
every hour.
After 12 hours an audible
signal will sound, and the
display will show the time
of day, [AUTO] and
[MANUAL].
The appliance can keep food warm after cooking.
Press the KEEP WARM button and the lamp will light up. Food will be kept at about
75℃. Food can be kept warm for up to 12 hours.
1. Keep Warm will stop when the lid is opened. It will start again once the lid is closed.
2. The appliance will automatically switch to Keep Warm after Timer cooking completes.
3. Depending on the menu, the avor may be affected if keep warm is set for long time.
NOTES :
* Suppose you want to keep food warm.
Before operating, make sure to connect the power cord correctly.
After use, turn the appliance off. Unplug and then remove the inlet plug from the main unit.
3
Reheating is completed.
Heating time cannot be extended.
After use, turn the appliance off. Unplug and then remove the inlet plug from
the main unit.
KN-H24VMA.indb 14 2017/03/08 14:15:15

en-15
en-16
KN-H24VMA KN-H24VMA
TIMER
CARE AND CLEANING
1
2
①Select the category [2].
②Conrm the category [2].
Select the menu [18].
Before operating, make sure to connect the power cord correctly.
Begin to set the cooking mode. Conrm [AUTO].
Set the menu number. (See page en-11)
①
②
The appliance can complete cooking at a preset time (in maximum 12hours)
The Timer cooking can be used for the AUTO menus which the TIMER button lamp ashes
during setting the menu number. There are two memory banks for the Timer cooking.
2
Select the memory bank and enter the cooking completion time.
.
Enter the time.
The time can be set in 10 minutes intervals.
(The time setting will be saved in the memory bank)
Select the memory bank 2.
The preset time [18:00] will ash.
3
Start Timer cooking.
・
The TIMER button lamp will be lit.
・
Heating starts as soon as you press the START
button, and the food will be ready to eat at the set time.
・
The appliance will automatically switch to Keep Warm
(for 12 hours) after the cooking is complete.
After use, turn the appliance off. Unplug and then remove the inlet plug from the main unit.
1. If you attempt to start the appliance with a Timer setting exceeding the maximum of
12 hours, you will hear a reminder sound and the display will return to time that you
can set Timer.
2. If you start the appliance with a Timer setting that is shorter than the required cooking
time, cooking will start immediately and you will see the approximate time left until
cooking is complete.
(In this case, the appliance will not switch to Keep Warm after cooking is complete)
NOTES :
Do not use the pot if the handle is loose. There is a risk of the pot falling
and causing burns. Tighten the screws on the under side of the handle before use.
Screws
If the handle becomes loose
Do not wash the outside or the inside water
level mark with cream cleanser with or even
without a soft sponge.
*Use citric acid that is generally available in pharmacies etc. (without additives or over 99.5%).
Lemon juice can be used instead of citric acid.
Inner pot/Drip tray
Mix 1 teaspoon of citric acid and a little salt with 1 tablespoon of water, apply on
a soft sponge and rub. Rust can be difcult or impossible to remove completely.
*
These are caused by elements contained in water and are not harmful to humans.
You can use the pot as it is.
If it bothers you, mix 1 teaspoon of citric acid with 1 tablespoon of water, apply
on a soft sponge and rub.
*
Outside
Water level mark
Press once :TIMER 1 (preset time: 6:00)
Press twice:TIMER 2 (preset time: 18:00)
* Suppose you want to set AUTO menu [2-18] ratatouille in the memory bank 2 as the
cooking completion time is 18:30.
Before cleaning, turn the appliance off. Unplug and then remove the inlet plug from the main unit.
Make sure the cavity including the temperature sensor and thermo plate, each parts and
accessories are completely cool.
Do not use commercial cleaners, abrasive, harsh cleaners, solutions that contain sodium
hydroxide, or scouring pads on any part of the appliance. Dishwashers cannot be used to clean
the appliance.
NOTE :
NOTE :
Cleaning tips
●Clean after every use.
●
Remove the drip tray after taking the inner pot out.
●
Wash with mild soap or detergent solution using a soft sponge. Rinse and dry thoroughly.
Water may leave trace minerals, which make it easier for iridescent or white
discoloration to form. Water may also cause rusting.
Heavy dirt
Iridescent or white
discoloration
When the pot has
become rusty
Rinse carefully after washing
Soak with hot water and rub with a sponge.
Baking soda can be used for stubborn stain.
Put 10g of baking soda per 200mL of water in the inner pot, and set the appliance
with MANUAL [1-2] for 10 minutes.
After heating, leave the inner pot for a few hours. Then rub with a soft sponge.
(Be careful not to get burned with the hot water after heating)
Key Point - Clean immediately if it is dirty!
❶
❸
❷
❹
KN-H24VMA.indb 15 2017/03/07 14:30:18

en-15
en-16
KN-H24VMA KN-H24VMA
TIMER
CARE AND CLEANING
1
2
①Select the category [2].
②Conrm the category [2].
Select the menu [18].
Before operating, make sure to connect the power cord correctly.
Begin to set the cooking mode. Conrm [AUTO].
Set the menu number. (See page en-11)
①
②
The appliance can complete cooking at a preset time (in maximum 12hours)
The Timer cooking can be used for the AUTO menus which the TIMER button lamp ashes
during setting the menu number. There are two memory banks for the Timer cooking.
2
Select the memory bank and enter the cooking completion time.
.
Enter the time.
The time can be set in 10 minutes intervals.
(The time setting will be saved in the memory bank)
Select the memory bank 2.
The preset time [18:00] will ash.
3
Start Timer cooking.
・
The TIMER button lamp will be lit.
・
Heating starts as soon as you press the START
button, and the food will be ready to eat at the set time.
・
The appliance will automatically switch to Keep Warm
(for 12 hours) after the cooking is complete.
After use, turn the appliance off. Unplug and then remove the inlet plug from the main unit.
1. If you attempt to start the appliance with a Timer setting exceeding the maximum of
12 hours, you will hear a reminder sound and the display will return to time that you
can set Timer.
2. If you start the appliance with a Timer setting that is shorter than the required cooking
time, cooking will start immediately and you will see the approximate time left until
cooking is complete.
(In this case, the appliance will not switch to Keep Warm after cooking is complete)
NOTES :
Do not use the pot if the handle is loose. There is a risk of the pot falling
and causing burns. Tighten the screws on the under side of the handle before use.
Screws
If the handle becomes loose
Do not wash the outside or the inside water
level mark with cream cleanser with or even
without a soft sponge.
*Use citric acid that is generally available in pharmacies etc. (without additives or over 99.5%).
Lemon juice can be used instead of citric acid.
Inner pot/Drip tray
Mix 1 teaspoon of citric acid and a little salt with 1 tablespoon of water, apply on
a soft sponge and rub. Rust can be difcult or impossible to remove completely.
*
These are caused by elements contained in water and are not harmful to humans.
You can use the pot as it is.
If it bothers you, mix 1 teaspoon of citric acid with 1 tablespoon of water, apply
on a soft sponge and rub.
*
Outside
Water level mark
Press once :TIMER 1 (preset time: 6:00)
Press twice:TIMER 2 (preset time: 18:00)
* Suppose you want to set AUTO menu [2-18] ratatouille in the memory bank 2 as the
cooking completion time is 18:30.
Before cleaning, turn the appliance off. Unplug and then remove the inlet plug from the main unit.
Make sure the cavity including the temperature sensor and thermo plate, each parts and
accessories are completely cool.
Do not use commercial cleaners, abrasive, harsh cleaners, solutions that contain sodium
hydroxide, or scouring pads on any part of the appliance. Dishwashers cannot be used to clean
the appliance.
NOTE :
NOTE :
Cleaning tips
●Clean after every use.
●
Remove the drip tray after taking the inner pot out.
●
Wash with mild soap or detergent solution using a soft sponge. Rinse and dry thoroughly.
Water may leave trace minerals, which make it easier for iridescent or white
discoloration to form. Water may also cause rusting.
Heavy dirt
Iridescent or white
discoloration
When the pot has
become rusty
Rinse carefully after washing
Soak with hot water and rub with a sponge.
Baking soda can be used for stubborn stain.
Put 10g of baking soda per 200mL of water in the inner pot, and set the appliance
with MANUAL [1-2] for 10 minutes.
After heating, leave the inner pot for a few hours. Then rub with a soft sponge.
(Be careful not to get burned with the hot water after heating)
Key Point - Clean immediately if it is dirty!
❶
❸
❷
❹
KN-H24VMA.indb 16 2017/03/07 14:30:18

en-17
en-18
KN-H24VMA KN-H24VMA
Place your fingers in the hollow section
and remove.
Steam vent cover
Clean both sides.
Cleaning tips
Removing the unit
CARE AND CLEANING continued
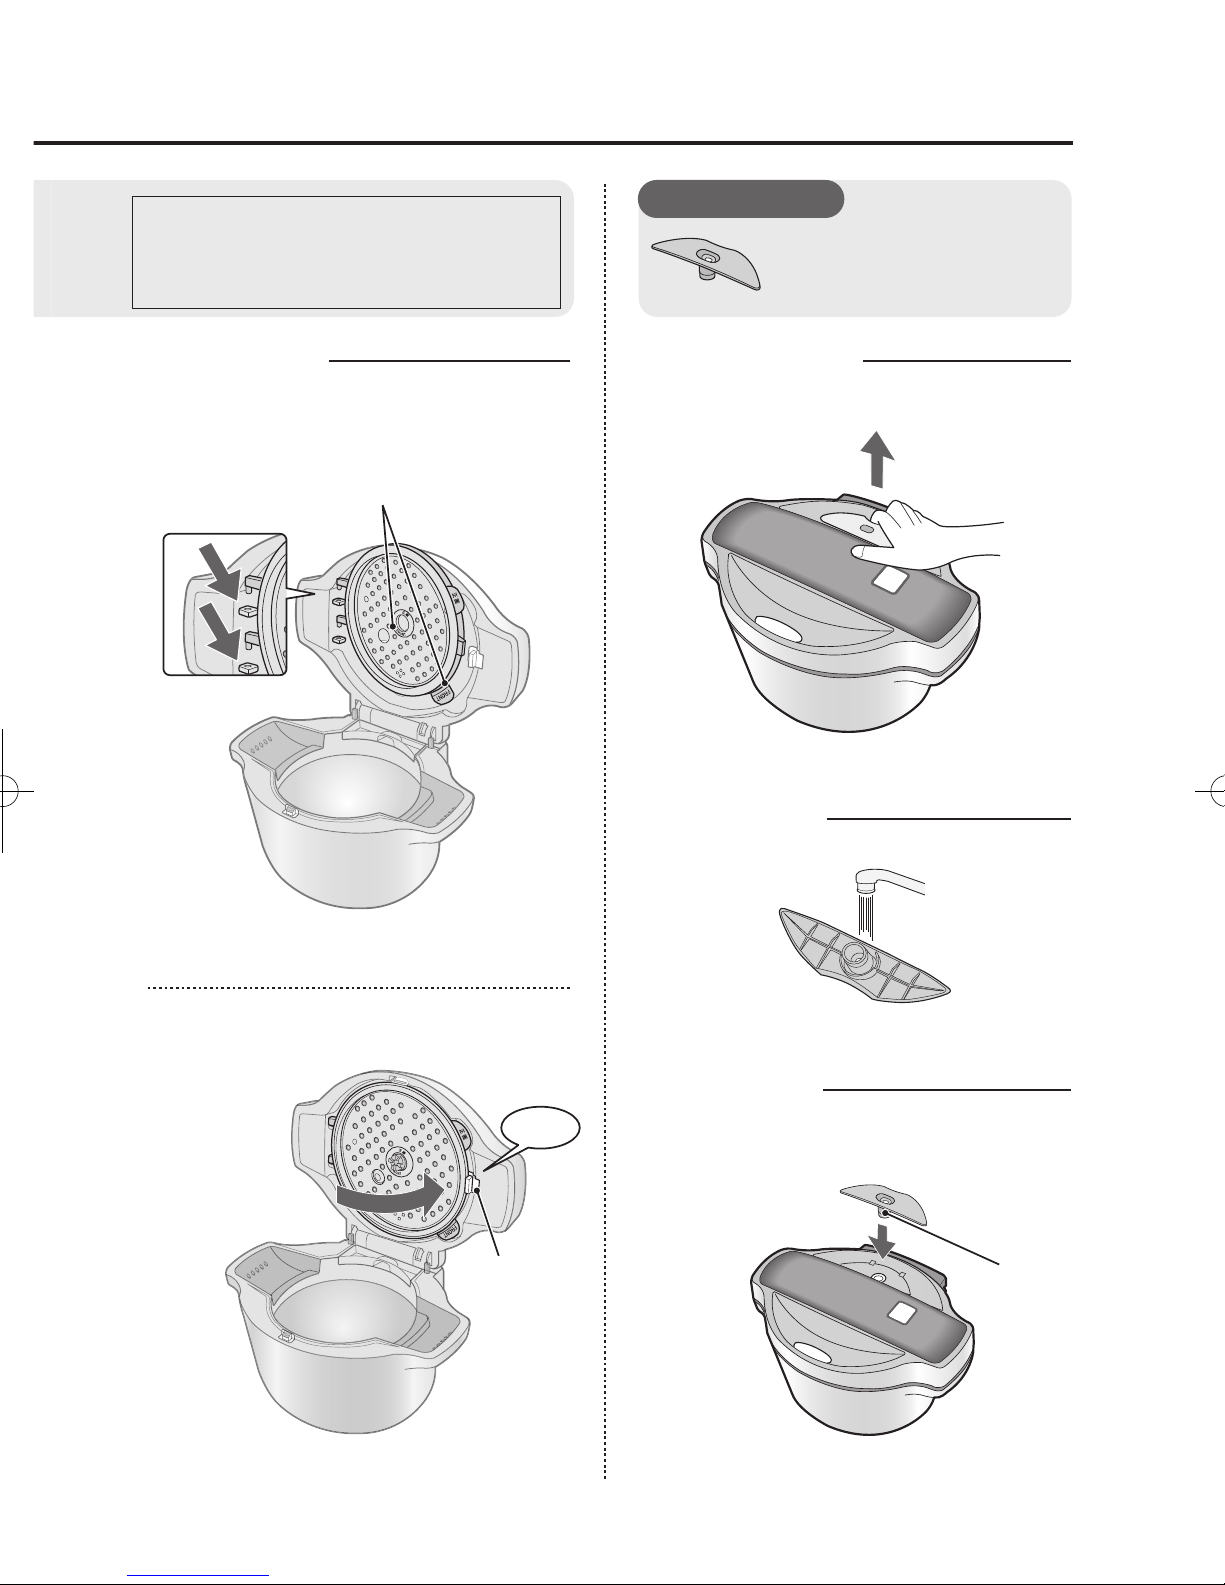
Inner lid
Remove the stirring unit (see page en-19)
Then push the lever outwards, then the inner
lid will open.
Place the two extensions in their respective
slots, with the text "FRONT" facing out.
Pull diagonally to free the inner lid.
Close the lever to attach the lid.
Gasket
❶
❶
❷
❷
"FRONT" is written here
How to attach
Removing the unit
Lever
Lever
Remove any water
from inside the gasket
Click
Lightly open
the gasket to
wash it.
Cleaning tips
Carefully dry the lid before attaching it after
cleaning. Be careful especially with the gasket
in the middle. Small amount of water may cause
rust.
Refer to Cleaning tips of the inner pot if you
encounter difficult to remove dirt.
See page en-16.
If you accidentally removed the
gasket (the rubber-like part)
●Make sure that the "FRONT" on the
inner lid and the "FRONT" on the gasket
are facing the same way.
(Attach the gasket by folding it, placing it
inside the hole and then letting it open)
A wrong installation may cause the
control panel to fog up. Also it may cause
the Stirrer unit becomes hard to rotate
and the parts break. (The fog on the
control panel will be gone away after a
while.)
●Clean after every use.
●Wash with mild soap or detergent solution using a soft sponge.
Rinse and dry thoroughly.
●Do not remove the gaskets (the rubber-like part)
Back
●
Clean after every use.
●
Wash with mild soap or detergent
solution using a soft sponge.
Rinse and dry thoroughly.
Insert the projection of the steam vent cover
into the hole of the lid.
How to attach
Projection
KN-H24VMA.indb 17 2017/03/08 14:15:16
en-17
en-18
KN-H24VMA KN-H24VMA
Place your fingers in the hollow section
and remove.
Steam vent cover
Clean both sides.
Cleaning tips
Removing the unit
CARE AND CLEANING continued
Inner lid
Remove the stirring unit (see page en-19)
Then push the lever outwards, then the inner
lid will open.
Place the two extensions in their respective
slots, with the text "FRONT" facing out.
Pull diagonally to free the inner lid.
Close the lever to attach the lid.
Gasket
❶
❶
❷
❷
"FRONT" is written here
How to attach
Removing the unit
Lever
Lever
Remove any water
from inside the gasket
Click
Lightly open
the gasket to
wash it.
Cleaning tips
Carefully dry the lid before attaching it after
cleaning. Be careful especially with the gasket
in the middle. Small amount of water may cause
rust.
Refer to Cleaning tips of the inner pot if you
encounter difficult to remove dirt.
See page en-16.
If you accidentally removed the
gasket (the rubber-like part)
●Make sure that the "FRONT" on the
inner lid and the "FRONT" on the gasket
are facing the same way.
(Attach the gasket by folding it, placing it
inside the hole and then letting it open)
A wrong installation may cause the
control panel to fog up. Also it may cause
the Stirrer unit becomes hard to rotate
and the parts break. (The fog on the
control panel will be gone away after a
while.)
●Clean after every use.
●Wash with mild soap or detergent solution using a soft sponge.
Rinse and dry thoroughly.
●Do not remove the gaskets (the rubber-like part)
Back
●
Clean after every use.
●
Wash with mild soap or detergent
solution using a soft sponge.
Rinse and dry thoroughly.
Insert the projection of the steam vent cover
into the hole of the lid.
How to attach
Projection
KN-H24VMA.indb 18 2017/03/08 14:15:17

en-19
en-20
KN-H24VMA KN-H24VMA
CARE AND CLEANING continued
Stirring unit
●Clean after every use.
●Wash with mild soap or detergent solution
using a soft sponge. Rinse and dry thoroughly.
Push the stopper (square side) until it clicks,
and the stopper (round side) on the opposite
side will come out.
Insert the
attachment shaft
in the stirring unit
attachment hole.
Push the stopper (square side) and the unit will
come free.
Gently open the stirring wings and remove dirt.
Open the clips on each side and remove
the cover. Remove dirt.
Push the stopper (round side) until it clicks.
The opposite side stopper (square) side will
come out, and the unit will be firmly attached.
Dry the unit carefully after cleaning,
and assemble it in reverse order as
it is removed.
❶
❷
❷
❸
❶
Removing the unit
Cleaning tips
How to attach
Stopper (square side) Align the
match marks.
Attachment
shaft
Stopper
(round side)
Stirring unit
attachment hole
Cover
Clips
Push to lock the unit in place.
Click
After locking the unit
in place, try to pull it
away from the lid to
make sure it does not
move.
Main unit/Control panel/Temperature sensor/Thermo plate/Power cord
Clean when dirty. Wipe with a soft cloth dampened with water only.
*Remove ingrained dirt from the thermo plate lightly with sandpaper (about 600-Grit) and wipe with a soft cloth
dampened with water only.
Stirring wings
TROUBLE SHOOTING
AnswerProblem
Sounds
Display
The appliance
makes sounds
during operation.
The display gets
foggy.
●
The display can become foggy depending on the environment
(room temperature etc.). The fog will go away on its own.
●
Is the gasket in the center of the inner lid installed correctly?
Can you see the engraved "FRONT" on it?
The display doesn't
show how long Keep
Warm has been on.
●
When Keep Warm ends, then the display will show the current time after
12 hours.
The time displayed
during cooking
increases,
decreases suddenly,
or stops for some
time.
●
While [APPROX.] is displayed, the shown time is the estimated cooking time.
A micro computer controls the cooking, so once the remaining time has
been calculated [APPROX.] will disappear.
The settings are
disappeared.
●
You may hear the following sounds during the cooking. It is common.
-The sound that the appliance controls the heating.
-The sound that the stirring unit works.
●
Is the stirring unit attached correctly?
●
Did you press the START button at the end?
If you forget to press the START button a reminder sound will beep for
3 minutes, after which the settings will be reset.
Time may increase
in some circumstances.
(Estimated cooking time) (Exact time left)
The time display
vanishes when I
unplug the power
cord.
Regarding the lithium battery (inside the appliance)
If the time display shows [ ] (blinking) after plugging in the power cord,
the internal battery is empty. Contact the Customer Service for changing the battery.
You cannot change the battery yourself.
(If plugged in, the appliance can be used as usual even if the battery is empty.
However, you will have to set the current time every time you use the Timer)
Purpose of the battery:
●
Current time will be displayed even if the power cord is not plugged in.
●and settings will be stored.
If the internal battery is empty:
●
The time display and stored Timer data will be lost.
*The battery will not run out while the appliance is plugged in, as the
current time display will operate on electricity from the power plug.
The following problems are common and are not signs that the appliance is malfunctioning.
For heavy dirt, soak the stirring unit in water with
mild detergent solution. That will make it easier to
remove the dirt
(Soak the stirring unit without removing the cover)
Remove the stirring unit when cooking a dish which does not require it - this makes cleaning it easy.
KN-H24VMA.indb 19 2017/03/07 14:30:20
Table of contents
Languages:
Popular Kitchen Appliance manuals by other brands


La Sommeliere
La Sommeliere CVD120 user manual

Omcan
Omcan TC-520 Operation manual

Xavax
Xavax Milchicopter operating instructions

HAEGER
HAEGER Super Set HB-80C-024A User instructions

Bertazzoni
Bertazzoni TUS95L 22 D X La Germania Installation, maintenance and use instructions

Gaggenau
Gaggenau VC 230-613 Operating and assembly instructions


