Healthmark IVO18680 User manual

PRO MAX INVERSION TABLE
NO. IVO18680
HEALTH MARK, INC.
322 NORTHPOINT PARKWAY
SUITE J
ACWORTH, GA 30102
1-888-829-1688

WARRANTY
Health Mark, Inc. and the manufacturer warrants to the original purchaser that this
product is free from defects in material and workmanship when used for it’s intended
purpose, and under the condition that it has been assembled and operated in accordance
with The Health Mark’s Owner’s Manual. Health Mark’s obligation under this warranty
is limited to repairing or replacing, free of charge, any parts which may prove to be
defective under normal home use. This warranty does not include any damage caused by
improper operation or misuse.
From date of purchase, the frame is warranted to be free
from defect for 1 year.
PROOF OF PURCHASE IS REQUIRED. For customer service please
call 1-888-829-1688
ORDERING REPLACEMENT PARTS
After 1 year replacement parts can be purchased by contacting our customer service
department:
Phone: 1-888-829-1688
Fax: 1-201-246-1112
E-mail: [email protected]
Please have the following information ready:
Model #
Part #
Description of Part
Date/Place of Purchase
Name/Address/Daytime Phone #
IMPORTANT
DO NOT RETURN THIS PRODUCT TO THE STORE!*
READ ALL INSTRUCTIONS CAREFULLY BEFORE
OPERATING THIS PRODUCT.
RETAIN THIS MANUAL FOR FUTURE REFERENCE
1

GENERAL PRECAUTIONS
It is recommended that you read this entire manual prior to using this product.
Ensure that this product is in the fully opened position prior to mounting
SAFETY PRECAUTIONS
1. !Always use this piece of equipment on a clear, level, and carpeted surface.
2. !Keep children away from this piece of equipment during at all times.
3. !Keep hands, fingers, loose clothing, hair, and feet away from moving parts while
opening or folding this massage chair.
4. !Do not insert any object into any opening on this piece of equipment.
5. !Read and adhere to all instructions before assembly and during operation.
6. !Do not stand on this product
7. !Inspect this product prior to each use
WARNING: Before beginning this or any other exercise program,
consult your physician who can assist you in planning a program
appropriate for your age and physical condition. This is especially
important for persons with any existing health conditions, or those on
medications.
Perform light stretching prior to use, and gradually increase your
operation time.
2

STEEL ROD
STEEL ROD
HANDLE BA
R
BEARING
INTERNAL SPRING POST
ADJUSTMENT LEVER
HEADREST SUPPORT
SPRING PIN
PIVOT BEARING COVER
3

4

ASSEMBLY OVERVIEWS
5

FRAME ASSEMBLY
Base Connect Tube
#1
Right/Left
Main Frame
#2 / #3 Base Connect
Frame #5
1. Insert Base Connect Tube (1) into
each end of the Right and Left Main
Frame (2,3).
2. Secure each Base Connect Tube using
bolts (60) and washers (67).
3. Connect and secure each end of the Base Connect Frame (5) to the Right and Left Main Frames
(2,3) using bolts (60) and washers (67) to secure the threaded straight post, and bolts (55) and nuts
(70) to secure the angled posts.
6

HANDLE BAR ATTACHMENT
Handle Bar x 2
#4
Upper Arm
Lower Arm
1. Place each Handle Bar (4) into place and secure using bolts (61) to attach the upper arm,
and Bolts (56) and nuts (70) to attach the lower arm.
7

LEG BOOM A
Foam Pad x 6
#23
Adjustable Boom
#7
SSEMBLY
Leg Positioning
Bracket
(comes assembled)
#8,#9,#10
Ankle Bracket
Adjustment Lever
#13
Slot Bracket #12
Foot Plate #11 1. Attach and sec Foot P
Adjustable Boom (7) using bolt
and nuts (73).
2. Slide the Slot Bracket (12) th
the Ankle Bracket Adjustment
(13)
2) in
and n
4. Insert end of Ankle Bracket
Adjustment Lever (13) into Slo
Foot Plate (11) and secure using
(52), washer (67), and nut (73).
ure the late (11) to the
s (52), washers (67),
Slot A
rough
Lever 3. Slide the Slot Bracket (1
and secure using bolt (53) to the Adjustable Boom (7)
ut (69).
t A on the
bolt
Plastic
Cover (41)
8

LEG BOOM A
Foam Pad x 6
#23
Adjustable Boom
#7
SSEMBLY 2
Leg Positioning
Bracket
(comes assembled)
#8,#9,#10
Ankle Bracket
Adjustment Lever
#13
Slot Bracket #12
Foot Plate #11 Slot A
5. Pull out on the pop pin on th
slide the assembly down the top
6. Fit the 6 Foam Pads (23) ont
lotion will help them slide easie using bolts (62).
e Leg Positioning Bracket and
of the Adjustable Boom (7)
o the appropriate beams, (the use of a liquid soap or
r). Secure the pads with the Plastic Pad Covers (41)
Plastic Cover
(41)
9

BED INSTALATION
Back Rest
#25
Pivot Bearing
Bearing Cover
#33 Bearing Cradle
1. Attach the Back Rest (25) by inserting the Pivot Bearing into the Bearing Cradles on the
inside of each Main Frame. Push the Pivot Bearings all the way in, and then push down to
lock into place.
Slide the Bearing Covers (33) over the Bearing Cradles. These covers
serve the dual purpose of securing the bearing in place and acting as a
pinch shield for rotating parts. Because of this, the Covers are pressure
fitted and must be gently tapped into place using a soft mallet. If you use
a standard hammer, protect the surface of the cover with some form of
padding (rolled cloth) to prevent damage.
10

LEG BOOM INSTALATION
1. Pull out on the pop pin on the bed frame and insert the Leg Boom Assembly.
HEAD REST INSTALATION
Head Rest
Support
#14/#27
Foam
Head Rest
#26
Attach the Head Rest Support to the Back Rest. Attach the Foam Head
Rest to the Support. 11

ANGLE ADJUSTMENT BEAM
Angle Adjustment Beam
#17
Plastic Cover
#41
Allen Bolt
#62
1. Attach the Plastic Covers (41) to the ends of the Angle Adjustment Beam (17).
ALWAYS ENSURE THAT THE ANGLE ADJUSTMENT BEAM IS IN PLACE
PRIOR TO INVERTING
12

INVERSION TECHNI
Q
UES
PRO MAX INVERSION TABLE OVERVIEW
Inversion therapy has long been used for the decompression of the spine and cervical spine in order
to relieve such conditions as pinched nerves along the spinal column, muscle spasms, cervical
headaches, back pain, stretching and strengthening of tendons and ligaments, and fluid circulation
conditions. Now, with the new design features of the Pro Max Inversion Table, inversion therapy can
be performed easily from either a face-down or face-up position. The added benefit of the face-down
position is that a therapist can now provide massage or manipulation while the client is inverted,
therefore using the gravity assisted traction to make the therapy more effective. By using the
Inversion Angle Adjustment Bar you can preset the unit to 1 of 5 angles, or remove the Bar in order
to achieve full inversion. By using the Leg Positioning Adjustment not only can you achieve ideal
comfort, but can also shorten your body length to lock-in a stationary position in order for you to
perform light stretching or hyper-extensions. These adjustments will be explained in greater detail
on the following page.
1. Face-down position with a preset
angle – Standard inversion therapy or
therapist assisted
2. Face-down position with a preset
angle – performance of light
stretching or hyper-extensions
3. Face-down position with
Bar removed – Full inversion
for maximum decompression,
hyper-extensions or light
stretching
4. Face-up position with a
preset angle – Standard
inversion therapy with knees
bent for comfort
5. Face-up position with a
preset angle –Knees bent to
lock in position while
performing light stretching
6. Face-up position with Bar
removed – Full inversion for
maximum decompression or
gentle twisting 13

LEG POSITIONING BRACKET
Prior to mounting your unit you will
need make your adjustment to the height
of the Angle Positioning Bracket. This
must be done while you are off of the
machine because your weight will
prevent any adjustments once you are
mounted. After mounting your unit, the
first adjustment that you will make will
be to the angle of Leg Positioning
Bracket. This bracket serves a dual
purpose:
1. Comfort
2. Maintains inversion angle during
movement
Adjusts the angle of the bracket
Adjusts the height of the bracket
Take note of the angle position of the Leg
Positioning Bracket in figures A and B.
With the increased angle in figure A,
causing the knees to be bent, your vertical
body length is effectively shortened in
relation to the height setting of the Leg
Boom. This will allow you to perform light
stretching, twisting or abdominal crunches
without the bed trying upright on its own
due to the shifting of your center of gravity.
As a result of this adjustment however, as
you begin the process of up-righting
yourself, you must compensate for the shift
of your body length by further bending your
knees and sliding your rear end down on the
bed as you use the handle bars to return.
This will shift your center of gravity in a
manner that will expedite your return with
relative ease.
A
B
In the face-down
position the angle of the
Leg Positioning Bracket
will typically be flat to
prevent hyper-extension
of the knee, however the
height of the bracket will
be adjusted to maximize
comfort.
14

PRIOR TO USING ALWAYS CHECK THE CONDITION OF YOUR UNIT. ALSO ENSURE THE
FOLLOWING:
1. THE ANGLE ADJUSTMENT BAR IS
SECURED IN PLACE 2. THE OUTER COVER OF THE ANGLE ADJUSTMENT BAR IS
OUTSIDE OF THE ANGLE KNOBS. YOU MAY NEED TO PINCH
THE HANDLE BARS IN SLIGHTY, AND THEN RELEASE.
C
B
A
Pull out to slide the Leg Boom in or
out (Boom Adjustment Knob – A).
Pull up on the Handle and move the lever in or out to secure or
unsecure the ankle bracket (Ankle Bracket Adjustment Lever – B).
Pull out to slide the Leg Positioning Bracket up or
down (Leg Positioning Knob – C).
The Leg Positioning Bracket is spring loaded. By
pulling up on the rollers you can release and adjust the
bracket.
Step 1. Use Knob A to
adjust the Leg Boom to
your Height, and use
Knob C to adjust the
height of the Leg
Positioning Bracket.
Step 2. Adjust the Head
Rest Height.
Step 3. Mount your table
b
y
ste
pp
in
g
onto the
Step 4. Regardless of the direction that you are facing, adjust the
angle of the Leg Positioning Bracket. Note that the deeper the bend in
your knees, the shorter your body becomes in relation to the Leg Boom
height, therefore adjustments may need to be made to the Boom. The
correct adjustment will provide you with the most comfort. If you need
to make adjustments to the height of the Leg Positioning Bracket you
will need to dismount the unit in order to do so.
1
5

FACE-UP OPERATION
Step 5. Use Lever B to lock your ankles
into the Ankle Bracket
Step 6. If inverting face-up,
reach around the handle bars
and push yourself slowly
backwards into position
(figure A). In order to return
to the upright position reach
up around the handle bars
and pull yourself gently up
(figure B).
A
B
Step 7. Once you are in
position rest comfortably
with your hands across
your stomach or chest, or
with your arms extended
over-head
To achieve full
inversion remove the
Angle Adjustment
Bar (17) and lower
yourself all the way
down. Once you are
completely vertical
your body will swing
free from the bed.
Hang comfortably or
perform gentle twists
without placing any
unnecessary torque
on your back with
quick movements.
To return to the
upright position
gently and cautiously
raise your upper
body by grabbing the
handle bars high on
the arch. Carefully
pull yourself back up
while shifting your
weight towards your
feet.
NOTE: All full inversion movements should
be performed with someone else available to
assist you if necessary.
1
6

FACE-DOWN OPERATION
Step 6. If inverting face-down,
reach around the handle bars
and slowly pull yourself down
into position (A). In order to
return to the upright position
reach back up around the
handle bars and gently push
yourself back up (B).
Step 5. Use Lever B to lock your ankles
into the Ankle Bracket
A
B
Once you are in position relax with your arms
hanging comfortably, or place your hands
behind your head and carefully perform hyper-
extensions. Perform any hyper-extension or
twisting motions slowly and with caution.
To achieve full inversion remove the Angle
Adjustment Bar (17) and to slowly pull
yourself all the way down. Once you are in
position your body will swing free of the bed.
Either hang freely or perform gentle twists or
hyper-extensions. Move cautiously and slowly
Pull yourself face back into contact with the head
rest and your body back into contact with the
Bed . Grab the frame and push yourself back up
(maintain contact with the bed), until you can
grab the handle bars and return upright.
NOTE: All full inversion movements should
be performed with someone else available to
assist you if necessary.
1
7

FREQUENTLY ASKED QUESTIONS
How long should I invert?
One of the most important skills for everyone to learn, especially when dealing with
fitness regimens, is to learn to listen to your body. Many people who are new to inversion
may feel some initial discomfort, and in almost all cases it is due to inverting too quickly,
too far, and for too long. We recommend that novices invert for only 1 – 2 minutes at
shallow angles for the first week or so, and then slowly increase the length of time and
the angle of inversion. I will generally invert for 10 – 15 minutes, two to three times a
day, and sometimes even longer, at a variety of angles. My sessions are strictly dependent
upon how I feel, and how long I wish to relax. If you feel any discomfort, simply return
to the upright position.
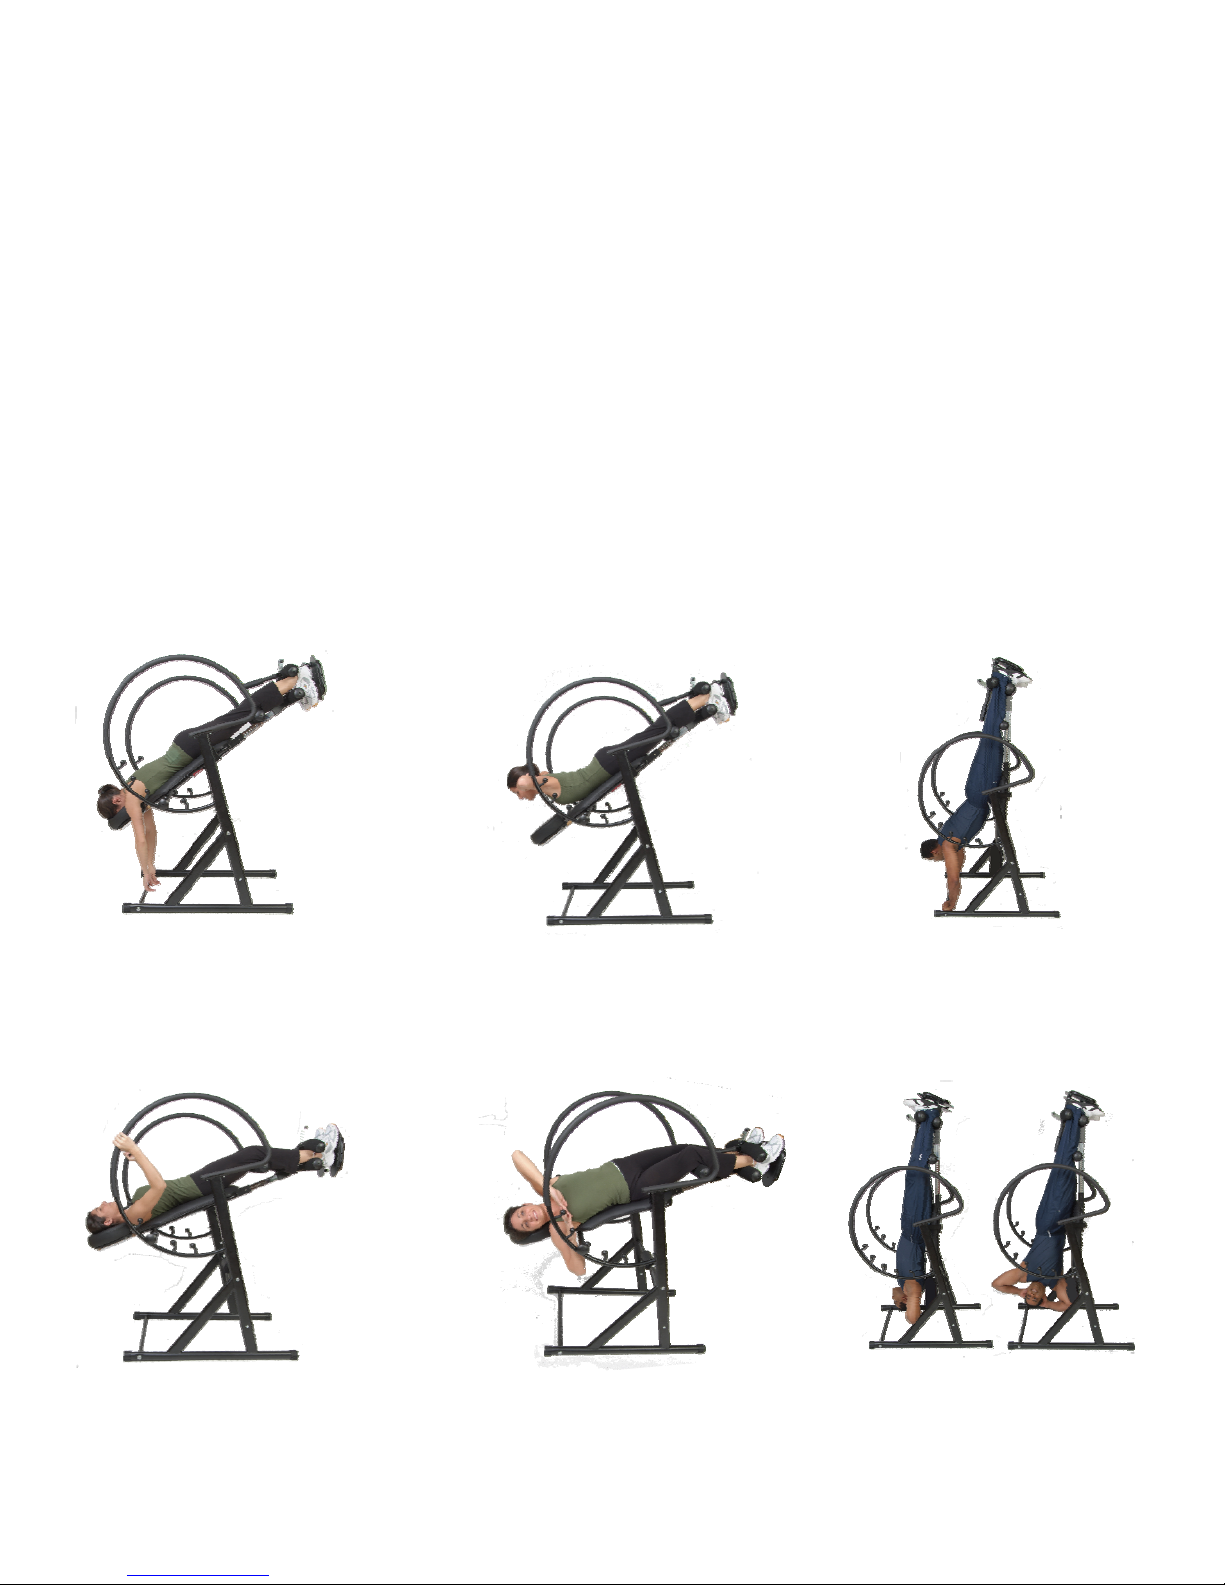
How far do you have to invert to get the benefits of inversion therapy?
Once you break the horizontal plane, the benefits begin. You begin to release the
accumulated stress on your spine: restoring the proper distraction between the facet
joints, replenishing the moisture to your disks, alleviating cervical pressures, and relaxing
your muscles. Of course, the greater the angle of inversion, the more advanced the effects
of the traction will be. Generally speaking; @ 20 – 30 degrees you will experience mild
stretching of your muscles, ligaments and tendons, improved oxygen flow to the brain
due to increased blood circulation, and realignment of your internal organs; @ 60 degrees
(your hands at just about floor level) your back will receive the required amount of
traction it needs to fully decompress; @ 90 degrees (full inversion) your body will hang
free and you can experience full stretching and traction, and you can perform inverted
exercises (this position is not necessary, nor recommended for everyone).
I feel some discomfort and slight pain after returning to the upright position, is this
normal?
Beginning an inversion program is not unlike beginning any other exercise program.
You are stretching and manipulating your body in a way that it is not used to. This is why
it is important to listen to your body and progress slowly. Ensure that you invert slowly,
return slowly, invert to only a comfortable angle, and invert for short periods of time until
you become experienced.
REMEMBER TO CONSULT YOUR PHYSICIAN PRIOR TO BEGINNING YOUR
INVERSION THERAPY. THERE ARE NUMEROUS INDEPENDENT STUDIES
SURROUNDING INVERSION THERAPY AND ITS BENEFITS. AS WELL, THERE
ARE NUMEROUS QUESTIONS THAT CAN BE ASKED CONCERNING
TECHNIQUE AND PRECAUTIONS. IF YOU HAVE ANY CONCERNS, PLEASE
CONTACT US VIA THE CONTACT INFO ON THE BACK PAGE, OR CALL THE
TOLL FREE NUMBER LISTED IN THE BEGINNING OF THIS MANUAL.
1
8

THE INFORMATION IN THIS MANUAL HAS BEEN
ASSIMILATED BY HEALTH MARK SPOKESMAN AND
FITNESS EXPERT KEVIN WINCE. FOR MORE INFORMATION
ON INVERSION THERAPY AND TECHNIQUES, PLEASE
CONTACT HEALTH MARK INC. OR E-MAIL ME DIRECTLY AT
Table of contents
Other Healthmark Fitness Equipment manuals