Healthstream HS1.0EL User manual
If you have any questions , please contact The Fitness Generation, +61 (03) 9765 9999.
www. healthstreamfitness.com.au
Free call number 1300 796 636

machine
machine
machine
machine machine
machine
machine
HS1.0E
If you have any questions , please contact The Fitness Generation, +61 (03) 9765 9999.
www. healthstreamfitness.com.au
1
A
intended only as exercise aids in determining heart rate trends in general.
SAFETY HINTS
WARNING - Read all instructions before using this appliance.
ϮDo not operate machine on deeply padded, plush or shag carpet. Damage to both
carpet and machine may result.
ϮKeep children away from the machine. There are obvious pinch points and other
caution areas that can cause harm.
ϮKeep hands away from all moving parts.
ϮNever operate the machine if it has a damaged cord or plug. If the machine is not working
properly, call your dealer.
ϮKeep the cord away from heated surfaces.
ϮNever drop or insert any object into any openings.
ϮDo not use outdoors.
ϮThe pulse sensors are not medical devices. Various factors, including the user’s
movement, may affect the accuracy of heart rate readings. The pulse sensors are
ϮWear proper shoes. High heels, dress shoes, sandals or bare feet are not suitable
for use on your machine. Quality athletic shoes are recommended to avoid leg fatigue.
SAVE THESE INSTRUCTIONS - THINK SAFETY!
CAUTION!! Please be careful when opening this unit.
Free call number 1300 796 636
ϮInstructions for assembly, including correct fitting of guards and other safety devices, and warning
about the likely injuries to young children if exercies cycles are operated in their vicinity without
properly fitted guards.
ϮInstructions for maintenance, including regular checking of the integrity of guards and safety devices.
ϮInstructions for the correct adjustment of the seat.
2
If you have any questions , please contact The Fitness Generation, +61 (03) 9765 9999.
www. healthstreamfitness.com.au
Free call number 1300 796 636
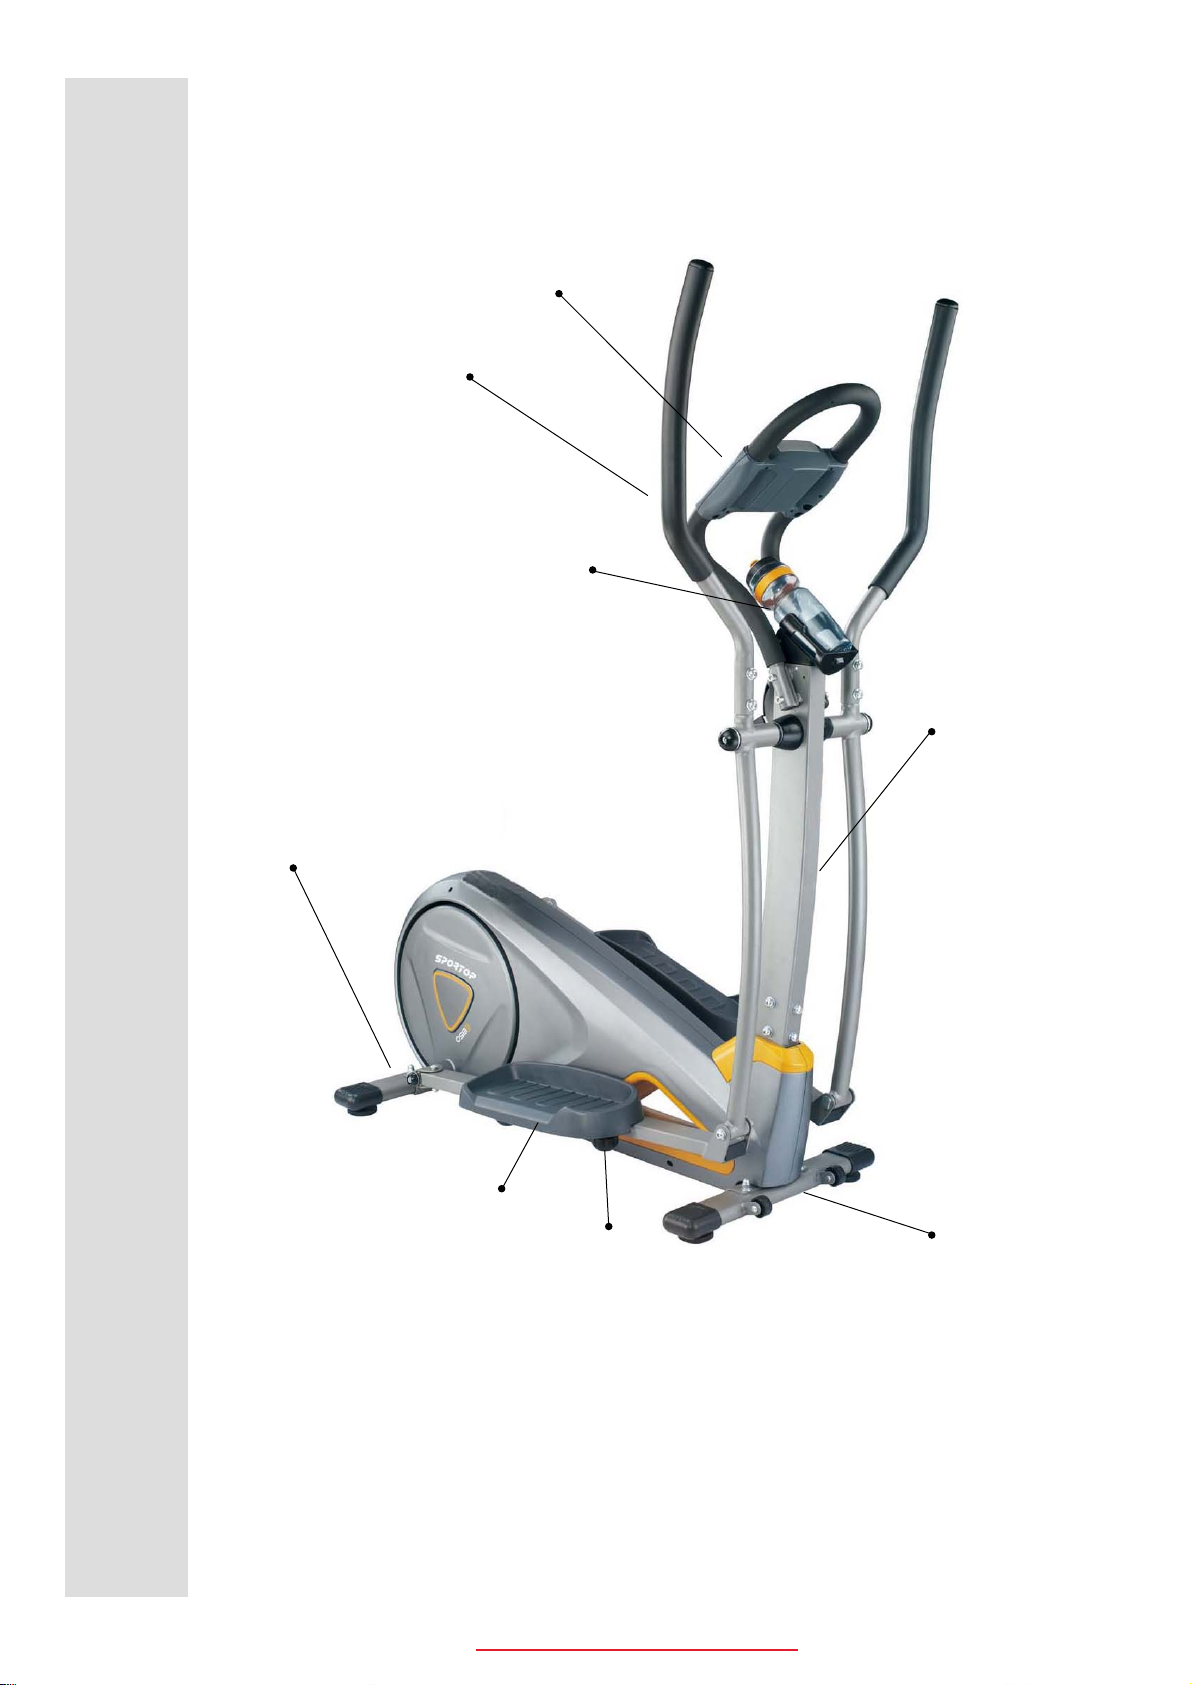
HANDLE BAR
COMPUTER
CENTRAL TUBE
REAR STABILIZER
PEDAL
FRONT STABILIZER
KNOB
WATER BOTTLE
3
FIGURE 1
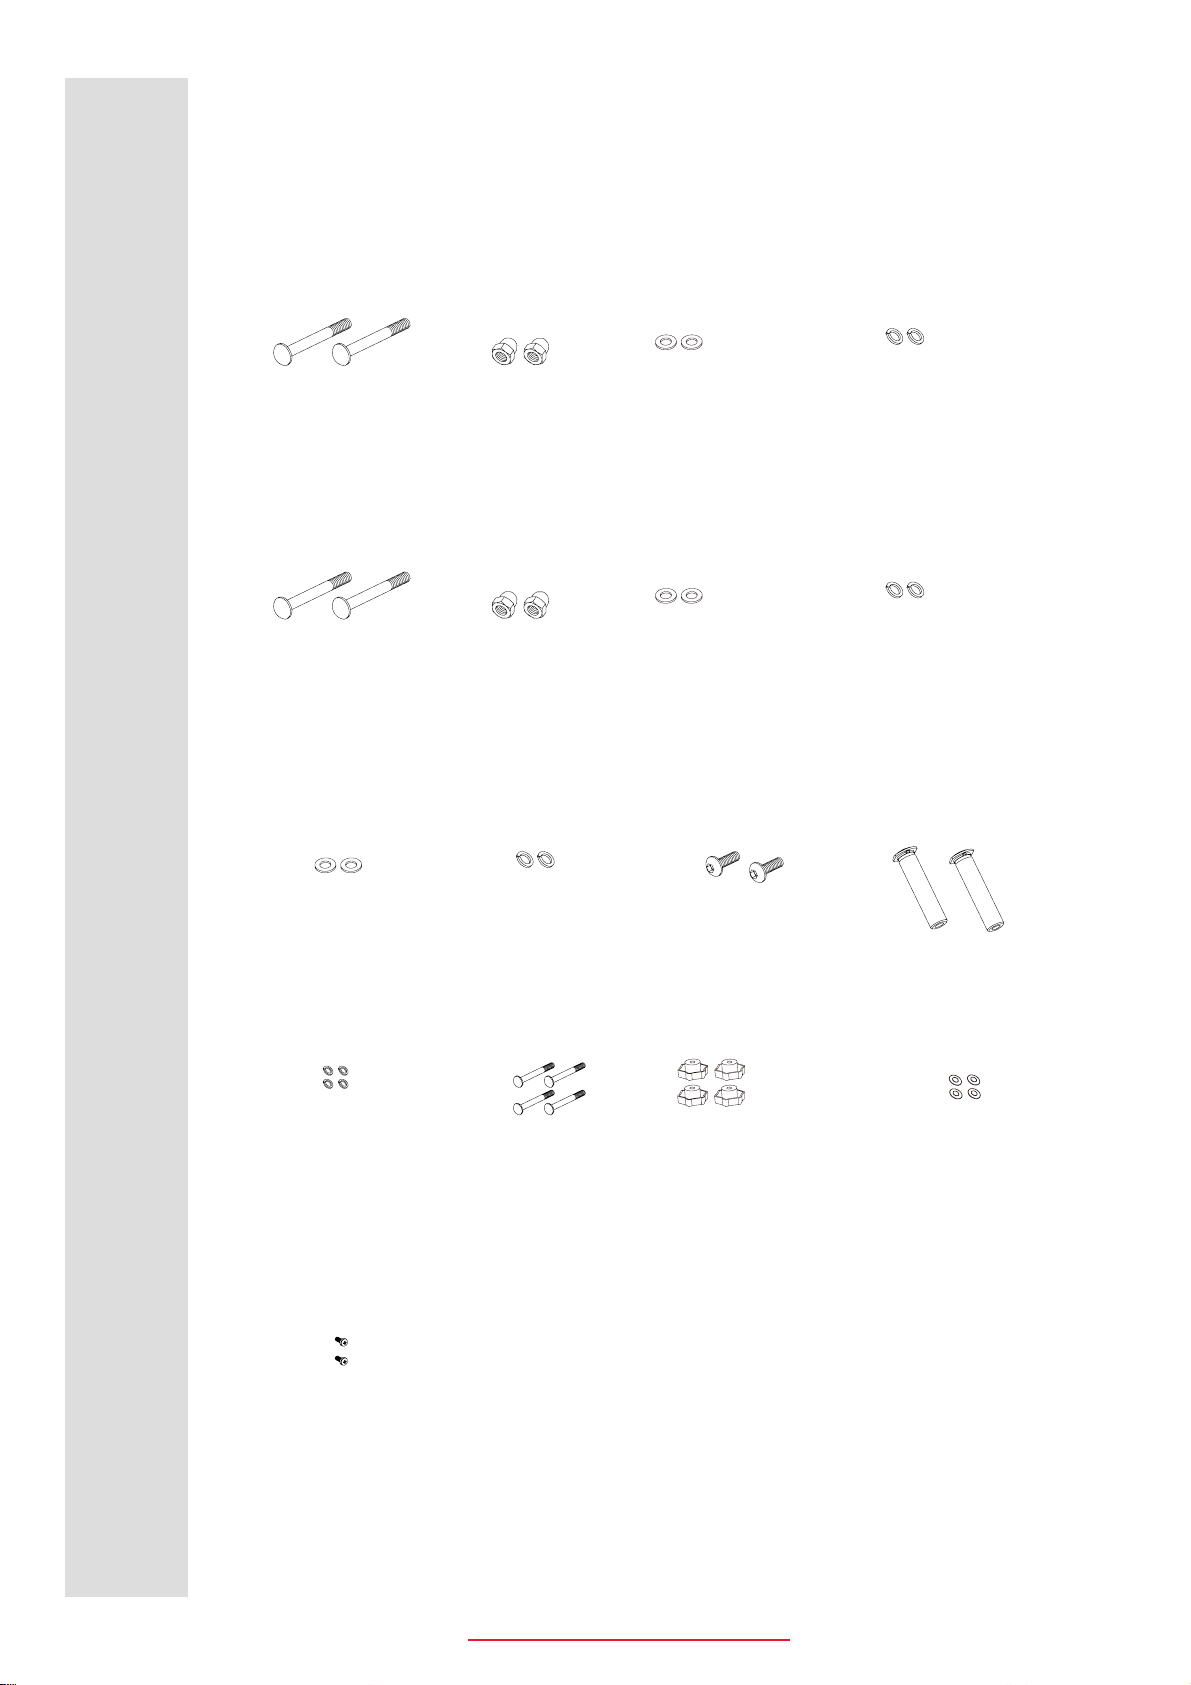
ASSEMBLY PACK CHECK LIST
FIGURE 3
FIGURE 5
If you have any questions , please contact The Fitness Generation, +61 (03) 9765 9999.
www. healthstreamfitness.com.au
Free call number 1300 796 636
FIGURE 4
N1 SCREW N2 NUT N3 WASHER N4 SPRING
N1 SCREW N2 NUT N3 WASHER N4 SPRING
N5 WASHER N7 SHAFTN4 SPRINGN3 WASHER
N6 SCREW N8 SCREW N10 KNOB N12 WASHER
FIGURE 7
N11 SCREW

4
If you have any questions , please contact The Fitness Generation, +61 (03) 9765 9999.
www. healthstreamfitness.com.au
Free call number 1300 796 636
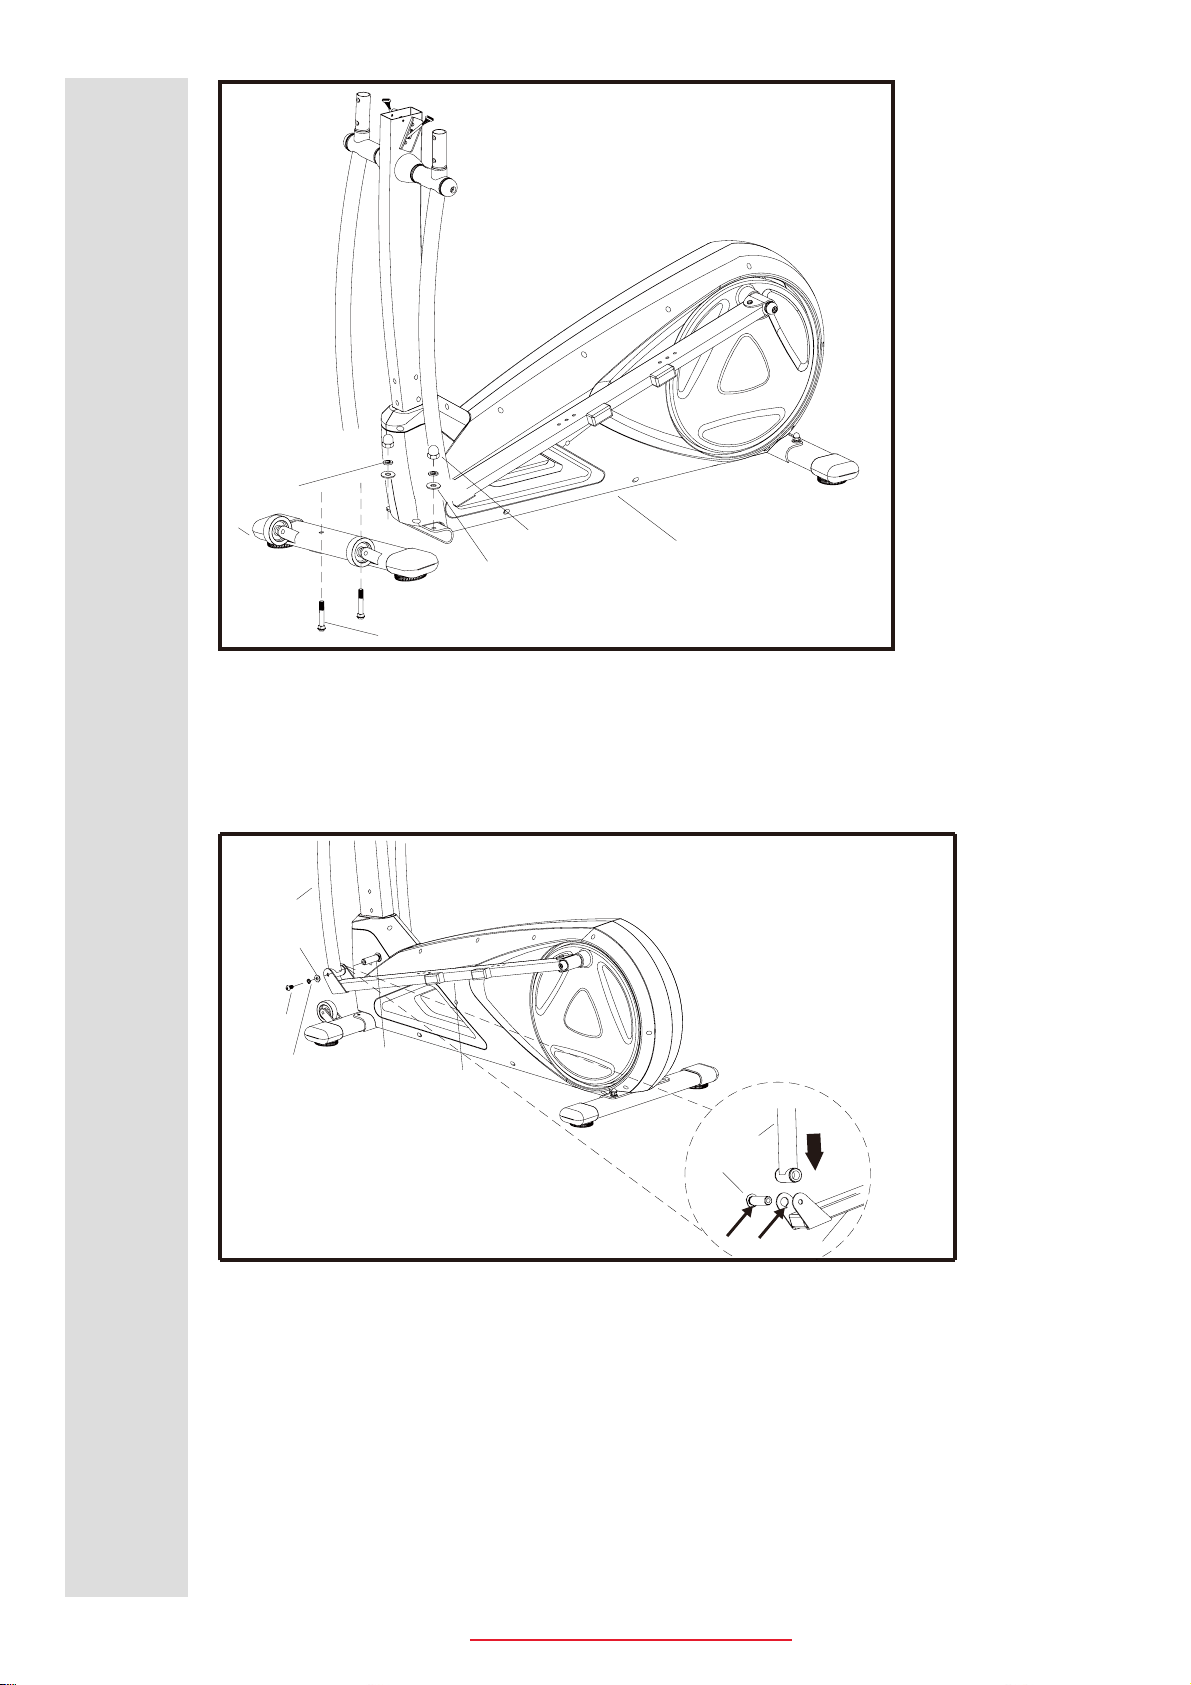
FIGURE_1 ASSEMBLY FOR REAR STABILIZER
HOW TO KEEP THE MACHINE STABLE
** After you finish assembly (Figure 1 & Figure 3), if the machine can't be stand stable,
you can use adjusted-end(C1) to adjust the machine.
Step1.Secure the rear stabilizer(C) to the main frame(A), using two screw(N1), two spring
washer(N4),washer(N3) and two nut(N2).
A
C1
N3
N2
N4
C
N1
D
A1
A2
A3
A4
FIGURE_2 ASSEMBLY FOR CENTRAL SUPPORT TUBE
A4-1
A
Note:the screw(A3) is for fixing the central supporing tube(D) and the main frame(A) .
Please do not tighten it for the assembly of FIGURE 4 easily
First, remove the bolts(A3), spring washer(A4-1) and washer(A4) from the main frame(A).
Step1. Connect the cable(A1) & ( A2).
Step2. Assemble the central support tube(D) onto the main frame(A) with bolts(A3),
spring washer(A4-1) and washer(A4).
Attention :when pushing the tubes toghter make sure not to pinch the cables.
5
If you have any questions , please contact The Fitness Generation, +61 (03) 9765 9999.
www. healthstreamfitness.com.au
Free call number 1300 796 636
FIGURE_3 ASSEMBLY FOR FRONT STABILIZER
Step1.Secure the front stabilizer(B) to the main frame(A) using two screw(N1),two spring
washer(N4), washer(N3) and two nut(N2).
A
N2
N3
N4
N1
B
FIGURE_4 ASSEMBLY CONNECTING TUBE AND PEDAL TUBE
Step1.Fix the connecting tube(A5) and pedal tube(A7) with
screw(N5) ,spring washer(N4), washer(N3) and screw(N7).
N7
N3
N4
N5
A5
A7
Step2.The right assembly is same as the left side.
A5
A7
N7
Note: Fix the screw(N7) with the pedal tube(please refer to the small drawing for reference)
After fixing it, refer to the assembly of FIGURE 2 and tighten the screw(A3) of the
central supporting tube.
6
If you have any questions , please contact The Fitness Generation, +61 (03) 9765 9999.
www. healthstreamfitness.com.au
Free call number 1300 796 636
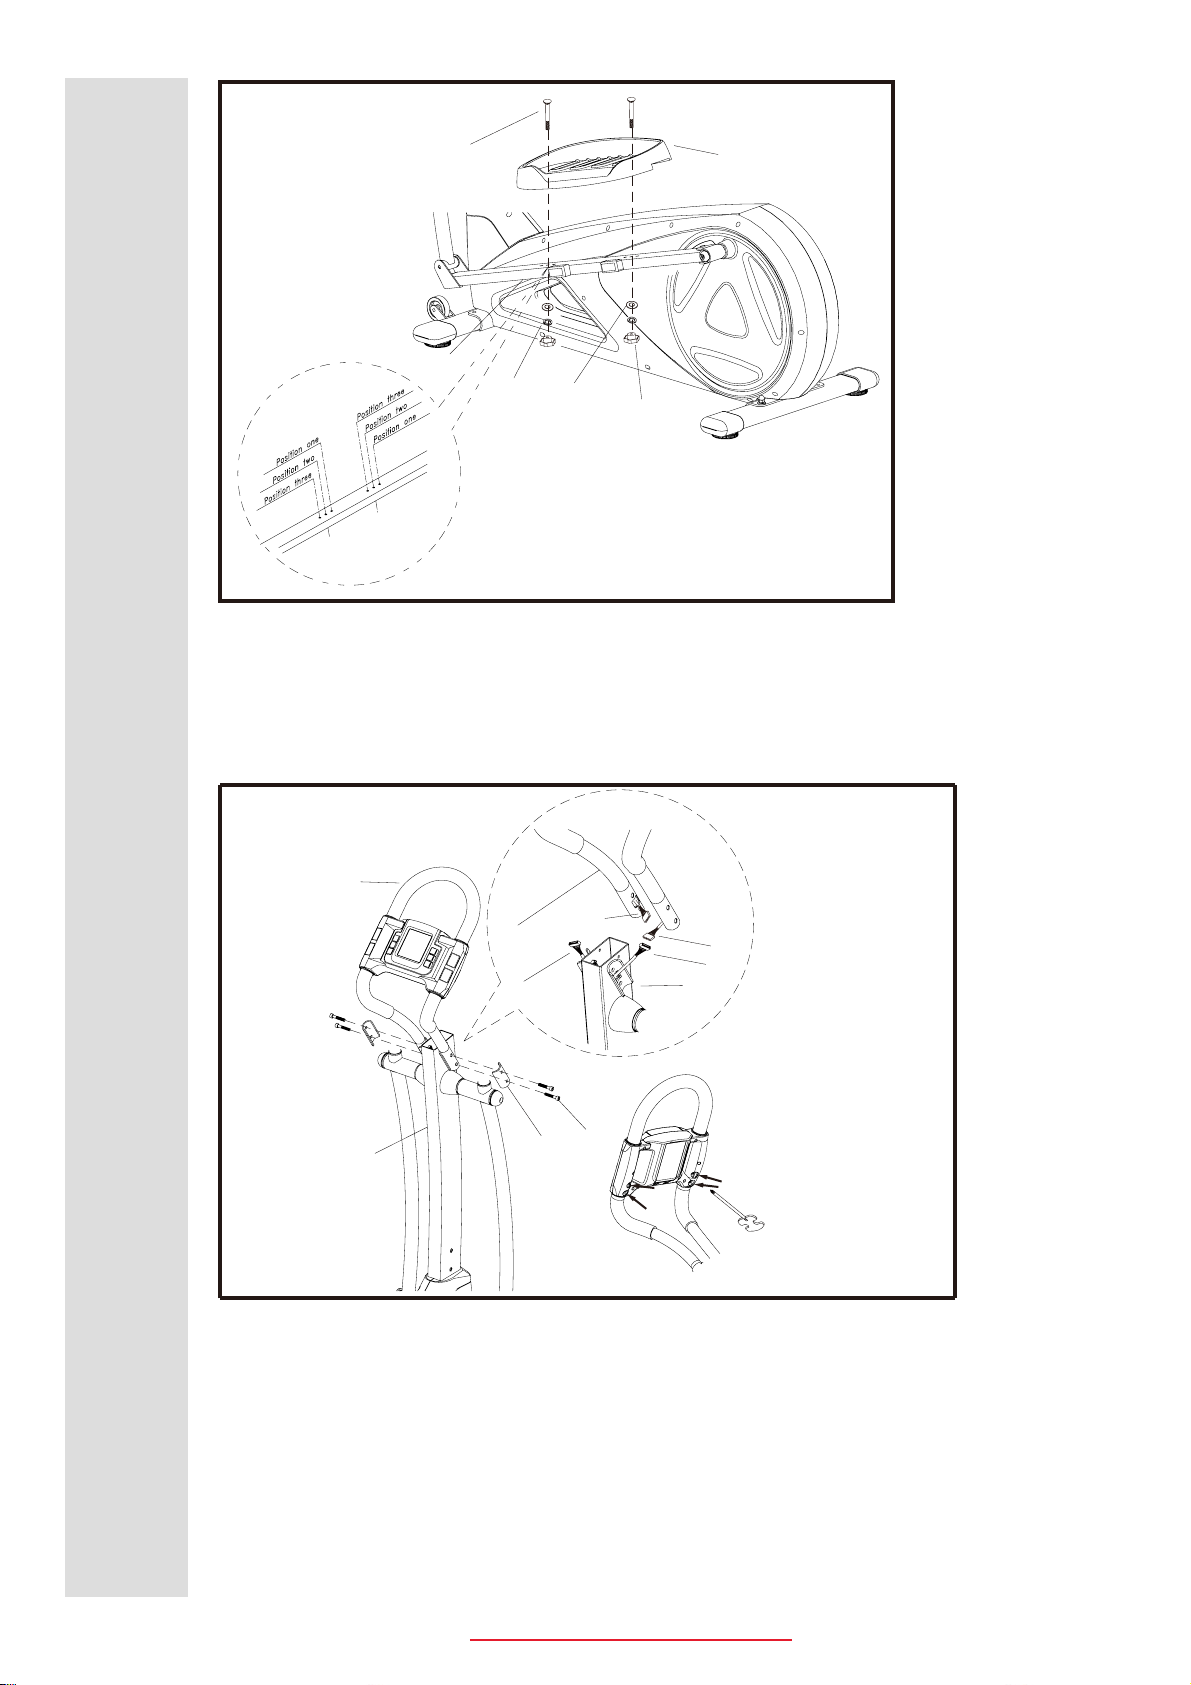
FIGURE_6 ASSEMBLY FOR COMPUTER AND HANDLE BAR
Step2. The right assembly is same as the left side.
Step1. Connect wire(A1) from central supporting tube with wire(F1&F2) from handle bar.
See picture for reference.
A7
N8
N10
H1
N12
N6
F
D
A1
A1
F1
F2
F
D
LN9
FIGURE_5 ASSEMBLY FOR PEDAL
Step1.Assemble the pedal(H1) by screw(N8),washer(N12),spring
washer(N6) and star knob nut(N10).
there are 3 sections adjusting for the moving track.
Step 2. Assemble handle bar(F) with central supporting tube(D),fix both sides using handle bar
bracket(L) and screw(N9).
1
2
3
4
Step 3. After finishing the Step1 and 2 please tighten the 4pcs of screws as the arrow directs.
7
If you have any questions , please contact The Fitness Generation, +61 (03) 9765 9999.
www. healthstreamfitness.com.au
Free call number 1300 796 636
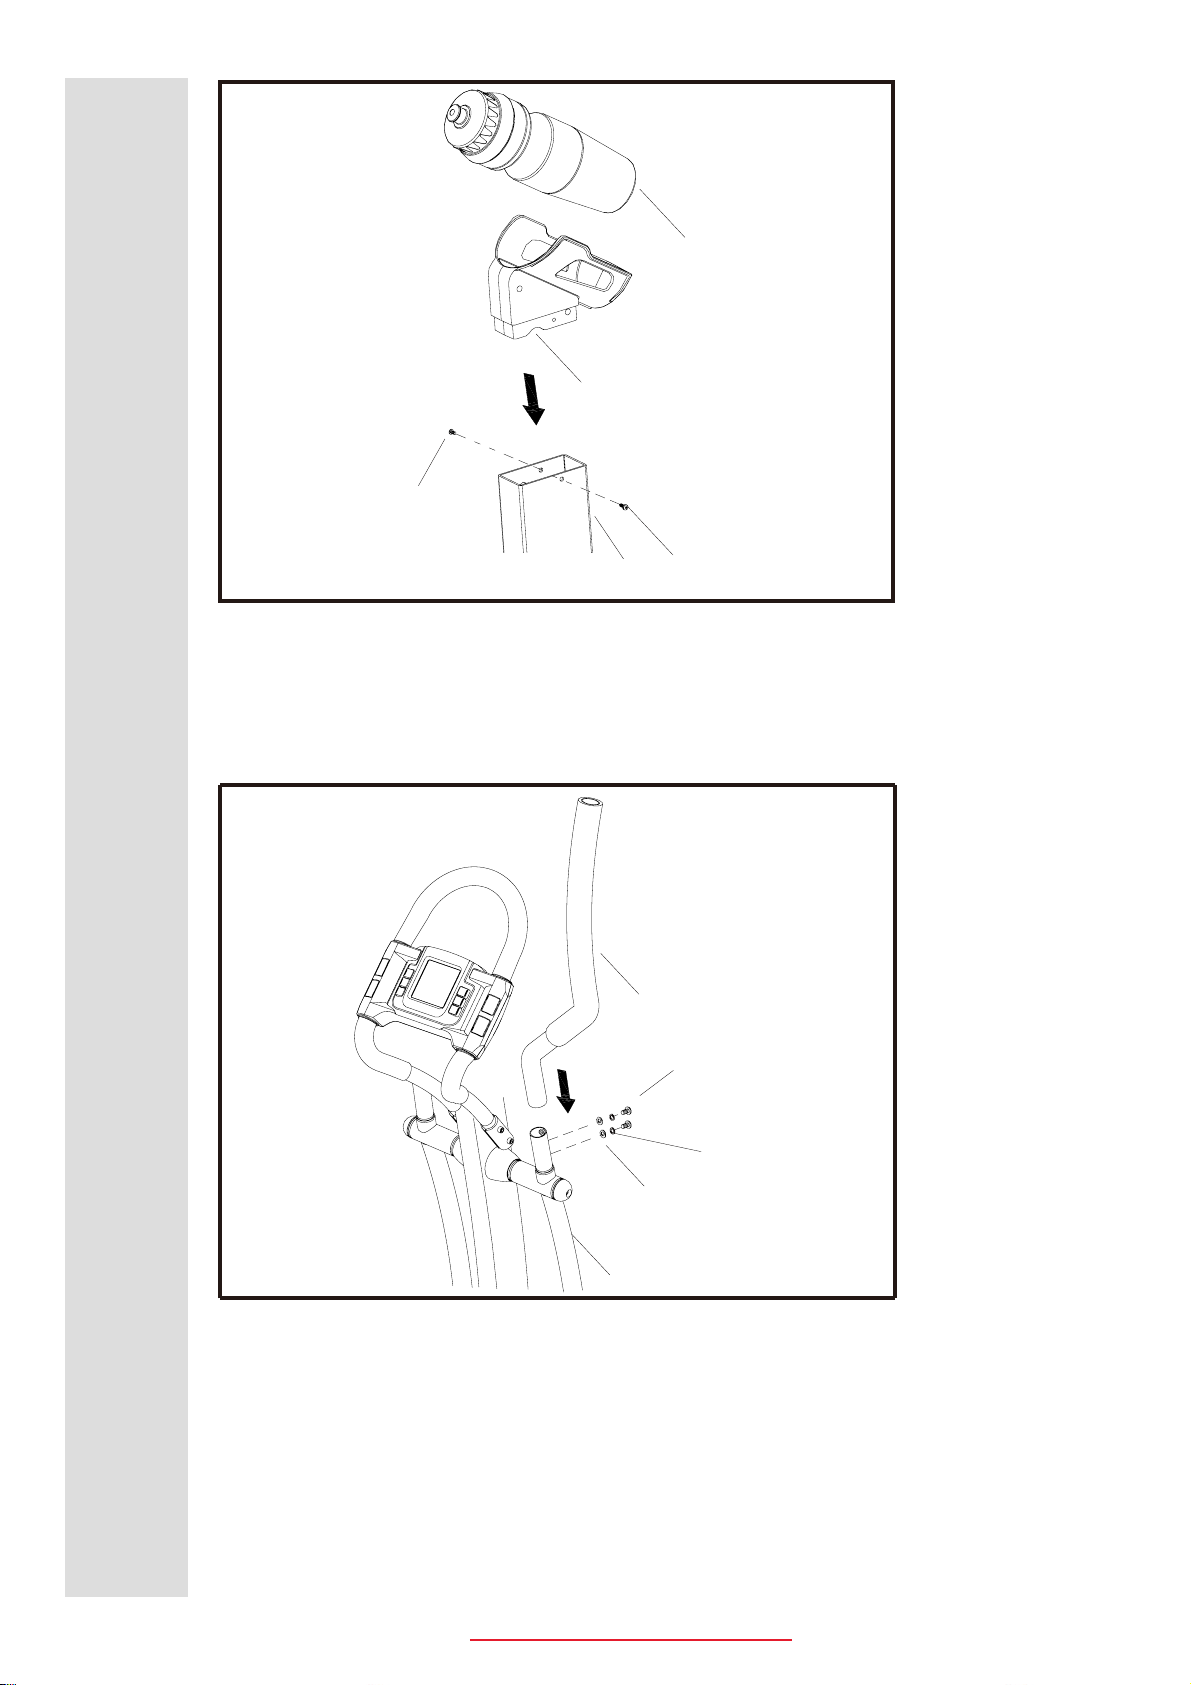
FIGURE_7 ASSEMBLY FOR WATER BOTTLE HOUSING AND
WATER BOTTLE
FIGURE_8 ASSEMBLY FOR HANDLE BAR
Step 1 Unfix the screw(A11),spring washer(A10) and washer(A9) of handle bar(A6).
Step 2. Assemble the handle bar(R)(E2) with A6 and fix them with A11,A10,A9.
A6
E2
A9
A10
A11
M
DN11
J
Step 3. The left assembly is same as the right side.
Step 1. Assemble the water bottle housing(J) with central supporting tube(D) and use screw(N11)
to fix.
Put the water bottle(M) on the water bottle housing(J).
N11

8
If you have any questions , please contact The Fitness Generation, +61 (03) 9765 9999.
www. healthstreamfitness.com.au
Free call number 1300 796 636
A
N2
N4
N3
C2
C1
N1
C
D
A1
A2
A3
A4
A5
A6
G
N5
N7
N1
N2
N3
N4
B
B1
B2
B3
B4
B5
H1
H2
N8
N6
N12
N10
A7
A8
N8
N12
N6
N10
F2 F1
F
LN9
E2
A10 A11
A9
M
J2
N11
J1
F3 F4
F5
F6
F7
F8
F9
F10
F12
E1
E3
D1
J3
D2
A12
A12
A13
A14
A16
A18
A19
A20
A21
A22
A23
A24
A25
A26
A27 A28
A29
A30
A30
A27
A28
A29
A34
A35
A36
A37
A38
A39
A40
A41
A42
A43
A44
A45
A46
A47
A48
A49
A50
A51
A52
A53
A54
A55 A56
A57
A58
A59
A60
A61
A62
A63
A63
A64
E4
F13
A4-1
N4 N3
A15
A17
A31
A31
A32
A33
A65
A66
A67 A70
A68
A69
A71
A58-1
A2-1
N13
N14
N15
N16
N18
N19

9
If you have any questions , please contact The Fitness Generation, +61 (03) 9765 9999.
www. healthstreamfitness.com.au
Free call number 1300 796 636
P/N DESCRIPTION Q’TY P/N DESCRIPTION Q’TY
A
A39
1MAIN FRAME
WASHER 1
A1
A40
1SENSOR WIRE
1
A41
1SENSOR WIRE2A
NUT 1
6SCREW3A
A42 SCREW 3
A4 6WASHER
DRIVING BELT
1
A5 A44
1SWING TUBE(L) 1
A6 A45
1DRIVING WHEEL 1
A7 A46
1PEDAL TUBE(L) MAGNETIC 1
A8 1A47 2
4WASHER9A A48 1
A10 A49
4SPRING WASHER 2
A11 SCREW 4 A50 1
A12 4BUSHING A51 1
A13 A52
4BUSHING 1
A14 A53
2WASHER 1
A15 A54
2END CAP
BEARING
2
A16 2WASHERA55
2SCREW
A17 2A56
2END CAP
A18 A57
4END CAP 2
A19 2SCREW
SPRING
1
A20 4BUSHING
FLYWHEEL
A21 4TAPER WASHER
A22
A61
2
MAGNETIC HOUSING
1
A23
A62
2SCREW
SCREW 9
A24
A63
2END CAP
SCREW 6
A25
A64
2WASHER
C CLIP
2
A26
B
4
FRONT STABILIZER 1
A27 2
A28
B2
2
END CAP 2
A29
B3
2SIDE COVER(R)(L)
MOVING WHEEL 2
A30 6SCREW
A31 6
AXLE
A32 1
SPRING WASHER
A33 1
SCREW
A34 1SCREW
SENSOR WIRE
A35
A59
1PRESSING
DC WIRE 1
A36
A60
1BEARING
CHAIN COVER(R) 1
A37 1
WASHER
A38 1
SPRING
NUT
NUT
BUSHING
CROSS FRAME(R)(L)
A43 WHEEL AXLE
NUT
TENSION CABLE
A58
C CLIP
SWING TUBE(R)
PEDAL TUBE(R)
CROSS FRAME COVER(R)(L)
WASHER
WASHER
WASHER
CHAIN COVER(L)
A2-1
A4-1
A58-1 SCREW 2
SPRING WASHER 6
MOTOR 1
A65 NUT 1
A66 WASHER 1
A67 AXLE 1
A68
A69
A70
A71
BEARING
BUSH
BEARING
NUT
1
1
1
4

10
If you have any questions , please contact The Fitness Generation, +61 (03) 9765 9999.
www. healthstreamfitness.com.au
Free call number 1300 796 636
P/N DESCRIPTION Q’TY P/N DESCRIPTION Q’TY
E2 1
E3 2
FOAM GRIP
2
END CAPE4
1
FRONT HANDLE BARF
F1 1
SENSOR WIRE(R)
F2 1
F3 1
F4 1
F5 4
2
F6
F7 1
CNOSOLE
F8
F9
F10 6
SCREW
F12 1
G1AXLE SUPPORT
H1 1PEDAL(L)
H2 1
J1 1WATER BOTTLE HOUSING(L)
J3 3SCREW
L2
M1
N1 4SCREW
N2 4NUT
N3 6
N4 6
N5 2
N6 4SPRING WASHER
N7 2SCREW
N8 4
N9 4
N10 4
N11 2SCREW
N12 4WASHER
SMALL HANDLEBAR BRACKET
WASHER
SPRING WASHER
SCREW
SCREW
SCREW
SCREW
KNOB
SIDE HANDLEBAR(R)
SENSOR WIRE(L)
FRONT HANDLE BAR(L)
FRONT HANDLE BAR(R)
FOAM GRIP
FOAM GRIP 1
BATTERY COVER
PEDAL(R)
J2 1WATER BOTTLE HOUSING(R)
WATER BOTTLE
LOWER HOUSING OF CONSOLE 1
B4 NUT 2
B5 2
C1
C1 2
SCREW
REAR STABILIZER
KNOB
C2 END CAP 2
DCENTRAL SUPPORT TUBE 1
D1 BUSHING 2
D2 BUSHING COVER 2
E1 SIDE HANDLEBAR(L) 1
F13 END CAP 2
N13
N14
N15
N16
N17
N18
N19
WASHER
WASHER
WASHER
WASHER
NUT
SCREW
ALUMINUM IDLE WHEEL 1
2
2
2
2
2
2
11
If you have any questions , please contact The Fitness Generation, +61 (03) 9765 9999.
www. healthstreamfitness.com.au
Free call number 1300 796 636
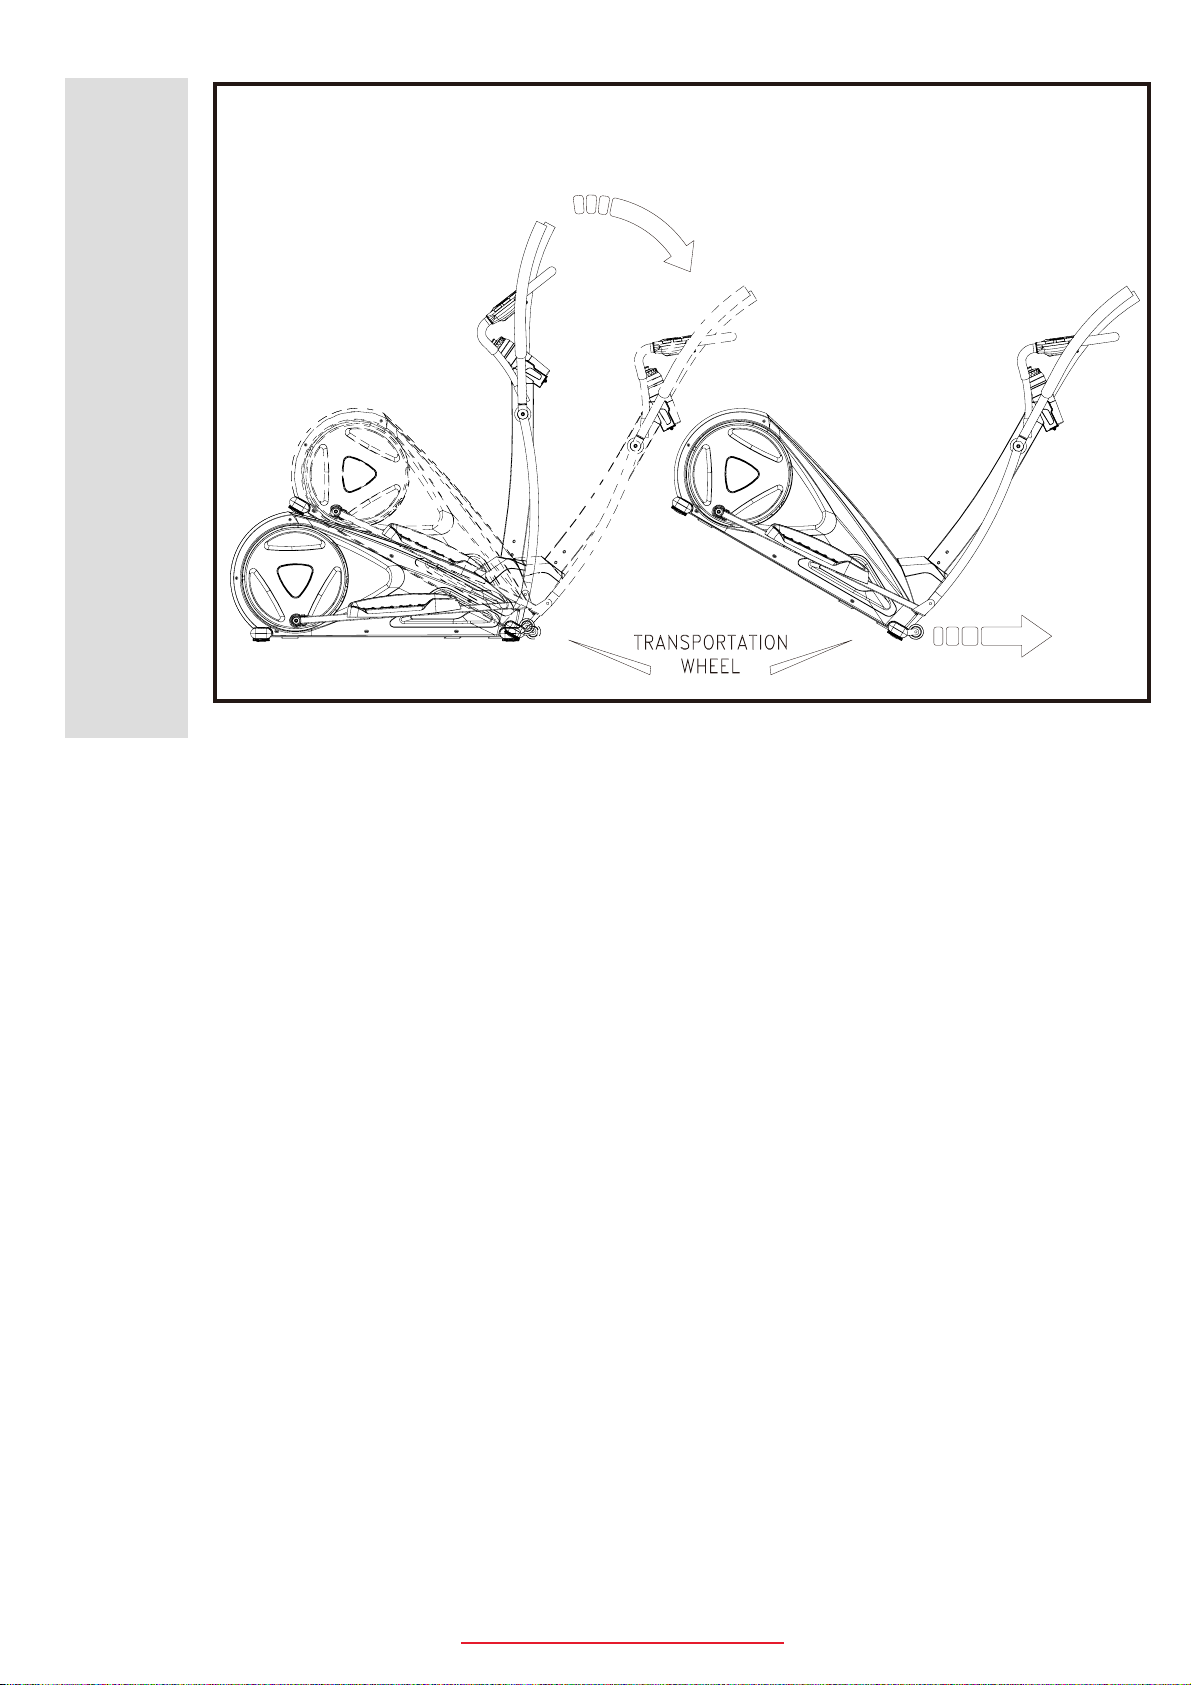
FIGURE_9 HOW TO MOVE THE MACHINE
The frone stabilizer has built-in transport wheels.
To move the machine, stand at the front and lift it up until the weight of
the machine is transferred to the transport wheels.
You can now easily move the machine to a new location.
12
If you have any questions , please contact The Fitness Generation, +61 (03) 9765 9999.
www. healthstreamfitness.com.au
Free call number 1300 796 636
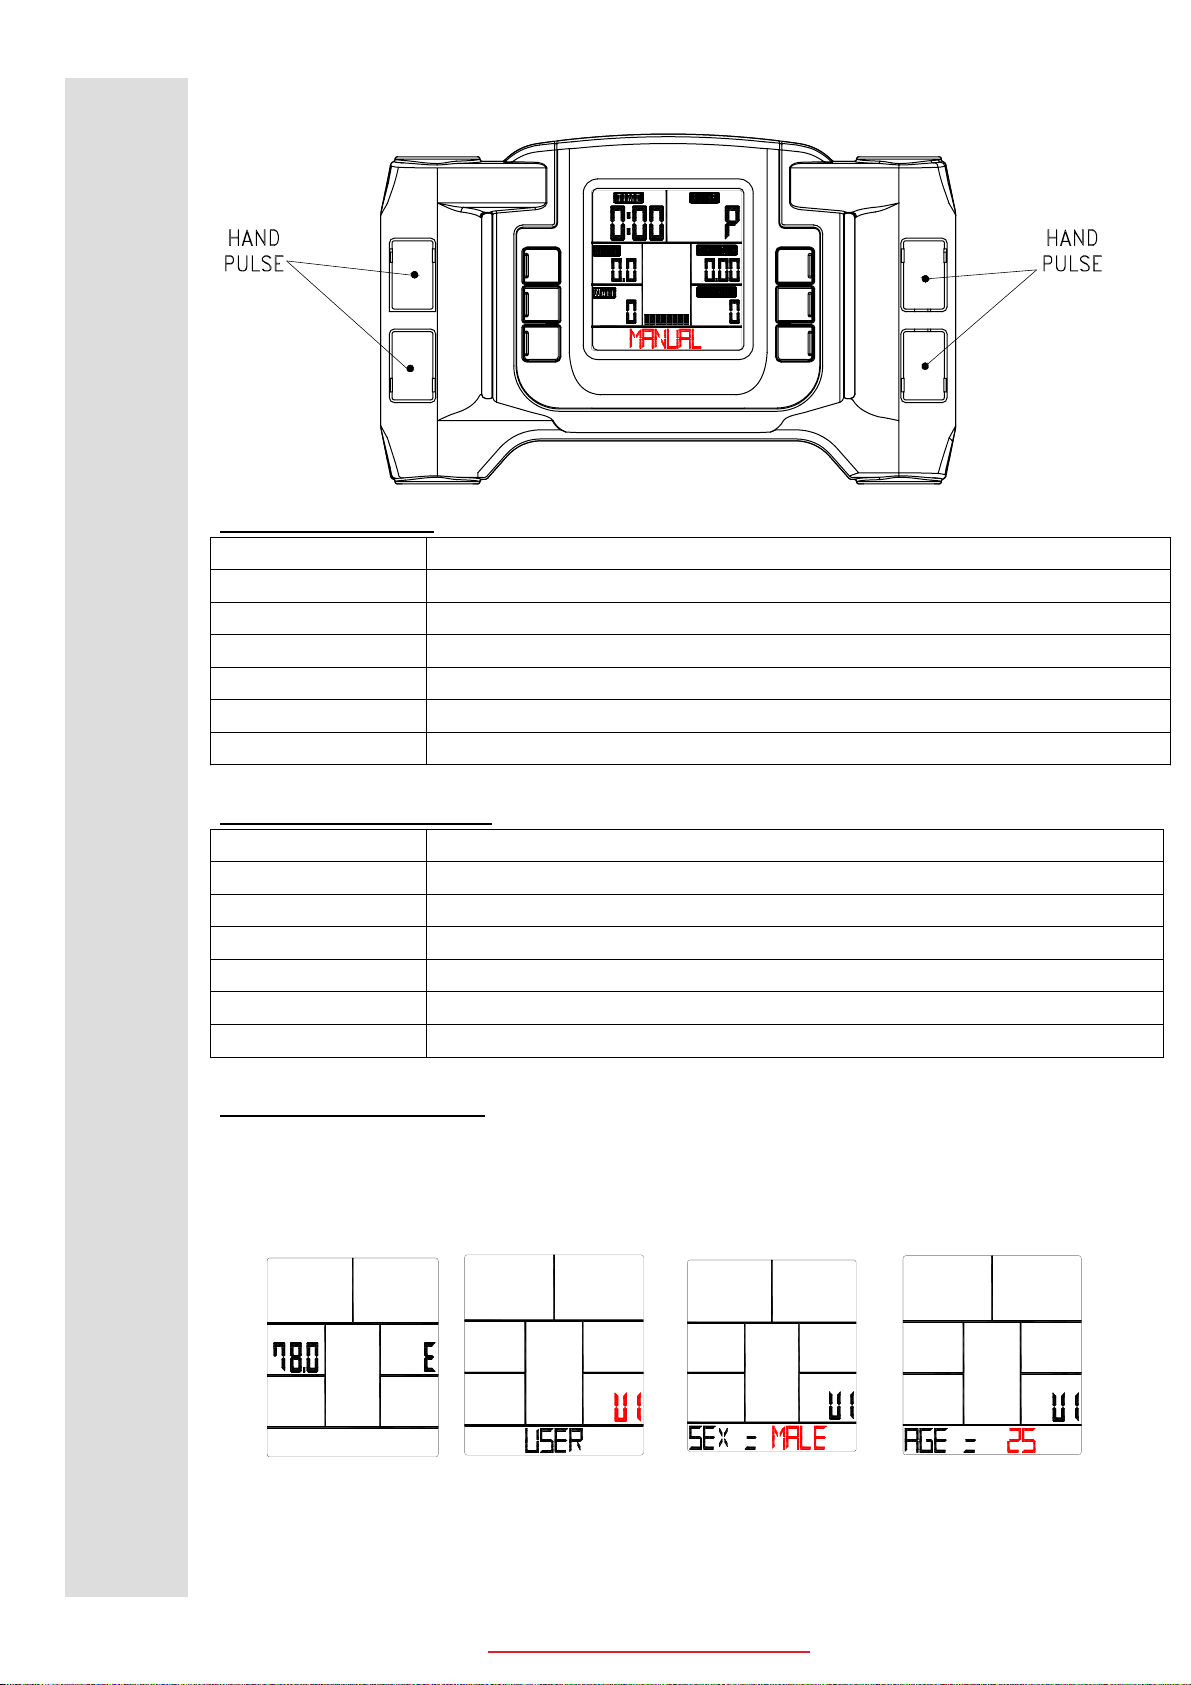
BUTTON FUNCTION:
MODE/ENTER In stop mode, the mode is to confirm all exercise data setting, and enter into program.
RESET In stop mode, press the button back to main menu.
START/STOP To start or stop exercise.
RECOVERY To test hear rate recovery status.
UP To select training mode and adjust function value up.
DOWN To select training mode and adjust function value down.
TOTAL RESET Clean all preset value to zero.
DISPLAY EXERCISE DATA:
TIME Display range 0:00~99:99 ; Setting range 0:00~99:00
DISTANCE Display range 0.00~99.99 ; Setting range 0.00~99.90km
CALORIES Display range 0~9999 ; Setting range 0.00~9990
PULSE Display range P-30~240 ; Setting range 0-30~240
WATT Display range 0~999 ; Setting range 10~350
SPEED 0~99.9km
RPM 0~999
OPERATION PROCEDURE
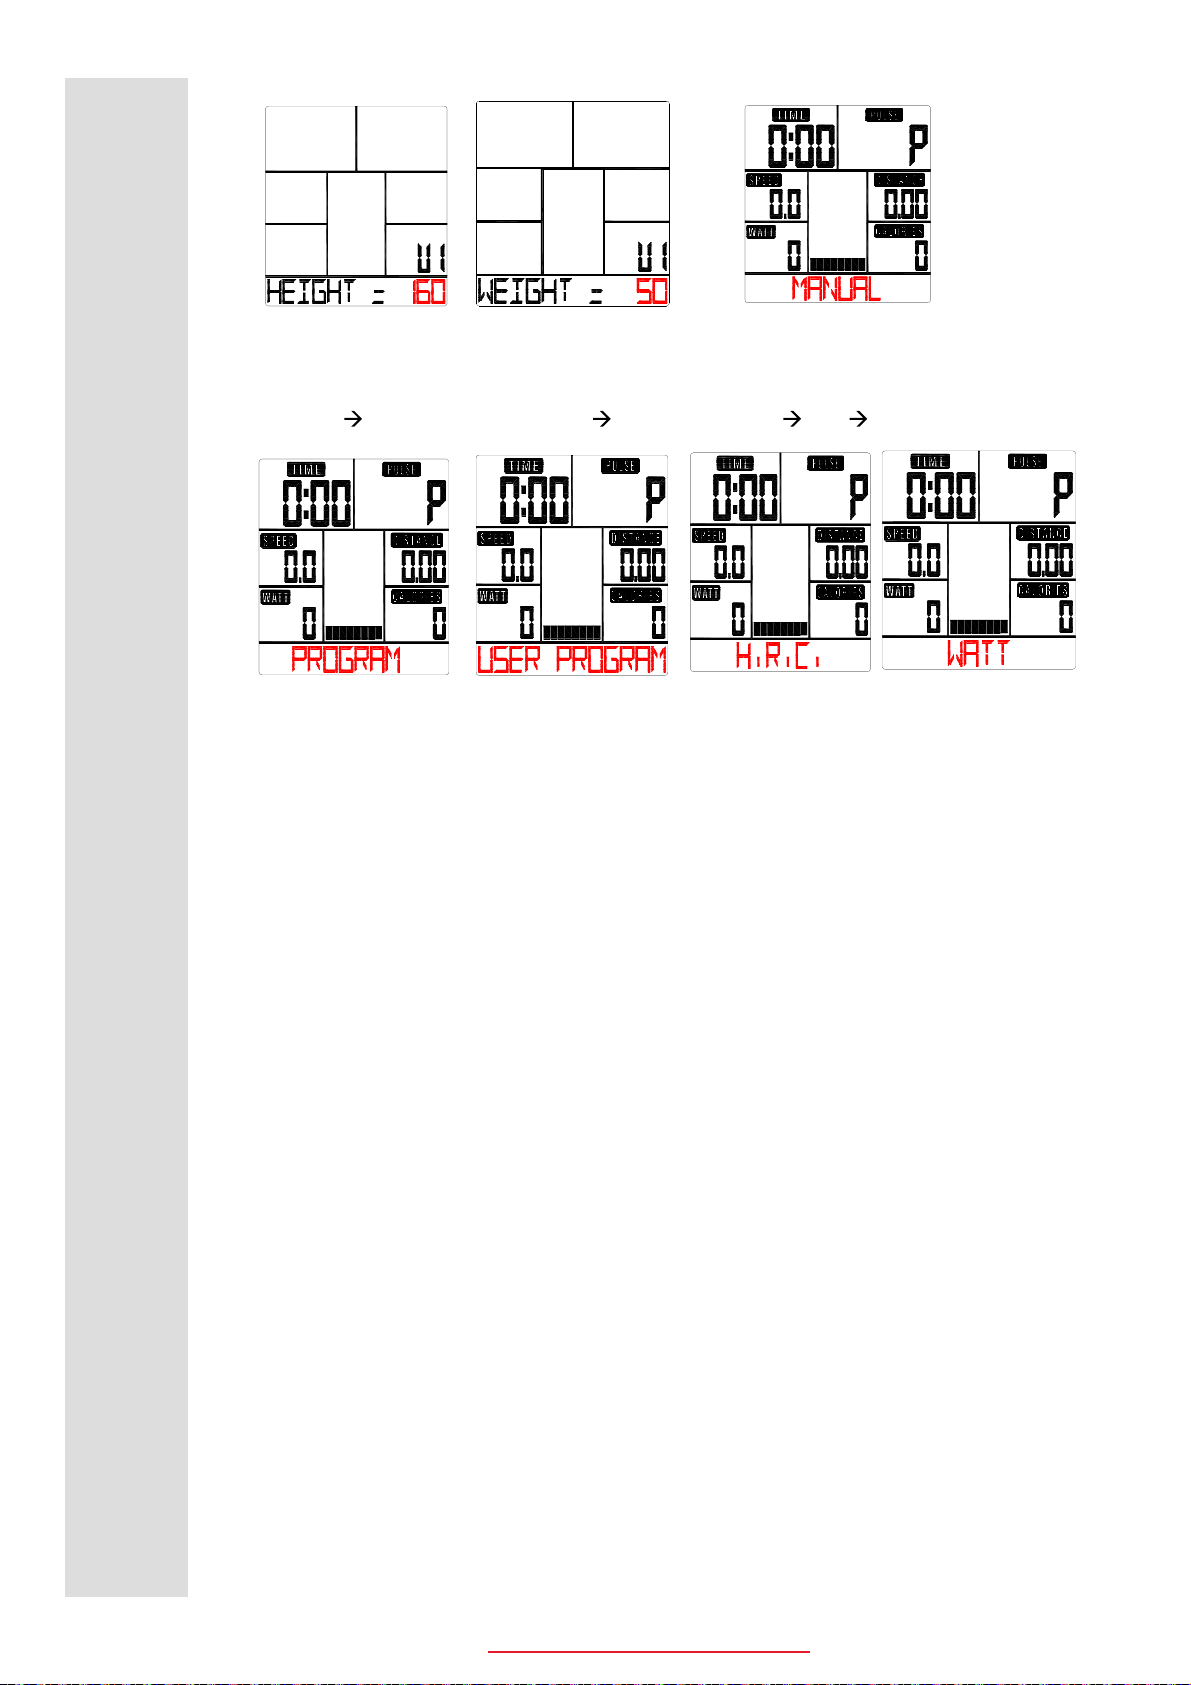
1. Connect power supply and computer will power on with a long beep sound, LCD display all segments for 2
seconds and enter into personal data setting mode (gender, age, height and weight) for U1~U4. (drawing A~F)
2. After user data set up, computer will display main menu (drawing G).
AB C D
13
If you have any questions , please contact The Fitness Generation, +61 (03) 9765 9999.
www. healthstreamfitness.com.au
Free call number 1300 796 636
MANUAL PROGRAM (12 profiles) USER PROGRAM HRC WATT. (Drawing H~K)
HIJK
4. Quick Start and Manual :
Before exercise in Manual mode, user my set up TIME, DISTANCE, CALORIES and PULSE target.
After power on, user may press START/STOP button to start exercise in MANUAL immediately without
any setting.
Level can be adjusted during exercise by press UP or DOWN.
5. PROGRAMΚ
Before exercise in Program mode, user may set up TIME target.
Press UP and DOWN to select Program with 12 profiles and press ENTER/MODE to confirm.
Level can be adjusted during exercise by press UP or DOWN.
6. H.R.C.Κ
Before exercise, computer will ask for user AGE first to calculate TARGET pulse. User may still press
UP and DOWN to change target pulse from 30 to 240.
7. USER PROGRAMΚ
User may press UP, DOWN and then press MODE to create his own profile. (from column 1 to column 20)
User may hold on pressing MODE button for 2 seconds to quit profile setting.
8. WATT :
The preset watt value 120 is flashing on screen in WATT setting mode. User may use UP, DOWN button
to set target value from 10 to 350. Press MODE button for confirm.
NOTE:
1. This computer require 9V, 0.5mA adaptor.
2. When user stop pedaling for 4 minutes, computer will enter into power save mode, all setting and exercise
data will stored until user start exercise again.
3. When computer act abnormal, please plug out the adaptor and plug in again.
EF G
3. In main menu, first exercise program MANUAL will flash, user may press UP and DOWN button to select
Table of contents
Other Healthstream Elliptical Trainer manuals


