Healthy Climate HCWB3-12 User manual

Introduction
Thank you for your r c nt H althy Climat ®Humidifi r purchas . W
sinc r ly appr ciat your busin ss and ar pl as d to add your
nam to our growing list of custom rs. Now, pl as tak a f w min-
ut s and r ad this bookl t. This will familiariz you with th b n fits
you will r c iv from th quipm nt you just purchas d and h lp you
und rstand th routin maint nanc that will b r quir d.
Principle of Operation
You hav purchas d a humidifi r that op rat s on th vaporativ
principl . It will provid th prop r r lativ humidity (s op rating
instructions) all during th h ating s ason. It is v ry possibl that
you hav qu stions conc rning what your n w humidifi r can do for
you, and what you should do to r c iv maximum b n fits from it.
This bookl t is int nd d to answ r th s qu stions.
Th humidifi r op rat s in conjunction with th furnac blow r
motor. Wh n th humidifi r control calls for humidity and th blow-
r motor is op rating, wat r flows to th distribution tray locat d at
th top of th humidifi r. Th wat r is uniformly distribut d across
th width of th tray and through a sci ntifically d sign d syst m of
outl ts. It flows by gravity ov r th humidifi r pad. Dry, hot air is
mov d through th moistur -lad n humidifi r pad wh r vapora-
tion tak s plac . Th now-humidifi d air carri s moistur in vapor
form throughout th hom .
The correct water flow is determined by an orifice in each humid-
ifier. When the humidifier is operating, there will be a small, steady
stream of water to drain, which flushes away most of the trouble-
causing minerals.
Th min rals and solid r sidu (whit dust) not trapp d by th
r plac abl humidifi r pad ar flush d down th drain. Th drain also
liminat s th probl ms caus d by stagnant wat r. This is th most
ff ctiv and l ast xp nsiv m thod to dispos of troubl -causing
min rals.
Troubl -fr p rformanc and minimum maint nanc ar assur d by
th d sign f atur s of th H althy Climat ®Humidifi r. All humidifi r
housing parts that com in contact with wat r ar non-m tal and will
n v r rust or corrod . N ith r h at nor wat r will aff ct th m und r
normal op rating conditions.
Th humidifi r pad, d sign d sp cially for uniform, high vaporation,
and th scal control ins rt also ffici ntly trap min ral d posits
which ar oft n th caus of damag to working parts in ordinary
humidifi rs. Wh n prop rly maintain d, no “whit dust” will b distrib-
ut d through th living quart rs. The humidifier pad must be in good
condition to assure high capacity trouble-free performance. It should
be changed at least annually.
Old r d sign wat r distribution trays hav a granular coating in th
bottom of th distribution tray to provid qual distribution of wat r to
ach of th op nings assuring an v n flow of wat r ov r th humid-
ifi r pad. Do not clean the mineral scale off the bottom of the water
distribution tray at the end of the humidification season. If th granu-
lar coating is r mov d, it is not n c ssary to purchas a n w
distribution tray. You can accomplish th sam uniform p rformanc
by applying a small amount of liquid dishwashing soap ov r th ntir
insid surfac of th wat r distribution tray. This will allow th wat r
to flow v nly through ach of th op nings, provid d th humidifi r
is l v l, in ord r to achi v maximum capacity.
Th curr nt distribution tray incorporat s a synth tic fabric lin r that
r plac s th granular coating and is d sign d to d liv r wat r uni-
formly ov r th ntir top surfac of th humidifi r pad, provid d it is
mount d l v l. It is normal for som min ral d posits to form in th dis-
tribution tray as it dri s out b tw n humidification cycl s. Th s
d posits can actually h lp distribut wat r in th tray, but if th y form
nough to block th op nings, th y should b r mov d as d scrib d
in th “R quir d Maint nanc ” s ction of this manual.
WARNING
Electrical Shock Hazard
Can caus injury or d ath.
Disconn ct all l ctrical pow r suppli s b for
s rvicing.
Shut off wat r supply b for disconn cting or
tapping into any wat r supply lin .
CAUTION
Risk of Equipment Damage
Aft r humidifi r installation is compl t d, turn wat r supply
back on.
CAUTION
Risk of Equipment Damage
Do not us th saddl valv to r gulat wat r flow.
It is d sign d to b compl t ly op n d or clos d.
1
HEALTHY CLIMATE®HUMIDIFIER
HUMIDIFIERS
506368-01
04/2011
Supersedes 09/2009
Includ s Saf ty, Op rating, and Maint nanc Instructions
OPERATING INSTRUCTIONS FOR HEALTHY CLIMATE HUMIDIFIER MODELS
HCWB3-12, HCWB3-12K, HCWB3-12A, HCWB3-12AK, HCWB3-17, HCWB3-17K,
HCWB3-17A, HCWB3-17AK, HCWP3-18 & HCWP3-18A

Operating Instructions
(Humidifier Models HCWB3-12, HCWB3-12K, HCWB3-17,
HCWB3-17K & HCWP3-18)
Your n w H althy Climat ®Humidifi r is controll d by a manual
humidifi r control install d ith r in th living ar a or in th cold air
r turn. It is important to anticipat a drop in t mp ratur and r duc
th s tting accordingly to avoid xc ssiv cond nsation. For
xampl , with an outsid t mp ratur of 20° th corr ct s tting will
b 35% r lativ humidity. If th t mp ratur is xp ct d to fall to 0°
that v ning, th n r duc th s tting to 25% s v ral hours prior to
th t mp ratur chang .
Obs rvanc of th
r comm nd d r lativ
humidity l v l on your
humidifi r control (s
tabl ) is an important
saf guard. Cond n-
sation of wat r on
insid windows in th
form of fogging or
frost is usually an indi-
cation of xc ssiv r lativ humidity. Th sam cond nsation can
tak plac in oth r ar as in your hom with th possibility of r sult-
ing damag .
B sur to k p fir plac damp rs clos d wh n not in us . Th y pro-
vid an xc ll nt scap rout for h at, as w ll as humidity.
Th humidifi r control can b us d to d t rmin th r lativ humid-
ity in your hom during th wint r. Turn th dial to th low r s tting
th n r v rs th dial dir ction slowly until a “click” is h ard. At this
point, r ad th r lativ humidity on th dial. This will b v ry clos to
th actual r lativ humidity in your hom .
To ch ck th humidifi r op ration, s t th humidifi r control abov
th click point, mak sur that th wat r saddl valv is op n and
that th r is l ctricity to th humidifi r. Th furnac blow r motor
must b op rating for th humidifi r to function. Aft r th humidifi r
has op rat d for s v ral minut s and wat r is nt ring th humidifi-
r and coming out at th drain, r duc th humidifi r control s tting
b low th click point and th humidifi r should automatically shut
off. Now, s t th humidifi r control dial at th r comm nd d insid
r lativ humidity, d p nding on th outsid t mp ratur . Follow th
sugg st d s ttings prior to a drop in th outsid t mp ratur .
Automatic Humidifier Controls
(Humidifier Models HCWB3-12A, HCWB3-12AK, HCWB3-17A,
HCWB3-17AK & HCWP3-18A)
HCWB3-12A, HCWB3-12AK, HCWB3-17A, HCWB3-17AK and
HCWB3-18A humidifi rs ar controll d by an automatic humidifi r
control, which off rs two mod s of op ration: automatic and manual.
Wh n install d in th automatic mod , th syst m b n fits you in th
following ways:
1. Th control automatically adjusts your hom ’s RH bas d on th
outdoor t mp ratur .
2. Th control liminat s th n d to manually adjust th control.
3. Th automatic humidifi r control pr cis ly controls th RH in your
hom , nsuring maximum comfort for a gr at r p rc ntag of
tim . Th automatic humidifi r control also pr v nts xc ss con-
d nsation or low humidity in th hom .
4. Th automatic humidifi r control also liminat s th n d to turn
th dial s tting to OFF during th summ r s ason.
Operating Instructions Automatic Mode
Imm diat ly aft r installation, th automatic humidifi r control must
b s t to match your hom ’s condition. Follow th s st ps to adjust
th automatic humidifi r control. S Figure A.
1. Turn th knob to s tting 5, which is within th normal rang .
During th n xt 24 to 48 hours, it may b n c ssary to adjust th
dial for mor or l ss humidity, d p nding on your p rsonal comfort
and hom ’s r quir m nts. S Tabl 1.
OUTDOOR-INDOOR RELATIVE HUMIDITY TABLE
Outside Temperature Recommended R.H.
+40° 45%
+30° 40%
+20° 35%
+10° 30%
0° 25%
–10° 20%
–20° 15%
CAUTION
Exc ss humidity can caus moistur accumulation which
allows possibl mold growth in your hom .
2
Figure A
Table 1 OPERATION GUIDE
Condition Solution
Cond nsation on windows. R duc th s tting on th control dial by on
incr m nt at a tim .
Lack of humidity. Incr as th s tting on th control dial by on
incr m nt at a tim .
Humidifi r do s not op rat .
(sol noid do s not “click”
wh n control is mov d to
TEST position).
Mak sur pow r is availabl to th sol noid valv .
Turn dial to TEST. Mak c rtain furnac blow r is
op rating and furnac is calling for h at. If unit still
do s not op rat , consult a h ating contractor.
Humidifi r won’t shut off. Turn dial to OFF. If unit continu s to op rat , consult
a h ating contractor.
T st Mod . Syst m op ration is ch ck d by s tting th knob to
TEST. Mak c rtain that th furnac blow r is
op rating and furnac is calling for h at. Humidifi r
will op rat for on minut .
90-1054
2. During th cold st portion of th first h ating s ason, minor
adjustm nts may b n c ssary, d p nding on th hom ’s con-
struction. S Tabl 1.
Th RH in your hom will b accurat ly controll d to m t your
n ds and should not n d furth r adjustm nt during futur h ating
sasons. Mak not of th dial s tting in th v nt th knob g ts
mov d.
Your humidifi r is part of a syst m that will accurat ly maintain th
RH in your hom . For v ry 1°F chang in outdoor t mp ratur , th
automatic humidifi r control will automatically adjust th indoor r l-
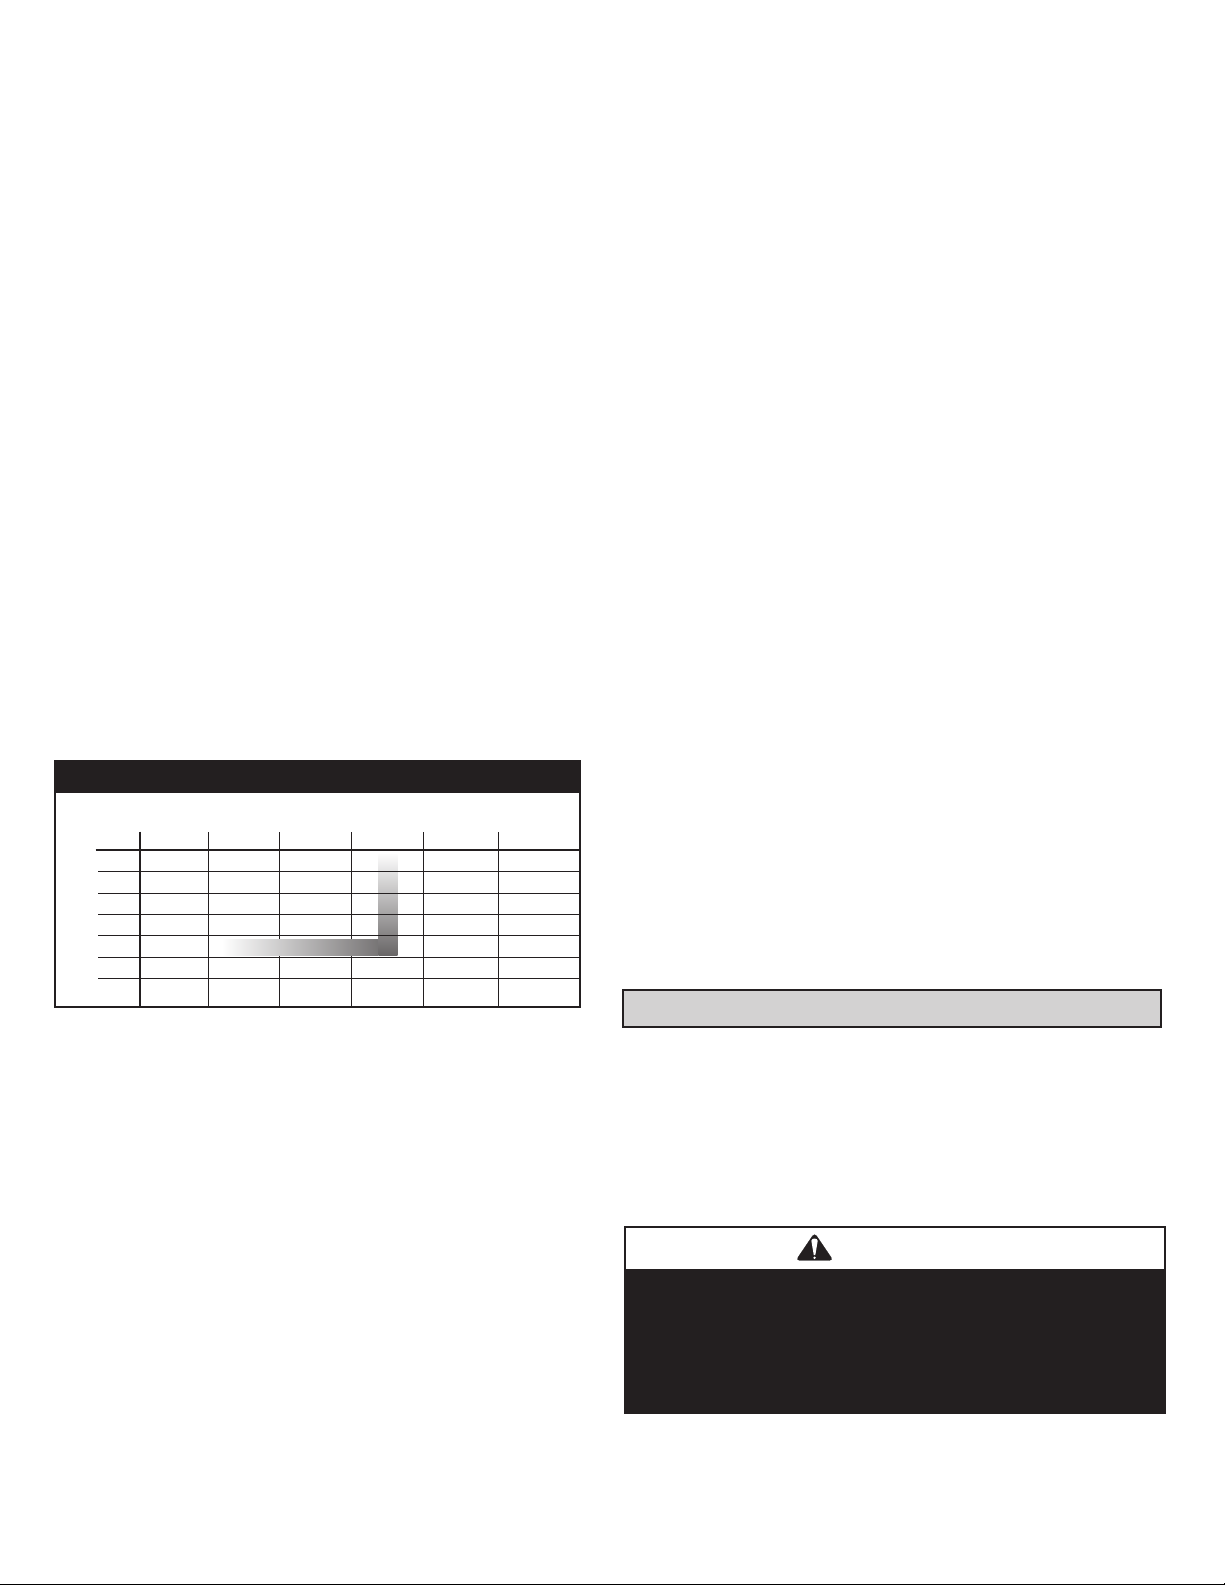
ativ humidity by 0.5% RH. If you would lik to d t rmin th RH in
your hom , follow th s st ps:
1. D t rmin th outdoor t mp ratur .
2. Activat th furnac blow r by s tting your th rmostat fan switch
to th ON position, or by s tting your th rmostat to a high r t mp r-
atur .
3. Turn th control dial s tting to th OFF position. Th n, slowly turn
th dial clockwis until you h ar th sol noid valv click on. Slowly
turn th dial count rclockwis until you h ar th sol noid valv
click off. At this point, mak not of th dial s tting.
4. Locat your dial s tting on Tabl 2. Follow th dial s tting to th
right until it int rs cts with th curr nt outdoor t mp ratur . This
is th RH in your hom und r xisting conditions.
5. R turn th th rmostat and control to th ir original s ttings.
As an example, if the outdoor temperature is 20°F and, follo ing step
3, the humidifier turns off at “5”on the dial range, then the RH in your
home is 35%.
Th automatic humidifi r control will accurat ly control th humidi-
ty in your hom to a maximum of 45% RH and a minimum of 10% RH.
Th valu s of outdoor t mp ratur and dial s ttings may fall in
b tw n or outsid of th list d valu s in Tabl 2. In th s cas s, you
will b abl to approximat your hom ’s actual indoor RH.
Operating Instructions Manual Mode
If an outdoor t mp ratur s nsor has not b n install d with your
automatic humidifi r control, th control is install d in th cold air
r turn and is s t for manual mod op ration. In this cas , it is impor-
tant to k p th humidifi r control s tting at th r comm nd d l v l
in ord r to avoid xc ssiv indoor RH. This will pr v nt th formation
of cond nsation on insid windows (fogging or frost on windows).
For xampl , with an outsid t mp ratur of 20°F, th corr ct s tting
will b 35% RH. If th t mp ratur is xp ct d to fall to 0°F that
v ning, th n adjust th s tting to provid 25% RH s v ral hours
prior to th t mp ratur chang .
Th r comm nd d s ttings on th stick r on th front of th control
and in th tabl on pag 2 ar bas d on y ars of r s arch and xp -
ri nc . For xampl , a wint r tim indoor RH of 50% may b
consid r d id al for your p rsonal comfort, how v r, this s tting
may r sult in damag to your hom . Obs rvanc of th r comm nd-
d RH l v ls on your humidifi r control, th r for , is an important
saf guard. Th s s ttings r pr s nt a compromis b tw n RH l v-
ls that ar d sirabl for comfort r asons and humidity l v ls, which
will avoid cond nsation on your windows.
Th humidifi r control can b us d to accurat ly d t rmin th RH
in your hom during th wint r. With th furnac blow r op rating at
th h ating sp d, turn th dial to th low st s tting, th n r v rs
th dial dir ction slowly until you h ar th sol noid valv click on. At
this point, r ad th RH on th dial. This will b v ry clos to th actu-
al RH in your hom . To ch ck th humidifi r op ration, s t th knob
to TEST. Mak sur that th wat r saddl valv is op n and that
th r is l ctricity to th unit. G n rally, th furnac blow r motor
must b op rating for th humidifi r to function. Aft r th humidifi r
has op rat d for on minut and wat r is nt ring th unit and com-
ing out at th drain, r duc th humidifi r control s tting to th
r comm nd d insid RH, d p nding on th outsid t mp ratur . Do
not l av th control in th t st mod . Th humidifi r will not op r-
at prop rly in th t st mod . Anticipat a drop in th outsid
t mp ratur and low r th s tting s v ral hours b for th drop in
outsid t mp ratur occurs.
Effect of Water Characteristics
Your humidifi r will op rat ff ctiv ly using ith r hard or m chan-
ically soft n d wat r.
Any typ of wat r (hard, soft, hot, or cold) is acc ptabl for us with
th HCWB3 or HCWP3 drain-typ humidifi rs. Hot supply wat r, 140°
maximum, is r comm nd d for all h at pump applications. Th us
of hot supply wat r will also incr as th humidifi r’s capacity.
Table 2 % RELATIVE HUMIDITY GUIDE
Outdoor Temperature (˚F)
-10 0 10 20 30 40
110 10 10 15 20 25
210 10 15 20 25 30
310 15 20 25 30 35
415 20 25 30 35 40
520 25 30 35 40 45
625 30 35 40 45 45
730 35 40 45 45 45
Dial Setting
WARNING
Risk of Scalding
Wat r t mp ratur ov r 125˚F can caus s v r burns and
scald instantly.
Shut off th hot wat r supply b for disconn cting or tapping
into any hot wat r supply lin .
3

Annual Maintenance
For best performance, you should replace the humidifier pad in your
humidifier at least annually.
• Call your L nnox d al r for pr v ntativ maint nanc and
rplac m nt compon nts.
Annual Summer Shutdown
For th summ r humidifi r shutdown, simply turn th humidifi r con-
trol to th “OFF” s tting (all humidifi r mod ls) and clos th damp r
(Mod ls HCWB3-12, HCWB3-12K, HCWB3-12A, HCWB3-12AK,
HCWB3-17, HCWB3-17K, HCWB3-17A and HCWB3-17AK).
Dealer Instructions for Preventative Maintenance
NOTE: Annual insp ction and pr v ntativ maint nanc of your total
h ating syst m is important for ffici nt and saf op ration. Call your
L nnox d al r for humidifi r s rvic and maint nanc insp ction.
Your humidifi r is quipp d with an in-lin wat r strain r and orific
as shown b low. Th s parts should b insp ct d and cl an d p ri-
odically to assur continu d prop r humidifi r p rformanc . Insp ct
mor oft n if s ing “whit dust”.
I. Water Line Inspection and Service Instructions
II. Required Maintenance (Humidifier Models
HCWB3-12, HCWB3-12K, HCWB3-12A, HCWB3-12AK,
HCWB3-17, HCWB3-17K, HCWB3-17A & HCWB3-17AK)
1. Disconn ct main pow r to furnac .
2. Not Humidifi r Control s tting and turn dial to th “OFF” position.
3. Turn off wat r supply. Turn th int gral bypass damp r (3) to th
SUMMER position.
4. Pr ss th tabs in th latch s on th top and bottom of front cov r
(1) and pull cov r off bas with both hands. S t asid .
5. Car fully pull th plastic f d tub (2) out of th distribution tray
(5) at th top of th vaporativ ass mbly (4). Pull this ass mbly
out by grasping at top and tipping out.
6. Unsnap th distribution tray (5) from th scal control ins rt (8).
Lightly scrap out or brush off any min ral d posits, b ing car -
ful not to str tch or loos n th synth tic fabric lin r. Soaking th
tray in vin gar or a lim -r moving ag nt is h lpful wh n trying to
r mov stubborn min ral d posits.
7. Slid th Humidifi r Pad (7) out from th scal control ins rt (8).
Cl an th scal control ins rt of min ral d posits. R plac th
Humidifi r Pad annually or if p rformanc drops (Catalog No.
X2660 for Mod ls HCWB3-12, HCWB3-12K, HCWB3-12A and
HCWB3-12AK, and Catalog No. X2661 for Mod ls HCWB3-17,
HCWB3-17K, HCWB3-17A and HCWB3-17AK). Slid th Humidifi r
Pad back into th scal control ins rt with th color d spot up and
snap th distribution tray (5) back into plac .
8. Insp ct th plastic f d tub (2) by g ntly fl xing it and looking for
cracks or signs of w ar. R plac tub if it is crack d, brittl , or
has b n damag d.
9. R install th vaporativ ass mbly (4) into th humidifi r by fitting its
drain into th round r c ptacl at th bas of th humidifi r. Push th
ass mbly in at th top until it snaps into plac . Push th nd of th
f d tub (2) back firmly into th distribution tray and r plac th
front cov r (1).
4
1. Disconnect elect ical powe to the
fu nace and shut off wate supply.
2. Disconnect the wate line at the
inlet comp ession nut.
3. Remove the in-line st aine f om
inside the inlet side of the valve by
using a small nail o wi e.
4. Flush the in-line st aine clean o
eplace with a new st aine ,
Se vice Depa tment, Catalog No.
22N14.
5. Reconnect the inlet wate line.
Use 7/16” wrench to hold valve
while tightenting compression
nut with 1/2” wrench to prevent
damage to valve bracket and to
ensure watertight connection.
6. Disconnect the wate feed tube at the outlet comp ession nut.
7. Inspect the wate feed tube by gently flexing it and looking fo
c acks o signs of wea . Replace tube if it is c acked, b ittle, o has
been damaged.
8. Remove the o ifice f om the coppe o plastic wate feed tube and
make su e this small opening is unplugged.
9. Replace the o ifice and econnect the wate feed tube. Use 7/16”
wrench to hold valve while tightenting compression nut
with 1/2” wrench to prevent damage to valve bracket and to
ensure watertight connection.
10. Remove the d ain line f om the bottom of the humidifie . If applicable,
flex it to loosen any mine al deposits o blockages. Flush the d ain
line with wate unde p essu e to clea it of any deb is, and slip it
back onto the d ain fitting. If d ain line does not clean p ope ly,
eplace it. Inspect the d ain line to make su e it has a constant
downwa d slope and is not flattened o blocked.
11. Tu n on wate supply and econnect elect ical powe to the fu nace.
9
6
3
7
8
5
2
1
4
INLET
COMPRESSION
NUT
INLET
SOLENOID
VALVE
ORIFICE
OUTLET
COMPRESSION
NUT
IN-LINE
STRAINER
WATER
FEED TUBE
90-1053
1. Front Cov r
2. F d Tub
3. Int gral Bypass Damp r
4. Evaporativ Ass mbly
5. Distribution Tray
6. “V” Notch s
7. Humidifi r Pad
8. Scal Control
Ins rt
9. Drain Lin
90-1422
WARNING
Electrical Shock Hazard
Can caus injury or d ath.
Disconn ct all l ctrical pow r suppli s b for
s rvicing.
Shut off wat r supply b for disconn cting or
tapping into any wat r supply lin .

10009367 4.11
B2205448A
10. R mov th drain lin (9) from th bottom of th humidifi r. If
applicabl , fl x it to loos n any min ral d posits or blockag .
Th n flush it with wat r und r pr ssur . If it do s not prop rly
cl ar, r plac it. Slip drain lin back onto th drain fitting. Mak
sur th drain lin has a constant downward slop and is not flat-
t n d or block d.
11. Turn on th wat r supply. R turn int gral bypass damp r (3) to
appropriat position.
12. Ch ck syst m op ration:
Manual Humidifier Control: With th furnac blow r op rating
and th furnac calling for h at, turn up Control and ch ck sys-
t m op ration.
Automatic Humidifier Control: (Automatic or Manual mod ) Ch ck
syst m op ration and r s t Chang Humidifi r Pad indicator by s t-
ting th knob to “T st/R s t”. With furnac blow r op rating and
furnac calling for h at, humidifi r will op rat for on minut . DO
NOT LEAVE IN TEST MODE AS HUMIDIFIER WILL NOT OPERATE.
13. S t Humidifi r Control to its original position.
III. Required Maintenance
(Humidifier Models HCWP3-18 & HCWP3-18A)
1. Disconn ct main pow r to furnac .
2. Not humidifi r control s tting and turn humidifi r control to th
“OFF” position.
3. Disconn ct l ctrical pow r and turn off wat r supply.
4. Unlatch humidifi r cov r ass mbly (1) from bas ass mbly (2) at
th bottom of th cov r, lift, and s t asid .
5. Pull out th vaporativ ass mbly (3) by grasping at th top and
tipping out.
6. R mov th distribution tray (4) from th vaporativ ass mbly (3)
by unsnapping th black plastic nds of th scal control ins rt (7),
from th tabs at th nd of th tray. Follow th instructions b low
d p nding upon th typ of distribution tray in your humidifi r:
For trays with a synthetic fabric liner: Lightly scrap out or brush
off any min ral d posits, b ing car ful not to str tch or loos n th
synth tic fabric lin r. Soaking th tray in vin gar or a lim -r mov-
ing ag nt is h lpful wh n trying to r mov stubborn min ral
d posits.
For trays with granular coating: Do not scrap off th granular
coating, but lightly scrap any calcium d posits out of th “V”
notch s (5). This t xtur d surfac h lps nsur v n wat r flow
for maximum p rformanc . If th granular coating has b n
r mov d, plac s v ral drops of liquid dishwashing soap on th
distribution tray. This will only n d to b don if th r is no gran-
ular coating.
7. Slid th humidifi r pad (6) out from th plastic scal control
ins rt (7). Cl an th ins rt fram by twisting and fl xing it to
loos n th calcium d posits or us a putty knif . R plac humid-
ifi r pad annually or if p rformanc of th humidifi r drops.
(Catalog No. X2661) Ins rt pad with th color d spot up and snap
th distribution tray (4) back into plac .
8. R install th vaporativ ass mbly (3) into th bas ass mbly (2).
Push th vaporativ ass mbly (3) in at th top b tw n th
r taining ribs that hold th ass mbly in plac in a v rtical position.
9. R mov th drain lin (8) from th bottom of th humidifi r. If
applicabl , fl x it to loos n any min ral d posits or blockag .
Th n flush it with wat r und r pr ssur . If it do s not cl ar,
r plac it. Slip drain lin back onto th drain fitting. Mak sur th
drain lin has a constant downward slop and is not flatt n d or
block d.
10. R install cov r ass mbly (1) by hooking at th top of bas ass m-
bly (2) and latching at th bottom.
11. R conn ct l ctrical pow r (9) and turn on wat r supply.
12. Ch ck syst m op ration:
Manual Humidifier Control: With th furnac blow r op rating
and th furnac calling for h at, turn up humidifi r control and
ch ck syst m op ration.
Automatic Humidifier Control: (Automatic or Manual mod )
Ch ck syst m op ration and r s t Chang Humidifi r Pad indica-
tor by s tting th knob to “T st/R s t”. With furnac blow r
op rating and furnac calling for h at, humidifi r will op rat for
on minut . DO NOT LEAVE IN TEST MODE AS HUMIDIFIER WILL
NOT OPERATE.
13. S t Humidifi r Control to its original position.
NOTE: The motor is permanently lubricated and does not need to be
oiled.
WARNING
Electrical Shock Hazard
Can caus injury or d ath.
Disconn ct all l ctrical pow r suppli s b for
s rvicing.
Shut off wat r supply b for disconn cting or
tapping into any wat r supply lin .
5
5
4
72
6
8
1
3
9
1. Humidifi r Cov r Ass mbly
2. Bas Ass mbly
3. Evaporativ Ass mbly
4. Distribution Tray
5. ”V” Notch s
6. Humidifi r Pad
7. Scal Control Ins rt
8. Drain Lin
9. Pow r Cord
90-1075
This manual suits for next models
9
Table of contents
Other Healthy Climate Humidifier manuals


