Hearing in a Box HB-100 User manual

HB-100 Hearing Aid
User’s Manual

2
Congratulations on taking this
important step towards
better hearing!
This User Guide will help you get the
most out of your HB-100 hearing aid.
Included are important instructions
for initial program selection, feedback
management training and daily use.

What’s in the Box ..............................................4
Hearing Aid Components Illustration .................5
Initial Set-up Instructions ...................................6
•Battery Installation and Removal ...............6
• Inserting Hearing Aid in Your Ear ...............9
• Removing Hearing Aid .............................12
• Program Selection ....................................13
• Low Battery Warning ................................16
•Tip Selection Guide ..................................20
Troubleshooting ...............................................25
Technical Specications ..................................26
Manufacturer’s Warranties and Service ..........27
Warnings .........................................................29
Other Information.............................................34
3
Table of Contents
Customer Help Hotline
If at any time you need assistance with Hearing in a Box products,
please contact us at (888) 347-7746. Hotline is open Monday - Friday,
8:00am to 6:00pm (CST).
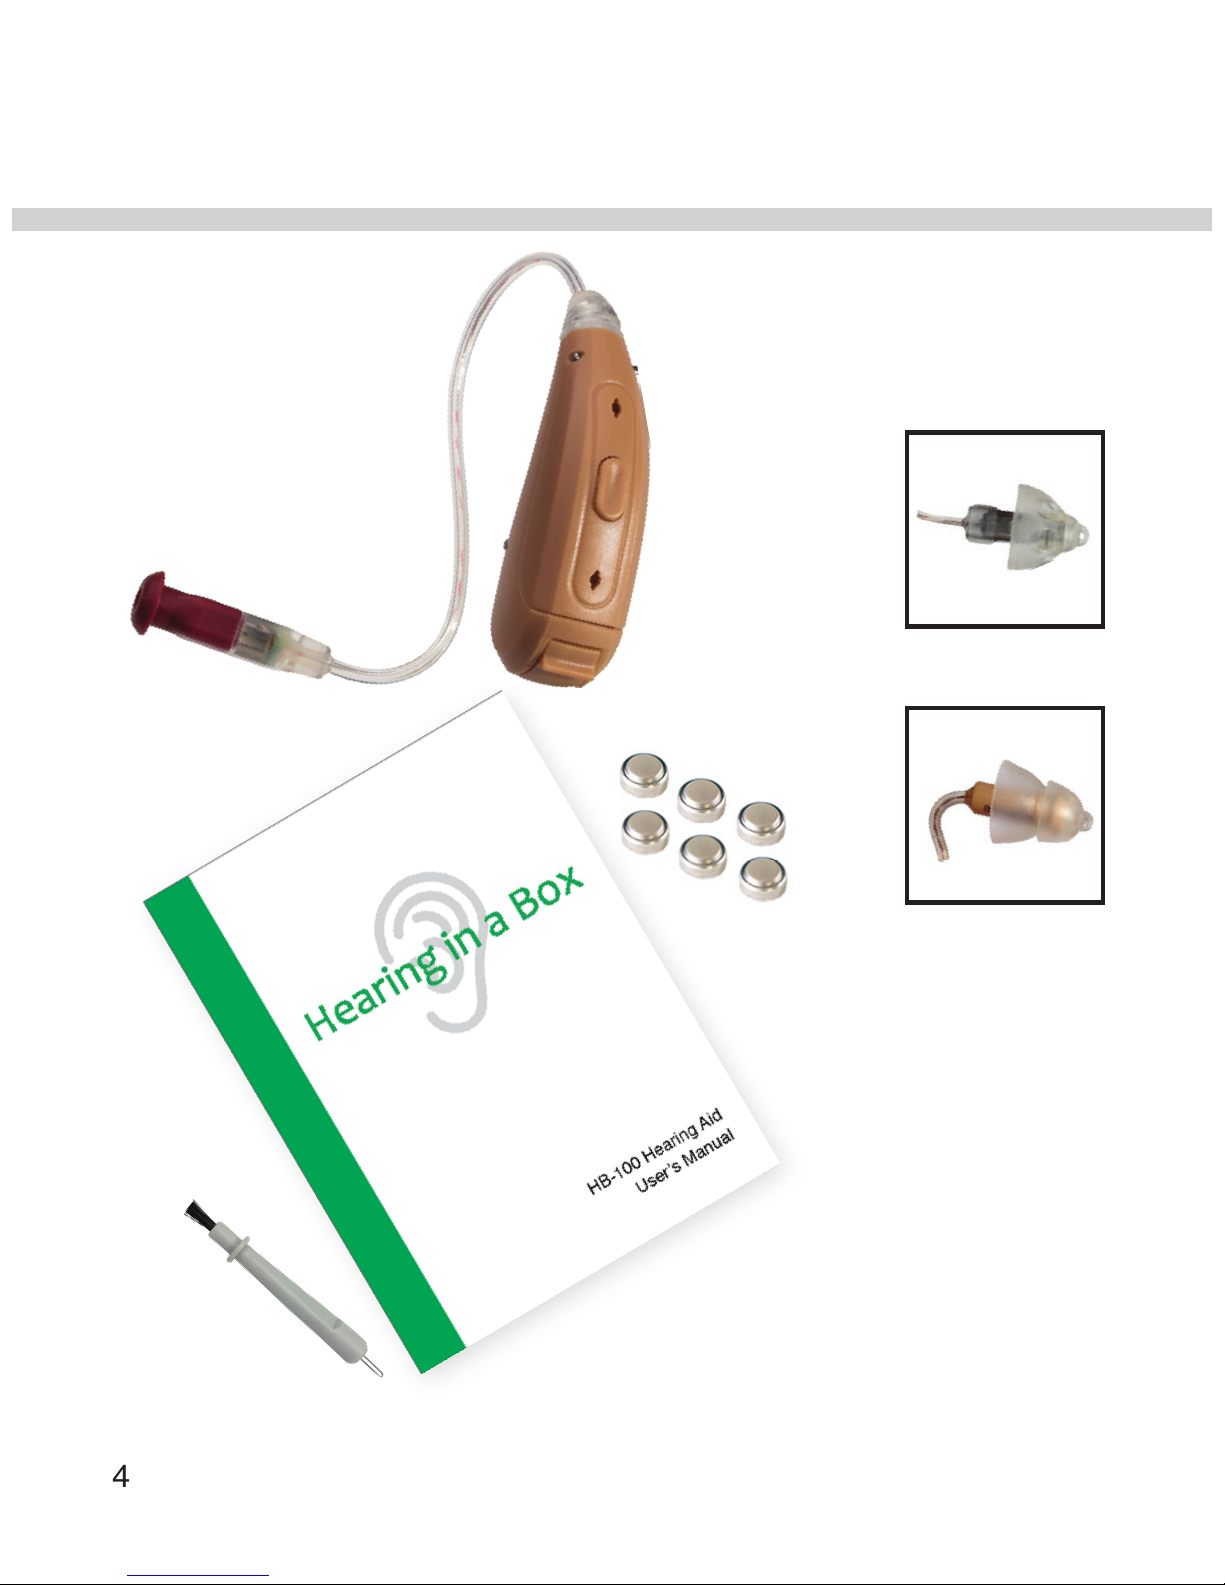
What’s in the Box
4
Open Fit
Closed
Dome
Tips
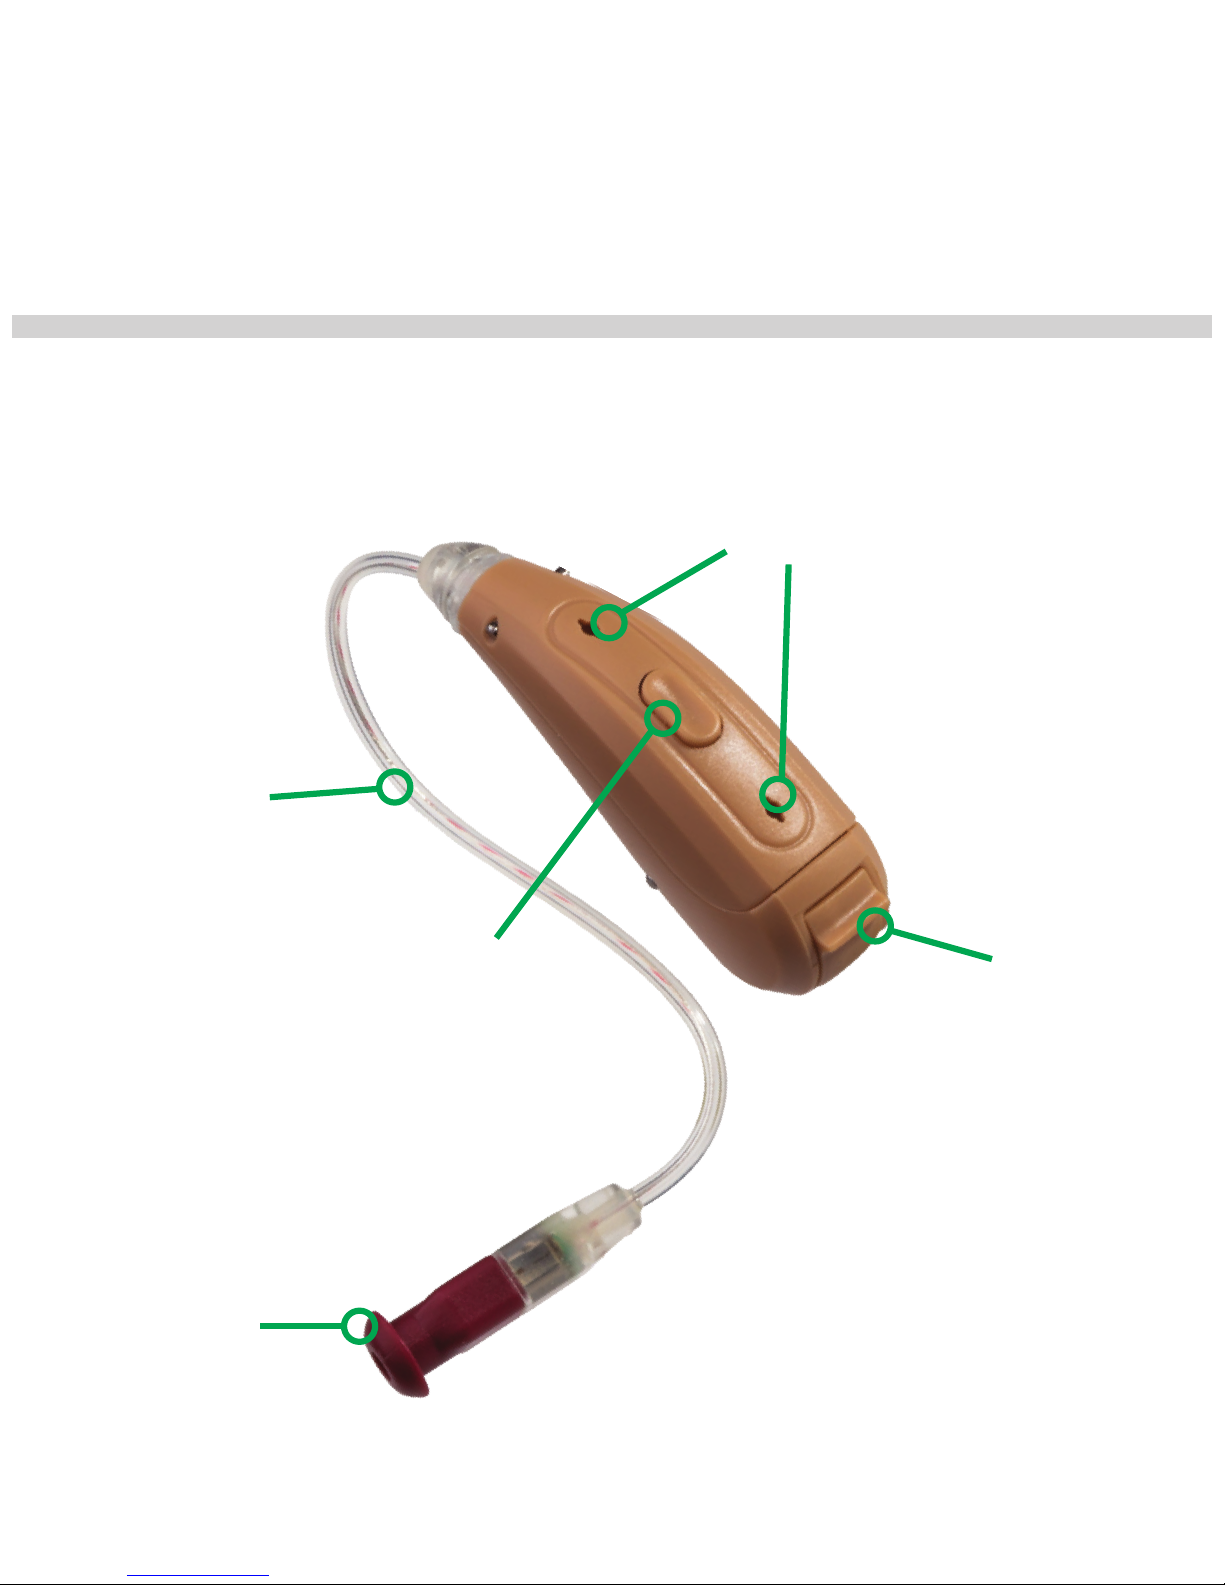
Microphones
Battery Door
Speaker
Link
Control Button
Hearing Aid
Components Description
5
HB-100 Hearing Aid

Your HB-100 hearing aid requires a Zinc-Air
#10 battery. The battery door is located at the
bottom of the hearing aid. To open, place your
ngernail in the notch and with a gentle down-
ward motion, your hearing aid battery door should
become ajar. When fully opened, the battery
door should extend to a full 90 degrees, or just
perpendicular to the hearing aid shell. To insert
a battery use the tab on the battery to place the
battery in the slot, then peel the tab back, expos-
ing the battery to air.
Battery Insertion and Removal
Initial Set-up Instructions
For a video tutorial on initial programming, please
go to www.hearinginabox.com and look in the
Tutorials tab.
6

The battery should sit open to the air for approxi-
mately two minutes, in order to activate. After two
minutes you can close the door and the hearing
aid is ready to wear. To close the battery door,
gently push the door closed with the end of your
thumb.
If the battery has been correctly inserted, the
hearing aid will emit the bugle sound when the
battery door is closed. This signies that the aid
is running properly.
If the bugle sound is not heard, either the battery
is incorrectly inserted or it has run down and
needs to be replaced.
To replace your battery, open the battery door
wide enough to remove the battery. To remove
the battery, lightly push on the bottom side and
it will pop out for easy removal.
7

Warnings:
If your battery door becomes loose or disconnected from the
hearing aid shell, please contact Customer Care for repair
assistance.
Never put a battery in your mouth as they could be
swallowed. Keep out of the reach of children, pets and
individuals with diminished mental capacity. If swallowed,
seek medical attention immediately and call the National
Button Battery Ingestion Hotline at 800-498-8666.
•
•
Do not use force when opening or closing your
battery door.
Use only #10 Zinc-air batteries.
When the hearing aid is not in use, leave the battery
door open, to shut off the aid.
Never take the tab off the battery until you are ready
to use it.
Important tips:
•
•
•
•
8

Right hearing aids have a red tipped link.
Left hearing aids have a blue tipped link.
Inserting Hearing Aid In Your Ear
Check to see if tip is rmly attached to speaker.
If not, do not insert the aid in your ear.
Ensure that you are using the proper left and
right hearing aids. Your hearing aids are
identied as follows:
•
•
For a video tutorial on Inserting Hearing Aid,
please go to www.hearinginabox.com and
look in the Tutorials tab.
9
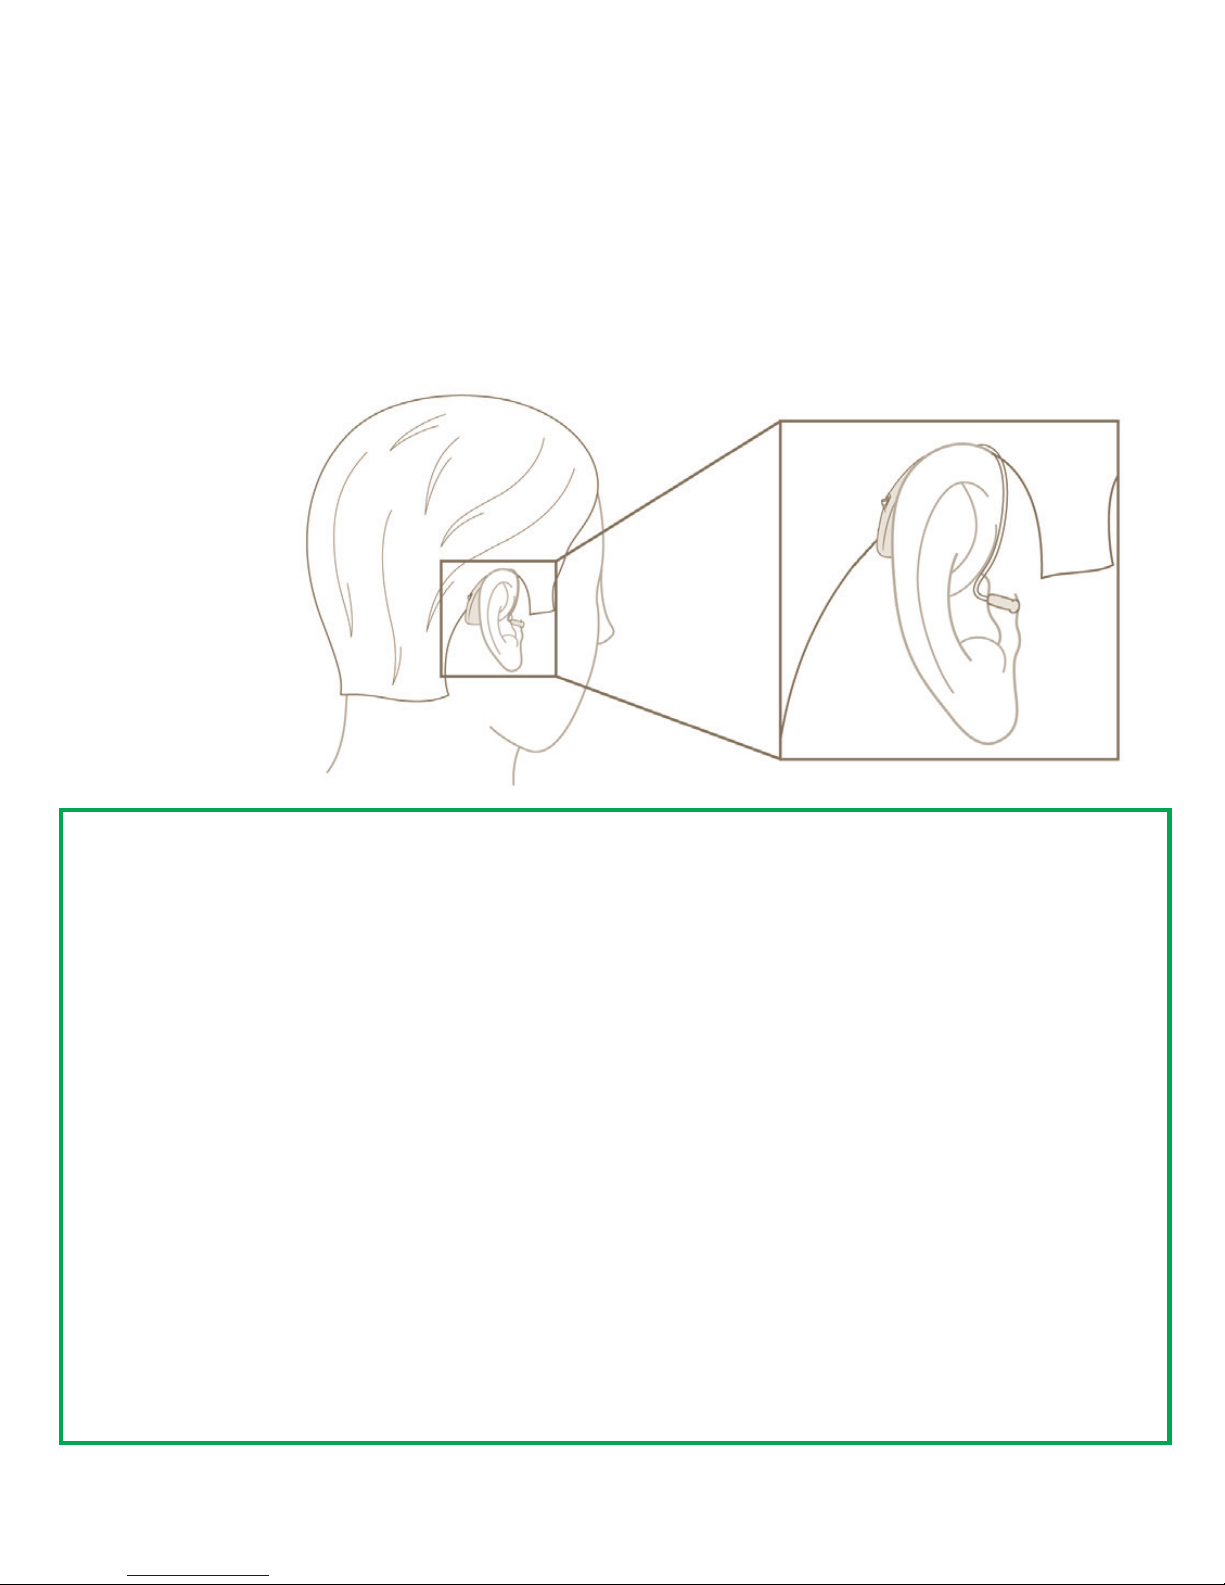
Step One
Place the hearing aid shell over your ear,
allowing the link to naturally coil over your ear
(Figure D).
Figure D
Warnings:
Do not insert the hearing aid if you think you may have a
foreign object in the ear canal.
The hearing aid and tips are made of modern
non-allergenic materials. Still, in rare cases, skin
irritation can occur. If you experience discomfort or skin
irritation in the ear or in the ear canal, discontinue use
and contact your physician immediately.
•
•
10

Step Two
Hold the speaker shell portion of the hearing
aid you will be inserting into your ear. Most
people use their right hand to insert their right
hearing aid and left hand to insert their left
hearing aid. Guide the tip and speaker shell
into your ear canal. With your free hand, pull
your ear up and back (Figure E). This will
straighten your ear canal. Continue to gently
push the tip and speaker shell up toward the
back of head.
Figure E
11

Removing Hearing Aid From Your Ear
Grasp the speaker shell with your thumb and
forenger. Gently pull the tip and speaker shell
out of your ear canal. The corresponding hearing
aid shell and tube will simply roll off the back of
your ear.
•
Important tips:
• Pull tip and speaker shell straight out of the ear by
grasping the speaker shell. Do not twist it out of the ear.
• Hearing In A Box tips are designed to be securely
attached to the speaker shell while inserting and
removing the hearing aid from the ear canal.
12

Your hearing aid has been precongured with four
individual programs. Most people experience greater
hearing loss at the higher frequencies, between
1,000Hz and 8,000Hz, where critical speech sounds
occur. These programs have been designed to
enhance your listening experience at these higher
frequencies, as shown below:
For a video tutorial on Program Selection,
please go to www.hearinginabox.com and
look in the Tutorials tab.
Program Selection
Hearing In A Box - HB-100 Technical Specs
2 CC Coupler Data ANSI S3.22-2003
Output Sound Pressure Level Equivalent Input Noise Level
Full on gain with 90 dB SPL Input 21 dB SPL
Maximum: 107 dB SPL
112 dB SPL
HFA: 105 dB SPL Battery Current Drain
Operation:
0.80 mA
Input-Output Characteristics
Reference Test Gain with AGC at 4 kHz
Full on gain with 50 dB SPL Input
HFA-FOG: 85 dB SPL
Frequency Response
Reference Test Setting with 60 dB SPL Input Dynamic Compressor Characteristics
RTG: 29 dB Attack: 6 ms
Release: 56 ms
Frequency Range
200- 7500 Hz
Total Harmonic Distortion
500Hz: 0.51%
800 Hz: 1.12%
1600 Hz: 0.85%
40043-205 A
70
80
90
100
110
120
100 1000 10000
dB SPL
Frequency (Hz)
60
70
80
90
100
110
100 1000 10000
dB SPL
Frequency (Hz)
70
80
90
100
110
120
50 60 70 80 90
dB SPL - Output
dB SPL - Input
13

Changing the Program
Your hearing aid comes already set at
Program 2, as the factory default. Should
you require greater amplication, you may
choose from Program 3 or Program 4.
For less amplication, try Program 1
Your hearing aid comes already set at
Program 2 with an Open Dome Tip.
Simply tap the control button on the top of
the aid, listen and repeat, until you nd the
program that works best for you.
Your hearing aid will automatically revert to
your chosen program when turned on.
14

Note: Should you hold the control button
down for 2 seconds or longer the hearing aid
will return to the factory default (Program 2)
and emit a low frequency beep.
15

Low Battery Warning
When your battery runs down, the hearing aid
will emit four tones of descending pitch and say
“Low Battery”. You should replace your battery
within a half hour of this warning.
Caring For Your Hearing Aids
Your hearing aids are sophisticated electronic
devices. To ensure that you obtain the most from
them, you need to protect them from the effects
that might damage or degrade their performance:
• Keep your ears clean from ear wax.
If necessary, have your ears cleaned regularly
by a physician.
• Dry your ears and hair before inserting your
hearing aids.
16

• Insert and remove your hearing aids over a soft
surface in case they drop, as they are sensitive
to bumps and shocks.
• Do not immerse your hearing aids in water.
Do not shower or swim with your hearing aids.
• Store your hearing aids outside the bathroom
during bathing and showering.
• Do not wear your hearing aids while applying
hair spray, insect repellent, or any other
products that could get into the hearing aids.
If you have used these products, clean your
hands before inserting your hearing aids.
• Never dry your hearing aids with a blow dryer,
microwave oven, or oven.
• Store away or direct sunlight or heating vents.
Do not leave them in a hot car.
17

• Wipe the outside surface with a soft cloth or
tissue frequently.
• Keep the hearing aids in a safe place, out of the
reach of pets and small children.
• Do not attempt to clean your hearing aids with
alcohol or other cleaning agents.
18

Tips General Information
• When replacing tips, avoid getting wax into the
hearing aid speaker opening.
• Do not apply any lotions or oils to your ears
while using the tips.
For Open Fit and Closed Dome Tip Use
• It is recommended to clean your Open Fit or
Closed Dome Tips regularly by using a hearing
aid brush daily to remove wax from the tip.
19

Tip Selection Guide
Your Kit includes both Open Fit and Closed Dome tips
in a variety of sizes, so you can select the type and size
that best ts your individual needs. Your aid comes with
an Open Fit Tip already attached to your link.
Open Fit Tip – Allows outside sound to come through
the tip. This tip is best used in Program 1 and 2, which
provide a lower amount of amplication
Closed Dome Tip – Does not allow outside sound to
come through the tip and better eliminates feedback,
which is important when using Program 3 and 4.
20
Table of contents


