HeartCheck MD100B User manual

VER1.0B1 HeartCheck HANDHELD ECG MONITOR
- 1 -
Copyright
This document is intended to be used solely for the use of the HeartCheck© ECG
monitor. No part of this work may be copied or disseminated without prior written
approval from the distributor.
All information contained in this publication is believed to be correct at the time of
publishing. The distributor shall not be liable for errors contained herein nor for
incidental or consequential damages in connection with the furnishing, performance, or
use of this material. The information this publication refers to is protected by copyrights
or patents and does not convey any license under the patent rights of our company, nor
the rights of others. We do not assume any liability arising out of any infringements of
patents or other rights of third parties.
Contents of this manual are subject to changes without prior notice.
This item is compliant with Medical Device Directive 93/94/EEC of 14 June
1993, a directive of the European Economic Community.
All rights reserved.
Issue date: 20 July 2010

VER1.0B1 HeartCheck HANDHELD ECG MONITOR
- 2 -
Notes on Safety
This device monitors and records ECG waveforms, it is not intended for medical
diagnosis. Please refer any recordings to a qualified physician for medical interpretation.
This device is not a substitute for seeking medical attention. If you believe you are
experiencing any adverse medical event, you are to seek medical attention immediately.
The recordings should be used as a reference for analyzing cardiac rhythm by doctors
only. Always consult your doctor.
Medical conditions can change suddenly. If you notice any change in your condition,
consult your doctor, regardless of the measurement results.
Warnings!
Not intended for use on individuals with a cardiac pacemaker.
Not intended for use with an implanted defibrillator.
Do not use in the presence of flammable anesthetics, drugs or pressurized oxygen
(such as in a hyperbaric chamber, ultraviolet sterilizer or oxygen tent).
Do not use on individuals with significant resting tremors.
Do not use on individuals with dermatological conditions.
Intended for adult user only.
Do not use batteries of a type other than that specified in this manual.
Do not take measurements where the device will be exposed to strong
electromagnetic forces.
Caution!
Do not expose the device to static electricity. Always disperse any static electricity
from your body before handling the device.
Do not take measurements in a moving vehicle.
Do not use a cellular phone near the device.
Do not disassemble, repair, or modify the device.
Do not insert batteries with their polarities reversed.
The chest electrode will be impeded by excessive body hair, remove hair at the
electrode contact point.

VER1.0B1 HeartCheck HANDHELD ECG MONITOR
- 3 -
General
Avoid extremes in temperature and humidity. Do not use this device in locations
subject to high or low temperatures or humidity.
Use at a temperature within 5°C to 40 °C and below 80% RH.
Do not sterilize this device in an autoclave or gas sterilizer (EOG, formaldehyde, high
density ozone etc.).
Do not wash this device with water.
Do not store the device in the following ambient conditions.
- Locations exposed to direct sunlight.
- Locations subject to high temperatures and high humidity.
- Wet or damp locations where water may get on the device.
- Dusty locations.
- Near fires or open flames.
- Locations exposed to strong vibration.
- Locations exposed to strong electromagnetic fields.
Dispose of the device and its accessories according to applicable local regulations.

VER1.0B1 HeartCheck HANDHELD ECG MONITOR
- 4 -
Contents
1. General Description..................................................................................................... - 5 -
2. Battery Installation....................................................................................................... - 7 -
3. Setting Date and Time................................................................................................. - 8 -
4. Taking a Measurement................................................................................................ - 9 -
5. Displaying an ECG..................................................................................................... - 19 -
6. System Settings ......................................................................................................... - 21 -
7. Data Management ...................................................................................................... - 22 -
8. Version.......................................................................................................................... - 23 -
9. Data Transmission..................................................................................................... - 23 -
10. Trouble Shooting........................................................................................................ - 23 -
11. Key Symbols................................................................................................................ - 24 -
12. Technical Data............................................................................................................. - 25 -
13. Maintenance and Storage........................................................................................ - 26 -
14. General information about the Heart and ECG Measurements..................... - 27 -
Appendix............................................................................................................................... - 29 -

VER1.0B1 HeartCheck HANDHELD ECG MONITOR
- 5 -
1. General Description
1.1 Know Your Device
Picture 1-1
Description of Picture 1-1:
①POWER button: Power on or off the device.
② Right Metal Electrodes: Hold these two with right index finger when taking a
measurement.
③START button: The shortcut key for ECG measurement.
④OK button: Press this button to confirm the selection or set date and time when in the
Date and Time Setting Mode.
⑤ Button: Press this button to move the cursor to your desired menu or change
the number, or move the wave form to the left.
⑥Button:Press this button to move the cursor to your desired menu or change
the number, or move the wave form to the right.
⑦MENU button: Return to the previous menu by pressing this button.
⑧Left Metal Electrodes: Place this against the center of left palm or chest when taking
a measurement.
⑨ECG cable socket: When taking a measurement by ECG cable, connect the ECG
cable with this port.

VER1.0B1 HeartCheck HANDHELD ECG MONITOR
- 6 -
⑩USB interface: Transmit data to the PC through this interface.
1.2 Product Features
Small, portable and easy to use.
Choice of two measuring modes.
USB data transmission.
Fast measurement in just 30 seconds.
Up to 200, 30 seconds ECG Strips recorded.
Measurement of one channel ECG anytime, anywhere you like.
Display of ECG waveform, heart rate, ECG quality result and battery status on the
backlit LCD screen.
Auto power-off.
Two AAA batteries.
PC Software provided to review recordings.
1.3 Intended Use
The MD100 ECG monitor is a handheld device intended for use in non-invasively
recording and displaying of ECG waveforms for self recording of adults in daily life under
physician direction to provide the physician with relevant data on the heart condition of
their patient. The MD100 is a patient triggered event recorder which makes available to
patients the ability to manually record transient cardiac events. The MD100 is suitable
for patient and professional use. The MD100 ECG monitor allows the recorded ECG
data to be saved to the device memory and to later display the ECG data on a computer.
An ECG report can be printed from the computer.
VER1.0B1 HeartCheck HANDHELD ECG MONITOR
- 7 -
1.4 Display
The device screen is used to display the ECG waveform, a confirmation of the ECG
quality, other parameters, such as time & date, battery status and the status of data
storage in memory.
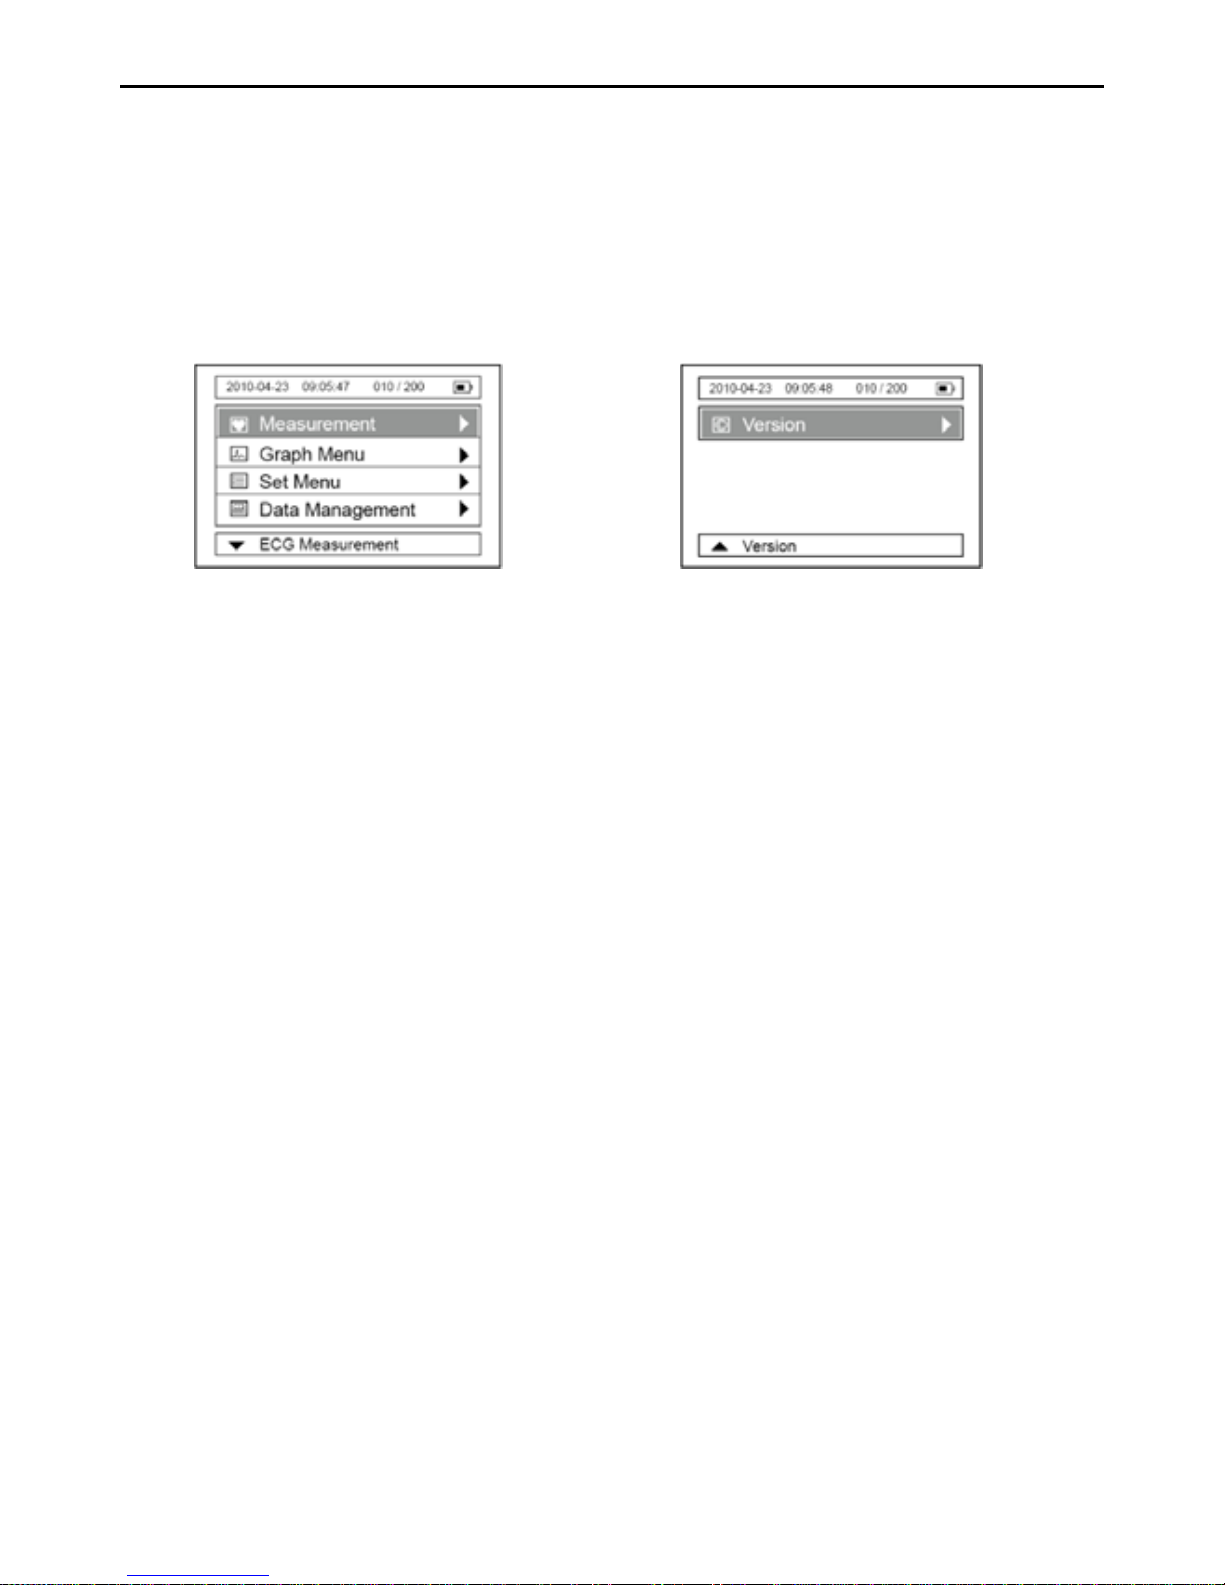
Menu interfaces
Picture1-2 Picture1-3
“Measurement”: Enter this menu to select the measurement mode and take a
measurement.
“GRAPH Menu”: Enter this menu to review, delete, and lock the detected ECG
waveform and ECG quality result.
“SET Menu”: Enter this menu to set the Date & Time, Brightness, Beep Tone
On/Off, Automatic Power-off, Assign ECG ID Number and set
Wave Scale.
“Data Management”: Enter this menu to delete data.
“Version”: Enter this menu to review the device’s information.
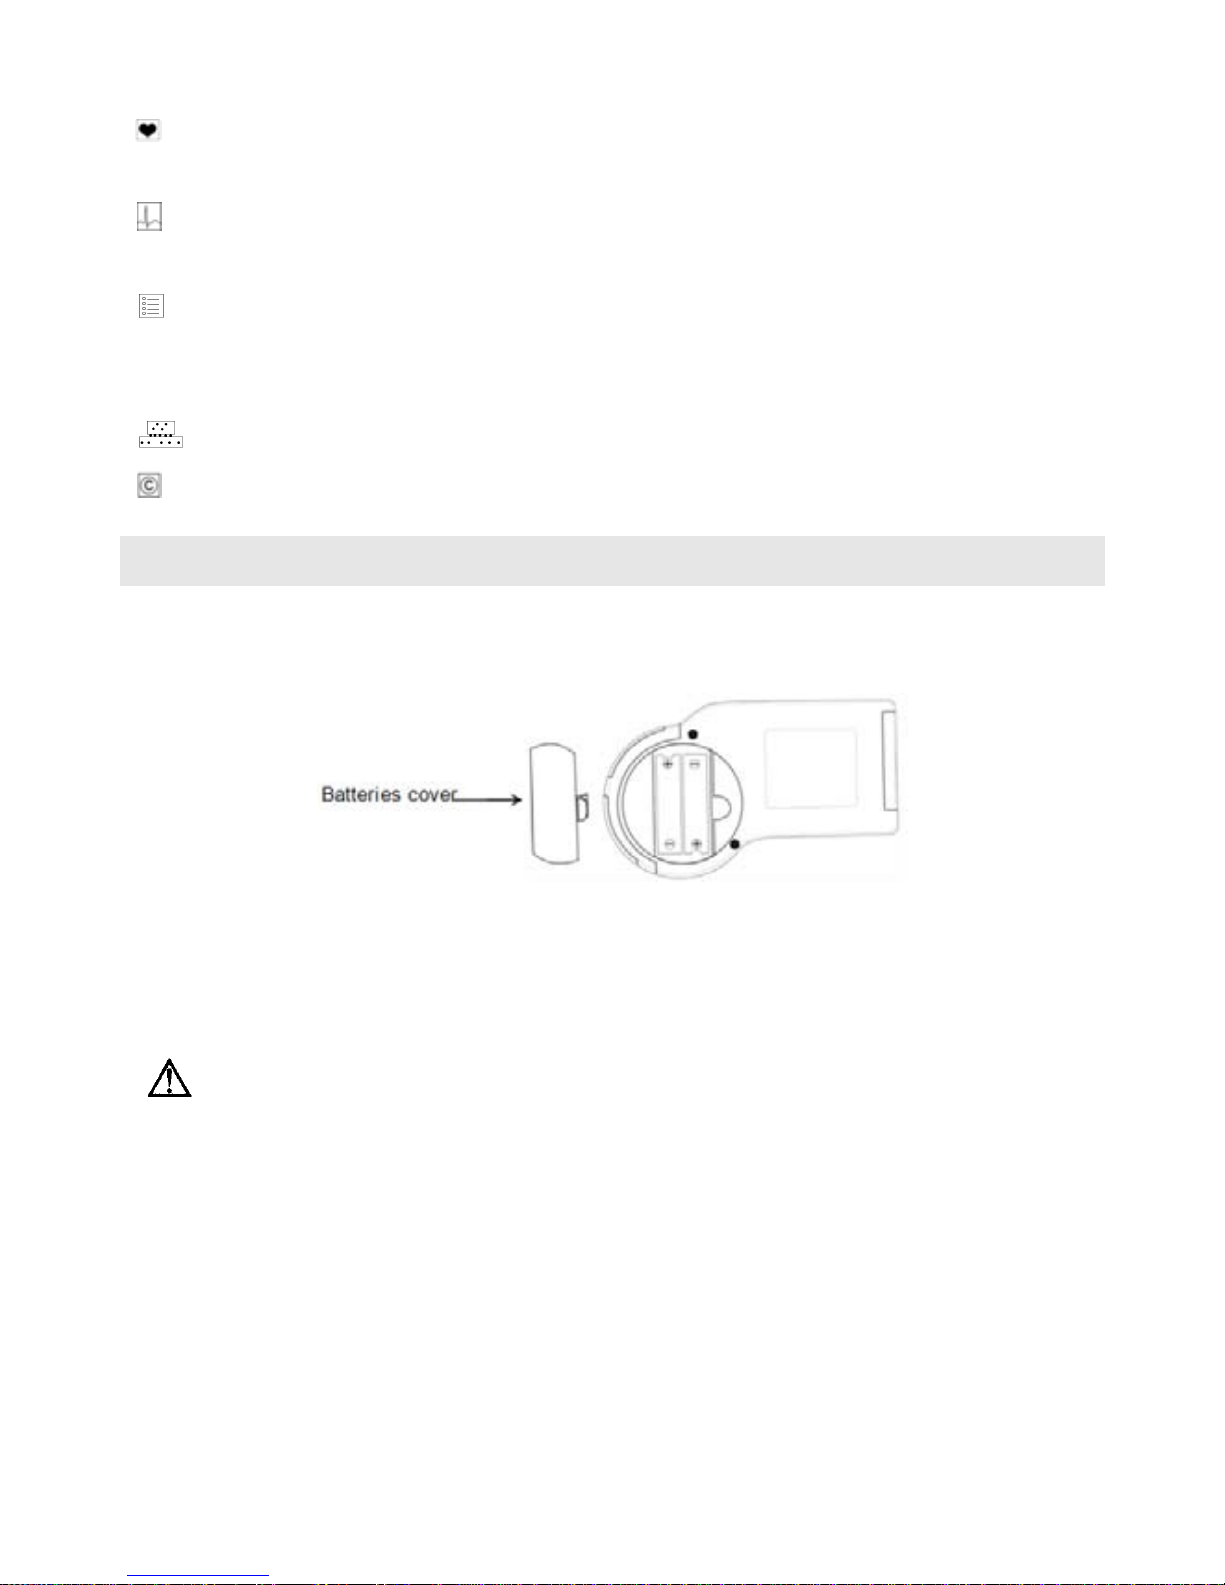
2. Battery Installation
2.1 Open the battery cover on the back panel of the device.
2.2 Insert two AAA batteries as indicated by the polarity sign (refer to Picture 2-1).
Picture 2-1
2.3 Replace the battery cover on the back panel of the device.
Ensure the polarity of the batteries is correct, otherwise the device will
not function correctly.
Battery life and replacement
When the “Battery power is low please replace with fresh new batteries” message
appears, replace batteries with new ones.
Always turn off the device before replacing the batteries.
Dispose of the used batteries according to the applicable local regulations.
VER1.0B1 HeartCheck HANDHELD ECG MONITOR
- 8 -
Battery life
Two new AAA batteries will last for approximate 400 measurements.
The batteries enclosed in the package are used for demonstration purposes. It is
possible that these batteries will not last for 400 measurements.
The battery life can be confirmed in the upper right of the LCD display.
CAUTION!
Do not use batteries not specified for this device.
Do not insert the batteries with the polarities in the wrong direction.
Do not dispose of batteries in fire.
If you come into contact with battery fluid, seek immediate medical attention.
Remove batteries from this device during periods of non use.
Disposal of the batteries should comply with local laws and regulations.
3. Setting Date and Time
Always set the date and time before using the device for the first time.
Routinely check whether the date and time are correct before using the device and reset
if necessary. The date and time are important indicators when a measurement is taken.
3.1 Date and time setting
Note: The date and time information will be displayed on the interface in the format of
“Year/Month/Date”; “Hour/Minute/Second”.
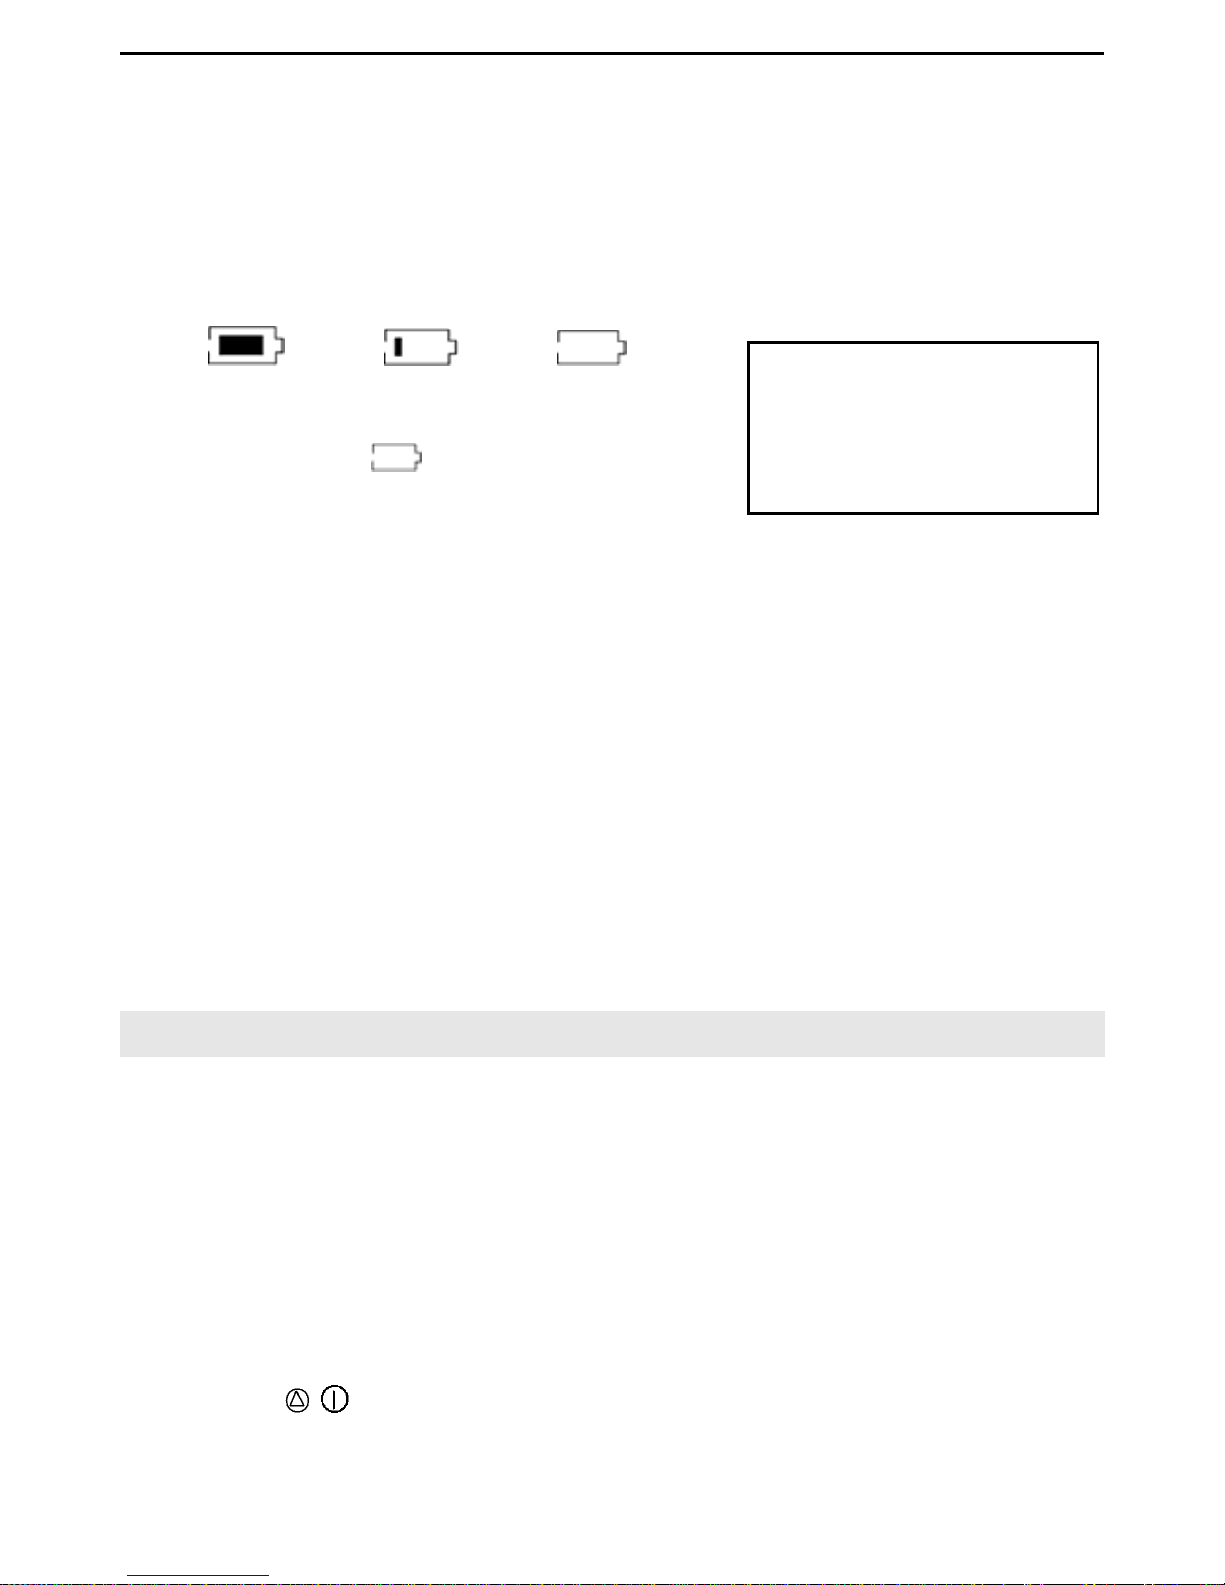
1. Press the /Power button for 3 seconds to turn on the device.
Full power low power no power
When the sign ” ” appears, it means the
battery power is not sufficient, and the device
will display the information as in picture 2-2.
We suggest users replace the batteries with
new ones.
Battery power is low
please replace with fresh
new batteries
Picture 2-2 Low power

VER1.0B1 HeartCheck HANDHELD ECG MONITOR
- 9 -
Picture 3-3
Picture 3-4
2. Select the “Set Menu” item, as shown in
Picture 3-2. And then press the “OK” button to
enter.
3. Select the “Date and Time” item, as shown in
Picture 3-3, then press the “OK” button.
4. Press the “OK” button to highlight an item, and
press or button to adjust each date and
time value. Press the “MENU” button to confirm
your settings.
4. Taking a Measurement
4.1 Important Notes on Taking a Measurement
In order to obtain a good ECG reading, it is important that measurements are taken
correctly. Please read the instructions carefully before taking a measurement for the first
time, and follow the instructions each time you take a measurement.
Make sure that the electrodes are directly touching your skin.
If your hands or skin are dry, wipe them with a damp towel so that they are slightly
moist.
If the electrodes are dirty, wipe any dirt off with a soft cloth moistened with
disinfectant alcohol or a cotton swab.
---- Take care not to use too much disinfectant alcohol when cleaning the electrodes.
Picture 3-2
Picture 3-1
VER1.0B1 HeartCheck HANDHELD ECG MONITOR
- 10 -
---- Do not wipe or get disinfectant alcohol on parts other than the electrodes.
Do not move during measurement.
---- Movement, including talking, coughing, or sneezing, during measurement can
affect the quality of the measurement results.
Incorrect positioning of the device during measurement may cause the results to be
inaccurate, be sure to check the position before taking a measurement.
To ensure the device remains in good working order, keep the electrodes clean.
Disinfect the electrodes by wiping them with a soft cloth or cotton swab moistened
with disinfectant alcohol.
4.2 Measurement Methods:
There are three ways to record an ECG using this device; palm measurement, chest
measurement and cable measurement.
The ideal posture for any of the methods listed above is to be seated comfortably with
your back straight. You can also take a measurement while you are standing or while
lying down. Be sure to stay as still as possible until the measurement is complete.
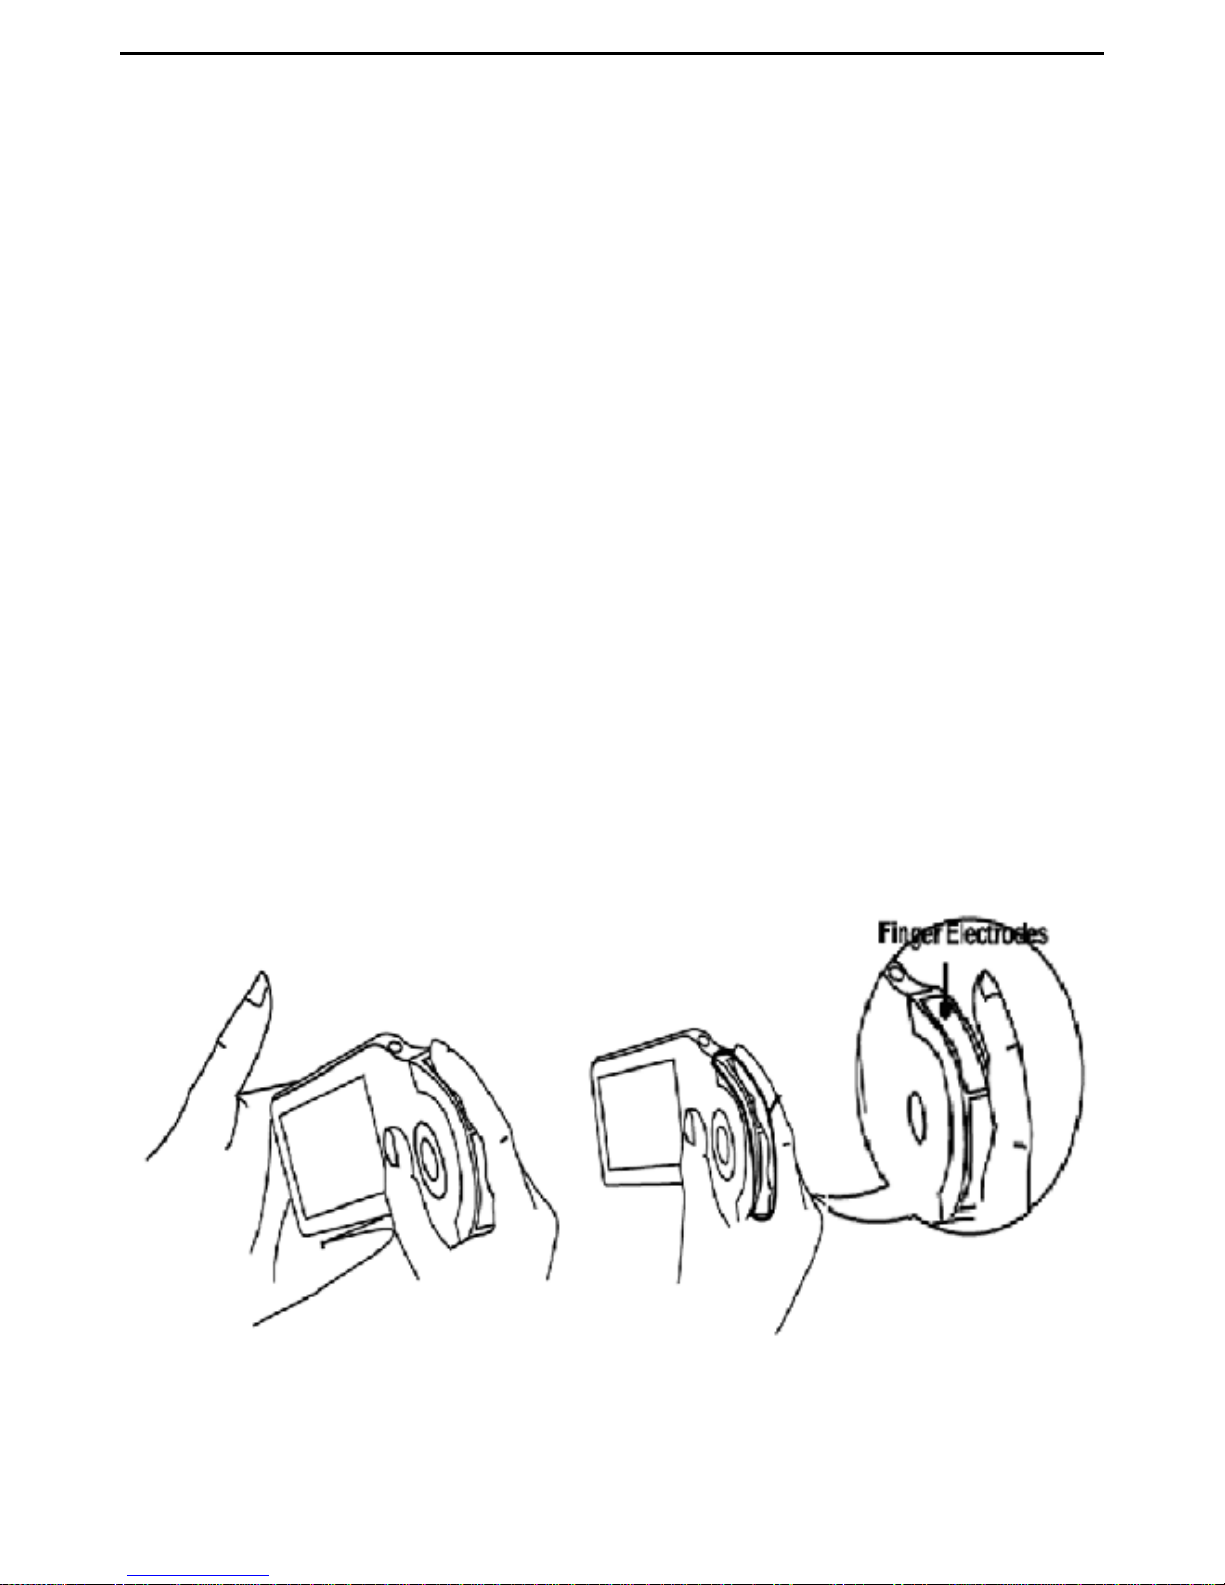
4.2.1 Palm Measurement
Make sure to hold the right metal electrodes of the device with right index finger firmly,
and place the left metal electrodes against the center of the left palm. (Refer to Picture
4-1)
Picture 4-1

VER1.0B1 HeartCheck HANDHELD ECG MONITOR
- 11 -
Notes:
During measurement, the device will only respond to the “MENU” or “OK” button to
discontinue the measurement.
If the contact between the electrodes and skin becomes loose, or the conditions
change during measurement, the recording may be inaccurate.
If the electrodes do not have good contact during the measurement, the device will
show the “ ” icon at the bottom right of the screen. Repeat recording.
Keep still and do not move until the measurement is complete.
If you experience difficulties using the palm measurement method please try one of
the alternative methods outlined below or consult your physician.
Wrong Operation Methods:
A. Hand contact with the electrodes become loose during the measurement.
B. Palm or fingers are not covering the electrodes.
4.2.2 Chest measurement
If palm measurement is not ideal, please adopt chest measurement.
(1) Measurement for Male:
Hold the device with the right hand; make sure that the index finger makes contact with
the right metal electrodes sufficiently. Place the left metal electrodes against left side of
your chest on bare skin about 5 cm below your left nipple. (Refer to Picture 4-2)
Picture 4-2
Note: If you experience problems placing the device’s left metal electrodes flat against
your chest during chest recordings, please ask your doctor for advice.

VER1.0B1 HeartCheck HANDHELD ECG MONITOR
- 12 -
(2) Measurement for Female
Locate the ECG monitor at the lower end of the breastbone
and move horizontally to the middle of the left part of the chest.
If necessary, gently lift the breast and place the left metal
electrodes under the left breast. If the electrodes come in
contact with under garments, move the device slightly until it
has made contact with the skin. It is NOT necessary to remove
the under garments; if you are unsure, please consult your
doctor.
Note: The proper position of the left metal electrodes is shown in Picture 4-3.
Improper Operation Methods:
A. The left metal electrodes are not in contact with the left chest.
B. The hand positioning is not correct on the right metal electrodes.
Notes:
Make sure that you are relaxed.
Press the electrodes against your bare skin. Do not try and take a recording through
clothing.
If your skin is very dry, your recording may not be accurate.
If you experience problems applying the device so that the left metal electrodes are
flat against your chest when taking the chest measurement, please ask your doctor
for advice.
Picture 4-3

VER1.0B1 HeartCheck HANDHELD ECG MONITOR
- 13 -
4.2.3 Cable Measurement
If palm measurement is not ideal and it is not convenient to adopt the chest
measurement, the cable measurement is recommended. 1. Place the electrode patches
on the appropriate body areas as depicted in Picture 4-4. Connect the cables to the
patches with the matching colour ends. 2. Connect the leads to the device through the
lead port.
Picture 4-4
(1) The position for placing the cable electrodes is shown in Picture 4-4.
White (right arm RA)electrode — under the clavicle next to the right shoulder.
Black (left arm LA)electrode —under the clavicle next to the left shoulder.
Red (left leg LL)electrode —at the left of the underbelly.
Note:Ensure the electrode patches are placed in the correct positions and are
well attached before pressing the “START” button.
(2) Connecting the device using the ECG lead cable. (Refer to picture 4-5).
Picture 4-5
Make sure the ECG cable connector is inserted fully into the device.
If the measurement has failed, please check the placement of electrode patches

VER1.0B1 HeartCheck HANDHELD ECG MONITOR
- 14 -
or the connection of the unit and lead cable.
Wrong Operation Methods:
A. Cables are mounted incorrectly.
B. Electrode patches have been placed on the body incorrectly.
4.3 Measurement Mode:
There are two measurement modes for your selection easy mode and continuous mode.
4.3.1 Measuring in Easy Mode:
Press the /Power button for about 3 seconds to turn on the device.
Enter the menu interface as shown in Picture 4-6 and select the “Measurement” item, the
interface switches to the one as shown in Picture 4-7. Measurement Modes include Easy
Mode and Continuous Mode. Choose the “Easy Mode” item, and click the “OK” button.
The interface will appear as shown in Picture 4-8. After the count down from six to zero,
the measurement will start.
Picture4-6 Picture4-7 Picture4-8
Additionally, you can press the START button to quickly start a measurement, based on
the measuring mode selected in the “Measurement” Menu. Before measuring, make
sure that you are in a relaxed position.
Measuring interface in Easy Mode:
It takes about 30 seconds to complete the ECG measurement. During the measurement,
the device will beep synchronously along with the heart beat.

VER1.0B1 HeartCheck HANDHELD ECG MONITOR
- 15 -
Picture 4-9
Description of Picture 4-9:
“2010-04-23”: The current date.
“09:05:47”: The current time.
“010/200”: Indicates that ten measurement results have been saved in the
device and the device may store up to a maximum of 200 records.
: Indication of the power level of the battery.
: ECGamplituderuler.
: The examined ECG waveform.
×1: ECG waveform scale. You can select the displaying scale (x 0.5, x 1,
x 1.5 or x 2) in the "SET Menu”.
: Speaker status – On or Off.
: The status bar showing measurement progress.
2:Indication of measurement time.
: The sign of heartbeat, it flashes on and off synchronously with the
heart beat.
A measurement result message is displayed when the measurement has been
completed (Refer to Picture 4-10 &4-11 for details).
Picture4-10 Picture4-11

VER1.0B1 HeartCheck HANDHELD ECG MONITOR
- 16 -
Description of Picture 4-11:
“2010-04-23”: The current date
“09:05:47”: The current time
“010/200”: Indicates ten measurement results have been saved in the device
and the device can store up to 200 records.
: Indication of the power level of the battery.
“HR 080 bpm”: The heart rate is 80 beats per minute.
“2010-04-23”: The record storage date
“09:05”: The record storage time
To cancel this ECG recording, press button once to move the cursor to the
“Cancel” item. Press OK button to return the Menu interface.
To save the ECG result, please perform the following steps:
To save the ECG press the OK button when the “Save” item is highlighted, or it will be
saved automatically within 3 seconds. The screen then switches to the user information
interface (Refer to Picture. 4-12). The user information is shown to allow the user to
confirm the patient’s identity.
Picture4-12 Picture4-13
If the patient’s information is correct select the “Yes” item and press the OK button. The
data will be saved under this patient.
If the patient’s information is incorrect, move the cursor to the “NO” item and press the
OK button to enter the correct patient information as shown in Pic.4-14.
VER1.0B1 HeartCheck HANDHELD ECG MONITOR
- 17 -
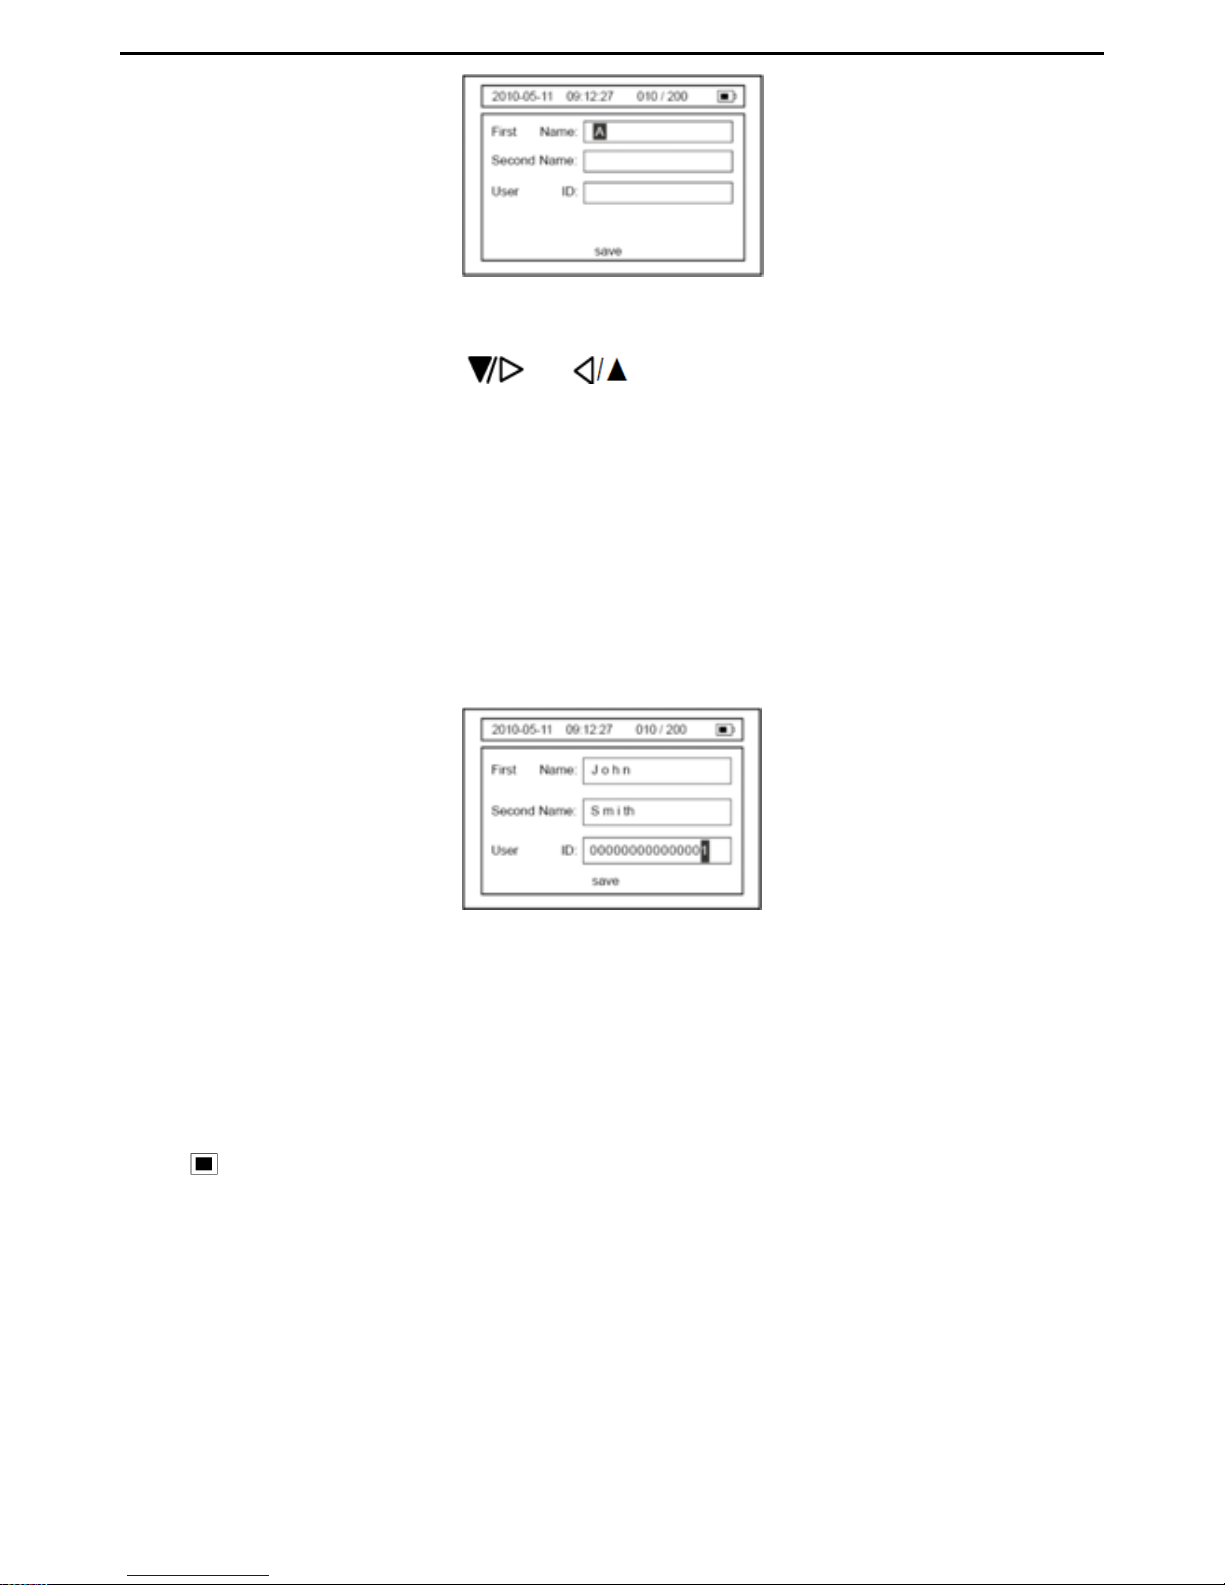
Picture 4-14
To input the first name, press or button to change the character from A to
the required letter (such as J in John) and then press the OK button to move the cursor
to the next space. Set each character of the first name based on the afore mentioned
steps. When the first name is complete, press the MENU button to move the cursor to
the “Second Name” field.
Enter the second Name and User ID following the steps used for the First Name
selection (see instructions above).
Note: Each field is large enough to accommodate 15 characters or numbers.
Picture 4-15
To save the information, press the MENU button to move the cursor to the “Save”
location and then press the OK button to save patient information and exit the current
interface.
The device can save 200 30-second ECG records. When the device memory is full, the
icon “ ” will appear on the upper right of the LCD screen (shown in Picture 4-16 &
Picture 4-17). Once the device memory is full an alert will be shown to indicate that no
further records can be stored (shown as Picture 4-17). Before being able to record new
ECGs delete unnecessary records from the device memory.

VER1.0B1 HeartCheck HANDHELD ECG MONITOR
- 18 -
Picture4-16 Picture4-17
To turn off the device press the /button for three seconds
Note: If you forget to turn the device off, it will automatically shut down within one minute.
Users can set the auto power off time limit (1 minutes, 2 minutes…10 minutes) in
“System Settings”
Caution!
Please note that while the measurements from an ECG monitor are a useful guide for
your doctor, they cannot detect all changes in heart conditions. Always consult your
doctor if you notice any changes in your condition, regardless of the measurement
results, even if “Stable waveform” is displayed as the measurement result.
The values displayed by the device are the values at the time of measurement.
Medical conditions can change suddenly. If you notice any change in your condition,
consult your doctor, regardless of the prior measurement results.
4.3.2 Continuous Mode
The device must be connected to a computer prior to the start of a recording In the
“Measurement Mode” you can select the “Continuous Mode” for longer term monitoring.
New batteries are expected to support approximately 6 hours of recordings in
Continuous Mode.
Picture 4-18
Note: In Continuous Mode, the device must be connected to the computer as
Continuous Mode measurement results cannot be saved in the device. The
measurement results can be displayed in real-time on a computer by using the data
Table of contents
Popular Medical Equipment manuals by other brands

Mentalab
Mentalab EXPLORE quick start guide

GETINGE GROUP
GETINGE GROUP Maquet SERVO-s VENTILATOR SYSTEM V7.0 user manual

KYRA MEDICAL
KYRA MEDICAL k-tek KTEK9200 Instructions for use

Nabtesco
Nabtesco Symphony NK-6 instruction manual

CardiAid
CardiAid CT0207RS User Manual and Introduction to the Device

Timago
Timago yuwell YF-01 user manual


