Heatcom HC71 User manual
1
Introductions for HC71 (Edition V4.0 ) 02000121_1.1 GB
This instruction is divided into two parts. User-Instructions and last in this instruction, the Installation-instructions.
User-Instructions
HC71is designed for heating systems especially Electrical Underfloor Heating. It will be easy to understand and use its
functions.
The Thermostat starts in Manual mode with floor sensor and temperature min. limit 5oC and max. limit 40oC.
Wooden floors should have floor limit at approx. 27oC.
Note: When Power Regulator mode is used, only Floor Sensor limit is activated.
A) The thermostat has three modes:
Manual mode gives a simple temperature control. No programming needed to use the thermostat, however
more useful functions i.e. Child Lock is possible to choose in Manual mode.
Manual mode is activated first time the thermostat is connected and after a Factory Reset.
Also choose Manual mode to cancel the programmed Event schedule (e.g. during holidays, for easy 5℃frost
protection) and to set the required temperature manually.
Power Regulator mode is a sub menu to Manual mode. Power Regulator mode can control the
underfloor heating without being influenced by other heat sources in the room.
Power Regulator run in 12-minute cycles. The user set how many minutes (out of the 12-minute cycle), the
heating element is warming.
I.e. Power Regulator set to 25%. Heating-element is on 3 out of 12 minutes = Power is 25% of max.
I.e. Power Regulator set to 50%, the heating-element is on 6 out of 12 minutes = Power is on 50% of the time.
Floor sensor temperature limit is activated.
Auto mode offers an intelligent temperature control automatically lowering temperatures according to you
needs i.e. during the night.
This function will run the Electrical Underfloor Heating in a very economical way, without compromising the
comfort.
Stand by - activate
Press Menu button for 3 seconds to set thermostat is in stand by. No settings will be changed the thermostat will turn
off, all the settings, including time and date will be saved.
Stand by - exit
Press Menu(middle) button and Exit Stand by.
Memory function
For memory function to work, the backup-battery must first charge 24h. Charging begins when the thermostat are
connected to power.
In case of power cut and fully charged backup-battery all setting are stored 1-2 days.
If the power cut is longer than the backup-battery can store settings the thermostat will restart in factory setting.

2
Technical data
Type
HC71
Supply voltage
100~240 VAC 50/60 Hz
Maximum Load
16 A
Operating temperature
0~50 ℃
Storage temperature
-10~60 ℃
Temperature range, room sensor
5~40 ℃
Temperature range, floor sensor
5~40 ℃
Running modes
Manual / Automatic / Power Regulator (12min. cycles)
Sensor options
Floor / Room / Room with Floor sensor as temperature limiter
Sensor calibration
Yes - adjustable
Floor temperature limiter
Yes –high and low, adjustable
IP class
IP21
Terminals
Max. 2.5 mm2
Floor sensor with 3.5m cable
NTC, 10 K / 25 ℃
Dimensions
82 mm×82 mm×56 mm
Colors
Polar white RAL 9010 / Signal white RAL 9003 / Matte black
Night and day set-back
Yes –3 modes. Individually adjustable
Open Window detection
Yes –On/Off
Energy Monitor
Yes –max. duration one week. Require specific Load setting
Child Lock
Yes –On/Off
Memory function
Yes - 1-2 days (when backup-battery is fully charged)
Apply to: LVD 2014/35/EU •EN60730-1 •EN60730-2-9 •EN50081-1 •EN50082-1 •RoHS
(EU)2015/1188 ECO Design

3
Press
Menu
Manual mode menu.
Use the arrow buttons to run forward or backwards in the Menu sequence.
If more information to the specific menus are needed, please see Thermostat setup options page 4.
Manual Main Window Menu start
Menu end.
to
Change from Manual to Auto mode.
Press Menu and roll forward til Auto menu window.
Press OK to activate Auto mode. Enter hour, minute, weekday and load(if load is known).
Press OK to activate Power Regulator mode.
If floor sensor is installed set “LIMIT FLOOR TEMP TO MAX” temperature. Default temperature limit setting is
27 oC.
Note: If no Floor Sensor has been installed There is no limit to the floor temperature.
Note: If load setting is not correct, only energy consumption readout in the “Energy Monitor” Menu will not show the
correct consumption. All other functions will work correct and unaffected no matter the load value.
“To return to Main Window, go to
EXIT and press OK”

4
menu
Press
Menu
Auto mode menu.
Use the arrow buttons to run forward or backwards in the Menu sequence.
If more information to the specific menus are needed, please see Thermostat setup options page 4.
Auto Main Window Menu start
Menu end.
Change All Wake and Return Temp or All Leave and Sleep Temp. in one operation.
In Auto Main Window: Press Temp.
Choose the events you need to change by selecting: All Wake and Return Temp or All Leave and Sleep Temp.
Then set the desired temperature and press OK.
Press OK to acknowledge.
Now all temperatures in the events chosen are changes to the new temperature.
to
Change from Auto to Man mode
In Auto Main Window: Press Man.
Select Man to cancel the programmed Event schedule (e.g. during holidays) or to simply to control the temperature in
a simple way manually. Also you may want to adjust the temperature to 5℃for frost protection while you are away.
Press Man, and Manual mode is active instantly. To return to Auto go to Auto Menu window.
“To return to Main Window, go to
EXIT and press OK”
5
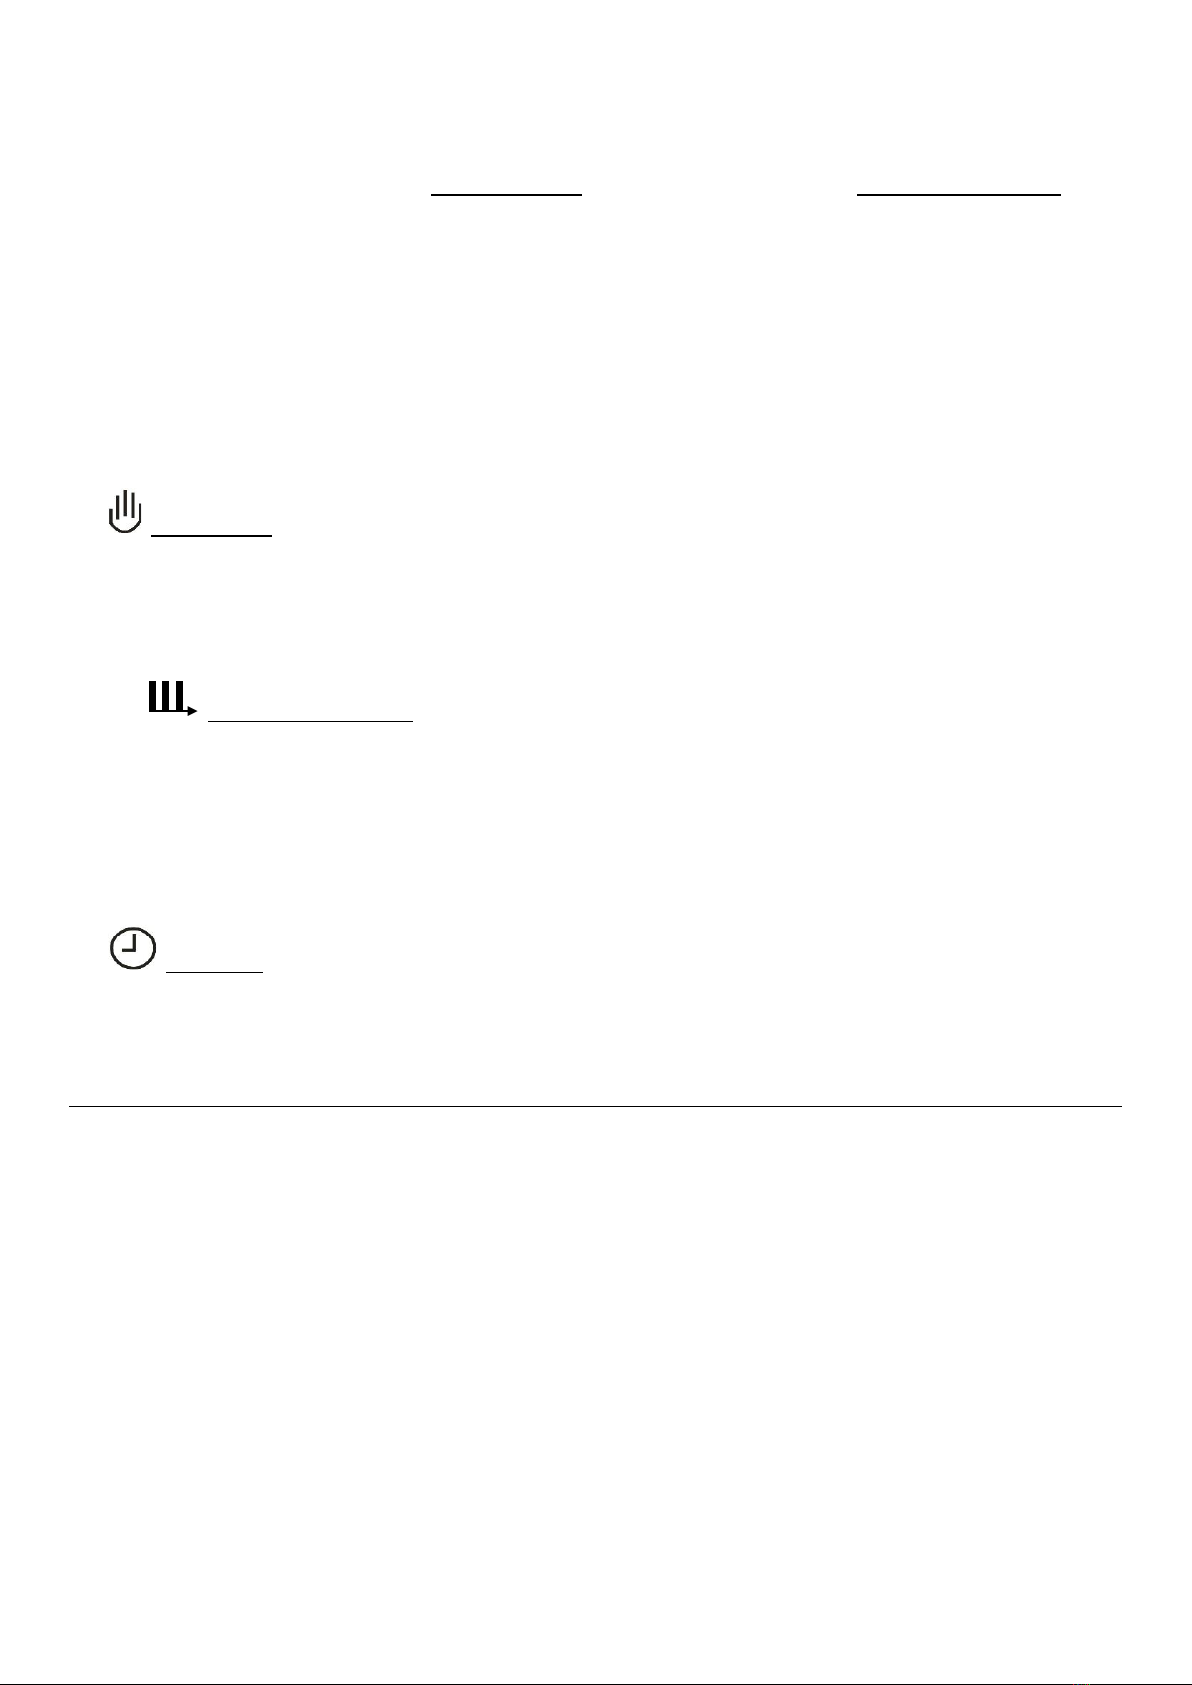
Power Regulator mode menu.
Use the arrow buttons to run forward or backwards in the Menu sequence.
If more information to the specific menus are needed, please see Thermostat setup options page 4.
Power Regulator Main Window Menu start
Menu end.
Press OK to activate Auto mode. Enter hour, minute, weekday and load(if load is known).
to
Change from Power Regulator to Manual mode.
Press Menu and roll forward til MAN menu window.
Press OK to activate MAN mode.
to
Change from Power Regulator to Auto mode.
Press Menu and roll forward til Auto menu window.
Note: If load setting is not correct, only energy consumption readout in the “Energy Monitor” Menu will not show the
correct consumption. All other functions will work correct and unaffected no matter the load value.
“To return to Main Window, go to
EXIT and press OK”
25 %
6
Thermostat setup options / Menu windows
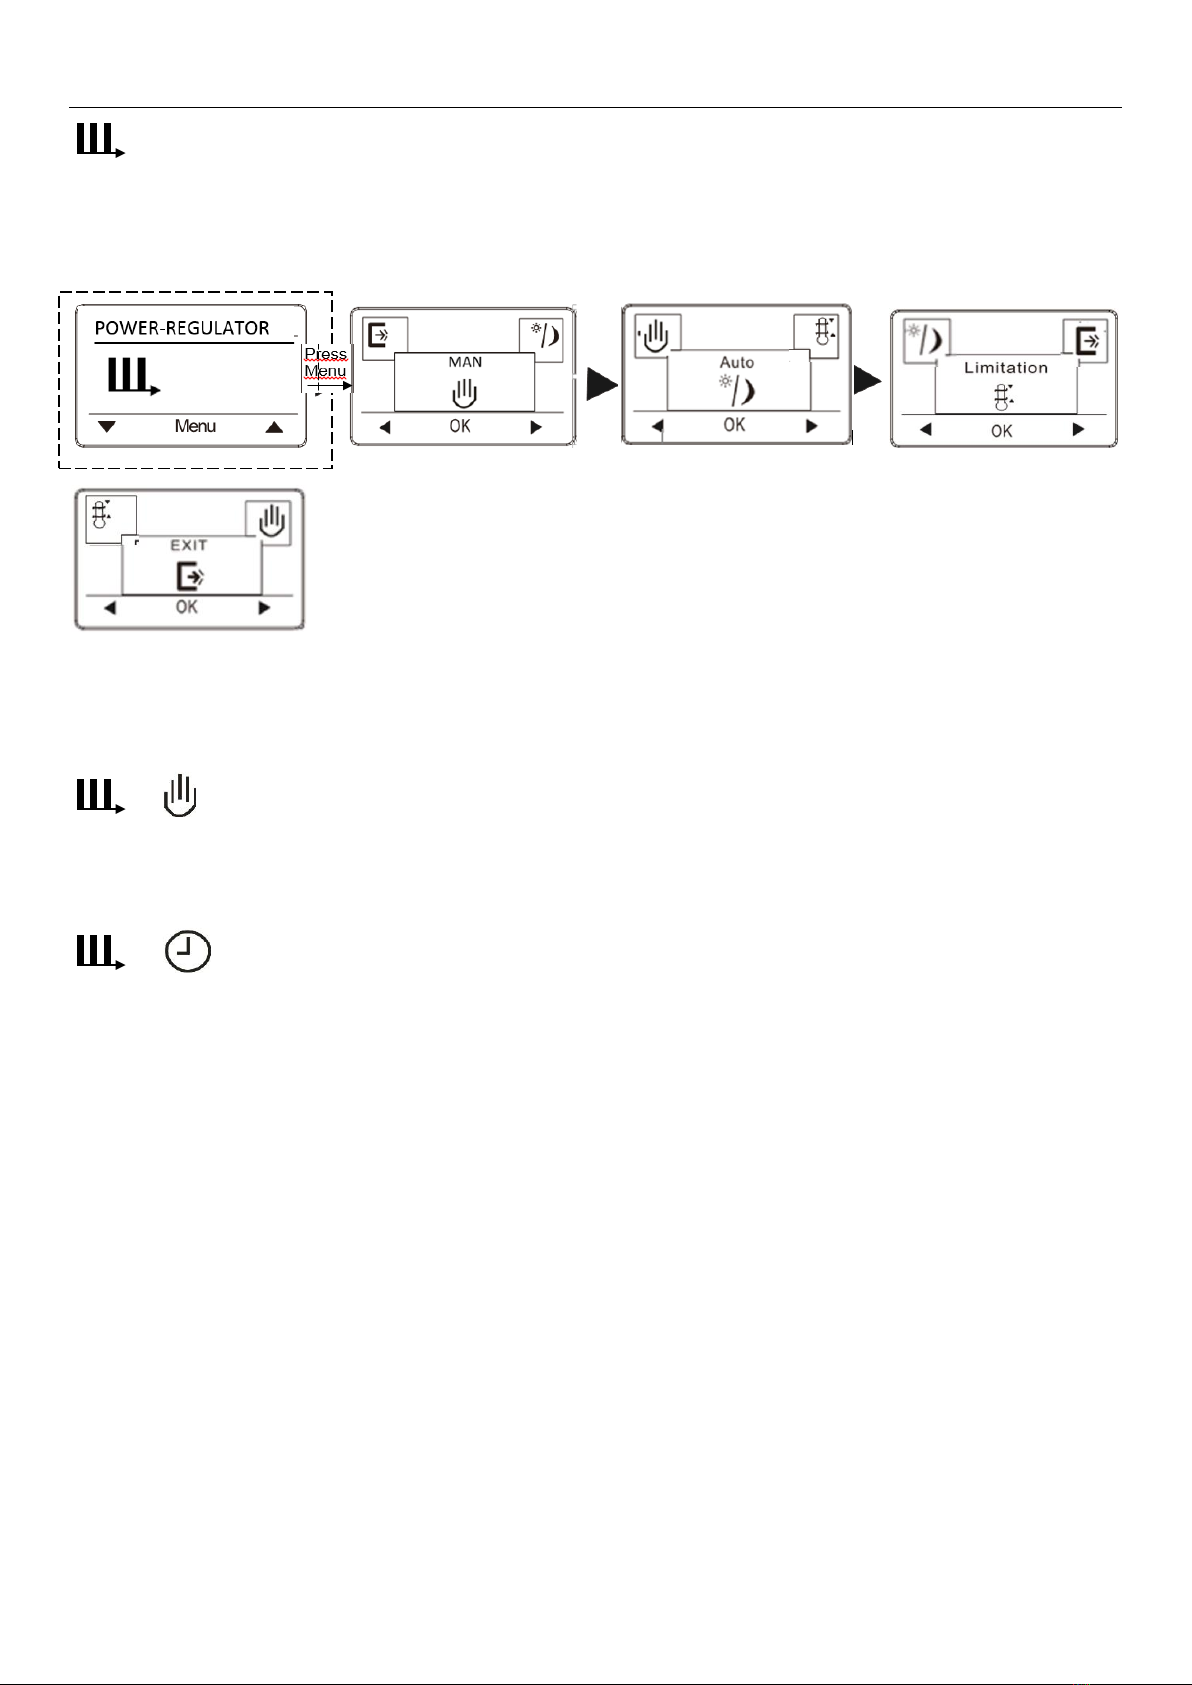
Sensor Setting
Set the type of regular used system. There are 3 options:
Floor reg. : The thermostat regulates floor temperature only. Afloor sensor must be connected.
Room reg. : The thermostat regulates room temperature only.
Room/limit: The thermostat regulates room temperature with min. and max. limits for floor temperature. A floor
sensor must be connected.
Press OK and select the required heating system.
Note: If the thermostat is in the room to be heated, select Room/limit. If the thermostat is outside of the room to be
heated, select Floor. Once you have chosen the required setting, press OK. You now need to select the actual sensor
setting so that the thermostat can take this into account during operation.
Auto
Press OK to activate Auto mode. Then enter hour, minute, weekday and load(if load is known).
Note: If load setting is not correct, only energy consumption readout in the “Energy Monitor” Menu will not work.
All other functions will work correct and unaffected no matter the load value.
Power Regulator (this is a Man only menu)
Press OK to activate Power Regulator.
The Power Regulator run in 12-minute cycles.
Fatory Setting
Options
50%
0 –100%
Examples:
0% = Heating on 0 of 12 min.
25% = Heating on 3 of 12 min.
50% = Heating on 6 of 12 min.
75% = Heating on 9 of 12 min.
100% = Heating on 12 of 12 min.

7
Calibration
If the actual measured temperature does not corresponding to the thermostat value, you can adjust the thermostat by
offsetting the temperature. Press OK and enter the value of the measured temperature. Confirm with OK.
Range -4℃~4℃, Default 0℃.
Limitation
Allows you to set the temperature range within which the thermostat can be set. It is then only possible to set a
temperature in this range in auto and manual mode.
Press OK to highlight Min temperature. Use the up or down button to select the minimum permissible temperature.
Press OK and select the maximum permissible temperature. Confirm the settings with OK.
Energy Monitor
If load setting is not correct, only energy consumption readout in the “Energy Monitor” Menu will not show the correct
consumption. All other functions will work correct and unaffected no matter the load value.
Energy monitor makes you monitor each day of the week, or a full week.

8
Open Window
Allows all the settings to Open Window;Press YES enable Open Window Features; Press NO disable Open Window.
With Open Window activated, a rapid temperature decrease in the room, will shut down the heat for 30 min.
Child Lock
Allows you to lock the thermostat settings if you do not want the settings to be changed or something. Press OK and
select YES or NO to set up the child lock. Confirm with OK. The child lock can be unlocked by pressing two side
buttons simultaneously for 5 seconds.
Factory Reset
Allows all the settings to be reset to Factory Settings. Your personal settings will be erased.
Press YES and choose Reset in the menu.
Press NO and cancel the factory reset.
Exit
Press OK in EXIT menu - Menus are closed and the thermostat returns to the main window.
9
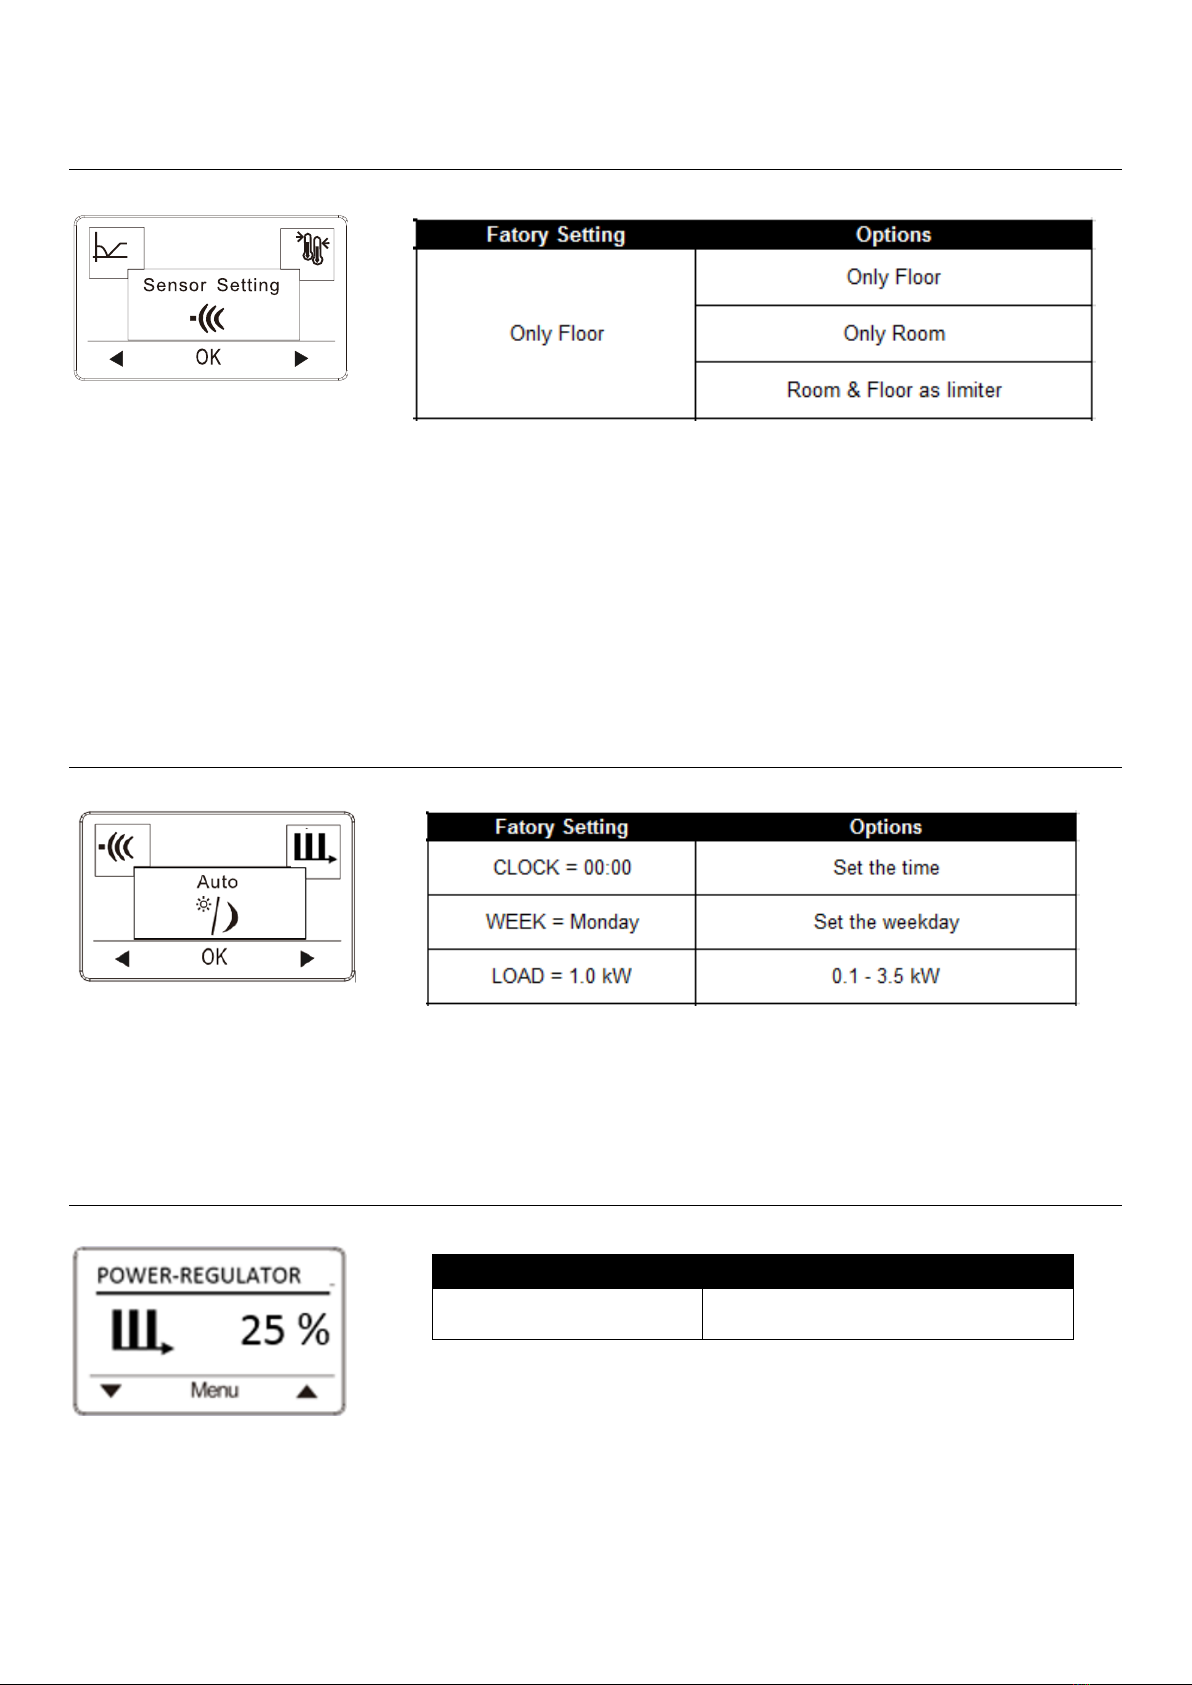
Event schedule (this is an Auto only menu)
7: Allows you to choose individual programs for each day of a week.
4 events- wake, leave, return, sleep for each day.
2: Monday to Friday with the same events setting and Saturday and Sunday with the same setting. Typically used if
you work from Monday to Friday.
4 events- wake, leave, return, sleep for Monday to Friday, 2 events- wake, sleep for Saturday and Sunday
1: 7 days of a week programs respectively.
2 events- wake, sleep for each day
Program Setting: (this is an Auto only menu)
1. Press the OK button to activate the Program setting.
2. Choose the days for which you want to change the Settings, Mon-Fri or Sat-Sun using the up or down Button.
Press OK.
3. Now select the time and temperature for each daily event in the program. Press OK and set the start time for the
event concerned. Confirm with OK. Set the temperature for this event and confirm with OK.
4. After setting the required events, select Exit in the menu to return to the initial display.
(Each icon for events programming
Wake
,
Leave
,
Return
,
Sleep
)
7:
7 days
Wake
Leave
Return
Sleep
Time
Temp.
Time
Temp.
Time
Temp.
Time
Temp.
4 events
6:30
22℃
7:30
19℃
17:00
22℃
23:00
18℃
2:
Monday
to Friday
Wake
Leave
Return
Sleep
Time
Temp.
Time
Temp.
Time
Temp.
Time
Temp.
10
4 events
6:30
22℃
7:30
19℃
17:00
22℃
23:00
18℃
Saturday
& Sunday
Wake
Sleep
Time
Temp.
Time
Temp.
2 events
6:30
22℃
23:00
18℃
1:
7 days
Wake
Sleep
Time
Temp.
Time
Temp.
2 events
6:30
22℃
23:00
18℃
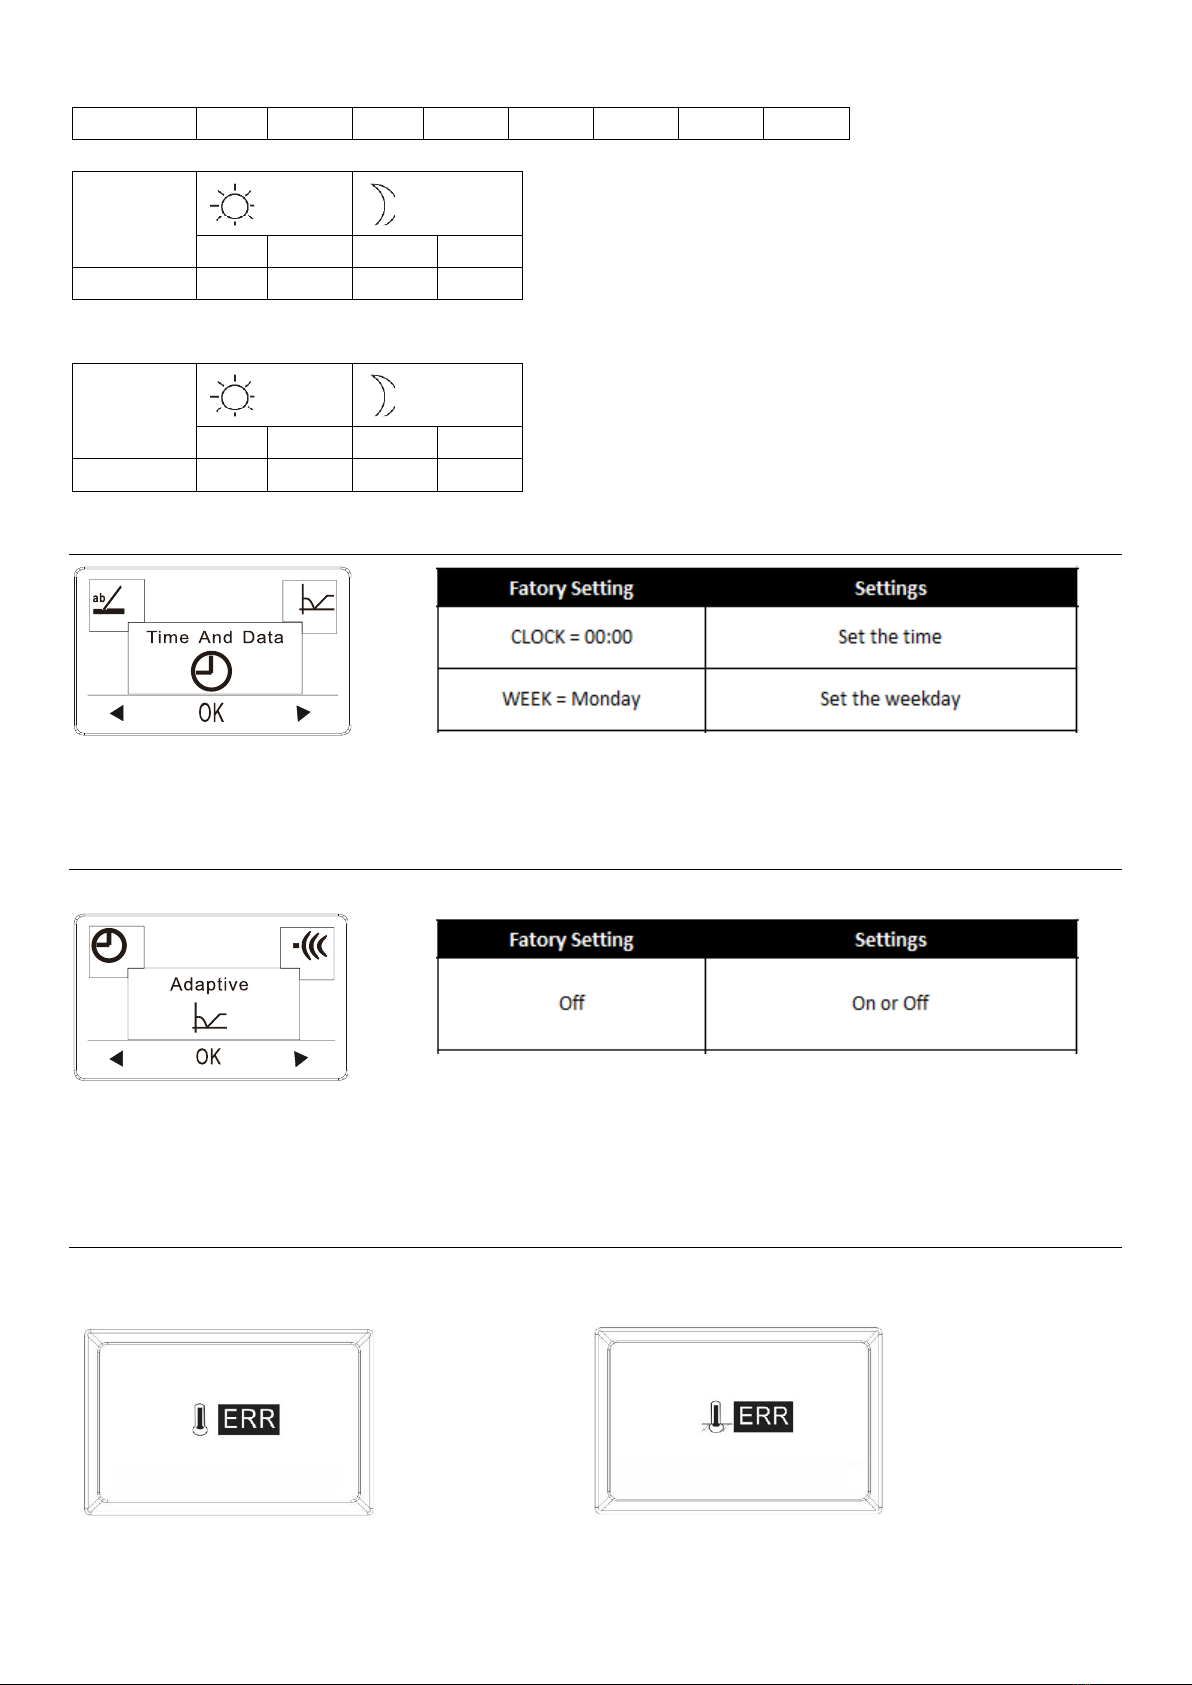
Time and Day (this is an Auto only menu)
Press OK and set the actual time in hours and minutes. The day will then be displayed. Set the day and confirm with
OK.
Adaptive (this is an Auto only menu)
It is ensure that the required temperature has already been reached when you get up in the morning or come home
from work. After just a few days, according to your habit, the adaptive function will be able to reach the temperatures
according the the event-setting.
Error alert
If a fault or an error occurs, the thermostat will display an error code as follows:
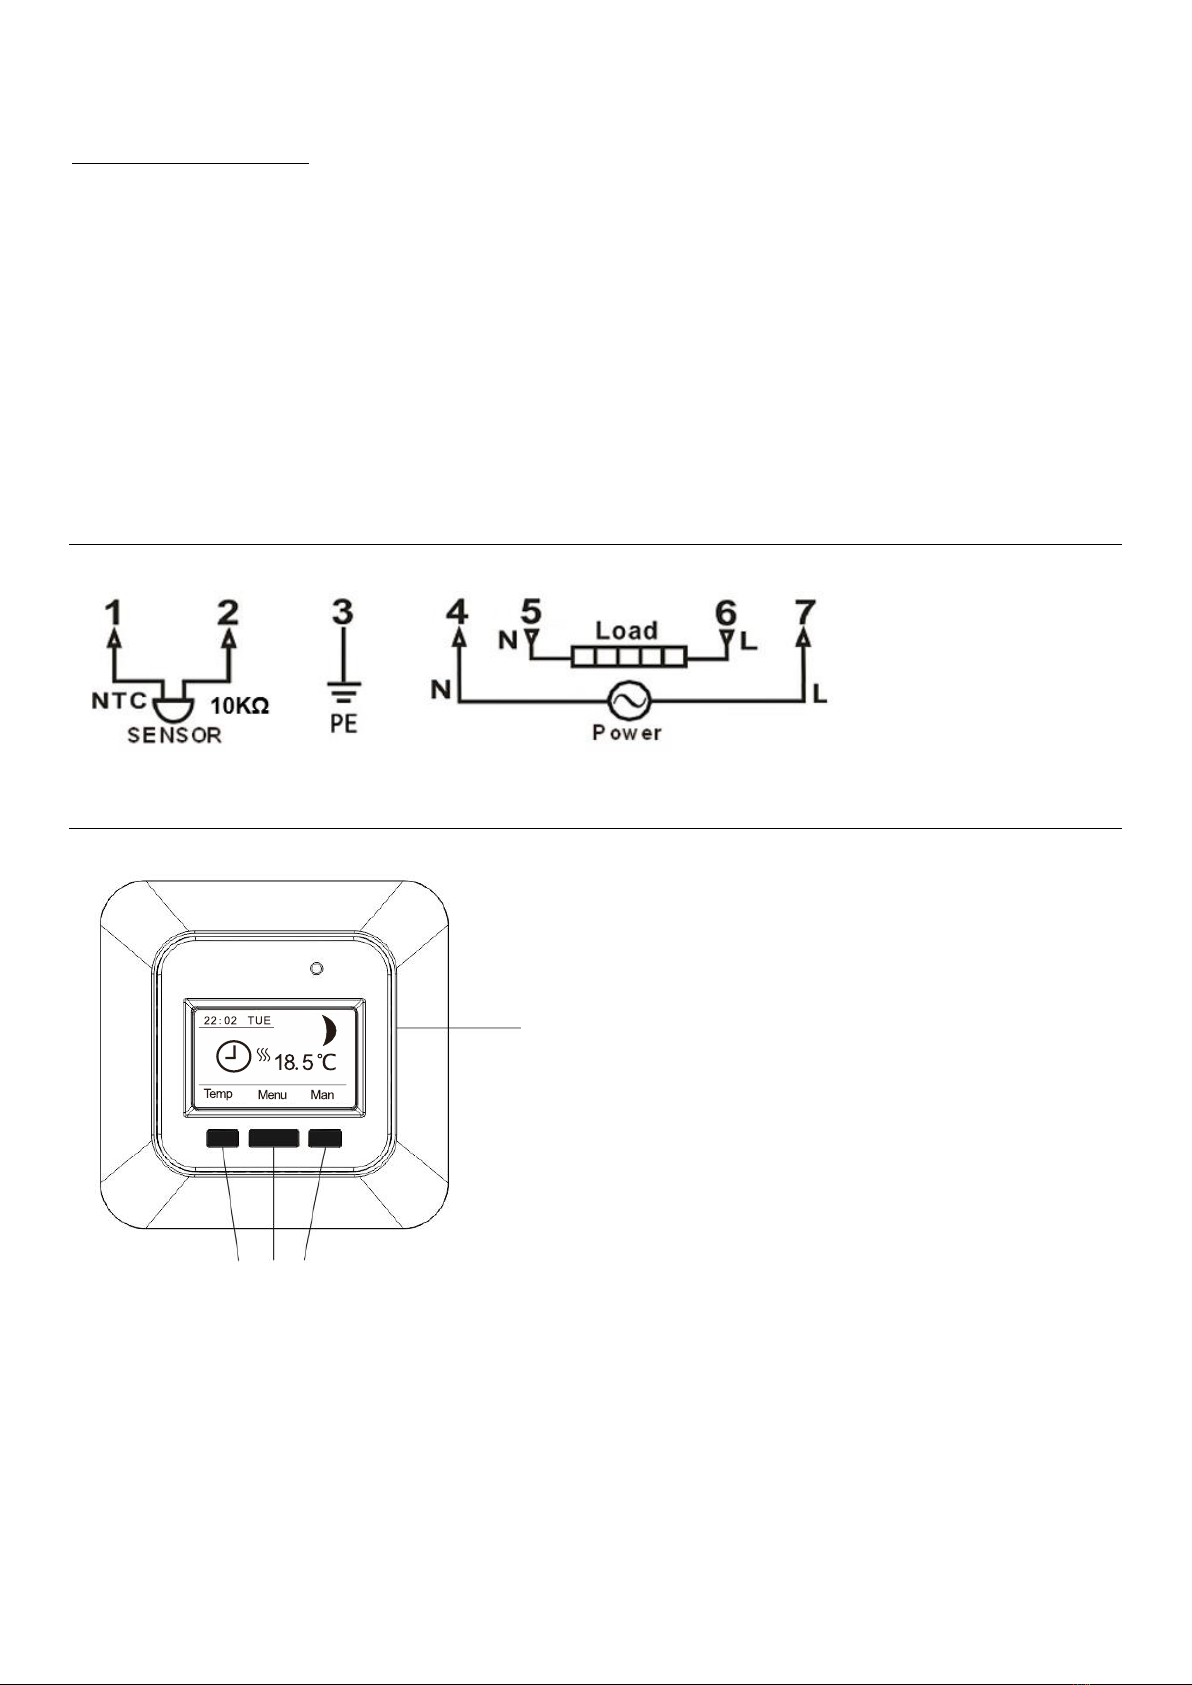
Temp Menu Man
Temp Menu Man
E1: Internal sensor
defective or short- circuited.
E2: External sensor
defective or short- circuited.

11
Installation-Instructions
Positioning, installation and connection
If the thermostat is not in the room to be heated, the Floor sensor must be installed in the floor of the heated room.
Position and connection of floor sensor
Position of floor sensor in the room.
Position the floor sensor about 0.5 m from the wall.
Position the floor sensor near the Thermostat. This gives the simplest installation.
If desired, the floor sensor cable can be extended. Optional extension of floor sensor cable, use ordinary doorbell cable
to extend the
floor sensor cable. Maximum extension 9m.
Position of floor sensor in floor.
Position the floor sensor in a pipe approximately half-way between two heating cables.
If necessary, the sensor may be placed in a grouting gap, without the use of I pipe.
Note: When positioning in a grouting gap, any regrouting should be undertaken with care in order not to damage the
sensor.
Connection of floor sensor.
Connect the floor sensor to the thermostat as shown on the diagram.
Position and mounting
Important! The thermostat must not be covered.
If the Floor sensor is used, any thermostat position may be used.
If the Room sensor or combined Room and Floor sensor are used, the thermostat must be positioned
approximately 1.2 m above the floor.
Avoid:
Heat from radiators, wood-burning stoves and other heaters
Cold outer walls
Concealed pipes or chimneys which give off heat
Direct sunlight or positioning behind curtains
Installation can be carried out in two different ways:
Flush-mounted in the wall
Surface-mounted on the wall
Selection of installation box for flush mounting
For walls of wood, plasterboard etc, use flush-mounting box intended for this use.
For walls of brick, concrete etc., use flush-mounting box intended for this use.
Selection of installation box for surface mounting
When mounting on the surface of a wall, use surface-mounting box.
12
Installation and connection
Remove the front cover from the display by inserting a small screwdriver in the square hole on the left and the right side
of the cover. Carefully lift the front cover outwards. Then remove the frame.
Connect wires and sensors in accordance with the diagram.
Connection must be made by an authorised electrician.
Important! Always read and follow the instructions for the Underfloor Heating System installed before connecting and
turning on the heat.
Replace the frame and press on the cover. Activate the lock with a click.
Wiring diagram
Appearance reference
Display interface
Navigation buttons
Other Heatcom Thermostat manuals


 installation instructions")


