Heath Consultants RMLD-FR User manual

Operator’s Manual
RMLD
-
FR

Operator’s Manual
2
RMLD
-
FR
Doc No. 16086 Rev A, RMLD-FR Operator Manual © 2021 Heath Consultants Incorporated. All rights reserved.
Table of Contents
Overview 3
Remote Detection for Increased Safety 3
Tunable Diode Laser
Absorption Spectroscopy (TDLAS) 3
Features 3
Proprietary Notice 3
Safety Warnings & Denitions 4
Specications 5
Instrument and Accessories 6
Battery, Charger, Charging Procedure 7-8
Battery Pack 7
Dual Bay Battery Charger 7
Charging Procedure 8
Remaining Battery Capacity 8
Operating the RMLD-FR 9-12
Turning On/O the Instrument 9
Button Controls 9
Simple 3-Button Control 9
Quick & Long Press Functions 9
Self Test 10
Screen Mode - Scan 11
Quick Press Features 11
Long Press Features 11
GPS Indicator 11
Border Color Indicators 11
Screen Mode - Image 12
Quick Press Features 12
Long Press Features 12
GPS Indicators 12
Border Color Indicators 12
Working with the Menu Items 13-17
Self Test 13
Audio Mode 13
DMD (Digital Methane Detection) 13
Audio Warning Indications 13
Alarm Level 14
Factory Default Settings 14
Custom Alarm Pre-Sets 14
USB 14
Command Mode 14
File Mode 14
Bluetooth (BLE) 14
WiFi 15
Access Point (AP) Mode 15
File Access 15
Change SSID or Password 15
Data Logging 16
Time Zone Oset 16
Peak History 17
Display Background 17
About Screen 17
File Access 18-20
USB File Transfer 18
WiFi Communications 19
File Server 19
Conguration Portal 20
How Does the RMLD-FR Measure Gas? 21
Scanning with the RMLD-FR 22-24
Detection Through A Window 22
Common Venting Points 22
Meter 23
Leak 23
Service Line 23
Along the Main 23
Long Range Scanning 24
Dealing With False Detections 24
Troubleshooting 25
Maintenance 26
Warranty and Repair 26
Contact Information 26
Return Procedure 27

Operator’s Manual
3
RMLD
-
FR
Doc No. 16086 Rev A, RMLD-FR Operator Manual © 2021 Heath Consultants Incorporated. All rights reserved.
1
Laser Beam
Is Transmitted
2
Plume Absorbs
Some Laser
3
Some Laser
Passes Through
6
Remaining Laser Returns to
RMLD-FR and Is Measured
4
Laser
Reflects Back
5
Plume Absorbs
Some Laser
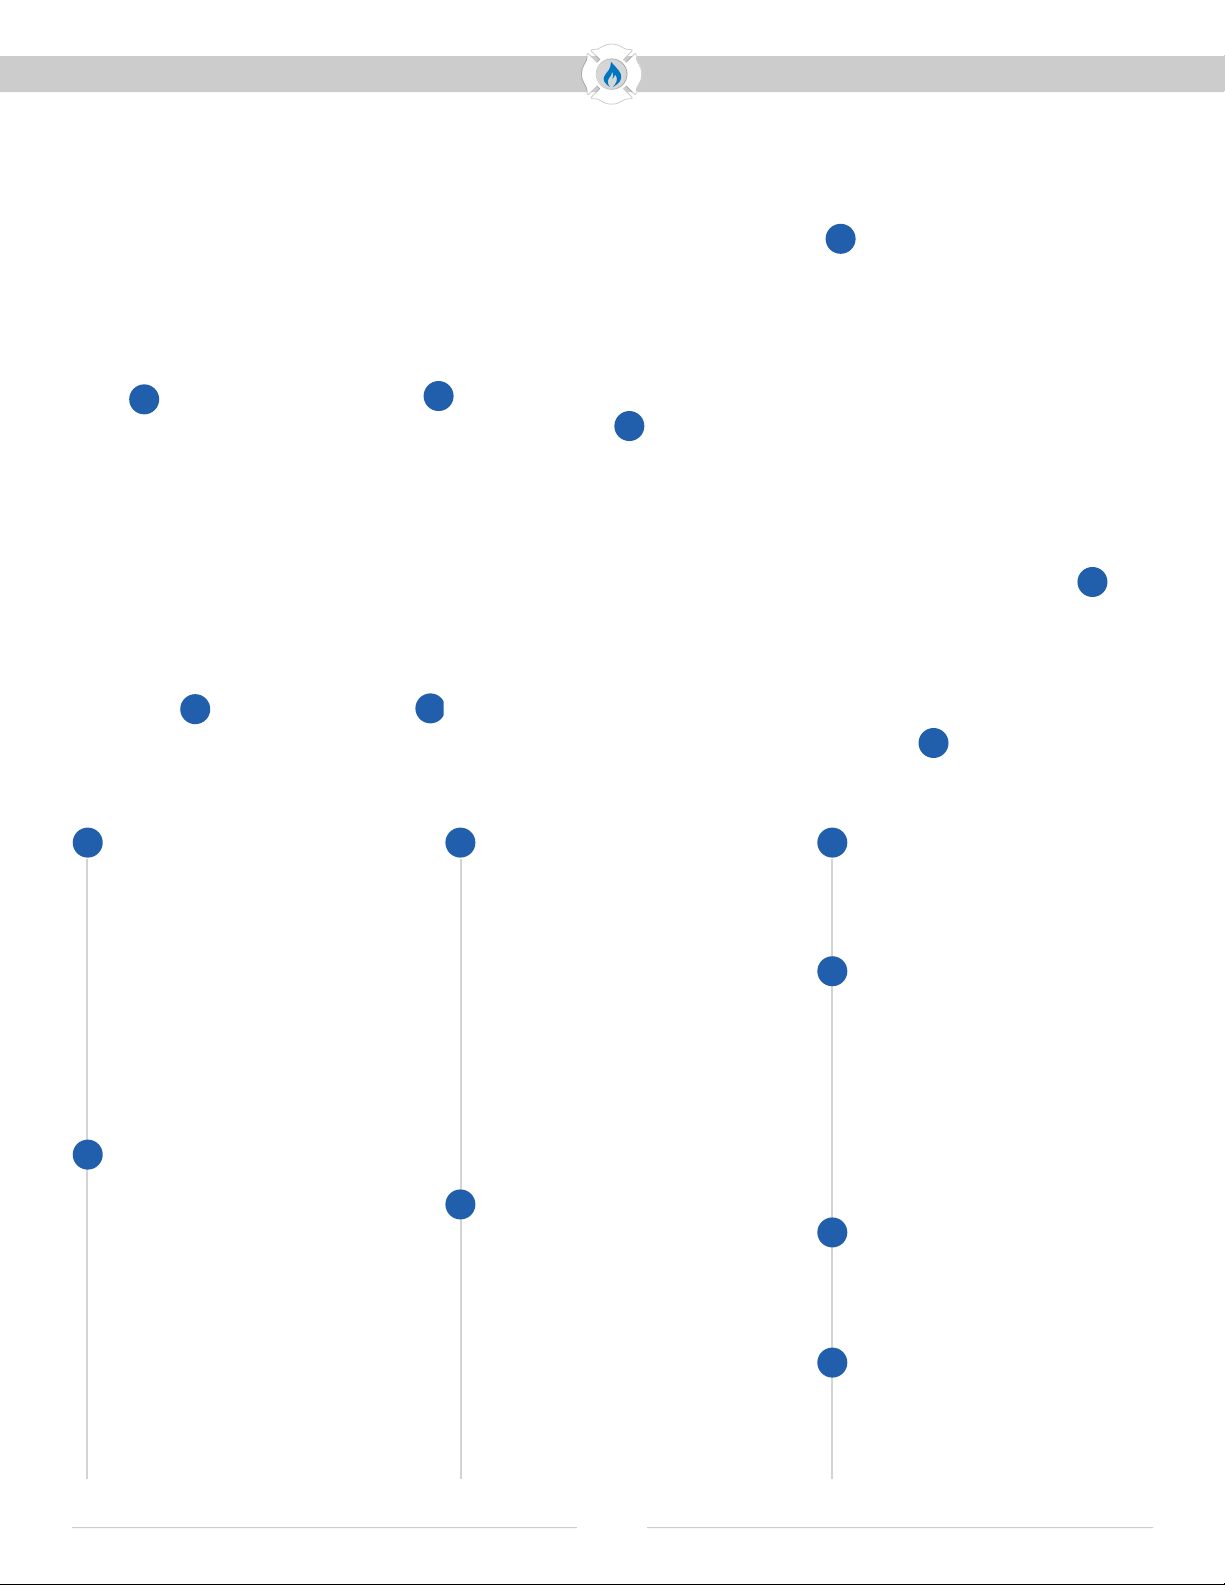
Remote Detection for Increased Safety
The RMLD-FR uses highly advanced technology to detect natural gas
plumes from a remote distance. This makes it safer to scan in areas that
may be dicult to reach such as busy roadways, yards with dogs, fenced
o areas, and other hard to access places.
Tunable Diode Laser Absorption Spectroscopy (TDLAS)
The RMLD-FR employs Tunable Diode Laser Absorption Spectroscopy
(TDLAS) technology.
As the laser passes through the gas plume,
the methane absorbs a portion of the light, which the
instrument then detects. Based on the local meteorological
conditions, a given amount of gas escaping from the ground
will produce a plume that varies in size and uniformity of concentration
levels. The plume, by nature, is variable and dependent on the soil
conditions, temperature, wind, and leak rate.
Features
The RMLD-FR includes many features which reduce costs and improve
usage. These advanced features include, but are not limited to:
- User Interface - highly optimized
for First Responders
- Internal Data Logging
- WiFi
- GPS
- Bluetooth BLE
- Color Camera
- Color Display
- Spotter laser
- Self Test
- Light Weight
- Rechargeable and Replaceable
Battery
- Dual Charger
- Ergonomic Housing
Overview
Proprietary Notice
The contents of this instruction manual are proprietary to Heath Consultants Incorporated. Reproduction of this
manual, in whole or in part, is prohibited without the express written consent of Heath Consultants Incorporated.
Heath Consultants Incorporated operates under a continual product improvement program and reserves the right to
make improvements and / or changes without prior notication.
This manual supersedes all previous manuals for this instrument.
Operates under a
variety of eld
conditions including:
- wide temperature range,
- light rain and fog.
Safe scanning from distances
of 100’ and 50’, using a
vehicle and tree for a shield
as an extra precaution.
Rugged design
stands up to normal
eld use and operating
conditions.
Sensitivity or range
is not aected by
reasonable amounts
of dust on the
instrument’s window.
100’
50’
100’
50’
FIRE DEPT

Operator’s Manual
4
RMLD
-
FR
Doc No. 16086 Rev A, RMLD-FR Operator Manual © 2021 Heath Consultants Incorporated. All rights reserved.
This is the safety alert
symbol. It is used to alert
you to potential physical
injury hazards. Obey all safety
messages that follow this symbol
to avoid possible injury or death.
DANGER indicates a hazardous
situation which, if not avoided, will
result in death or serious injury.
WARNING indicates a hazardous
situation which, if not avoided, could
result in death or serious injury.
CAUTION indicates a hazardous
situation which if not avoided, could
result in minor or moderate injury.
NOTICE indicates practices not
related to physical injury.
SAFETY INSTRUCTIONS indicates
specic safety-related instructions
or procedures.
Read this manual before using the RMLD-FR instrument and accessories.
Users must read, understand and follow the instructions for operation
and maintenance. Failure to do so can result in serious injury.
Safety Warnings & Denitions
DANGER: Do not turn on or use
inside a hazardous environment.
DANGER: Do not connect USB in a
hazardous environment.
DANGER: Do not swap batteries
while in a hazardous environment.
DANGER: To reduce the risk of
ignition of a ammable or explo-
sive atmosphere, batteries must be
recharged only in a location known
to be non-hazardous.
WARNING: Read and understand
this manual fully before use.
WARNING: Follow the manual in-
structions and testing methods.
WARNING: The visible
green Spotter laser is a
Class 2 (II) laser product.
Do not stare into beam
or view
directly with optical in-
struments.
WARNING: Avoid direct eye expo-
sure to the laser and do not point in
the direction of others. Visible and
Invisible Lasers are deployed by this
instrument.
CAUTION: Use of controls or
adjustments or performance of pro-
cedures other than those specied
herein may result in hazardous laser
radiation exposure.
CAUTION: No attempt should be
made to repair the instrument.
Should the instrument not work
properly, or indicate a fault or warning,
refer to the troubleshooting section
of this manual.
Do not dispose of this product
in the unsorted municipal waste
stream. Dispose of this product
according to local regulations.
DANGER WARNING CAUTION
DANGER
WARNING
CAUTION
NOTICE
NOTICE
SAFETY
INSTRUCTIONS

Operator’s Manual
5
RMLD
-
FR
Doc No. 16086 Rev A, RMLD-FR Operator Manual © 2021 Heath Consultants Incorporated. All rights reserved.
Specications
General
RMLD-FR Weight
3 lbs (approx.)
Carry Case Dimensions
21” x 17.5” x 9.5”
Display
3.5” color LCD
Storage
Internal SD card (not removable)
Power
Battery
Removable
Rechargeable
Lithium-ion pack, 10.8 VDC 2.6Ah
Battery Run Time
8 hours at 32° F (approx.)
Battery Charger
External
110-240 VAC, 50/60 Hz Universal
Charge Time
2-3 hours full charge (approx.)
Charging Indicator
Integrated into Dual Battery Charger
Detection/Measurement System
Detection Method
Tunable Diode Laser Absorption
Spectroscopy (TDLAS)
Detection Distance
100 ft (30m) nominal - may vary
due to background type and
conditions
Measurement Range
0 to 50K PPM-M
Sensitivity
5 PPM-M at distances from 0 to
100 ft (30m)
Beam Size
Conical in shape with a 22”
diameter at 100 ft (55cm at 30m)
Lasers
IR Laser
Class I
Spotter Laser
On time duration is 2 minutes
Class 2 (II) <2mW @ 532nm
Spot size is 7mm at 15M
Eye Safety Warning
Do not stare into beam or
view directly with optical
instrument
Display
Resolution
320x240
Camera
Color
Aperture
f/2.6
FOV
94DEG (at 6.0mm image circle)
GPS
Compatible With
GPS
GLONASS
Beidou
Galilieo
Communication
Bluetooth 4.2 BLE
(to support future features and
mobile applications)
WiFi
USB Dual Mode
Alarms
Digital Methane Detection (DMD)
Audible tone and visible color
border when detection threshold
exceeded
Adjustable Detection Alarm Level
50’
1 to 200 PPM M
100’
1 to 400 PPM M
System Fault & Warnings
Audible alarm and visual
indication on the display
Testing
Built-In Self Test
Veries operation and adjusts
laser wavelength for maximum
sensitivity
Test Gas Cell
Integrated within carrying case
Data Logging
Saves to Internal Memory
FAULT logs
Self Test logs
Captures
Data Collected
Includes, but not limited to:
CH4 PPM-M measurement
GPS location
Timestamp
Battery level
Battery voltage
Serial number of the instrument
Operating Conditions
Operating Temperature
0° to +122° F (-17° to 50° C)
Humidity
5 to 95% RH, non-condensing
Regulatory
Instrument Protection
IP54 (water splash and dust
resistant)
Compliance
EMC (EN61000-6-2, EN6100-6-4)
Radio Equipment Directive
(2014/53/EU) ETSI EN 301 489-1
v2.2.0
EN 61326-1:2013
47 CFR Part 15 & ICES-003
Operator’s Manual
6
RMLD
-
FR
Doc No. 16086 Rev A, RMLD-FR Operator Manual © 2021 Heath Consultants Incorporated. All rights reserved.
Complete Kit Assembly
HPN 105755
Includes:
- RMLD-FR Instrument
- Rechargeable Li-Ion
Battery Pack
- Battery Charger
- USB Cable
- Carry Case
RMLD-FR Instrument
HPN 105754
- Methane gas detection up
to 100’ away
- Modern user interface
- Data logging
- Battery and power
connectors
Battery Pack
HPN 106005
- Rechargeable Li-Ion battery
- Provides power to the
instrument
- Charges independently of
the instrument
- Up to eight (8) hours of
operating time on a full charge
- Recharge between uses to
assure no interruption in use
- Use only with HPN 105753
Battery Charger
Battery Charger
HPN 105753
- Universal 100 - 240 VAC
- Two (2) slots for dual
battery charging
- Recharge the instrument’s
battery after use
- LED on the front indicates
charging status
- Use only with HPN 106005
Battery Pack
USB Cable
- USB2 A to micro cable for
downloading data from the
instrument to a computer
Carrying Case
HPN 106071
- Protects the
instrument during
storage and transport
- Built in test gas cell for
calibration
- Keep instrument in the
case while not in use
Power Supply (AC Adapter)
HPN 105359
- Replaces the original from
Complete Kit/Battery Charger
Test Gas Cell
HPN 106024
- Replaces the original from
Complete Kit/Carrying Case
Instrument and Accessories
A
B
C
C
D
E
F
F
G
H
A
B
E
D
H
G

Operator’s Manual
7
RMLD
-
FR
Doc No. 16086 Rev A, RMLD-FR Operator Manual © 2021 Heath Consultants Incorporated. All rights reserved.
Battery Pack
Dual Bay Battery Charger
- Provides the power to the
instrument
- Removable
- Rechargeable
- Lithium-ion
- Up to 8 hours of operating time
when fully charged.
NOTICE: Must recharge between
uses to assure no interruption in use
NOTICE
- Charge two batteries
simultaneously
- Includes a universal AC adapter
and power cord
- An integrated metal bracket
included on the bottom of the
charger allows for wall or xed
mounting options.
To wall mount charger use four 8-32 screws to thread into self-clinching nuts
on charger chassis. Thread dept is 0.060in, max screw intrusion is .150in.
NOTICE: Access to both sides of the mounting wall are needed.
NOTICE: For wall mounted or mobile applications, HEATH recommends
securing the battery to the charger using the captive screws attached to
the battery pack.
NOTICE
DANGER: Do not use the device in
a hazardous environment.
DANGER: To reduce the risk of
ignition of a ammable or explo-
sive atmosphere, batteries must be
recharged only in a location known
to be non-hazardous.
DANGER
NOTICE: Do not dispose of this
product in the unsorted municipal
waste stream. Dispose of this prod-
uct according to local regulations.
Two (2)
charging
bays
Universal AC adapter
Power cord

Operator’s Manual
8
RMLD
-
FR
Doc No. 16086 Rev A, RMLD-FR Operator Manual © 2021 Heath Consultants Incorporated. All rights reserved.
1. Turn instrument OFF.
2. Unscrew the two captive
screws located on the bottom
of battery pack. Remove battery
from instrument.
3. Insert battery into the charger,
ensuring it is all the way down.
Optional: Fasten captive screws
into charger housing to prevent
battery from dislodging.
4. LED panel of charger illuminates
to show charging status of the
battery.
a. Green ashing = charging
b. Green solid = fully charged
c. No light = battery not present
or not connected properly
d. Red = fault
i. Position battery into the
other bay, if still red, then
try another battery.
ii. If the light is still red send
to repair or replace.
5. When fully charged, power up
the instrument to verify the
battery capacity on the screen.
Charging Procedure
DANGER: To reduce the risk of
ignition of a ammable or explosive
atmosphere, the battery must be
recharged only in a location known
to be non-hazardous.
WARNING: Only use the HEATH
supplied RMLD-FR battery charger
to recharge the instrument. Use
of any other charger may cause
severe damage to the battery or
electrical circuits.
CAUTION: To prevent damage to
the battery or electrical circuits,
always plug the charger into a
surge-protected outlet.
NOTICE:The prolonged storage of
battery inside or outside the instru-
ment can lead to battery chemistry
being irreversibly damaged leading
to permanent failure of the battery.
Remaining Battery Capacity
Remaining battery capacity
(in percent) is indicated in the
top right of the screen.
DANGER
WARNING
CAUTION
NOTICE
When storing the
instrument or battery
for more than a month:
- Charge battery to 40-50%
- Store at 60-70° F
Full charge in 2-3 hours
Charge in ambient
temperature above
50° F (10° C) to obtain
full battery capacity
a
b
c
d
a b c d
Charging legend displayed on charger
White icon indicates
sucient capacity
remaining
Red icon indicates low
capacity remaining/
time to charge

Operator’s Manual
9
RMLD
-
FR
Doc No. 16086 Rev A, RMLD-FR Operator Manual © 2021 Heath Consultants Incorporated. All rights reserved.
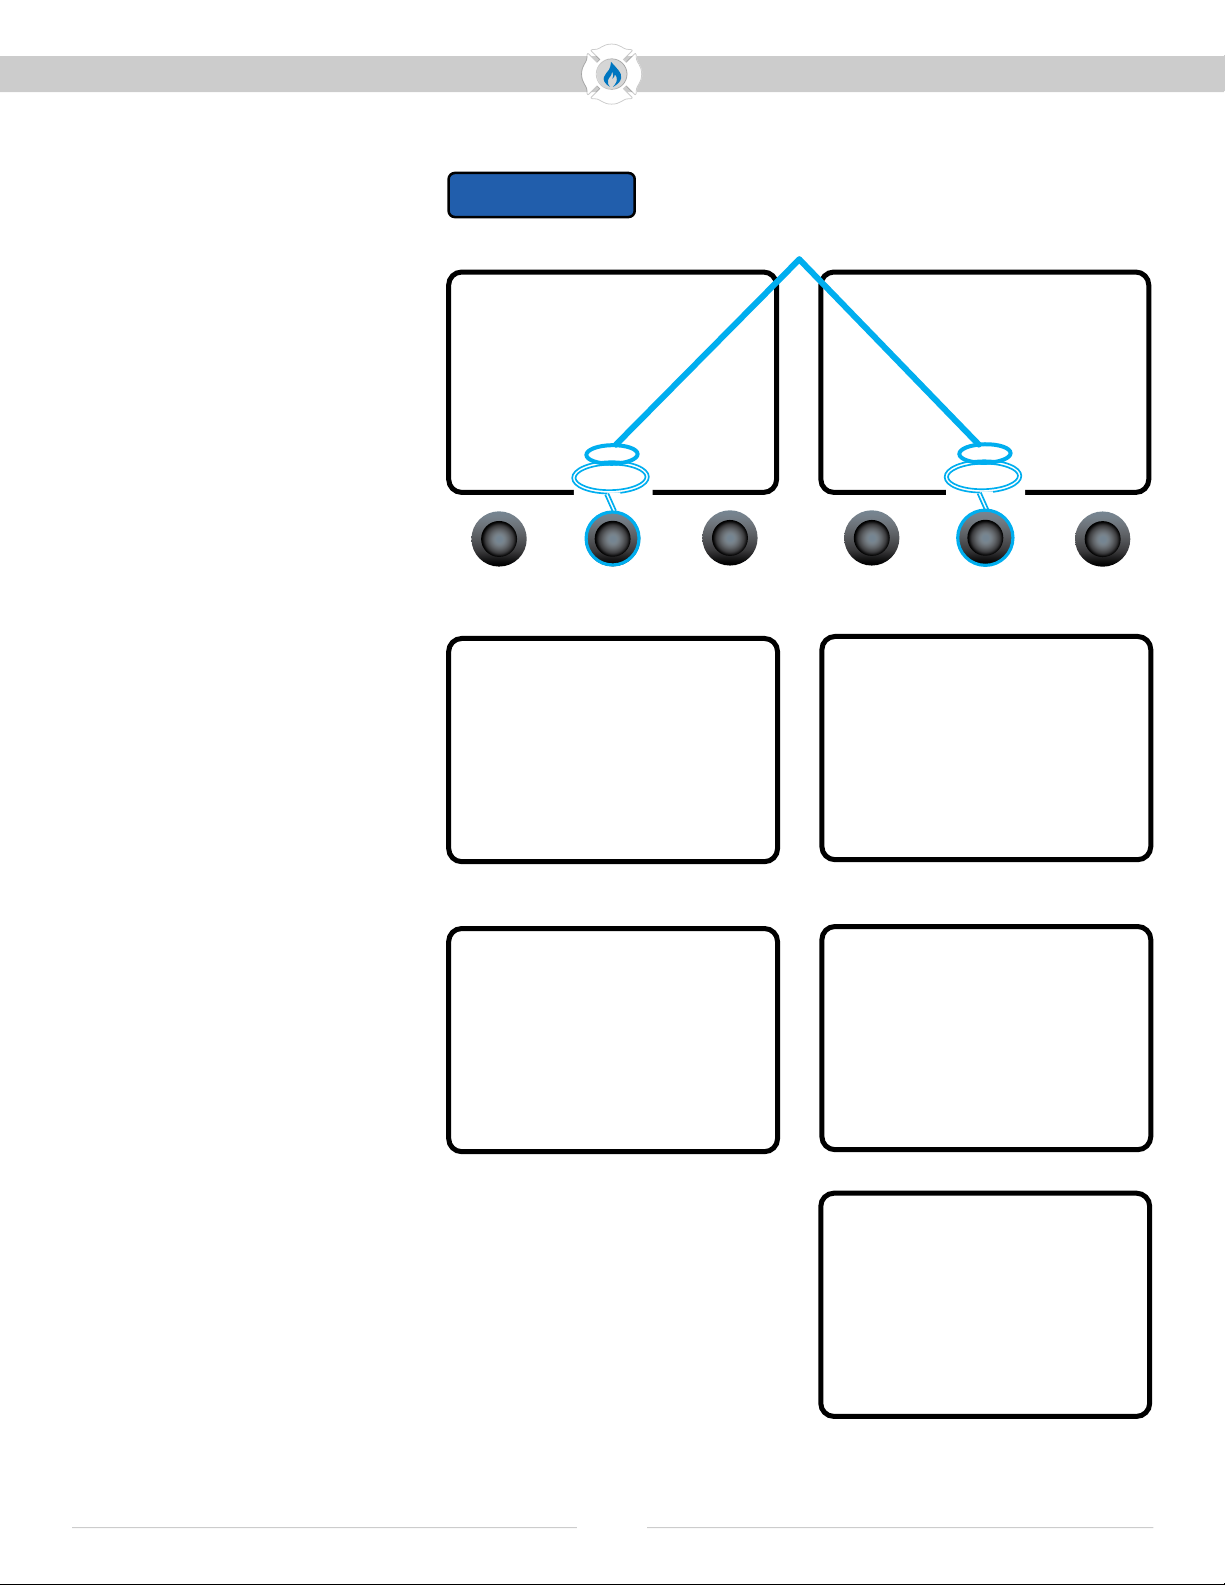
Quick & Long Press Functions
Each button functions with either a quick press and release, or a long press
(hold for 1 second) and release. The available functions vary, depending
upon the active screen.
A quick press activates:
- the only function shown for a
button, when only one function
is available (shown below).
- the left-most or rst function
shown for a button, when two
(2) functions are available
(shown at right).
A single beep will sound upon
release to indicate a successful
press activation.
A long press activates the right-
most or second function shown for
a button, when two (2) functions are
available (shown below).
A blue line under the second
function indicates a successful
long press activation.
Turn On/O the Instrument
Simple 3-Button Control
Navigate through screens and
control features of the RMLD-FR
using three (3) buttons which are
located below the screen.
Press and hold
the middle button
for 3 seconds
to turn the
instrument
on/o
WARNING: The visible green
Spotter laser is a Class 2 (II)
laser product.
Do not stare into beam or
view directly with optical
instruments.
WARNING: Avoid direct eye
exposure to the laser and do not
point in the direction of others.
Visible and Invisible Lasers are
deployed by this instrument.
WARNING
Button Controls
NOTICE: The button is a
toggle function, and requires only
a quick press to activate.
NOTICE: On all screens, the middle
button shuts down the instrument
when pressed and held for 3 seconds.
NOTICE

Operator’s Manual
10
RMLD
-
FR
Doc No. 16086 Rev A, RMLD-FR Operator Manual © 2021 Heath Consultants Incorporated. All rights reserved.
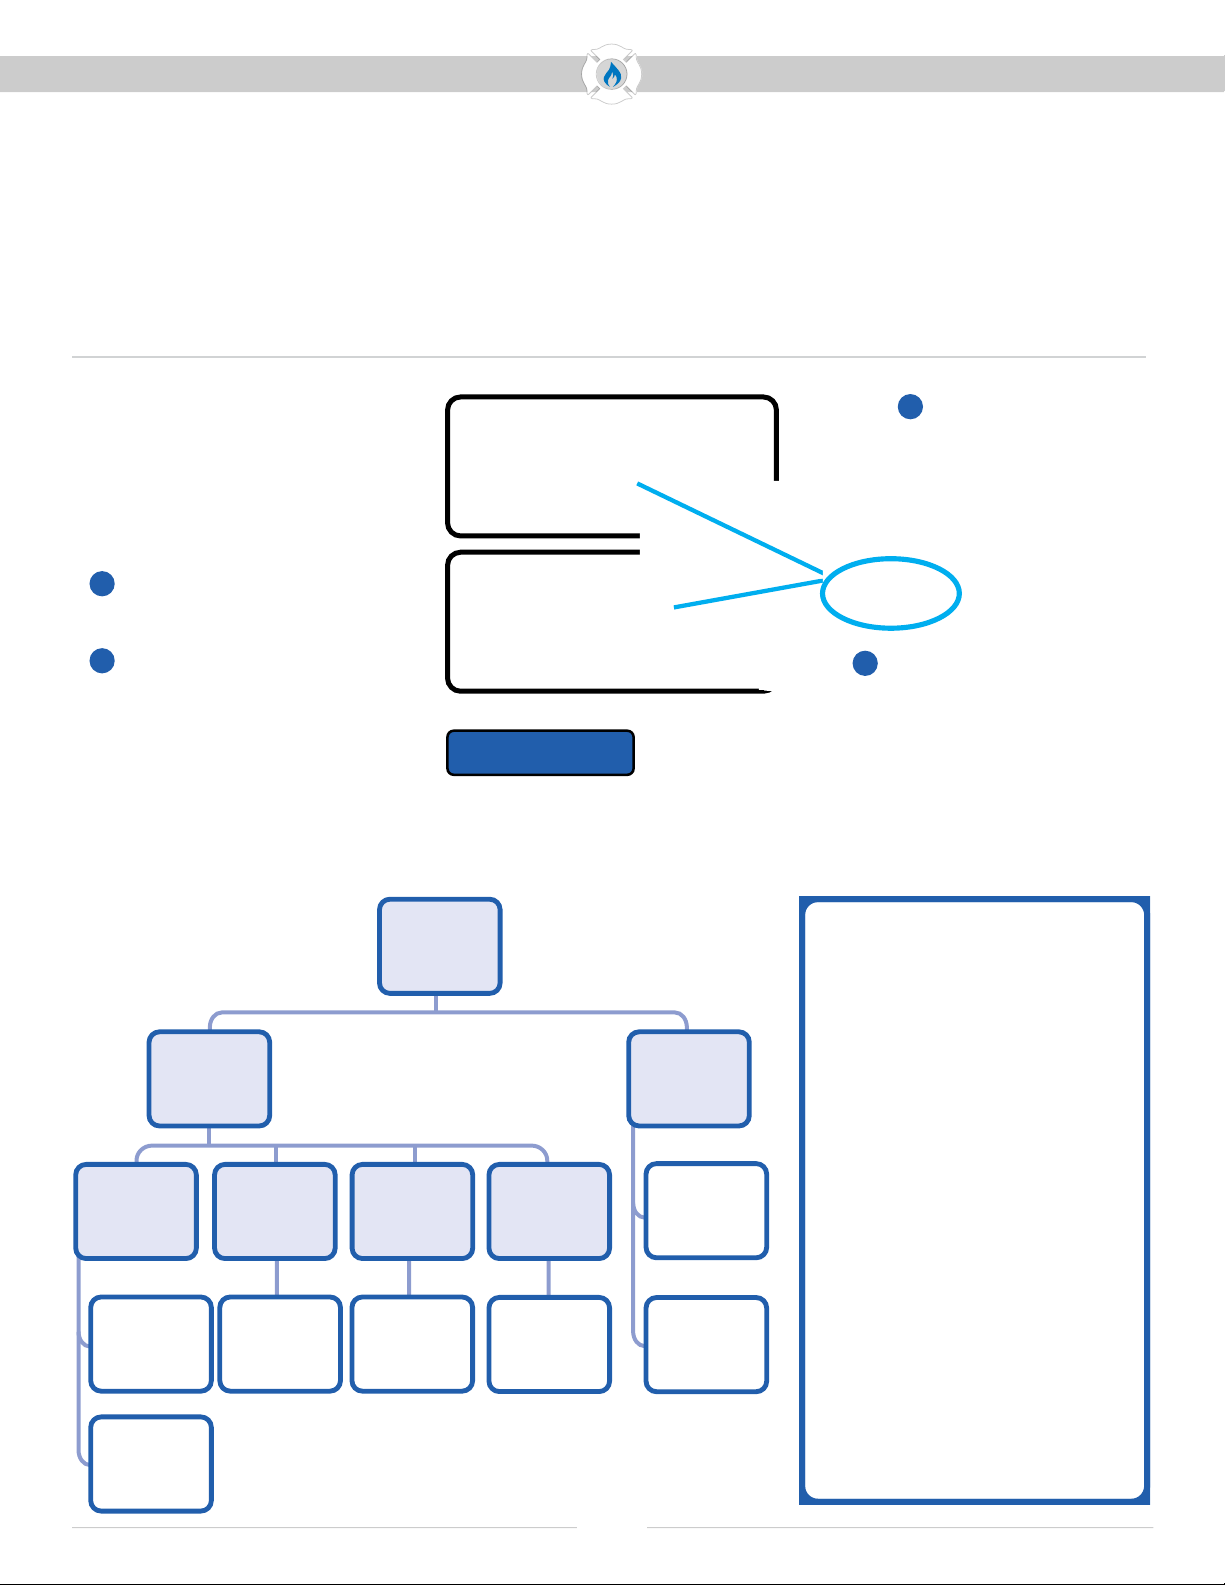
What if the instrument
failed the Self Test?
The cause is most often due to:
- instrument not properly
positioned in the case
- case was moved during test
- laser wavelength has drifted
- battery level is too low
Ensure sucient battery
charge before attempting
Self Test procedure.
Make sure the instrument
is in its proper position,
all the way down, and at.
After rechecking the above,
repeat the Self Test procedure.
The instrument has a built-in function to perform a Self Test
of the laser wavelength. Perform the Self Test daily before
scanning to ensure the instrument is operational.
A Self Test log le is recorded and stored on the instrument.
To access the stored les, refer to pages 18-20.
Self Test
Self Test takes 1-3 minutes
No yearly factory
calibration required unless
instrument repeatedly fails
the Self Test or presents
other problems.
CAUTION: Should the instrument
not pass after several attempts,
do not use the instrument for scan
work until the problem is corrected.
CAUTION: Do not attempt to
repair the instrument. Should the
instrument not work properly,
or indicate a fault or warning,
refer to the troubleshooting
section of this manual.
NOTICE: Laser wavelength drift
is a normal characteristic of the
RMLD-FR. The rate of drift is
normally low and will not aect
the Self Test if performed on a
regular basis. Scan work conducted
with an instrument which has drifted
and was not Self Tested may need
to be redone. If instrument does not
successfully perform a Self Test
after three attempts, contact
HEATH for assistance.
CAUTION
1. Turn on the instrument and
allow it to successfully boot up.
If the instrument does not nd a
successful Self Test report for the
day, a pop-up message appears
on screen. Press the OK button to
continue. (There is no pop-up
message if a successful Self Test
report is found for the day.)
2. Press (long press) and release the
MENU button.
3. Select the Self Test option.
The screen will display and guide
the next steps for the Operator
to follow within 10 seconds
(enough time for the steps).
4. Place the instrument in its
designated area in the carrying
case, making sure it is all the
way in place and at.
5. Result of Self Test is indicated
by audible tones:
One (1) beep every second
means instrument passed.
Two (2) beeps every second
means instrument failed, and
Self Test should be repeated.
If instrument fails on a third
attempt, contact Heath
Consultants Factory Service.
Result of Self Test is indicated
on the display. A Self Test le is
also created.
NOTICE
PP
X

Operator’s Manual
11
RMLD
-
FR
Doc No. 16086 Rev A, RMLD-FR Operator Manual © 2021 Heath Consultants Incorporated. All rights reserved.
Scan Screen Mode
Peak Value:
- Holds for two (2) seconds
before resetting
to a current reading
- Changes instantly
if a higher reading
is measured
Peak Hold:
- Holds until PEAK button is
pressed, or a higher peak is
measured
- Peak History list of recent
holds can be viewed and saved
to a data le through MENU
A blue underline for MENU
or MODE indicates a
successful long press.
Alarm Level Setting:
- May be changed in Menu,
in Alarm Level
The no-clutter Scan Mode
displays large numerical
readouts of PPMM and
PEAK detections.
Scan mode is the default screen
mode when not in MENU mode.
Quick Press Features
Turn green spotter laser ON.
Will automatically shut o
after two (2) minutes.
Turn green spotter laser OFF
Set distance alarm to 50’
Set distance alarm to 100’
Add current Peak Hold
value to Peak History List.
Peak History List of
recently held peaks can
be viewed and saved to a
data le through MENU.
A single beep sound indicates a
successful short press.
Long Press Features
Opens MENU screen.
Opens IMAGE screen mode.
A “long press” is achieved by
pressing and holding until a blue
line appears underneath.
GPS Indicator
GPS in the instrument is always
enabled. The GPS icon is only
visible if a GPS signal is locked.
Border Color Indicators
Screen border color indicates
detection status:
- Green, no ashing – no detection
above the alarm level.
- Red, fast ashing – detection
exceeds alarm level methane
detected.
Operator may disable ashing
through the MENU.
NOTICE: Border color will not appear while DMD Alarm is disabled.
NOTICE

Operator’s Manual
12
RMLD
-
FR
Doc No. 16086 Rev A, RMLD-FR Operator Manual © 2021 Heath Consultants Incorporated. All rights reserved.
Image Screen Mode
Displays a live image of
where the RMLD-FR is
pointed, as well as current
and peak PPMM readings.
This feature is especially useful
in bright sunlight when the green
spotter laser may be hard to see.
Quick Press Features
Turn green spotter laser ON.
Will automatically shut o
after two (2) minutes.
Turn green spotter laser OFF
Set distance alarm to 50’
Set distance alarm to 100’
Add current Peak Hold
value to Peak History List.
Peak History List of
recently held peaks can
be viewed and saved to a
data le through MENU.
A single beep sound upon release
indicates a successful press.
Long Press Features
Saves snapshot and text le
of related data to internal SD
memory. See pages 18-20
for le access instructions.
Opens IMAGE screen mode
A “long press” is achieved by
pressing and holding until a blue
line appears underneath.
GPS Indicator
GPS in the instrument is always
enabled. The GPS icon is only
visible if a GPS signal is locked.
Border Color Indicators
Screen border color indicates
detection status:
- Green, no ashing – no detection
above the alarm level.
- Red, fast ashing – detection exceeds
alarm level methane detected.
Operator may disable ashing
through the MENU.
NOTICE: Reticle is a general representation of IR beam location.
Beam may not be at exact center. Operator must sweep the area of interest
to ensure beam coverage.
NOTICE
NOTICE: Border color will not appear while DMD Alarm is disabled.
NOTICE
A blue underline for Camera
icon or MODE indicates a
successful long press.
Alarm Level Setting:
- May be changed in Menu,
in Alarm Level
Peak Value:
- Holds for two (2) seconds
before resetting
to a current reading
- Changes instantly
if a higher reading
is measured
Peak Hold:
- Holds until PEAK button is
pressed, or a higher peak is
measured
- Peak History list of recent
holds can be viewed and saved
to a data le through MENU

Operator’s Manual
13
RMLD
-
FR
Doc No. 16086 Rev A, RMLD-FR Operator Manual © 2021 Heath Consultants Incorporated. All rights reserved.
Working With Menu Items
Audio Mode
Self Test
Please refer to list shown here for the page number location of each menu item.
Self Test...................................page 13
Audio Mode...........................page 13
Alarm Level........................... page 14
USB.......................................... page 14
Bluetooth............................... page 14
WiFi ..........................................page 15
Data Logging....................... page 16
Time Zone Oset ............... page 16
Peak History ..........................page 17
Display Background...........page 17
About.......................................page 17
DMD (Digital Methane Detection)
Digital Methane Detection (DMD)
is a highly sophisticated detection
algorithm that greatly enhances the
use of the RMLD-FR. The factory de-
fault setting for DMD is Enabled (on).
While using DMD mode, an audio alarm
will be heard, and on-screen indicators
(ashing/color-changing readings
and screen border) will be seen when
methane detection occurs.
DMD will indicate detection when
the PPM-M exceeds the Alarm Level,
or when the reading is excessive.
While the low light warning is sound-
ing, the RMLD-FR may still be able to
detect very large gas concentrations,
indicated by frequent, fast beeps.
The adjustable Alarm Level controls
the DMD. Your department’s scan-
ning procedure may require the use
of a specic value or procedure to
set it. Set the Alarm Level such that
the false detection rate is low, while
not too high that leaks are missed.
Please refer to page 10 for detailed instrucitons on performing a Self Test.
Audio Warning Indications
The instrument emits a constant
beep to indicate instrument-level
warnings and/or fault conditions.
A warning will also be displayed
on screen. The most common
warnings are:
- Low signal return/low light level
- Over saturation of signal
- Low battery
If low signal return/low light
occurs, then change angle or
move in closer to get in range.
If over saturation, then back up
from the target or point the
device at a less reective surface.
Should the warning(s) persist in
the instrument, check the display
and follow the instructions in the
troubleshooting guide on page 25.
To turn o DMD mode:
- Press the MENU button
- Select AUDIO MODE
- Select Disabled
NOTICE: DMD Mode will enable
automatically after 5 minutes,
enabling audible and color
border indicators.
NOTICE
WARNING
WARNING: When DMD is
disabled, the instrument
will not alarm with audible
or visible indicators.
Operator’s Manual
14
RMLD
-
FR
Doc No. 16086 Rev A, RMLD-FR Operator Manual © 2021 Heath Consultants Incorporated. All rights reserved.
Custom Alarm Pre-Sets
The operator may customize the
alarm level threshold for the 100’
and/or 50’ setting. The custom
settings replace the factory
defaults, and become the alarm
pre-sets for future sessions.
To change the Alarm Detection
Threshold:
1. Press (long press) the MENU
button
2. Press the down arrow to scroll
through the list and highlight
Alarm Level.
3. Press SELECT.
4. Select 50’ or 100’.
5. Press the down arrow to
increase the number.
6. Press SELECT to advance
to the next digit.
7. Press BACK when done
with settings.
Alarm Level
NOTICE NOTICE: A higher Alarm Level setting will require a
higher concentration of methane to alarm.
Step 2-4 Step 5-7
USB
The RMLD-FR instrument is equipped two USB settings:
Command Mode
Select to use the USB port as a
communications port.
File Mode
Select to use the USB port for le
access as a ash drive. This is the
instrument’s default mode.
Factory Default Settings
The instrument is pre-programmed
with two (2) distance-based alarm
level thresholds for the operator to
easily toggle between. The factory
default setting is 100’ to alarm at
200 PPM-M. A quick press on the
button shown below will:
Set 50’ distance alarm at
100 PPM-M
Set 100’ distance alarm at
200 PPM-M
Alarm level threshold setting is shown on the screen.
A quick press on the button toggles
between the two (2) distance-based pre-sets.
(50’ selection shown above, 100’ selection shown below.)
Bluetooth (BLE)
The RMLD-FR instrument is equipped with Bluetooth 4.2 BLE to support future features and mobile applications.

Operator’s Manual
15
RMLD
-
FR
Doc No. 16086 Rev A, RMLD-FR Operator Manual © 2021 Heath Consultants Incorporated. All rights reserved.
The WiFi option enables
apple/android/pc devices to
connect to the Conguration
Portal through a web browser.
The Operator can use the Congu-
ration Portal to:
- Retrieve data and images stored
on the device, such as Self Test
logs, data logging, fault codes,
and image captures (see page 20)
- Congure the instrument
To enable the WiFi feature:
1. Press and hold the MENU button
until a blue line appears under
MENU. Release the button.
2. Press the down arrow to scroll
down to WiFi, and press SELECT.
3. Scroll down to and select AP Mode.
4. Press BACK when done.
Access Point (AP) Mode
AP Mode broadcasts a wireless net-
work directly from the RMLD-FR in-
strument. Operator must search for
this network and connect directly
to the instrument using the WiFi
(AP) network name and password.
1. After turning on the WiFi network
and selecting AP Mode (steps 1-3
at left), connect a computer or
smartphone to the FR’s WiFi
network. The WiFi (AP)SSID
network name will be set as “RM-
LD-FR” at the factory. An opera-
tor can see/change it by going to
the RMLD-FR Menu – WiFi – Edit
WiFi (AP)SSID (shown at right), or
through the Conguration Portal
(see page 20 for details).
2. Enter the WiFI (AP) password.
The WiFi password will be set as
“changeme2” at the factory. An
operator can see/change it by
going to the RMLD-FR Menu –
WiFi – Edit WiFi(AP) PASS, or
through the Conguration Portal
(see page 20 for details).
3. Once connected, open a web
browser and enter the address
for either the le server or the
conguration page.
File Server address:
http://10.123.45.1/
Conguration Page address:
http://10.123.45.1/cong
File Access
See page 19-20 for details on
accessing les through a WiFi
connection to the Conguration
Portal.
Change SSID or Password
Go to MENU - WiFi settings.
Scroll to and select either
Edit WiFi (AP)SSID for name, or
Edit WiFi (AP)PASS for password.
Press the down arrow to scroll
through characters:
- lowercase a-z
- uppercase A-Z
- numbers 0-9
- symbols/punctuation
Press SELECT to choose.
Press BACK when done.
Additional controls are revealed
when you press and hold the
down arrow.
While continuing to press/hold the
down arrow, the up arrow will go
back in sequence (i.e. from R to Q);
the double down arrow will skip to
the next set of characters (i.e. from
an uppercase letter to the number 0.
WiFi
WiFi Broadcasting
IP: 10.123.45.1
White WiFi icon in the status bar
indicates a connection.
A message on screen will conrm
that the WiFi is broadcasting.
Red WiFi icon indicates
no connection or the instrument is
attempting a connection
NOTICE
NOTICE: SSID and Password can
be set using the Conguration
Portal (see page 20).
Changing the factory default
AP SSID and AP Password is
recommended.

Operator’s Manual
16
RMLD
-
FR
Doc No. 16086 Rev A, RMLD-FR Operator Manual © 2021 Heath Consultants Incorporated. All rights reserved.
Data Logging
The data logging feature allows the instrument to store
complete telemetry records of the instrument,
while powered on, to an internal SD memory card.
Data telemetry is recorded into log les during operation.
The following measurement information is saved:
• CH4 PPM-M measurement
• Battery level
• Battery voltage
• GPS location
• Timestamp
• Serial number of the instrument
• Various system status elds and
values that can help evaluate
instrument performance or aid
in troubleshooting if a fault
condition occurs
To enable Data Logging:
1. Press MENU
2. Scroll down to DATA LOGGING
and press Select
3. Scroll down to and select
ENABLED
To disable Data Logging:
1. Press MENU
2. Scroll down to DATA LOGGING
and press Select
3. Scroll down to and select
DISABLED
Data logging
does not
need to be enabled
in order for
the instrument
to record:
- FAULT logs
- SELF TEST logs
- Screen captures
To access stored
data logs, refer to
the various methods
outlined on pages 18-20.
Time Zone Oset
The time zone oset menu option allows the user to select the desired oset from UTC
time acquired by the GPS.
1. In the menu, select
TIME ZONE OFFSET
2. Use the arrow buttons to adjust
the desired oset
3. Select the BACK button
when complete
NOTICE NOTICE: Time Zone Oset can be set using the Conguration Portal (see page 20).

Operator’s Manual
17
RMLD
-
FR
Doc No. 16086 Rev A, RMLD-FR Operator Manual © 2021 Heath Consultants Incorporated. All rights reserved.
About Screen
The ABOUT menu item
displays real-time
information about
the instrument.
Press the MENU button,
scroll down to ABOUT
and press SELECT.
Use the down arrow button to
scroll through the available
information:
• Model (name, serial number)
• Time Stamp (time, date)
• Firmware Version
• GPS Status
• Battery (% remaining)
• Storage (% remaining on
internal SD card)
• Self Test (status)
• Bluetooth Status (o/on)
• WiFi (AP) SSID (name)
• WiFi (AP) SSID (name)
• WiFi Status (on/o)
• Contact Information for
Heath Consultants Incorporated
Display Background
Peak History
The RMLD-FR oers three (3) choices
for the display background color:
- Black (factory default)
- White
- Automatic
Displays white from 8AM - 8PM
Displays black from 8PM - 8AM
The factory default setting is
Black, but the operator can
change this in the MENU,
DISPLAY BACKGROUND settings.
1. Press (long press) to open MENU.
2. Press the down arrow to
highlight Display Background,
and then press SELECT.
3. Press the down arrow to
highlight your choice of
Automatic, Black, or White,
and then press SELECT.
4. Press BACK when done.
A Peak History list of recent peak
holds can be viewed and saved
through the MENU.
Operator must save peak le
before turning instrument o.
A downloadable le is created
when saved.
To access saved peak les,
refer to pages 18-20.
NOTICE
Operator’s Manual
18
RMLD
-
FR
Doc No. 16086 Rev A, RMLD-FR Operator Manual © 2021 Heath Consultants Incorporated. All rights reserved.
To access recorded/captured data:
1. Turn on instrument.
2. Use the provided USB 2.0 A
to Micro-B cable to connect the
instrument to the PC.
a. Plug the Micro-B end into the
port on the instrument while
powered on.
b. Plug the USB 2.0 A end into
the USB port of the PC.
3. A le explorer window should
open automatically when the
device is ready for access, or
simply browse the PC’s devices
and drives to locate the instru-
ment’s USB drive.
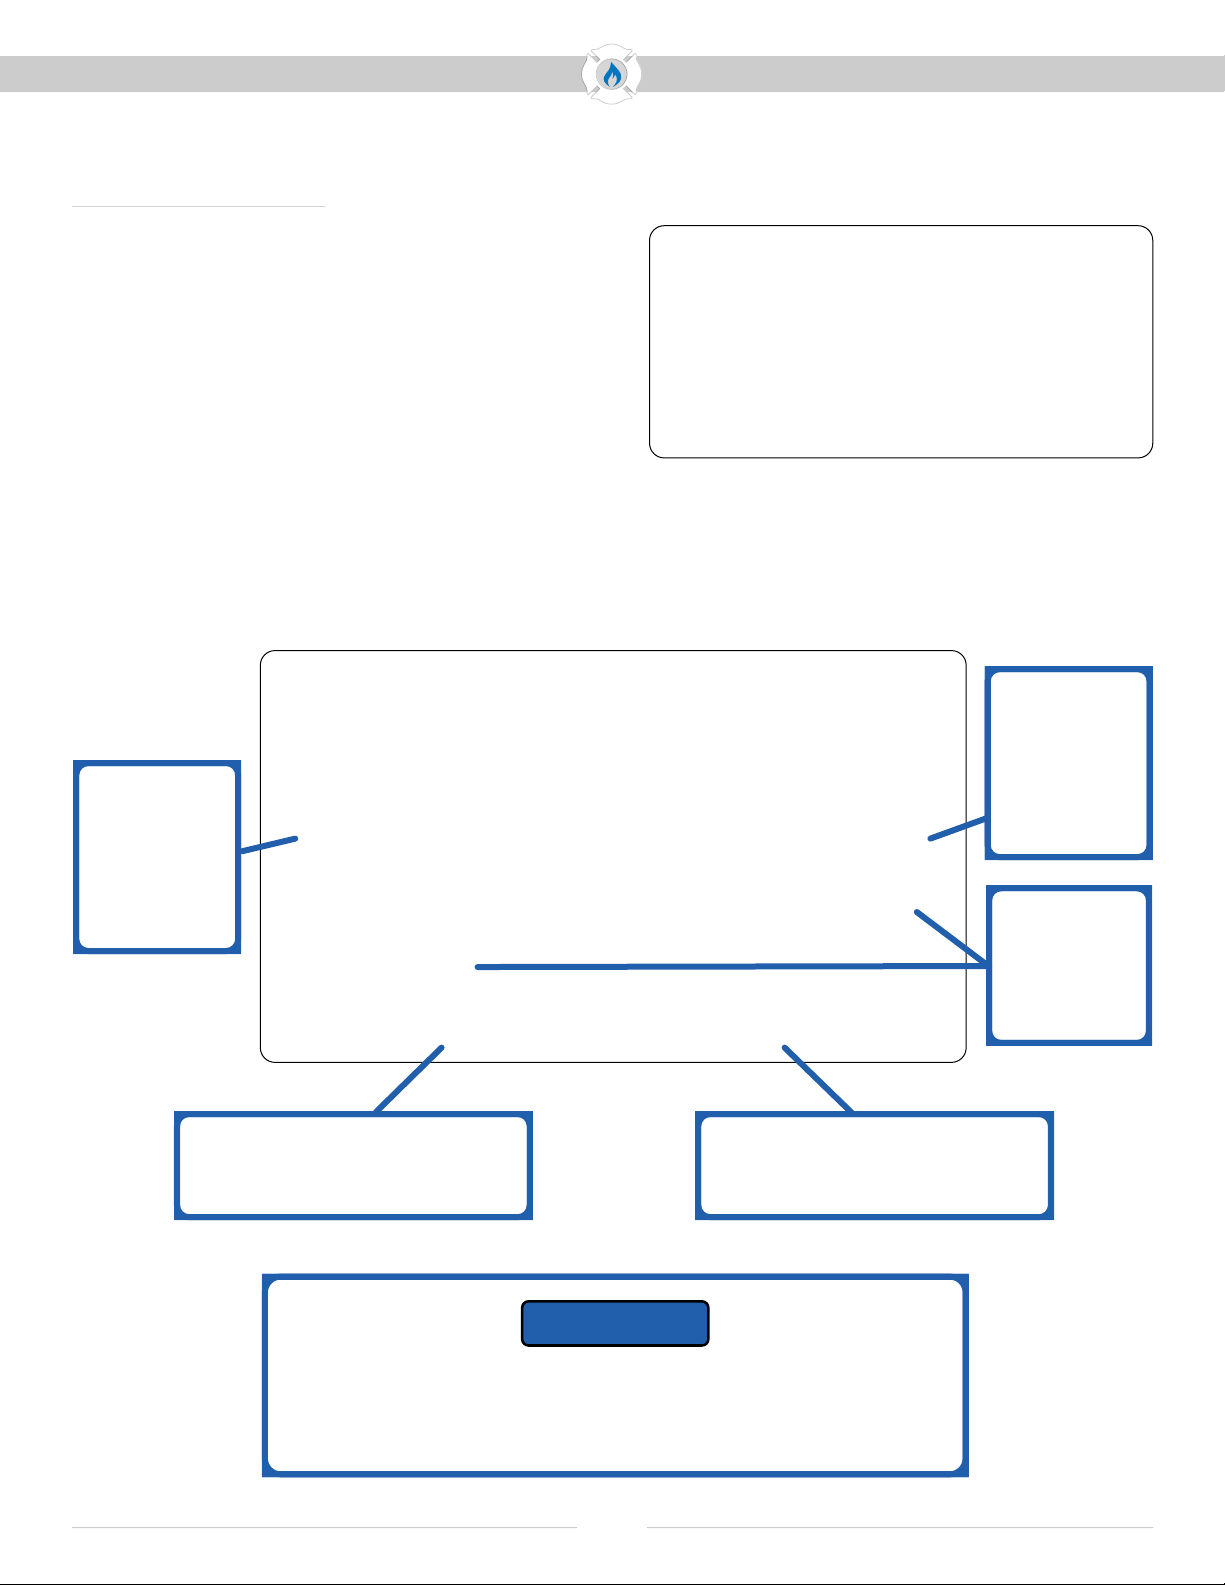
USB File Transfer
Root
Folder
Daily
Folders
Captures
Folder
Diagnostics
Folder
Datalogs
Folder
Capture
Image
.bmp
Startup
Log File
.txt
Capture
Log File
.txt
Fault
Log File
.txt
Peaks
Folder
SELF_TEST
Folder
Data Log
File
.txt
Peak Log
File
.txt
Basic folder
and le structure:
File Access
The RMLD-FR stores data on an internal SD memory card. The data les can be
downloaded or accessed in the following ways:
- USB File Transfer
(details below)
- WiFi connection to Conguration Portal
(see page 19-20)
Plug the Micro-B end into the
instrument while powered on.
a.
b. Plug the USB end into the
USB port of the PC.
File Name Conventions
<
SERIAL
>
-
<
DATE
>
-
<
TIME
>
-
<
USERNAME
>
-
<
FILETYPE
>
.
<
EXT
>
SERIAL number of instrument
DATE of le creation (YYMMDD)
TIME of le creation (HHMMSS)
USERNAME of user that was
logged on (always ADMIN for FR)
FILETYPE is the le type name:
Capture(Log)
Selftest
Datalog
Peaks
Startup
Fault
EXT is the le extension
.bmp for Capture images
.txt for log les
NOTICE
NOTICE: Recognition of RMLD-FR may take some time on rst plug in as
the required drivers are installed. Please allow time for this initial process
to complete.
SELF_TEST
Log File
.txt

Operator’s Manual
19
RMLD
-
FR
Doc No. 16086 Rev A, RMLD-FR Operator Manual © 2021 Heath Consultants Incorporated. All rights reserved.
File Access (continued)
WiFi
The WiFi option enables
apple/android/pc devices
to connect to the Congura-
tion Portal through a
web browser.
Please refer to page 15 for
step-by-step instructions to
enable WiFi and AP Mode.
The RMLD-FR only supports
protected networks with WPA-2
security. The SSID and password
may be entered manually through
options provided in the main menu.
The IP address of the RMLD-FR
unit is displayed on the about
screen when AP mode is success-
fully enabled. In AP mode, the
RMLD-FR instrument is actively
broadcasting and accepting
connections. The IP address is used
to access the RMLD-FR from a
client device on the same network.
The RMLD-FR provides a le server
and conguration web portal. One
can access these web pages by
navigating to their respective URLs
in any modern web-browser on
a device connected to the same
network as the RMLD-FR.
File Server
The RMLD-FR le server grants
users the ability to download and
delete les presented using the
same internal folder structures that
are accessible through the wired
USB port (shown on page 18).
After enabling WiFi and AP Mode
on the RMLD-FR (see page 15 for
step-by-step instructions to
enable WiFi and AP Mode),
one can access the le server in
any modern web-browser on
a device connected to the
RMLD-FR network.
File Server address: http://10.123.45.1/
From here, an operator may
download individual les by
clicking directly on the lename.
Additionally, operators may delete
date folders or individual les using
the checkboxes and Delete button.
NOTICE: The deleting of
les/folders is irreversible.
NOTICE
Operator’s Manual
20
RMLD
-
FR
Doc No. 16086 Rev A, RMLD-FR Operator Manual © 2021 Heath Consultants Incorporated. All rights reserved.
Conguration Portal
The Conguration Portal provides users with an easy
interface for accessing les and conguring the instrument.
Navigating to http://10.123.45.1/cong will return the
Conguration Portal page.
The conguration portal is divided between two tabs:
- Files is the default tab (shown at right), used for
accessing/downloading data and images saved on
the instrument’s internal SD card.
- Instrument (shown below) is the tab that provides
editable elds that identify the operator, timezone
oset, and WiFi information. Both AP and Station mode
credentials are supported.
File Access (continued)
Timezone
Oset
oers a
drop-down list
for ease of
selection.
Name ADMIN
cannot be
changed, but
all other elds
are editable.
Save Cong to RMLD
must be clicked to update the
instrument with any changes.
Load Cong from RMLD
will populate the elds with
the current instrument settings.
When Finished With Conguration Portal:
- Close the web browser
- Disable WiFi AP Mode
NOTICE
Changing the
factory default
AP SSID and
AP Password is
recommended.
Table of contents
Other Heath Consultants Gas Detector manuals


Popular Gas Detector manuals by other brands


New Cosmos Electric
New Cosmos Electric NV-100C instruction manual

MSA
MSA MGS-550 operating manual

STEINEL
STEINEL CO2-AirCheck Signal manual

FORENSICS DETECTORS
FORENSICS DETECTORS FD-VAPE-WALL user manual

Eagle
Eagle GD-1000 Technical reference manual

Bacharach
Bacharach IAM-100 Installation and operation manual


