Heath Zenith SECUR360 9304 User manual

To see operational and troubleshooting information and videos,
go to www.hzsupport.com
Dated receipt required for warranty replacement.
FEATURES
• Battery Powered
• Wi- connectivity
• 180° Motion sensor
UNPACKING
Be sure to remove all contents from packaging and verify
all items are present before assembling this light xture.
is package includes the following items:
• Security Light
• Owner’s Manual
• SECUR360 App Quick Start Guide
• Mounting Hardware
© 2020 HeathCo LLC 210449-01A
Connected LED Battery
Security Motion Light
Model: 9304
HARDWARE INCLUDED
Note: Six mounting bracket screws are included. e installation will only require two. Discard the unused mounting
bracket screws after installation.
Screw (x2) Wall Anchor (x2)

2 To see operational and troubleshooting information and videos,
go to www.hzsupport.com
210449-01
IMPORTANT SAFETY AND INSTALLATION INFORMATION
Before installing security light, read all instructions carefully and keep owner’s manual for future reference.
• WARNING: To prevent possible SERIOUS INJURY or DEATH never allow small children near batteries.If a battery
is swallowed, immediately notify a doctor.
• WARNING: DO NOT mix old and new batteries. DO NOT mix battery types - such as alkaline, heavy duty, and
rechargeable - in a single device. Battery leakage may occur.
• WARNING: DO NOT DISPOSE OF BATTERIES IN FIRE. BATTERIES MAY EXPLODE OR LEAK.
• WARNING: Risk of re. Keep the lamp head at least 2 in. from combustible materials.
• CAUTION: To avoid water damage, the motion sensor controls must be facing the ground when the installation is
complete.
• CAUTION: Keep the lamp head 30° below horizontal to avoid water damage.
• CAUTION: Burn hazard. Allow the light xture to cool before touching.
• NOTICE: Do not immerse components in liquid.
• is light xture requires 4 “D”alkaline batteries (not included).
• To extend the life of the batteries, this light only works in the dark (night time).
• is xture is designed for outdoor installation and should be mounted to a wall or eaves.
• To achieve best results,this xture should be mounted 8 feet (2.4 meters) above the ground.Note: If xture is mounted
higher than 8 ft. (2.4 meters), aiming the sensor down will reduce coverage distance.
e motion sensor on this light xture detects “motion” by the movement of heat across the coverage area.e motion
sensor is more sensitive to the movement of heat moving across the coverage area and less sensitive to the movement
of heat directly towards it.
Note: Light xture and sensor should be mounted as shown above when installed (depending upon type of installation).
Least Sensitive Most Sensitive
Wall Mount Eave Mount
Motion Motion
Sensor
R
E
S
E
T
/ 0 +
217,0(
6HQVLWLYLW\
(FR3RZHU0RGH
2Q2II
6
7HVW
2II
R
E
S
E
T
/ 0 +
217,0(
6HQVLWLYLW\
(FR3RZHU0RGH
2Q2II
6
7HVW
2II
7+,66,'(83
7+,66,'(83

To see operational and troubleshooting information and videos, 3
go to www.hzsupport.com
210449-01
Figure 1
Figure 2
Figure 3
6,=('
OPEN
PRESS TO CLOSE
R
E
S
E
T
/ 0 +
217,0(
6HQVLWLYLW\
(FR3RZHU0RGH
2Q 2II
6
7HVW
2II
R
E
S
E
T
/
0 +
217,0(
6HQVLWLYLW\
(FR3RZHU
0RGH
2Q 2II
6
7HVW
2II
INSTALLATION
1. Press the bottom tab of the wall mounting plate and slide the
mounting plate from the light body (see Figure1).
2. Using the wall mounting plate as a template, mark the position
of the mounting holes.Note: e“UP”arrow must point upward.
3. Usethetwoscrews and wall anchors (provided) to mount the wall
plate to a solid surface (see Figure2).Make sure there is enough
vertical space above the mounting plate to allow the light xture
to be slid down onto the mounting plate.
4. Press up on the battery compartment cover locking tab and swing
the cover out and down to remove (see Figure3).
5. Install four 1.5V “D” batteries (not included) into the battery
compartment. Make sure the polarity of the batteries matches
the markings on the inside of the battery compartment cover.
Replace the battery compartment cover (see Figure4).
Figure 4

4 To see operational and troubleshooting information and videos,
go to www.hzsupport.com
210449-01
Figure 8
Figure 5
Figure 6
Figure 7
R
E
S
E
T
/ 0 +
217,0(
6HQVLWLYLW\
(FR3RZHU0RGH
2Q 2II
6
7HVW
2II
FINAL ASSEMBLY
Slide the rear of the light xture down onto the mounting plate until
it snaps into place (see Figure5).
IMPORTANT:
• If wall mounted, make sure the xture is mounted with the sensor
below the lamp head (see page 2).
• If eave mounted, mount the xture with sensor facing away from
the house wall (see page 2). Rotate the sensor so the controls on
the bottom of the sensor (see Figure 7) face the ground.
TESTING AND ADJUSTMENTS
R
E
S
E
T
/ 0 +
217,0(
6HQVLWLYLW\
(FR3RZHU0RGH
2Q2II
6
7HVW
2II
CAUTION:To avoid water damage, motion sensor con-
trolsmustbefacingthegroundwheninstallationiscomplete.
1. Slide the sensitivity (SENS) switch to the “L” position, the
ON-TIMEswitchtotheTESTposition,andtheECOPOWER
MODE switch to the OFF position (see Figure 7).
2. Walk through the coverage area noting where you are when the
lights turn on. Also,the LED indicator behind the motion sen-
sor lens will glow blue when motion is detected (see Figure 8).
Note: e blue LED will turn o 30 seconds after all motion has
stopped.
3. If needed, gently grasp the motion sensor and move it from side
to side or up and down to adjust the detection zone.
4. If needed, gently grasp the lamp head and move it from side to
side or up and down to adjust the light coverage area.
LED Indicator

To see operational and troubleshooting information and videos, 5
go to www.hzsupport.com
210449-01
FINAL SETUP
IMPORTANT: All of the settings on the motion sensor are
also controlled through the SECUR360 app. However,
if the light loses wi- connection (the LED indicator
will blink blue), the motion sensor settings will control
the light until wi- connection is reestablished. Once
the light reconnects to wi-, the settings in the app will
control the light.
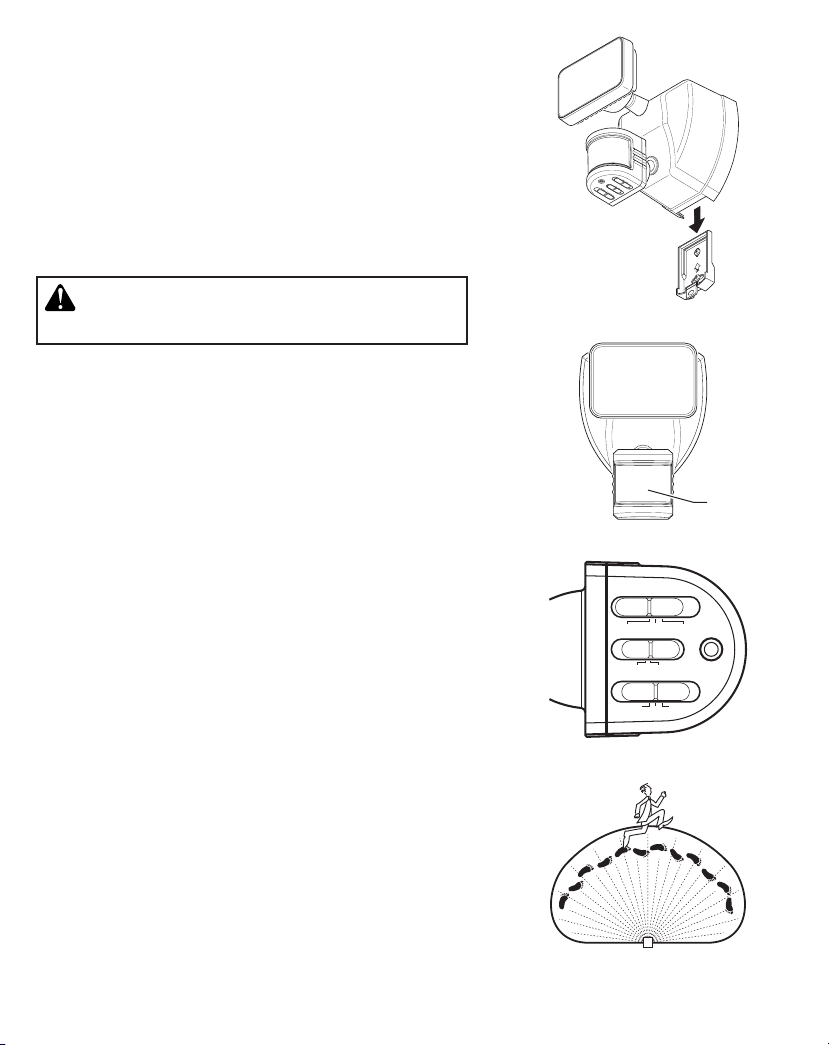
1. Adjust the sensitivity (SENS) switch as needed (“L”,
“M”,“H”). Sensitivity set too high may increase false
triggering.
2. Set the ON-TIME switch to OFF or 20 seconds (the
amount of time the light will stay on after all motion
has stopped).
3. SettheECOPOWERMODEswitchtoONorOFF.
See
Eco Power Mode
section for more information.
4. Go to the App StoreSM or Google Play™ and search
for the “Secur360” app and download. See the
enclosed instruction sheet,“Connecting to your new
SECUR360 device”, for more details.
5. Oncestep4iscomplete,opentheSECUR360appand
log into the account. Use the app to set the controls
for the light xture.
LED Indicator
• RED + Solid: Light is warming up – Stays in this mode
until the light is ready.
• RED + ashing (1 second ON / 1 second OFF): Light
is in wi- connection mode.
• BLUE + ashing: Light is connecting to the internet.
• BLUE + (2 Minutes ON): Light is connected to the
internet.
• BLUE: When motion is detected,the LED will be ON
until all motion has stopped for 30 seconds.
For additional information concerning this light or the
SECUR360app,visitwww.heath-zenith.com/Secur360.
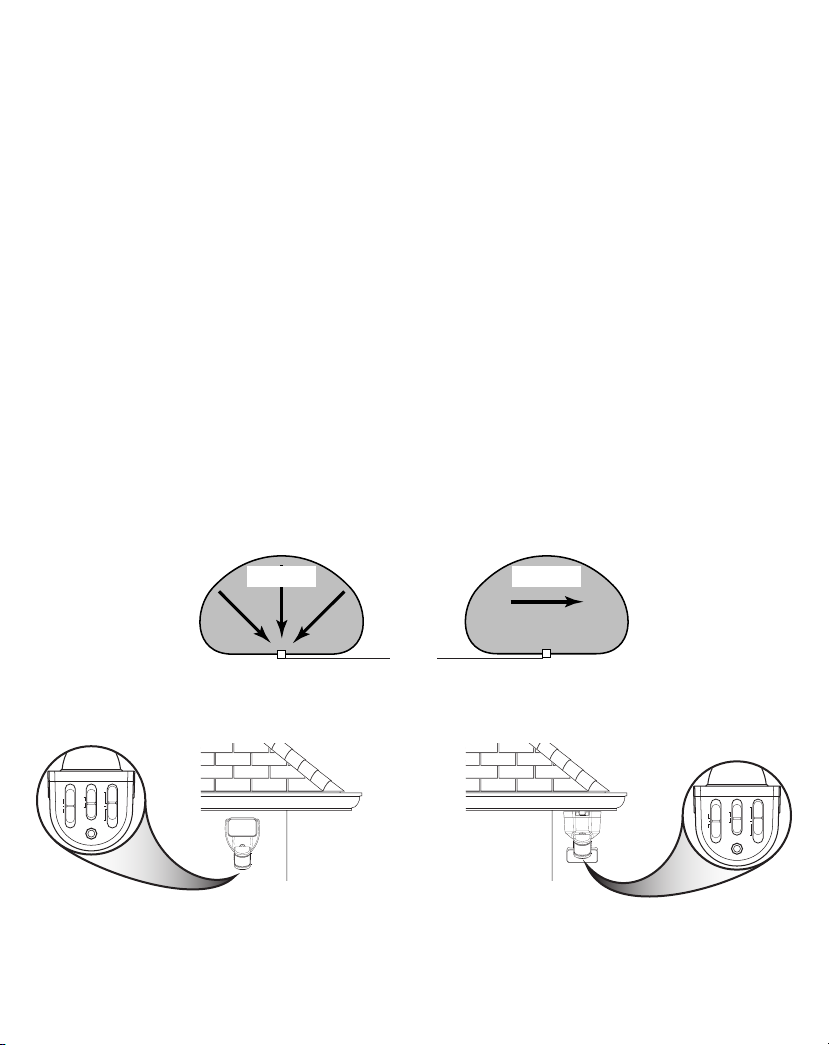
IMPORTANT CONSIDERATIONS
AVOID AIMING THE SENSOR AT:
• Below are examples of objects that might produce heat
and may cause the motion sensor to trigger:
• Pools of Water • Air Conditioners
• Dryer Vents • Animals
• Heating Vents • Automobile Trac
If you suspect that a heat source of this type is triggering
the motion sensor, reduce the sensitivity.
• Areaswherepetsortracmaytriggerthemotionsensor.
• Nearby large, light-colored objects reecting light may
trigger the shut-o feature. Do not point other lights
at the motion sensor.
SEASONAL CHANGES:
e motion sensor works by sensing temperature changes
across its eld of view. e closer the surrounding tem-
perature is to a person’s body heat, the less sensitive the
sensor will appear.e greater the temperature dierence,
the more sensitive the sensor will appear.Use the sensitiv-
ity control in the app to adjust the setting as the outside
temperature changes for the dierent seasons. is is a
normal part of the light sensor’s operation.
ECO POWER MODE
“Eco Power mode” is a selectable feature within the app
designed to increase battery life by reducing certain func-
tions, such as:
• e light will not have constant access to wi-.e wi-
module in the light will only activate after a set amount
of time has passed or whenever the light is activated by
motion.
• e brightness of the light will be reduced.
• Voice activation is turned o.
• When grouped with other lights, this light will not be
turned on when other lights are activated. When this
light is activated,it will turn on other lights in the group.
RESET BUTTON
islightcanberesettotheoriginalfactory settings either
by using the reset button on the bottom of the sensor or
throughtheSECUR360app.Note: Afterresettingthelight,
it may take up to 5 minutes for the light to be removed
from the SECUR360 app.
• Reset Button (see Figure 7) – Use a paper clip to press
the RESET button for 15 seconds to reset the light.
For additional information concerning this light or the
SECUR360app,visitwww.heath-zenith.com/Secur360.

6 To see operational and troubleshooting information and videos,
go to www.hzsupport.com
210449-01
6,=('
OPEN
PRESS TO CLOSE
CARE AND CLEANING
• To prolong the original appearance, clean the light xture with clear water and a soft, damp cloth only.
• Do not use paints, solvents, or other chemicals on this light xture.ey could cause a premature deterioration of the
nish.is is not a defect in the nish and will not be covered by the warranty.
• Do not spray the light xture with a hose or power washer.
• If not to be used for several weeks, turn the unit OFF.
SPECIFICATIONS
Motion Sensing Range.........................Up to 40 ft. (12 m) [Varies with surrounding temperature].
Motion Sensing Angle .........................Up to 180°
Power Requirements.............................“D” Alkaline Batteries (4x) (not included)
Oine Operating Modes.....................TEST, OFF, and MOTION ACTIVATED
ON-Timer............................................20 seconds (non-adjustable) (Night Only)
Test Timer............................................5 Seconds (Day and Night)
Sensitivity (SENS) ...............................“L”, “M”, “H”
LED Lumens .......................................650
LED color temperature ........................4700K
BATTERY REPLACEMENT
1. Press the bottom tab of the wall mounting plate and
slide the light xture up and o of the mounting plate.
2. Remove the battery cover on the back of the light
xture and remove the old batteries.
3. Install four new 1.5V “D” batteries into the battery
compartment.Make sure the polarity of the batteries
is correct.
4. Replace the battery cover.
5. Place the top rear of the light xture over the wall
mounting plate and slide the xture down onto the
wall mounting plate.Slide the light xture down until
the bottom tab clicks and locks the light xture into
place.
IMPORTANT:Properlydisposeofdrainedbatteries.
Battery Cover
“D” Batteries

To see operational and troubleshooting information and videos, 7
go to www.hzsupport.com
210449-01
TROUBLESHOOTING GUIDE
SYMPTOM POSSIBLE CAUSE SOLUTION
e light will not come on. 1. e motion sensor is aimed in the wrong
direction.
2. Batteries are weak or dead.
3. Daylight turn-o (photocell) is in eect.
4. e outside air temperature is close to the
same as a person’s body heat.
5. e light has been turned “OFF” using the
app.
6. Surrounding air temperature is greater than
122° F (50° C) or less than -4° F (-20° C).
1. Re-aim the motion sensor to cover the
desired area.
2. Check battery charge and replace if necessary.
3. Recheck after dark.
4. Increase the sensitivity setting. See
Seasonal
Changes
on page 5 for more information.
5. Use the app to set the light to “AUTO”
mode.
6. Recheck when the surrounding air
temperature is within the specied range.
e light comes on during
the day. 1. e motion sensor may be installed in a
relatively dark location.
2. e “ON-TIME” in the app is set to
“TEST”.
1. e light xture is operating normally under
these circumstances.
2. Set the “ON-TIME” in the app to the 20
second setting.
e light comes on for no
apparent reason. 1. e motion sensor may be sensing small
animals or automobile trac.
2. Sensitivity is set too high.
3. e outside temperature is much warmer or
cooler than a person’s body heat (summer or
winter).
1. Decrease the sensitivity setting or reposition
the motion sensor.
2. Decrease the sensitivity setting.
3. Decrease the sensitivity setting. See
Seasonal
Changes
on page 5 for more information.
e lights stay on
continuously. 1. e motion sensor may be picking up a heat
source like an air vent, dryer vent, or brightly
painted, heat-reective surface.
2. e light has been turned “ON”using the
app.
1. Decrease the sensitivity setting or reposition
the motion sensor.
2. Use the app to set the light to “AUTO” or
“OFF” mode.
e lights ash on and o. 1. Heat is being reected from other objects
and may be turning the motion sensor on
and o.
2. e “ON-TIME” is in “TEST” mode and
warming up.
3. Battery is almost dead.
1. Decrease the sensitivity setting or reposition
the motion sensor.
2. While in TEST mode, the light only stays
on for 5 seconds. Set the “ON-TIME” in the
app to the 20 second setting.
3. Check battery charge and replace if necessary.
e lights ash once then
stay o in manual mode. e motion sensor is detecting light from the
lamp head. Reposition the lamp head to keep the area below
the motion sensor relatively dark.
Light is not as bright as
normal. Weak battery. Check battery charge and replace if necessary.

8 To see operational and troubleshooting information and videos,
go to www.hzsupport.com
210449-01
ONE YEAR LIMITED WARRANTY
is is a “Limited Warranty”which gives you specic legal rights.You may also have other rights which vary from
state to state or province to province.
For a period of 1 year from the date of purchase,any malfunction caused by factory defective parts or workmanship
will be, at the sole option of HeathCo LLC, either repaired or replaced at no charge to you.
Not Covered - Repair service, adjustment and calibration due to misuse,abuse or negligence,light bulbs,batteries,
and other expendable items are not covered by this warranty. Unauthorized service or modication of the product
or of any furnished component will void this warranty in its entirety.is warranty does not include reimbursement
for inconvenience, installation, setup time, loss of use, unauthorized service, or return shipping charges. HeathCo
LLC reserves the right to discontinue products and to change specications at any time without incurring any
obligation to incorporate new features in products previously sold.
is warranty covers only HeathCo LLC assembled products and is not extended to other equipment and com-
ponents that a customer uses in conjunction with our products.
THISWARRANTYISEXPRESSLYINLIEUOFALLOTHERWARRANTIES,EXPRESSORIMPLIED,
INCLUDING ANY WARRANTY,REPRESENTATION OR CONDITION OF MERCHANT ABILITY
OR THAT THE PRODUCTS ARE FIT FOR ANY PARTICULAR PURPOSE OR USE, AND SPECIFI-
CALLY IN LIEU OF ALL SPECIAL,INDIRECT,INCIDENTAL,OR CONSEQUENTIAL DAMAGES.
REPAIR OR REPLACEMENT SHALL BE THE SOLE REMEDY OFTHE CUSTOMER ANDTHERE
SHALL BE NO LIABILITY ON THE PART OF HEATHCO LLC FOR ANY SPECIAL, INDIRECT,
INCIDENTAL, OR CONSEQUENTIAL DAMAGES, INCLUDING BUT NOT LIMITED TO ANY
LOSS OF BUSINESS OR PROFITS, WHETHER OR NOT FORESEEABLE. Some states or provinces do
not allow the exclusion or limitation of incidental or consequential damages, so the above limitation or exclusion
may not apply to you.
Please keep your dated sales receipt, it is required for all warranty requests.
TECHNICAL SERVICE
Please call 1-800-858-8501 (English speaking only) for assistance before returning product to
store.
If you experience a problem, follow this guide. You may also want to visit our Web site at: www.hzsupport.com. If the
problem persists, call* for assistance at 1-800-858-8501 (English speaking only), 8:00 AM to 5:00 PM CST (M-F).
You may also write* to:
HeathCo LLC
P.O. Box 90045
Bowling Green, KY 42102-9045
ATTN: Technical Service
* If contacting Technical Service, please have the following information available: Model Number, Date of Purchase,
and Place of Purchase.
No Service Parts Available for this Product
Please keep your dated sales receipt, it is required for all warranty requests.

Para ver más información y vídeos sobre operación y resolución de problemas, 9
visite www.hzsupport.com
210449-01
© 2020 HeathCo LLC 210449-01 S
Se necesita el recibofechadoparareemplazo bajo garantía.
CARACTERÍSTICAS
• Accionada por pilas
• Conectividad Wi-
• Detector de movimiento de 180 °
DESEMPAQUE
Asegúrese de retirar todo el contenido del empaque y
vericar que todos los elementos estén incluidos antes de
ensamblar este aparato de luz. Este paquete incluye los
siguientes elementos:
• Luz de seguridad
• Manual del propietario
• Guía de inicio rápido de la aplicación SECUR360
• Ferretería de montaje
FERRETERÍA INCLUIDA
Nota: Se incluyen seis tornillos para el soporte de montaje. La instalación sólo requiere dos. Deseche los tornillos del
soporte de montaje no utilizados luego de la instalación.
Tornillo (x2) Ancla de expansión de pared (x2)
Luz LED de seguridad con
detección de movimiento
activada con pilas conectada
Modelo: 9304

10 Para ver más información y vídeos sobre operación y resolución de problemas,
visite www.hzsupport.com
210449-01
INFORMACIÓN IMPORTANTE DE SEGURIDAD E INSTALACIÓN
Antes de instalar la luz de seguridad, lea todas las instrucciones con cuidado y guarde el manual del propietario para
futura referencia.
• ADVERTENCIA: Para evitar posibles LESIONES GRAVES LA MUERTE nunca deje que los niños pequeños estén
cerca de las pilas. Si alguien ingiere una pila, notique inmediatamente al médico.
• ADVERTENCIA: NO mezcle las pilas viejas con las nuevas. NO mezcle diferentes tipos de pilas - tales como alcalinas,
muy resistentes y recargables - en un solo dispositivo. Pueden causar goteo de las pilas.
• ADVERTENCIA: NO TIRE LAS PILAS AL FUEGO. LAS PILAS PUEDEN EXPLOTAR O GOTEAR.
• ADVERTENCIA: Riesgo de incendio. Mantenga la bombilla alejadas al menos 2 pulgadas (51 mm) de materiales
combustibles.
• PRECAUCIÓN: Para evitar daños por el agua, los controles del detector de movimiento deben estar de cara al suelo
cuando la instalación esté terminada.
• PRECAUCIÓN: Mantenga lo portabombilla inclinados a 30° por debajo de la línea horizontal para evitar daños por el
agua.
• PRECAUCIÓN: Peligro de quemaduras. Deje que el aparato de luz se enfríe antes de tocarlo.
• AVISO: No sumerja los componentes en líquidos.
• Esta lámpara requiere 4 pilas alcalinas “D” (no incluidas).
• Para prolongar la vida de las baterías, esta luz sólo funciona en la oscuridad (en la noche).
• Este aparato está diseñado para una instalación al aire libre y se lo debe montar en una pared o en aleros.
• Para lograr los mejores resultados, este aparato debe montarse a 8 pies (2,4 metros) por encima del suelo. Nota: Si el
aparato está instalado a más de 8 pies (2,4 m), si se apunta el detector hacia abajo se reducirá la distancia de cobertura.
El detector de movimiento de este aparato de luz detecta “movimiento” debido al movimiento del calor a través del
área de cobertura. El detector de movimiento es más sensible a la circulación del calor que se mueve a través del área de
cobertura y menos sensible a la circulación del calor que va directamente hacia él.
Nota: La lámpara y el sensor debe montarse como se indica arriba, una vez instalado (según el tipo de instalación).
Lo menos sensible Lo más sensible
Montaje en pared Montaje en alero
Detector
Movimiento Movimiento
R
E
S
E
T
/ 0 +
217,0(
6HQVLWLYLW\
(FR3RZHU0RGH
2Q2II
6
7HVW
2II
R
E
S
E
T
/ 0 +
217,0(
6HQVLWLYLW\
(FR3RZHU0RGH
2Q2II
6
7HVW
2II
7+,66,'(83
7+,66,'(83

Para ver más información y vídeos sobre operación y resolución de problemas, 11
visite www.hzsupport.com
210449-01
Figura 1
Figura 2
Figura 3
6,=('
OPEN
PRESS TO CLOSE
R
E
S
E
T
/ 0 +
217,0(
6HQVLWLYLW\
(FR3RZHU0RGH
2Q 2II
6
7HVW
2II
R
E
S
E
T
/
0 +
217,0(
6HQVLWLYLW\
(FR3RZHU
0RGH
2Q 2II
6
7HVW
2II
Figura 4
INSTALACIÓN
1. Pulse la lengüeta inferior de la placa de montaje en pared y deslice
la placa de montaje del cuerpo del aparato (ver Figura 1).
2. Usando la placa de montaje en pared como una plantilla,marque
la posición de los agujeros de montaje.Nota: La echa “UP”debe
apuntar hacia arriba.
3. Use los dos tornillos y anclas de pared (provistos) para colocar la
placadeparedsobreuna superciesólida(verFigura2).Asegúrese
de que hay suciente espacio vertical por encima de la placa de
montaje para que la lámpara se deslice hacia abajo sobre la placa
de montaje.
4. Presione hacia arriba la lengüeta de bloqueo de la tapa del com-
partimiento de las pilas y gire la tapa hacia fuera y hacia abajo
para quitarla (ver Figura 3).
5. Instalecuatropilas“D”de1.5V(noincluidas)enelcompartimiento
de la pila. Asegúrese de que la polaridad de las pilas coincida
con las marcas en el interior de la tapa del compartimento de la
pila. Vuelva a colocar la tapa del compartimento de la pila (ver
Figura4).

12 Para ver más información y vídeos sobre operación y resolución de problemas,
visite www.hzsupport.com
210449-01
Figure 8
Figure 5
Figure 6
Figure 7
R
E
S
E
T
/ 0 +
217,0(
6HQVLWLYLW\
(FR3RZHU0RGH
2Q 2II
6
7HVW
2II
MONTAJE FINAL
Deslice la parte de atrás del aparato de luz hacia abajo sobre la placa
de montaje hasta que cierre a presión en su sitio (vea la Figura 5).
IMPORTANTE:
• Si lo monta en la pared, asegúrese de que el aparato esté montado
con el detector debajo de la cabeza de la lámpara (vea la página 10).
• Si lo monta en un alero, monte el aparato con detector de espaldas
a la pared de la casa (vea la página 10).Gire el detector de modo que
los controles en la parte inferior del detector (vea la Figura 7) miren
hacia el suelo.
PRUEBAS Y AJUSTES
R
E
S
E
T
/ 0 +
217,0(
6HQVLWLYLW\
(FR3RZHU0RGH
2Q2II
6
7HVW
2II
PRECAUCIÓN:Paraevitardañosporelagua,loscontro-
les del detector de movimiento deben estar de cara al suelo
cuando la instalación esté terminada.
1. Deslice el interruptor de sensibilidad (SENS) a la posición “L”,
el interruptor ON-TIME (DURACIÓN) a la posición TEST
(PRUEBA)yelinterruptorECOPOWERMODEa la posición
OFF (APAGADO) (vea la Figura 7).
2. Camine por el área de cobertura y note dónde está usted cuando
la luce se encienden.Además,el indicador LED detrás de la lente
deldetectordemovimiento seiluminaráenazulcuando sedetecte
movimiento (vea la Figura 8). Nota: El LED azul se apagará 30
segundos después de que se haya detenido todo movimiento.
3. Si es necesario, sujete suavemente el detector de movimiento y
muévalo de lado a lado o de arriba hacia abajo para ajustar la zona
de detección.
4. Si es necesario, agarre suavemente el cabezal de la lámpara y
muévalo de lado a lado o hacia arriba y hacia abajo para ajustar
el área de cobertura de la luz.
REGULACIÓN FINAL
IMPORTANTE:Todoslosajustesen eldetectordemovimientotambién
se controlan a través de la aplicación SECUR360. Sin embargo, si la
luz pierde la conexión wi- (el indicador LED parpadeará en azul),los
ajustes en el detector de movimiento controlarán la luz hasta que se
restablezca la conexión wi-. Una vez que la luz se vuelve a conectar a
wi-, la conguración de la aplicación controlará la luz.
1. Ajuste el interruptor de sensibilidad (SENS),según sea necesario
(“L”,“M”,“H”).Una sensibilidad demasiado alta puede aumentar
las falsas alarmas.
Indicador LED

Para ver más información y vídeos sobre operación y resolución de problemas, 13
visite www.hzsupport.com
210449-01
2. PongaelinterruptorON-TIMEenOFFo20segundos
(lacantidaddetiempoquelaluzpermaneceráencendida
después de que todo movimiento se haya detenido).
3. Ponga el interruptor ECO POWER MODE (MO-
DALIDADDEENERGÍAECOLÓGICA)enON
u OFF. Vea la sección
Modalidad de energía ecológica
para más información.
4. Vaya a la App StoreSM o GooglePlay™ y busque la
aplicación “Secur360” y descárguela.
Consulte la
hoja de instrucciones adjunta,
“
Cómo conectarse a
su nuevo dispositivo SECUR360”, para obtener más
detalles.
5. Una vez que complete el paso 4, abra la aplicación
SECUR360 e inicie sesión en la cuenta. Use la apli-
cación para congurar los controles de la lámpara.
Indicador LED
• ROJO + Sólido: la luz se está calentando: permanece
en esta modalidad hasta que la luz esté lista.
• ROJO + parpadeante (1 segundo ENCENDIDO /
1 segundo APAGADO): la luz está en modalidad de
conexión wi-.
• AZUL+intermitente:laluzseestáconectandoalinternet.
• AZUL + (2 minutos ENCENDIDO): la luz está
conectada al Internet.
• AZUL: cuando se detecta movimiento, el LED estará
ENCENDIDO hasta que todo movimiento se haya
detenido por 30 segundos.
Paraobtenerinformaciónadicionalsobreestaluzolaaplica-
ciónSECUR360,visitewww.heath-zenith.com/Secur360.
CONSIDERACIONES IMPORTANTES
EVITE APUNTAR EL DETECTOR A:
• A continuación hay ejemplos de objetos que pueden
producir calor y pueden causar que el detector de mo-
vimiento se active:
• Pozos de agua • Acondicionadores de aire
• Ventosas de la secadora • Animales
• Ventosas de calefacción • Tráco de carros
Si sospecha que una fuente de calor de este tipo está acti-
vando el detector de movimiento,reduzca la sensibilidad.
• Zonas donde animales domésticos o el tráco puedan
activar el detector de movimiento.
• Losobjetosgrandescercanosydecoloresresplandecientes
que reejan la luz del día pueden hacer que el detector se
apague.No apunte otras luces al detector de movimiento.
CAMBIOS DE TEMPORADA:
Eldetectordemovimientofuncionadetectandoloscambios
detemperaturaatravésdesucampodevisión.Cuanto más
cerca esté la temperatura ambiente al calor del cuerpo de
una persona,el detector aparecerá menos sensible.Cuanto
mayor sea la diferencia de temperatura, mayor aparecerá
la sensibilidad del detector. Use el control de sensibilidad
en la aplicación para ajustar la conguración a medida
que cambia la temperatura exterior para las diferentes
estaciones. Esta es una parte normal del funcionamiento
del detector de luz.
MODALIDAD DE ENERGÍA ECOLÓGICA
La “modalidad de energía ecológica”es una función selec-
cionable dentro de la aplicación diseñada para aumentar la
vidaútilde lapilareduciendociertasfunciones,talescomo:
• La luz no tendrá acceso constante a wi. El módulo
wi- en la luz solo se activará después de que haya
transcurrido un tiempo determinado o cuando la luz se
active por movimiento.
• El brillo de la luz se reducirá.
• La activación por voz está desactivada.
• Cuandoseagrupaconotrasluces,estaluznoseencenderá
cuando se activen otras luces.Cuando se activa esta luz,
las otras luces en el grupo se encenderán.
BOTÓN DE REINICIO
Esta luz se puede restablecer a la conguración original de
fábrica usando el botón de reinicio en la parte inferior del
detectorousandolaaplicaciónSECUR360.Nota: Después
de restablecer la luz, la luz puede tomar hasta 5 minutos
en eliminarse de la aplicación SECUR360.
• Botón de reinicio (vea la Figura 7): use un clip para
papel para presionar el botón DE REINICIO por 15
segundos para reiniciar la luz.
Paraobtenerinformaciónadicionalsobreestaluzolaaplica-
ciónSECUR360,visitewww.heath-zenith.com/Secur360.

14 Para ver más información y vídeos sobre operación y resolución de problemas,
visite www.hzsupport.com
210449-01
CAMBIO DE LA BATERÍA
IMPORTANTE: Deseche debidamente las pilas
drenadas.
1. Pulse la lengüeta inferior de la placa de montaje en
pared y deslice la lámpara hacia arriba y hacia fuera
de la placa de montaje.
2. Retire la cubierta de las pilas de la parte posterior de
la lámpara y quite las pilas viejas.
3. Instale cuatro pilas “D” nuevas de 1.5V en el com-
partimiento de la batería. Asegúrese que la polaridad
de las pilas sea la correcta.
4. Vuelva a colocar la tapa de las pilas.
5. Ponga la parte superior trasera de la lámpara sobre la
placa de montaje en pared y deslice el aparato hacia
abajo sobre la placa de montaje en pared. Deslice la
lámpara hacia abajo hasta que la lengüeta inferior se
enganche y asegure la lámpara en su lugar.
6,=('
OPEN
PRESS TO CLOSE
Tapa del compartimiento
de las pilas
Pilas “D”

Para ver más información y vídeos sobre operación y resolución de problemas, 15
visite www.hzsupport.com
210449-01
CUIDADO Y LIMPIEZA
• Para prolongar la apariencia original, limpie la lámpara solo con agua limpia y un paño suave y húmedo.
• No use pinturas,solventes ni otros químicos en este aparato de luz.Podrían ser la causa de una prematura deterioración
del acabado. Esto no es un defecto del acabado y no será cubierto por la garantía.
• No rocíe la lámpara con una manguera o lavadora a presión.
• Para limpiar la lente de la cámara, use solamente un paño seco de microbra.
• Si no va a usar la por algunas semanas, APAGUE la unidad.
ESPECIFICACIONES
Rango de detección de movimiento.............. Hasta 40 pies (12 m) (Varía con la temperatura circundante)
Ángulo de detección de movimiento............ Hasta 180°
Requisitos de Energía................................... Pilas alcalinas “D”(4x) (no incluidas)
Modalidades de operación sin conexión ....... PRUEBA, APAGADO y ACTIVADO POR MOVIMIENTO
Temporizador de duración (del encendido).. De 20 segundos (no regulable) (Solo nocturna)
Temporizador de prueba............................... 5 segundos (Día y noche)
Alcance (SENS) ........................................... “L”,“M”,“H”
Lúmenes LED.............................................. 650
LED de temperatura de color....................... 4700K

16 Para ver más información y vídeos sobre operación y resolución de problemas,
visite www.hzsupport.com
210449-01
GUIA DE INVESTIGACION DE AVERIAS
SÍNTOMA POSIBLE CAUSA SOLUCIÓN
La luz no se enciende. 1. El detector de movimiento está enfocando a
la dirección incorrecta.
2. Las pilas están débiles o agotadas.
3. El apagado de la luz diurna (fotocélula) está
vigente.
4. La temperatura del aire exterior está cercana
al calor corporal de una persona.
5. La luz se ha APAGADO con la aplicación.
6. La temperatura ambiente circundante es
mayor de 122 °F (50°C) o menor de -4° F
(-20° C).
1. Vuelva a enfocar el detector de movimiento para
que cubra el área deseada.
2. Compruebe la carga de la pila y cámbiela si es
necesario.
3. Vuelva a revisar al amanecer.
4. Aumente el ajuste de sensibilidad.Vea Cambios de
Temporada en la página 13 para más información.
5. Use la aplicación para congurar la luz a la
modalida “AUTO”.
6. Revise de nuevo cuando la temperatura del aire del
entorno esté dentro del rango especicado.
La luz se enciende
durante el día. 1. El detector de movimiento puede estar
instalado en un sitio relativamente oscuro.
2. El interruptor “ON-TIME” (DURACIÓN)
en la aplicación está congurado en “TEST”
(PRUEBA).
1. El aparato de luz está operando normalmente bajo
estas circunstancias.
2. Ponga el interruptor de “DURACIÓN” en la
aplicación a la conguración de 20 segundos.
La luz se enciende sin
razón aparente. 1. El detector de movimiento puede estar
detectando pequeños animales o tráco
automotor.
2. La Sensibilidad es demasiado alta.
3. La temperatura exterior está más caliente o
más fría que el calor corporal de una persona
(verano o invierno).
1. Reduzca la sensibilidad o vuelva a colocar el
detector de movimiento.
2. Reduzca la sensibilidad.
3. Reduzca la sensibilidad. Vea Cambios de Temporada
en la página 13 para más información.
Las luces permanecen
encendidas
constantemente.
1. El detector de movimiento puede estar
absorbiendo calor de una fuente de calor
como una ventosa de aire, una secadora de
aire, o una supercie pintada con colores
brillantes y que reeja el calor.
2. La luz se ha “ENCENDIDO” usando la
aplicación.
1. Reduzca la sensibilidad o vuelva a colocar el
detector de movimiento.
2. Use la aplicación para congurar la luz en la
modalidad “AUTO”u “OFF”.
Las luces se encienden
y se apagan. 1. El calor reejado desde otro objeto puede
estar encendiendo y apagando al detector de
movimiento.
2. El “ON-TIME” está en la modalidad
“TEST” (“PRUEBA”)y se está calentando.
3. La batería está casi muerta.
1. Reduzca la sensibilidad o vuelva a colocar el
detector de movimiento.
2. Mientras está en la fase PRUEBA, la luz sólo
queda encendida por 5 segundos. Ponga el
interruptor de “DURACIÓN” en la aplicación a la
conguración de 20 segundos.
3. Compruebe la carga de la pila y cámbiela si es
necesario.
Las luces destellan
una vez y luego
permanecen apagadas
en la fase manual.
El detector de movimiento está detectando luz
de lo cabezal de la lámpara. Vuelva a colocar el cabezal de la lámpara para
mantener el área por debajo del detector de
movimiento relativamente oscura.
La lámpara está
menos brillante que lo
normal.
Pila baja. Compruebe la carga de la pila y cámbiela si es
necesario.

Para ver más información y vídeos sobre operación y resolución de problemas, 17
visite www.hzsupport.com
210449-01
GARANTÍA LIMITADA A 1 AÑO
Esta es una “Garantía Limitada” que le da a Ud. derechos legales especícos. Usted puede también tener otros
derechos que varían de estado a estado o de provincia a provincia.
Por un período de 1 año a partir de la fecha de compra, cualquier mal funcionamiento causado por piezas defec-
tuosas o por mano de obra será reparado o reemplazado sin cargo alguno, a criterio exclusivo de HeathCo LLC.
No cubierto - Servicio de reparación, ajuste y calibración debido al mal uso, abuso o negligencia, bombillas, ba-
terías, u otras partes fungibles no están cubiertas por esta garantía. Los Servicios no autorizados o modicaciones
del producto o de cualquier componente que se provee invalidarán esta garantía en su totalidad. Esta garantía no
incluye reembolso por inconveniencia, instalación, tiempo de instalación, perdida de uso, servicio no autorizado,
o costos de transporte de retorno. HeathCo LLC se reserva el derecho de descontinuar productos y de cambiar
especicaciones a cualquier momento sin incurrir en ninguna obligación de tener que incorporar nuevas caracte-
rísticas en los productos vendidos con anterioridad.
Esta garantía cubre solamente los productos ensamblados por HeathCo LLC y no se extiende a otros equipos o
componentes que el consumidor usa junto con nuestros productos.
ESTA GARANTÍA ESTÁ EXPRESAMENTE EN LUGAR DE OTRAS GARANTÍAS, EXPRESADAS
O SOBREENTENDIDAS, INCLUYENDO CUALQUIER GARANTÍA, REPRESENTACIÓN O CON-
DICIÓN DE COMERCIABILIDAD O QUE LOS PRODUCTOS SE ADAPTEN PARA CUALQUIER
PROPÓSITOOUSOENPARTICULAR,Y ESPECIFICAMENTEENLUGARDETODOSLOSDAÑOS
ESPECIALES, INDIRECTOS, INCIDENTALES Y CONSECUENTES.
LA REPARACIÓN O EL REEMPLAZO DEBERÍA SER LA ÚNICA SOLUCIÓN DEL CLIENTE Y
NO HABRÁ RESPONSABILIDAD POR PARTE DE HEATHCO LLC POR CUALQUIER DAÑO
ESPECIAL, INDIRECTO, INCIDENTAL O CONSECUENTE, INCLUIDOS PERO NO LIMITADOS
A CUALQUIER PÉRDIDA DE NEGOCIO O GANACIAS SEAN O NO PREVISIBLES. Algunos estados
o provincias no permiten la exclusión o limitación de daños incidentales o consecuentes,de modo que la limitación
o exclusión arriba indicada puede que no se aplique a Ud.
Por favor guarde su recibo de venta fechado; se lo requiere para cualquier solicitud de garantía.
SERVICIO TÉCNICO
Favor de llamar al 1-800-858-8501 (sólo para hablar en inglés) para pedir ayuda antes de
devolver el producto a la tienda.
Si tiene algún problema, siga esta guía. Usted puede también visitar nuestro sitio Web: www.hzsupport.com. Si el
problema continúa, llame al 1-800-858-8501 (sólo para hablar en inglés), de 8:00 AM a 5:00 PM CST (L-V). Usted
puede también escribir a:
HeathCo LLC
P.O. Box 90045
Bowling Green, KY 42102-9045
ATTN: Technical Service (Servicio Técnico)
* Si se llama al Servicio Técnico, por favor tener lista la siguiente información: Número de Modelo, Fecha de compra y
Lugar de compra.
No hay piezas de servicio disponibles para este producto.
Por favor guarde su recibo de venta fechado; se lo requiere para cualquier solicitud de garantía.

18 Visitez www.hzsupport.com pour des renseignements
et des vidéos sur l'utilisation et le dépannage
210449-01
© 2020 HeathCo LLC 210449-01 F
Reçu daté nécessaire pour remplacement sous garantie.
CARACTÉRISTIQUES
• Alimenté par pile
• Connectivité Wi-Fi
• Détecteur de mouvement 180°
DÉBALLAGE
Retirez tout le contenu de l’emballage et assurez-vous
d’avoir en main tous les éléments avant de débuter
l’assemblage. L’emballage contient les éléments suivants :
• Éclairage de sécurité
• Guide du propriétaire
• Guidededémarragerapidedel’applicationSECUR360
• Ferrures de montage
QUINCAILLERIE FOURNIE
Remarque : Les six vis du support de montage sont fournies. L’installation n’en exige que deux. Jeter les vis du support
de montage non utilisée une fois l’installation terminée.
Vis (x2) Cheville d’ancrage (x2)
Luminaire DEL de sécurité
à piles, branché, à
détecteur de mouvement
Modèle : 9304

Visitez www.hzsupport.com pour des renseignements 19
et des vidéos sur l'utilisation et le dépannage
210449-01
IMPORTANTS RENSEIGNEMENTS DE SÉCURITÉ ET D'INSTALLATION
Avant d’installer ce luminaire de sécurité, lisez avec soin toutes les directives et conserver le guide du propriétaire aux
ns de référence.
• AVERTISSEMENT : Pour éviter tout risque de BLESSURE GRAVE ou de DÉCÈS,ne laissez jamais de jeunes enfants
jouer avec des piles. En cas d’ingestion d’une pile, avisez immédiatement un médecin.
• AVERTISSEMENT : NE MÉLANGEZ PAS de vieilles piles avec des nouvelles. NE MÉLANGEZ PAS les types de
piles dans un même appareil, p.ex., alcaline, usage intensif et rechargeables; des fuites pourraient se produire.
• AVERTISSEMENT : NE JETEZ PAS LES PILES AU FEU;ELLES POURRAIENT EXPLOSER OU COULER.
• AVERTISSEMENT : Risque d’incendie. Conserver au moins 2 po (51 mm) entre la lampe et toute matière combustible.
• ATTENTION : Pour éviter les dommages par l’eau, les commandes du détecteur de mouvement doivent faire face au
sol une fois l’installation terminée.
• ATTENTION : Conserver le lampe à un angle de 30° sous l’horizontale pour éviter les dommages par l’eau.
• ATTENTION : Danger de brûlure. Laissez refroidir le luminaire avant d’y toucher.
• AVIS : Ne pas immerger les composants dans un liquide.
• Ce luminaire exige 4 piles D alcalines (non comprises).
• Pour prolonger la durée des piles, ce luminaire ne fonctionne que la nuit.
• Ce luminaire est conçu pour une installation extérieure; il devrait être xé à un mur ou à l’avant-toit.
• Pour des résultats optimums,ce luminaire doit être installé à 8 pieds (2,4 mètres) du sol. Remarque : Lorsque le lumi-
naire est installé à une hauteur supérieure à 8 pi (2,4 m), le fait de diriger le détecteur vers le bas réduit la portée de la
couverture.
Le détecteur de mouvement de ce luminaire décèle les «mouvement» grâce à un déplacement de chaleur dans la zone
de couverture.Le détecteur de mouvement est plus sensible aux déplacements de chaleur à travers la zone de couverture
qu’aux déplacements de chaleur directement dans sa direction.
Remarque : Le luminaire et capteur devraient être montés comme montré ci-dessus au cours de l’installation (selon le
type d’installation.)
Le moins sensible Le plus sensible
Montage mural Montage sous avant-toit
Mouvement Mouvement
Détecteur
R
E
S
E
T
/ 0 +
217,0(
6HQVLWLYLW\
(FR3RZHU0RGH
2Q2II
6
7HVW
2II
R
E
S
E
T
/ 0 +
217,0(
6HQVLWLYLW\
(FR3RZHU0RGH
2Q2II
6
7HVW
2II
7+,66,'(83
7+,66,'(83

20 Visitez www.hzsupport.com pour des renseignements
et des vidéos sur l'utilisation et le dépannage
210449-01
INSTALLATION
1.
Appuyez sur la languette au bas de la plaque de montage,puis faites
glisser cette dernière du corps de l’appareil (voir la Figure 1).
2. Enutilisantlaplaqued’installationmuralecommegabarit,marquez
la position des trous d’installation. Remarque: La èche « UP »
doit pointer vers le haut.
3. Utilisez les deux vis et les dispositifs d’ancrage au mur (fournis)
pourinstallerlaplaquemurale surunesurfacesolide(voirlaFigure
2). Assurez-vous qu’il y a susamment de place au-dessus de la
plaque de montage pour permettre de glisser le luminaire vers le
bas sur la plaque de montage.
4. Appuyezsur lalanguettedeblocageducouvercleducompartiment
à piles, puis faites pivoter la porte vers le bas pour l’enlever (voir
la Figure 3).
5. Installez quatre piles D de 1,5V (non comprises) dans le compar-
timent à piles. Assurez-vous que la polarité des piles correspond
aux marques à l’intérieur du couvercle du compartiment à piles.
Remettez le couvercle du compartiment à piles en place (voir la
Figure 4).
Figure 1
Figure 2
Figure 3
6,=('
OPEN
PRESS TO CLOSE
R
E
S
E
T
/ 0 +
217,0(
6HQVLWLYLW\
(FR3RZHU0RGH
2Q 2II
6
7HVW
2II
R
E
S
E
T
/
0 +
217,0(
6HQVLWLYLW\
(FR3RZHU
0RGH
2Q 2II
6
7HVW
2II
Figure 4
This manual suits for next models
1
Table of contents
Languages:
Other Heath Zenith Security Sensor manuals
Popular Security Sensor manuals by other brands

Siemens
Siemens FDT181 product manual

Elk Products
Elk Products ELK-319GB quick start guide

Markes International
Markes International C-HLD Instructions for use

TeleAlarm
TeleAlarm leesys HM-LES900 quick guide

Spectronics Corporation
Spectronics Corporation Pro Alert TP-9360 operating manual

EG AIR
EG AIR EGVOC-100 user manual