Heath Zenith 7352 User manual

© 2014 HeathCo LLC
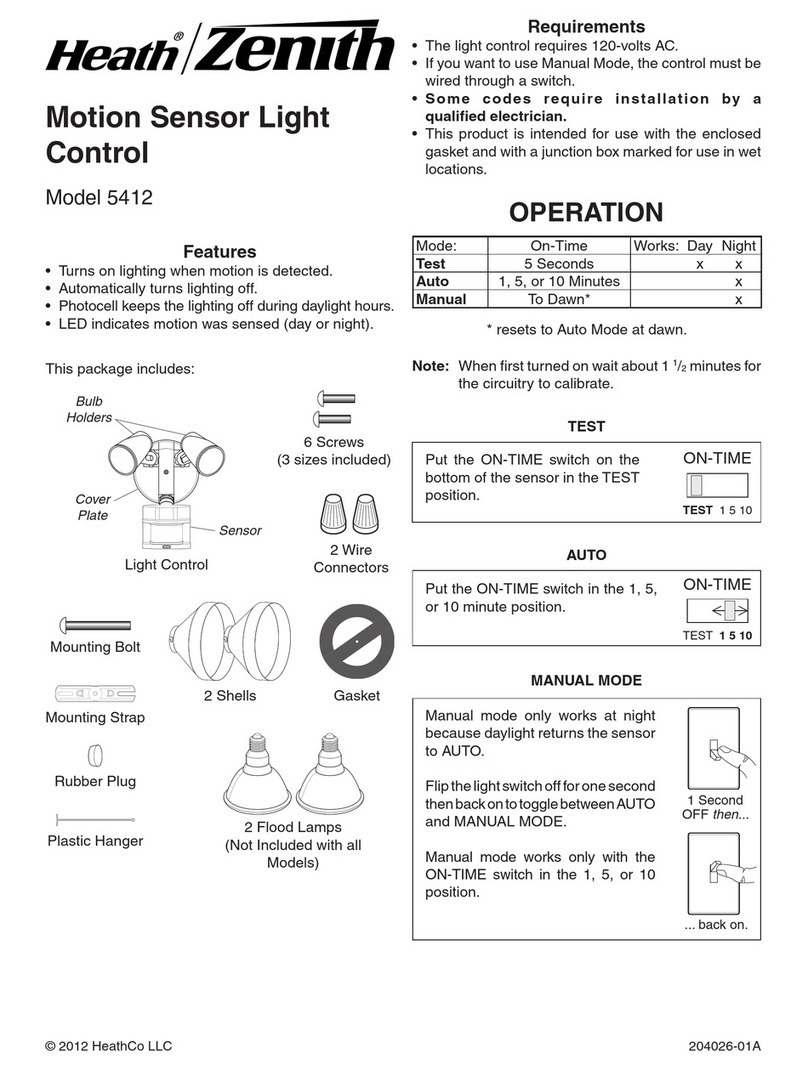
Wireless
Home Alert Kit
Install Wireless Chime
Plug in wireless chime. IMPORTANT: To
avoid resetting chime memory, wait 30
seconds before pressing the push button
or the “TEST” button inside the sensor. See
Troubleshooting, Problem 3 if chime memory
was accidentally reset.
Figure 1
WARNING: To prevent possible
SERIOUS INJURY or DEATH:
• NEVER allow small children near
batteries.
• If battery is swallowed, immediately
notify doctor.
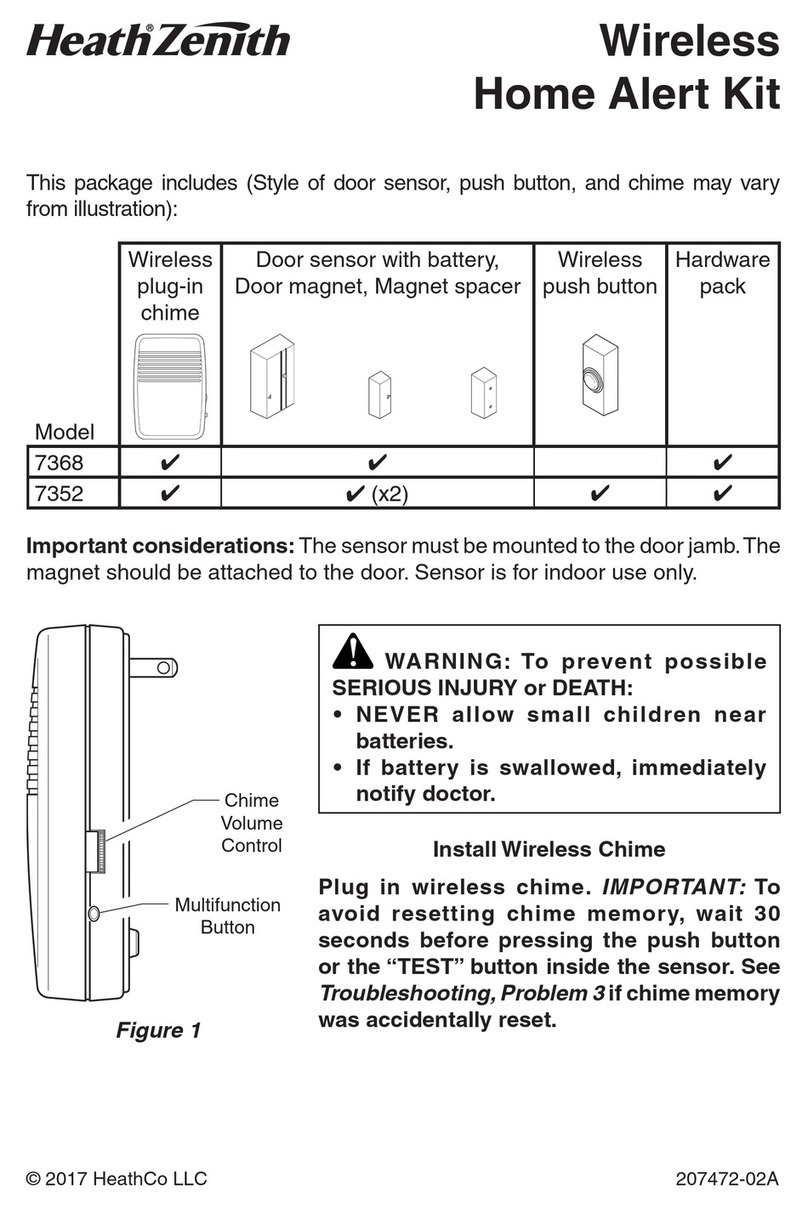
Model 7352
Wireless
plug-in
chime
Door sensor with battery,
Door magnet, Magnet spacer
Wireless
push button
Hardware
pack
✔✔(x2) ✔ ✔
Important considerations: The sensor must be mounted to the door jamb.The
magnet should be attached to the door. Sensor is for indoor use only.
This package includes (Style of door sensor, push button, and chime may vary
from illustration):
Chime Volume Control
Access Door (See Tune
Settings or Troubleshooting)
C
H
I
M
E
V
O
L
U
M
E

2
Install Door Sensor
1. Remove orange battery tab from sensor.
Remove back of case by pushing in tab on
bottom with a small screwdriver (see Figure
1). Remove orange battery tab.
2. Test range. Before mounting, hold sensor
and magnet in selected location and verify
operation.While holding the sensor still, move
the magnet away from the sensor to simulate
door being opened. Verify red LED on sen-
sor flashes momentarily and chime sounds.
Note: If sensor does not operate correctly,
see Troubleshooting.
3. Mount sensor. Use either screws or
double sided tape to mount push button.
IMPORTANT: The maximum gap between
sensor and magnet is 1/2" (13 mm) (see
Figure 3). The arrows located on the face of
each component must be aligned and facing
toward each other (see Figure 4).The magnet
must be beside the sensor.Note: If the magnet
is recessed, use spacer to ensure proper
alignment (see Figure 4).
• Screw mounting: Remove back of case
by pushing in tab on bottom with a small
screwdriver (see Figure 2). Note: Remove
material in screw holes (if needed) before
mounting with screws. Attach sensor back
cover to wall using two short screws (see
Figure 5). Snap sensor onto back cover.
• Tape mounting: Apply foam tape to the
sensor back cover.Stick sensor back cover
to frame of door in desired position. Snap
sensor onto back cover.
Figure 2
Alignment Arrows
1/2" Maximum
Use Optional Spacer if
Needed
Figure 3
Figure 4

3
Use Optional
Spacer if Needed 4. Mount magnet. Repeat step 3 to attach
magnet (and spacer if needed) to door using
two screws (provided). Note: If using spacer,
use the two long screws (provided).
Install Push Button
1. Remove orange battery tab from push
button. Remove back of case by pushing in
tab on bottom with a small screwdriver (see
Figure 6). Remove orange battery tab.
2. Test range. Temporarily position push button
where you want it mounted.Press push button
to verify chime and push button work properly.
If chime does not sound, see Troubleshooting.
3. Mount push button. Use either screws or
double sided tape to mount push button.
• Screw mounting: To mount with screws,
remove back of case by pushing in tab on
bottom with a small screwdriver (see Figure
6). Note: Remove material in screw holes (if
needed) before mounting with screws.Attach
back of case to door jamb or wall (see Figure
7). Snap front of push button on.
• Tape mounting: When attaching push but-
ton using double sided tape, make sure the
surface of the door jamb or wall is clean.
Adjust Chime Volume Control
Unplug chime and adjust volume control to
desired volume (see Figure 1). Plug chime back
into wall outlet.
Figure 5
Figure 6
Figure 7

4
ON
1 2
WARNING: Disconnect chime unit from power source before
opening chime access door. Close door and replace screw before
reconnecting to power.
Tune Settings
ON
1 2
ON
1 2
1 – MODE
2 – TUNE
Push Button / Sensor Chime Tune
Switch 2 - ON Switch 2 - ON Ding
Switch 2 - OFF Switch 2 - ON Ding-Dong
Switch 2 - OFF Switch 2 - OFF Ding-Dong
Switch 2 - ON Switch 2 - OFF Westminster
Tune Setting Table
The chime has different selectable tunes: Ding (one note tune), Ding-Dong
(two note tune), or Westminster (eight note tune).The factory setting is for the
Westminster tune.This tune can be changed by following the instructions in the
Tune Setting Table. Note: Only use switch 2 when changing the chime tune.
Note: All chime models are designed to work with up to 5 transmitters (push
buttons and/or sensors – sold separately).All chimes are designed to play only
two different tunes no matter how many transmitters are used.
Inside Chime Access DoorInside Push Button Inside Sensor

5
Troubleshooting
WARNING: Disconnect chime unit from power source before
opening chime access door. Close door and replace screw before
reconnecting to power.
1. PROBLEM: Chime does not sound or rang one time and quit.
A. POSSIBLE CAUSE: Push button/sensor battery is not installed correctly.
A. CORRECTIVE ACTION: Make sure battery is installed according to the
diagram inside the push button/sensor.
B. POSSIBLE CAUSE: Push button/sensor battery is dead.
B. CORRECTIVE ACTION: Check charge of push button/sensor battery
and replace if necessary.
C. POSSIBLE CAUSE: Chime is not receiving power.
C. CORRECTIVE ACTION: Make sure the plug-in chime has power.
D. POSSIBLE CAUSE: Push button/sensor and chime are not synced.
D. CORRECTIVE ACTION: Sync the push button/sensor and chime.
• Unplug chime.
• Ensure switch 1 on both the chime and push button/sensor is set to
OFF.
• Wait 30 seconds.
• PUSH BUTTON – Press and hold the push button within 20 seconds
after plugging in chime.When the “Ding-Dong” tune is played, the push
button is synced with the chime.
SENSOR – Press and hold the “TEST” button inside the sensor within
20 seconds after plugging in chime. When the “Ding-Dong” tune is
played, the sensor is synced with the chime.
2. PROBLEM: Push button/sensor battery seems okay, but the chime does not
work after installation.
A. POSSIBLE CAUSE: Chime or push button/sensor is mounted on metal
or near metal studs. Note: Metal reduces transmission range.
A. CORRECTIVE ACTION: Use 1/4 in. to 1/2 in. (6 to 13 mm) wood shims
to move push button/sensor away from metal surface. Move chime to a
different wall outlet.
B. POSSIBLE CAUSE: Chime is mounted near concrete floor or wall.Note:
Concrete may reduce range.
B. CORRECTIVE ACTION: Move chime away from concrete surface.

6
C. POSSIBLE CAUSE: Chime and push button/sensor are installed too far
apart.
C. CORRECTIVE ACTION: Locate chime closer to push button/sensor.
3. PROBLEM: Chime sounds when not intended (false triggers).
POSSIBLE CAUSE: Chime is receiving interference from another wire-
less device.
CORRECTIVE ACTION: Reset chime.
• Unplug chime.
• Ensure switch 1 on both the chime and push button/sensor is set to
OFF.
• Wait 30 seconds.
• PUSH BUTTON – Press and hold the push button within 20 seconds
after plugging in chime. When the “Ding” tune is played, the chime
memory has been erased.
SENSOR – Press and hold the “TEST” button inside the sensor within
20 seconds after plugging in chime. When the “Ding” tune is played,
the chime memory has been erased.
• To re-sync the push button/sensor and chime, unplug chime. Wait 30
seconds.
• PUSH BUTTON – Press and hold the push button within 20 seconds
after plugging in chime.When the “Ding-Dong” tune is played, the push
button is synced with the chime.
SENSOR – Press and hold the “TEST” button inside the sensor within
20 seconds after plugging in chime. When the “Ding-Dong” tune is
played, the sensor is synced with the chime.
Note: The push button/sensor and chime come synced from the factory. The
range of the wireless chime can vary with location, temperature, and battery
condition.
Regulatory Information
This device complies with Part 15 of the FCC Rules and RSS-210 of Industry
Canada. Operation is subject to the following two conditions:(1) this device may
not cause harmful interference, and (2) this device must accept any interference
received, including interference that may cause undesired operation.
The user is cautioned that changes or modifications not expressly approved by
the party responsible for regulatory compliance could void the user’s authority
to operate the equipment.
Learn more about home shop we have.
Table of contents
Other Heath Zenith Security System manuals
