HEAVTH HP105 User manual

海斯科技-让切割更精彩
HP105
Plasma Arc voltage torch height
controller
Operation Manual
VISION:1404
HEAVTH SCIENCE&TECHNOLOGY
130# MINGXING ROAD MINGHUANG TOWN
CHANGZHOU CITY JIANGSU.CHINA
TEL:86-0519-89182619 FOX:86-0519-89183619

HP105 Plasma arc voltage height controller
第- 2 - 页 共 23 页
1.IMPORTANT INFORMATION
1.1 SERVICE ASSISTANCE AND CONTACT INFORMATION
For service assistance, have the following information available:
• HP105 model, part and serial number located on a label
• Type of cutting application you are using
1.2 RECEIVING AND UNPACKING
After receiving the HP105 you should:
• Carefully, unpack and inspect the equipment.
• Compare the received shipment with the packing list.
• Report any damage to the carrier and your representative.
• Store equipment that will not be used in a clean, dry location.
• Take appropriate precautions to prevent moisture, dust and dirt
from accumulating in storage and installation areas.
1.3 SAFETY CONSIDERATIONS
Safety practices should not be an after thought. Before installing
or servicing the controller, review and follow applicable policies and
procedures to ensure worker safety. Machinery must be in a safe
state and you must be aware of any additional hazards that can
arise.
1.4 PRE-INSTALLATION CONSIDERATIONS
Before installing the HP105:
• Check to be sure that you have all of the required parts.
• Familiarize yourself with the parts of the HP105.

HP105 Plasma arc voltage height controller
第- 3 - 页 共 23 页
• Check to be sure that the torch lifter motors you are using with
the HP105 are within the acceptable range.
• Review the instructions for Configuring the Lifter Mechanics.
1.5 CONFIGURING THE LIFTER MECHANICS
Proper configuration of the torch lifter mechanism is an
important factor for establishing the accuracy of your cutting system.
Be sure that:
• Gear reduction is selected on the torch lifter so that the
maximum suspension speed does not exceed 3000 mm/min (120
IPM). If higher accuracy is required, maximum suspension speed
should be set to 1500 mm/min (60 IPM).
• Gears, racks and spindles have minimal backlash.
• Oversizing is avoided. The mass of moving parts, including
armature inertia must be as small as possible. Motors with low
nominal RPM are preferred.
2. Brief Intro
2.1 Summarize
HP105 plasma arc voltage height controller is equipped with
constant current plasma . During cutting course, the current
always equals the given current. And the cutting arc voltage will
be changed with the fixed speed being the height of torch changing.
When the distance gets farther ,the arc voltage increases; On
opposite, the arc voltage will decrease. HP105 plasma arc voltage

HP105 Plasma arc voltage height controller
第- 4 - 页 共 23 页
height controller will inspect the voltage change, then control the
distance between cutting torch and material via the lift motor. So
that the arc voltage is fixed, the same is the height of cutting torch.
Generally, the instruction will list all the cutting parameters for
some type of plasma . The user can refer to these parameters.
Adjust the voltage in arc voltage height controller to match the
selected current. The torch height will keep constant under regular
speed.In fact,the user should set the arc voltage according to the
height of the cutting torch.
In the status of automation ,the arc voltage more high,then the
height of the cutting torch more high
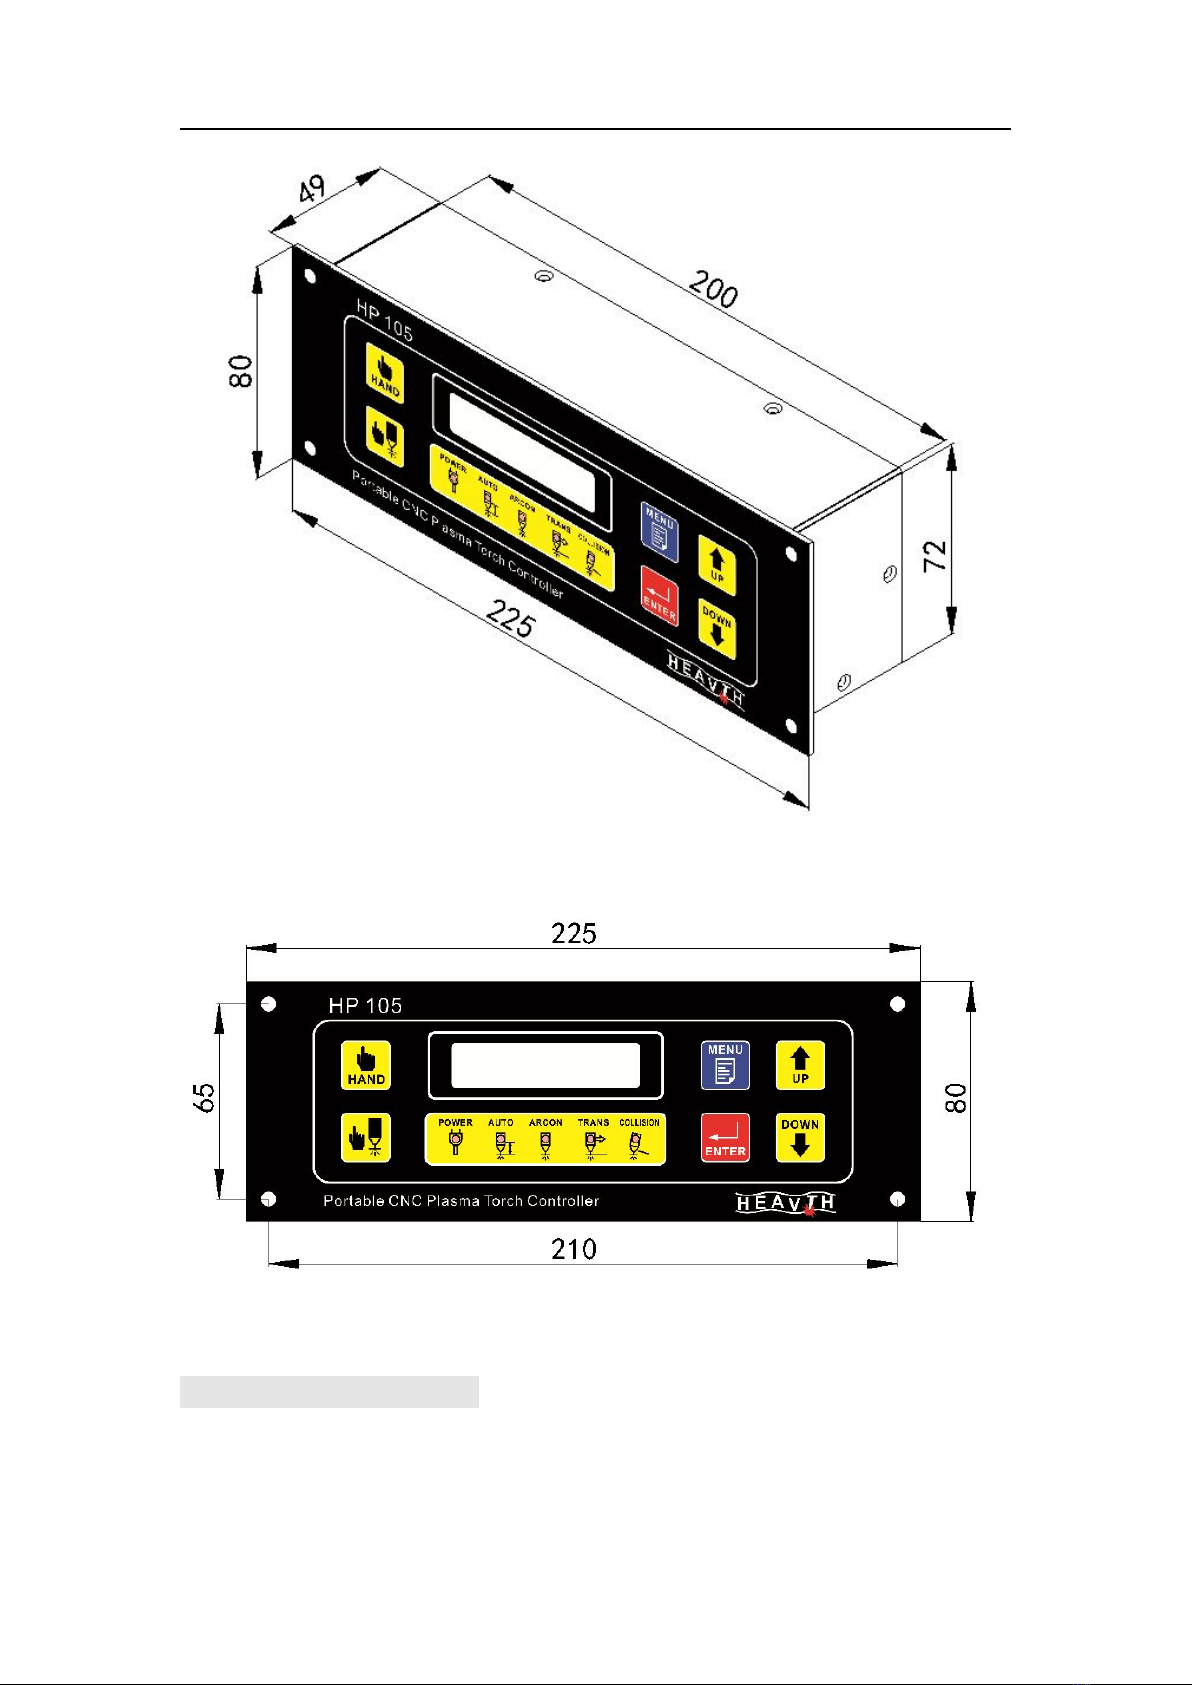
2.2
Dimensions
:
HP105 Plasma arc voltage height controller
第- 5 - 页 共 23 页
Mounting Hole Size:
2.2 Technical parameter
Working voltage: DC24±10%,50Hz/60Hz,Please prepare a
isolated power, do not shared with others such as electronic

HP105 Plasma arc voltage height controller
第- 6 - 页 共 23 页
valve . Especial Pay more attention the DC 24V
Lift motor: DC24V DC motor
Drive mode: PWM
Output current:1A-4A.
Working temperature: Height controller -10∽60℃
IHS style: Switch inspecting IHS (suitable for all plasma
both above-water and under-water cutting),Plasma Shield
Protector IHS (suitable for above-water cutting’s touch
leading arc voltage plasma)
Running transfer: Alternative Arc transfer and pierce transfer
Divided voltage ratio:100:1
Accuracy: ±1V∽±5V,adjustable
Outer Dimension: Length X Width X Height:
225mmX50mmX80mm
Weight: 0.8kg
Protection class: IP64, to prevent dust from entering.
Installation connector: 2-pin, 4-pin, 5-pin, DB-9 core
Installation position: Keep away from heat, air convection good place.
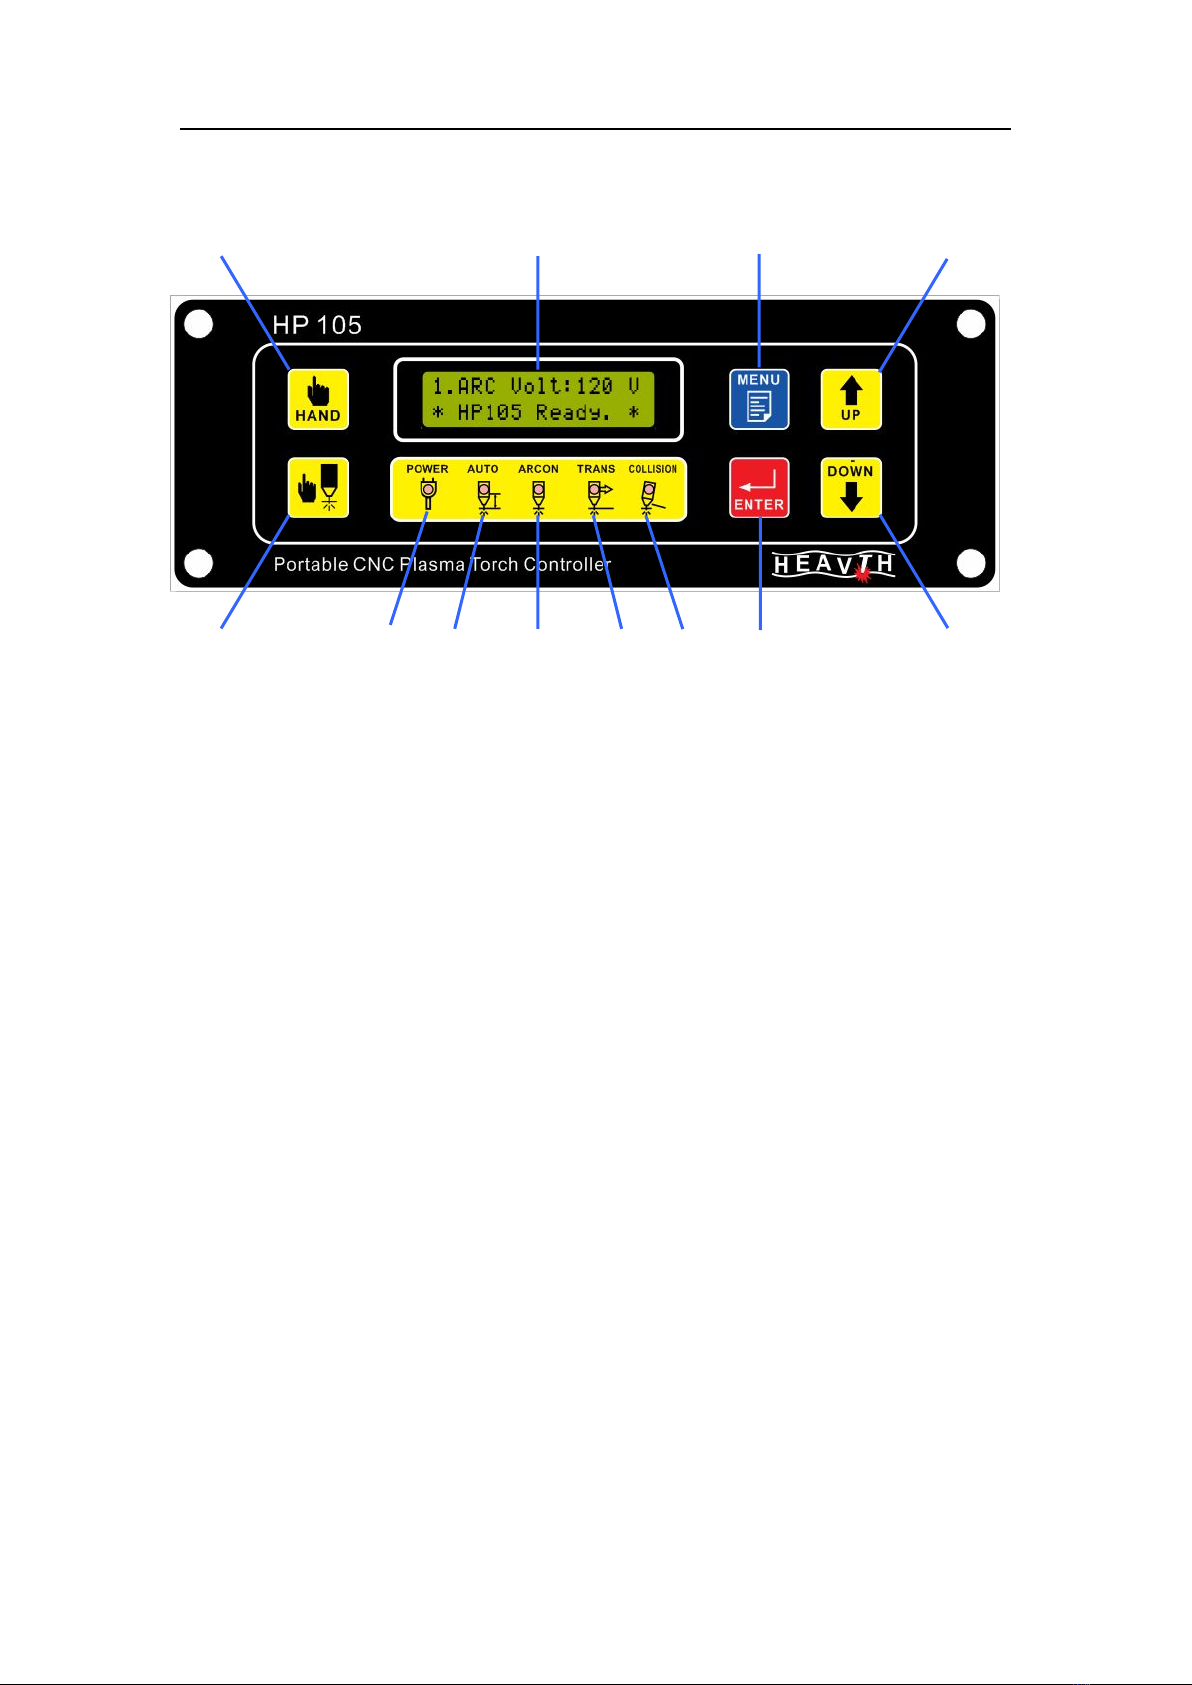
2.4
Operation Panel Features
Rise
Menu
LCD
HP105 Plasma arc voltage height controller
第- 7 - 页 共 23 页
下降
起弧测试
自动
起弧
电源
反馈
碰撞
Manually
确认
Function Description:
LCD: display the working status and parameters.
Manual: Auto / Manual mode selection increase, alternating work.
Arc test: standby press, arcing into the test mode.
When arcing test, press to return to standby mode.
Menu: In standby mode press to enter the parameter setting mode.
When the parameter setting Press to return to standby.
Confirmation: parameter setting mode, confirm that the set
parameters.
Rise / fall: In standby mode, manual lifting torch.
When parameter setting, subtraction parameter values.
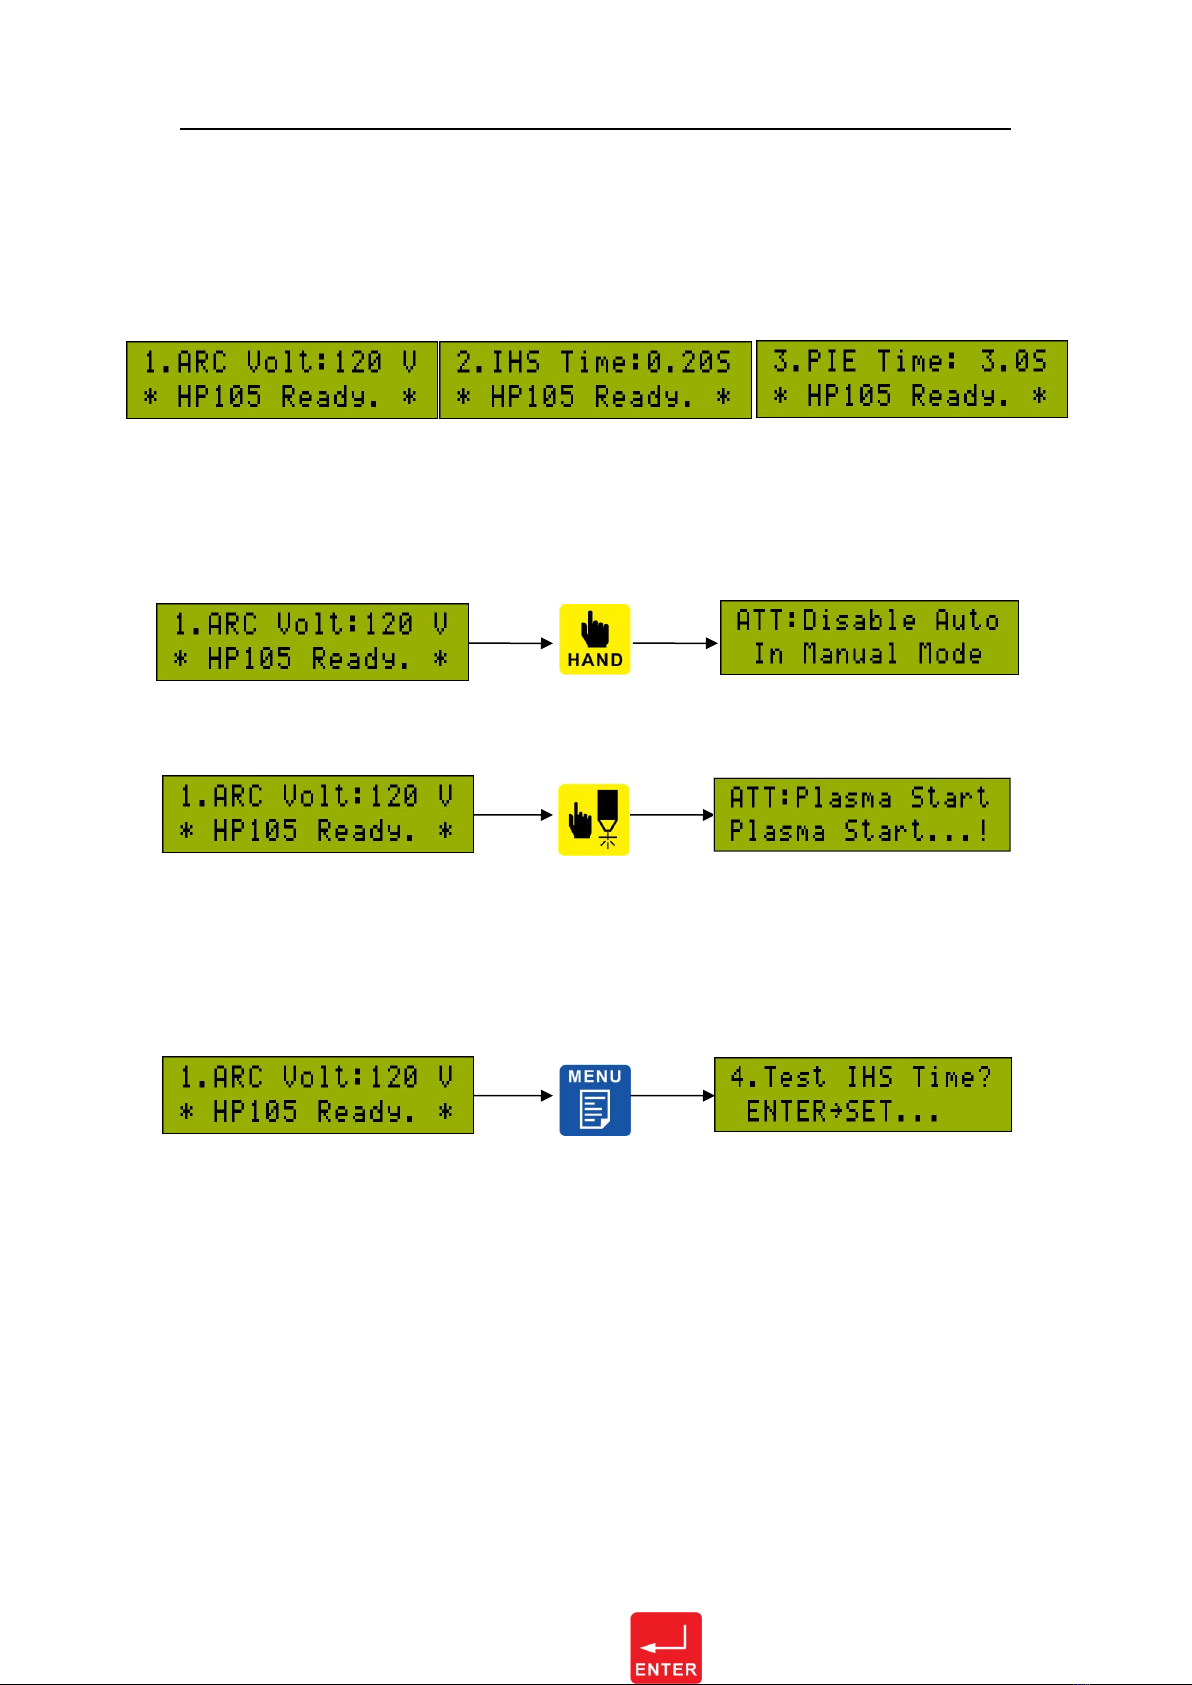
2.5
parameter settings
HP105 Plasma arc voltage height controller
第- 8 - 页 共 23 页
Automatic standby state, the LCD second planetary number flashing, and
cycles through the following parameters:
Standby mode, press the manual key to enter the manual mode,
then you must manually control the cutting height:
Standby mode, press arcing test, arcing into the test mode:
Standby mode, press the Menu key, select 4, press the Enter key to enter the positioning test
mode:
Set Arc Voltage:
This parameter is set automatically track ions and other torch
height.
Arc voltage value, the higher the torch distance. Arc voltage
value, the lower the torch distance.
Standby interface
1.Setting arc voltage
2. When initial positioning
3. When arcing perforation

HP105 Plasma arc voltage height controller
第- 9 - 页 共 23 页
Set the initial positioning time:
This parameter sets the arc height, before and after start cutting torch fell across the workpiece,
elevation time.
Positioning higher the value, the higher the arc height. Positioning the smaller the value, the lower
the arc starting height.
Press the Menu
key
Enter key to enter
Up and Down keys to
adjust the parameters
ENTER to
confirm
The arrow keys to
select the parameter
Menu key to
return
Standby interface
Press the Menu
key
Up and Down keys to adjust
the parameters
The arrow keys to
select the parameter

HP105 Plasma arc voltage height controller
第- 10 - 页 共 23 页
Set perforation time:
When this parameter is set arc torch perforation time,
according to the workpiece
thickness is set.
Perforation higher the value, the longer the piercing
time. Perforated smaller the
value, the smaller the perforation time.
Standby interface
Press the
Menu key
Enter key to enter
Up and Down keys to adjust
the parameters
ENTER to confirm
The arrow keys to select the
parameter
Menu key to
return
Enter key to enter
ENTER to
confirm
Menu key to
return

HP105 Plasma arc voltage height controller
第- 11 - 页 共 23 页
3. installation and commissioning
3.1 Work process:
When CNC system’s output arc signal to the HP105’s interface J2-4,
the height controller should process the IHS firstly; Secondly
auto-control the Arc-on, the height controller will send the signal of
arc transfer and pierce transfer to the NC system after producing
the transfer arc. At the mean time, the controller delay time to put
the arc voltage into the single chip system. If “Auto Permitted is
available in height controller and NC system has sent out AUTO
height adjusted signal, the controller is on status of “Height Auto
adjusted”
ATTN: When the cNC system that you use can not receive the
signal of arc-on and pierce, please delay the time to control the NC
system’s running. It just means that the cNC system send arc-on
signal to the height controller, delay time to run the cNC system.
3.2 INSTALLATION CONTROLER
:
The following section provides you with the procedure to follow
when installing the HP105 Some of the steps direct you to other
sections in this manual that provide you with more detailed
instruction.

HP105 Plasma arc voltage height controller
第- 12 - 页 共 23 页
1. Determine a mounting location for the HP105. Keep the
following points in mind:
To avoid overheating and potential damage to the control box
from cutting process fumes, DO NOT choose a mounting location
directly above the torch.Find a mounting location away from the
torch lifter unit.
2. Attach the wires from the CNC,the plasma,the lifter motor and
lifter limit switches to a connector and then to the control box at the
receptacle. To reduce noise emission, 20 AWG (0.5 mm2) shielded
cable is recommended. Filters consisting of a resistor and capacitor
can be connected only directly to the motor.
3. Connect a 12 AWG (2.5 mm2) ground wire to the ground
screw located on the control box and then, to the machine ground
rail of your cutting system.
3.3 Divided voltage board
Controlling the arc voltage must inspect the changing of plasma
arc voltage. The plasma arc voltage equals the voltage that is
between the pole and ground. The anticathode which put out the
plasma power is connected to the ground. The Cathode connects
to the pole which is in the cutting gun. So the voltage in the

HP105 Plasma arc voltage height controller
第- 13 - 页 共 23 页
electrode is negative. When process the cutting, the arc voltage
absolute value is usually higher than 100V. If so, the voltage must
be divided in order to process the control in the controlling circuit.
ATTN: the voltage that put into the height controller is negative.
If the polarity is connected in reverse, the Height Auto-adjusted is
not available.
The controller built-in isolation stars platen default input 1:1 Actual
arc voltage (when the partial pressure ratio of 100: 1) 1. For some comes
with 50: 1 non-isolated sub-plate plasma can set the input of 50: 1 low
pressure (in this case the partial pressure ratio of 2: 1).
Enter the arc voltage is set by DIP switch on the back of the controller to
set:
DIP switch to on: Input 1: 1 actual arc voltage.
DIP switch to the next: Enter 50: 1 arc voltage dividing.
初始定位介绍
本公司的调高器设计有两种定位方式,有条件的情况
下,推荐同时使用,以提高定位的可靠性。
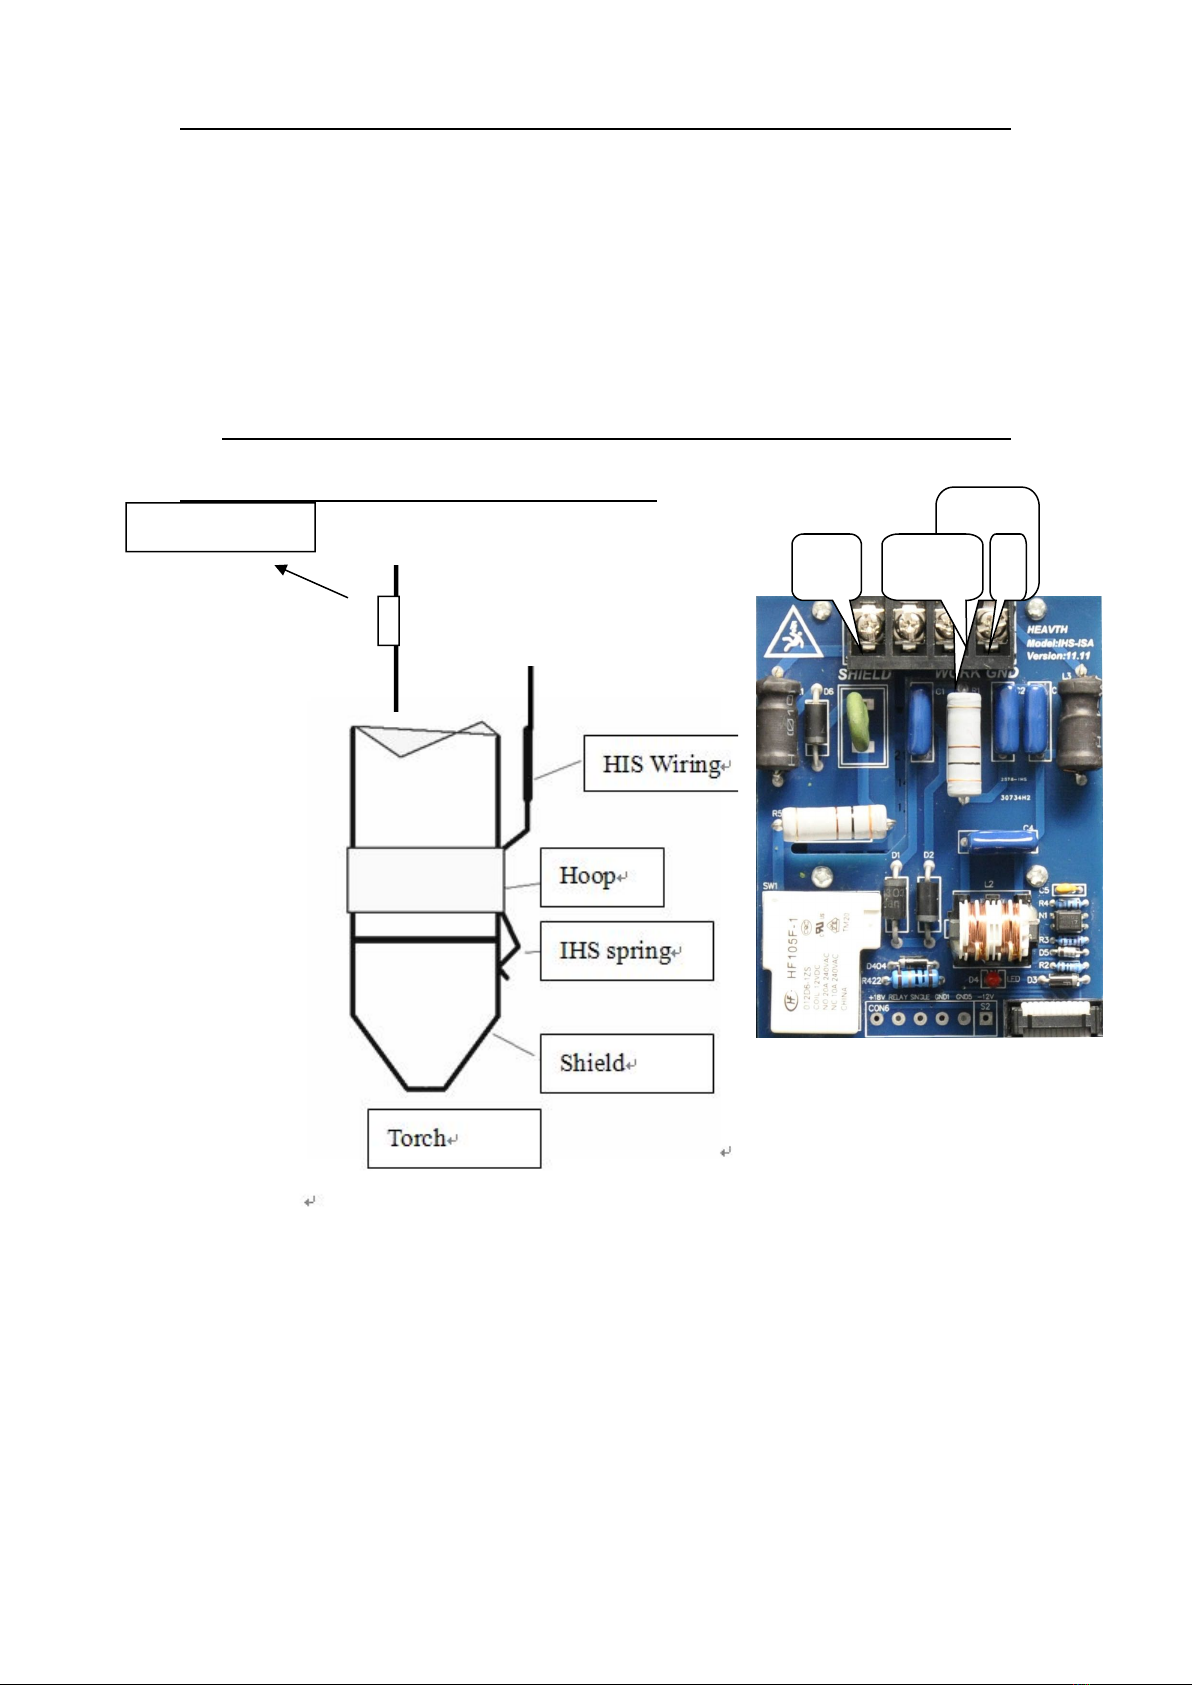
3.4 IHS introduction
Set the input
voltage arc
HP105 Plasma arc voltage height controller
第- 14 - 页 共 23 页
Two types of IHS style of height controller
1. Plasma Shield protector IHS inspecting style
The material of the protector should be metallic. They can
transmit each other when it gets to the material.
ATTN :The cutting torch protector IHS inspecting style is
suitable for abover-water cutting only.
Single
Working process: After the height controller receives the arc-on
signal which is sent out from NC system, the cutting torch will fall
down immediately. When the protector get to the material, the
height controller will receive this signal, and then control the cutting
torch to rise to the given Height of IHS. The height controller will
Magnetism
ring
Workpiece
Shield
GND
Floating
Magnetism ring

HP105 Plasma arc voltage height controller
第- 15 - 页 共 23 页
control the plasma to arc on after IHS.
2. inductive proximity switch IHS style(switch mode: NPN
Mode, 2mm, outer diameter Ф12, the distance of screw
thread:1.0mm)
When this style is adopted, the client should design the tongs
according the IHS cutting torch tongs sketch map which is provided
by our company. All the plasma IHS, whatever over-water cutting
and under-water cutting, can adopt this IHS style. Please adopt the
approach switch IHS style if you use the high frequency input arc
plasma and under-water cutting.
The tongs sketch map: Please see the appendix
Before IHS, the approach switch is on approaching status. The
cutting torch will rise once the switch is broken away.
Working process: After the height controller receives the arc-on
signal which is sent out from NC system, the cutting torch will fall
down immediately. When the cutting torch gets to the material, the
approach switch will break away from the approaching spot. The
height controller receives this signal, and then controls the cutting
torch to rise to the given Height of IHS (the approach switch will
reposition automatically during the rising). The height controller will
control the plasma to arc on automatically after IHS. This IHS style
is suitable for all plasma IHS.

HP105 Plasma arc voltage height controller
第- 16 - 页 共 23 页
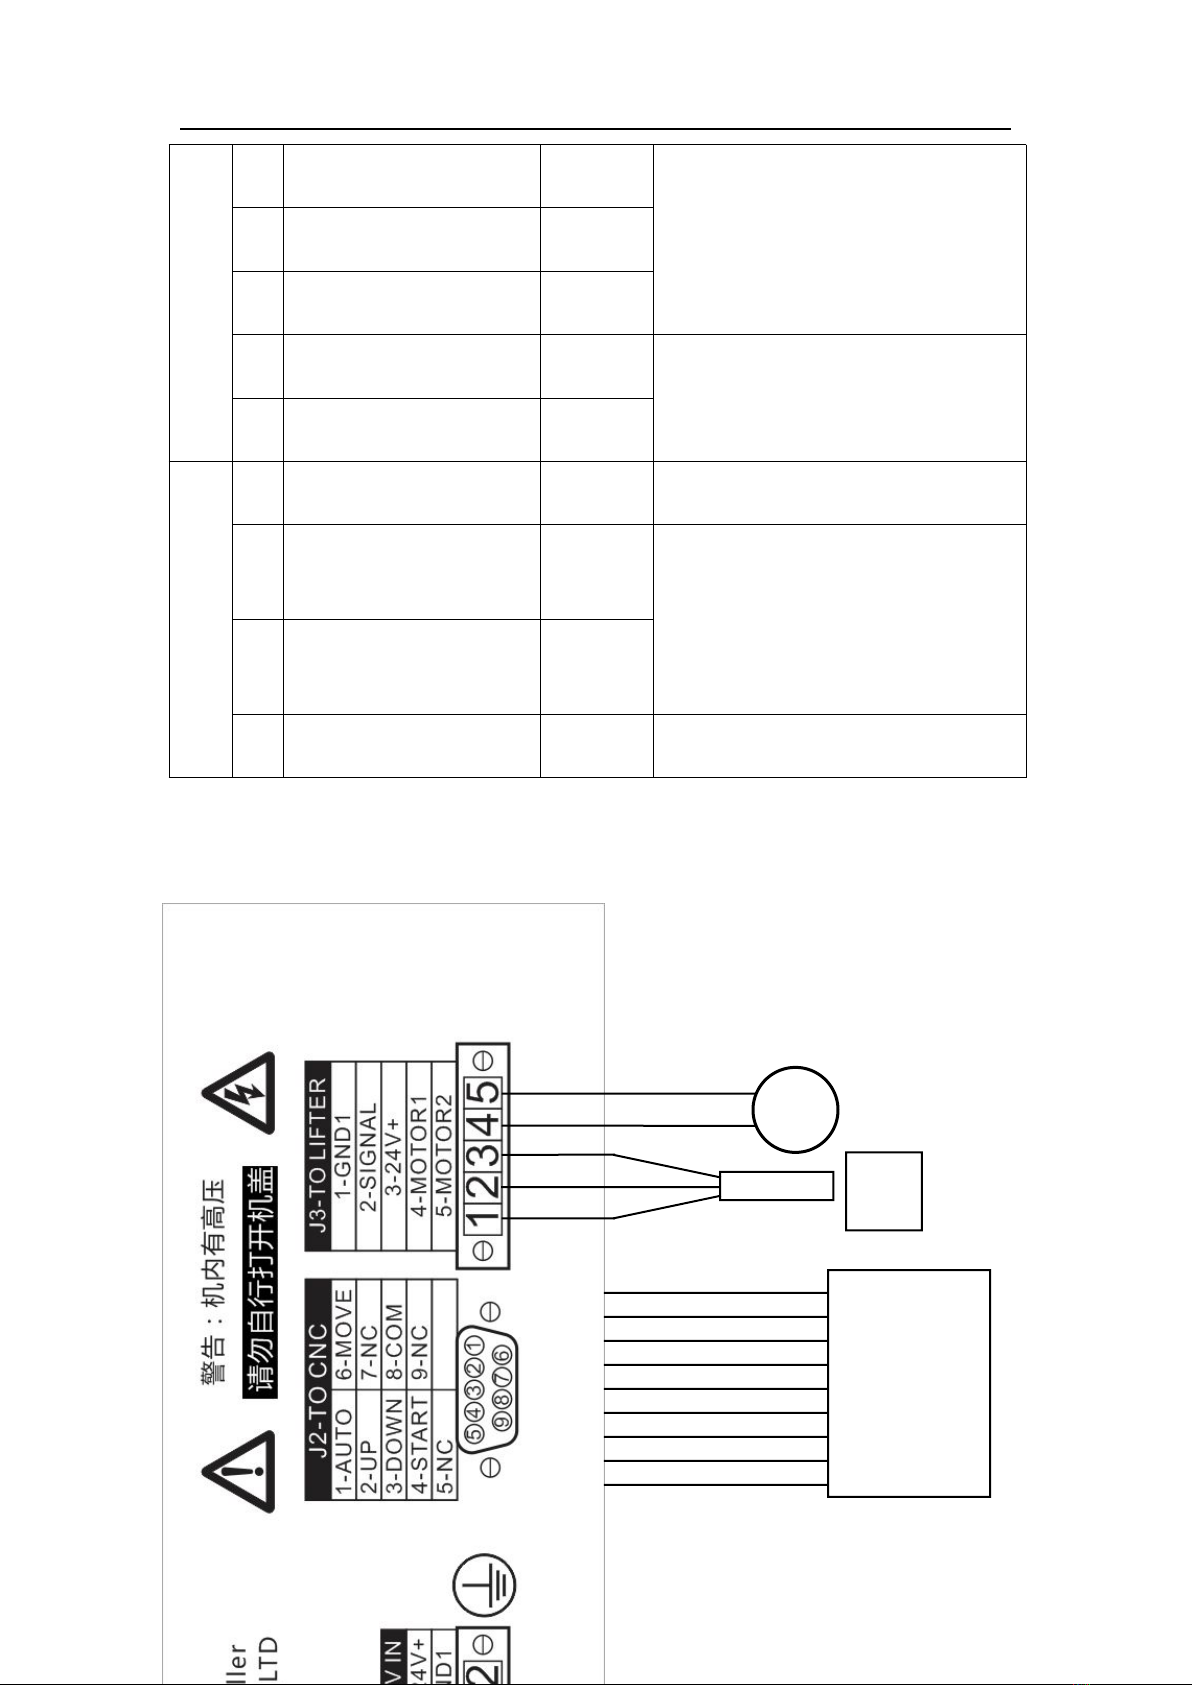
By raising the J3-1,2,3 aviation plug is connected to the proximity
switch.
3.3
Interface Circuit
Interfa
ce
Signal
input
Output
Remark
J1
1
DC 24V +
input
Connect switching power supply.
2
DC 24V -
input
J2
1
Automatic signal (corner
signal)
input
Raised manually (with the
common ON)
2
Manual rise
input
Manual rise (and the common terminal
connected)
3
Manually drop
input
Manually decrease (and common
ON)
4
With locating arcing
input
Start positioning arc (the
common terminal connected)
5
Floating
6
Arcing complete (machine
running)
output
Control machine running
7
Floating
8
Signal common
Common
J2 port signal common
9
Floating
HP105 Plasma arc voltage height controller
第- 17 - 页 共 23 页
J3
1
Proximity switch to
output
Connected NPN type positioning
proximity switches, 1-2 foot signal NC.
When using ordinary mechanical switch
normally closed switch 1-2 pin connector
pin 3 unconnected.
2
Proximity switch signal
input
3
Proximity Switch Power
output
4
DC
output
Permanent magnet motor, maximum
40W
5
DC
output
J4
1
actual arc voltage
negative
input
Plasma arc voltage actual negative
2
Arcing signal
output
Plasma arc switching signal.
3
Arcing signal
output
4
actual arc voltage positive
input
Plasma actual arc voltage positive
p
M
24V
直流电机
Blue
Black
Brown
NPN
接近开关
1foot-automatic
signal (corner signal)
9 feet - vacant
8 feet-input common
7 feet-vacant
6feet-arcing
5 feet - vacant
4 feet - with locating
3feet-Manual fall
2 feet - Manual rise
CNC
数控系统

HP105 Plasma arc voltage height controller
第- 18 - 页 共 23 页
Electric lift body recommended limit switch wiring:
Arc Voltage input Note:
The controller built-in isolation stars platen default input 1: The actual arc
voltage 1. For carrying part 50: a non-isolated sub-plate plasma can be
input is set to 50: 1.
1. Do the actual arc voltage lines connected directly to the ground clip
and the torch cable.
2. The arc voltage height controller to the motor cable should be shielded
cable, shielding connected to the machine ground.
3. plasma power and arc voltage height control must be strictly grounded.
Note Check before arcing torch height and ground clip.
4. Domestic plasma power: its arc voltage must be taken from the
DC24V+
DC24V-
1:1actual arc
voltage+
Plasma arc
Plasma arc
1 : 1 actual
arc voltage-
Plasma
power
supply
DC24V
Switchin
g Power
Supply

HP105 Plasma arc voltage height controller
第- 19 - 页 共 23 页
high-frequency arc-grade and reactor before. Plasma samples from the
position of the rectifier output.
5. Any control cables and a plasma torch cable wiring should be as far
away from (5cm above), to prevent the high-frequency signal is coupled
to control, damage control and CNC systems.

HP105 Plasma arc voltage height controller
第- 20 - 页 共 23 页
Parameter setting screen, hold UP and DOWN at the same time more than three seconds, into the
implicit parameter setting.
NO.
parameter name
Parameter meaning
Factory
Settings
1
MAX_PWM
Maximum pulse width
120
2
MIN_PWM
minimum pulse width
30
3
IHS_UP
initial positioning pulse
width
100
4
IHS_DOWN
initial position by pulse
width
100
5
HAND_PWM
Up and down pulse width
manually
120
6
ARCV_ERR
Arc voltage protection
scope
020
7
EN_BREAK
brake can make
01
8
PWM_AMP
Automatic sensitivity
005
9
UP_BREAK
Increase reverse braking
time
030
10
DN_BREAK
By reverse braking time
080
11
EMG_LIFT
Promotion time of
emergency
020
12
EMG_ PWM
Emergency pulse width
120
13
ADJ_RANGE
Arc pressure intelligent
adjusting range
015
14
ADJ_STEP
The size of arc voltage
intelligent adjustment
002
15
ADJ_EN
Arc pressure intelligent
effective adjustment
000
16
ARC_ACC
Arc pressure precision
01
17
PEI_EN
Perforation signal can
make
01
18
AUTO_UP
Broken arc cutting torch
when hoisting height
10
19
ERR_STOP
Arc pressure anomalies can
stop making
00
20
DELAY_IN
When the arc rolling access
05
21
RESET(18)
Restore the factory value
00
Table of contents


