Hedman EDP2000 User manual

HEDMAN EDP 2000
COUNTER 00000
RESET
AUDIT
COUNTER
START
STOP
3-1/2”
7”
CHECK
SIZE
00000
OFF/ON
OPERATING INSTRUCTIONS
EDP1000
&
EDP2000
CONTINUOUS
FORM SIGNER
HEDMAN
®

MODEL EDP1000 & EDP2000 DIFFERENCES
FEATURE MODEL EDP2000 MODEL EDP1000
ON/OFF Key Lock Power Switch
Form Size Key Lock None
Select 3-1/2" or 7"
Audit 6 Digit None
Counter Non-resettable
Stop Push Button None
PLEASE BE SURE THAT YOU CAREFULLY
READ ALL INSTRUCTIONS BEFORE
OPERATING YOUR CONTINUOUS FORM SIGNER.
SPECIFICATIONS
UNIT
Width 25-1/4" (64.1 cm)
Depth 9" (22.9 cm)
Height 14-3/4" (37.5 cm)
Weight 39 lbs. (17.7 kg)
Electrical 115 Volts, 60 Hz.
FORMS
3-1/2" or 7" High up to 17" Wide
Multiple carbon or carbonless interleaved forms
Weights up to 125 lbs (56.7 kg).
Your Continuous Form Signer is fully assembled
except for the ink roll, which must be installed before operating the
signer. Refer to Page 8, Figure 10, for ink roll installation instructions.
Manufactured by: The Hedman Company
189 Gordon Street
Elk Grove Village, IL 60007-1118
(847)718-6500
FAX (847)718-0603
© 1990 The Hedman Company

Printed in U.S.A.
Form No. 198228HF (Rev.B)
Manufactured by:
The Hedman Company
189 Gordon Street
Elk Grove Village, IL 60007-1118
(847)718-6500
FAX (847)718-0603
1
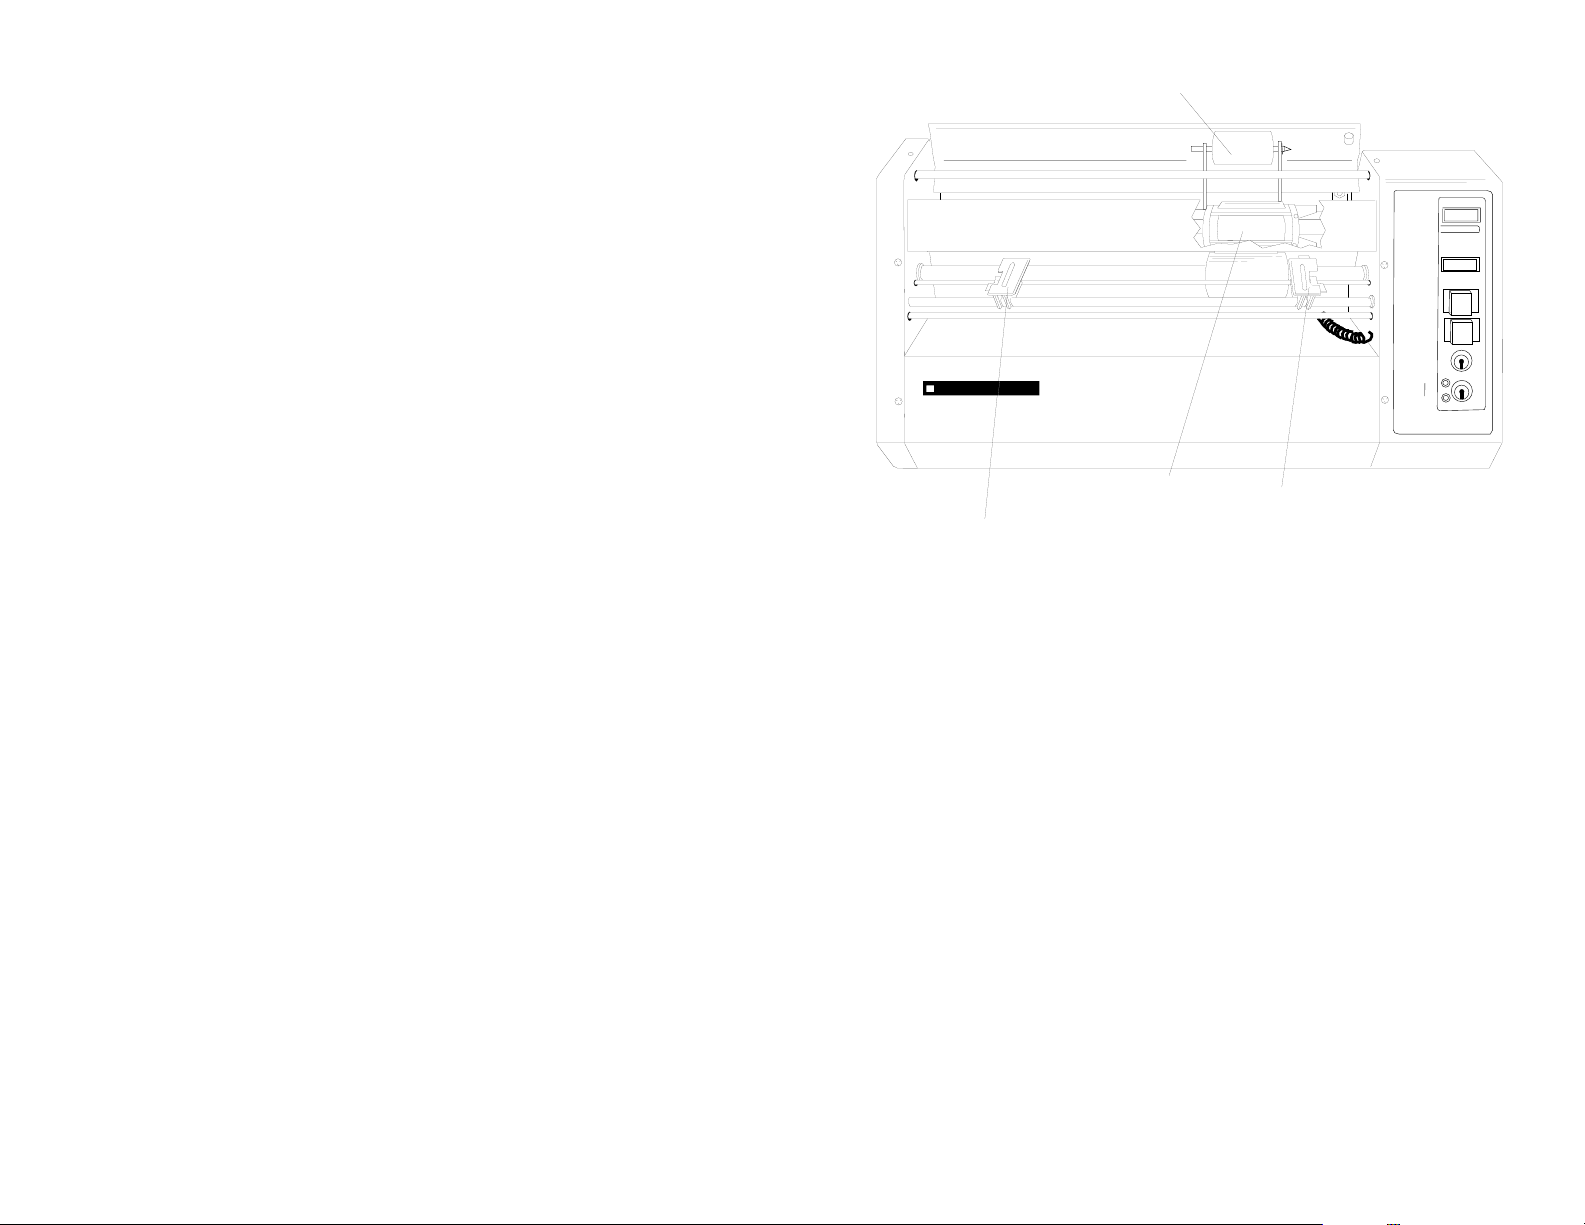
Figure 1
SECTION 1. MODEL EDP2000 OPERATING INSTRUCTIONS
NOTE:
Refer to Pg. 9 for differences in Model EDP1000 operating instructions.
To sign 3-1/2" checks you must use two (2) signature plates.
To sign 7" checks with top or bottom vouchers you must use ONLY one (1) signature
plate.
The signature plate holder on your machine has two (2) signature plate positions.
These are marked POSITION A and POSITION B. Proper signature plate positions
are dictated by the type of check that you are using. Refer to Pages 3 & 4, Step C.
A. TO OPERATE THE CONTINUOUS FORM SIGNER (See Figure 2)
1. Insert the ON/OFF key into the ON/OFF lock, turn to the left to turn on
machine. The yellow light near the Check Size Lock will illuminate. This
light indicates the machine is ON, also what size check the machine will
sign.
2. Insert the Cover key into the Cover lock, turn it to the right to open the
cover.
Ink Roll
Right
Tractor
Signature
Plate
Holder
Left
Tractor
HEDMAN EDP 2000
COUNTER
00000
RESET
AUDIT
COUNTER
START
STOP
3-1/2”
7”
CHECK
SIZE
00000
OFF/ON
2
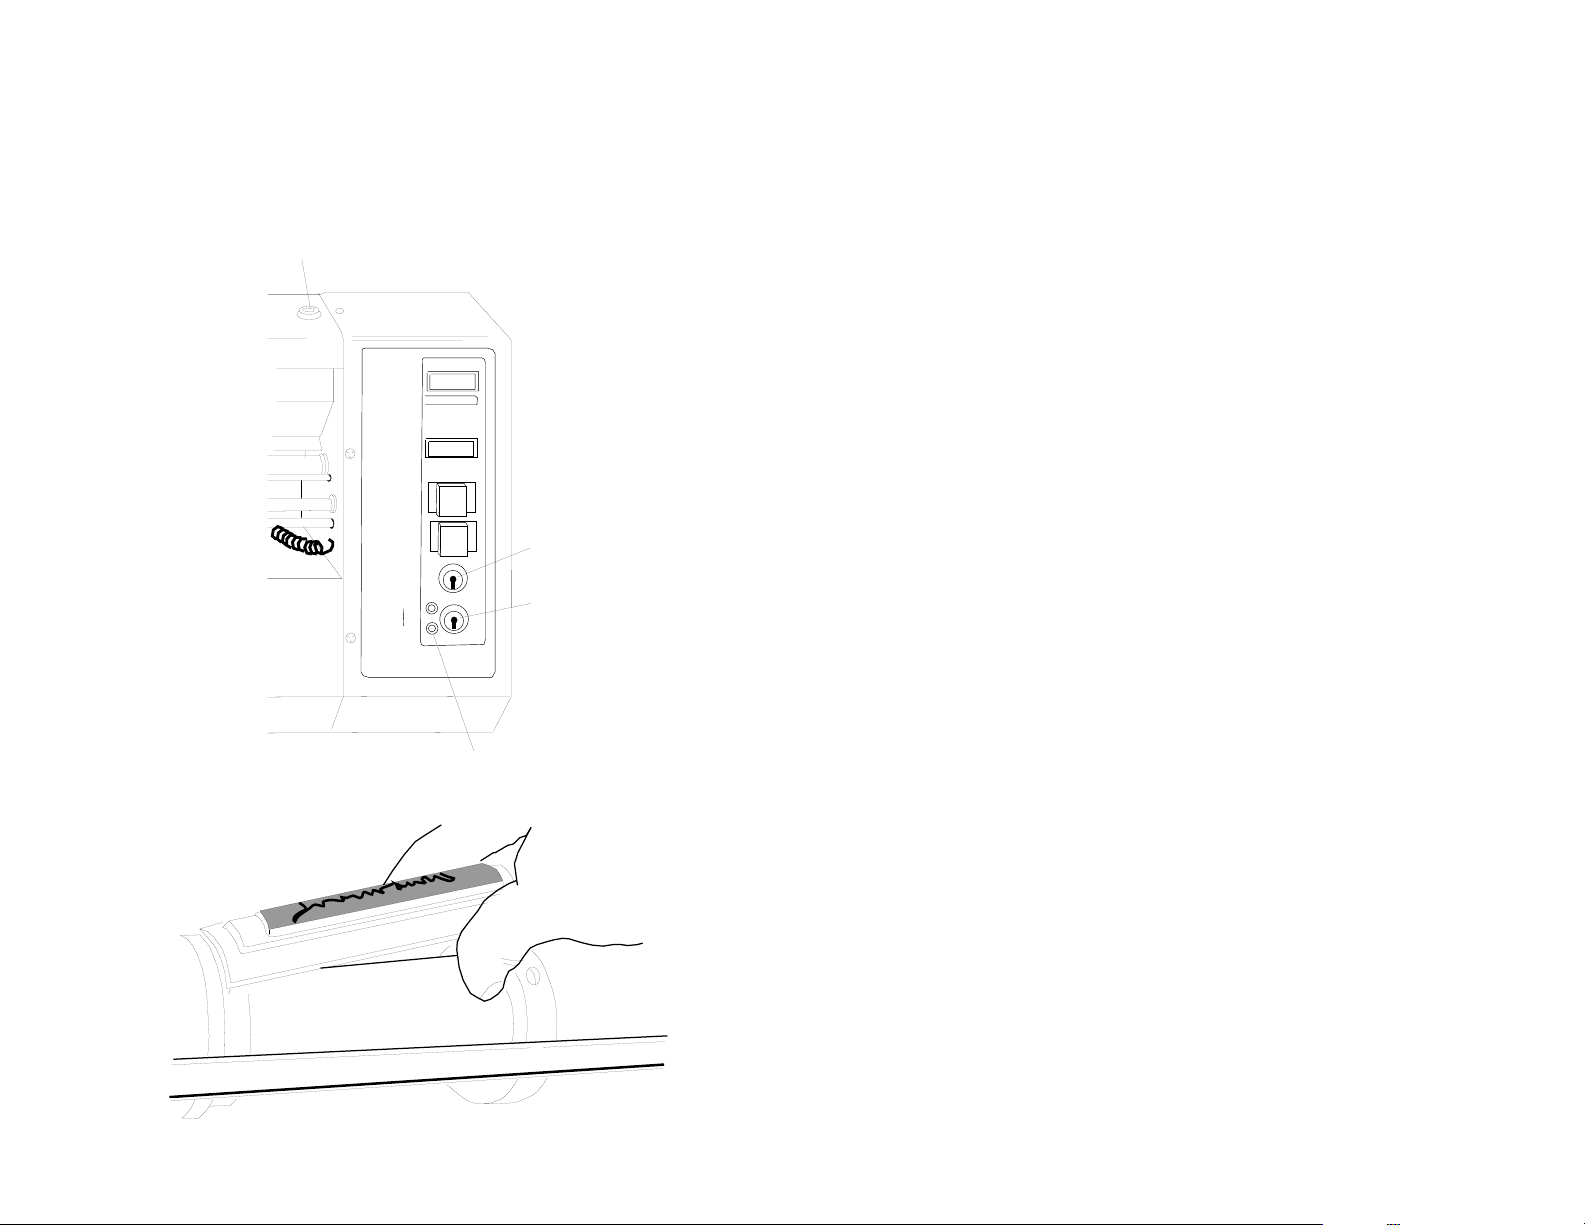
B. LOADING SIGNATURE PLATES (See Figure 3)
1. Grasp the signature plate with your left hand - the notch should be
pointed to the left.
2. Slip the signature plate down, sliding it to the left so that the plate holder
pin locates into the signature plate notch.
Cover Lock
OFF/ON
Lock
00000
RESET
AUDIT
COUNTER
START
STOP
3-1/2”
7”
CHECK
SIZE
COUNTER
00000
OFF/ON
Check Size
Lock
Check Size
Lights
Figure 3
Figure 2
3
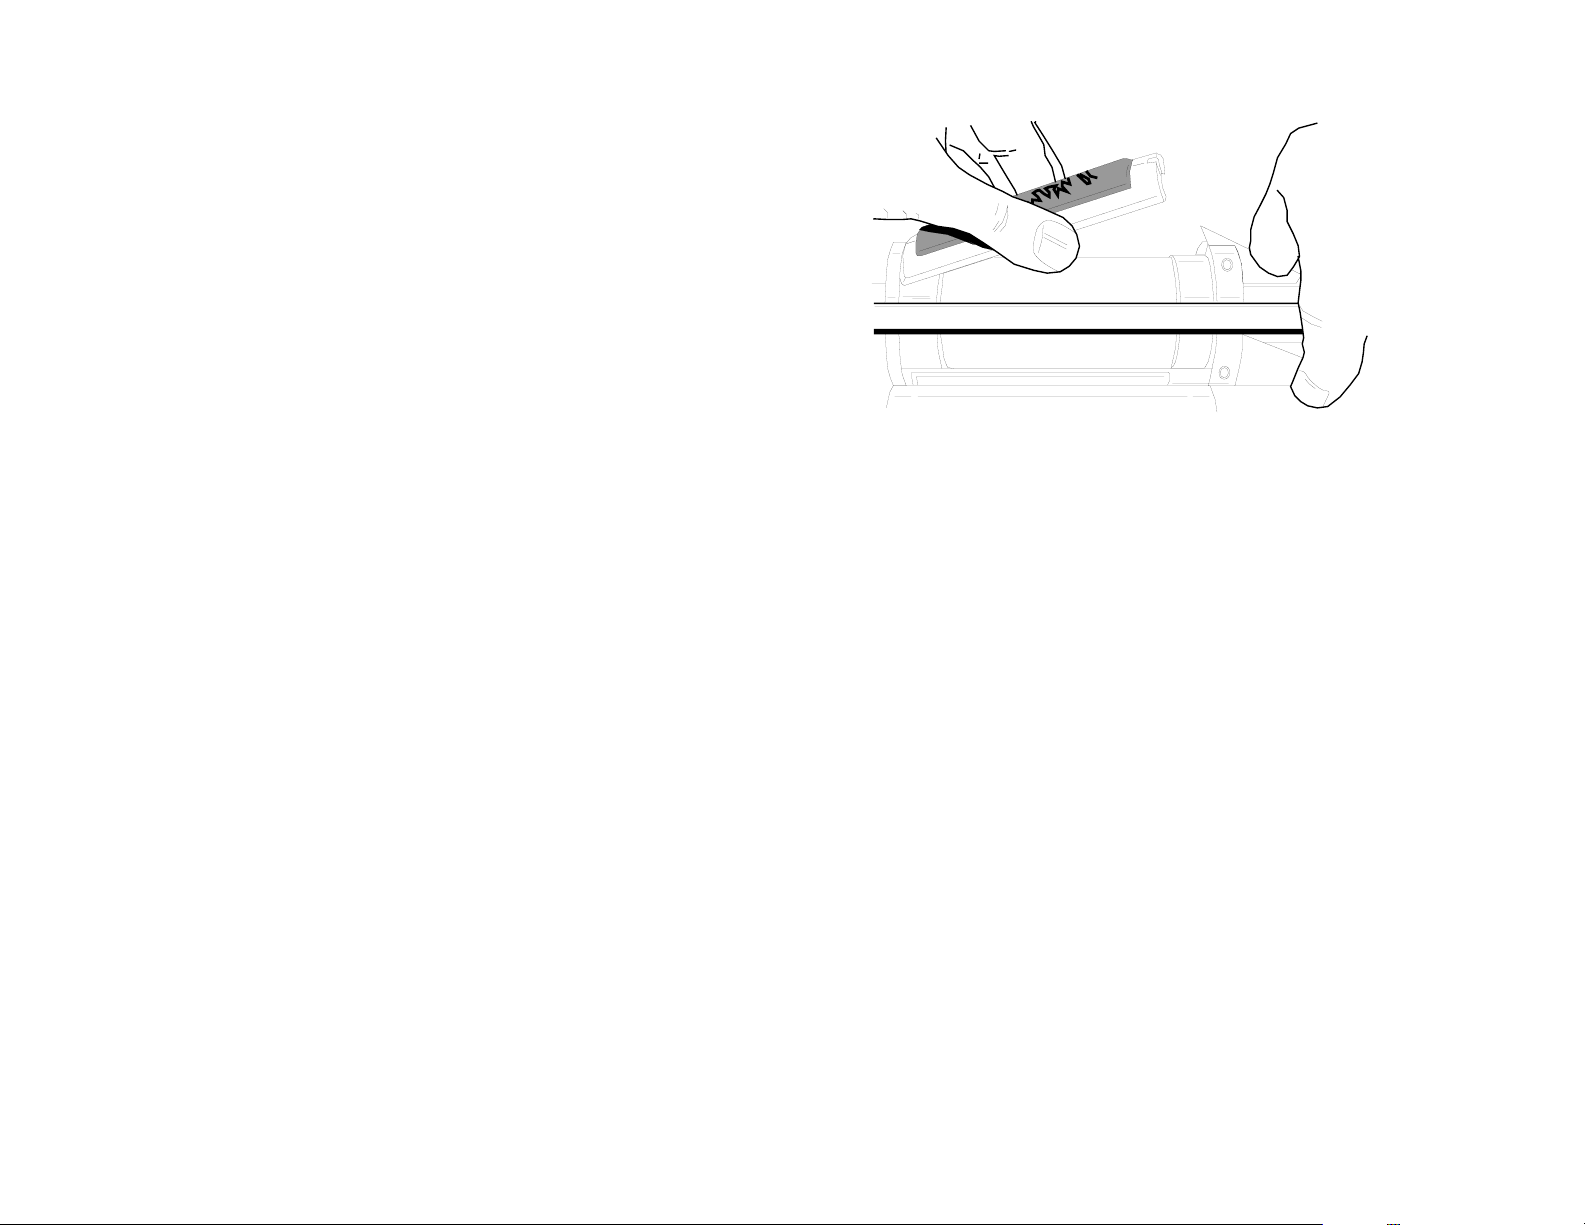
3. Holding the signature plate with your left hand, use your right index
finger (or the eraser end of a pencil held in your right hand) to press
down on the signature plate holder latch. (See Figure 4).
4. Press the signature plate down into position and release the latch. The
latch will position itself into the beveled slot on the signature plate and
lock the plate firmly into position.
C. HOW TO SIGN VARIOUS TYPES OF CONTINUOUS FORM CHECKS
SIGNING 3-1/2" CHECKS
1. Turn Check Size key to the 3-1/2" position and remove key. The yellow
light next to the 3-1/2" check size will illuminate.
2. Either plate POSITION A or POSITION B can be loaded first. Load
either plate A or B following instruction "B" - Loading Signature Plates.
3. To load second signature plate, momentarily tap the START button
once. The signature plate holder will rotate 1/2 turn - load the second
plate.
4. Proceed to Step D.
SIGNING 7" BOTTOM VOUCHER CHECKS (Check at top - Voucher at
bottom).
1. Load one (1) signature plate into POSITION A ONLY.
Figure 4

4
If POSITION A is not visible on signature plate holder, momentarily tap the
START button once. The signature plate holder will rotate 1/2 turn and you
can then load the signature plate into POSITION A.
2. Load signature plate into POSITION A following instruction "B" -
Loading Signature Plates.
3. Set Check Size key to 7" positon - remove key.
4. Proceed to Step D.
SIGNING 7" TOP VOUCHER CHECKS (Voucher at top - Check at bottom).
1. Load one (1) signature plate into POSITION B ONLY.
2. Load signature plate into POSITION B following instruction "B" -
Loading Signature Plates.
3. Again tap START button. See that the plate you loaded rotates to the
lower printing position.
4. Set Check Size key to the 7" position - remove key.
5. Proceed to Step D.
NOTE:
Machine will stop with the signature plate "down". To remove the
plate, set Check Size key to the 3-1/2" position and momentarily tap the
START button once. This will bring the signature plate holder up for easy
signature plate removal.
D. LOADING AND POSITIONING OF CONTINUOUS FORM CHECKS (See
Figure 5).
1. Open left and right tractor covers.
2. Align the top right edge of the continuous form with top edge of right
tractor. Align check carrier strip holes with tractor pins. Close tractor.
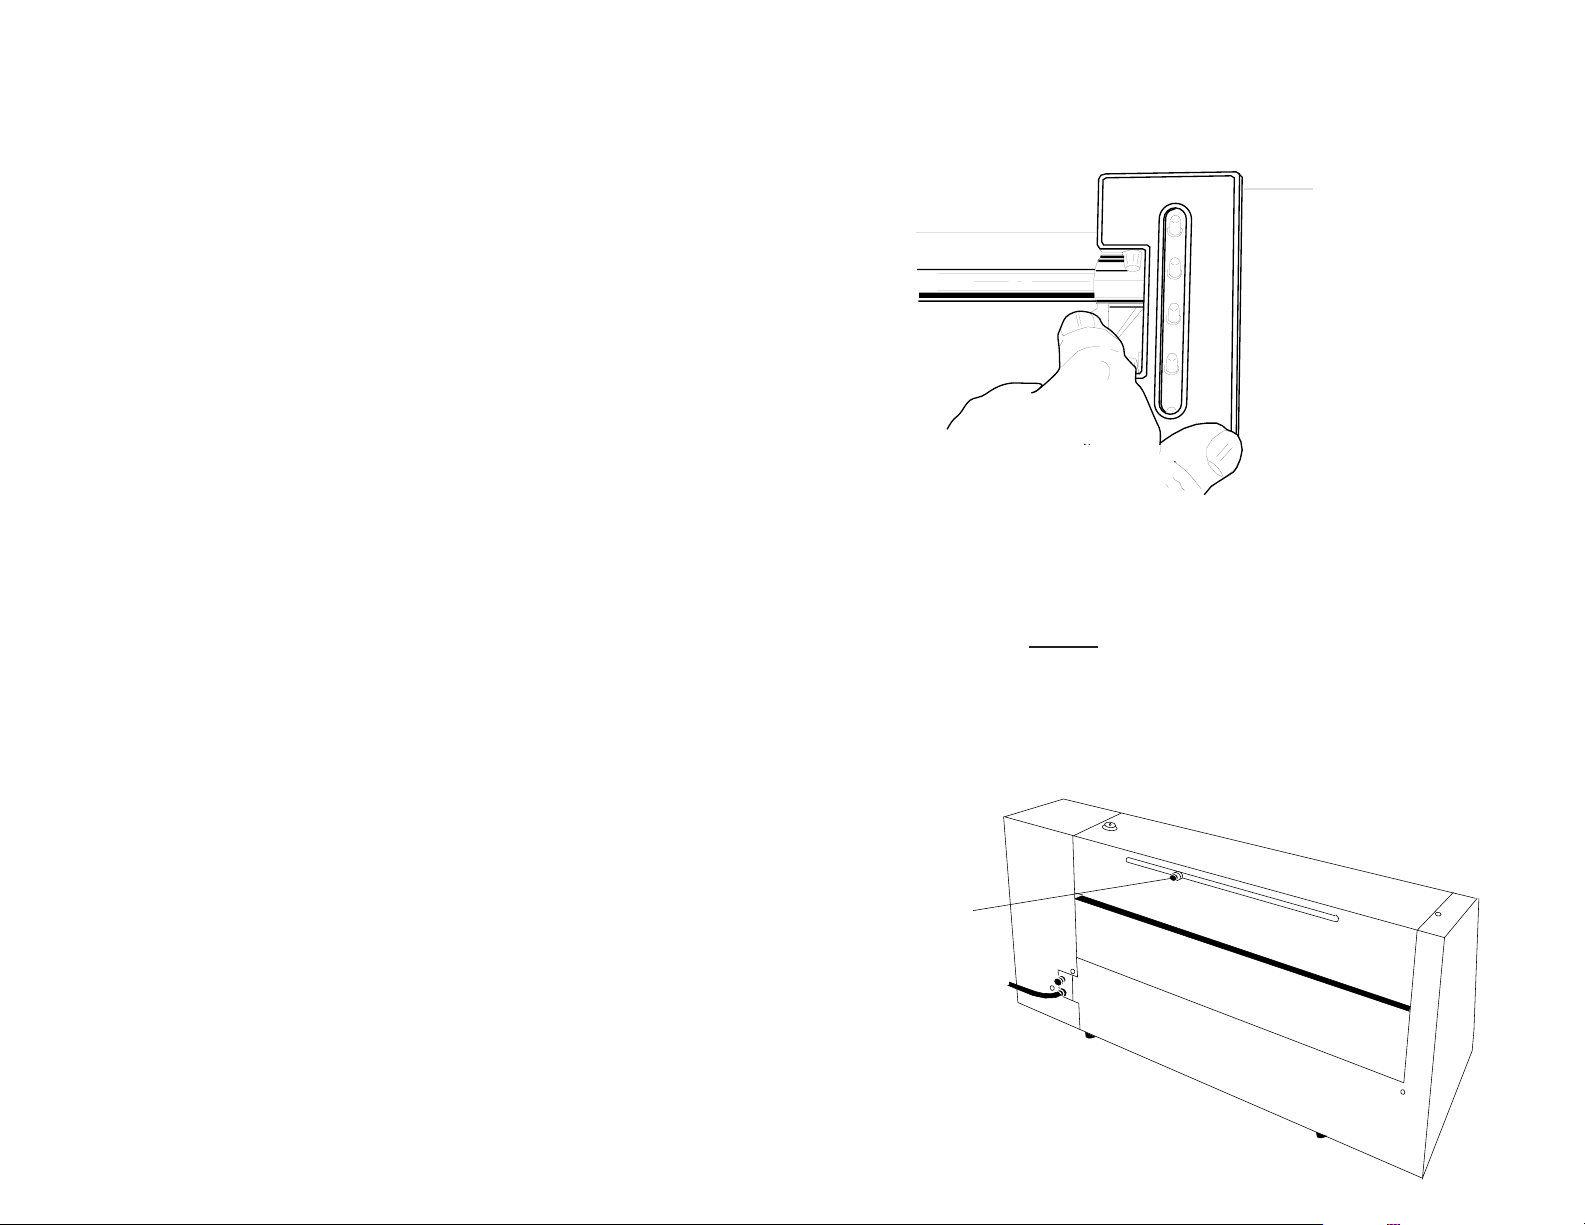
3. Release left tractor lock. Lift up on locking lever. (See Figure 6)

5
Figure 6
Figure 5
NOTE: Be sure corner
of form is not torn or
wrinkled

6
Figure 5
4. Using both hands, one on the tractor the other on the paper, slide
tractor right or left so that the tractor pins line up with the holes in check
carrier strips.
a. Align top of check form with top of tractor - insert left check carrier strip
into feeder pins and close tractor cover. (See Figure 7).
b. GENTLY pull tractor to the left to eliminate any sagging of the forms - -
- forms must be taut between the tractors. Lock the left tractor in place
by pushing down on the locking lever. (See Figure 8).
NOTE:
Continuous forms of some manufacturers may vary in width from
box to box or even within the same box. Whenever loading continuous
forms, always check to make sure that the feeder strips line up with the
tractor pins AND that the paper is taut between the tractors.
E. Close cover on machine. LOCK and REMOVE key.
F. Reset Run Meter by pressing in firmly on CENTER of RESET bar. Make
sure all zeros (00000) appear and line up across the face of the meter.
G. Press START button. Allow approximately 12 checks to run through the
machine. Press STOP button. Model EDP1000 checks will run until they are
all signed - there is no STOP button. The Model EDP1000 can be stopped
for stacking by the power switch.
1. Make sure that the checks are stacking properly at the rear of the
machine. The first check should be pointing toward the rear of the
machine. If not, manually refold the checks along the natural fold lines.
Place the stack of refolded checks about 6" from the rear of the
machine.
7
2. Press START button and sign checks or forms. The machine will stop
automatically when the last check has been signed.
FOR OPTIMUM SIGNING OPERATION, IT IS SUGGESTED THAT A STACK OF
CHECKS NO HIGHER THAN 4" BE PROCESSED IN ONE RUN.
Figure 8
Figure 9
H. INKING SYSTEM
Your Continuous Form Signer is equipped with an ink roll that will sign up to
150,000 signatures, depending upon age and usage. The ink roll is located inside
the top cover.
CAUTION: Do Not touch ink roll.
1. INK ROLL PRESSURE
The ink roll must not place too much pressure on the signature plates.
Adjust the ink roll to just "kiss" the signature plates but with enough
pressure for a good printed impression. Ink roll pressure is adjusted by
turning the RED adjustment knob located at the rear of the form signer
(See Figure 9). Turning this knob to the right DECREASES ink roll
pressure - a lighter signature imprint. Turning the knob to the left
INCREASES ink roll pressure - a darker signature imprint.
Ink Roll
Adjustment
Knob
8
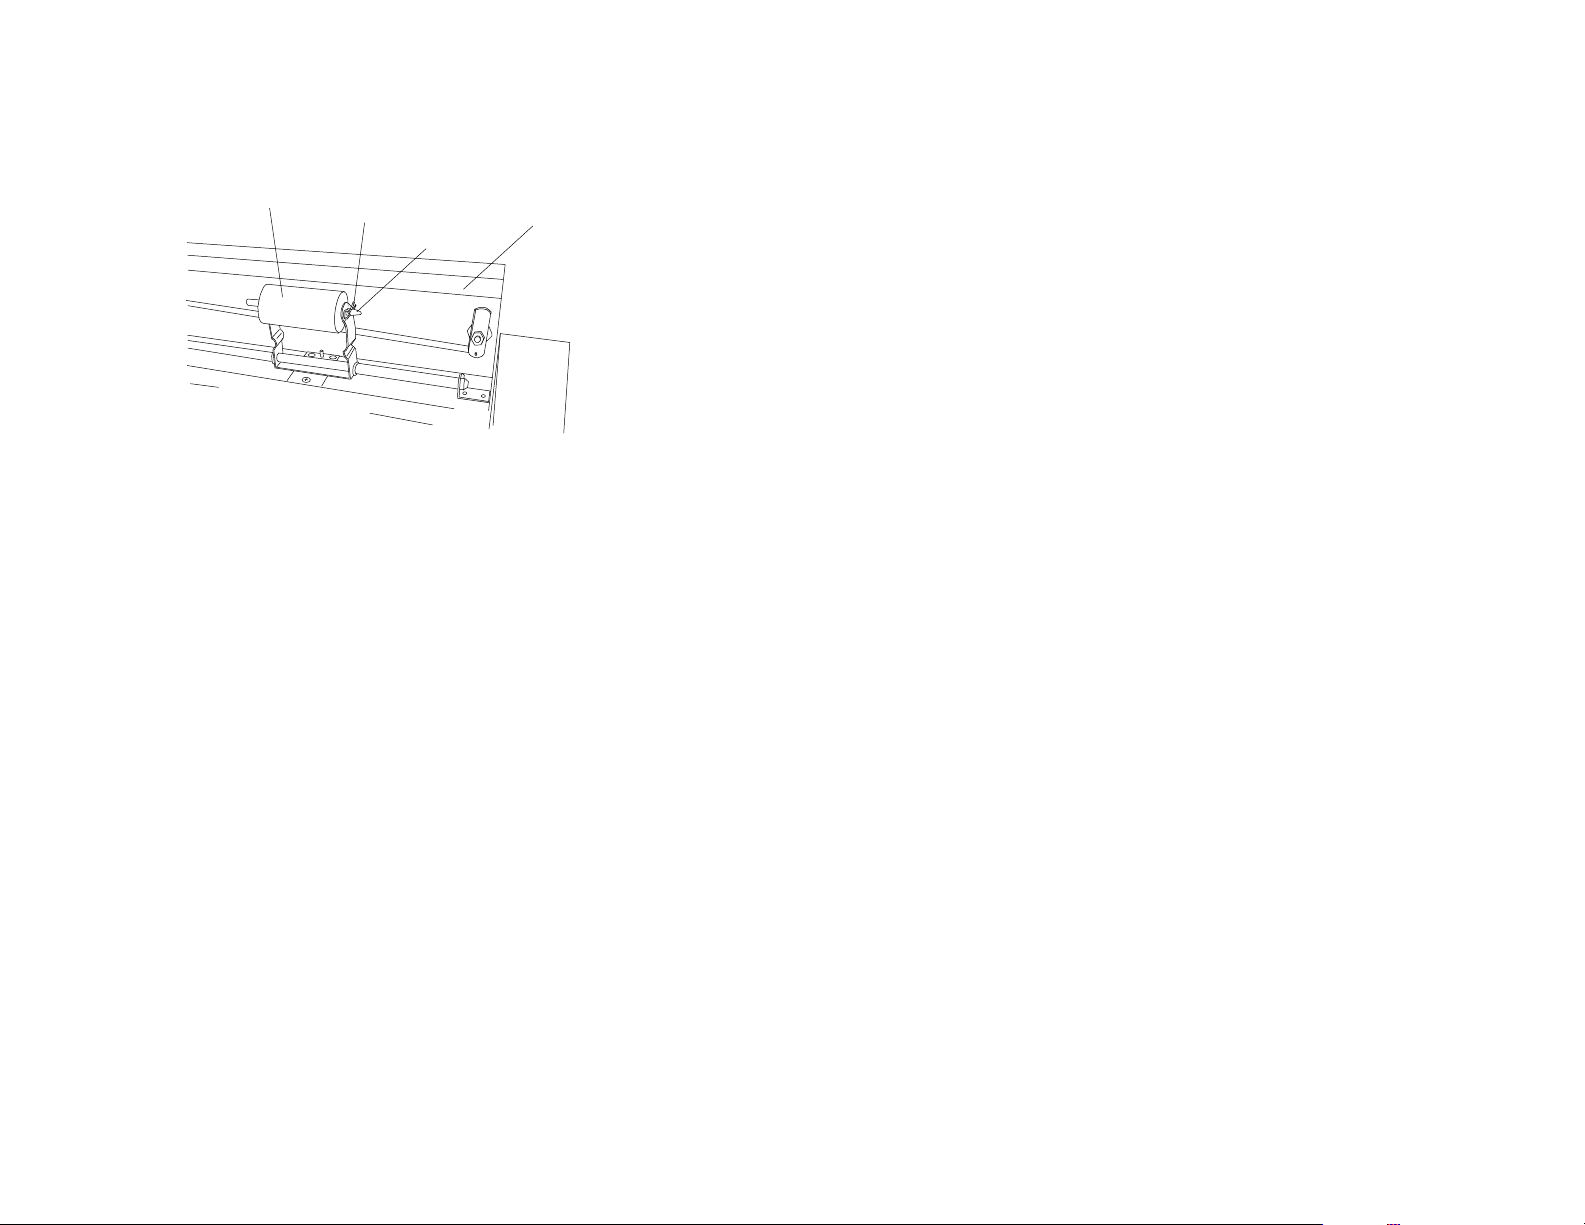
2. POSITIONING INK ROLL
The ink roll can be moved by opening the top cover and simply sliding
the ink roll assembly to the right or left as required (See Figure 10). The
ink roll must be positioned so that it inks the entire signature plate.
Figure 10
3. REPLACING INK ROLL
a. Open the top cover.
b. Put on the gloves shipped with the ink roll.
c. Pull the cotter pin out of the axle (see Figure 10).
d. Hold onto the ink roll and pull the axle out of the ink roll carriage.
e. Hold the new ink roll between the sides of the ink roll carriage and
insert the axle with the pointed end as shown in Figure 10.
f. Insert the straight side of the cotter pininto the hole in the pointed end
of the axle.
g. Push the cotter pin until the axle is secured between the two loops of
the cotter pin.
h. Close the top cover.
I. PAPER MISFEED
NOTE:Torn or damaged carrier strips can cause misfeeds or stop the machine
from operating. Check the carrier strips on the forms to make sure they will not
cause you a problem. Should a paper misfeed occur, the following stops should
be followed:
1. Stop machine by pressing the RED stop button.
2. Unlock and open cover.
3. Open tractor cover. Clear and remove checks.
4. Examine damaged carrier strips and make any necessary repairs with
scotch tape, taking care not to cover carrier strip holes.
5. Momentarily tap the START button to bring the signature plates into
proper printing position.
6. Reload checks in tractors. First check should be undamaged or
repaired.
7. Close and lock cover and remove key.
8. Repeat Step G.
Axle
Ink
Roll
Cotter
Pin
Top
Cove
r

9
SECTION 2. MODEL EDP1000 OPERATING INSTRUCTIONS
NOTE:
Model EDP1000 Operation is similar to Model EDP2000 except for the
following:
A. TO SIGN 3-1/2" FORMS YOU MUST USE TWO (2) SIGNATURE PLATES
POSITION A AND B.
Figure 11
POSITION A - TOP
POSITION B - BOTTOM
PLATEN
1. Switch ON/OFF switch to ON.
2. Unlock and open the top cover.
3. Load one signature plate into POSITION A. (See Figure 11).
4. Touch the green button momentarily to jog unit. The other signature
plate can now be loaded into POSITION B. (See Figure 11).
5. Loading paper is the same as the MODEL EDP2000 . See Page 4, Step
D. After forms are loaded procedd to Page 11, Step C.

10
B. TO SIGN 7" FORMS WITH A TOP OR BOTTOM VOUCHER (Refer to
Figure 12), ONLY ONE SIGNATURE PLATE IS NEEDED.
Figure 12
VOUCHER DIAGRAM
1. Switch ON/OFF switch to ON.
2. Unlock and open the top cover.
3. TOP VOUCHER. Load one signature plate into POSITION A (TOP).
Refer to Figure 11.
or
4. BOTTOM VOUCHER. Touch the green button momentarily to jog the
unit. The signature plate should now be in the bottom position. Load one
signature plate into POSITION B (BOTTOM). Refer to Figure 11.
NOTE:
Only one signature plate is used for 7" forms.
CURRENTLY THE UNIT WILL SIGN 7" TOP VOUCHER FORMS OR BOTTOM
VOUCHER FORMS - DEPENDING ON WHETHER THE SIGNATURE PLATE
WAS LOADED INTO POSITION A OR B.
BOTTOM VOUCHER
CHECK
CHECK
TOP VOUCHER
or

11
C. PROCEDURE FOR SIGNING FORMS
1. Reset the counter to zero by pressing the reset button on the counter.
2. Push the green button to sign forms.
3. The unit will stop after the last form is signed.
WHEN THE RUN IS DONE, MAKE SURE THAT THE SIGNATURE PLATE IS IN
THEPROPERPOSITIONFORTOPVOUCHERORBOTTOMVOUCHERFORMS.
(7" ONLY)
3-1/2" FORMS, THE COUNTER COUNTS ALL FORMS THAT ARE SIGNED.
7"FORMS,DIVIDETHE NUMBER ON THE COUNTER BY 2 TO GET THE ACTUAL
COUNT OF FORMS SIGNED.

12
MODELS EDP1000/EDP2000
TROUBLESHOOTING
SYMPTOM CAUSE
Machine will not run 1. Checks not loaded into tractors properly.
continuously. 2. Tractor switch (right tractor) not fully depressed.
3. Cover is not locked and key removed.
Machine will not 1. ON/OFF key not in ON position.
operate. 2. Check wall plug.
3. Check fuse (rear of machine). Replace with 2 AMP fuse.
4. Model EDP1000. Check Power Switch - not ON.
Signature not 1. Refer to Step C.
properly positioned
on check.
Reset counter 1. Firmly press in on center of reset bar.
not clearing.
Your Key Number____________ ON_______ CHECK_______COVER _______
OFF SIZE
Machine Serial Number ______________________________________________
This manual suits for next models
2
Table of contents


