HELLER HTLW7 User manual

:DWHU /HYHO
3URFHVV
3UHVHW
:DWHU
WHPSHUDWXUH
3URJUDP
3DXVH
6WDUW
2Q2II
3RZHU
MODEL: HTLW7
7KG FULLY AUTOMATIC WASHING MACHINE
All manuals and user guides at all-guides.com
all-guides.com

Contents
Name of all components
Accessories
Suggestions
Installation
Connection of the inlet hose
Connection of the power cord
Preparation
Method
Program time table
Safety warning
Maintenance
Trouble shooting
Wiring diagram
1
1
2
Control panel 3
4
5
6
7
7
10
11
12
13
15
Specifications 15
Name of all components
Installation instructions
Operating instructions
Maintenance
Wiring diagram
Warranty / Contact information 16
Warranty / Contact information
All manuals and user guides at all-guides.com

-1-
Name of all components
Accessories
83
top lid
hot water inlet
black plate
power cord
drain hose
adjustable foot
body
control panel
filter
inner tub
detergent box
bleach intake
:DWHU/HYHO
3URFHVV
3UHVHW
:DWHU
WHPSHUDWXUH
3URJUDP
3DXVH
6WDUW
2Q2II
3RZHU
cold water inlet
water inlet hose
(2pcs)
(The two water inlet
hose components
are the same and
there's no different
on cool/warm water
during using)
Under cover(1pcs) tapping screws(2pcs)
Inlet valve cap(including sealing plate)(1suit)
All manuals and user guides at all-guides.com

-2-
1 Low foam detergent powder is recommended.
2 . Please operate it under 0 ~45 , as extra-high or extra-low ambient temperature
may cause malfunction.
3 . If the washing machine has been stored under 0 , it can be used after being placed
under room temperature for about 4 hours to avoid machine damage due to residual
ice in the washing machine.
4 . The washing and spinning capacity refers to the maximum weight of standard
laundry during two operating fashions, which is different from that of the actual
laundries. The cloth thickness, size and category of the laundries will impact the
washing capacity. The volume of washing items should be appropriate for the normal
turning of washing items within the washing machine.
5 . High water level should not be selected for washing volume below1.0kg to avoid
water splashing during washing.
Suggestion
All manuals and user guides at all-guides.com

1RUPDO
Fuzzy: set the water level automatically according to the load of clothes
Normal: regular washing
Use this button to turn the washing machine on and off. If a set program
is not started within 5 minutes of turning the machine on, it will switch off
automatically.
Press this button to begin a wash program, or to pause / resume a
program that is currently in progress
Press this button repeatedly to set the desired wash program. You can
choose from the following options.
Press this button repeatedly to choose the required washing temperature.
You can select Cold, Warm or Hot.
If the hot value is not connected, please do not select hot or warm model.
The default warm temp is 35 dergee, and the hot model one is 45 degree.
Press this button repeatedly to choose Soak, Wash, Rinse and Spin.
Use this button to program a delay start to the wash cycle.Each pressing
can increase 1 hour for presetting time, and hold this button,time will
increase rapidly.
Heavy: to wash the coverlet, jeans and other big clothes
Air dry: to dry the tub
Gentle: for washing of wool or underwear
Speedy: to wash the slight dirty clothes
Use these buttons (Preset & Water temperature) simultaneously to
activate and deactivate the safety lock.
Use this button to select the appropriate water level according to the
volume of laundry.
A long pressing on “Water Level” will re-supply water untill the hand goes or the water level
reaches the warning level.
The user can not adjust the water level under Speedy or Air dry
Control Panel
All manuals and user guides at all-guides.com

Place the washing machine at
least 5cm away from the wall.
Alteration of adjustable foot
In order to prevent vibration during wash
operation, you can loosen level adjustment
knob and change the height of the adjustable
foot until the washing machine is stable, and
then tighten it. (The inclination angle of the
washing machine should not be more than 2
degrees)
Place the washing machine on a firm and level surface, use the level adjustable
knob to adjust the washing machine to be stable.
1.Take out the mice-proof plate. 2.The entrance is at back of the
bottom part.
3.Insert the noise-proof plate
into the base.
4.Lay down the washing
machine, fasten up two screws.
-4-
Insert the mice-proof plate into the washing machine base
Loosen Tighten
Level
adjustment knob
5cm
5cm
㜅∈
∈
ಲ
ᬊ
ⓖ⋫
⋫⍸
⍌⊵
࠽ԭᯊ䯈
乘㑺ᯊ䯈
ᓖᐌ䄺
ᱎ
㛑
⋫
ⳕ
∈
⋫
亢ᑆ
⋕Ṋ
ᖿ䗳
䕏ᶨ
⠽
ޚ
ߚ
ス䫕
ߚ
㜅∈
∈ಲ
ᬊ
ⓖ⋫
⋫⍸
⍌⊵
࠽ԭᯊ䯈
乘㑺ᯊ䯈
ᓖᐌ䄺
ᱎ
㛑
⋫
ⳕ∈
⋫
亢ᑆ
⋕Ṋ
ᖿ䗳
䕏ᶨ
⠽
ޚ
ߚ
ス䫕
ߚ
Installation
All manuals and user guides at all-guides.com
all-guides.com

Outlet:
Installation and connection of the inlet hose
Connection of the inlet hose
1.Select the appropriate type
1.Unscrewing the part “a” from the water faucet.(As figure 1)
2.Respectively attach the water inlet hose to the water faucet.(As figure 2)
3.Run water through both faucet and inlet hose,into a bucket or laundry tub,to get
rid of particles in the water line that might clog the inlet valve screen.
4.Attach the hose connected with the water faucet to the water inlet valve.(As figure 3)
5.Check for leak
1)Swing the water inlet hose gently to confirm if it’s suitable.
2)Turn on the water faucet and check for leak.A small amount of water might enter the washer.
You will drain this later.
Do not overtighten.Damage to the valve can result.
Note:
Do not overtighten.Damage to the valve can result.
Note:
of outlet as shown in the figure.
2.End of outlet spout should be more than
10mm, or the connector cannot be assembled.
3.Water leakage is
possible from here.
All manuals and user guides at all-guides.com

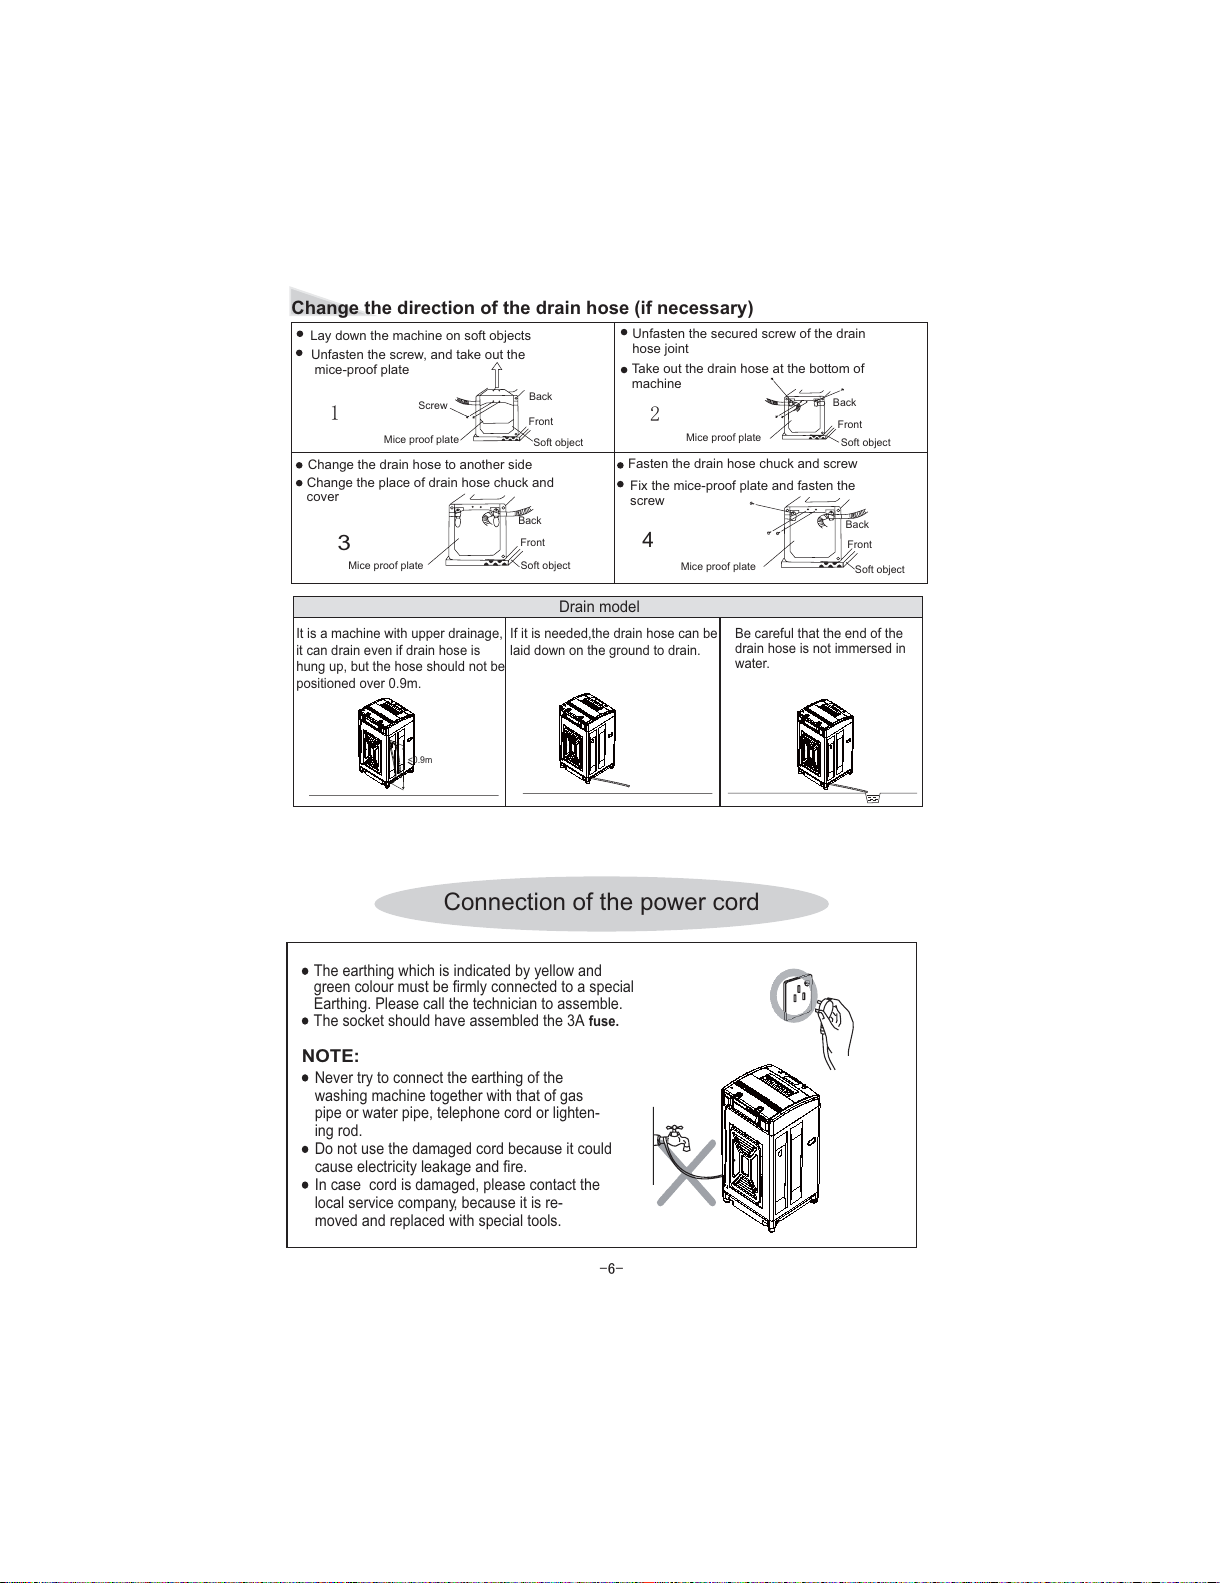
It is a machine with upper drainage,
it can drain even if drain hose is
hung up, but the hose should not be
positioned over 0.9m.
If it is needed,the drain hose can be
laid down on the ground to drain.
Be careful that the end of the
drain hose is not immersed in
water.
The earthing which is indicated by yellow and
green colour must be firmly connected to a special
Earthing. Please call the technician to assemble.
The socket should have assembled the 3A
fuse.
Never try to connect the earthing of the
washing machine together with that of gas
pipe or water pipe, telephone cord or lighten-
ing rod.
Do not use the damaged cord because it could
cause electricity leakage and fire.
In case cord is damaged, please contact the
local service company, because it is re-
moved and replaced with special tools.
NOTE:
Drain model
<0.9m
Connection of the power cord
Change the direction of the drain hose (if necessary)
Lay down the machine on soft objects
Unfasten the screw, and take out the
mice-proof plate
1
Unfasten the secured screw of the drain
hose joint
Take out the drain hose at the bottom of
machine
2
Soft object
Front
Back
Front
Soft object
Mice proof plate
Change the drain hose to another side
Change the place of drain hose chuck and
cover
3
4
Fasten the drain hose chuck and screw
Fix the mice-proof plate and fasten the
screw
Back
Front
Mice proof plate Soft object
Back
Front
Soft object
Mice proof plate
Back
Screw
Mice proof plate
All manuals and user guides at all-guides.com

Preparation
5.Put suitable wash load into the
inner tub.
3.Plug in the power cord.
7.Add suitable detergent according
to the wash load volume into the
detergent box or washing tub
directly.
6.Close wash lid completely. (or
else, it will not spin and give
alarm)
1.
2.
Connect the water inlet hose
to the tap.
Turn on the tap.
1.Power switch
Press the power switch to turn on the washing machine.The default indicator will light on.
Method
İ90cm
4.I
into the hook shelf, and hang the
drain hose over a drain outlet.
nsert the end of the drain hose
Operation
All manuals and user guides at all-guides.com

-8-
3.Water Temperature Selector
2.Washing Program Selector
The model has 6 programs to fit for different clothes quanlity. The default program is “Fuzzy”.
If other program is needed, you can press Program button to choose.
We recommend that you select 'Normal' program for a full load (7kg) of normally soiled clothes,
select 'soak' and set warm water level to 10.
After power on, the model of water temperature is Cold Water , if your needed water temperature
is Hot Water or Warm Water, pressing Water Temperature is available.
Wash
Rinse
Spin
4.Washing Process Selector
After power on, the default process is Wash, Rinse and Spin.
If needed, press the PROCESS button to choose the “Soak”process
(to keep the best wash ration of the wash powder and detergent)
Press the PROCESS button continuously, 4 process will circulate as figure below
Wash Wash
Rinse
Rinse
Spin Spin
Soak
Wash
Rinse
Spin
All manuals and user guides at all-guides.com

5.Water Level Switch
Choose the water level according to the wash loading, the table below offers the quantity of the
detergent or wash powder according to the wash loading(Only for reference)
6.Preset selector
1:Select automatic process or edit process by yourself
2:Press“PRESET”button continuously,the indicating window indicates the time needed for washing.
(Example:if the preset time is 8 hours,press the button till the window indicates 8.)
-9-
Water
Level WashLoading Water
Volume
Normal wash
powder
Concentratedwash
powder
40g/30L 25g/30L
9-10 5.5-7kg 62L 83g 52g
57L 76g 48g
7-8 4–5.5kg 52L 69g 43g
47L 63g 39g
5-6 2.5-4kg 42L 56g 35g
37L 49g 31g
3-4 1-2.5kg 32L 43g 27g
28L 37g 23g
1-2 Less than
1kg
24L 32g 20g
20L 27g 17g
3:Please close the wash lid completely.(otherwise the machine will give alarm)
4:The washing machine works according to the program you have set and shows the left time as you preset.
7.Press Start/Pause button,start the washing machine
The water inlet valve open, water come into the tub, when the water level reach to the set level, the
washing machine will start.
Please do not open the top lid when the machine has started, especially in the spinning, to prevent
the danger.
If you want to change your wash program after it has started, you can do so by pausing the current
washing cycle by pressing the Start/Pause button. You can then select your desired wash program.
At last press this button to resume washing with the new wash cycle.
Stand by Start Pause
All manuals and user guides at all-guides.com
all-guides.com

8.Wash over
1The Buzzer will alarm after the program finish, and it will power off
Unplug the power cord.
2
Program Time Table
wash 16 spin 3 wash 3 spin 3
w
ash 3 spin 4 44
wash 18 spin 3 wash 3 spin 3
w
ash 3 spin 3
w
ash 3 spin 5 57
wash 3 spin 2 wash 2
w
ash 2 spin 3 26
wash 3 spin 2 wash 2 spin 2 13
spin11 wash 16 spin 10 89
spin 38 40
TOL
Program
Fuzzy
Heavy
Gentle
Speedy
Normal
Air dry
Wash Rinse
1st Rinse 2nd Rinse 3rd Rinse
Spin (min)
Inlet water
Inlet water
Inlet water
Inlet water
drain water
drain water
drain water
drain water
Spin 2
soak 20
wash 24
Computer sequencer saves up 6 kinds of washing programs, all kinds of programs are shown as washing
process form.
In soaking process, washing is that take clothes moving soak for some time, then begin to work as gently
wash program, so as to pre-wash fully and improve the clean ratio.
Fuzzy means the machine can set the water level automatically according to the loading, if
other water level is needed,you can press Water level button. But if there is some water in the
tub before pressing Start/Pause, this function will lose effectiveness, and water level is 5.
Under the fuzzy function, the water level maybe improper if you put the clothes into the tub
after pressing START/STOP button.
If pressing START/STOP button is later than pressing Process, Program or Water level button,
it will cancel the fuzzy function automatically.
Memory means if the operation is interrupted for cutting off electricity,and pressing the
START/PAUSE button in 10 minutes after the power returns to normality, the machine can
continue the unfinished operation. Beyond 10 minutes and do not press START/PAUSE button,
the machine will turn off automatically.
Fuzzy function and memory function
All manuals and user guides at all-guides.com

Safety warning
All manuals and user guides at all-guides.com

Do not switch on when the
water pressure isn't within
0.03MPa-0.85Mpa, so as to
protect the inlet valve.
Make sure the lid is closed
especially during spin.
Maintenance
Clean the filter in the inlet valve
Clean the filter in the inlet valve regularly in order to prevent it from clogging
1.First unplug the power cord .
2.Take off the inlet hose and clean the filter with a brush.
The appliance is not intended
for use by young children or
infirm persons unless they have
been adequately supervised
by a responsible person to
ensure that they can use the
appliance safely. Young
children should be supervised
to ensure that they do not play
with the appliance.
If the appliance is supplied from
a cord extension set or electrical
portable outlet device, the cord
extension set or electrical portable
outlet device must be positioned
so that it is not subject to
splashing or ingress of moisture.
The power cord must be
unplugged after use. Pleas use
low foam powder detergent.
The appliance is to be connected
to the water mains using new
hose-sets and that old hose-sets
should not be reused.
The highest point of the drain
hose must be within 90cm above
floor level.
İ
90cm
All manuals and user guides at all-guides.com

Malfunction phenomenon
Start the washing machine from Rinse
Process, the washing machine does
not input the water
The wash process changes from Spin
to Rinse
The control button is useless to touch
spin delay
The washing machine will start from the spin process
in order to spin out the water and detergent from the
clothes, then input the water (if there is water in the tub
it will drain out the water first)
When the clothes are not even or are on a single side
of the tub, the washing machine will input the water and
make the clothes balance and even.
If want to change the PROCESS after the washing
machine started, please touch the Start/Pause button
to reset the process
Trouble Shooting
Reason
Before maintenance
Problem Checklist
Does not work
Is electricity present?
Is the tap opened?
Is the plug loose, or fuse broken?
Turn on the power or start button?
Fail to fill water
Is the tap opened?
Is the drain hose frozen?
Is the water supply cut?
Is the water inlet valve blocked?
Body Maintenance
Clean the lint filter
Note:
Clean the surface of the washing machine with a soft
cloth regularly.
After washing starched or bleached laundry, the inner
tub must be clear ,or deposit will appear.
The washing machine will delay 15 to 60 seconds to enter
spin process after drain or after select spin process only
1. Pully upward to remove
the filter assy's.
2. Take the filter from
the filter cover.
3. Clean and rinse
it thoroughly.
4. Reinstall the filter.
All manuals and user guides at all-guides.com

Note: When the loading is too much or too less, or the washing machine is not on the level
surface, the self-exam mode will come out often, which will increase the rinse times.
Please open the lid when the washing machine alarm, and get rid of the problem according
to the above sheet, then close the lid ,the machine will work again.
Trouble Shooting Method
For some trouble, the machine buzzer will ring and alarm, and the indicator will flash.
Troubles Indicator Light
No indicator
No indicator
No indicator
Possible Cause Solution
Breakdown
No indicator
The plug is badly connected
to the socket or the switch is
not activated.
The socket is dead or the
fuse is broken.
The current process is lost
for power failure
The voltage is too low or too
high
Connect the plug properly or
activate the switch
Contact the authorized
technician.
Reuse only when power failure
is eliminated
Remove the plug and reuse it when
the voltage comes to normality.
(
(
(
(
Standing
drain
A conflict
between the
tub and the
cabinet
during
spinning
Insufficient
water supply
Unavailable
preset
function
(
1.The drain hose is blocked;
2.The drain hose is positioned
over 90cm height.
Check the drain hose,open the
lid and then close it to continue
drain process.
The clothes are not laid evenly
in the tub.The machine will try
to make a automatic check
and ajustment for 2 times,or if
nothing available ,an alarm
will be given.
Open the lid,distribute the clothes
evenly in the tub and then it.
The tap is close,water supply
is cut off or water pressure is
too low,so the water fails to
reach to the desired level for
quite a long time.
Open the tap or use the machine
after the water pressure comes
to normal.Open the wash lid,
close it and restart to input water
.
The lid is unclosed during
preset process(the process
will pause and an alarm will
be given)
Close the lid.
Abnormal
water level
sensor
The sensor fails for short or
open current,etc.and an alarm
will be given.
Contact the authorized
technician.
(
(
Unstoppable
Memory chips
break down
inlet or
automatic
drain
Abormalities occur in PCB,
It can not be read or wrote.
inlet valve or water level
sensor
Cut off the power after draining ,
and try to contact with the
authorized technician.
Fail to power
off or power
on
Unending process
or no indicator PCB is broken. Contact the authorized
technician.
Contact the authorized
technician.
All manuals and user guides at all-guides.com
all-guides.com

Wiring diagram
Specifications
560mm
580mm
950mm
Rated voltage
Wash/spin capacity
Rated frequency
220~240V
7.0 kg
50Hz
Net weight
560mmX580mmX950mm
36.5kg
Dimension
B=Blue
BL=Black
BR=Brown
G=Green
GR=Gray
W=White
Y=Yellow
O=Orange
PI=Pink
R=Red
LB=Light Blue
P=Purple
LP=light purple
Motor
&
/
Microcomputer Programmer
W
W/
BL
W/
R
W
Hot water valve
Cold water valve
All manuals and user guides at all-guides.com

Before making a claim under warranty, please refer to your user/installation
manual to ensure that you have followed correct operating procedures of your
product, and refer to the trouble shooting section to assist solving any problems
you may have.
Australian Customer Service
GAF Control (Sales) Pty Ltd
P.O Box 19
Altona North Victoria 3025
Phone: 1300 659 489
Hours: 9am-5pm (EST) Mon-Fri
www.gafcontrol.com.au
All manuals and user guides at all-guides.com
Other manuals for HTLW7
1
Table of contents
Other HELLER Washer manuals