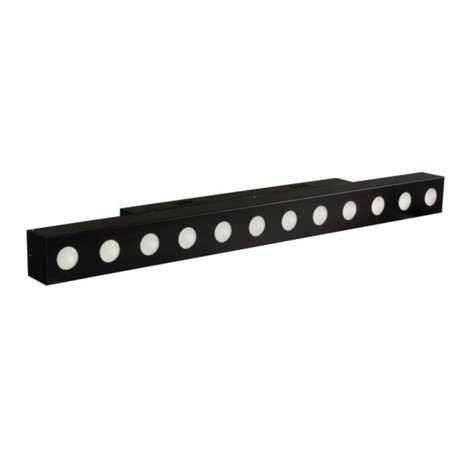
HELLO LITE HW-01 Technical manual

Operation Instruction for
the Stage Special Effect
Spark Machine

This instruction contains important information. Please read the instruction
before making the machine.
Every time you have finished adding consumables, please cover the lid
immediately. It is strictly forbidden to spark without the lid. When you ignite the
consumables carelessly, please use sand to extinguish them. You can't use
water. If the consumables in the bin are not used up, please pour them out and
seal them with bags for the next time.
Attention!
The continuous sparking time of the machine can not exceed 30 seconds.
Otherwise it will affect the service life of the machine. If you want to
continue using, you need to pause for a few seconds before sparking
flowers.
Eye Protection Warning!
Remind you to protect your eyes during machine operation.
Installed in warning:When applying power supply, there is dangerous
voltage and electric shock risks in the machine. Under no circumstances should
you try to open the machine or try to remove and adjust any parts installed in the
machine. The machine must be repaired and opened by qualified technicians.
Please use it carefully and don't wet the machine.Keep the machine and
controller dry. Do not use them in unshielded places on rainy or snowy days.
Please prevent anything from entering the spark outlet. If it happens, do not
continue to operate the machine and remove obstacles first.
When installing, please prevent the machine from falling off "Damage may
occur"
Please check the nozzle before using, and confirm whether there is any
particle accumulation. If there is, please invert the machine to clean up the
particles.
Store the consumables in a dry place without direct sunlight, away from the
source of fire.
User's Manual of Stage Special Effect
Spark Machine

Safety concerns
1. Unauthorized maintenance is prohibited, otherwise serious accidents may
occur.
2. Keep dry and do not use in rain or snow.
3. After adding consumables or using, ensure that the opening lid is well
covered.Accidental combustion of composite titanium can only be extinguished
with sand.Composite titanium should be stored in a dry and sealed environment.
4. Keep the crowds and flammable materials at a safe distance of 3 meters to
ensure that no objects will be touched after the sparkle flashes out.
5. Before and after performances, the residual composite titanium must be
cleaned at the nozzle. After each performance, the residual composite titanium
must be checked.If so, please clean it up, otherwise it will affect the effect and
even damage the machine.
6. Up to six machines are connected in series. Over-connection may cause
damage or even fire.
7. For better heat dissipation, do not block the intake and exhaust ports.
8. No object should be used to seal the nozzle.
Machine parameter
Model number
HW-01
Jetting height
1-5 meter
Operating temperature
-10℃-50℃
Power power
600w 3.8A (110V )/ 600w 1.9A
(220V )
Fuse fuse
110V /10A , 220V /6.3A
Control control
Remote control/DMX512
Net weight suttle
5.5kg
Volume Dimension
190mm*184mm*245mm
Maximum number of tandem
stations
Maximum number of series
6
Warranty period
1 year
Packaging package
Packing in cartons or 1 pack in 2/4/6
air boxes
Carton or 1 to 2/4/6 air case

Material parameters
Consumables
Titanium composite article
Net weight suttle
45 g/200g
Time time
It can take 4-15 minutes.
It can take 4-15 minutes
Packaging package
Vacuum package
Operation steps:
1.When the machine is not connected to DMX, the
machine automatically preheates after starting (when
DMX signal is connected, CH1 channel value 240-255 is
ready). After preheating is completed, the indicator
READY starts to flicker to indicate that the machine is
preheating and the temperature is not up to the preset
temperature during the preheating process. The
indicator READY stops flickering to indicate that the
temperature has been heated to the preset temperature
and can start sparking, press the key No.1-6 of the
remote control button, the extension device opens for 8
seconds, press again halfway, the machine suspends
operation, the machine displays the key No.1 of the
remote control corresponding to F01, the key No.2 of
the remote control corresponding to F02 on the
machine, the key No.3 of the remote control
corresponding to F03 on the machine, the key No.4 of
the remote control corresponding to F04 on the
machine, and the key F05 on the machine
corresponding key No.5 of the remote controller, and

the corresponding key of F06 is No. 6 on the machine
display (the range of the address code of the remote
controller is adjustable from 1 to 6).
2.Preheating mode:No. 1 green indicator READY
flickers, No. 4 red indicator HEAT lights up, indicating
that it has entered the preheating state, the preheating
is completed, No. 1 indicator READY is always on, No. 4
indicator lights out HEAT.
3.Connect 512 console:No. 2 blue indicator DMX is on,
representing 512 communication, when remote control
invalid CH1 channel value 240-255 ready, channel value
stops when pushed to 0-10 stop.
Fault:When the indicator No. 3 FAULT flickers, the
digital tube shows the corresponding fault code:
ER2 Temperature Sensor Fault
ER3 Box Excessive Temperature
ER4 Body tilt protection
ER5 Core Excessive temperature
ER6 Heating Failure
ER7 Temperature Abnormal Alarm
4.Turn off:Press the button 12 of the remote controller,
COL appears and wait for 2 minutes before power off. (If
DMX signal is turned on, pushCH1 channel value to
0-10 to stop running.)
5.Remarks:After changing 512 address.Operation 512
console dialing needs to select 3-bit lever according to
address
III. Instructions for Machine Display and Key
Operation

1. Contents displayed in the machine display area:
1)F01, F02, F03, F04, F05, F06 (when the remote
control is in control state, the default display area
shows F1-F6 as the address code of the remote control
is adjustable).
2)DMX512 Address (When connecting to DMX, the
default display area shows that DMX512 Address 1-510
is adjustable corresponding to DMX1-510 Address
Code)
3)Total running time
4)Case temperature
5)Current temperature
2. Content of Function Number
1). P00 - Device parameter setting
2). PO1-DMX512 Address Settings
3). P02-gear adjustment settings (function number selection
parameters 1, 2, 1 represent the indoor gear, 2 represent the
outdoor gear.User-friendly for indoor and outdoor two
scenarios.
4). When the device is powered on and two keys are pressed
at the same time, it can enter the temperature setting
interface and set the target temperature. After the setting is
completed, the device needs to be restarted before it takes
effect.
Key operation instructions:
1.After powering on the machine, the display interface
shows:F01 represents the device number and can switch
display content by pressing left and right keys.
2.Long press left key, you can enter function number, P00,

P01, P02. At this time, you can switch function number by
pressing left and right key.
3.Long press left key to enter the function number parameter
setting interface, short press left key to increase the function
number parameter, short press right key function number
parameter to reduce, after setting is completed, often press
left key to confirm.
Display of parameter
function number
P88
Normal Digital Display
Up to three decimal-free
points
Alarm display
Er0-9
Data Overflow Display
9.9.9.

3. DMX512 address parameters
512 channel
value
function
CH1
0 - 10
Stop running
11 - 179
Emergency stop
180 - 199
Clear material
200 - 219
Protocol
switching
220 - 239
Wireless
machine
240 - 255
Operation
CH2
0-255
Density control
increment
CH3
0-255
Height control
increment
IV. Notes for 512 Address Operation:
1. Each extension occupies three channels
1. Set 4, 7, 10 with interval of 3

2. Actual Operating Channel 1 goes to the Operating
Address Code.
3. Channel 2 is a density channel.
4. Channel 3 is height channel
Remote Controller Description
Before using the remote control, the antenna should be pulled out to achieve the
best control effect.
1 KEY:No. 1 address number on/off, press No. 1 key, the machine
starts, press No. 1 key again, the machine stops; after pressing
No. 1 key, the machine runs for 8 seconds by default.
2 KEY: No. 2 address number on/off, press No. 2 key, the machine
starts, press No. 2 key again, the machine stops; after pressing
No. 2 key, the machine runs for 8 seconds by default.
3 KEY: No. 3 address number on/off, press No. 3 key, start the
machine, press No. 3 key again, stop the machine; press No. 3
key, the machine runs for 8 seconds by default.
4 KEY: No. 4 address number on/off, press No. 4 key, start the
machine, press No. 4 key again, the machine stops; press No. 4
key, the machine runs for 8 seconds by default.
5 KEY: No. 5 address number on/off, press No. 5 key, machine
start, press No. 5 key again, machine stop; press No. 5 key,
machine runs for 8 seconds by default.

6 KEY: No. 6 address number on/off, press No. 6 key, the machine
starts, press No. 6 key again, the machine stops; after pressing
No. 6 key, the machine runs for 8 seconds by default.。
7 KEY: Spark 1.5 seconds from 1-6 address once, time
interval is 0.5 seconds, cycle is 3 times, 1.5 seconds for
extension 1, 0.5 seconds for extension 2, 1.5 seconds for
extension 2, and 0.5 seconds for extension 2. Until
extension 6 sparks 1.5 seconds, waits 0.5 seconds;Then
start on the 1st and cycle three times.
8KEY: Spark 1.5 seconds from 6-1 address once, time
interval is 0.5 seconds, cycle is 3 times, spark 1.5 seconds
from extension 6, wait 0.5 seconds, spark 1.5 seconds from
extension 5, wait 0.5 seconds. Spark 1.5 seconds until
Extension 1, wait 0.5 seconds;Then start from No. 6 and cycle
three times (notice the commands here, for example, start
sparking No. 1, start sparking No. 2 0.5 seconds after No. 1 start,
then start No. 3 0.5 seconds, then start No. 4 0, 5 seconds, then
No. 1 has sparked 1.5 seconds, closed, and so on).Not required
for No. 1 to be sparked until No. 1 runs for 1.5 seconds and then
starts No. 2 in 0.5 seconds.
9 KEY: Spark 1.5 seconds, 1 second interval, 3 cycles, 1-6 spark 1.5 seconds, 1
second interval, 3 cycles, 1-6 spark 1.5 seconds, 1 second interval, 3 cycles.
10 KEY: Overall spark 30 seconds, 1-6 spark 30 seconds (no
matter which address, can receive sparking).
11KEY: The emergency stop command, all the machines receive
the command for stopping the sparking action and return to the
standby preheating state.
12 KEY: Cleaning, soft shutdown, press soft shutdown, stop all actions,
extinguish all indicators, only the cooling fan in work, the fastest reversal of the
first feeding, the fastest speed of the second feeding motor, the fastest speed of
the fan, heating stop, start timing, timing time to the extension execution
mechanism all stop, No. 1-6 shutdown, stop all actions, extinguish all indicators.
Only the cooling fan is working. Please press No. 12 key before cutting off the
power supply. Soft shutdown is needed for cooling. The temperature of the
display frequency will drop to about 250 degrees for about 6-8 minutes. It is
strictly prohibited to pull out the point source without starting No. 12 key. This will
damage the machine.

Operating panel instructions
1:Connect the power input cable, press the ON key of the main switch
of the power supply, the preheating indicator HEAT will turn on the red
light, READY indicator flashes, indicating that the preheating of the
machine takes about 5 minutes. In the process of preheating, the key of
the device to start any remote controller is invalid. When the preheating
reaches the preset temperature of 550 degrees in about 5 minutes, the
machine is in a constant temperature state. At this time, the HEAT
indicator lights out. Indicator READY lights green, indicating that heating
to the preset temperature can be operated according to the relative keys
on the remote control, below the preset temperature system will
automatically heat to the preset temperature.
2:DMX indicator and DMX input and output:When the DMX indicator is
not on, it indicates that the device is in the remotecontrol mode. When the
DMX is turned on, the DMX indicator will turn blue.
3: When in remote control mode (DMX indicator is not on) the system
defaults to F01-F06, which shows the address code controlled by the
remote controller. Please operate the machine according to the
instructions of the remote controller. Short press the minus-key on the left
most side to display the DMX address code 1-510 once, then short press
the minus-key on the left most side to display the total running time of the
device once, and then short press the minus-key on the left most side to
display the total running time of the device. - The temperature in the case
is about 25-30 degrees at one time, and then short press the minus sign on
the left side. The temperature in the core is about 550 degrees at one time.

The parameter confirmation needs long pressing the left key, and long
press the right key for the return operation.
4: Long press the minus sign on the left most -, the system will display P00
(P00 represents the address code of the remote controller, the parameter
range is 1-6 adjustable). When the display displays P00, then long press
the minus sign on the left frequently -, enter the adjustment mode of the
address code parameters of the remote controller, adjust the parameters
with the left and right keys, confirm the parameters by long pressing the
left key, and long press the right key for the return operation.
5:Function number P01 parameter adjustment (P01 means DMX address
code settings), long press the left key to display P00, then long press the
left key to display P01, then long press the left key to enter the DMX
address code settings, DMX address code parameter adjustment range is
1-510 adjustable, long press the left key for parameter confirmation, long
press the right key for return operation.
6:Function number P02 parameter adjustment (P02 means adjusting
indoor and outdoor parameters of the spark machine),long press the left
key to display P00, then short press the right key to switch to the P02
display state, then long press the left key to enter the parameter
adjustment mode, P02 parameter range 1-2 can be adjusted, 1 means
indoor use parameters, 2 means outdoor use parameters, parameter
confirmation needs long press the left key, long press right key for return
operation.
Warranty Notes:
1. Thank you sincerely for purchasingour products. As our customers, you
will receive the high quality after-sales service provided by our company.
2. This product is warranted for one year. For example, within one week,
due to quality problems, the company can replace the same type of products.
3. During the warranty period, our company will provide free maintenance
service for customers due to hardware failure caused by the product itself.
Please do not disassemble and repair the machine by yourself.

4. Any one of the following circumstances does not fall within the scope of
warranty service:
1. Damage caused by external reasons or failure to operate in
accordance with the instructions;
2. The product has been disassembled, modified or repaired without
authorization;
3. Damage caused by improper handling, management, use and
maintenance or man-made damage by users;
4. Damage caused by incorrect installation or use of users;
Products not covered by the warranty will provide fee-based
maintenance services.
5. When repairing is needed, please show the purchase certificate and
this warranty card. Otherwise, it will not be accepted.

Warranty card
Product name
Product
number
Date of
purchase
Contact
address
Contact
number
User
Feedback
Information
Failure
Disposal
Repairing
personnel
Reparing date

Table of contents
Other HELLO LITE Lighting Equipment manuals
