HemoCue Glucose 201 User manual

HemoCue Glucose 201 with Plasma Conversion
Operating Manual

2
Table of Content
HemoCue®Glucose 201 system ............................................................................................................... 3
Components ............ ...................................................................................................................................... 4
Start up .......................................................................................................................................................... 6
Audio signal .................................................................................................................................................. 8
Determination ............................................................................................................................................... 10
Capillary blood.............................................................................................................................................. 10
Venous and arterial blood.. ........................................................................................................................... 18
Maintenance............. ..................................................................................................................................... 20
Daily maintenance ........................................................................................................................................ 20
Optical parts ................................................................................................................................................. 22
Troubleshooting Guide ................................................................................................................................ 24
Specifications ........... .................................................................................................................................... 27
US

3
HemoCue Glucose 201 with Plasma Conversion Operating Manual
The HemoCue®Glucose 201Analyzer with plasma conversion provides laboratory
quality analysis of glucose in whole blood, easily, quickly and conveniently.
Utilization of a conversion factor allows the measured whole blood result to be
displayed as a plasma equivalent glucose value. Capillary, venous or arterial
whole blood may be used.This manual provides the basic instruc-
tions for routine use as well as technical specifications. Further
information may be obtained from HemoCueAmerica or your
local distributor.
All system components are designed and manufactured to provide
maximum safety. Any other use of the system may impair the safety.

4
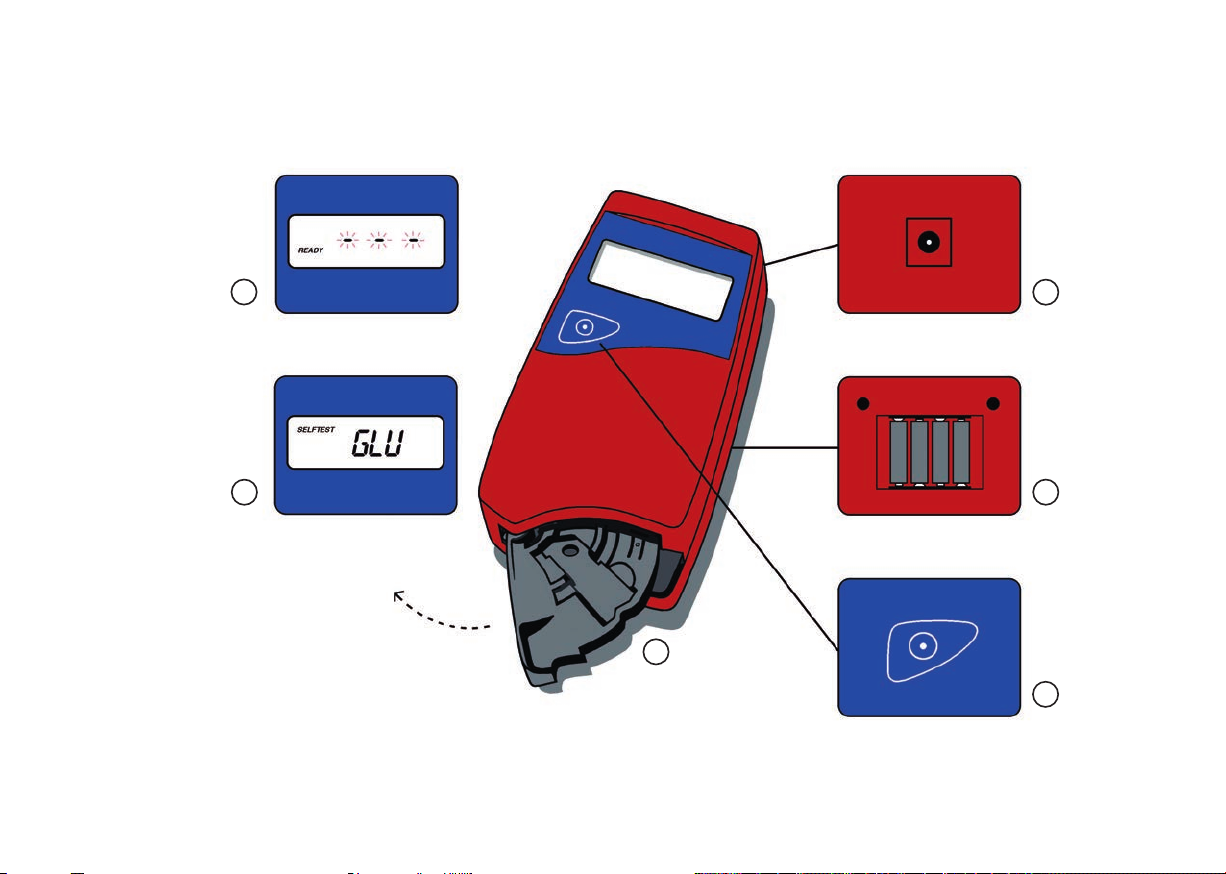
Components
4
2
1
QRG
3
5
6

5
1. The HemoCue Glucose 201 Analyzer*
2. AC adapter.**
3. 4 type AA or R6 batteries, 1.5 V.***
4. A vial of HemoCue Glucose 201 Microcuvettes. Individually packaged
HemoCue Glucose 201 Microcuvettes.***
5. HemoCue Glucose 201 Operating manual and Quick Reference Guide.
6. HemoCue Cleaner.
The HemoCue Glucose 201 Analyzer and power adapter are delivered in a carton.
Open the carton on a stable surface and lift out the analyzer and the accessories.
Consult local environmental authorities for proper disposal of batteries.
* Do not open the cover of the analyzer.
Note: The warranty is voided if the analyzer has been opened
** Only use adapters as listed under Specifications.
*** Not included.
US
6
Start-up
1a
2
3
4
5
1b

7
1a. If A/C power is available, plug the power adapter into the power inlet at the
back of the analyzer.
1b. If A/C power is not available, install 4 type AA batteries in the battery compartment
as shown.
2. Pull the cuvette holder out to the loading position.
3. Press and hold the on/off button until the display is activated.
4. The display shows ”SELFTEST” and the version number of the program, after
which it will say ”GLU”. During the ”SELFTEST” the analyzer will automatically
verify the performance of the optronic unit.
5. After 15 seconds the display will show ”READY” and three flashing dashes.
This indicates that the HemoCue Glucose 201 Analyzer is ready for use.
To turn the analyzer off, press and hold the on/off button until the display is turned off.
US

8
1
2a
2b
3
Audio signal

9
To activate an audio signal which will indicate when the result is displayed,
follow the instructions below.
1. Check that the analyzer is turned off. The display should be blank. Pull the cuvette
holder out to the loading position.
2a,b. Press and hold the on/off button until the display shows a bell in the upper right
corner. The audio signal is now activated.
3. Wait until the analyzer display says ”READY” before performing an analysis.
To turn off the audio signal follow steps 1–3 until the bell in the upper right corner
disappears. The analyzer is delivered with the audio signal turned off.
US

10
Measuring Capillary blood
12
34

11
Note: In cases of severe hypotension or peripheral circulatory failure, glucose measure-
ment from capillary samples may be misleading. In such circumstances it is recommen-
ded that venous or arterial whole blood be used.1
1. After start-up, the cuvette holder should be in the loading position. The display will
show “READY” and three flashing dashes.
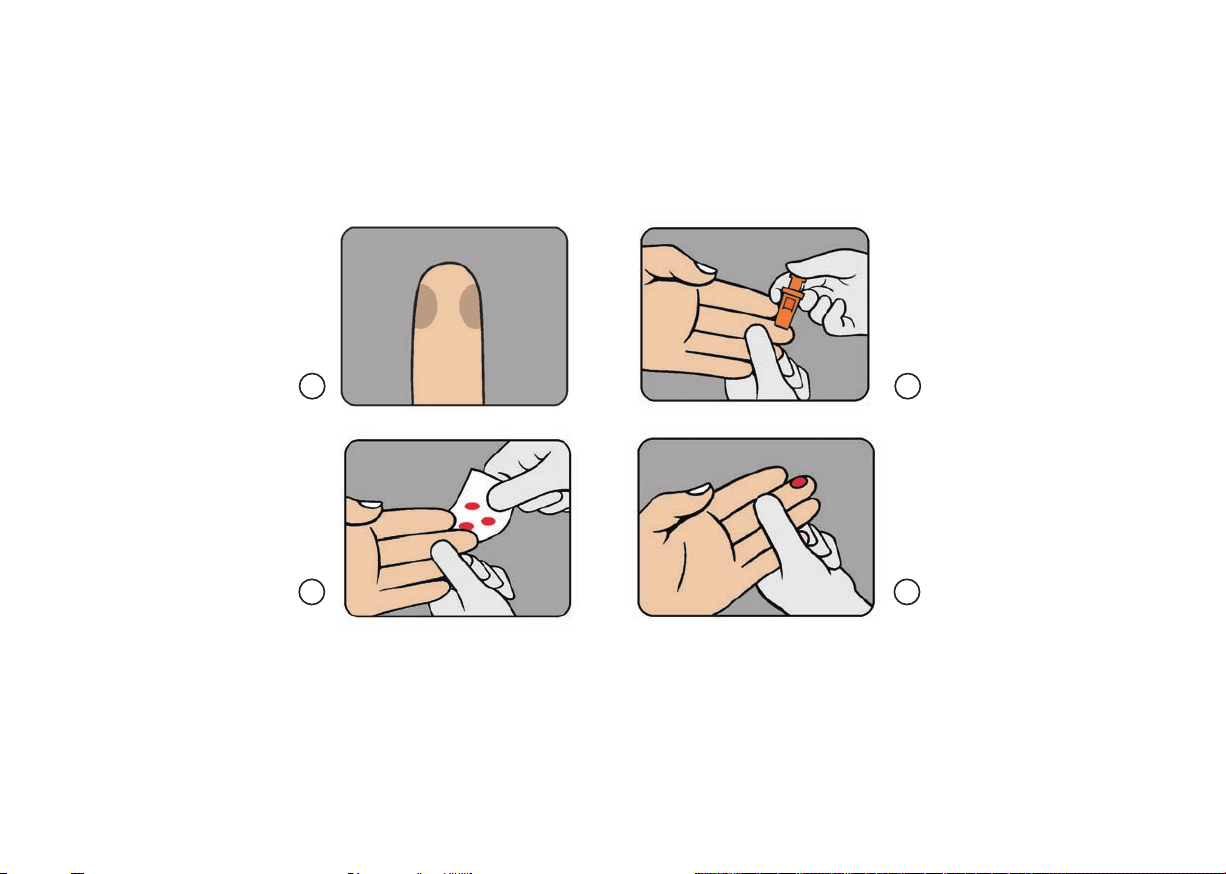
2. Make sure the patient’s hand is warm and relaxed. Use only the middle or ring
finger for sampling. Avoid fingers with rings on.
3. Clean with disinfectant and allow to dry or wipe off with a dry, lint free tissue.
4. Using your thumb, lightly press the finger from the top knuckle towards the tip.
This stimulates the blood flow towards the sampling point.
US
12
8
7
65

13
5. For best blood flow and least pain, sample at the side of the fingertip,
not in the center.
6. While applying light pressure towards the fingertip, puncture the finger
using the lancet.
7. Wipe away the first 2 or 3 drops of blood.
8. Re-apply light pressure towards the fingertip until another drop of blood
appears.
US
14
910
11

15
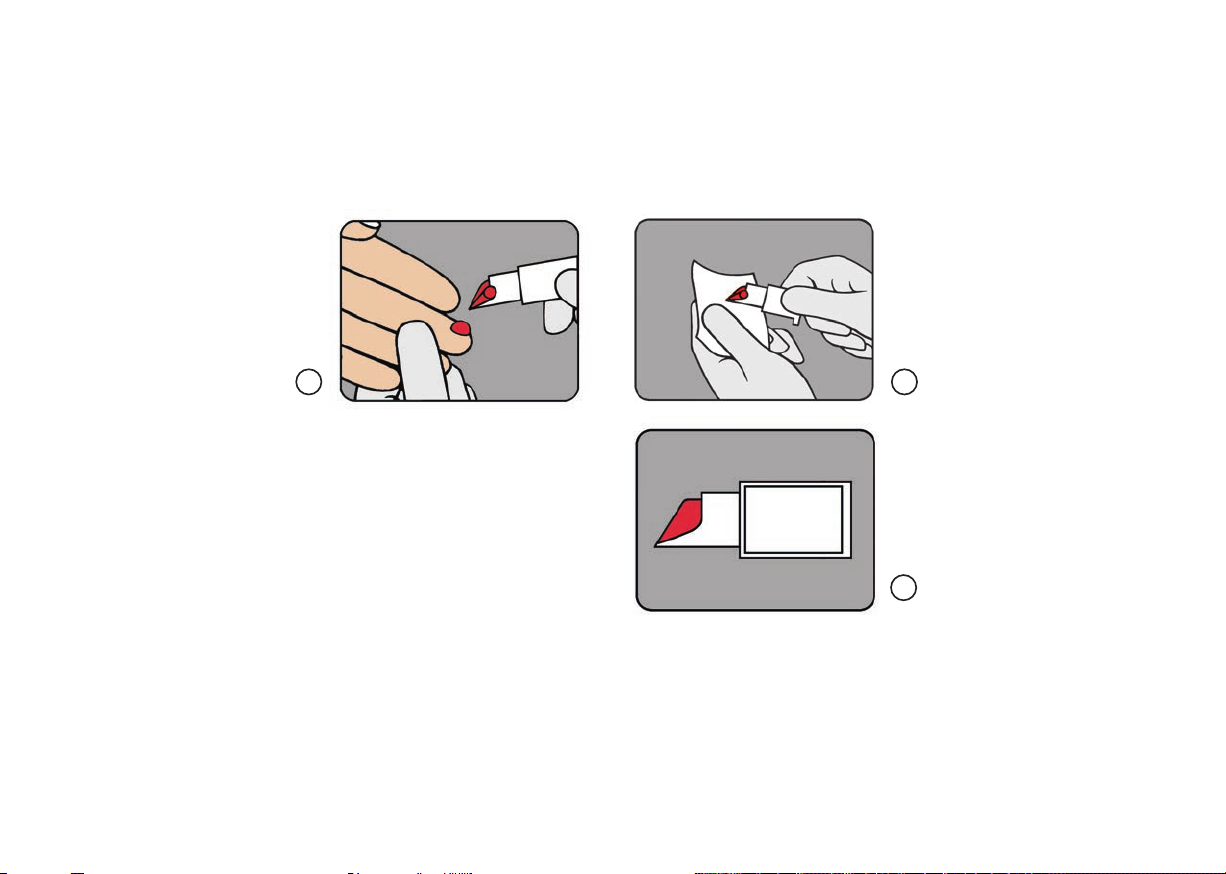
9. When the blood drop is large enough, fill the microcuvette in one
continuous process. The microcuvette shall be completely filled. Do NOT
refill!
10. Wipe off excess blood from the outer surface of the microcuvette with lint
free tissue, being careful not to touch the open end of the microcuvette.
11. Look for air bubbles in the filled microcuvette. If present, take a new sample.
Small bubbles around the edge can be ignored.
Note: If a second sample is to be taken from the same fingerstick, it is important
that this should be done after the first sample has been read. Wipe away the
remains of the first sample and take a second one from a new drop of blood.
US
16
14
15
12
14
13

17
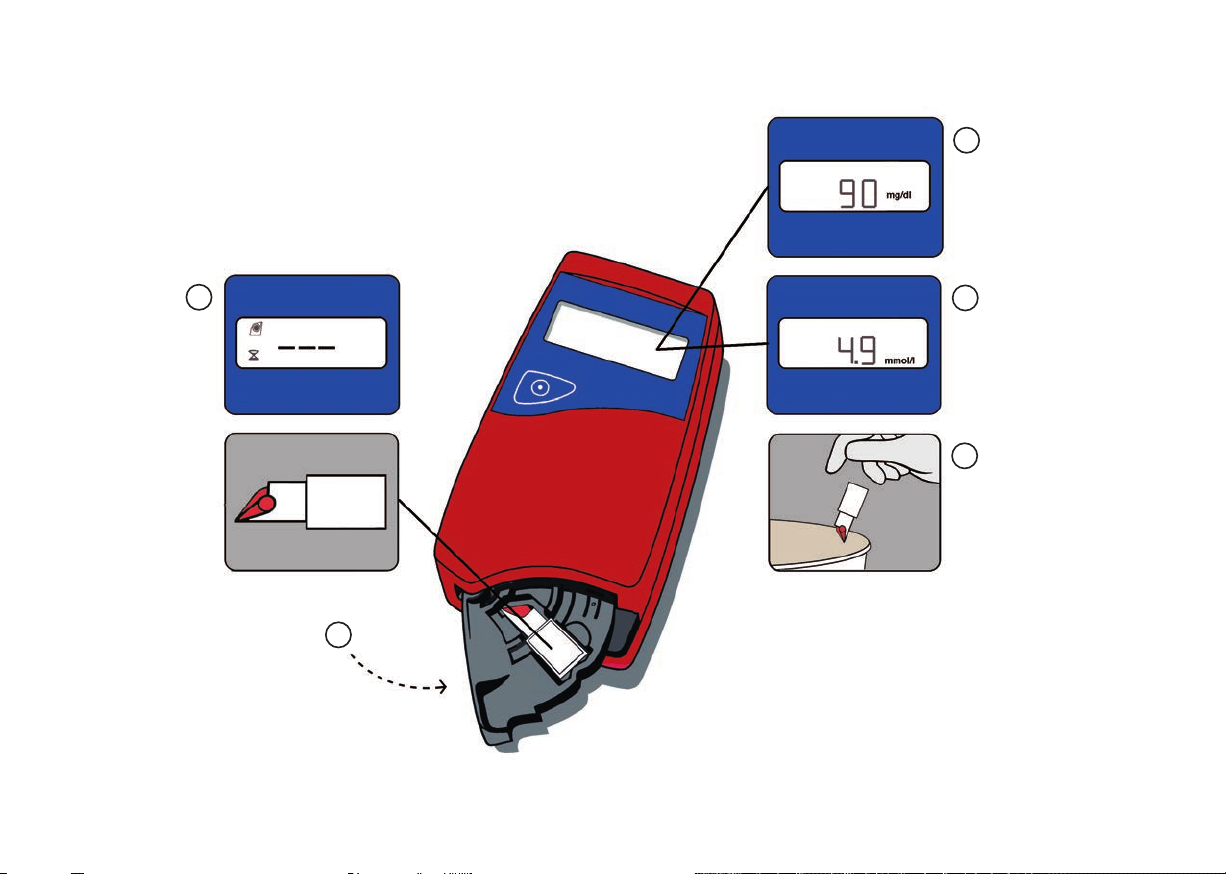
12. Place the microcuvette into the cuvette holder and start measurement as
soon as possible but no later than 40 seconds after filling the microcuvette
by gently pushing the cuvette holder to its measuring position.
13. During the measurement, “6” will be shown in the display.
14. After 40 –240 seconds, the glucose value of the sample is displayed. The
result will remain on the display as long as the cuvette holder is in the
mesuring position. When operating on battery power, the analyzer will
automatically turn off after approximately 10 minutes. The result can be
retrieved by pressing the on/off button until the display is reactivated.
DO NOT remeasure the microcuvette!
15. Although the reagents are present in the microcuvette in extremely low
quantities, consult local environmental authorities for proper disposal.
Always handle blood specimens with care, as they might be infectious.
US

18
3
12a 2b
4
Measuring Venous and arterial blood

19
1. The blood should be well mixed prior to performing the measurement.
2a,b. Place a drop of blood onto a hydrophobic surface, e.g., a plastic film, using a
pipette, a DIFF-Safe™or directly from a syringe.
3. Fill the microcuvette in one continuous process. The microcuvette shall be
completely filled. Do NOT refill! Wipe off excess blood from the outer
surface of the microcuvette with lint free tissue, being careful not to touch
the open end of the microcuvette.
4. Look for air bubbles in the filled microcuvette. If present, take a new
sample. Small bubbles around the edge can be ignored.
Perform the analysis as per steps 12–15 on page 17.
US

20
2
3
4
Maintenance Daily maintenance
1
Other manuals for Glucose 201
1
Table of contents
Other HemoCue Blood Glucose Meter manuals


