Herowear Apex 2 exosuit User manual
v.1 EN
USERS MANUAL

HeroWear® Apex™ 2 Exosuit User Manual (v3.0)
HeroWear Apex Exosuit User Manual
Applies to HeroWear Apex 2 exosuit components with the following SKUs:
Clutch
SK-00214
SK-00213
Shoulder Straps:
SK-00185
SK-00186
SK-00187
SK-00188
SK-00189
SK-00190
Thigh Sleeves
SK-00191
SK-00192
SK-00193
Bands:
SK-00223
SK-00224
SK-00225
SK-00226
SK-00227
SK-00228
SK-00229
SK-00230
SK-00231
SK-00232
SK-00233
SK-00234
SK-00235
SK-00236
SK-00237
SK-00238
SK-00239
Thigh Sleeve Anchors:
SK-00210
Belts:
A-AN01-121-11-BS
A-AN01-121-11-BM
A-AN01-121-11-BL
Chest Straps:
SK-00212
See the product label on each component for the SKU.
© 2023 HeroWear LLC, Nashville, Tennessee.
HeroWear is a registered trademark of HeroWear, LLC.
Apex is a trademark of HeroWear, LLC.

TABLE OF CONTENTS
PART 1: USER MANUAL................................................................. 7
3 About the Apex 2 User Manual ........................................................................ 8
4 Patents ...................................................................................................................... 8
5 Intended Use ........................................................................................................... 8
5.1 Task Selection and Users .................................................................................. 8
6 Cauon for Users .................................................................................................. 9
6.1 Medical Clearance .............................................................................................. 9
7 Apex 2 Support Personnel ................................................................................. 10
7.1 Cautions for Apex 2 Support Personnel ....................................................... 10
8 About the Apex 2 Exosuit .................................................................................. 10
8.1 Parts and Operations ........................................................................................... 11
8.1.2 Lift Assistance On (Engaged) ............................................................... 12
8.1.3 Lift Assistance Off (diengaged) ........................................................... 12
8.2 The Apex 2 exosuit non intended use .............................................................. 12
9 Using the Apex 2 Exosuit .................................................................................... 13
9.1 Unpacking and Assembly .................................................................................... 13
9.2 Putting On (Donning) and Using Your Apex 2 Exosuit ............................... 15
9.3 Adjusting the Apex 2 ................................................................................................ 18
9.4 How to Move or Add a Chest Strap ................................................................... 19
9.5 How to Adjust Thigh Sleeves ................................................................................ 20
9.6 How to Move or Replace Thigh Sleeve Anchors ........................................... 20
9.7 Ensuring Proper Use of Bands ......................................................................... 21
9.8 Using the Switch to Operate Apex 2 .............................................................. 22

9.9 Wear Schedule ..................................................................................................... 23
9.10 Taking Off (Dofng) Your Apex 2 Exosuit .................................................. 23
9.11 Apex 2 Resuse and Reassignment ............................................................... 23
9.12 Disassembly of the Apex 2 ............................................................................. 24
9.13 Removing Thigh Sleeve Anchors .................................................................. 24
9.14 Detaching Thigh Sleeves From Bands ......................................................... 24
9.15 Detaching bands from the Clutch ................................................................ 24
9.16 Detach Switch and Clutch from Shoulder Straps .................................... 24
9.17 Detach Clutch from Back Panel of the Shoulder Straps ........................ 24
9.18 Remove Chest Strap from Shoulder Straps ............................................... 25
10 Inspecon, Storage, Care, and Maintenance of Apex 2 ......................... 26
10.1 How to Perform Daily Inspections ............................................................... 26
10.2 Weekly/Monthly/Other Inspection ............................................................. 27
10.3 Test System Functionality ................................................................................ 27
10.4 Storage and Transport ....................................................................................... 27
10.5 Service Liffe of the Apex 2 ............................................................................... 28
10.6 Device History ...................................................................................................... 28
10.7 End of Use Considerations (Disposal) ............................................................ 28
10.8 Maintenance ............................................................................................................ 28
10.9 Sanitizing and Cleaning ....................................................................................... 28
10.10 Daily Sanitizing Instructions ............................................................................ 29
10.11 Periodic Cleaning ................................................................................................. 29
PART 2: ADVANCE FITTING, CARE, AND
SAFEY INSTRUCTIONS ................................................................. 31
11 Selecon, Sizing, and Fing ......................................................................... 32
11.1 Selection, Sizing, and Fitting ........................................................................... 32
11.2 General Information on Sizing, Fitting, and Adjusting the
Apex 2 Exosuit ................................................................................................................ 32
11.3 Before Sizing, Fitting and Adjusting the Apex 2 Exosuit ......................... 32

11.4 How to Size and Fit Users with an Apex 2 Exosuit .................................... 32
11.5 Apex 2 Exosuit Component Size Chart .......................................................... 33
11.6 Taking a User’s Measurements for Apex 2 Exosuit .................................... 34
12 Hazards and Protecve Strategies .............................................................. 36
12.1 Unguarded Moving Parts .................................................................................. 36
12.2 Parts with Rough Surfaces ............................................................................... 36
12.3 Parts with Sharp Edges ...................................................................................... 37
12.4 Snag, Catch, or Drag Points .............................................................................. 37
12.5 Slips, Trips, and Falls ............................................................................................ 37
12.6 Radiation or Hazardous Substances Used in the Workplace ................ 38
12.7 Fire ............................................................................................................................... 38
12.8 Contact with Heat sources Other than Fire ................................................. 38
12.9 Virus, Bacteria, Mold, Fungi or Other Hazardous
Biological Agents .............................................................................................................. 38
12.10 Contact with Hot and Cold Media ................................................................. 39
12.11 Heat-Related Illnesss .......................................................................................... 39
12.12 Poor Weather Conditions While Working Outside ................................ 39
12.13 Incompatibility with Equipment and/or PPE ............................................. 39
12.14 Allegic Reactions ................................................................................................... 40
12.15 Carcinogens ............................................................................................................ 40
12.16 Mental Stress ......................................................................................................... 40
12.17 Physical Stress Caused by the Apex 2 Exosuit .......................................... 40
12.18 Misunderstanding of Apex 2 Exosuit Technology .................................... 41
12.19 Working in an Inappropriate Posture Position ........................................ 41
12.20 Poor Fit and/or Poorly Adjusted Apex 2 Exosuit ...................................... 41
12.21 Inadequate Training for Use of the Apex 2 Exosuit ................................. 41
12.22 Improper Cleaning, Sanitation, Disinfection
and/or Decontamination ................................................................................................ 42
12.23 Obstruction of Senses ........................................................................................ 42
12.24 Emergencies and Evacuations ......................................................................... 42
12.25 Exosuit Malfunction ............................................................................................ 43
13 Addional User Safety Consideraons ...................................................... 43

13.1 Reuse on Other People ......................................................................................... 43
13.2 Improper Cleaning, Sanitation, Disinfection
and/or Decontamination ................................................................................................ 43
13.3 Direct Contact with Users’ Skin ........................................................................ 43
13.4 Excessive Strain on the Apex 2 Exosuit .......................................................... 43
13.5 Contact with Salt Water, Chlorinated
Water, or Dirty Water ...................................................................................................... 44
13.6 Contact with Clean Water ................................................................................... 44
13.7 Contact with Abrasive Substances and/ Or Materials Such
as but Not Limited to Dust, Sand, Dirt, or Mud ..................................................... 44
13.8 Exposure of Apex 2 Exosuits to Unsuitable
Environment Conditions ................................................................................................ 45
13.9 Use With Personal Protective Equipment (PPE) ........................................ 45
14 Technical Informaon .................................................................................... 46
14.1 Weight and Dimensions ........................................................................................ 46
14.2 Product Noise Emissions ...................................................................................... 47
14.3 Environmental Conditions for Intended Use ............................................... 47
15 Warranty ............................................................................................................ 48
15.1 Limitations of this Warranty ............................................................................... 48
15.2 No Other Warranties Made or Implied .......................................................... 48
15.3 Times Limits May Not Apply ............................................................................... 49
15.4 Warranty Claims ...................................................................................................... 49
16 Appendix ............................................................................................................ 50

USER MANUAL PART: 1

3 About the Apex 2 User Manual
This user manual documents the proper sizing, tting, selection, adjustment, use, care,
maintenance, storage, and disposal of the Apex 2 exosuit.
Apex 2 exosuit users and support personnel must read and familiarize themselves with the
Apex 2 Wear and Use Guide included with each exosuit before using it for the rst time.
4 Patents
Patent information may be found at — https://HeroWearExo.com/patents/
5 Intended Use
The HeroWear Apex 2 is intended to be used by adults for work performed in industrial
environments. The Apex is designed to support and assist the low back (with secondary
assistance for knees and hips) to reduce strain, fatigue, and risk for injury while performing
bending, stooping, leaning, reaching, squatting, and lifting tasks. See section 8.2 and 8.3 for a
more comprehensive list of activities and when the exosuit should be engaged or disengaged.
Please note, the Apex 2 is not intended to allow users to lift objects that are heavier than they
would normally lift or move more quickly than they would normally when performing tasks.
The Apex 2 exosuit does not increase strength or prevent injuries that arise from improper
lifting techniques.
5.1 Task Selecon and Users
• Inappropriate user or task selection may result in personal injury or Apex 2
exosuit damage.
• It is critical for safety that Apex 2 exosuits are used by appropriate personnel for
tasks that meet all criteria for the intended use.
• All users should receive training on any and all hazards, protective strategies, and
personal protective equipment (PPE) to be used in conjunction with the Apex 2.
• Users should be selected based on their performance of work that can benet
from the intended use of the Apex 2 exosuit.
8

6 Caution for Users
The Apex 2 exosuit can only be used safely and reliably when the instructions contained in this
user manual, including inspection guidelines, see Chapter 10, Inspection, Storage, Care, and
Maintenance of Apex 2 are followed.
Avoid working with Apex 2 exosuits in ways not outlined or explained in this user manual
without rst consulting with knowledgeable HeroWear support staff. Inappropriate use may
lead to injury, ineffective suit performance, or product damage.
6.1 Medical Clearance
Medical clearance should be obtained by users with the following conditions prior to
using the Apex 2 exosuit or if any of the below occurs after the beginning of use:
• The presence of implanted devices such as but not limited to, cardioverter
debrillators, cardiac pacemakers, coronary stents, insulin pumps, intrathecal
drug pumps, articial hips, articial knees, spine screws and/or rods, articial discs
and/or breast implants
• Previous musculoskeletal injuries of the neck, shoulders, back, hips, thighs, or
knees
• Previous surgery for musculoskeletal problems of the neck, shoulders, back, hips,
thighs or knees
• Skin diseases, cellulitis, injuries, inammation, or prominent scars with associated
swelling under the areas in contact with the Apex 2 exosuit.
• Allergies to latex or to synthetic bers including rayon, nylon, and similar
materials
Skin redness or overheating in the areas that are in contact with the Apex 2
exosuit
• Cardiovascular diseases
• Pulmonary diseases
• Renal diseases
Circulatory disorders of the upper extremities, back, hips, or lower extremities,
such as severe varicosis, blood or lymphatic ow disorders, including swelling,
inammation, or edema distal to the body areas on which the Apex 2 exosuit is
worn
• Congenital or acquired neurological disorders or other disorders causing motor
and or sensory limitations or imparement
9

7 Apex 2 Support Personnel
• For each location where Apex 2 exosuits are in use, at least one member of the Apex 2
support personnel should be trained and presen. We recommend support personnel be
trained on each shift and within each group of users.
• Apex 2 Support Personnel training consists of user training, advanced Apex 2 exosuit
training, and related tasks for which they are responsible (such as inspection and cleaning).
These include but are not limited to tting new users for Apex 2 exosuits, adjusting Apex 2
exosuits for users, and training new users.
7.1
Cauons for Apex 2 Support Personnel
For Apex support personnel, see Chapter 10, Inspection, Storage, Care, and
Maintenance of Apex 2, you should familiarize yourself with this user manual to
properly size, t, adjust, use, and care for your Apex 2 exosuits, and to support others
in their use.
We recommend you print and keep a copy of the User Manual and Inspection
Guidelines, Chapter 10, Sections 10.1 and 10.2, in an accessible location at your work
or job site with other safety and compliance documentation.
Ensure the Apex 2 User Manual, Apex 2 Wear & Use Guide, Apex 2 Inspection and
Fitting Guidelines, and the HeroWear support website are available for all users.
8 About the Apex 2 Exosuit
The Apex 2 is an occupational exosuit designed to reduce strain, fatigue, and injury risk for
the low back during work that requires the user to bend, lean, stoop, squat, or lift. The Apex 2
exosuit has a proprietary, patent-pending dual mode switch to engage and disengage passive
support and assistance its elastic bands provide.
The Apex 2 exosuit does not increase strength, allow users to li loads that are heavier than
they can generally li, or prevent injuries that arise from improper liing techniques. For
details on intended use, see Secon 5 of this document
10
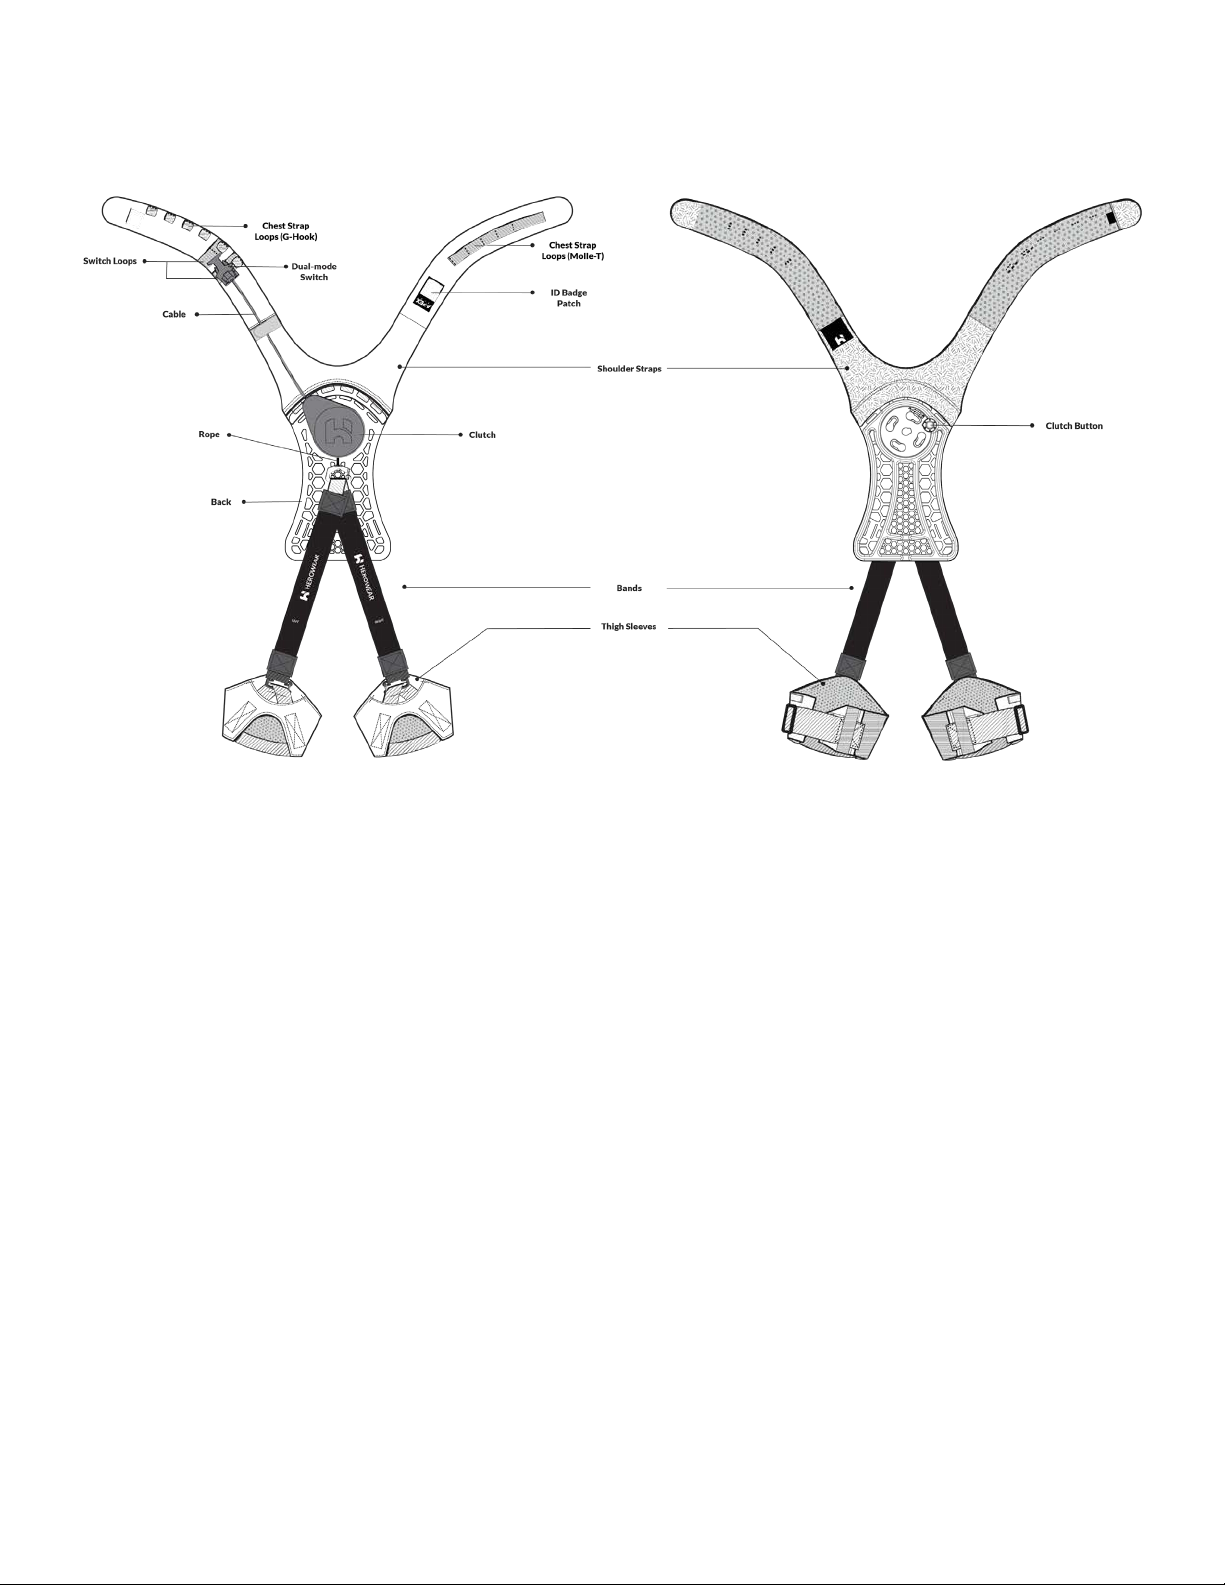
8.1 Parts and Operaons
The Apex 2’s shoulder straps are one component and are worn like a backpack. Thigh sleeves
are worn around the thigh in a manner similar to athletic equipment like thigh pads or thigh
compression garments.
The upper and lower body components are connected with high-strength elastic bands which
stretch as the user bends, leans, stoops, squats, or lifts. The bands shorten when the user
stands upright or lifts. It is this stretching/shortening action that assists the user when bending
and lifting objects.
When the Apex 2’s assistance is not needed, the user can disengage assistance by using the
shoulder strap-mounted dual-mode switch to deactivate the clutch. Doing so allows the user
to move about, climb, sit, or crawl freely.
11

We recommend using each Apex 2 li assistance mode in the following condions:
Li Assistance On (Engaged)
• Bending
• Squatting
• Stooping
• Lifting from below the waist or extended forward from the body
• Leaning forward
Apex 2 exosuits can be used for all of the listed activities above while standing or
kneeling. Likewise, lift assistance can remain on while walking short distances
between bends or lifts and while stepping off certain equipment (standing forklifts,
electric pallet jacks, etc.)
Li Assistance O (Disengaged)
• Walking long distances
• Running
• Climbing stairs, ladders, or scaffolding
• Sitting
• Operating equipment from a seated position (forklifts, tractors, etc.)
• Lying down
• Crawling
• Other awkward positions or movements where back assistance is not needed
8.2 The Apex 2 exosuit is not intended to be used in the following ways:
• Without proper cleaning, sanitization, or decontamination by a trained person
• Without user-specic tting and adjustment by a trained person
• Without inspecting, repairing, or refurbishing by a trained person
• Without proper training, either by a qualied person or by referencing provided
training materials
• To lift people or heavy objects that cannot be otherwise lifted safely by the user
without the Apex 2
8.1.2
8.1.3
121212
9 Using the Apex 2 Exosuit
When the Apex 2 arrives from HeroWear, initial assembly of the suit may be required before
rst use.
9.1 Unpacking and Assembly
Open the box(s) containing the Apex 2 components carefully. If using a box cutter
to open the boxes, please use caution and do not cut too deep as this would risk
damage to the Apex 2.
Unpack required Apex 2 components out of the box.
For best t, match the clutch length with the corresponding shoulder straps. The
clutch length is indicated by a yellow dot on the inside of the clutch. The
corresponding shoulder straps (See Section 11.5) will have a matching yellow dot
on the outside of the back panel.
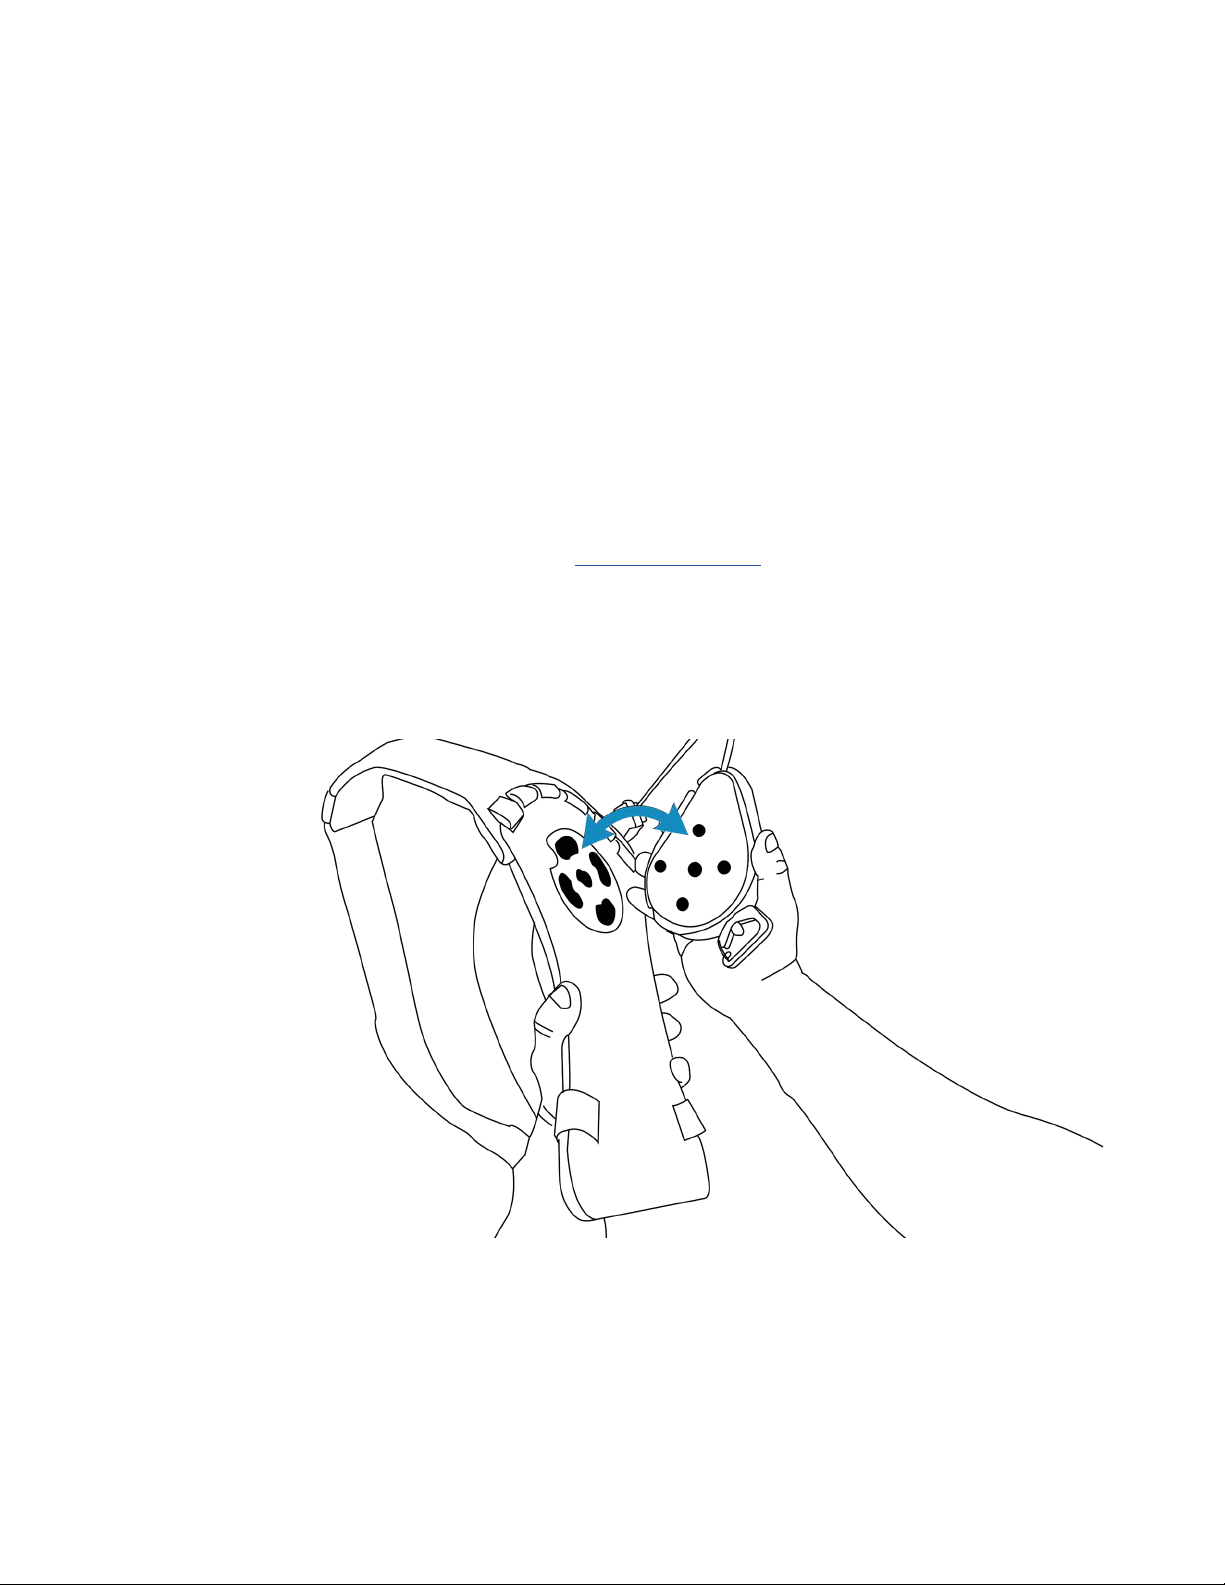
Take the clutch, with the logo facing your palm and the screws facing the holes on
the back panel of the shoulder straps, and insert the four screws on the clutch into
their respective round slots on the back panel, withthe cable pointing towards the
left shoulder strap.
1.
2.
3.
13

Once the clutch is rested, turn it to the left until it clicks and is secured.
Ensure the cable is captured by the hook and loop fastener on the upper left
shoulder strap. Clip the switch to one of two switch loops on the left side of the
shoulder strap.
5.
6.
Turn the upper body components over with the clutch facing up and shoulder
straps facing down.
Connect the bands to the clutch by opening the metal gate of the carabiner at the
bottom of the clutch with one hand and sliding the top loop of the bands onto the
carabiner with your other hand. Ensure the metal gate of the clutch carabiner is
closed before moving on.
7.
8.
141414

Note the labeled directionality (left and right) of the bands and thigh sleeves.
Connect each band to its corresponding thigh sleeve by opening the gate of the
metal carabiner at the bottom of the band and sliding the loop found at the top of
the thigh sleeve into the opening of the carabiner. The metal carabiner opening
should be closed and face in.
9.
The initial assembly of the Apex 2 suit is complete and ready for use.
HeroWear also provides accessories such as a belt and secondary chest strap for
your Apex 2 exosuit.
a. If users are experiencing any abnormal rubbing or irritation, the use of a
secondary chest strap may be necessary see Chapter 9, section 9.4 How To
Move or Add a Chest Strap
b. Users should use their own belt if possible, however a belt is provided
and should be used when the user is not wearing their own belt.
10.
11.
Pung On (Donning) and Using Your Apex 2 Exosuit
Your Apex 2 exosuit has been sized and assembled so you can wear it comfortably
for a full work shift. Putting on the Apex 2 exosuit properly will ensure your
exosuit works as intended and you remain comfortable all day.
Perform visual inspection daily prior to use of the Apex 2 exosuit, see section 10.1,
Daily Inspection)
After inspection, put on the Apex 2 exosuit like a backpack, beginning with the
shoulder straps.
1.
2.
9.2
15
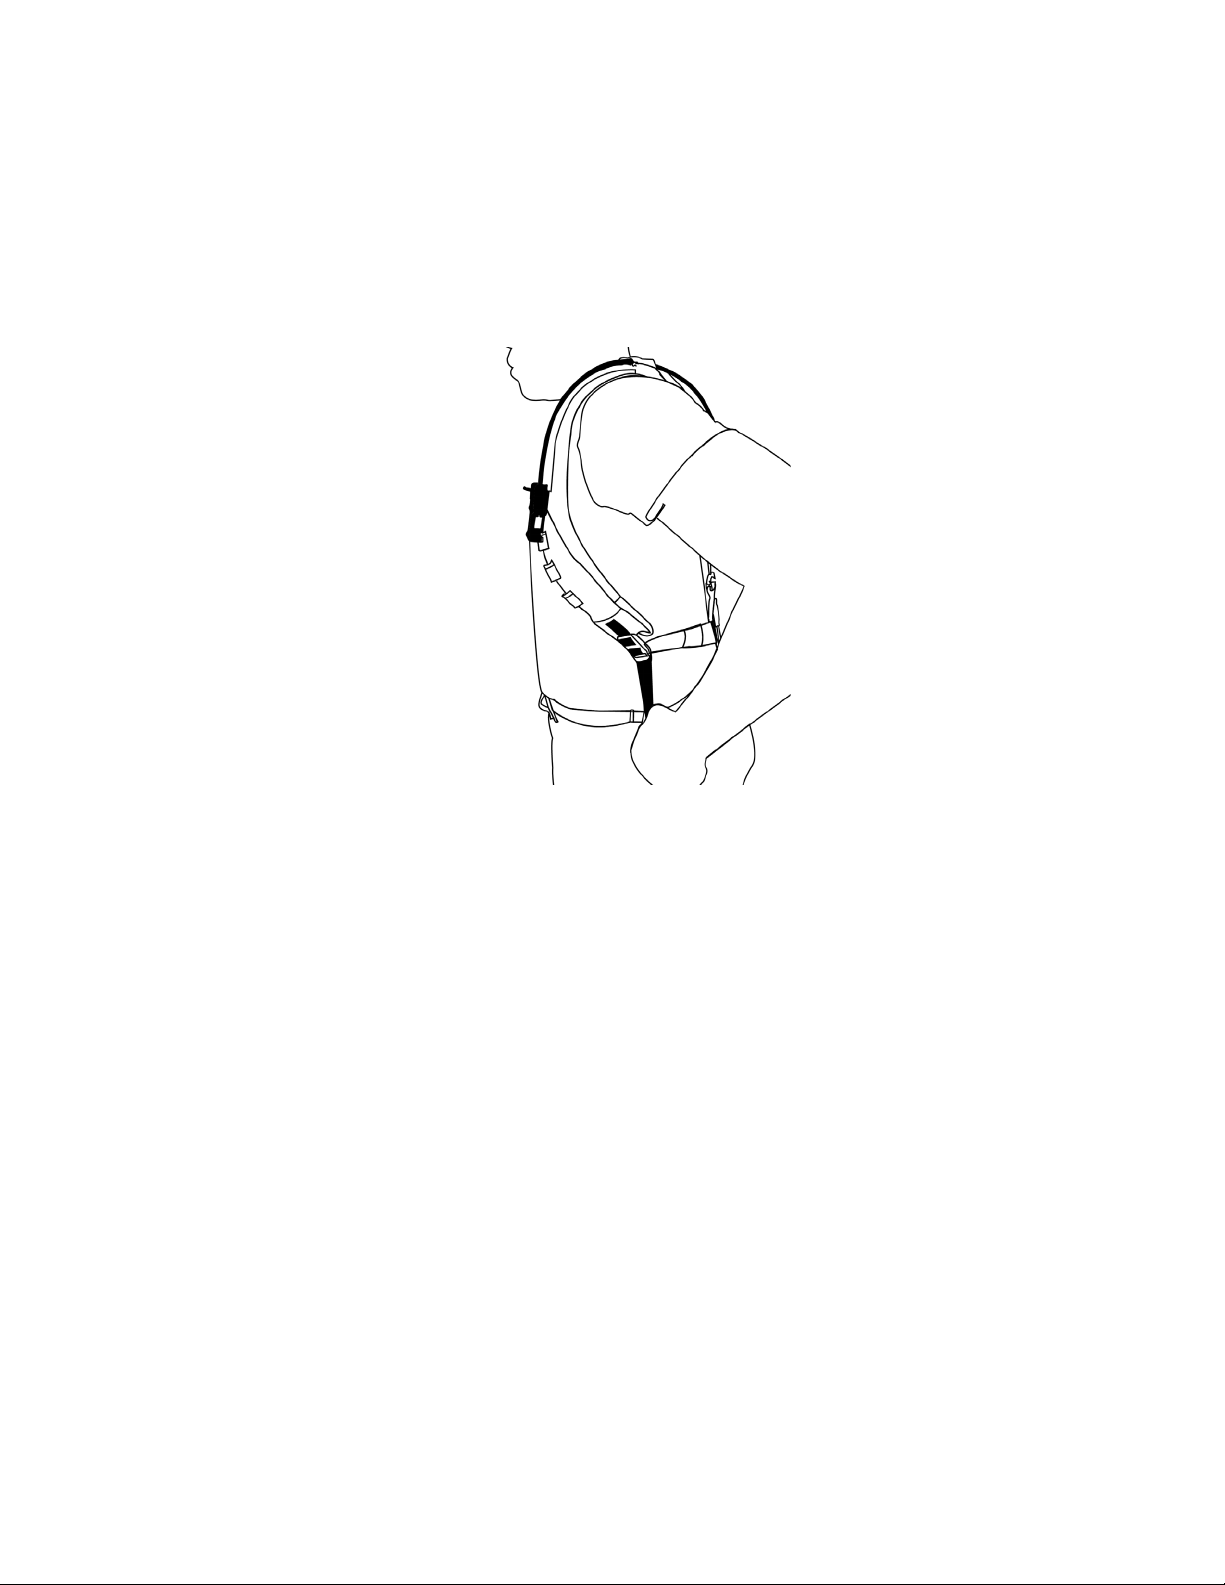
Connect the chest strap by hooking the end of the chest strap into the loop on
the front of the left shoulder strap most closely aligned with the location of the
MOLLE-T connection on the right shoulder strap. Tighten the shoulder straps rst
by pulling down and back on the webbing for each strap. Then tighten the chest
strap so that it ts snug but comfortably.
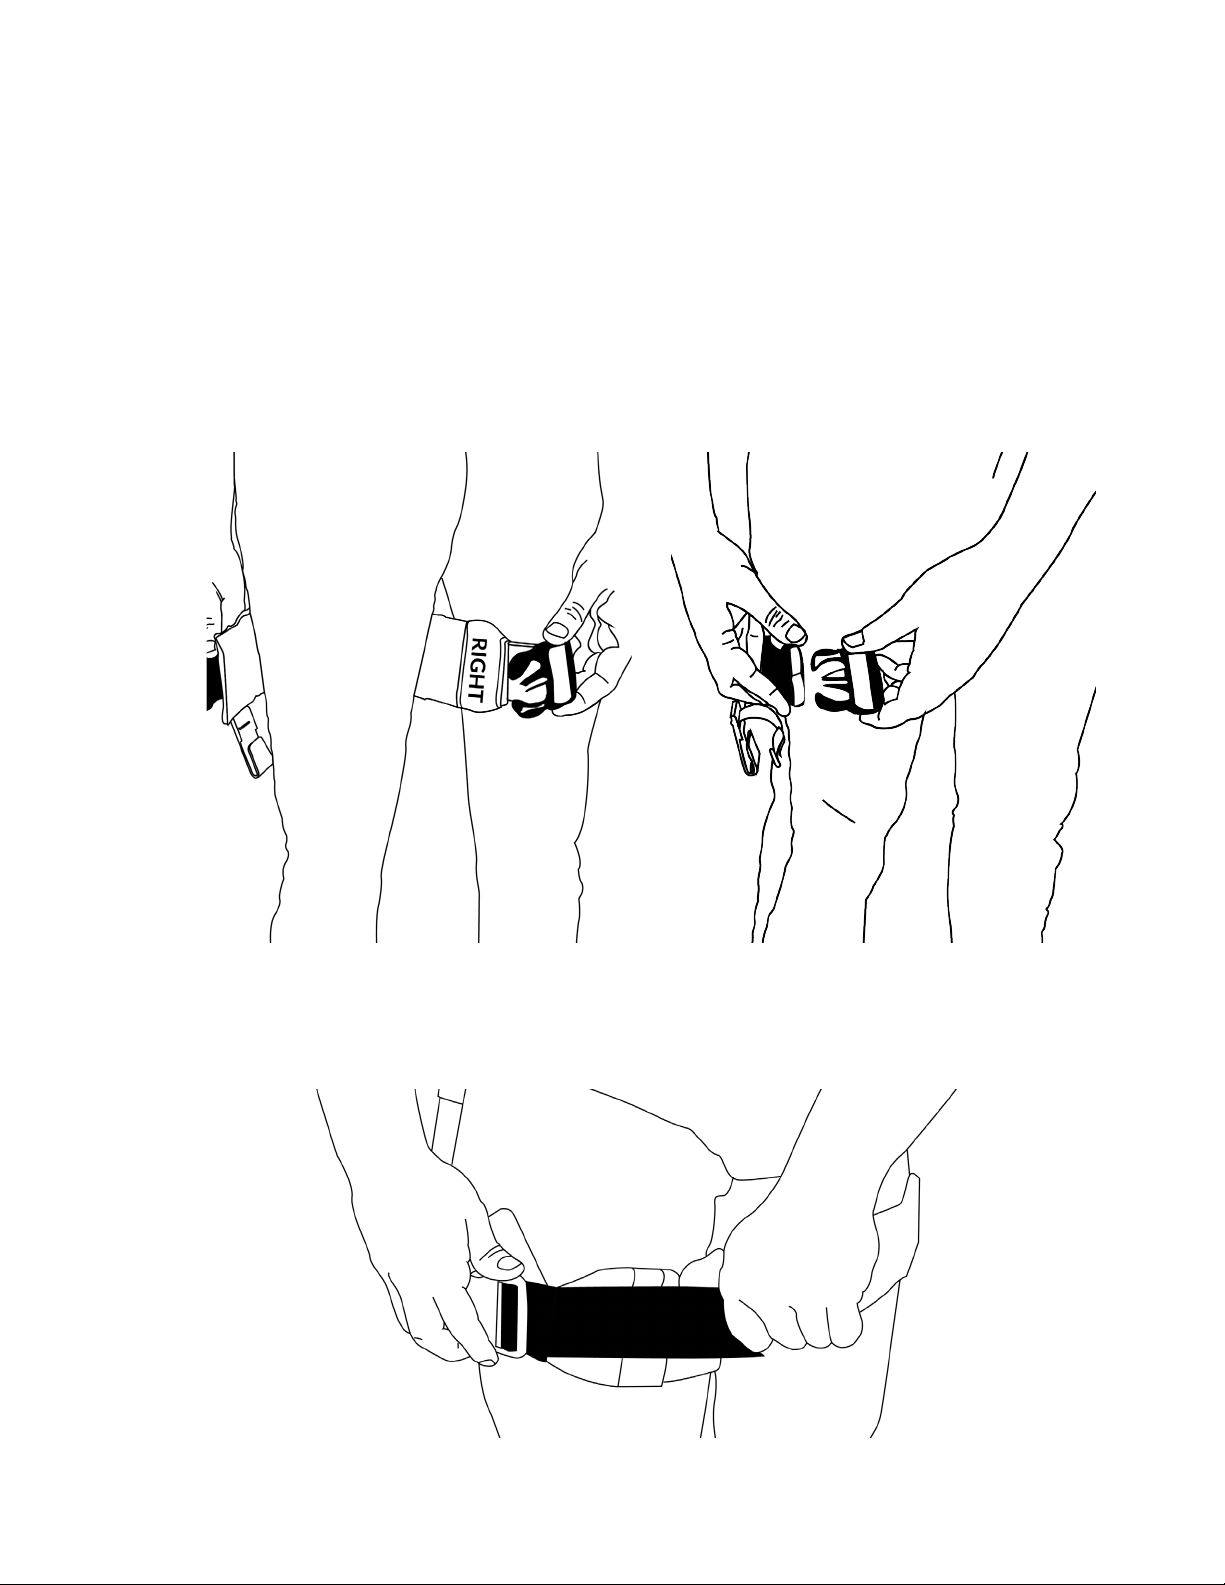
To put on each thigh sleeve, note the left/right directionality and place the correct
thigh sleeve on the corresponding leg. The side of the thigh sleeve with
rubberized texture and printing on it should face your leg. Then reach between
your legs and wrap the thigh sleeve around the front of your thigh about 5 inches
(12 cm) below the groin. Next fasten the buckle so that the buckle is on the
outermost part of your leg (usually this is along your pants seam).
3.
4.
Adjust tightness until the thigh sleeve ts snugly on the thigh so that it will not
slide or twist. You may nd it easier to unfasten the buckle to adjust tightness and
then reconnect the buckle.
5.
16
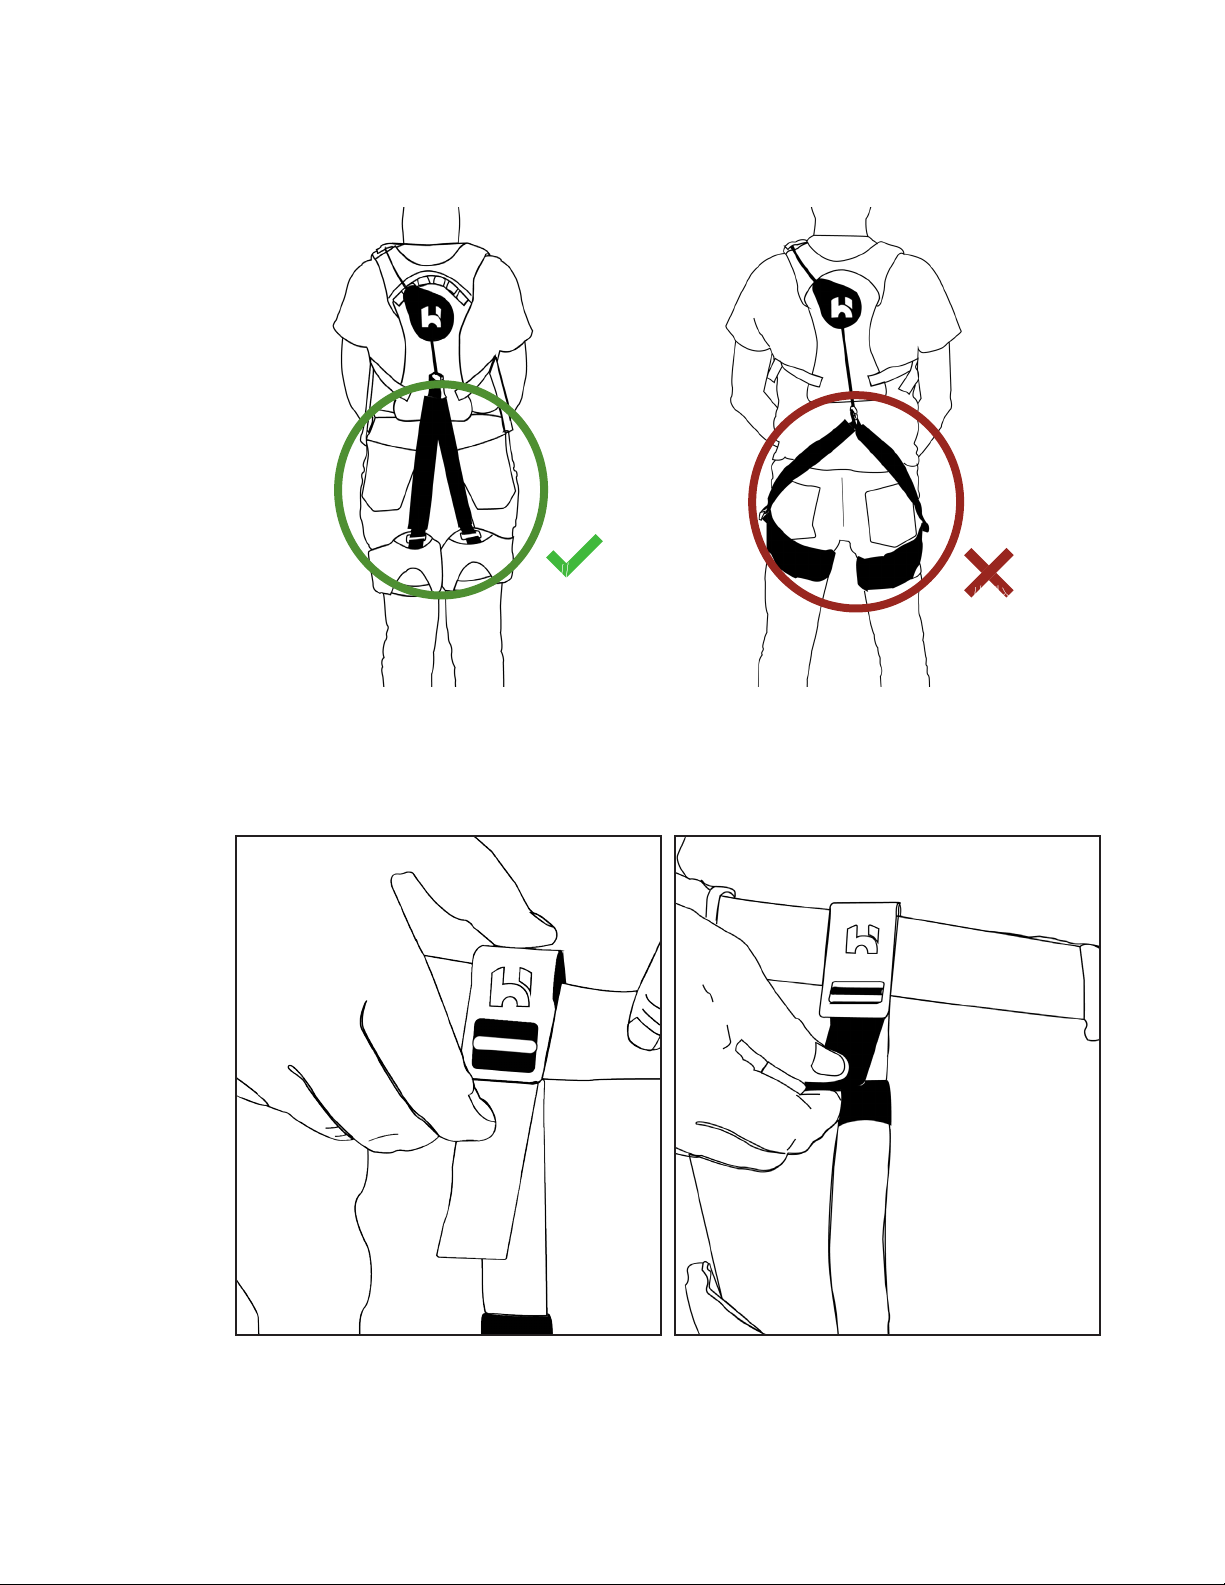
Check to ensure the bands in the back are aligned with the middle of each buttock
and adjust if necessary.
6.
Ensure that the anchor is aligned with the outside seam of your pants, then hook
the thigh sleeve anchor over your belt near your hip bone and tighten until there
is no slack.
7.
Please note: We recommend using your own belt, but a belt is included with each
Apex 2 exosuit. Multiple belts are included Apex 2 bulk user kits .
17
The shoulder straps are adjusted using the webbing under each arm.
When adjusted properly, the switch should be located at or just below the level of the
user’s collarbone (clavicle), and the shoulder straps should be toward the inner part of
the user’s shoulder, away from the arms.
• The user should also be able to take a deep breath easily, reach forward without
irritation, and move freely while not feel constricted in any way
• Tighten the webbing at the bottom of the shoulder strap by pulling down and
behind the user.
• Loosen shoulder straps by lifting up on the ladder locks at the bottom of each
shoulder strap and pulling forward.
• Generally any time you loosen the shoulder straps, you should tighten the chest
strap. Likewise, any time you loosen the chest strap, you should tighten the
• shoulder strap.
8.
9.
Repeat for both legs.
Fold all loose webbing on the shoulder straps, thigh sleeves, and thigh sleeve
anchors and secure them in their webbing keepers.
Adjusng the Apex 2
While wearing the exosuit, if at any point the device loses the proper adjustment
or needs to be readjusted, users should stop what they are doing and adjust t.
9.3
18
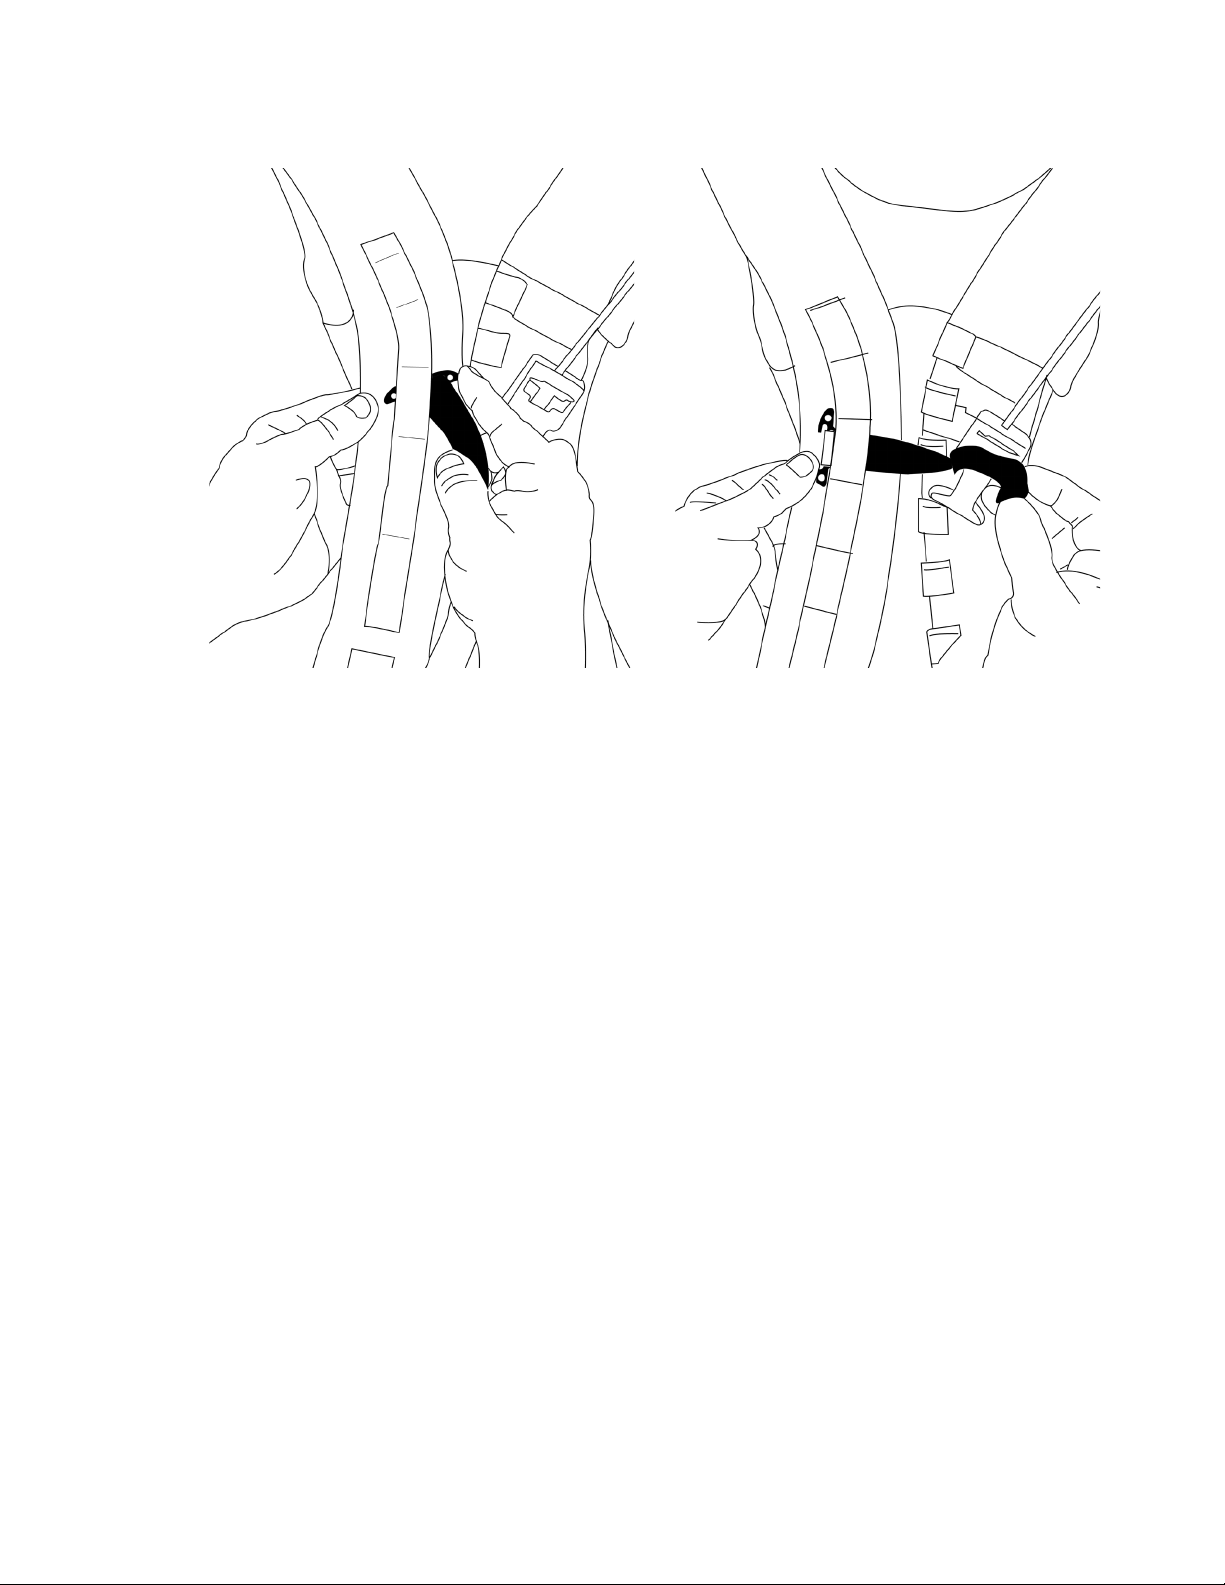
How to Move or Add a Chest Strap
• The chest strap may need to be moved or a secondary chest strap added to t
the user properly. Adding or moving the chest strap can pull the shoulder straps
toward the inner part of the user’s shoulder, creating a vest-style t. This can
prevent or alleviate shoulder strap discomfort around the underarms and
sensitive areas.
• To attach a secondary chest strap, start by inserting the MOLLE-T side of the chest
strap into the loops on the right side of the shoulder straps.
• Ensure the MOLLE-T end is fully inserted into the shoulder strap loop and
positioned vertically.
9.4
19
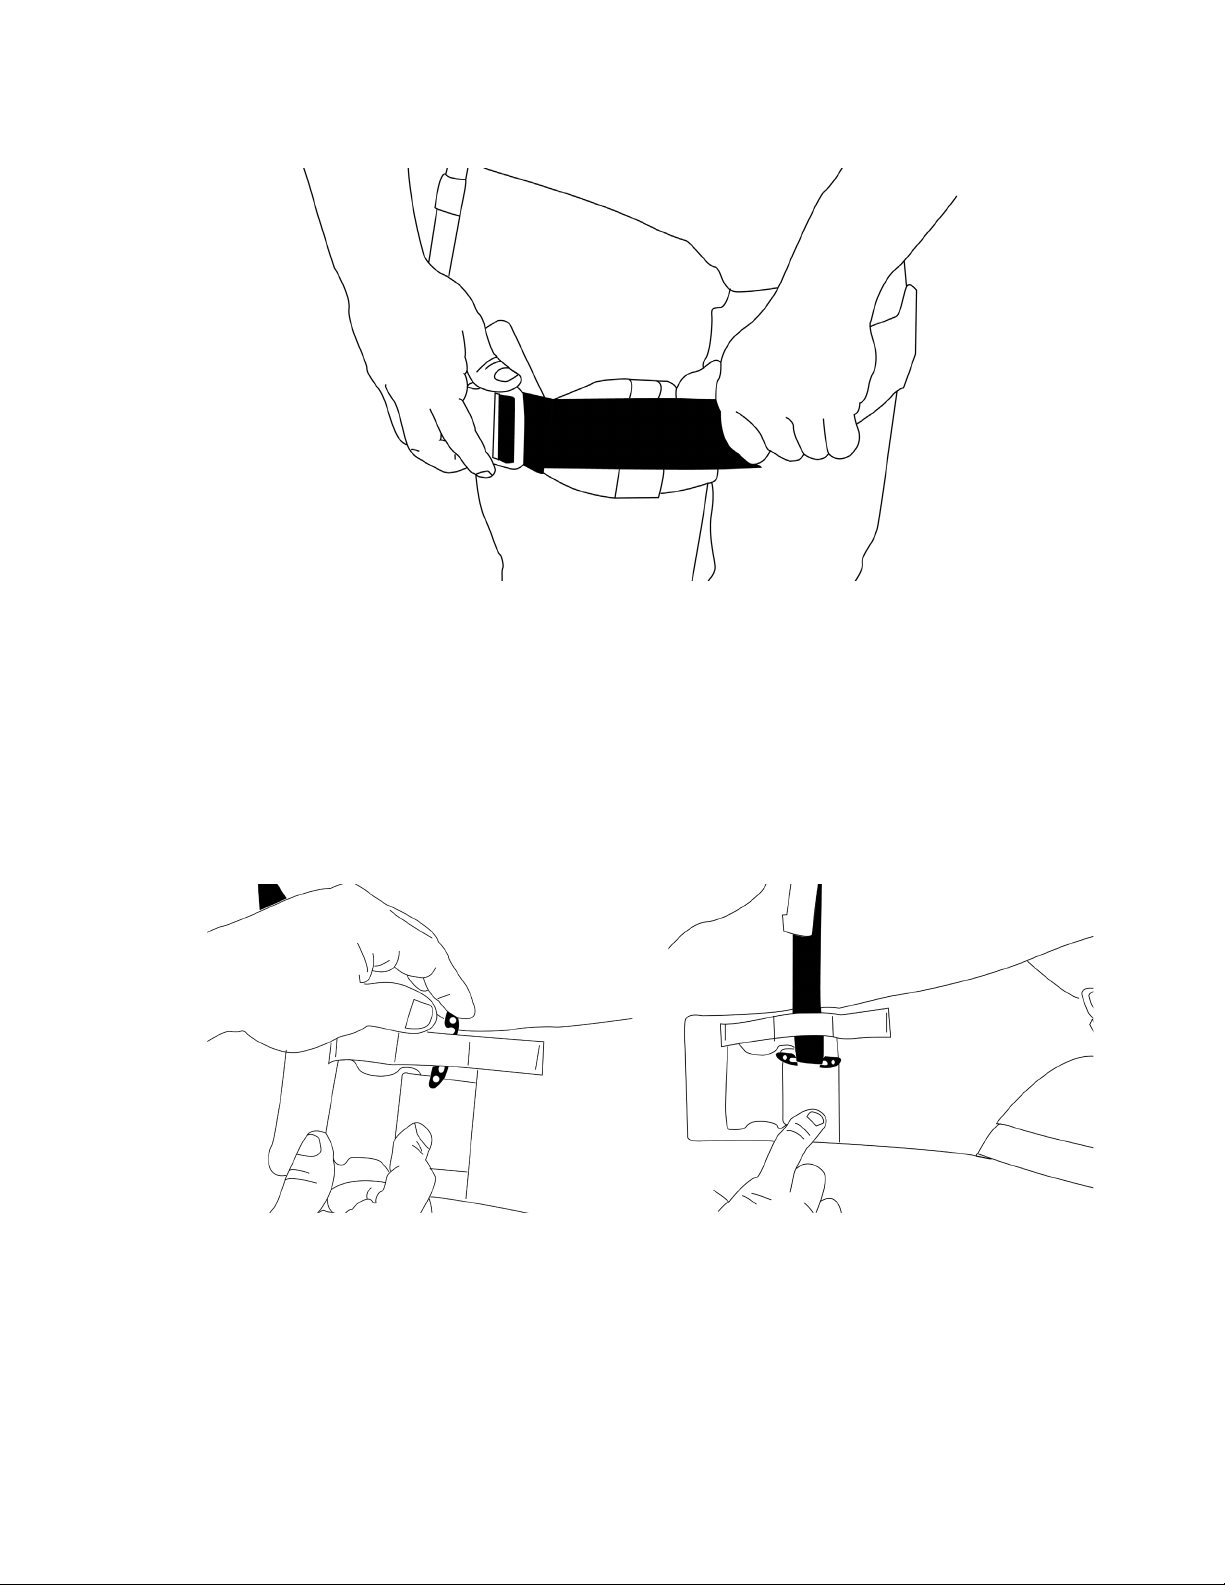
How to Adjust Thigh Sleeves
• To tighten thigh sleeves, hold the buckle and pull the webbing in towards the inner
thigh. Once tightened ensure your bands are aligned along the center of the
buttock and the buckle is aligned with the outside seam of your pants.
• To loosen thigh sleeves, lift at the bottom of the female-side of the buckle.
• Some users nd it easier to unbuckle the thigh sleeve to adjust tightness before
refastening the buckle.
How to Move or Replace Thigh Sleeve Anchors
9.5
9.6
• To attach the thigh sleeve anchors, take the MOLLE-T side of the anchor and
insert it through one of the thigh sleeve anchor loops found outside the thigh
sleeve near the buckle.
• Attach at least one thigh sleeve anchor to each thigh sleeve. A second thigh sleeve
anchor can optionally be attached to each thigh sleeve for additional support.
20
Table of contents
Other Herowear Personal Care Product manuals


Popular Personal Care Product manuals by other brands


Philips
Philips HP4551/00 user manual

Eldom
Eldom satiin SE20 manual

Orliman
Orliman EVOTEC EV-101 Use and maintenance instructions

PROZIS
PROZIS Smoover user manual

Eurofase Lighting
Eurofase Lighting CERISSA 44369 instruction manual

evo Medical Solutions
evo Medical Solutions Aeroneb GO 7010 quick start guide