Ride Corbac User guide

Ride™Corbac™
Adjustable Back Support
i
Y
Owner’s
Handbook:
Ride Designs®
a branch of Aspen Seating, LLC
8100 SouthPark Way
Littleton, Colorado 80120 USA
toll-free (U.S. Only): 866.781.1633
phone: 303.781.1633
www.ridedesigns.com
M
Supplier: This manual must be transferred to the end user of
this product as it contains important information for proper use
of this product.
User: Carefully read this entire manual prior to using this
product and keep for future reference.
Intended Use and Installation Instructions
Intended Use
Your Ride Designs®Corbac™is an Adjustable Wheelchair
Back Support that has been carefully constructed to meet your
posture and skin integrity needs and has been designed to
be mounted to multiple wheelchair styles and sizes to aid in
supporting and positioning of wheelchair users.
Weight Capacity
Maximum user weight is 250 pounds (113kg).

Ride™Corbac™Adjustable Back Support Owner’s Handbook 2
www.ridedesigns.com
General Product Safety
Safe application of this product depends upon your good judgment and common sense,
as well as that of your provider, caregiver, and/or healthcare professional, and your
attentiveness in following the cautions, notes, and instructions in this manual.
NOTE: We have compiled this manual from the latest specifications and product
information available at the time of publication. We reserve the right to make changes
as they become necessary. Any changes to our products may cause slight variations
between the illustrations and explanations in this manual and the product you have
purchased.
Y WARNING: All Ride Designs support surfaces are designed to help reduce the
incidence of pressure sores. However, no back support can completely eliminate sitting
pressure or prevent pressure sores. The Ride Corbac is not a substitute for good skin care
including proper diet, cleanliness, and regular pressure relief techniques.
CAUTION: Failure to heed cautions may result in damage to your product.
Yi Please read this instruction manual before using this product.
Y All Ride Designs support surfaces are designed to help reduce the incidence of
pressure sores. However, no back support can completely eliminate sitting pressure or
prevent pressure sores. The Ride Corbac is not a substitute for good skin care including
proper diet, cleanliness, and regular pressure relief techniques.
Y Installation of any back rest on your wheelchair might alter your center of gravity within
the wheelchair. A recessed back position might cause the wheelchair to tip backwards,
potentially resulting in injury. Always assess the need for anti-tippers or amputee axle
adapter brackets to be added to your wheelchair to help increase stability. Similarly,
a more forward back position might reduce the forward stability of the wheelchair,
increasing risk of tipping forward, with potential for injury.
Y Do not use your Corbac without the spacer mesh overlay in place.
Y Do not lift the wheelchair by the Corbac.
Y Improper placement or securement of the Ride Corbac to your wheelchair may result
in injury.
Y This product should be installed and fitted by a qualified and competent healthcare
professional. Failure to accurately assess and adjust the fit of the Corbac could result in
injury to the user.
Installation and Use Instructions
It is recommended that a therapist or authorized Ride Designs supplier conduct the initial
fitting of your back support. Your Ride Corbac is designed to enhance core trunk stability
by providing posterior and lateral support to the lower trunk, lumbar spine, and pelvis
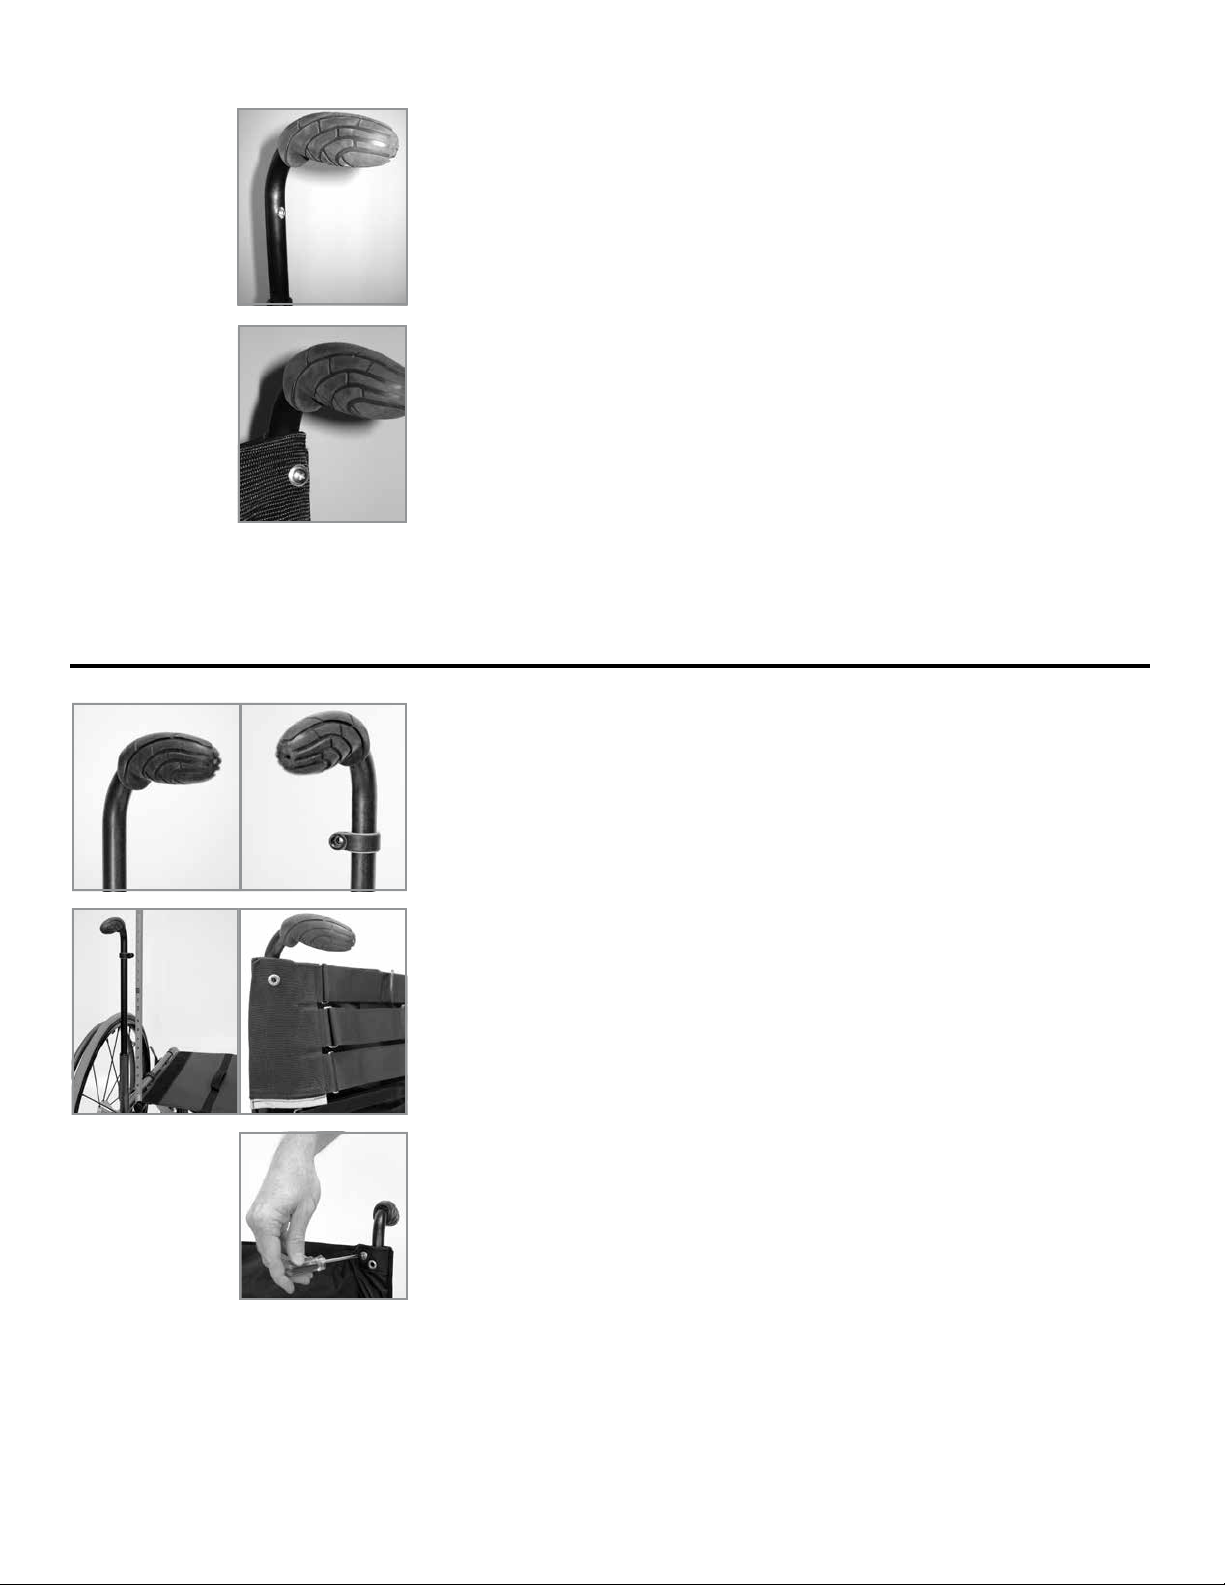
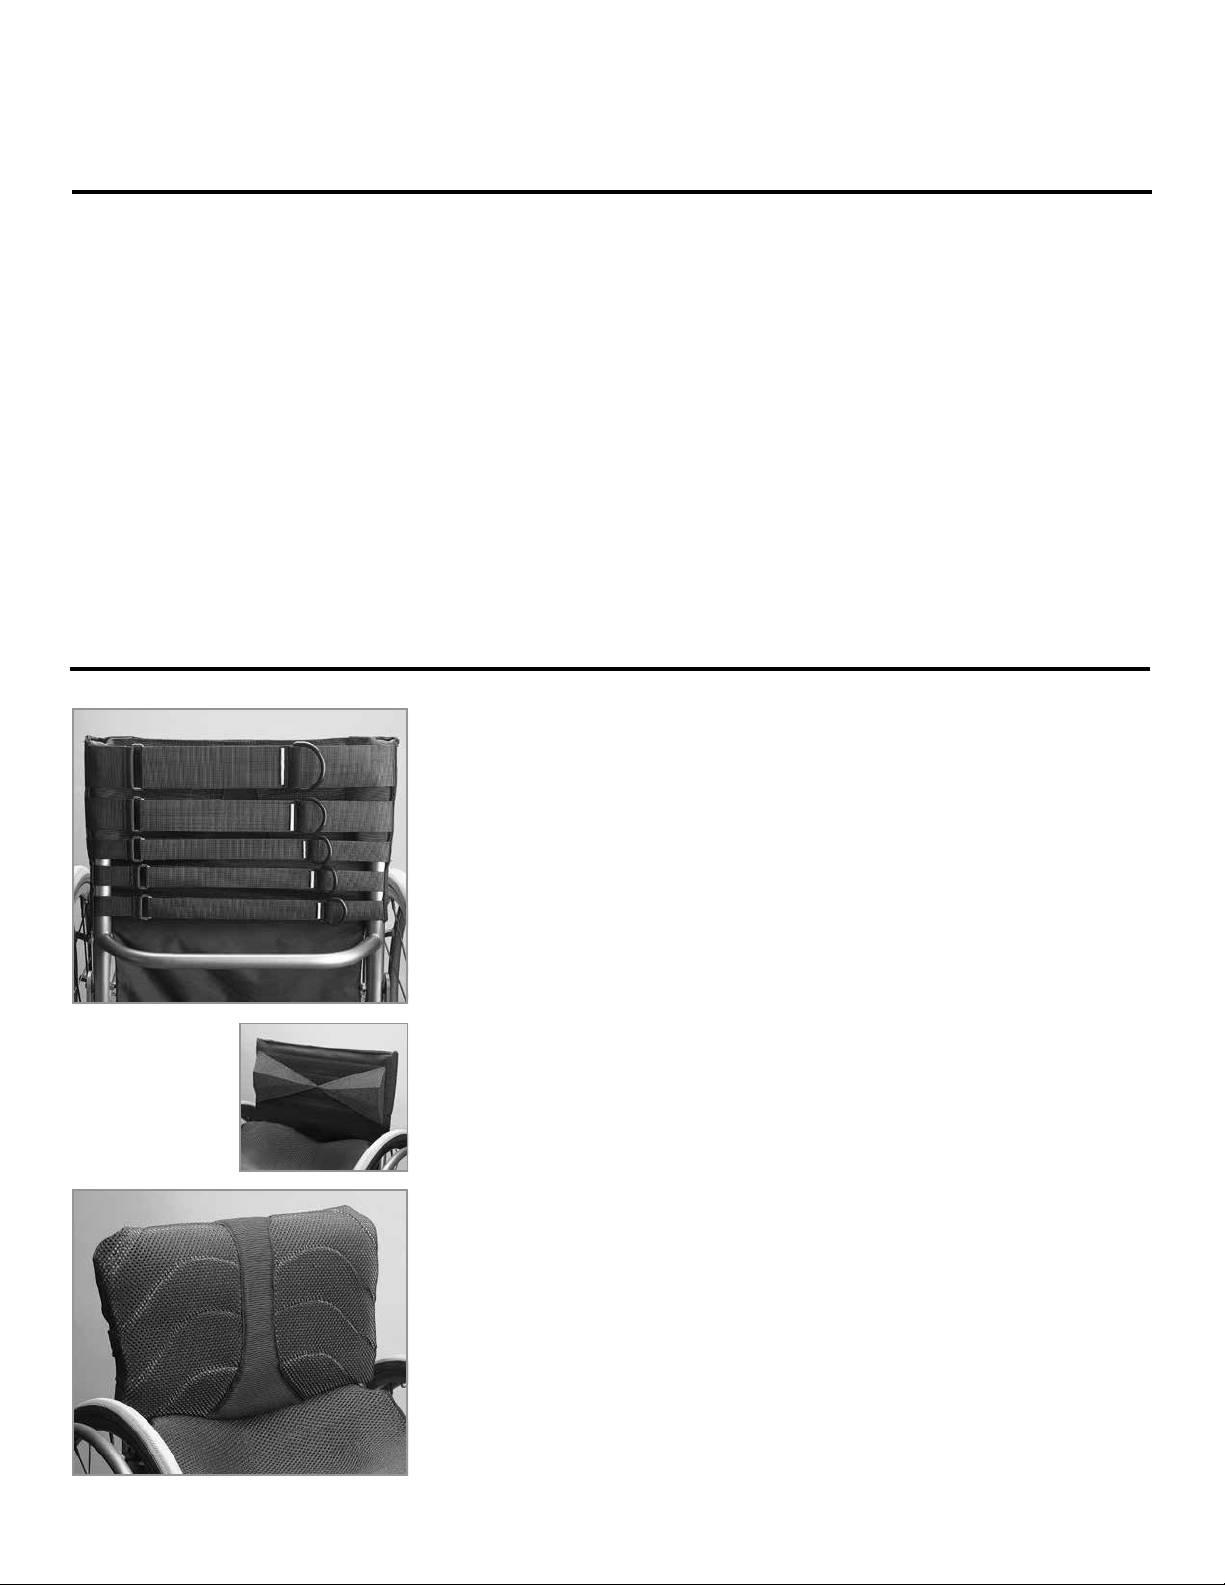
(ie, the core). The Corbac Adjustable Mount uses straps to achieve the initial support
for balance and alignment. The thoraco-lumbar-pelvic (TLP) supports provide additional
posterior-lateral support and the Corbac’s spacer mesh overlay provides a lightweight
cushioning support to facilitate moisture vapor transport while reducing shear.
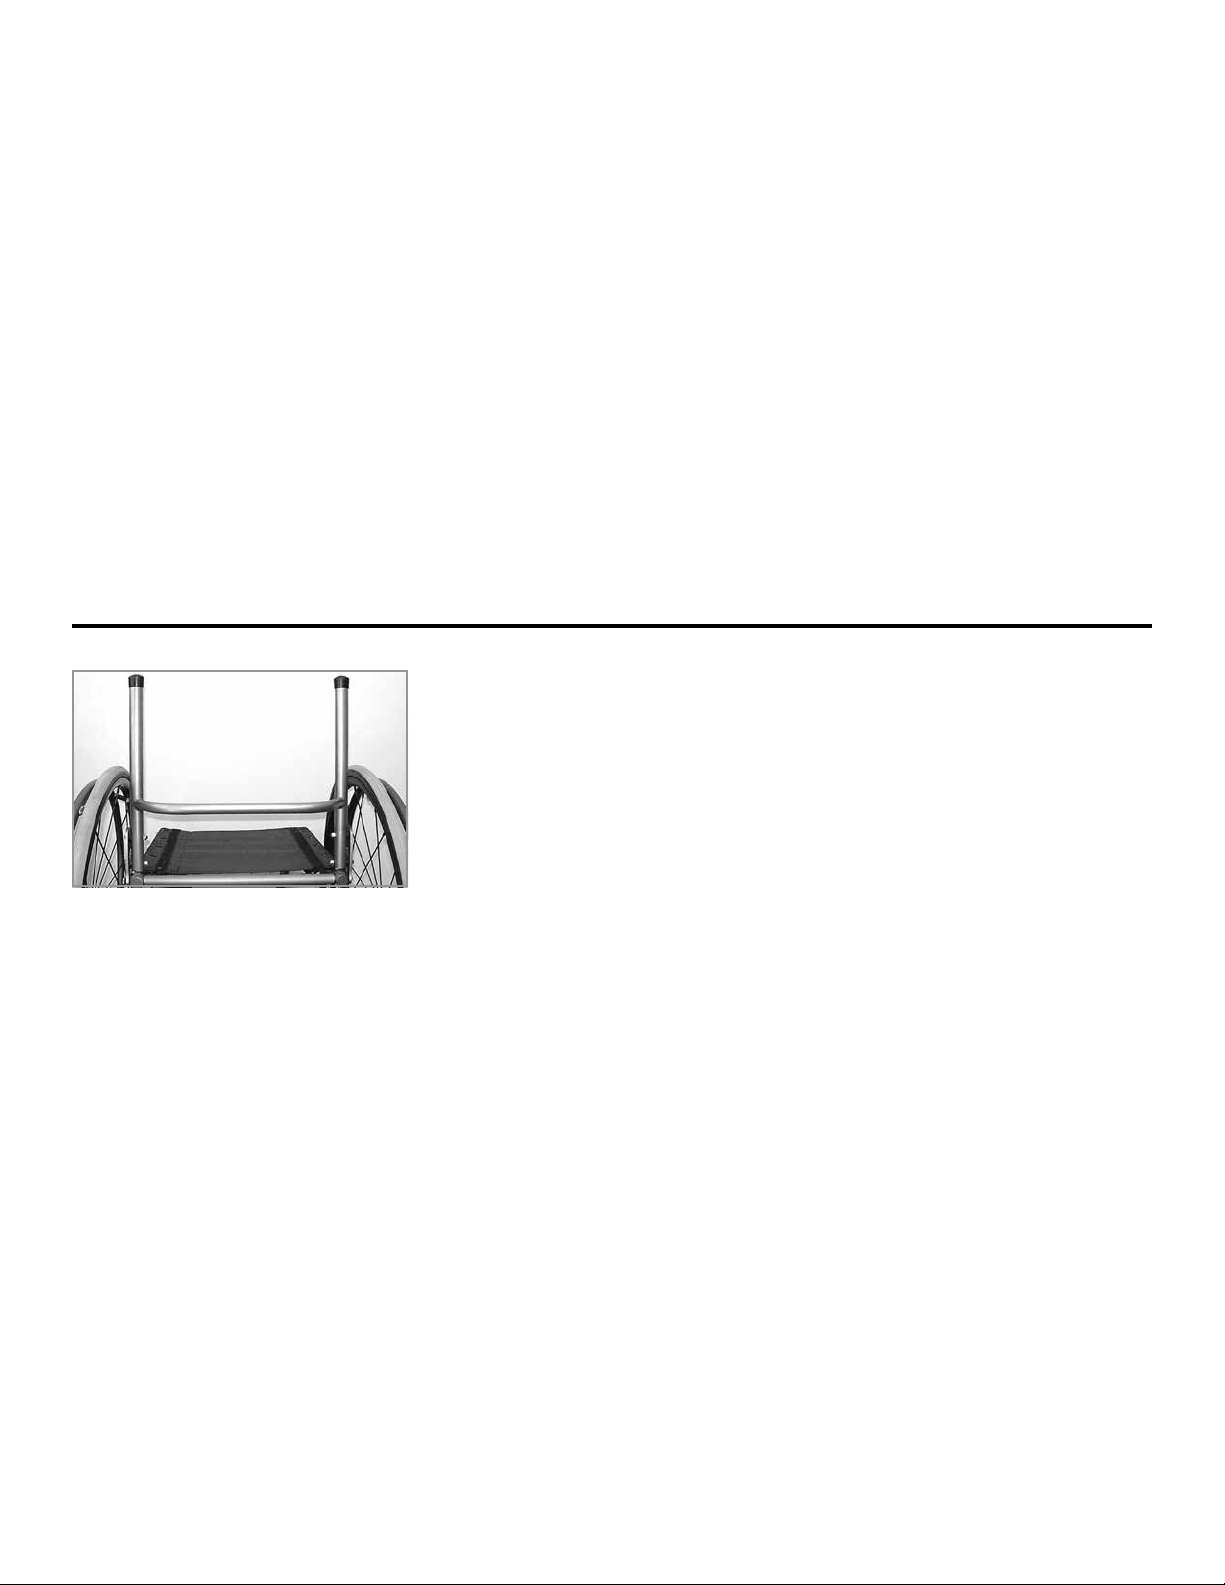
The Corbac consists of four components: 1) the adjustable mount, 2) two thoraco-lumbar-
pelvic (TLP) supports, 3) the spacer mesh overlay and 4) four mounting clamps.

Ride™Corbac™Adjustable Back Support Owner’s Handbook 3
www.ridedesigns.com
Determine appropriate installation instructions
Before installation determine the configuration needed and proceed to the correct section
of the handbook:
❑If replacing sling back upholstery on a wheelchair WITHOUT push handles, refer to
the section titled “Replace existing sling back upholstery on a wheelchair without push
handles.”
❑If replacing sling back upholstery on a wheelchair that has back canes with
integrated push handles and existing threaded inserts, refer to the section titled
“Replace existing sling back upholstery on a wheelchair with push handles and existing
threaded inserts.”
❑If replacing sling back upholstery on a wheelchair with integrated push handles, but
WITHOUT threaded inserts, refer to the section titled “Replace sling back upholstery
on a wheelchair that has back canes with integrated push handles but without existing
threaded inserts.”
❑If installing Corbac over existing sling back upholstery, refer to the section titled
“Install Corbac over existing sling back upholstery.”
Corbac installation
Replace existing sling back upholstery on a wheelchair without
push handles
1. Remove the existing wheelchair back upholstery.
2. Adjust back cane height (if applicable) for desired back support height.
3. Slide the Corbac adjustable mount onto the wheelchair back canes.
a. Remove the Corbac adjustable mount from the cardboard packaging. Do not
unfold.
b. Locate the back cane pockets along the inside of the back panel and under the
adjustment straps. Reflective tape identifies the opening of the cane pockets.
c. Slide Corbac adjustable mount cane pockets over the wheelchair back canes. (You
may need to slightly loosen the adjustable mount straps.)
Y Failure to use the back cane pockets can result in the Corbac sliding down the
back canes resulting in injury to user.
4. Tighten the adjustment straps slightly. On some rigid model wheelchairs one or more
of the bottom adjustment strap(s) may need to be located below the rigidizer bar.
5. Pull down and attach privacy flap to seat sling allowing sufficient slack for the cushion
to be placed against the back canes.
6. Install the seat cushion ensuring proper location.
7. Proceed to section titled “Fitting the Corbac.”

Ride™Corbac™Adjustable Back Support Owner’s Handbook 4
www.ridedesigns.com
Replace existing sling back upholstery on a wheelchair with push
handles and existing threaded inserts
1. Verify that the Corbac will be used without the original wheelchair back upholstery
and that the rear canes are equipped with push handles (A) and threaded inserts (B) as
shown in Illustration 1.
2. Remove the Corbac adjustable mount from the cardboard packaging. Do not unfold.
3. Locate large pocket underneath the adjustment straps.
4. Slide the Corbac adjustable mount over the push handles of the wheelchair pushing
the handles through holes provided in the inside upper and lateral corners of the large
pocket.
5. Align the grommets on the Corbac mount with the original threaded insert on the
wheelchair.
6. Insert screw from original wheelchair upholstery through the grommet and into the
threaded insert, and tighten securely (Illustration 2).
7. Tighten Corbac Mount tension straps lightly. On some rigid model wheelchairs, the
bottom strap(s) may need to be be located below the rigidizer bar.
8. Pull down and attach privacy flap to seat sling allowing sufficient slack for a seat
cushion to be placed against the back canes.
9. Install seat cushion ensuring proper location.
10. Proceed to section titled “Fitting the Corbac.”
Replace sling back upholstery on a wheelchair that has back canes
with integrated push handles but without existing threaded inserts
1. Verify that the Corbac will be used without the wheelchair back upholstery and that
the rear canes are equipped with push handles but without existing threaded inserts
(Illustration 3).
2. Determine the cane diameter at the location where the top of the Corbac height will be
positioned.
3. Use the following clamps for your cane diameter:
1" cane ............. Large clamps without shims
7/ 8 " cane ............. Large clamps with shims
3/4" cane ............. Small clamps with shims
4. With the clamp’s screw inserts towards the back side of the wheelchair, install the
clamps by spreading the clamps over the canes (Illustration 4). Adjust the clamp height to
¾" below the final Corbac height and ensure both clamps are at the same height above
the seat rails (Illustration 5). Do not install the screws at this time.
5. Install the Corbac adjustable mount.
a. Remove the Corbac adjustable mount from the cardboard packaging and detach
spacer fabric overlay. Do not unfold. Locate the large pockets underneath the
adjustable straps.
b. Slide the Corbac adjustable mount over the wheelchair push handles and clamps,
pushing the handles through the holes provided in the inside upper and lateral corners
of the large pocket (Illustration 6).
c. Align the adjustable mount grommet holes with the clamps and insert the 10-32
screws provided. Adjust the clamp rotations to match the desired curvature of the
adjustable mount. Tighten the screws securely (Illustration 7).
6. Tighten straps lightly. On some rigid model wheelchairs, the bottom strap(s) may be
located below the rigidizer bar.
7. Pull down and attach the privacy flap to seat allowing sufficient slack for a seat cushion
to be placed against the back canes.
4
56
7
A
B
1
2
3

Ride™Corbac™Adjustable Back Support Owner’s Handbook 5
www.ridedesigns.com
8. Install seat cushion ensuring proper location.
9. Proceed to section titled “Fitting the Corbac.”
Install Corbac over existing sling back upholstery
1. Leave existing sling back upholstery in place on wheelchair.
2. Install the Corbac adjustable mount.
a. Remove the Corbac adjustable mount from the cardboard packaging. Do not
unfold.
b. Locate the large pocket underneath the adjustment straps.
c. Slide the Corbac adjustable mount over the wheelchair’s sling back upholstery.
Ensure the existing sling upholstery is inserted into the large pocket. (You may need to
slightly loosen the straps.)
d. Tighten straps lightly. On some rigid model wheelchairs, the bottom strap(s) may be
located below the rigidizer bar.
4. Pull down and attach privacy flap to seat sling allowing sufficient slack for a seat
cushion to be placed against the back canes.
5. Install seat cushion ensuring proper location.
6. Proceed to section titled “Fitting the Corbac.”
Fitting the Corbac
1. Transfer onto wheelchair.
2. Adjust straps on mount for optimal balance and trunk alignment (Illustration 8).
3. Adjust thoraco-lumbar-pelvic (TLP) supports (Illustration 9).
a. Lean forward and place TLP supports (tips pointing inward) against your trunk at
desired location in the lumbar-sacral region.
b. Lean back to attach wedges to the front surface of the adjustable mount via the
hook and loop fastener.
c. The TLP supports can be moved up/down, in/out, and rotated. In some instances,
they may extend beyond the width of the wheelchair frame and can be trimmed.
d. Continue to make adjustments to the TLP supports until the desired posture and
comfort is achieved.
4. Install the spacer mesh overlay (Illustration 10).
a. Lean forward and pull the spacer mesh overlay over the adjustable mount and TLP
supports.
b. Attach the hook fastener at the inside bottom/front of overlay to the loop fastener
on the front of the adjustable mount.
c. Lean back and attach the four loop fastener straps of the overlay to the back of the
adjustable mount straps.
d. Pull the spacer mesh overlay back flap over the adjustable mount’s straps. Loop
fastener strips on the back flap will affix to the back side of the adjustable mount
straps.
e. Readjustment of TLP supports may be necessary once overlay is in place. Simply
remove overlay, adjust position of the TLP supports, and re-install the overlay.
10
8
9

Ride™Corbac™Adjustable Back Support Owner’s Handbook 6
www.ridedesigns.com
Initial wearing schedule
Prior to prolonged sitting, it is advisable to use your Ride Corbac for a short period of
time and visually check any area that contacts the back support. Any reddened area
should fade within 10-30 minutes. Contact your doctor or therapist if redness persists for
greater than 30 minutes. As long as skin inspections do not show red areas persisting
more than 30 minutes, you are safe to continue use. Skin checks should be made no less
than daily, even after skin tolerance is established. Continue to perform routine intermittent
pressure relief techniques (forward lean) as advised by your healthcare professional.
Y WARNING: If any redness associated with the use of the Corbac persists for greater
than 30 minutes, cease using and contact your therapist or doctor immediately.
Follow-up
It is recommended to have your seated posture and skin integrity checked by your
healthcare professional at least annually, or whenever you experience a change in
your weight, posture, or general condition that could impact your ability to sit safely,
comfortably, and functionally.
Care and Maintenance of Your Ride Corbac
Cleaning the Corbac spacer mesh overlay
• Remove the spacer mesh overlay from the Corbac.
• Attach hook/loop fasteners to each other. Place in a zipper bag
• Machine or hand wash in warm water (regular detergent/no bleach).
• Hang dry.
Cleaning the Corbac adjustable mount
Using a damp cloth or mild disinfectant, clean the privacy flap, TLP supports, and base
components as needed.
CAUTION: Do not clean your Corbac with isopropyl alcohol or any other chemical
solvents.
Motor vehicle safety
Y RISK OF INJURY: The Corbac has NOT been dynamically tested for use in a motor
vehicle. Do not rely on a Corbac for safe impact support in a motor vehicle. Serious injury
or death could occur during a motor vehicle accident without proper Original Equipment
Manufacturer vehicle safety features being utilized.
1. Always transfer out of your Corbac and into Original Equipment Manufacturer vehicle
seat and restraints for motor vehicle travel.
Maintenance
The Corbac and attachements should be routinely checked every 6 months minimum for
loose, missing or damaged hardware and proper functionality. Inspect and tighten all
components according to this manual. Contact your authorized Ride Designs supplier
regarding any damaged or missing components.
Y Do NOT continue to use your product with any loose, missing or damaged
components.
Laundry Care Symbols
h
H
Machine wash warm water (40˚ C)
Do not bleach
Drip dry
Do not dry clean
Do not iron
V
K
C

Ride™Corbac™Adjustable Back Support Owner’s Handbook 7
www.ridedesigns.com
Product Life
The maximum intended usage of this product is four years.
Reuse
Y RISK OF INJURY: Consult an authorized Ride Designs dealer before transferring to
another user. Do NOT use product if any damage is found.
Disposal
♻Recycle components and materials per local, state, and national regulations.
Warranty Policy
Your Ride Designs®Corbac™Adjustable Back Support has been carefully constructed
to meet your posture and skin integrity needs. This Limited Warranty is effective for
24 months from the date of delivery to the original purchaser. If any defect in material
or workmanship is found, Ride Designs will repair or replace the component, at our
discretion. This limited warranty does not cover daily wear and tear or damage that
is a result of mishandling, misuse, neglect, or not following the care and maintenance
instructions.
Claims and repairs should be processed through your nearest authorized Ride Designs
rehab technology supplier. A copy of the Bill of Sale issued to the purchaser of the product
may be required prior to processing a warranty claim.
The Ride Corbac back support works best when used with
a complementary Ride Designs Cushion
The Ride Forward Cushion is most appropriate for people with mild to moderate risk
for skin breakdown.
Achieve a high level of skin protection and functional performance with the Ride Java
Cushion (only the Ride Custom Cushion can provide a higher level of protection and
support).
For people at higher risk for skin breakdown, and/or more challenging postural control
needs, the Ride Custom Cushion is the ultimate in postural support and skin care. It
is specifically contoured to support a person’s unique size, shape, posture and functional
requirements. Available in US only.
More information on the full line of Ride Designs cushion options is available at
www.ridedesigns.com.

Ride™Corbac™Adjustable Back Support Owner’s Handbook 8
www.ridedesigns.com
Installation Notes
Patents: www.ridedesigns.com/patents
© 2015, Ride Designs. 090-005-B
C
y
MDSS GmbH
Schiffgraben 41
30175 Hannover, Germany
Table of contents
Other Ride Personal Care Product manuals
Popular Personal Care Product manuals by other brands

MGA Commodies
MGA Commodies GEOME-24 installation instructions

tanning essentials
tanning essentials PROV Troubleshooting

SystemRoMedic
SystemRoMedic HygieneSling user manual

ResMed
ResMed S9 Series Welcome guide

Arizant Healthcare
Arizant Healthcare Bair Paws 850 Operator's manual

DERMAMED
DERMAMED MEGAPEEL EX SILVER SERIES Instructional manual