Herowear Apex Exosuit User manual

Quick Start Guide
10000-T-02

Introducing the Apex 1
Diagram of Components 1
Basic Assembly 2
Pung the Apex On 4
Put on the Anchors 6
How To Detach and Store Anchors 9
Adjusng the Apex 10
Using the Apex 12
Taking the Apex O 14
Maintenance 14
Safety Consideraons 16
Resources 17
Apex Exosuit Fing Checklist 18
Contents

1herowearexo.com
Introducing the Apex
Thank you for purchasing the HeroWear Apex. This Quick Start Guide is an
abridged version of The Apex Exosuit User Manual. Familiarizing yourself with
this guide will enable you to quickly idenfy Apex components and understand
how to assemble, wear, adjust, and maintain the exosuit. Always keep this guide
with your exosuit unit for reference—because a strong, comfortable t is the
HeroWear standard.
Now, let’s get started.
Diagram of Components
HEROWEAR - SUPERSUIT COVER
Style Numbers
Style Name Supersuit
Client HEROWEAR LLC.
Prepared by Interwoven Design Group
HW100 - Back Component
HW110 - Thigh Slvs
HW120/HW130 - Straps
HW140/HW150 - Latex Bands
DATE: 1/31/2020
PAGE 1
Figure 1: Components of the Apex Exosuit
Shoulder Strap
Back
Dual-mode
Switch
Clutch
Thigh Sleeves
Bands
Back View Front View
Chest Strap
Webbing with
Ladder Locks
Rope
Cable
2herowearexo.com
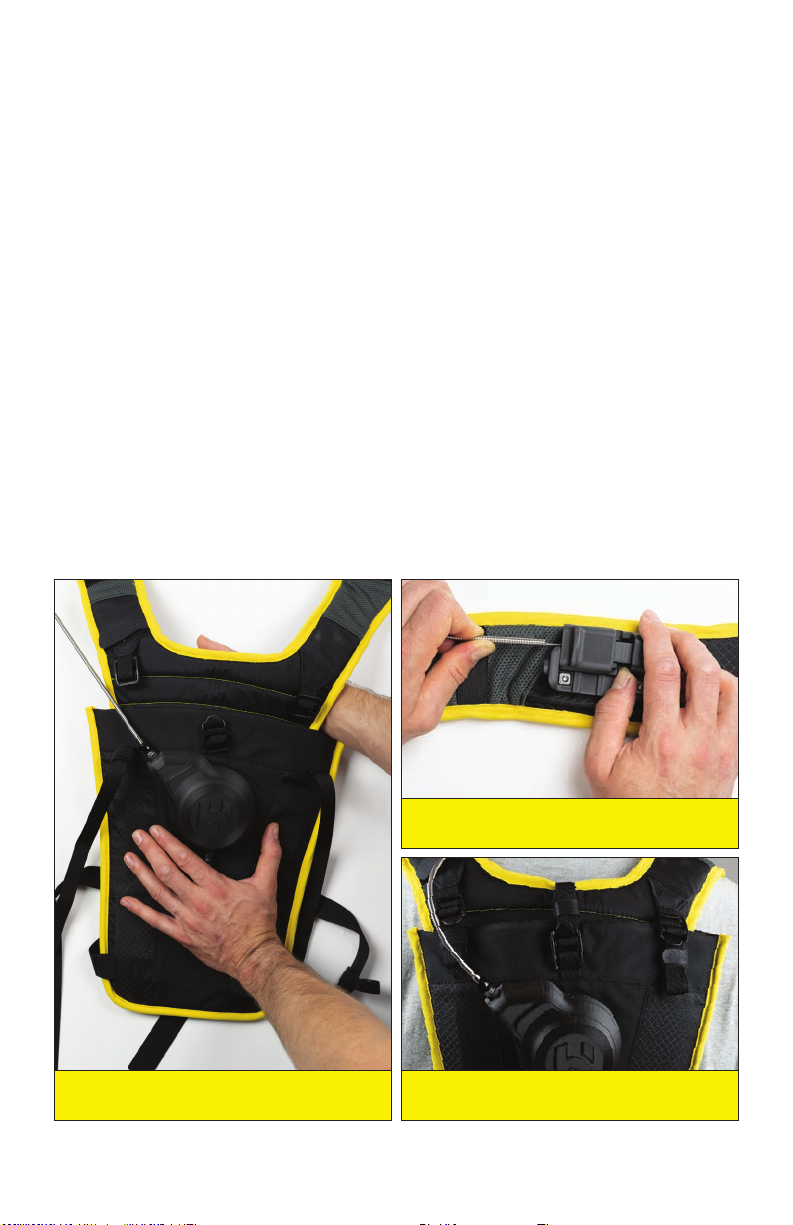
Basic Assembly
Step 1 Install the Shoulder Straps into the Back by sliding the Strap’s
large center panel into the Back’s pocket using the yellow
stching to ensure they are installed straight/level (Figure 2).
The Back length can be adjusted by sliding more or less of the
Strap’s large center panel into the Back.
Step 2 Install the Switch onto the rails of the le Shoulder Strap then
install the set screw to lock the Switch in place (Figure 3).
Step 3 Connect the Webbing Strips. Connect the three (3) Webbing
Strips at the top of the Back into the ladder locks and ghten
so that when the Apex is on the user, there is no slack in the
Webbing (Figure 4). Connect the two (2) Webbing Strips from
the boom of the Back to the end of the Shoulder Straps.
Figure 4: Webbing Strips into Ladder Locks
Figure 2: Shoulder Strap Installaon
Figure 3: Switch Installaon
3herowearexo.com
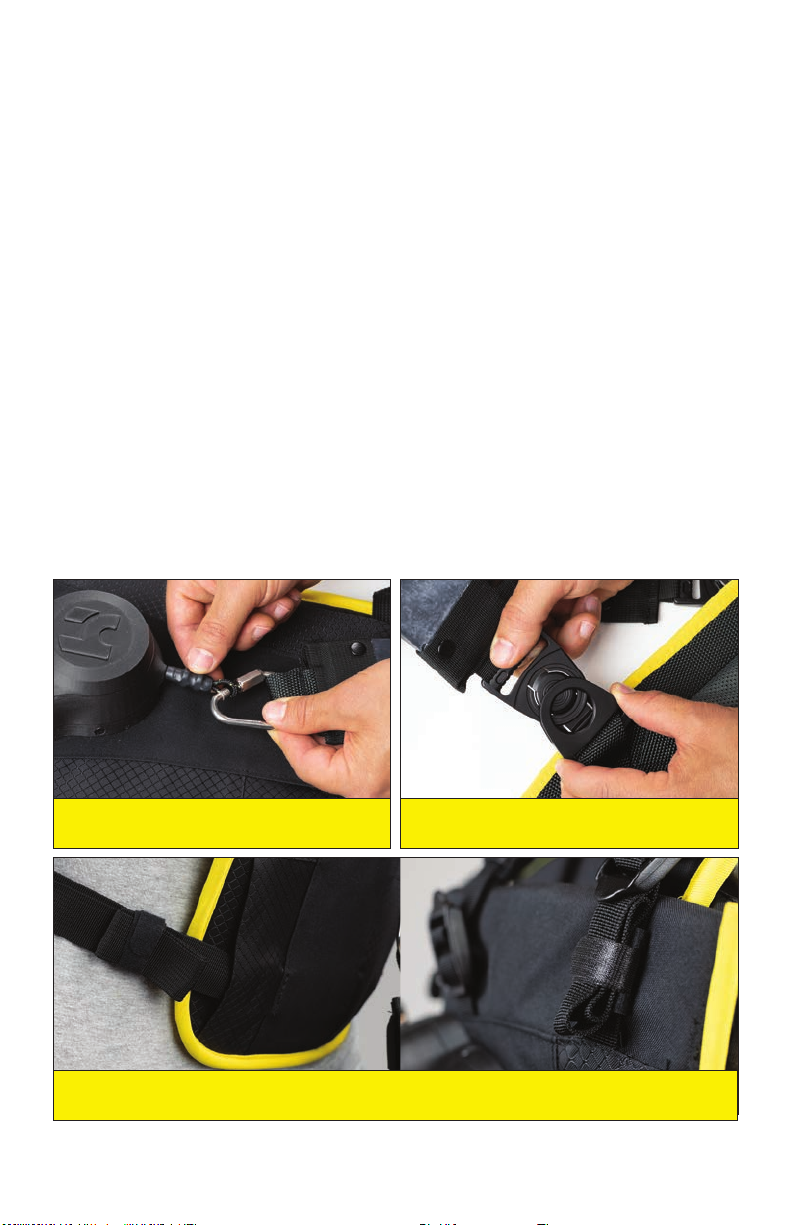
Figure 5: Connect Bands to Rope Loop Figure 6: Clip Bands to Thigh Sleeves
Figure 7: Capture Loose Webbing with Webbing Keepers
Step 4 Connect the Bands to the Rope loop at the boom of the Clutch
on the Back by unscrewing the gate on the triangle, sliding it
into the loop then reghtening the gate (Figure 5).
Step 5 Clip the Bands to the Thigh Sleeves. Be sure to clip the Band
angled toward the right thigh into the right Thigh Sleeve and
the Band angled toward the le thigh into the le Thigh Sleeve
(Figure 6).
Step 6 Capture loose Webbing with Webbing Keepers. Fold or roll up
extra Webbing once the Apex is properly adjusted and capture
with the Webbing Keepers (Figure 4, 7, 11, and 12).

4herowearexo.com
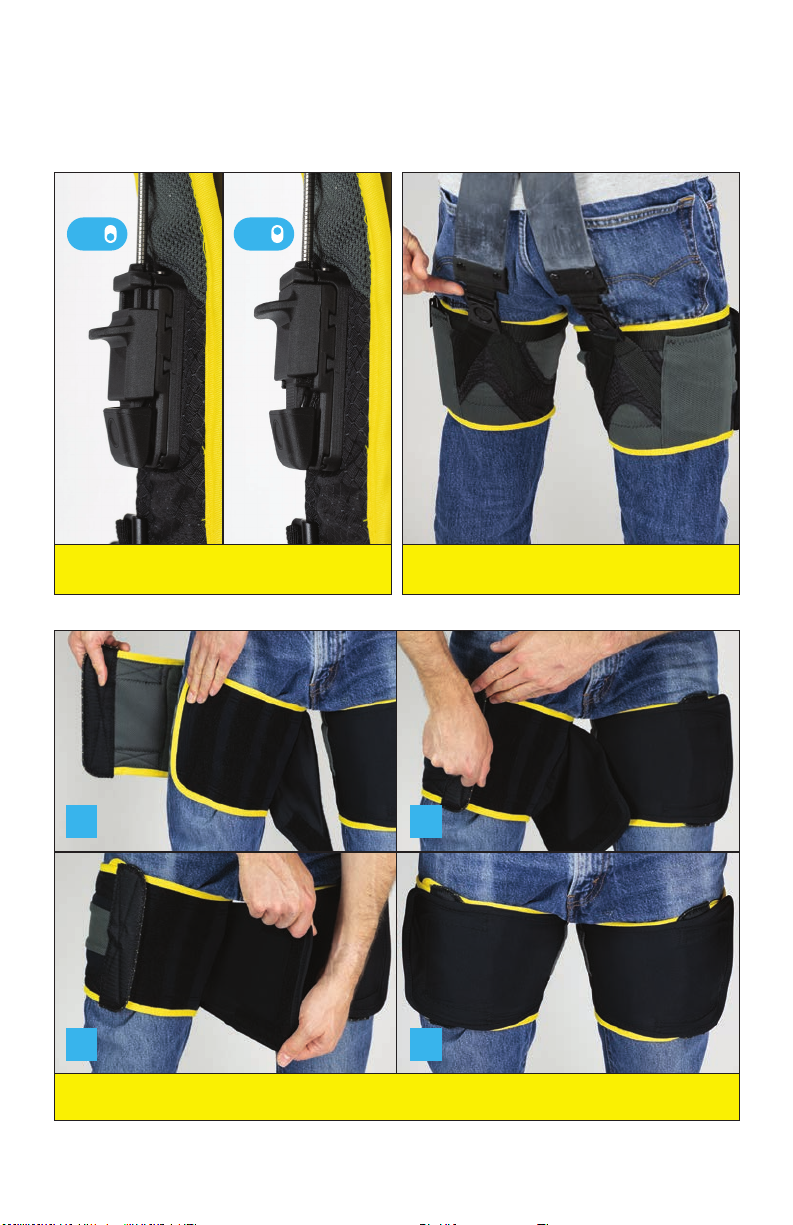
Putting the Apex On
Note: The Apex is intended to be worn over clothing.
Step 1 Start with the Shoulder Straps. Shoulder Straps and Back go on
like a backpack.
Step 2 Switch O. Be sure the Switch is toggled OFF by pressing the
buon at the boom of the Switch before pung on Thigh
Sleeves (Figure 8).
Step 3 Wrap Thigh Sleeves. The label on the inside of the Thigh Sleeve
will indicate which thigh it goes on, and the black clip on the
back of the Thigh Sleeve should always be at the top of the thigh
and centered on the buock (Figure 9).
Follow steps A, B, and C, and D in Figure 10.
Secure Thigh Sleeves by wrapping the inner ap around the
front of the thigh, then the ap from the outer part of the thigh
aaches over it, with the nal ap stretched ght from the inner
thigh, and fastened in to place over the front of the thigh.
Step 4 Connect Bands. If the Back and Thigh Sleeves are already
connected with the Bands, the user is ready to use the Apex
exosuit; if not, connect the Bands by clipping them (Figure 9).
5herowearexo.com
Figure 8: Dual-mode Switch ON/OFF
Figure 10: Wrapping Thigh Sleeve
ON OFF
Figure 9: Thigh Sleeve Placement
A B
C D

6herowearexo.com
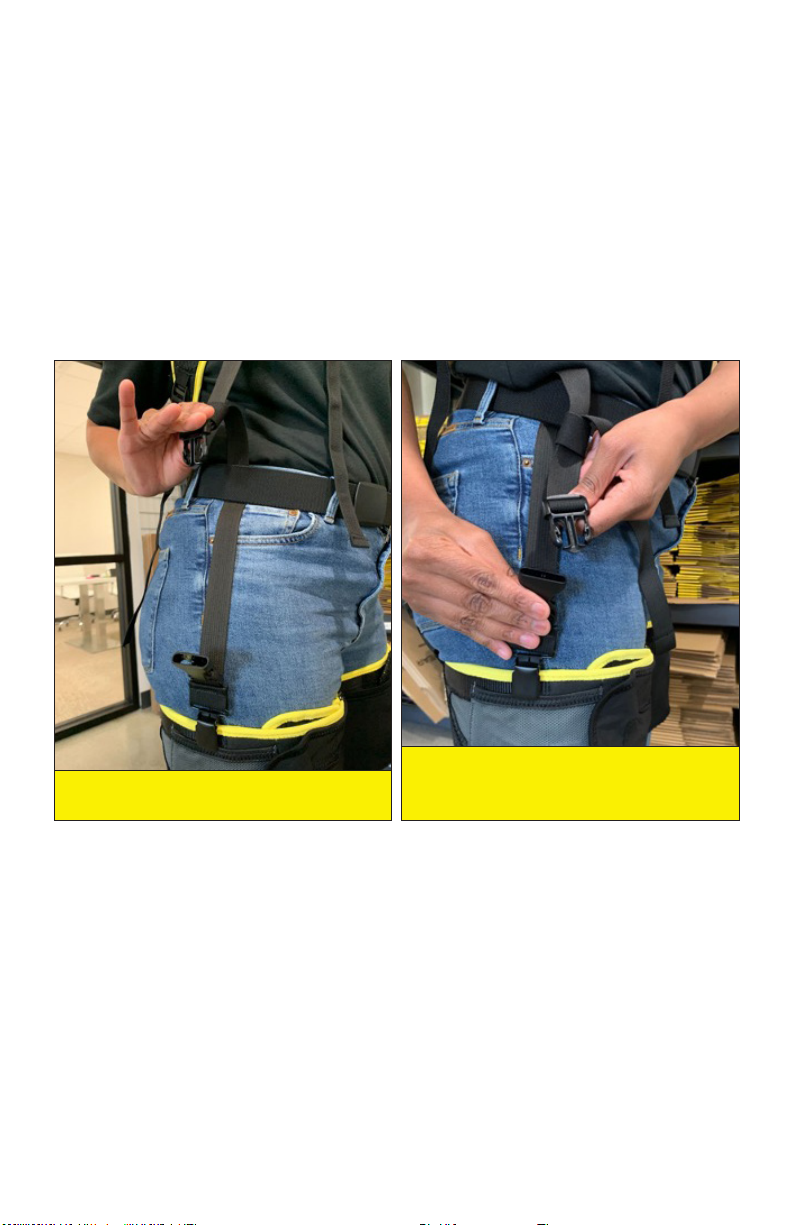
Put on the Anchors
If you haven’t already, assemble and put on yourApex exosuit, and wear a sturdy belt
(we have provided a belt with the anchors). You do not have to have pants with belt
loops to use the thigh sleeve anchors.
Step 1 Open the anchor clip by pulling up on the metal tab (Figure 11).
Step 2 Place plasc teeth around the top of the thigh sleeve, even with
the outermost part of your leg, with the at metal tab facing out.
Step 3 Push down on the at metal tab to close the clip and secure in
place.
Figure 11: Put on Anchors
7herowearexo.com
Step 4 Loop anchor strap under, then over the belt and fasten clip
(Figures 12 and 13).
Figure 12: Loop Anchor Strap Under Belt
Figure 13: Pull Anchor Over the Belt and
Fasten Clip

8herowearexo.com
Figure 14: Tighten Anchor Strap
Figure 15: Fold Loose Webbing and Secure
in Webbing Keeper
Step 5 Tighten anchor strap by pulling up on the loose end of the
strap. Make sure the anchor strap is loose enough to t a at
hand under the strap to allow adequate freedom of movement
(Figure 14).
Step 6 Fold loose webbing and secure in webbing keeper (Figure 15).
Step 7 Repeat for both thigh sleeves.

9herowearexo.com
Figure 16: Release Anchor Buckle Figure 17: Unloop from Belt
How To Detach and
Store Anchors
Step 1 Release anchor buckle, unloop from belt (Figures 16 and 17).
Step 2 Reclip the anchor buckle. Fold excess webbing in thigh sleeve
pocket, leaving metal clip aached to thigh sleeve. If used, you
can also fold and tuck the provided belt in a pocket (Figure 18).
Figure 18: Reclip the Anchor Buckle, Fold Excess Webbing in Thigh Sleeve Pocket, Leave
Metal Clip Aached to the Thigh Sleeve

10 herowearexo.com
Adjusting the Apex
Back Length Loosen or detach the three (3) strips of Webbing connecng
the Shoulder Straps to the Back. Pull the Shoulder Straps
away from the Back and adjust the length by sliding more
or less of the Strap’s large center panel into the Back, and
using the yellow stching to ensure they are installed
straight and level. Reaach and ghten the Webbing
connecng the Shoulder Straps to the Back so there is no
slack in the Webbing when the Apex is being worn (Figures
19 and 20).
Strap Length Loosen or ghten the Shoulder Straps like a backpack so
that the Switch sits on the front of the shoulder, not on top
(Figure 21 and 22). Shoulder Straps should t snugly but
allow for comfortable movement.
Chest Strap Loosen and ghten the Chest Strap to the desired length
like a backpack.
Thigh Sleeves Adjust Thigh Sleeves so that they are very snug and allow
for comfortable movement, using the instrucons in Step 3
on Page 4.
Band Length
and Strength
Contact HeroWear to obtain the proper Band length or
strength for the user.

11herowearexo.com
Figure 19: Shortest Back Length Figure 20: Longest Back Length
Figure 22: Male Straps Adjusted Correctly
Figure 21: Male Straps Adjusted
Incorrectly. Straps too loose. Note height
of Switch.

12 herowearexo.com
Using the Apex
The Apex is a passive exosuit with no baeries, motors, or sensors. It uses elas-
c bands acvated by a proprietary, patent-pending mechanical on/o switch
as its support and assistance mechanism to reduce strain, fague, and injury
risk for the ssues of and those surrounding the spine, torso, hips, and thighs
during tasks that require the user to bend, lean, stoop, squat, or li.
The Apex exosuit does not increase strength or allow users to li loads that are
heavier than they can typically li. Always use good body mechanics and safe
liing techniques when using the Apex.
Switch Operation
Engage the system by pulling the upper poron of the Switch downward unl
it clicks. Disengage the system by pressing the buon at the boom of the
Switch so that the upper poron of the Switch slides back up to the top of the
rails (Figure 8).
ON OFF

13herowearexo.com
Engaged Mode
The Apex exosuit is designed to be engaged while performing tasks and
acvies, such as but not limited to, the following:
• Liing
• Bending
• Leaning forward
• Stooping
• Squang
• Extended reaching involving bending or leaning
Disengaged Mode
The Apex exosuit can be disengaged when the assistance from the Bands is not
wanted or needed. While in disengaged mode, users can easily perform tasks
and acvies that do not require assistance from the device, such as but not
limited to the following:
• Walking
• Running
• Climbing
• Sing
• Operang equipment
• Lying down
• Crawling

14 herowearexo.com
Taking the Apex O
Step 1 Switch the device OFF to disengage.
Step 2 Remove Thigh Sleeves.
Step 3 Unclip the Chest Strap.
Step 4 Loosen Shoulder Straps if needed.
Step 5 Take the device o like a backpack.
Maintenance
Sanitizing and Cleaning
Daily Sanizing
• With the device hanging on a hanger, spray all parts except the Switch,
Cable, and Clutch well at the end of each day with a sanizing soluon.
Disinfectant wipes can be used to wipe, clean, and sanize the Switch,
Cable, Clutch, and any other hard or elasc component.
• For recommended cleaning products and further cleaning instrucon, visit
hps://HeroWearExo.com/Care
• Ensure there is adequate airow around the device and allow it to dry
thoroughly before the next use.

15herowearexo.com
Periodic Cleaning
• Cleaning Opon 1 (Paral Machine Wash):
Note: DO NOT machine wash the Back component of the Apex exosuit.
Please read and follow these instrucons carefully.
• Ensure the Apex is in disengaged mode.
• Remove the Switch from the Le Shoulder Strap and engage it to lock it together.
• Remove the Shoulder Straps from the Back, disconnect the Thigh Sleeves from
the Bands, and remove the Bands from the Back.
• Place the Shoulder Straps and Thigh Sleeves inside a laundry sack and machine
wash using mild detergent in cold or warm water (do not use hot water) using the
most gentle cycle possible.
• The Back and Bands can be hand washed with a moist, soapy rag (mild detergent
and cold or warm water).
• The Switch, Cable, Clutch, and any other hard or elasc components can be
wiped clean with moist, soapy rag, or disinfectant wipes; be careful not to get
these components wet or submerge them. For recommended cleaning products
and further cleaning instrucon, visit hps://HeroWearExo.com/Care.
• Line dry wet components thoroughly.
• Cleaning Opon 2 (Complete Hand Wash):
• All measures listed in Opon 1 apply to Opon 2, exempng the instrucons for
machine washing the Shoulder Straps and Thigh Sleeves.
• Alternately, the Shoulder Straps, Thigh Sleeves, Back, and Bands can be hand
washed with a moist, soapy rag (mild detergent and cold or warm water).

16 herowearexo.com
Inspection
Visually inspect the following areas on a weekly basis for any cracking, ripping,
or other signs of stress or wear: Shoulder Straps, Clutch, Switch, Bands, Thigh
Sleeves, Rope, Cable, Webbing, and all plasc
In the event that any of the above issues are idened during inspecon, take
pictures of the problem, and contact HeroWear by emailing
Care@HeroWearExo.com or vising hps://HeroWearExo.com/HeroCare360.
Depending on the severity of the issue, the Apex can stay in use if the problem
is only minor. For all condions that appear to aect the funconality of the
device, remove the Apex exosuit from use and contact HeroWear.
Storage
Store the Apex on a hanger, or on a rack, with sucient airow to allow the
exosuit to dry thoroughly if wet. Protect the exosuit from dust, moisture,
extreme temperatures (-4º Fahrenheit to 122º Fahrenheit), and large
temperature uctuaons by storing it in an area not subject to these
condions.
Safety Considerations
The Apex exosuit is only for use as intended. Please refer to User Manual for
detailed safety informaon.

17herowearexo.com
Resources
User Manual available at:
HeroWearExo.com/HeroCare360/user-manual

18 herowearexo.com
Apex Exosuit Fitting Checklist
Fit checks should be performed with new users. This involves observaon of
the user working with the Apex and discussion about adjustments that might
improve the t. Fit checks every two to four hours during the rst week of use
will help ne-tune the t for a beer user experience. Once users achieve their
perfect t, they may no longer require t checks, and can visit
HeroWearExo.com/HeroCare360 for addional inquiries about the Apex.
Straps
A. Shoulder Straps should be adjusted so the upper body poron of the Apex
is snug, minimizing any sliding or shiing on the body with movement. It
should t more snugly than a backpack.
B. Top of Switch is posioned at or slightly below collarbone level, not above
the collarbone.
C. Chest Strap is adjusted, horizontally and vercally, so that the Shoulder
Straps don’t interfere with arm movements across the body or overhead.
The Back and Straps should be so comfortable that they feel like part of the
body (rib cage/thorax). Similar to a hydraon pack for running, the Apex
should not bounce, slide, or shi.
D. Once adjusted for the user, all Webbing is captured in the Webbing Keeper.
Thigh Sleeves
E. Thigh Sleeves are worn as far up the thighs as possible, snug enough not to
shi, slide down, or rotate.
F. Thigh Sleeve clips are posioned under the middle of each bu cheek. Some
people may prefer the clips to be slightly more toward the body’s midline,
but not so far that the clips wedge between the buocks; nor should the
clips orient too far toward the outside of the hips so that the Bands slide
around the outside of the hips.
Other manuals for Apex Exosuit
1
Table of contents
Other Herowear Personal Care Product manuals


Popular Personal Care Product manuals by other brands

TZS First AUSTRIA
TZS First AUSTRIA FA-5530-1 instruction manual

Juzo
Juzo JuzoFlex Genu Xtra manual

Olymp
Olymp HairMaster HM600 I User instructions

SNORBLOK
SNORBLOK NITE-PRO instruction manual

Insportline
Insportline IN 23225 user manual

Mangar Health
Mangar Health Mangar Bathing Cushion Quick start guide and warranty

MDH
MDH Qmed Elbow Rush DRQF0H Instructions for use

Leggett & Platt
Leggett & Platt Designer Series owner's manual

Compressana
Compressana EASY manual

Deesse Pro
Deesse Pro Express user guide

Teufel
Teufel Ankle Air PRO user manual

American Standard
American Standard Plebe Round Front Complete Toilet 3500.000 Specification sheet


