Hi-ltte Rambo Phantom User manual
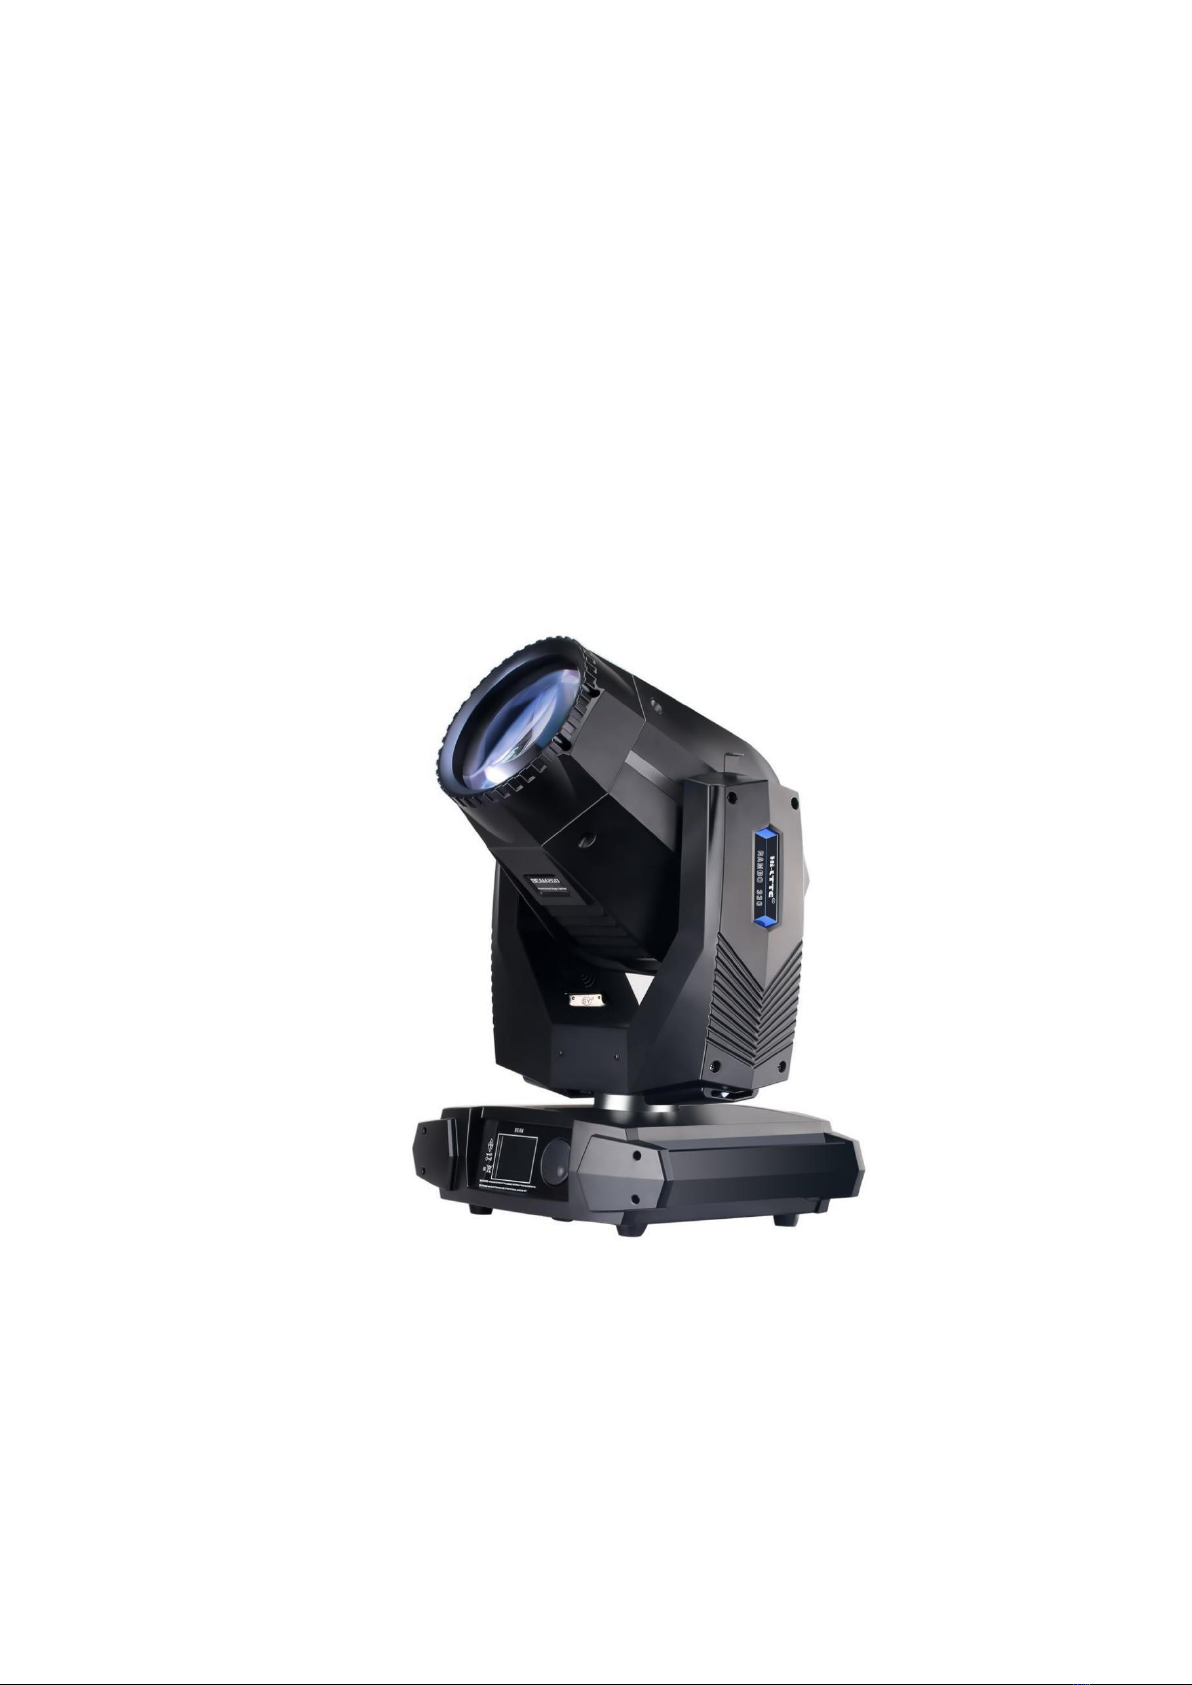
Rambo Phantom
330W Philips Lamp Super Sharpy Beam
User Manual

1. Safety Instructions -------------------------------------------------- 2
2. Technical Parameters ---------------------------------------------- 2
3. Schematic Lighting Components ------------------------------ 4
4. Packing And Shipping --------------------------------------------- 4
5. Safety Standard Installation ------------------------------------- 6
6. AC Power -------------------------------------------------------------- 9
7. Function ---------------------------------------------------------------- 9
8. Dynamic Effects ----------------------------------------------------- 11
9. LCD Control ---------------------------------------------------------- 13
10. DMX Control -------------------------------------------------------- 15
11. Failure Scoreboard And Solutions ------------------------- 18
12. Cleaning ------------------------------------------------------------- 19

1. Safety Instructions
• Before using this product, please check carefully the product is not unwrap or damage
during transportation. As a result of damage during transporting, please do not use
the lights, and contact with the dealer or manufacturer.
• Before running products, to ensure that the voltage and Hertz in accordance with the
requirements of lights.
• It’s very important to connecting ground wire to avoid the electric shock.
• This product is only for dry indoor environment.
• This product must be installed on the sufficient space and the shortest distance
between each light is at least 50cm, to ensure that the lights will not collide.
• Power off before moving or repairing the product.
• Make sure there is no explosive and flammable materials when the product is
working.
• Please use the safety rope as installing the product. Please lift the armrest base and
not the light body as moving the product.
• This product is suitable for a maximum temperature of 40 degrees Celsius. Please do
not use this product when the surrounding environment is higher than 40 degrees
Celsius.
• Do not touch the product as it working. It’s running at a very fast speed, so you must
avoid hands injury.
• Stop using the products immediately when some problems occur during the
showtime. Do not carry out maintenance, repair damage caused or likely to cause
other problems. Please contact the company’s maintenance repair. During the
repair process, use the same type of accessories.
• Please read the <User Manual> carefully, especially regarding the installation, using,
maintenance parts. Always transport the lighting in a packed anti-shock protection
carton or flight case.
2. Technical Parameters
• DM X Channels: 16 Channels/20Channels.
• DMX Mode: DMX 512.
• Display: LCD Display+rotating Button.
• Light Source: 330w Philips 16R Lamp.
• Motor: Total 11pcs supper quiet motors, 16 bit, including 2 3-phase step motors (X-axis
and Y-axis ), super silence and super speed.
• Color Temperature: 8000K.
• Life Span: 2000 Hours.
• Color Wheel 1: 14 Colors + White + OTC.
• Color Wheel 2: 8 Colors, Rainbow Effect.
• Fixed Gobo: 18 Fixed Gobo.
• Prism: 8 Facet Prism, 16 Facet Prism, 16+16 Facet Circular Prism, Variable Speed.
• Optical Lens: High quality precious optical system lens.
• Frost:Adjustable
• Focus: Linear Adjustable Focus.
• Dimmer: 0-100% Linear dimmer.
• Beam Angel: 0 - 2.3°.
• Shutter: Motorized(0.5-9 FPS).
• Housing: High temperature resistant alloy plastic.
• Parallel Beam Angel: 0-2.3°.
• Frost Beam Angel: 8°.
• IP Rate: IP20.
• Weight: 16KG.
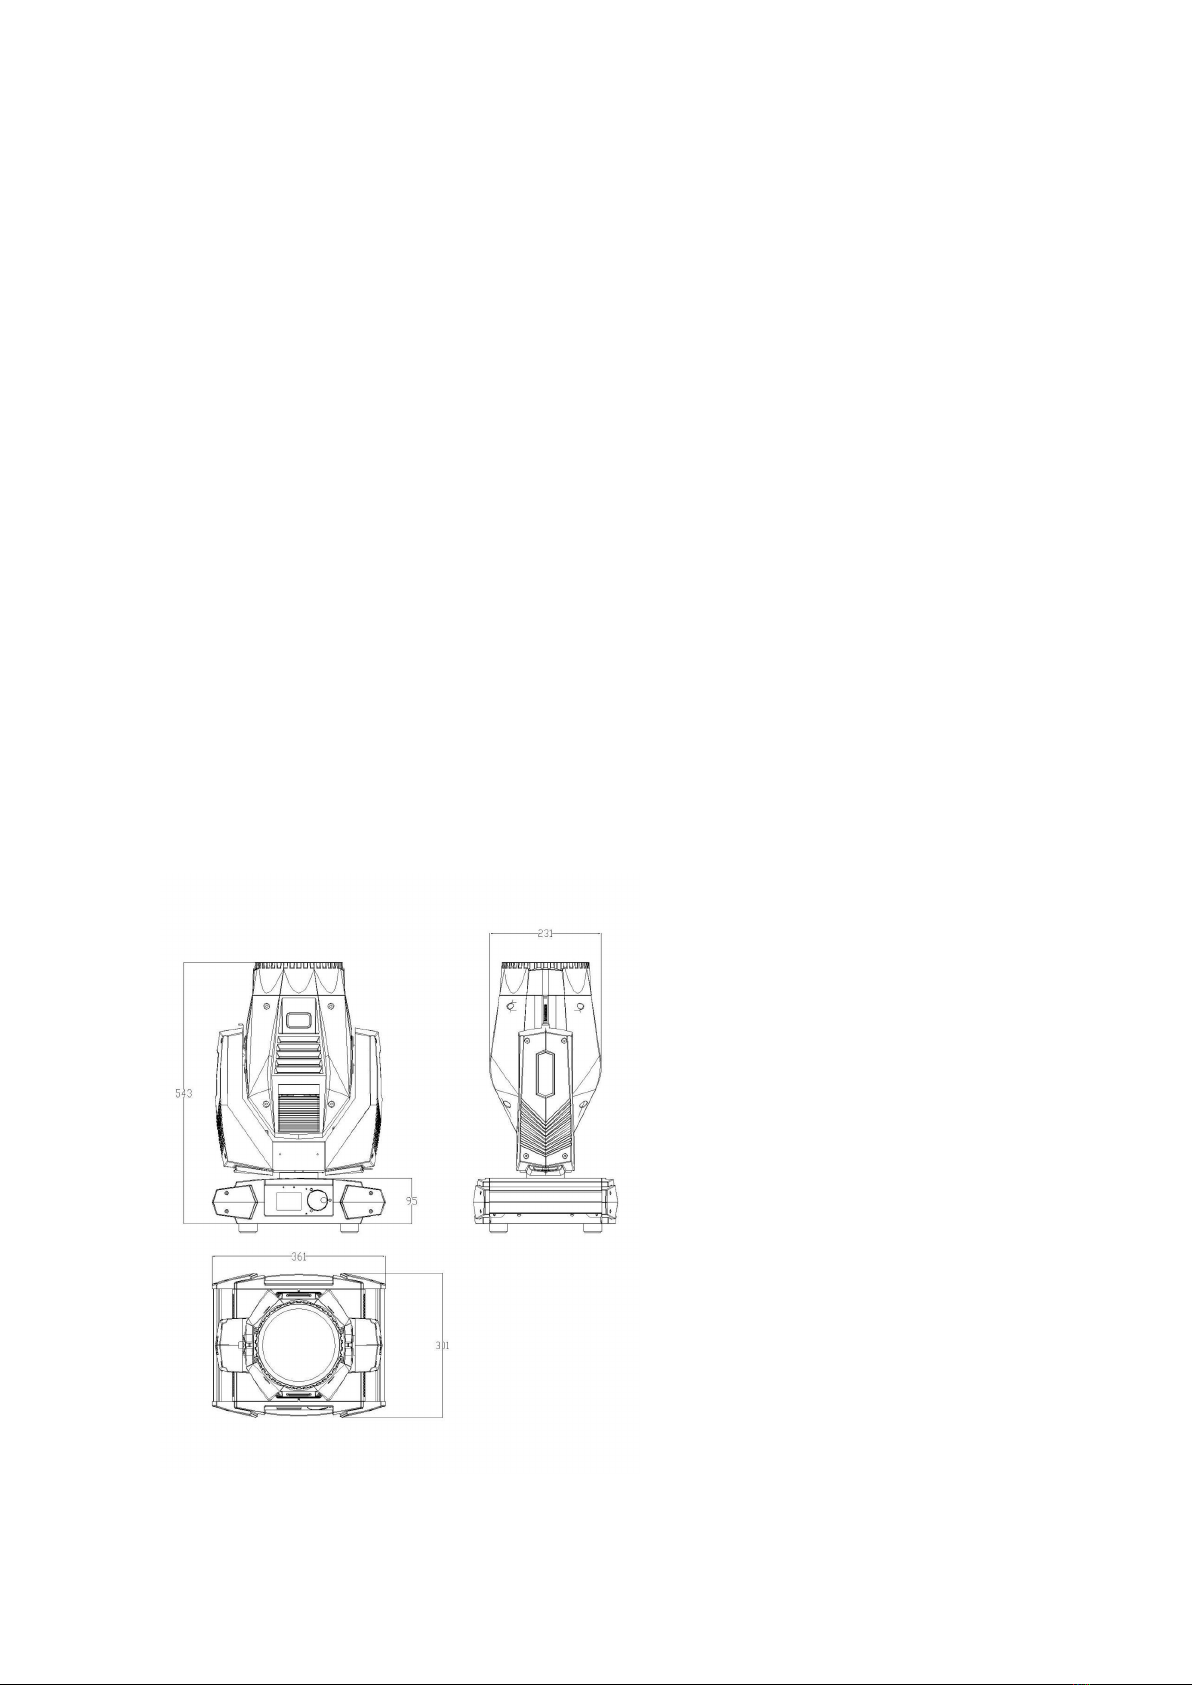
• Dimensions: 361*301*543mm.
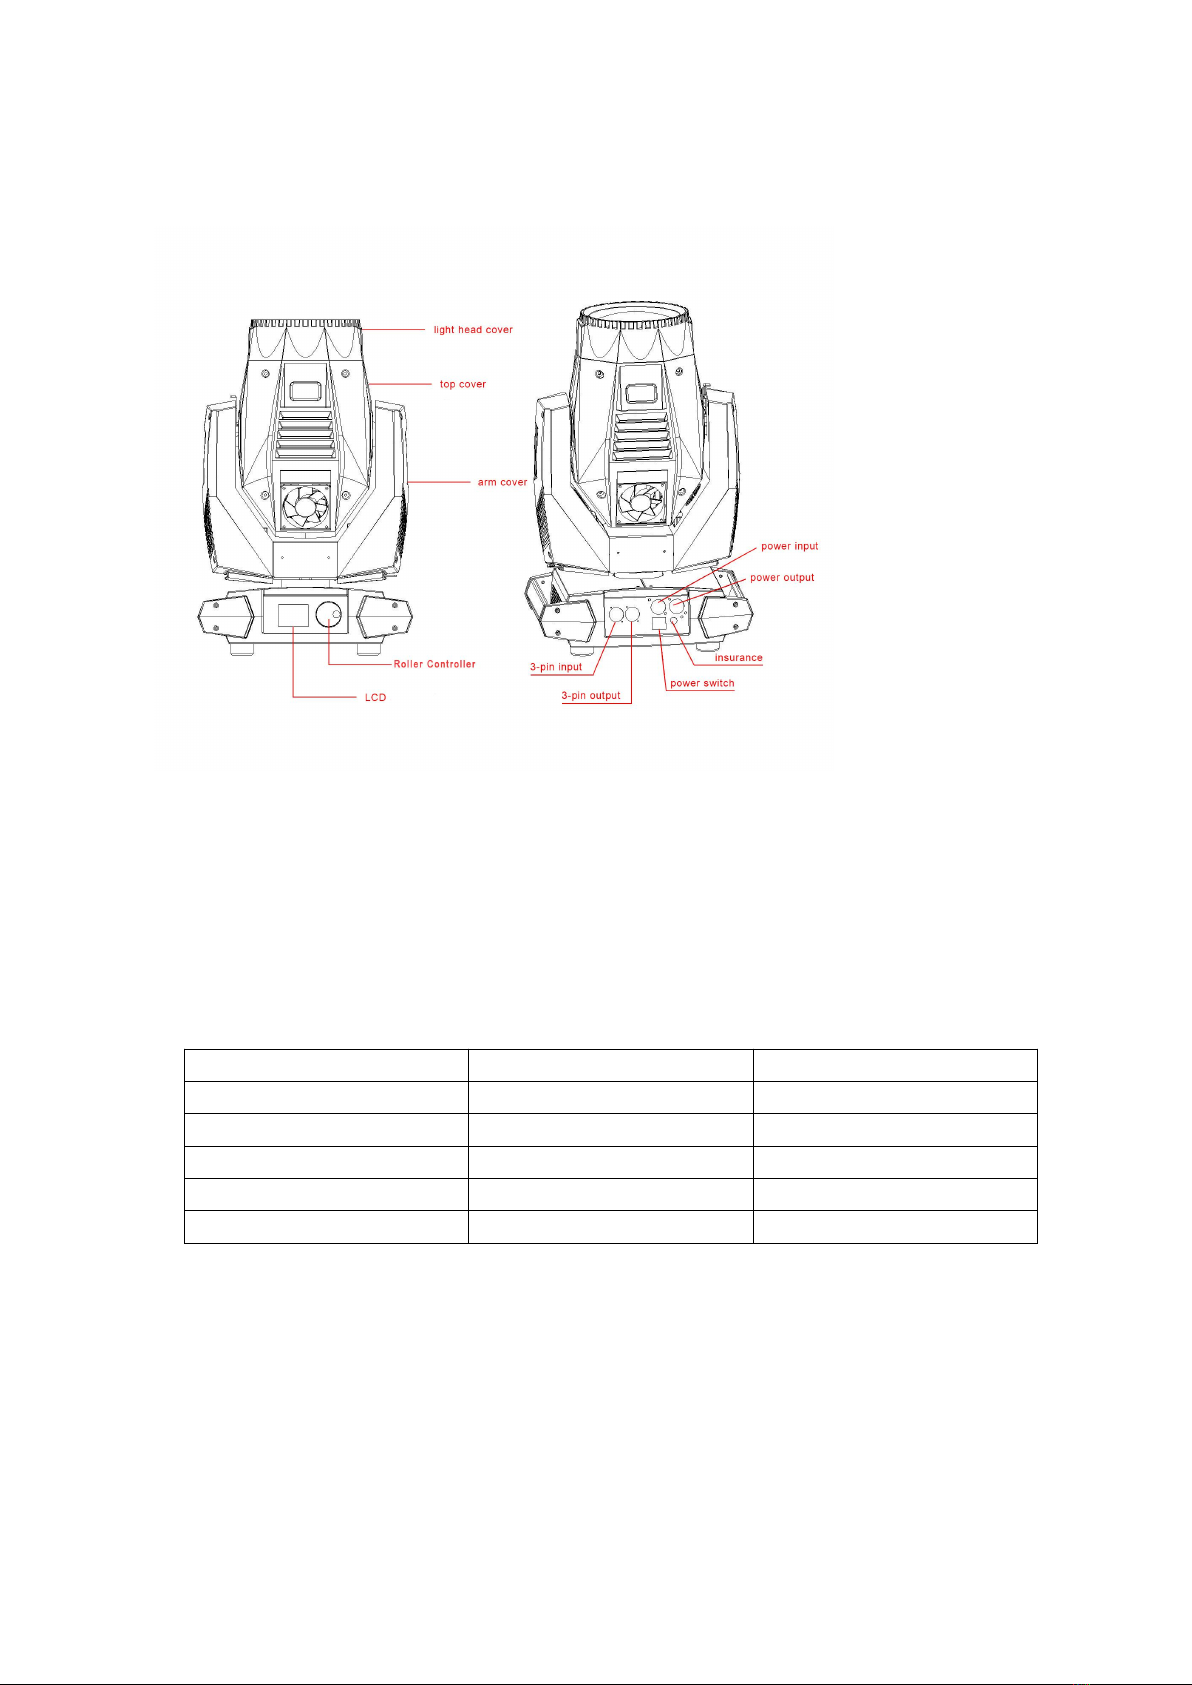
3. Schematic Lighting Components
4. Packing And Shipping
4.1 Packing Material And Accessories
RAMBO330 Super Beam is packaged by carton or standard 2in1flightcase(Other options are
the 1in1 flight case and 4in1 flight case). Random accessories items as shown below.
Item
Quantity
Unit
User Manual
1
Piece
Signal Line
1
Piece
Safety Rope
1
Piece
Hook Clamp
2
Pieces
Power Cable
1
Piece
4.2 Protection Lock For Transport
For the convenience of transportation, the light has 2 protection locks(Each of it is on the
X-axis and Y-axis.). There are 4 locked buttons on the X-axis and 3 locked buttons on the
Y-axis to lock the light’s position. The lock position is locked at the center and the light body
is in a vertical position with the arm.

4.3 Packing
1. Power off to let the lamp cool completely before packaging equipment at least 15
minutes or more.
2. Lock the light protection locks when cleaning the surface of the light.
3. Use the packing bag to cover the light, seize the aluminum handle on both sides of the
equipment and put it upside down and put it into the box gently.
4. Add lighting accessories after putting the light into packing box.
5. It’s only up to two crates stacked and is prohibited upside down.
4.4 Unpacking
1. Open the packing box and packing bag.
2. Seizing the equipment’s handles, lifting and carrying away the light from the
packing box or opening the flight case cover placing lift boom close to the light
base, then equipping light hook on light base bottom tightening quick Install
locks. At last rising away boom to the top of the lamp from flight case, put the
flight case away.
3. Unlock the light protection lock before turning on the light.
Note:
Upon receipt of lamps, please check if there is damage to the fold closure caused by
transport, where there is transportation damage, please do not use this fixture, and
contact us as soon as possible.

5. Safety Standard Installation
Users should ensure that light and installation materials are checked for regular safety
checks. Unprofessional incorrect installation can lead to dangerous, if the lack of working
conditions and professional standards, please operate the light by professionals.
Do not use the light if the working temperature isn’t -15-40 degrees Celsius. Don’t stand
directly under the light When the light is installed, dismantled, moved or serviced. The
operator must ensure that the fixtures are securely connected. Installing the light after
professionals approving electrical parameters make sure that these installation must be
checked at least once per year by experts.
5.1 Hook Clamp Installation
330W Super Beam Light can be placed on the stage or on a stand in any direction,quick lock
system can quickly and easily remove or install a light hook.
Note: must use two clamps fixed equipment, and are 1/4 buckle fastening jig, only fully rotated 90
degrees clockwise to lock fastener.
5.2 Fixing Equipment
1. Before installing fixtures must verified rigging equipment is not damaged, and can bear at
least 10 times of light’s weight. Check the building can be bore at least 10 times of total
weights of light, fixture, and cable accessories.
2. Insert the locked hook fastener into base mounting holes horizontally, grab the handle
clockwise 90 degrees fasteners, in the same way to install a second fastener, make sure the
fastener is fastened under the light base.
3. If truss can be lifted the equipment can be directly clamped from flight case and locked
fixture base. Then hung on the light and fixed it. Before rising the light to right height,
connect the power cord and signal cable.
Note: add a safety rope attached the light's base insurance shelf, do not connect the
device handle.
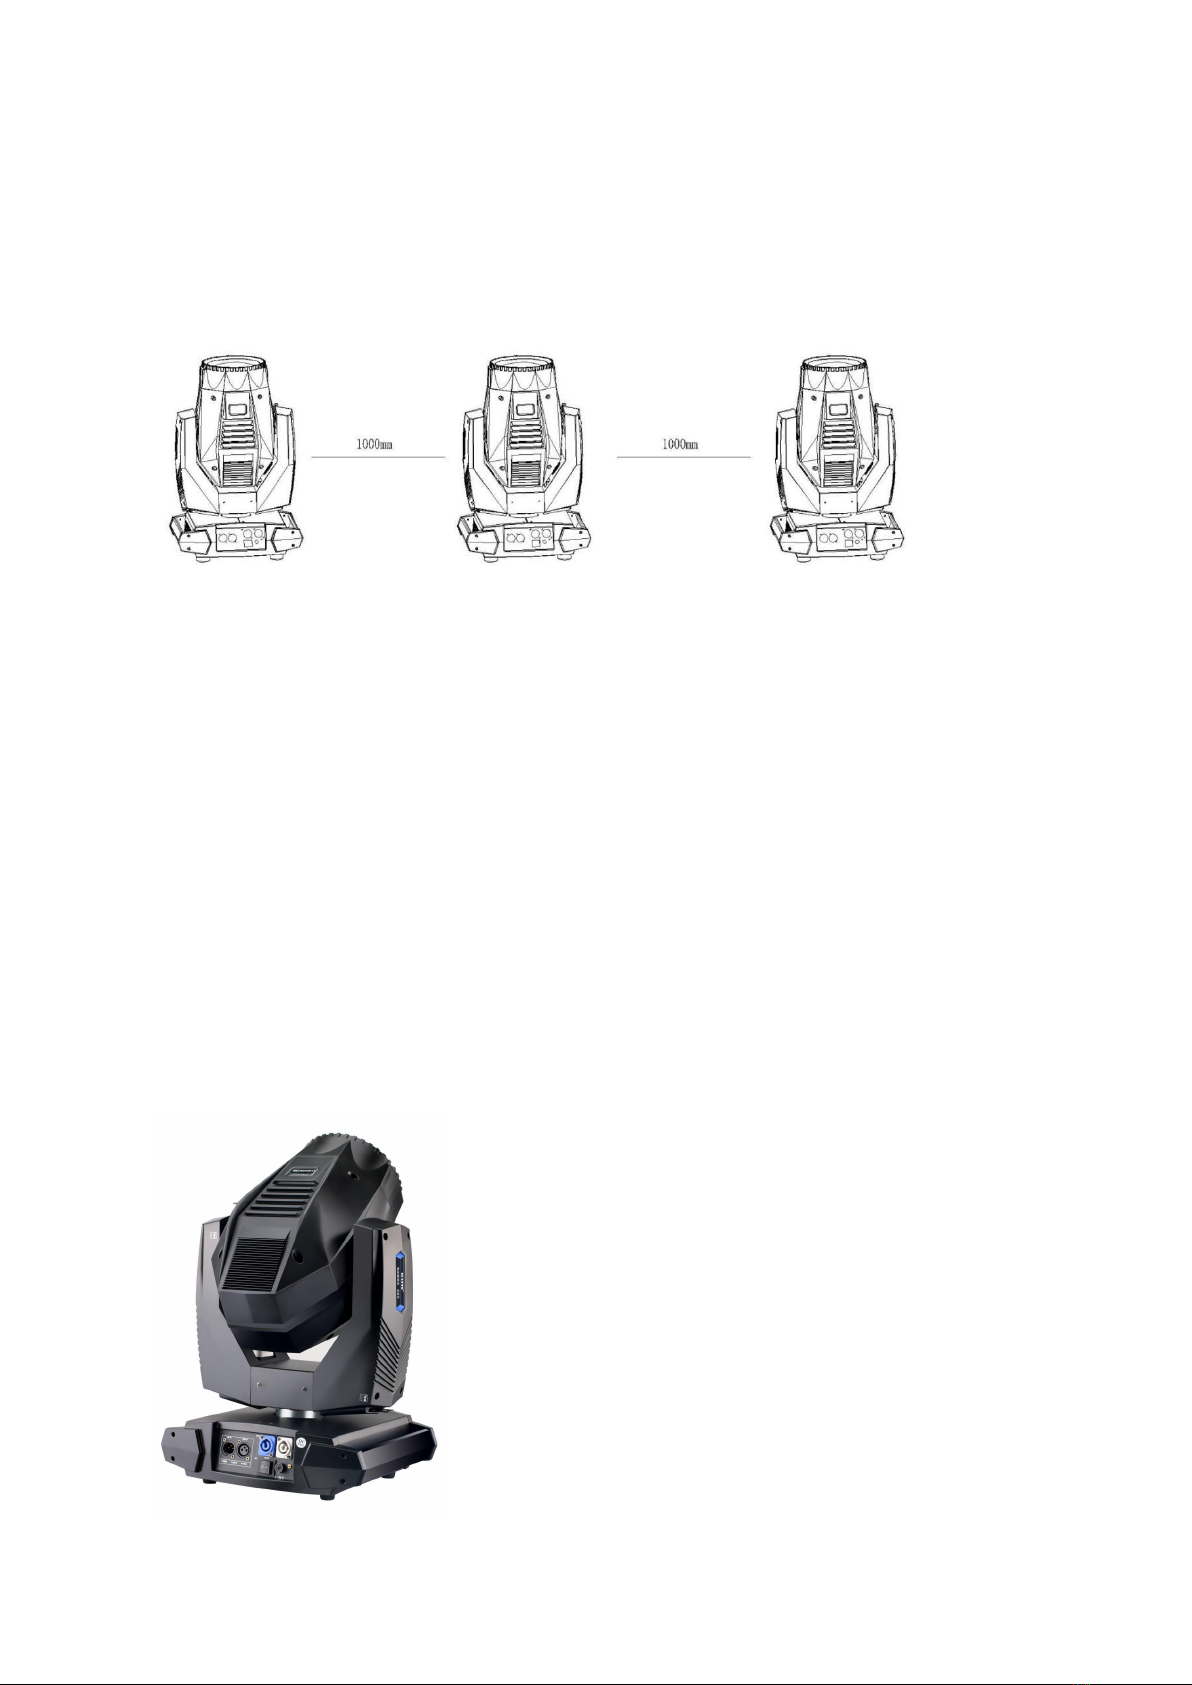
Note: Lights be placed vertically upward, the shortest distance between working lights
must be more than or equal 1000mm, lighting installation layout as following.
5.3 Data cable
Data cable is DMX512 signal.
Caution: Signal line connections is X-type connector.
X-type connector-----If the external flexible cable or cord of this light is damaged, please
replace professional cable or cord from the manufacture or its agent. Lights’ DMX input and
output connects to a 3-pin XLR, first pin is grounded, then negative signal is second pin,
third pin connects to the positive polarity signal.
In order to prevent reception reflection and interference control signal, a terminal plug
must be installed on the first branch of the connected device last 3-pin output jack.
3XLR plug
Terminal plug connect with XLR plug second
or
1.Grounding
third by a 0.25w 120ohm resistor, then
connect
2.Signal-
the resistor into last light’s DMX output
jack
3.Signal+
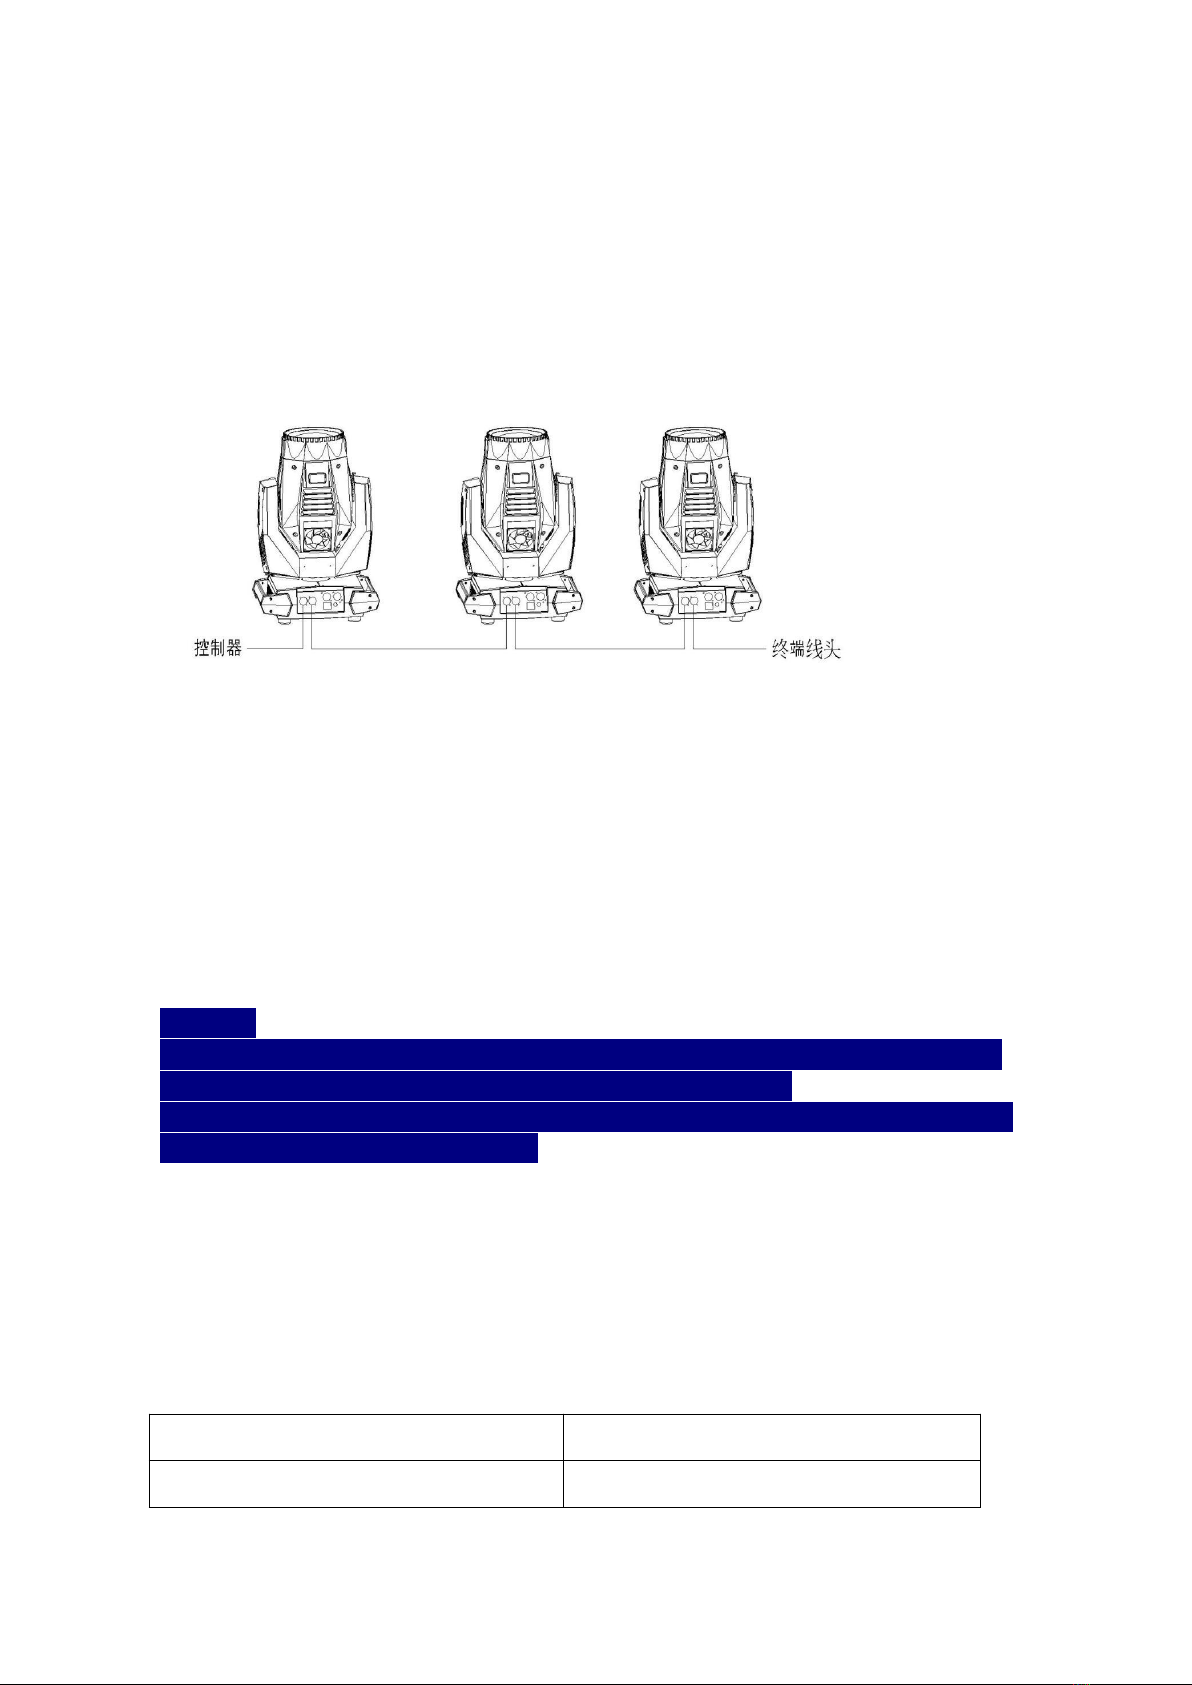
The controller connects to the nearest input XLR 3-pin, then from the output of the device
connects to the input of the next device, continuous connection one by one, the final output
data cable terminal equipment plug one end into the terminal.
If the signal transmission is long-distance , 512 signal amplifier must be added. DMX512
signal controller connect to the input of the amplifier first, then connect to the fixture from
its output, couple with the terminal plug last.
Caution:
1. Do not use two separate output connections. To connect the branch, a separating
consecutive DMX512 signal amplifier must be used to separate.
2. Please use the shielded twisted-pair cable. Standard microphone cables can not be
reliably controlled long-distance data.
6. AC Power
6.1 Fuse Size
The power and fuse equipment as below
AC power
Fuse
AC 100-240V
8A 5*20 main fuse

6.2 Power Connection
If the external flexible cable or cord of this light is damaged, the line is up to the
manufacturer or its agent or a similar qualified person to replace, in order to avoid danger.
Connect the power supply personnel must have the appropriate qualifications before
proceeding, you must make sure you are using the power supply voltage matches the
voltage identified and have overload or leakage protection. Directly connect the device to
the power supply, do not connect to the silicon box dimming system, otherwise damage to
the equipment.
7. Function
7.1 Lamp Description
330W Super Beam Light Moving Head Light is used with Phillip Single-ended lamp is short
arc point light source, and its color temperature is 8500K and very stable, CRI>90. Life span
is over 2000 hours (according the using situation)
Attention!
1. Do not install other similar lamps. It will cause safety hazards or equipment damage.
2. To reduce the risk of damage to the light, replace the lamp before its life is over
3. Do not use the banned scratched and damaged bulb.
7.2 Changing the Lamp
1. Disconnect the power, so that the lamp cooling, the arm of the lamp body lock
locked in a horizontal position.
2. Split bulbs: Remove the cover which is written “split this cover to replace the lamp head
cover”.
3. Use a Phillips screwdriver to remove the fan two thumb screws fixed side.
4. With the appropriate force, push down the bulb when the lamp cup beyond the
edge of the stainless steel shrapnel, taking up the lamp.
5. To install the bulb, reverse these steps.
Attention!
1. Avoiding oil stained hands.
2. To prevent damage, make sure you handle the lamp with care when installing and
dismantelling. Do not let the bulb hit hard objects around it as it will cause damage.
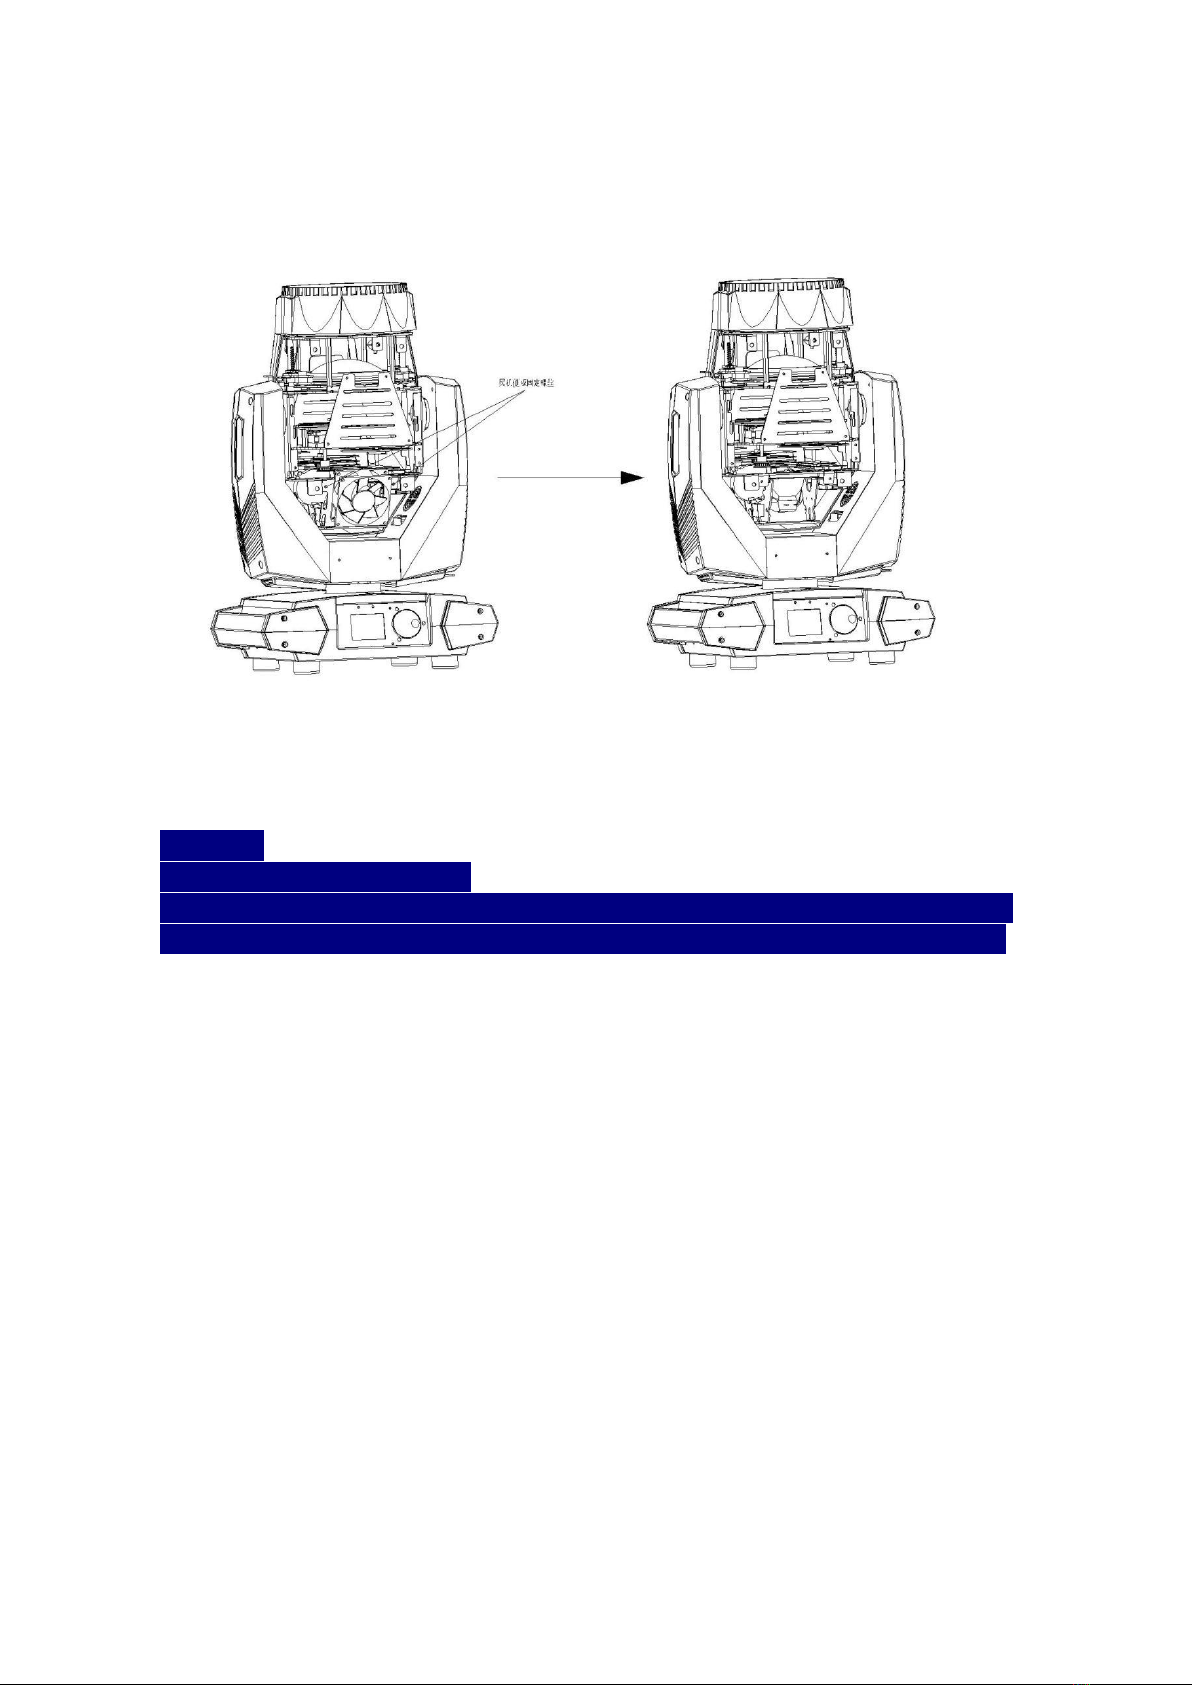
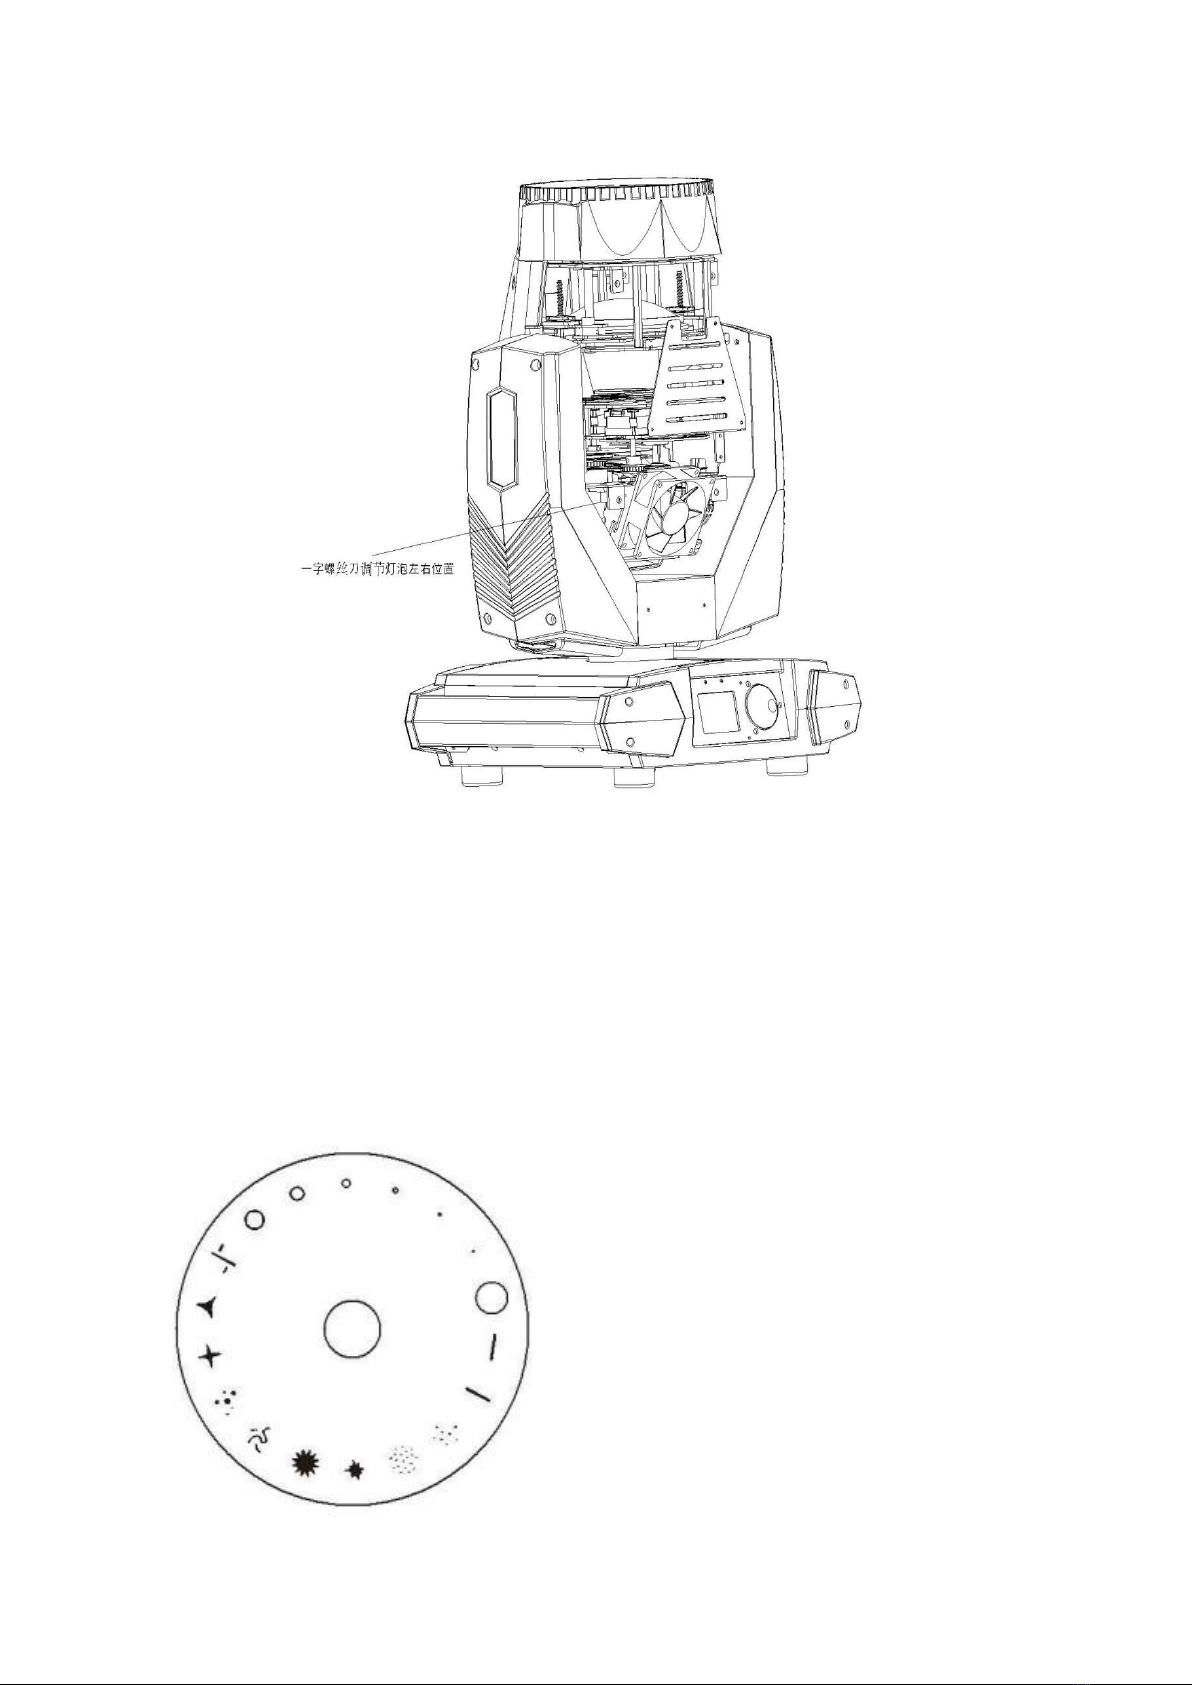
7.3 Correction Bulbs
Lamp has been corrected before selling. In the rare case the lamp may need correction,
follow these steps:
1. The light is reseted by turning on the power, using the menu or console light bulb
to play a bunch of white beam.
2. Using cross screwdriver to open the light body one bonnet side which is printed “this
cover to replace the lamp”
3. Using a flathead screwdriver to adjust the lamp bracket adjustment screw, turn the
screw clockwise or counter clockwise, and the lamp can be right or left to adjust.
8. Dynamic Effects
8.1 Gobo wheel
A 11 fixed gobo + 4 open composed of fixed gobo wheel, customers could change them
according to the needs of their own custom a variety of simple gobos.
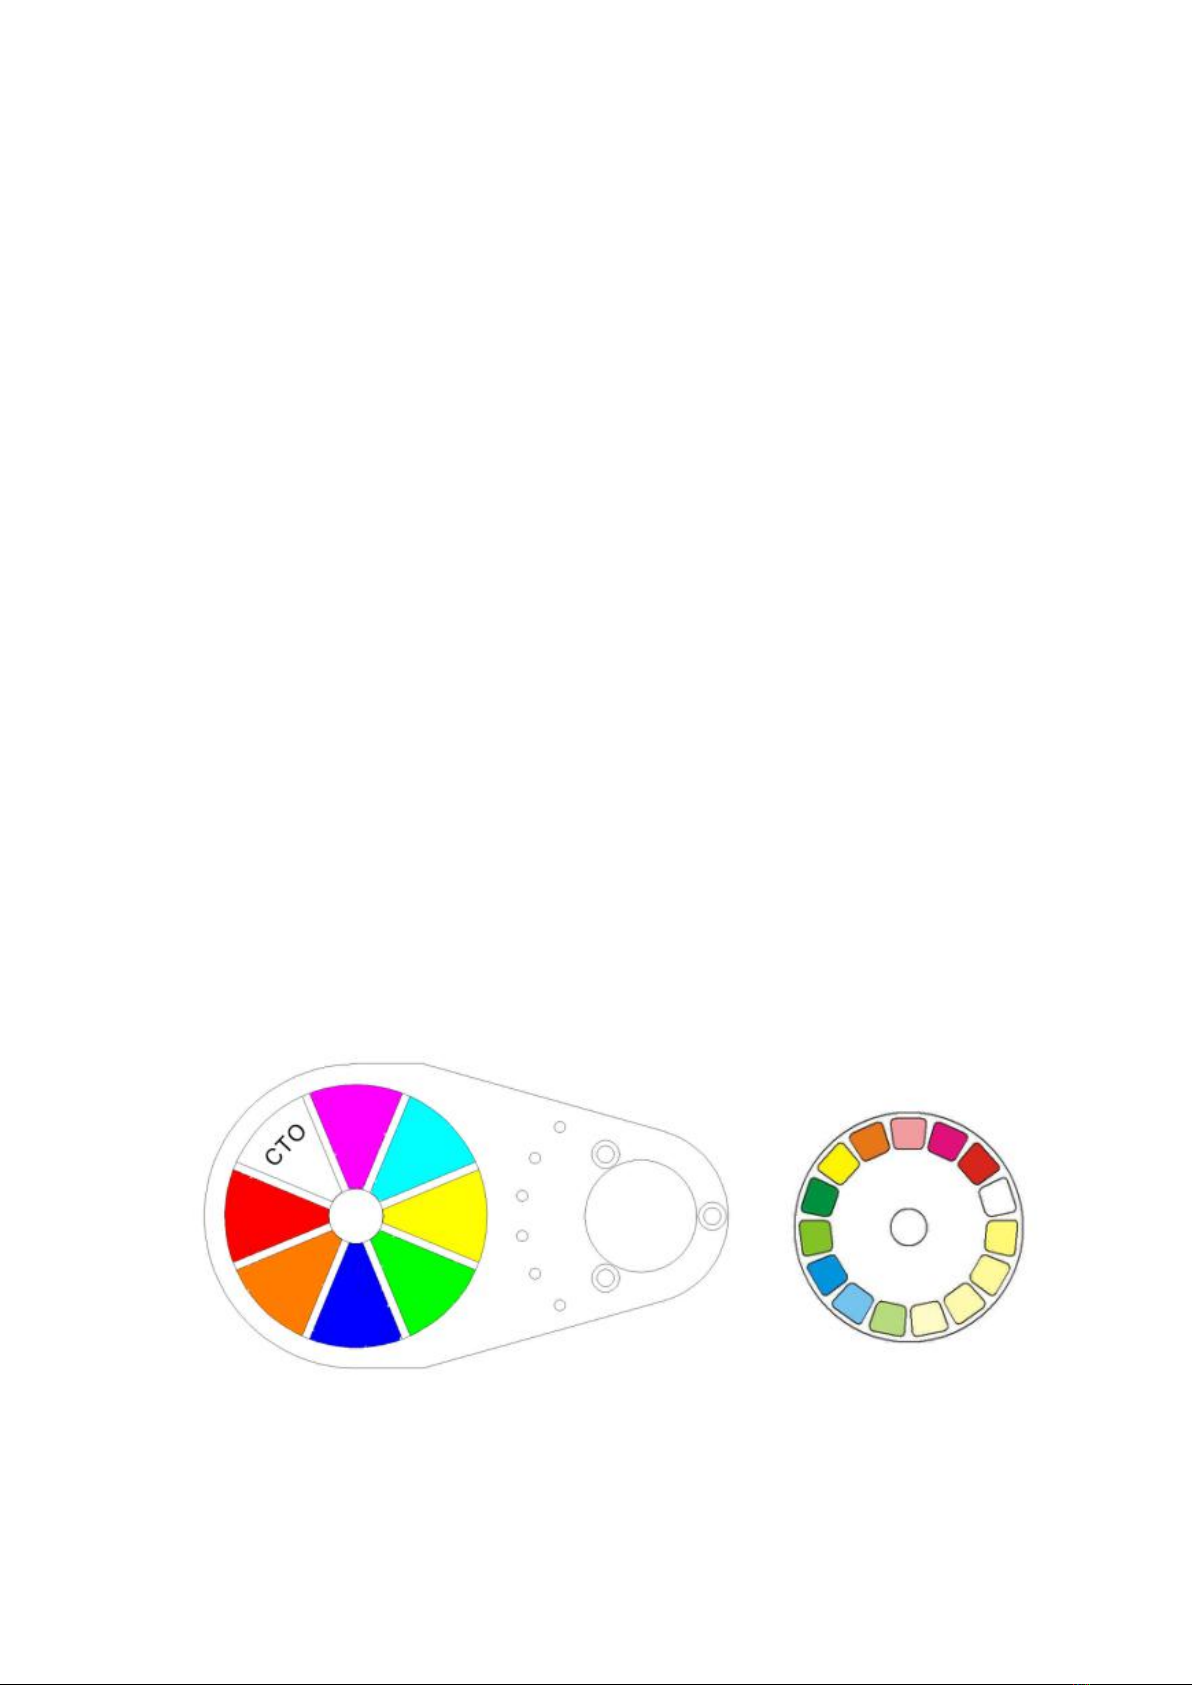
8.2 Color Wheel
One color wheel is with 8 colors.
The color can be customized.
Color wheel is made by14 high standard fixed color, the user can easily select their own
favorite color, to create a perfect lighting effect. Use the gobo wheel at same time is better.
It can be easily transformed a colorful gobo effect. (According to customer needs may
change at any time own custom various color wheel).
8.3 Optical Lens Focusing
Two high-precision ultra-fast eight-head screw motor working, and adjust optics lenses to
adjust focus make perfect focus function.
8.4 Prism Wheel And The Prism Enlarge
There is a 16+16facet circular prism and a 16-facet prism on the prism holder. Clockwise and
counterclockwise rotating, speed is adjustable. Prism wheel can be created a variety of
brilliant lighting effects with color wheel and gobo wheel. The prism can be switched at high
speed to create the dynamic effects.
8.5 8 Color Wheel With Rainbow Effect
8 color wheel can be created an eight color rainbow and prism effect with prism and color
superposition.
8.6 Dimming And Strobe
0-100% mechanical dimmer, you can instantly switch freely adjustable strobe speed
up to 12 times / sec, along with random strobe special features.
8.7 Frost
Frost is a piece of atomizing lens, according to the actual control to complete the frost
effect as you want.
8.8 Horizontal And Vertical Scanning
Pan: 540°, Tilt 270° with 16bit precise positioning capabilities. Horizontal and vertical
speed is adjustable.
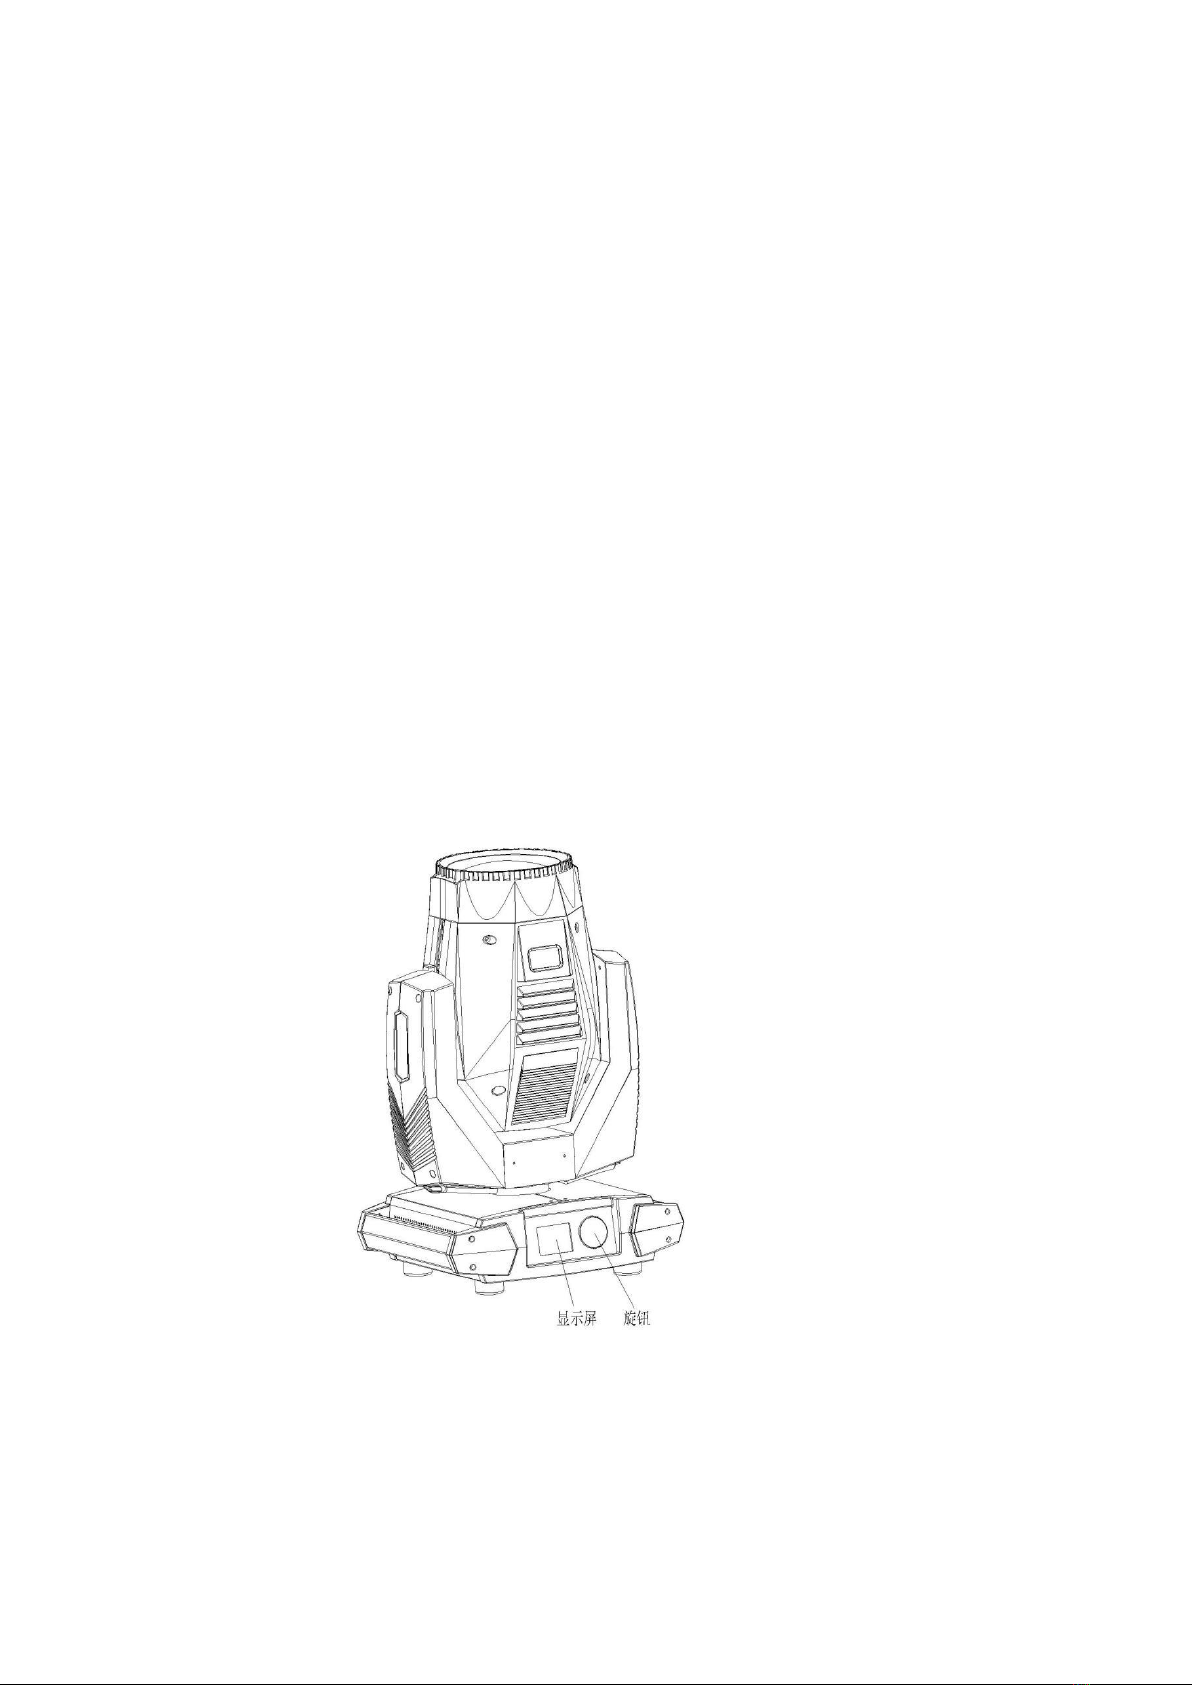
9. LCD Control
9.1 LCD Control Instruction

9.2 Main Menu Setting
Set up
1. DMX Address: 001
2. Channel Mode
3. Standard(16ch)
4. Vector(20ch)
Option Invert
Invert Pan Off
On
Invert Tilt Off
On
Display Reversal Off
On
Back Light Open
Auto Close(15s)
Information System Version
XY: V3.10
MCU1: V1.01
MCU2: V1.01
MCU3: V1.00
Fixture Hours
Total:0000(hrs)
Cur.:0000(hrs)
Lamp Hours
Total:0000(hrs)
Cur.:0000(hrs)
Time Clear
Clear PWRON Time
Clear LAMP Time
Fans Monitor
Fan1:(0000)RPM
Fan2:(0000)RPM
Fan3:(0000)RPM
DMX Monitor
1.Color (000)
2.Strobe (000)
3.Dimmer (000)

4.Gobo (000)
5.MUL Color(000)
6.Prism1/2.(000)
7.PrismEFF.(000)
8.Prota(000)
9.Frost (000)
10.Focus (000)
11.Pan (000)
12.PanFine(000)
13.Tilt (000)
14.TiltFine(000)
15.Function(000)
16.Lamp (000)
17.P/T Time(000)
18.Col.Time(000)
19.BeamTime(000)
20.GoboTime(000)
Manual Control
Lamp
Off
On
Reset
System Reset
Pan/Tilt Reset
Effect Reset
Factory default
Input:1212
Parameter
Color Adjust
Value: 000
Gobo Adjust
Value: 000
Shutter Adjust
Value: 000
Pan Adjust
Value: 000
Tilt Adjust
Value: 000
Fan MaxSP Adjust
Value: 000
10. DMX Control
Channel
Value
Description
1. Color Wheel
0-3
White
4-7
White/Color1
8-11
Color1
12-16
Color1/ Color2
17-20
Color2
21-24
Color2/ Color3
25-28
Color3
29-33
Color3/ Color4
34-37
Color4
38-41
Color4/ Color5
42-45
Color5
46-50
Color5/ Color6
51-54
Color6
55-58
Color6/ Color7
59-63
Color7
64-67
Color7/ Color8
68-71
Color8
72-75
Color8/ Color9
76-80
Color9
81-84
Color9/ Color10
85-88
Color10
89-92
Color10/ Color11
93-97
Color11
98-101
Color11/ Color12
102-105
Color12
106-109
Color12/ Color13
110-114
Color13
115-118
Color13/Color14
119-122
Color14
123-127
Color14/ White
128-255
Rainbow color effect from slow to fast
2. Shutter
0-3
on
4-7
off
8-97
Shutter from fast to slow
98-101
off
102-126
Strobe from fast to slow pulse open
127-151
Strobe from fast to slow pulse close
152-155
open
156-180
Random open the pulse strobe from fast
to slow
181-205
Random close the pulse strobe from fast
to slow
206-209
Open
210-249
Random strobe from fast to slow
250-255
Open
3. Dimmer
0-255
From dark to light dimming
4. Gobo
0-3
Gobo1
4-7
Gobo2
8-11
Gobo3
12-15
Gobo4
16-19
Gobo5
20-23
Gobo6
24-27
Gobo7
28-31
Gobo8
32-35
Gobo9
36-39
Gobo10
40-43
Gobo11
44-47
Gobo12
48-51
Gobo13
52-55
Gobo14
56-59
Gobo15
60-63
Gobo16
64-67
Gobo17
68-71
Gobo18
72-115
Clockwise rotating from fast to slow
116-159
Anticlockwise rotating from fast to slow
160-166
Gobo2 Swing
167-173
Gobo3 Swing
174-180
Gobo4 Swing
181-186
Gobo5 Swing
187-192
Gobo6 Swing
193-198
Gobo7 Swing
199-204
Gobo8 Swing
205-211
Gobo9 Swing
212-217
Gobo10 Swing
218-223
Gobo11 Swing
224-230
Gobo12 Swing
231-236
Gobo13 Swing
237-243
Gobo14 Swing
244-249
Gobo15 Swing
250-255
Gobo15 Swing
5. Eight Colors
0-255
Eight colors
6. Prism(Prism1/Prism2)
64-127
Prism1
128-191
Prism2
192-255
Prism1+Prism2
7. Prism Effect
16-55
Prism 2 dynamic effect
56-95
Prism 1 dynamic effect
96-135
Prism 1 & Prism 2 dynamic effect
136-175
Prism 2 & Prism 1 dynamic effect
176-215
Prism 1 & Prism 2 dynamic effect
216-255
Prism 1 & Prism 2 interacting effect
8. Rotating prism
0-63
Prism rotating 0-720°
64-127
Prism clockwise from fast to slow
128-191
Prism anticlockwise from fast to slow
192-255
Prism rotating clockwise & anticlockwise
9. Frost
0-255
Linear frost
10. Focus
0-255
Linear Focus
11. Pan (X-axis)
0-255
Pan
12. Pan Fine (X-axis)
0-255
Pan Fine
13. Tilt (Y-axis)
0-255
Tilt
14. Tilt Fine (Y-axis)
0-255
Tilt Fine
15. Function
0~255
Pan/Tilt moves exchange light
16. Lamp
0-31
No function
32-63
Lamp power down (immediate action)
100-109
Pan & Tilt Reset
110-119
Effect wheel reset
120-129
Whole light reset
160-191
Close lamp (5 seconds)
192-223
No function
224-255
Open lamp (5 seconds)
11. Failure Scoreboard And Solutions
Listed below are common approaches in the operation of a few common problems.
•Problem A: The lamp is not working, the bulb is not lit, the fan does not work
Solution 1: Check the power supply or the fuse is burned Solution.
Solution 2: The main power connector on the voltage detector.

•Problem B: connect control units, lighting does not respond
Solution 1: After connecting control units, lighting should be working. If it is not
working properly, check the signal cable plugs and wires are
connected correctly.
Solution 2: If the lamp is lit display, but the channel does not respond, check the
address code is set correctly and DMX output voltage polarity.
Solution 3: DMX signal problems if your lighting is off, check the input terminal and
the circuit board Solution.
Solution 4: Please change another one DMX controller.
Solution 5: Check whether the signal cable near high voltage power lines caused
DMX display board inside the wire damage.
•Problem C: some channel is not working
Solution 1: stepper motor may be damaged, or the line connecting the
motherboard burned out Solution.
Solution 2: IC driver board on the motherboard may be damaged.
12. Cleaning
Regularly clean the outside of the optical lens focusing on the dust.
Based on the number of lamps use a clean environment to determine: Are they moist,
smoked or is the surrounding environment particularly dirty, which can cause dust
deposition lamps.
Please use a glass cleaning solution and a soft cloth to wipe the focusing optical lens.
Carefully dry each part. At least 20 days to clean the dust outside a lens, the lens inside
30-60 days to clean up the dust once.
Regular inspection lamp fan and bottom case fan, a fan of at least 20/days to clean up dust
deposition.
Cleaning must be executed in case of power failure.
Note: All information is subject to change without prior notice. Riviera
Ice Chalet reserves the right to the final decision in case of dispute.
Table of contents
Other Hi-ltte Lighting Equipment manuals


