Highly Reliable SYSTEMS High-Rely NetSwap User manual
1
Copyright © 2011-2019 by Highly Reliable Systems, Inc. All rights reserved.
High-Rely NetSwap/NetSwap Plus/RAIDFrame
Pl
us
Backup S
y
s
tem
User Manu
al
V
2.16

2
Copyright © 2011-2019 by Highly Reliable Systems, Inc. All rights reserved.
Please Read This First
Important Quick Start Information for your High-Rely d
rive
●
When using “High-Rely Classic” media trays the drive will not spin up until the key is turned
on. This is by design and prevents accidental media removal.
●
Please do NOT ATTEMPT TO REMOVE High-Rely classic media from their drive
ba
ys
w
ithout
“unlocking” the drive with the key first! Forced removal of the drive will void your
warranty. The key has a mechanical interlock that blocks the drive from being removed. This
note does not apply to MPac media, which is removed by simply flipping the metal locking tab
out or RAIDPac media which is removed by pushing the release tab and pulling.
●
We recommend telling all operating systems. to “safely remove” the drive prior to removing
drive to avoid removing drive during a write. If you are sure the drive is not being used, you
may skip this step at your own discretion.
●
The latest Service Packs are important! Microsoft has continued to Debug removable drives on
the Windows 2000, XP, 2003, Vista, Windows 7, 2008 and beyond. If you do not have the latest
service packs you may have problems. For example, XP machines without appropriate Service
Packs cannot properly recognize drives above 137GB. While it may appear to work, the drive
will corrupt data when it fills above that level. Windows XP and 2003 operating systems do not
recognize greater than 2TB drives or GPT partition tables. Read the manual or our web site for
more details.
●
If you are swapping multiple trays in your removable device, you may have a drive letter
problem as you change your media. Sometimes Windows will assign drive letters randomly
which can cause your backup software to fail. You can use the High-Rely Drive Manager
utility HRDM2.MSI to solve this problem. To do this, install HRDM2 on the machine that the
High-Rely system will be connected to.
●
Larger hard drives are extremely sensitive to shock. Please handle all media with care when
transporting off-site or removing and use our padded carrying cases to avoid data loss. Best practice
removal is partially extracting the media, wait 20 seconds for it to spin down and then finish pulling
it out.
●
Photos and screen shots in this manual may not reflect your exact product or operating sys
tem
.
The information in this manual primarily documents Windows. Although our products are known
to work with Windows NT, Linux, Mac OS X and other operating systems, at this time, our tech
support can assist with Windows platforms only.

3
Copyright © 2011-2019 by Highly Reliable Systems, Inc. All rights reserved.
NetS
w
a
p/RAI
DFrame
Plus
User Man
ual
v2.16
Copyright © 2011-2019 by Highly Reliable Systems, Inc.
All rights reserved. No parts of this work may be reproduced in any form or by any
means - graphic, electronic, or mechanical, including photocopying, recording, taping,
or information storage and retrieval systems - without the written permission of the
publisher.
Products that are referred to in this document may be either trademarks and/or registered
trademarks of the respective owners. The publisher and the author make no claim
t
o
t
hes
e
trademarks.
While every precaution has been taken in the preparation of this document, the publisher
and the author assume no responsibility for errors or omissions, or for damages resulting
from the use of information contained in this document or from the use of programs and
source code that may accompany it. In no event shall the publisher and the author be
liable for any loss of profit or any other commercial damage caused or alleged to have
been caused directly or indirectly by this document

4
Copyright © 2011-2019 by Highly Reliable Systems, Inc. All rights reserved.
Table of Contents
1 Introduction.............................................................................................................................................7
2 NetSwap/RAIDFrame Plus Hardware....................................................................................................8
2.1 Front Panel.....................................................................................................................................8
2.1.1 Desktop Chassis(legacy).......................................................................................................8
2.1.2 2U Rackmount Chassis (NetSwap Plus only).......................................................................9
2.1.3 4U 8 Bay Rackmount Chassis (NetSwap Plus only)..........................................................10
2.1.4 4U RAIDFrame Rackmount Chassis (RAIDFrame Plus only)(legacy)...............................11
2.1.5 Mini Chassis.......................................................................................................................12
2.1.6 Power On Procedure...........................................................................................................12
2.1.7 Power Off Procedure...........................................................................................................13
2.2 Rear Panel....................................................................................................................................13
2.2.1 Desktop Chassis(legacy).....................................................................................................13
2.2.2 2U Rackmount Chassis (2 or 4 Bay)...................................................................................14
2.2.3 4U Rackmount Chassis (8 bay or RAIDFrame)(legacy)....................................................15
2.2.4 Mini Chassis.......................................................................................................................16
3 NetSwap/RAIDFrame Plus Administration..........................................................................................17
3.1 Quick Setup..................................................................................................................................18
3.2 Disk Preparation...........................................................................................................................21
3.2.1 Formatting Disks.................................................................................................................21
3.2.2 Sharing Disks......................................................................................................................22
3.2.3 Creating RAID Disks (NetSwap/RAIDFrame Plus only)...................................................23
3.3 Replication (NetSwap/RAIDFrame Plus Only)...........................................................................24
3.3.1 Replication Jobs, Locations, and Targets............................................................................24
3.3.2 Setting up a Basic Replication Job......................................................................................25
3.3.3 Seeding................................................................................................................................30
3.3.3.1 Seed Using a Replication Seed Job............................................................................30
3.3.3.2 Seed Using SpeedSeedTM...........................................................................................31
3.3.4 Snapshots............................................................................................................................36
3.4 Administration Reference............................................................................................................38
3.4.1 Page Layout.........................................................................................................................38
3.4.2 Status Menu.........................................................................................................................39
3.4.2.1 Status..........................................................................................................................39
3.4.2.2 Tasks...........................................................................................................................41
3.4.2.3 View Log....................................................................................................................42
3.4.3 Settings Menu.....................................................................................................................43
3.4.3.1 Network......................................................................................................................43
3.4.3.2 Dynamic DNS (NetSwap/RAIDFrame Plus Only)....................................................46
3.4.3.3 Admin.........................................................................................................................47
3.4.3.4 Disks...........................................................................................................................49
3.4.3.5 iSCSI..........................................................................................................................51
3.4.3.6 Windows Networking.................................................................................................55

5
Copyright © 2011-2019 by Highly Reliable Systems, Inc. All rights reserved.
3.4.3.7 NFS............................................................................................................................61
3.4.3.8 SMTP.........................................................................................................................62
3.4.3.9 Alerts..........................................................................................................................64
3.4.3.10 Date/Time.................................................................................................................67
3.4.3.11 Dashboard Registration............................................................................................69
3.4.3.12 Export Configuration...............................................................................................70
3.4.3.13 Import Configuration...............................................................................................70
3.4.3.14 Restore Default Configuration.................................................................................71
3.4.3.15 Docs & Software......................................................................................................71
3.4.4 Replication (NetSwap/RAIDFrame Plus Only)..................................................................72
3.4.4.1 Settings.......................................................................................................................72
3.4.4.2 Jobs.............................................................................................................................73
3.4.4.3 Remote Locations......................................................................................................92
3.4.4.4 Targets........................................................................................................................99
3.4.4.5 Amazon Import/Export Jobs....................................................................................101
3.4.5 Virtualization Menu (Select models only, Experimental).................................................104
3.4.5.1 Virtual Machines......................................................................................................104
3.4.5.2 Install Utility OS......................................................................................................108
3.4.6 System Menu.....................................................................................................................108
3.4.6.1 Reboot Device..........................................................................................................108
3.4.6.2 Shutdown Device.....................................................................................................109
3.4.6.3 Check for Updates....................................................................................................109
3.4.6.4 Update Device..........................................................................................................110
3.4.7 Disk Properties..................................................................................................................111
3.4.7.1 Format......................................................................................................................117
3.4.7.2 Disk Tools................................................................................................................120
3.4.7.3 Share.........................................................................................................................122
3.4.7.4 Safely Remove.........................................................................................................122
3.4.7.5 Smart Info................................................................................................................124
3.4.7.6 Mirror Schedule (Plus models only)........................................................................125
3.4.7.7 Mount Disk..............................................................................................................127
3.4.7.8 Quick DeltaSync......................................................................................................127
3.4.8 Seeding Operations (NetSwap/RAIDFrame Plus Only)...................................................129
3.4.8.1 Make Seed................................................................................................................129
3.4.8.2 Unmark Seed Disk...................................................................................................130
3.4.8.3 Seed RAID Disk.......................................................................................................131
3.4.9 Create RAID Disk (NetSwap/RAIDFrame Plus only).....................................................132
3.4.10 RAID Properties (NetSwap/RAIDFrame Plus only)......................................................134
3.4.10.1 Resume RAID........................................................................................................137
3.4.10.2 Pause RAID............................................................................................................137
3.4.10.3 Break RAID...........................................................................................................138
3.4.10.4 Add Disk................................................................................................................139
3.4.10.5 Remove Disk..........................................................................................................140
4 High-Rely iSCSI Connector Software................................................................................................141
4.1 Installation..................................................................................................................................141

6
Copyright © 2011-2019 by Highly Reliable Systems, Inc. All rights reserved.
4.2 Operation....................................................................................................................................145
4.2.1 ISCSI Targets....................................................................................................................145
4.2.1.1 Connect....................................................................................................................146
4.2.1.2 Safely Remove.........................................................................................................147
4.2.1.3 Refresh.....................................................................................................................147
4.2.2 Persistent/FavoriteTargets................................................................................................148
4.2.2.1 Edit...........................................................................................................................148
4.2.2.2 Remove....................................................................................................................149
4.2.2.3 Refresh.....................................................................................................................149
5 Configuration Examples.....................................................................................................................149
5.1 iSCSI Mode................................................................................................................................149
5.1.1 Windows............................................................................................................................149
5.2 More Examples..........................................................................................................................159
6 Restore to Factory Defaults.................................................................................................................159
7 NetSwap/RAIDFrame Plus Console...................................................................................................160
7.1 Configure Network....................................................................................................................161
7.1.1 Hostname..........................................................................................................................161
7.1.2 Ethernet X.........................................................................................................................162
7.2 Configure Date/Time..................................................................................................................163
7.2.1 NTP...................................................................................................................................165
7.2.2 Windows Server................................................................................................................165
7.2.3 Manual..............................................................................................................................166
7.3 Restore Default Settings.............................................................................................................167
7.4 Reboot........................................................................................................................................167
7.5 Shutdown...................................................................................................................................168
8 Remote Monitoring and Management (RMM) Support.....................................................................169
8.1 Network (TCP/HTTP) Based Monitoring..................................................................................169
8.1.1 Log Files...........................................................................................................................169
8.1.2 Disk Status Files................................................................................................................169
8.1.3 Replication Status Files.....................................................................................................170
8.1.4 Disk Flag Files..................................................................................................................171
8.1.5 Replication Job Flag Files.................................................................................................172
8.2 File Based Monitoring...............................................................................................................173
8.3 LabTech RMM...........................................................................................................................174
8.3.1 Network Monitor...............................................................................................................174
8.3.2 File Based Monitor............................................................................................................181
8.4 Level Platforms Managed Workplace 2012...............................................................................186
8.4.1 DeviceAvailability Monitor..............................................................................................186
8.4.2 Custom Log File Monitor.................................................................................................194
8.4.3 Performance Counters Monitor.........................................................................................201
9 GPLCode Statement...........................................................................................................................207

7
Copyright © 2011-2019 by Highly Reliable Systems, Inc. All rights reserved.
1 Introduction
The NetSwap/RAIDFrame Plus is a removable-media network-attached backup system connecting via
Gigabit Ethernet using either iSCSI or standard Network Attached Storage (NAS) networking
protocols. 10 Gigabit Ethernet is available as an option.
The NetSwap/RAIDFrame Plus family consists of the NetSwap 200 series (single removable bay, 1
internal disk, and RAID), the 2 or 4 bay 2U rack-mount NetSwap 400 series (2 or 4 removable bays
and RAID), the 2 bay NetSwap 300 series mini-tower (2 bays and RAID), the 8 bay 4U rack-mount
NetSwap 800 series (8 removable bays and RAID), and the 2 or 4 bay RAIDFrame 2000 and 4000 4U
rack-mount (2 or 4 RAIDPac removable bays and RAID). With the exception of the RAIDFrame plus,
all NetSwap models can be equipped with either the High- Rely Classic or MPac media bays.
With the NetSwap/RAIDFrame Plus backup system you can choose one of two sharing modes for each
disk: iSCSI or NAS (Network Attached Storage) connecting over Windows Networking(SMB/CIFS)
and NFS. Windows networking is also called (SMB/CIFS) which stand for “Server Message Block/
Common Internet File System”. NFS stands for “Network File System”, which is often used in
Unix/Linux and for virtualization platforms like VMware.
It is possible to have both Windows networking (SMB/CIFS) and NFS networking turned on at
once
for each disk. The NetSwap/RAIDFrame Plus's internal (NetSwap 200 series only) and removable
drive's are available as a simple Windows network share and as a NFS export point (folder) –basically
as NetworkAttached Storage (NAS) with a removable drive.
In iSCSI mode the NetSwap/RAIDFrame Plus cannot simultaneously share the disk as a NAS device
since the entire removable hard drive is dedicated to direct connectivity. A given machine (server) will
directly connect and use the entire removable drive. The NetSwap/RAIDFrame Plus's
remova
b
le drive
s
are connected using iSCSI initiator software and supports optional CHAP username/name and
password/secret to improve security. If you need to make an iSCSI drive available to multiple servers
for backup simply “share” the drive on the machine with the iSCSI initiator software, making it
available as a network wide resource. This may be thought of as re-sharing the drive to the rest of the
network.
Disks may be formatted with with encryption if desired for added protection. The encryption is
compatible with the popular TrueCrypt disk encryption software allowing for the disk to be decrypted
on any system capable of running TrueCrypt. Some models of the NetSwap/RAIDFrame Plus include
hardware encryption.
Some models add the ability to replicate backups off site; either to another NetSwap or to various cloud
storage providers (including Dropbox, Amazon S3, Google Cloud Storage) or servers or providers
using FTP or SFTP protocols.

8
Copyright © 2011-2019 by Highly Reliable Systems, Inc. All rights reserved.
2 NetSwap/RAIDFrame Plus Hardware
2.1 Front Panel
The front panel of the devices are as follows:
2.1.1 Desktop Chassis (legacy)
3
1 2
7
4
5
6
Illustration 1: Desktop Chassis Front Panel
1
Power/Alarm Indicator*
2
Power Button
3
Removable Drive Bay
4
Clear Alarm Button*
5
Disk Activity Indicator
6
USB P
ort
7
Bay Status Indicators*
*Note: Bay Status Indicators,Alarm Indicator and Clear Alarm button only on G2 models.

9
Copyright © 2011-2019 by Highly Reliable Systems, Inc. All rights reserved.
2.1.2 2U Rackmount Chassis (NetSwap Plus only)
12
6
1 8 5 7 9 2
3 13 4
10
11
Illustration 2: 2U Rackmount Chassis Front Panel
1
Removable Bay 1
2
Removable Bay 2
3
Removable Bay 3
4
Removable Bay 4
5
Power/Alarm Indicator*
6
USB P
ort
7
Power Switch
8
Bay 1 Status Indicator*
9
Bay 2 Status Indicator*
10
Bay 3 Status Indicator*
11
Bay 4 Status Indicator*
12
Clear Alarm Button*
13
Removable Boot Disk Bay
*Note: Bay Status Indicators,Alarm Indicator and Clear Alarm button only on G2 models.
10
Copyright © 2011-2019 by Highly Reliable Systems, Inc. All rights reserved.
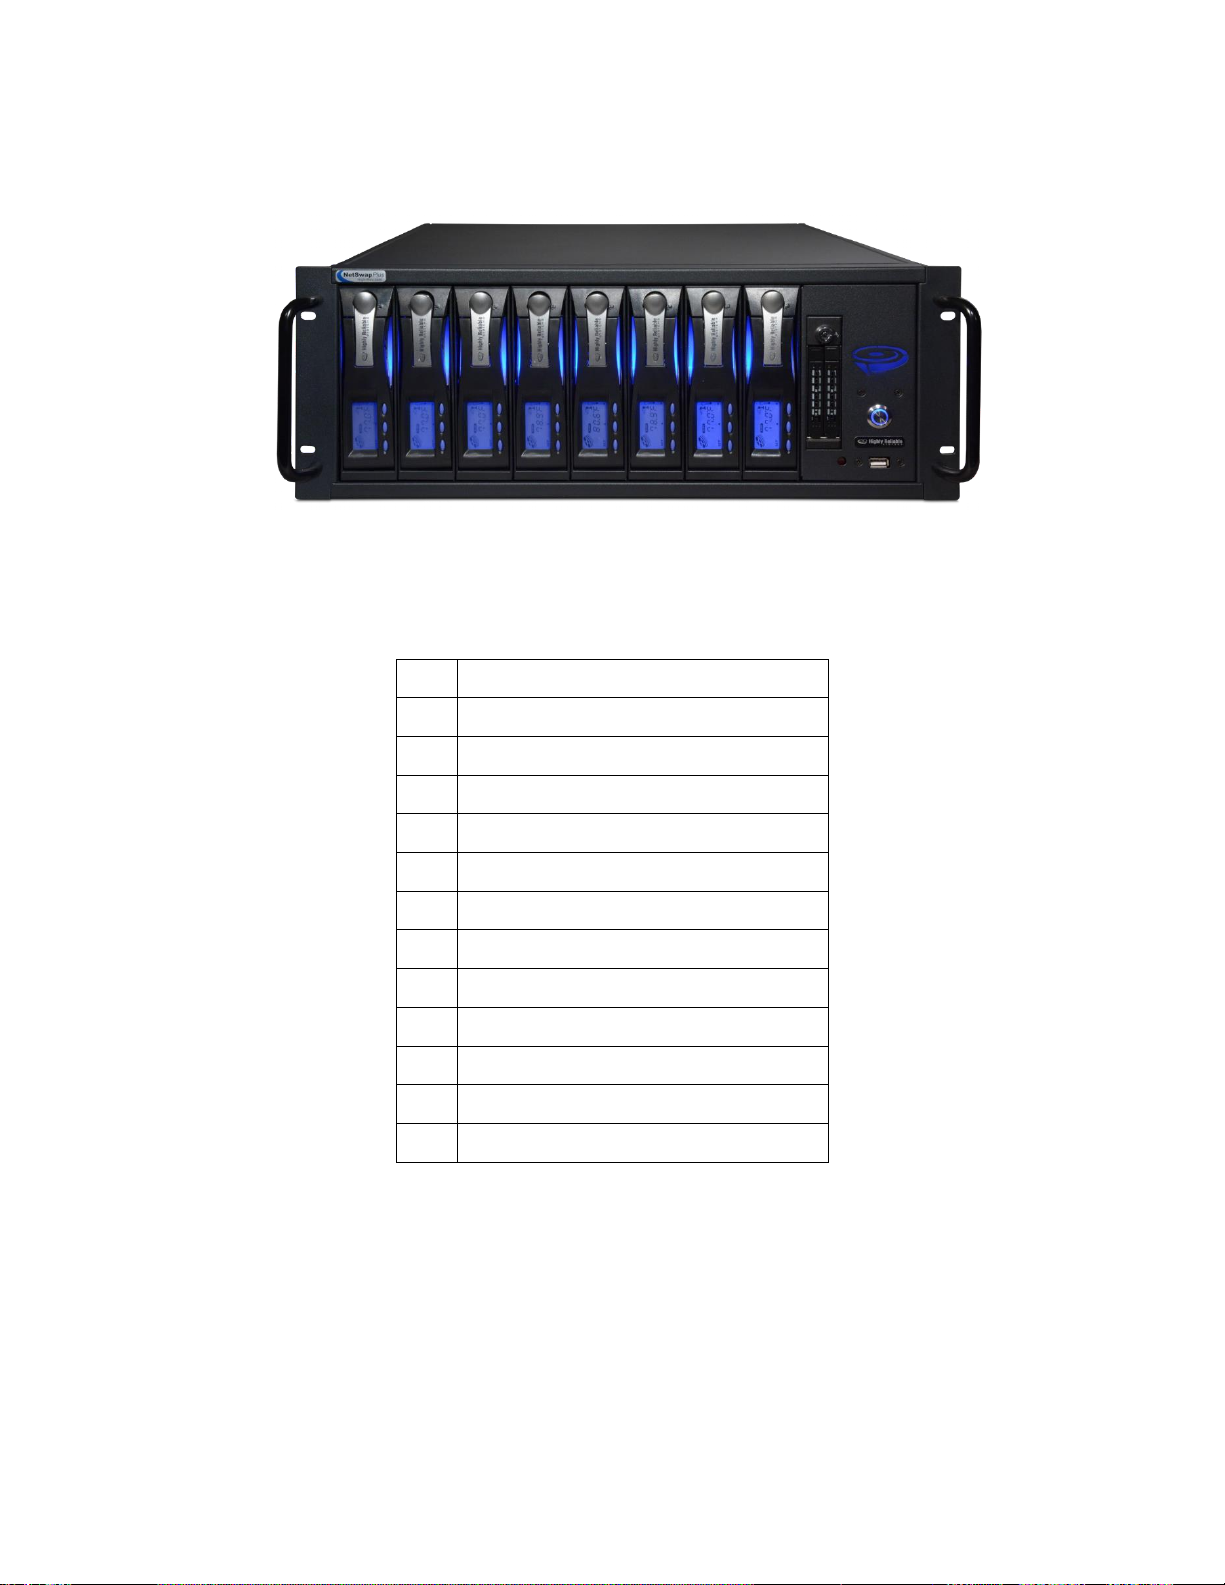
2.1.3 4U 8 Bay Rackmount Chassis (NetSwap Plus only)
10
9
11
1 2 3 4 5 6 7 8
12
13
Illustration 3: 4U 8 Bay Rackmount Chassis Front View
1
Removable Bay 1
2
Removable Bay 2
3
Removable Bay 3
4
Removable Bay 4
5
Removable Bay 5
6
Removable Bay 6
7
Removable Bay 7
8
Removable Bay 8
9
Removable Boot Disk Bay
10
Power/Alarm Indicator
11
Power Button
12
USB P
ort
13
ClearAlarm Button
*Note: Bay Status Indicators,Alarm Indicator and Clear Alarm button only on G2 models.
11
Copyright © 2011-2019 by Highly Reliable Systems, Inc. All rights reserved.
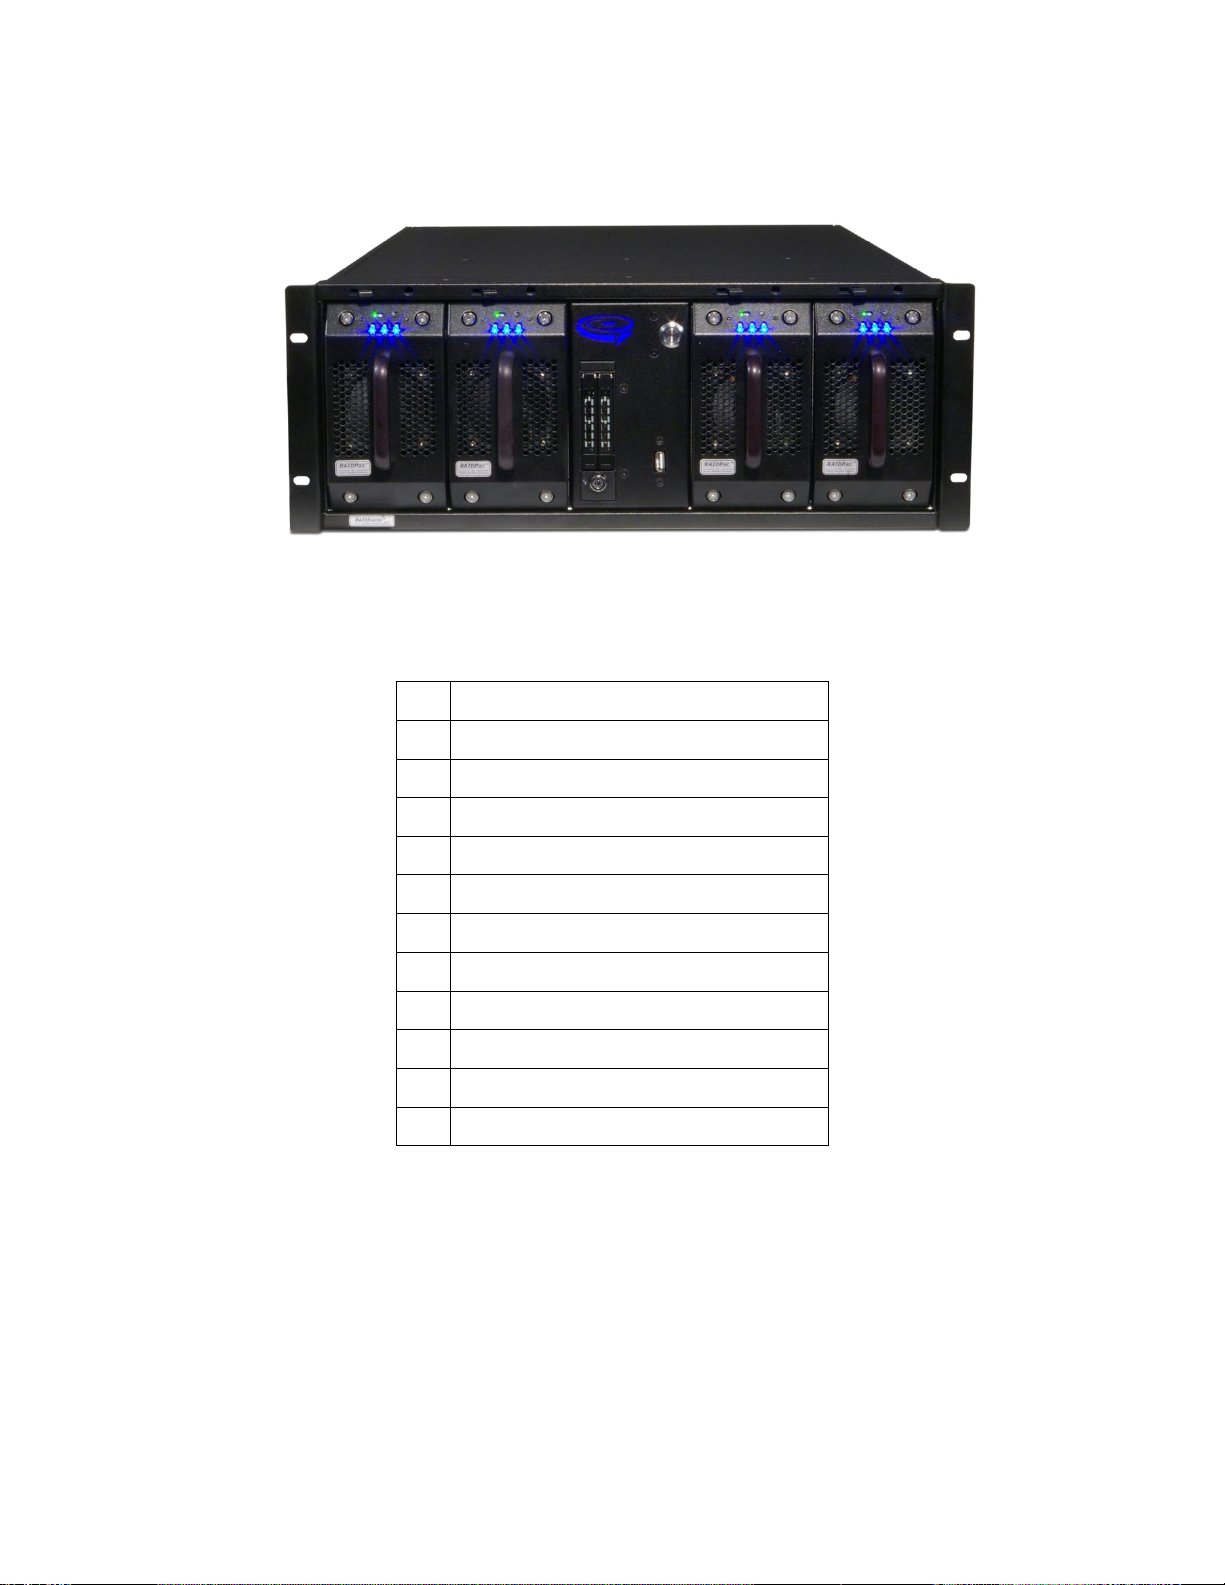
2.1.4 4U RAIDFrame Rackmount Chassis (RAIDFrame Plus only)(legacy)
9 10 11 12
6
1 2 7 3 4
5
8
Illustration 4: 4U RAIDFrame Rackmount Chassis Front View
1
Removable RAIDPac Bay 1
2
Removable RAIDPac Bay 2
3
Removable RAIDPac Bay 3
4
Removable RAIDPac Bay 4
5
Removable Boot Disk Bay
6
Power/Alarm Indicator
7
Power Button
8
USB P
ort
9
Bay 1 Indicator
10
Bay 2 Indicator
11
Bay 3 Indicator
12
Bay 4 Indicator
*Note: Bay Status Indicators,Alarm Indicator and Clear Alarm button only on G2 models.
12
Copyright © 2011-2019 by Highly Reliable Systems, Inc. All rights reserved.
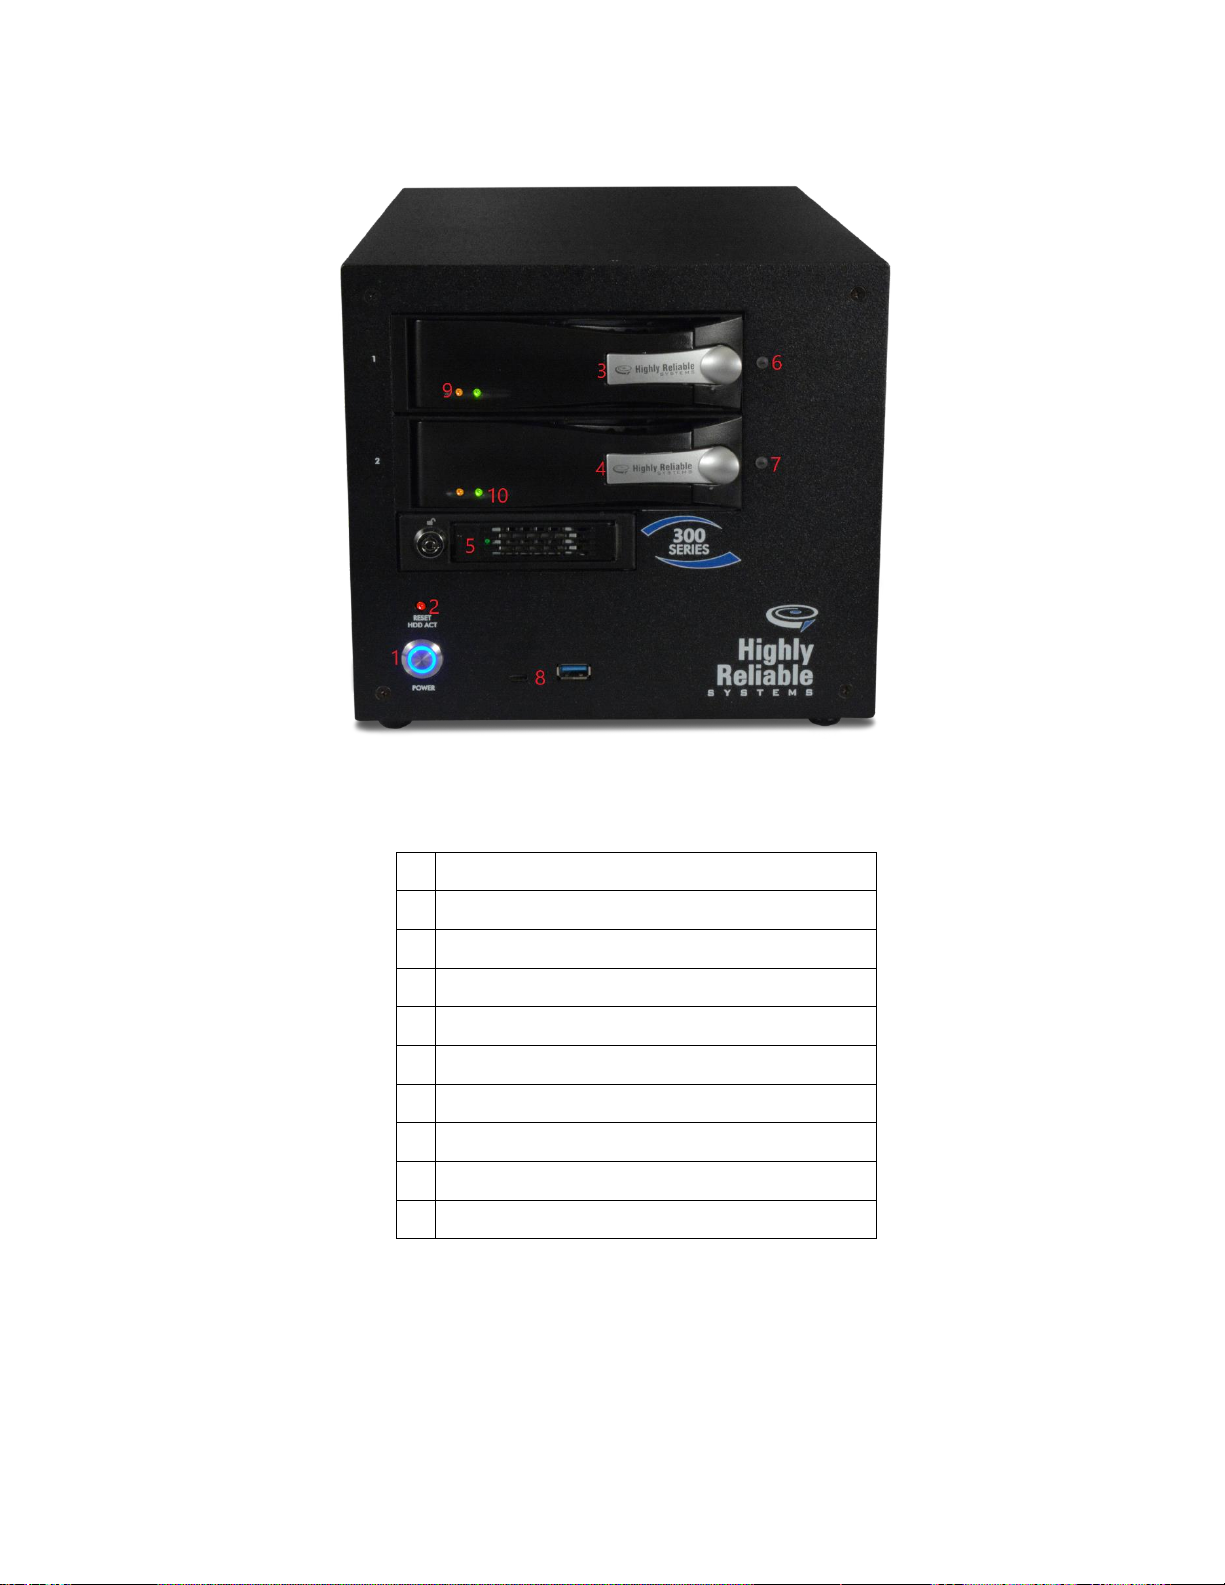
2.1.5 Mini Chassis
Illustration 5: 2 Bay Mini
1
Power Button
2
Reset Button/Unit Activity
3
Removable Drive Bay 1
4
Removable Drive Bay 2
5
Removable Boot Disk Bay
6
Bay 1 Status Indicator
7
Bay 2 Status Indicator
8
USB 3.0/ USB C Ports
9
Drive Activity Indicator (Amber)
10
Drive Activity Indicator (Green)
2.1.6 Power On Procedure
To power on the device, press and release the power button. The clear ring surrounding the power
button will glow blue when the power is on.

13
Copyright © 2011-2019 by Highly Reliable Systems, Inc. All rights reserved.
2.1.7 Power Off Procedure
To power off (shutdown) the device press and release the power button. The device will gracefully
shutdown by saving any unwritten data and properly disconnecting devices. NOTE: YOU MUST
SAFELY REMOVEANY MEDIA CONNECTED TO REMOTE SERVERS THROUGH ISCSI
BEFORE POWERING OFF THE DEVICE OR DATA LOSS OR CORRUPTION MAY OCCUR!!!!
If the device does not power down automatically after pressing the power button, the device can be
forced to power down by pressing and holding the power button until the device powers off.
You can also power off (shutdown) the device through the web administration interface as documented
below.
2.2 Rear Panel
The rear panel on the devices are as follows:
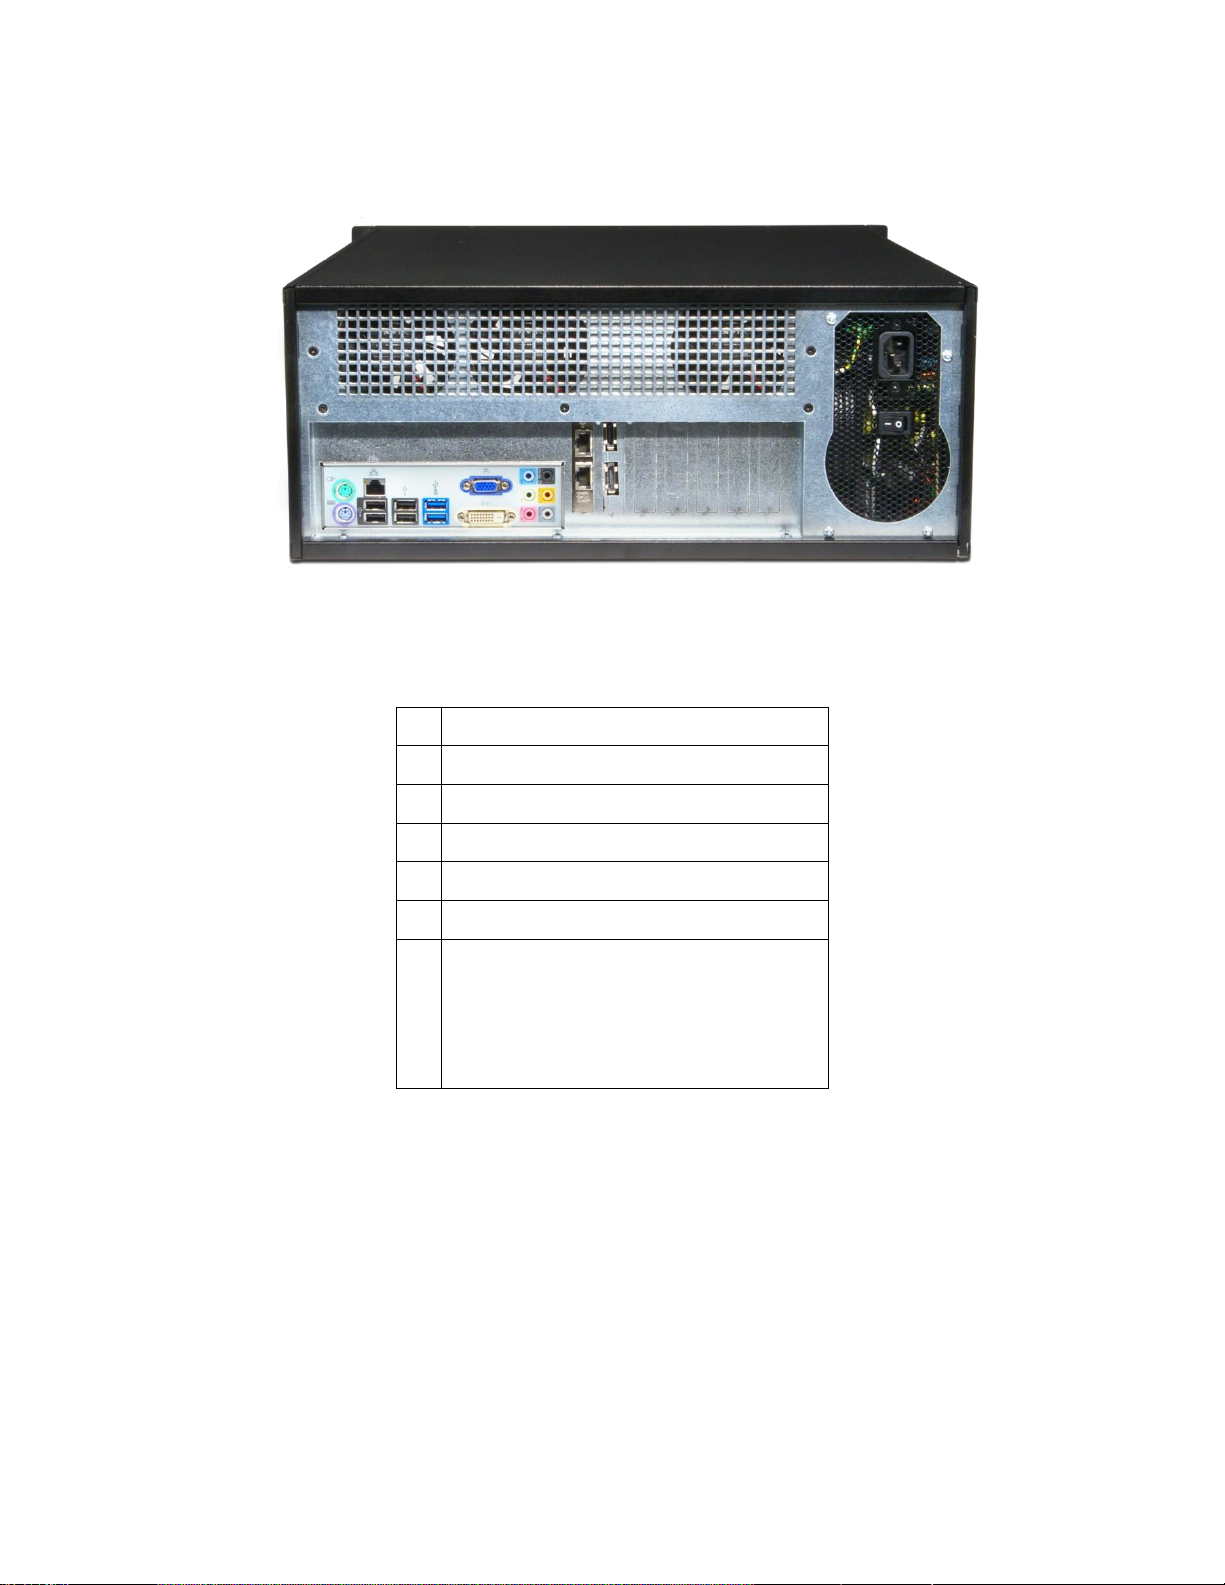
2.2.1 Desktop Chassis (legacy)
4
1 2 3
5
Illustration 6: Desktop Chassis Back View
1
PS/2 Keyboard/Mouse
2
VGA/DVI Video Connectors
3
USB P
ort
s
4
10/100/1000 MB Ethernet Port
5
Power Receptacle - A
ut
o-sw
itc
h
110/220 V
olt
s
Note layout may vary depending on motherboard used.

14
Copyright © 2011-2019 by Highly Reliable Systems, Inc. All rights reserved.
2.2.2 2U Rackmount Chassis (2 or 4 Bay)
13 6
2 4 5
Illustration 7: 2U Chassis Back View (2 or 4 Bay)
1
Power Receptacle - 110/220 V
olt
s
Some power supplies are auto-
switch and some are not –
c
h
ec
k
power supply before
c
onn
ecti
ng
pow
er
.
2
PS/2 Keyboard/Mouse
3
10/100/1000 MB Ethernet Port
4
USB P
ort
s
5
DVI/VGAVideo Connectors
6
eSATA Ports (optional)
Note layout may vary depending on motherboard used.
15
Copyright © 2011-2019 by Highly Reliable Systems, Inc. All rights reserved.
2.2.3 4U Rackmount Chassis (8 bay or RAIDFrame) (legacy)
7
2 5 6
1 3 4
Illustration 8: 4U Rackmount Chassis Back View (8 Bay or RAIDFrame)
1
PS/2 Keyboard/Mouse
2
10/100/1000 MB Ethernet Port
3
USB P
ort
s
4
DVI/VGAVideo Connectors
5
10 Gb Ethernet (optional)
6
eSATA Ports (optional)
7
Power Receptacle - 110/220 V
olt
s
Some power supplies are auto-
switch and some are not –
c
h
ec
k
power supply before
c
onn
ecti
ng
pow
er
.
Note layout may vary depending on motherboard used.

16
Copyright © 2011-2019 by Highly Reliable Systems, Inc. All rights reserved.
2.2.4 Mini Chassis
Illustration 9: 2 Bay Mini
1
Power Receptacle - A
ut
o-sw
itc
h
110/220 V
olt
s
2
Video Connectors
3
Gigabit Ethernet Port
4
USB 3.0 Ports
5
PCIE Expansion Slot
Note layout may vary depending on motherboard used.
17
Copyright © 2011-2019 by Highly Reliable Systems, Inc. All rights reserved.
3 NetSwap/RAIDFrame Plus Administration
Although the NetSwap/RAIDFrame Plus has a VGA, keyboard, and mouse port for emergency use, the
device is normally administered through a web browser so it will not be necessary to directly connect a
monitor. Just hook the device up via an Ethernet cable to your network or directly to the configuring
machine and power it up. Now open a browser on the configuring machine using standard port 80 (or
securely over SSL on port 443).
By default the NetSwap will use a dual IP mode of DHCP+STATIC which means it will attempt to get
an IP address using DHCP as well as use a static IP of 192.168.1.50. The NetSwap Locator software
available from our website (https//high-rely.com) can be used to locate the NetSwap on your network.
To connect to the NetSwap/RAIDFrame Plus either use the NetSwap Locator (skip to step 3) or browse
to 192.168.1.50:
1. If you are currently using a different IP address scheme on your network, you will need to
temporarily change the TCP/IP properties of your configuration computer's network adapter to
access this IP. We recommend making your Network card something like 192.168.1.49 with a
netmask of 255.255.255.0 (as long as this address is unused... “ping 192.168.1.49” first to
verify nothing responds).
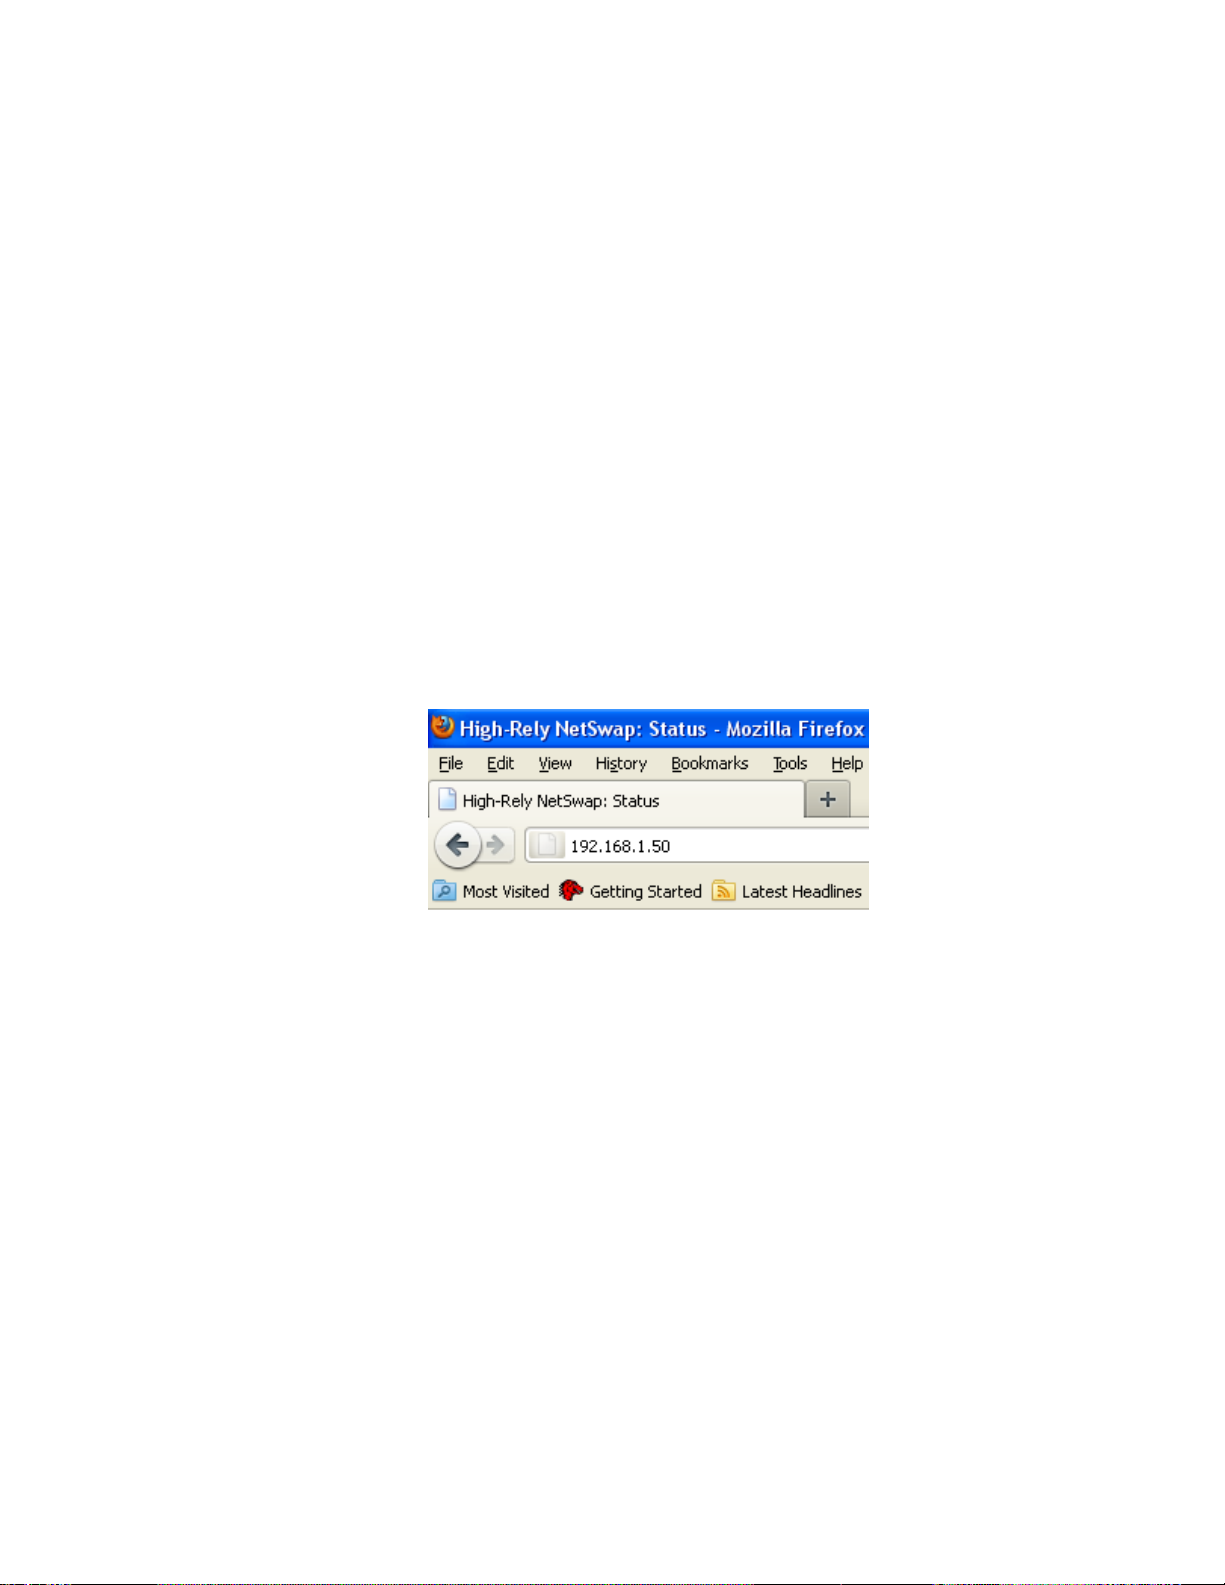
Open a web browser and enter “192.168.1.50”into the address bar.
Illustration 10: Web Browser Address Bar
2. If you are unable to connect to the NetSwap/RAIDFrame Plus default IPAddress you may have
to use the supplied USB key to reload factory defaults.
3. When prompted enter for username and password:
User Name: hradmin
Password: password
Please NOTE: the username and password are BOTH case sensitive –you will need to use
all lower case.

18
Copyright © 2011-2019 by Highly Reliable Systems, Inc. All rights reserved.
Illustration 11: Username/Password Entry
3.1 Quick Setup
This section provides a set of steps to quickly configure the NetSwap/RAIDFrame Plus and get it
connected to your network. A complete reference for the administration interface is provided below.
1. Change the Admin Password
Click the 'Admin' option under 'Settings' on the administration menu. Enter a new password
and matching confirmation password and click the 'Save' button.
2. Set Network Settings
You will want to adjust the NetSwap/RAIDFrame Plus to match your network IP numbering
scheme. Click the 'Network' option under 'Settings' on the administration menu.
We
rec
o
mme
nd STATIC IP mode rather than DHCP since this device will be accessed by the
backup software at a fixed location. Make sure to choose an address outside your DHCP scope
(or make a reservation). Enter the desired values for IP address, Netmask, Gateway, and DNS
and click the 'Save' button. After changing the network settings you may need to reconfigure
your configuring machine's network adapter back to it's previous IP to both work with the
re
s
t
of the network and to reconnect to the NetSwap/RAIDFrame Plus on the new number scheme.
3. Prepare Hard Disks
Prepare each removable disk (and the internal disk on equipped NetSwap Plus models) and
share the disks as detailed in the 'Disk Preparation' section below.
4. Connect to the NetSwap/RAIDFrame Plus
iSCSI –Connect using the iSCSI Initiator using the IP Address, Target Name, and CHAP
authentication as set using the 'iSCSI' menu option (the default is no CHAP authentication).
See the detailed walk through in a later chapter for more detail. You should install the High-
Rely iSCSI Connector software described below to allow safe removal of the hard drive when
swapping.
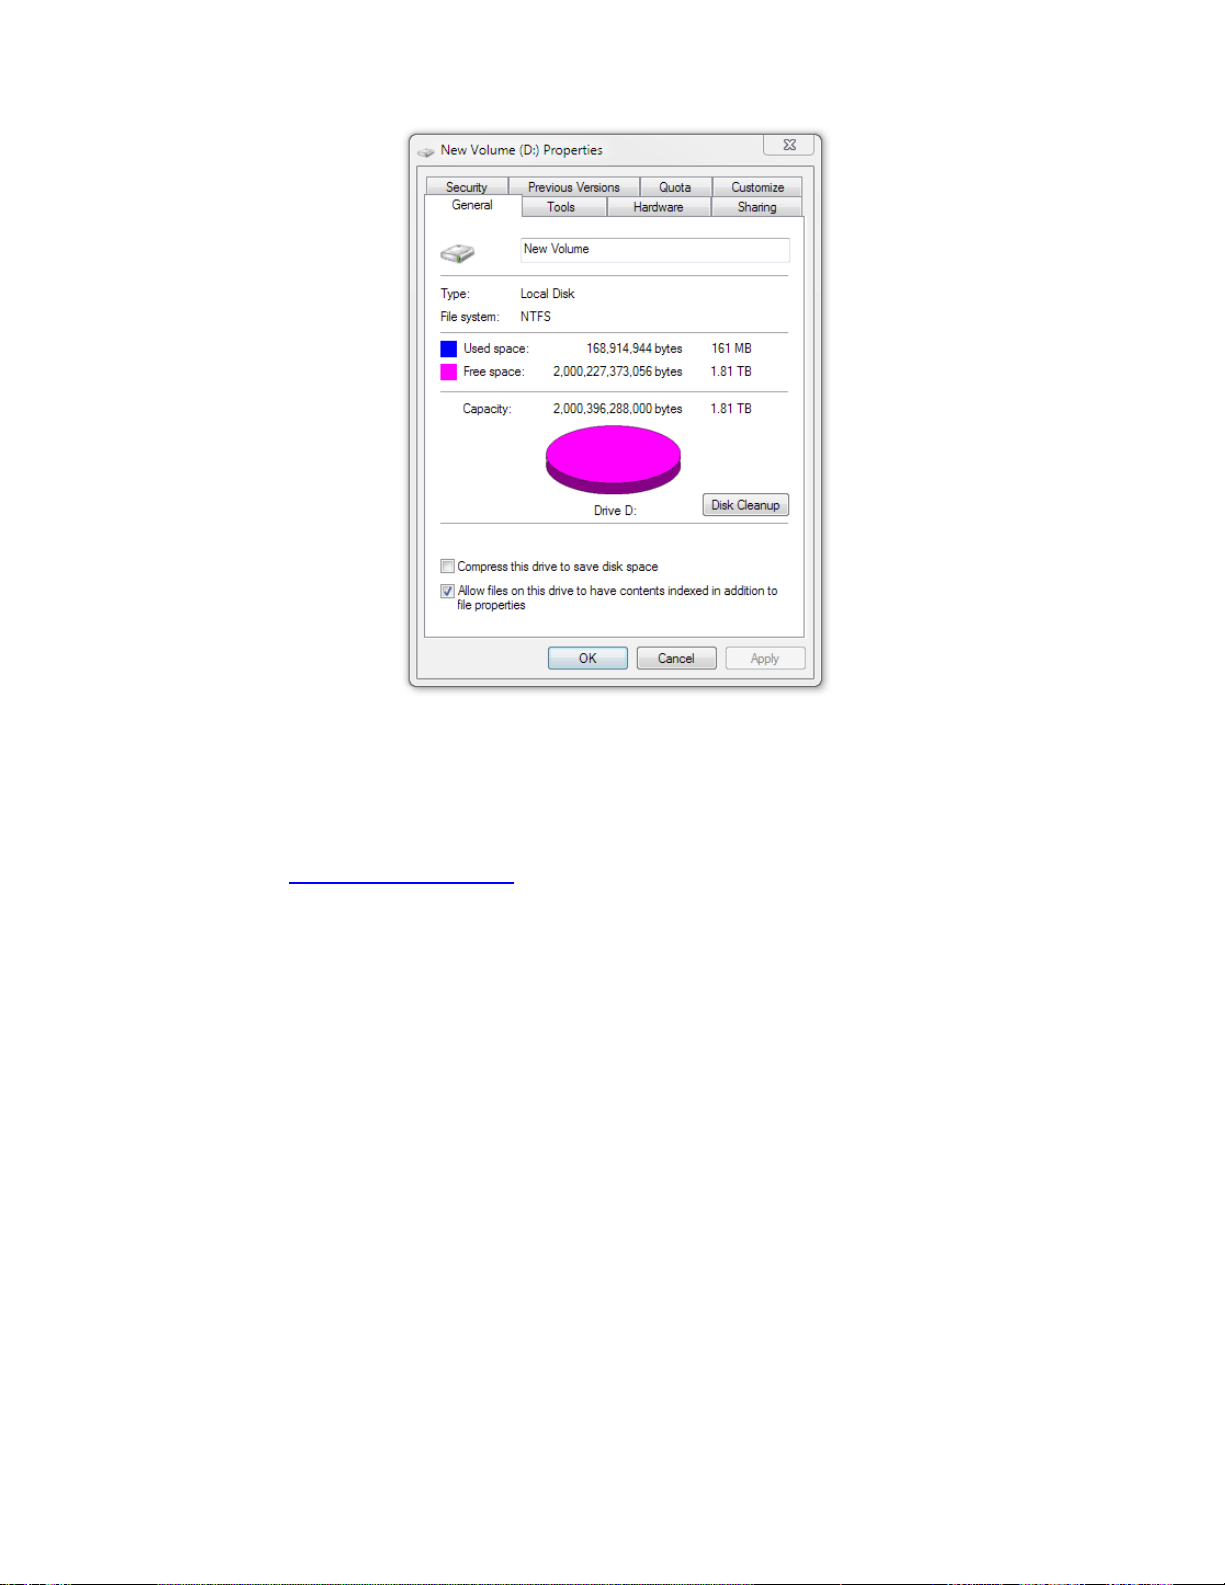
When using iSCSI we recommend turning off off default indexing service. Right click the
drive in Explorer and select properties. Uncheck “Allow files on this drive to have contents
indexed in addition to file properties.”
19
Copyright © 2011-2019 by Highly Reliable Systems, Inc. All rights reserved.
Illustration 12: File Indexing
NAS - Connect using the Network Browser or from the command line on Windows using the
command “net use <drive> \\<NetSwap/RAIDFrame Plus ip or hostname>\<share name>”, for
example:
net use x: \\192.168.1.50\Backup password /user:bill
You may want to verify that your Windows network card is at the highest possible speed (e.g.
Gigabit Ethernet). Right click your network connection, select status and verify Speed:

20
Copyright © 2011-2019 by Highly Reliable Systems, Inc. All rights reserved.
Illustration 13: Windows Network Settings
Note: When sharing via NAS \\server\share... we assume that the client's backup software supports and
internally retains storing NTFS and SHARE level permissions. If you copy files directly to
NetSwap/RAIDFrame Plus drive using explorer, Robocopy or similar file program to the
NetSwap/RAIDFrame Plus drive may not preserve all user and group permissions.
This manual suits for next models
2
Table of contents
Other Highly Reliable SYSTEMS UPS manuals


