Hiplok AIRLOK V1 User manual

USER GUIDE | INSTRUCTION MANUAL | WARRANTY
AIRLOK V1

EXPANSION SLEEVE ( x4 )
SECURITY WASHER ( x4 )
METAL FRAME ( x1 )
M10 BOLT ( x4 )
BALL BEARING ( x4 )
OUTER COVER ( x1 )
COVER FIXING BOLTS ( x4 )
RUBBER FRAME HOLDER ( x1 )
LOCKING PIN ( x1 )
CODED KEY ( x3 )
SOLID WALL
THE PARTS OF YOUR AIRLOK
TOOLS REQUIRED + RECOMMENDED FOR FITTING
1 X ELECTRIC DRILL
1 X 6mm MASONARY DRILL BIT
1 X 15mm MASONARY DRILL BIT
1 X 6mm ALLEN KEY
1 X PENCIL
1 X SPIRIT LEVEL
1 X SAFETY GOGGLES
1 X STEP LADDER
1 X VACUUM CLEANER
1 X ROLL OF MASKING TAPE
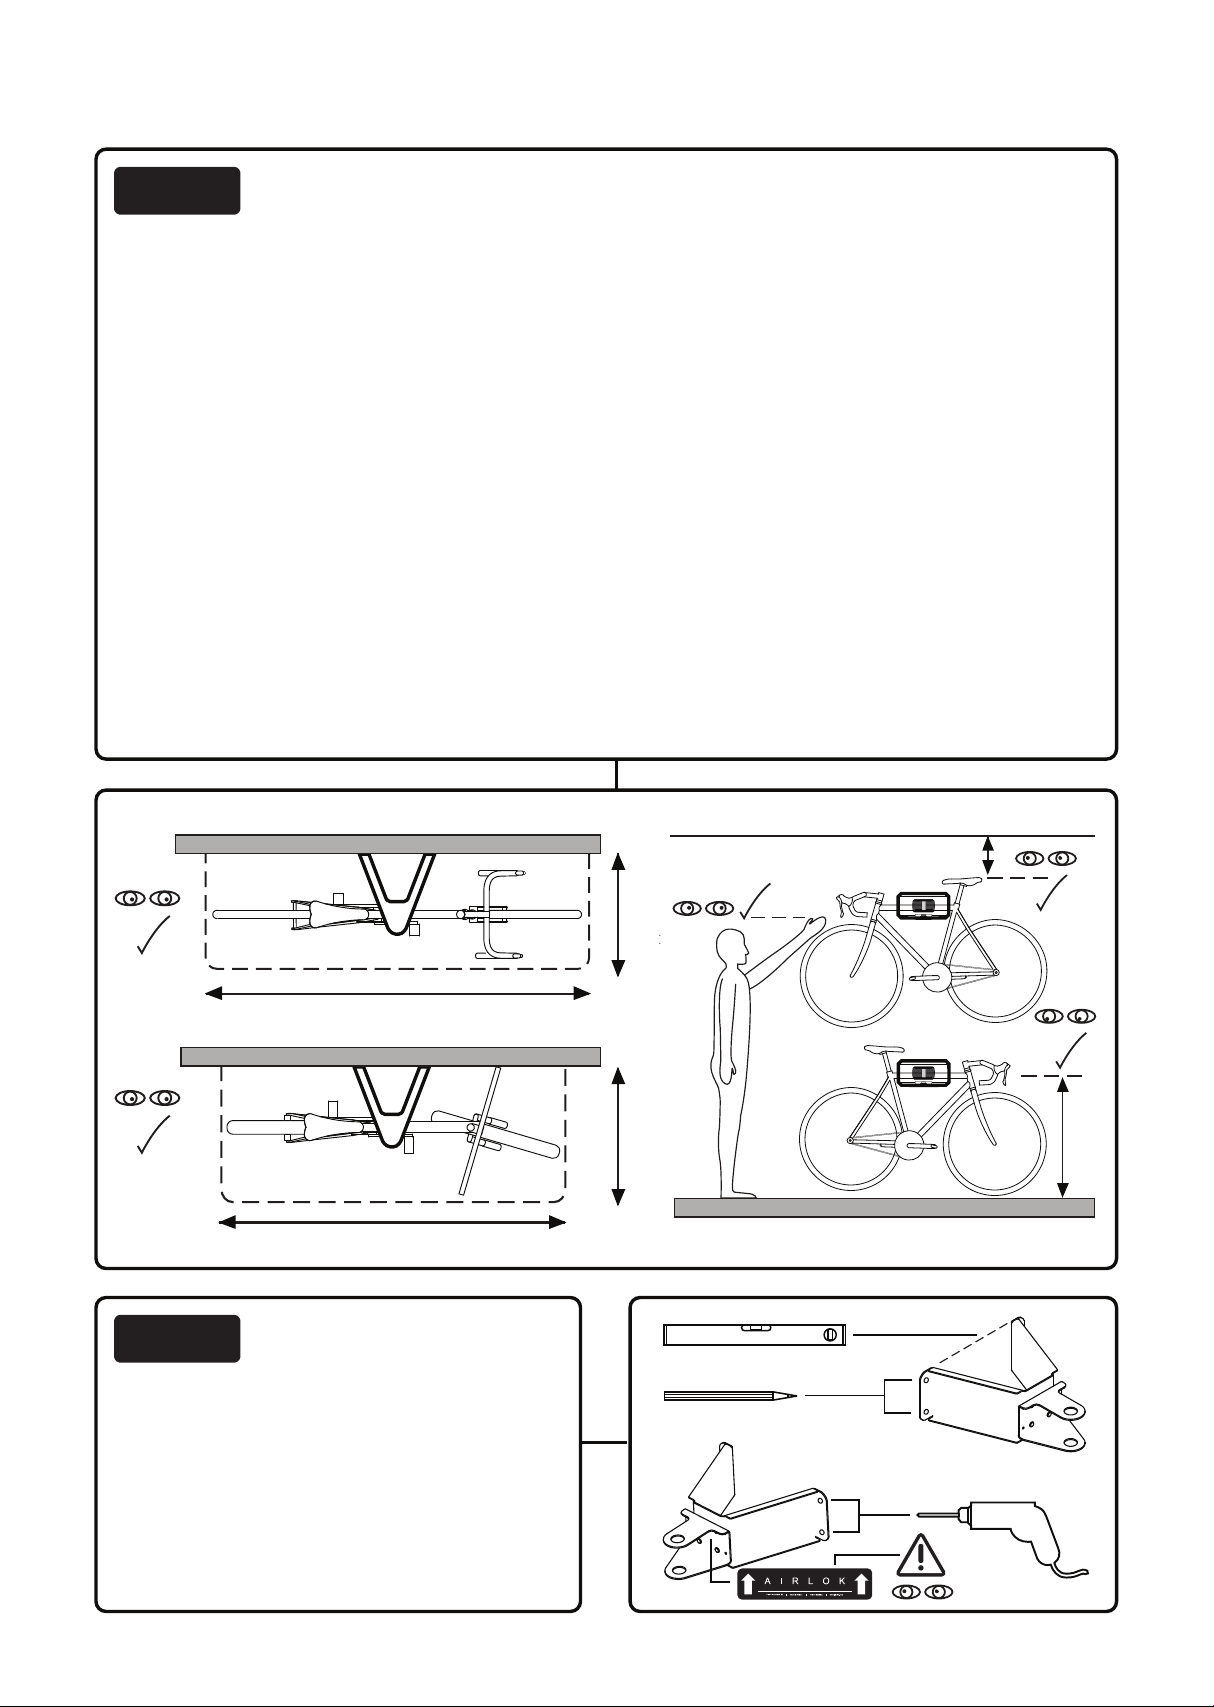
Decide on the location for AIRLOK, taking into consideration the type and size of bike(s) it will
secure and the type of wall it is being fixed to. Ensure there will be sufficient clear space around
the AIRLOK and bicycle taking into account furniture, opening doors etc. Check the unit is not too
high to be able to safely unlock the locking pin and remove / hang your bicycle. AIRLOK is
designed for indoor and outdoor use.
Important: For Sold Secure & ART approval AIRLOK must be fitted to a solid substrate ( i.e
concrete wall ) using the security fixings supplied.
AIRLOK does not have to be fitted to a brick or concrete wall BUT it will not be as secure and will
not be Sold Secure or ART approved. Before fitting, ensure the selected wall is suitably strong
and of sound construction to support the weight of the AIRLOK and bicycle ( stud or plaster board
walls may be to weak ).
AIRLOK can be fitted to a timber wall if timber is of appropriate structural rigidity and thick enough
to fix with correct timber fixings such as heavy duty wood screws ( not supplied ) but again it will
not be as secure and Sold Secure or ART approval will not apply.
Remove AIRLOK from box and slide metal
frame from out of outer cover.
Using the metal frame, mark the 4 holes
with a pencil ensuring the unit is level. Drill
four pilot holes using a 6mm or 8mm
masonry drill approximately 20mm deep.
FITTING AND ASSEMBLY INSTRUCTIONS
STEP 1
STEP 2

Hold the metal frame up to the wall and screw the bolts back in through the frame using the
security washers using an allen key wrench, tighten each bolt hand tight until the unit is
secure. Please note the larger holes in the framework allow for a small amount of adjustability.
Ensure unit is level and correct way up before fully tightening the bolts (and before inserting
ball bearings).
Using a 15mm masonry drill bit (if using the supplied anchor bolts) drill each hole 55-60mm
deep. Make sure these are clean and drilled level. Always vacuum out drilled holes before
installing the anchor bolts.
Warning: ensure you are not drilling into water pipes, gas pipes or electrical wiring.
These may be recessed into a concrete or brick wall behind plaster or render. If in doubt
check with an expert.
STEP 3
STEP 4
55 - 60mm
15mm
Remove the bolts from the outer casing and tap into the wall. Be carefull not to
damage the casings.
STEP 4a
Bolt casing should be flush
with wall
Tapered nut should remain
inside casing
Wall

BALL BEARING
BALL BEARING
Installation of ball bearings – for Sold Secure & ART approval ball bearings must be
hammered into the allen key holes. To install these use adhesive tape to hold the ball bearing
over the holes. Use a large hammer to hammer them into place then remove adhesive tape.
Note: Once ball bearings are hammered into allen key holes, removal of the AIRLOK unit is
not possible without damage to the wall or AIRLOK itself.
Remember: if you’re unsure please call us, refer to our website www.hiplok.com or ask a
professional for help.
STEP 5
Other Hiplok Bicycle Accessories manuals


Popular Bicycle Accessories manuals by other brands


Specialized
Specialized Elite CylcoComputer user manual

Sigma
Sigma BC 16.16 manual

Playcore
Playcore Dero Setbacks installation instructions

VDO Cyclecomputing
VDO Cyclecomputing x3dw instruction manual

Cateye
Cateye RAPID X2 manual

buratti meccanica
buratti meccanica Clorofilla Trail Use and maintenance manual


