hisky HMX280 User manual

Read this manual carefully before use
Instruction Manual v1.0
HMX280HMX280
Thank you for purchasing our HiSKY-brand products
www.hiskyhobby.com
www.openpilot.org

7.1 Mode choice of Transmitter
Table of Contents
Foreword 2
Declaration 2
1. Definition of Flight Direction 4
5
6
7
8
14
Caution
2. Box Contents
3. Instructions of Charger
3.1 Instructions of Charger
3.2 Charging Procedure
5. Install the Landing Gear
5.1 Installation Procedure of the Landing Gear
6. Install the Motors
6.1 Installation Procedure of Rotors
7. Preparing the HMX280 for Flight and Unlock the Motors
7.2 Steps of Flight
7.3 Unlock the Motors
7.4 Lock the Motors
7.5 Caution
8. Selection of Flight Modes
8.1 3-axis Flight Mode
8.2 6-axis Flight Mode
9. Flight Control Diagram
9.1 Flight in Normal Status
9.2 Practice Flips
10. End the Flight
12. HMX280 Data Ports
11. Exploded View
3
6
6
7
17
8
10
10
11
11
11
12
12
12
12
12
13
13
11.1 Parts of HMX280 16
10
4. Low-voltage Protection of the Battery 7

A.Keep away from obstacles and people
Declaration
B. Keep away from Humidity
C.
Proper operation and maintenance
D. Avoid Flying alone
E.
Safe operation
F. Away from highly spinning parts
G. Protect from heat
Caution before Flight
F. Age Recommendation
Foreword
23
Dear Customers:
Thanks for purchasing a HiSKY radio control aircraft product. In order to quickly and
safely master the operation of the HMX120, please read the manual carefully and then
A. Ensure the battery packs both transmitter and receiver are fully charged.
B. Ensure the throttle stick of your transmitter stay at the lowest position before operation.
C.
D.
keep it properly for future consultation and reference.
HMX280 quadcopter has potential danger .Please operate it in the open
spaces away from people. Improper assembly, damage of the air frame,
mal-performance of the radio, mal-operation will result in injury or damage
to the product, people unexpectedly. The pilot should operate the model in a
safe manner and know the responsibility he/she needs to take after if any
failure of following the manner.
HMX280 quadcopter can fly at uncertain speed, which
poses potential dangers. Please keep your HMX280
away from people, high buildings, high-tension lines,
etc., and avoid operating in rain, storms, thunder and
lightening.
HMX280 should be kept away from humidity and vapor
because its complex and precise electronic components
and mechanical parts may be damaged.
Please use HiSKY original parts to upgrade,modify or
maintain your HMX280 within the range or functions
permitted. It is forbidden to use it against of the safety
laws or regulations.
At the beginning of learning about radio-controlled
flight,there are some difficulties to overcome. Please
avoid flying alone. Invite experienced pilots to guide
you(two of the most effective methods to practice
are via a PC flight simulator and/or under the
supervision of a skilled pilot).
Please fly your HMX280 according to your physical
status and flight skills. Fatigue, listlessness and
mis-operation will the increase the possibilities of
accidental hazard.
Please keep pilot,people and objects away from the
spinning blades of high main rotors and tail rotors.
HMX280 quadcopter is made from metal,fiber,plastic
and electronic components,etc. Please keep away from
heat and sunshine in order to avoid distortion and
damage caused by high temperatures.
Please strictly obey the order of turn on and turn off before operation.When
starting your flight, please turn on your transmitter first, and connect the power
cable of your HMX280 last. When finishing your flight,please disconnect the power
cable of your HMX280 first and turn off your transmitter last.Please cultivate a
correct habit of turn on and turn off.
Continuous shakes and fierce movement may cause the disconnect of the battery
and result in the lose control of the model. Please ensure the fastened connection
of batter y and motors before flight.
Not for children under 14 years,This is not a toy.

UP
down
left right
front
back
Components
Airframe
Motors
Propeller
ESCs
Battery
Charger
Transmitter(No this item in BNF version)
HiSKY HMX280Talon
4x Brushless Outrunner Motor, 1300Kv
4x6*3 Propeller
4x 12-Amp Brushless ESC
1350mAh 3S 11.1V 25C Li-Po Battery
3S/2S DC Li-Po Balancing Charger
X-6S
Specifications
Length 350mm
Height 120mm
Rotor Diameter 18mm
Flying Weight 416g
Flight time 7-10mins
Suggested load 150g
Max tension 1300g
HiSKY MHX280 airframe
rotors
1350mAh 3S 11.1V 25C Li-po Battery
3S 2S Li-po Battery Charger
Landing Gear Screws
Screwdriver
Charging Wire
X-6S transmitter( No this item in BNF version)
Bullet Head
Landing Gear
2.Box of Contents
Manual
1.Definition of Flight Direction
45
HiSKY defines the directions of HMX280 in order not to cause confusion in the
following descriptions. That is to say,the tail of HMX280 is facing the pilot, and its
head facing forward(front of the pilot). The left hand of pilot is the left side of
HMX280, while the right hand of pilot is the right side of HMX280.Its head is to the
front and its tail is to the back. The direction in which main body of HMX280 is
facing up ,and its skids are facing down.
Contents
1
8
1
1
4
1
1
1
4
1
1
Quantity

5.1 Installation Procedure of the Landing Gear(see the following):
Step 1 Step 2
Step 3
Step1 Step2
Step3 Step4
Fasten the landing gear with two screws
Finish the installation.
Step 4
3.Instruction for Charger
3.1 Instruction for Charger:
3.2 Charging Procedure(see the following steps):
5.Install of Landing Gear
4.Low-voltage Protection of the Battery
6 7
Please ensure there is no heat-emission ,curve ,transformation,impale and damage
before charging. It is suitable for charging 3S 11.1V and 2S 7.4V Li-ion batteries and
Li-po batteries.
1)
2)Connect the charger wire.
3)Take the battery from the battery bay in the airframe, connect the balance joint of
the battery with the 3S charging port on the charger.
4)It is charging when the indication LED become red. If the LED turn green,the battery
is full charged.
5)Disconnect the batter y with the charger when finished charging.
6)The time to charge the battery full is 60 minutes.
(Caution: Only the designated Charger can be allowed to charge for HMX280 battery.
The use of other charger may cause the injury and damage to the people and property.)
Connect the charger to 220V AC power.
Connect the battery joint with the
3S port on the charger.
Connect the power wire of the charger
at the back of the charger.
Plug the other side of the power wire
into the power socket, there will be on
three red LED lights. It is the status of
charging.
Put the land gear on the groove of
the airframe, please make left to the
left side, right to the right side
Make the antenna pass through the
landing gear and fasten the copper
bush in the inner side.
When finish the charging,
the LED lights turn green. Take out the
battery, then you can enjoy the flight.
Low-voltage Protection has set in HMX280 system. The
default parameters are as following.
Class 1 Low-voltage Protection:10.5V-10.8V When the
voltage of the battery reach in this range, the red rear
decoration lights are flashing slowly,which is reminding
the low voltage.
Class 2 Low-voltage Protection: 9.6V-9.8V When the
voltage of the battery reach in this range, the quadcopter
will land slowly in the position flying. Please change the
battery or charge for the battery.
(REMINDER: Please fly with the battery correctly. Overcharging or over-discharging
the battery will cut down its ser vice life.)
Red Light Red Light
White Light White Light

8 9
6.Install the rotors
6.1 Installation Procedure of the motors
Step1 Step2
Step3
步骤4
Step4
Fasten the bullet head with the screwdriver Do the other three rotors same as the above
(see the above picture) Rotors of M1 and M2 are orange.
M1 is counter-clockwise rotor, while M2 is clockwise rotor.
Rotors of M3 and M4 are black. M3 is counter-clockwise rotor. M4 is clockwise rotor.
M1 and M3 rotors are counter-clockwise. The direction of leading edge is counter-clockwise,
M2 and M4 rotors are clockwise. The direction of leading edge is clockwise,(see the
The quad cannot fly if place the wrong rotors
1)Unscrew the bullet head with screwdriver;
2)Install the clockwise rotors to M2 and M4 motors;
3)Install the counter-clockwise rotors to M1 and M3 motors.
Unscrew the bullet head on the motors
with the cross screwdriver
Don’t mistake the up or down side of
the rotor as down or up side.(The side
with 2 dots besides the hole is the up
side, while 4 dots is the down side.)
3 steps
(see the following picture)
Leading edge
Leading edge
following picture)
at the motors.Please ensure the rotors of
clockwise and counter-clockwise are loaded
accordingly.
M1
M2
M3 M4
Orange rotors
Black rotors
Orange rotors
Black rotors
*Note:

7.1 Mode choice of Transmitter:
1) Please choose Fixed Wing Mode to fly the quadcopter with X-6S and H-6 transmitters
10 11
7.Preparation for flight and Unlock the motors
7.2 Steps of Flight:
3) Bind the model with the transmitter.
4) After the binding, the signal light will Bind the model with the transmitter and make
Step 1 Step 2
Step 3
turn on the transmitter first connect the battery of the model with
succeeding the binding, the signal light
7.3 Unlock the motors
Push the aileron stick left side down for
7.4 Lock the motors
Push the aileron stick right side down for
2) Pull the throttle stick of the transmitter to the lowest position and turn on the
transmitter. Connect the battery joint with that of the main board in the airframe
and close the battery cover.
1) Install the battery. Open the batter y bay of the quad and place the battery into
the battery bay.
the main board.
on the airframe turn flash in green slowly.
2-3S and release then unlock the motors 2-3S and release then Lock the motors
7.5 Notice:
1) Please follow the order ”turn on the transmitter first and then connect the
battery of the model”.After turn on the transmitter, then connect the battery
of the quadcopter with the main board in 10s.The light of signal will change
from flash to ever green in 1-3s.Then the binding succeeds.
2) Fail to connect the battery in 10s, please disconnect the battery ,turn off the
transmitter and repeat the step above.
Trouble shooting: a flashing receiver light after connecting the battery:
Possible causes Solutions
Fail the binding Turn transmitter off and then on and
reconnect the battery, rebind
The throttle stick of transmitter is
not at the lowest position
Pull down the throttle stick to the
lowest position and rebinding.
The transmitter battery is low and
empty
Replace transmitter battery and
rebinding.
The HMX280 battery is low and
empty
Replace the HMX280 battery and
rebind
No function of receiver and
transmitter
Replace receiver or transmitter and
rebind
sure the distance of them within 10cm.
Step 4
You can fly the quad after close the battery
back hatch.
Notice: Please follow the order ” turn on the transmitter first and then connect
the battery of the model”.
(When lock the motors, the green signal
light will flash more slowly.)

9.1 Flight in Normal Status
Aileron throttle
Rudder
elevator
13
12
9.Flight Control Diagram
Pull down the fifth channel of the transmitter to the 3-axis flight mode. In this
mode, the flight control system has no restriction to the flight poses and angles.
Pull up the fifth channel of the transmitter to the 6-axis flight mode. In this mode,
the flight control system auto-correct the flight pose when the model out of control.
(see left picture) There is a GYRO SENS button
at the right up side of the transmitter which
can switch between “0” and “1”. “0” is
for 6-axis flight mode, while “1” is for 3-axis.
8.Selection of Flight mode
8.1 3-axis flight mode
8.2 6-axis flight mode
GYRO
SENS
0
1
1) When the stick of Aileron turn left
or right, the quad will turn left or right
accordingly.
2) When the stick of throttle turn up
or down, the quad will turn up or down
accordingly.
3) When the stick of rudder turn left or
right, the head of quad will turn left or
right accordingly.
4) When the stick of elevator turn up
or down, the quad will be for ward or
backward accordingly.
9.2 Practice Flips:
HMX280 can do excited stunt actions, such as forward and backward, rolling right
and left:
1) Find a spacious ground with soft grass to practice.
2) Select ( )
3) It is advised the beginners increase the ser vo distance of ELEV and AILE of the
transmitter to 100%-110%. It can be adjusted according to personal skill. The
default setting is 100%
4) It is a must to practice with the throttle of the transmitter. When the HMX280
quadcopter change from normal flight to stunt flight ,the throttle stick needs
to pull down slowly. When the model exchanges from stunt flight to normal,
the throttle stick needs to pull up accordingly. Please adjust it according to
personal skill.
roll flight mode 3-axis mode
10.End the flight
Step 1: Push the aileron stick to
the right side down
Step 2:Disconnect the battery
Step 3: turn off the transmitter Step 4: Take out the battery
of the quad

14
11.Exploded View
15
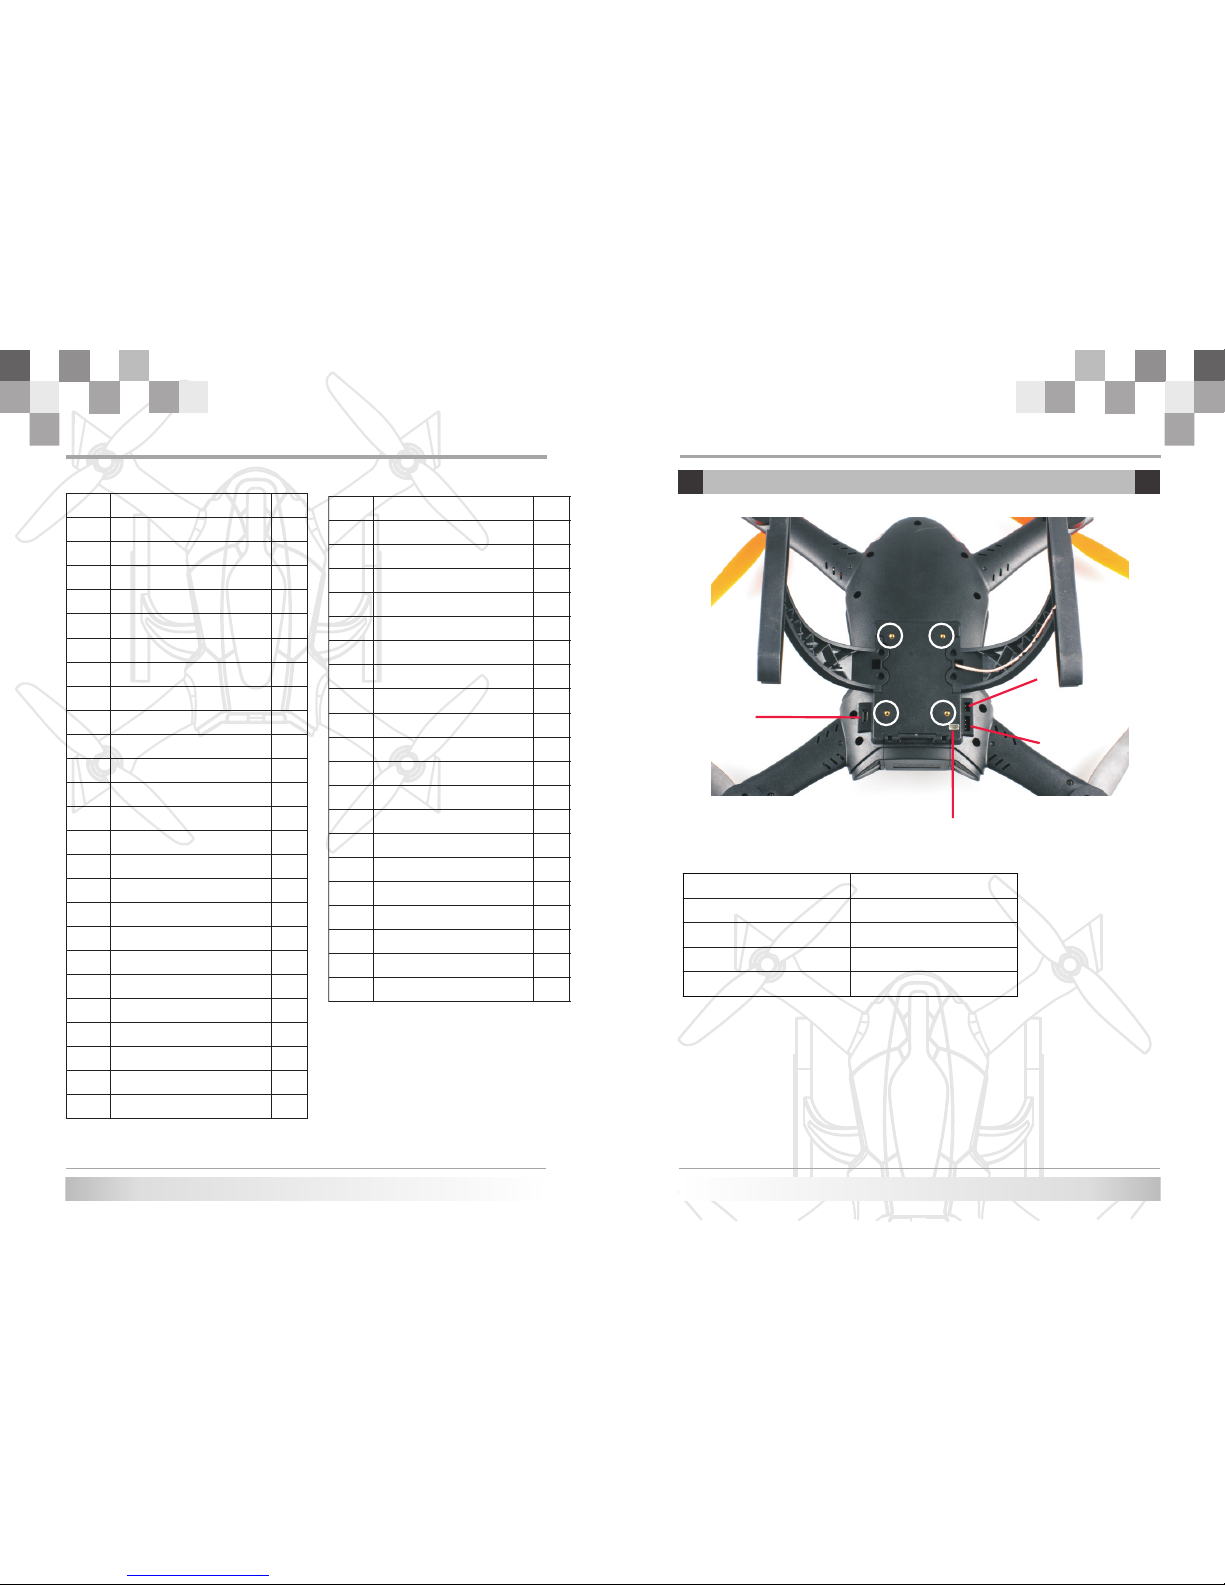
12.HMX280 Data Ports
A
B
C
D
USB Port
There are four ports at the bottom of the airframe(see the above picture):
DSMX/II satellite receiver
11.1V battery port
Gimbal control port
(The four screw holes marked with white circles in the picture are left for gimbals.)
Serial number Data Ports
A
B
C
D
Amount
33
27
26
28
29
30
31
32
Name
No.
4
8
1
1
4
9
8
8
Machine screws 2.0*5
HMX280-CC3D USB
XY1001 receiving board
Machine screws 2.0*8
Tapping screws 2.0*8
HMX280-CC3D power socket
Tapping screws 1.5*3
1
42
36
35
37
38
39
40
41
1
1
2
1
1
34
Tapping Screws 2.0*8
HMX280 Down Cover
Tapping screws 1.5*5
HMX280 battery hatch
1
4
1
4
2
1
45
44
43
HMX280 batter y bay
1350mAh 11.1V 25C battery
HMX280-CC3D satellite receiver
16 17
Clockwise motors(with M4 caps)
HMX280 right finger position
HMX280 right rear leg decoration 1
1
port
10.1 Parts of HMX280
Luminous diode (white to white,
Amount
8
2
1
3
4
5
6
7
Name
No.
HMX280 left rear leg
HMX280 semi-finished red-light
HMX280 counter-clockwise rotor
Counter-clockwise motors(with
HMX280 Upper cover decoration
HMX280 Upper cover
HMX280 left finger position
2
1
1
1
2
1
2
1
HMX280 right front leg
22
16
15
17
18
19
20
21
HMX280 left front leg decoration
HMX280 clockwise rotor(orange)
HMX280 left front light
Luminous diode (white to red,
HMX280 right front light
HMX280 counter-clockwise rotor
HMX280 semi-finished white-
1
2
1
1
2
1
1
1
HMX280 left rear light
HMX280 right rear light
HMX280 clockwise rotor(black)
9
10
11
12
13
14
2
1
1
1
23
24
25
decoration light piece
light piece
(black)
M4 caps)
super bright)
piece
(orange)
decoration piece
light
super bright)
decoration light piece
decoration piece
light piece
machine screws
HMX280 right tripod
Tapping screws
machine screws
Tapping screws
HMX280left tripod
Tapping screws 2.0*8
HMX280-CC3D Main Board
HMX280-ESCs
(semi-finished)
6
1
4
(semi-finished)
(semi-finished)
(semi-finished)
board(semi-finished)
Table of contents
Popular Quadcopter manuals by other brands

Quadrone
Quadrone Pro-Cam AW-QDR-PCAM instruction manual

Protocol
Protocol Galileo 6182-5U Pilot's handbook

REVELL
REVELL qg550 user manual

Horizon Hobby
Horizon Hobby Blade 350 QX RTF instruction manual

DELTA-SPORT
DELTA-SPORT 293841 Instructions for use

Mattel
Mattel Hot WHEELS RC Disney PIXAR LIGHTYEAR HHX49T instructions


