Quadrone Pro-Cam AW-QDR-PCAM User manual

• Four axis structure makes the quadcopter for flexible and faster for flying.
•It is wind resistant and can be flown indoor and outdoor.
• Built in 6 axis gyroscope for precise hovering in the sky.
• Simple design makes changing parts easy.
• Comes with 360 degree flips and throwing take off features.
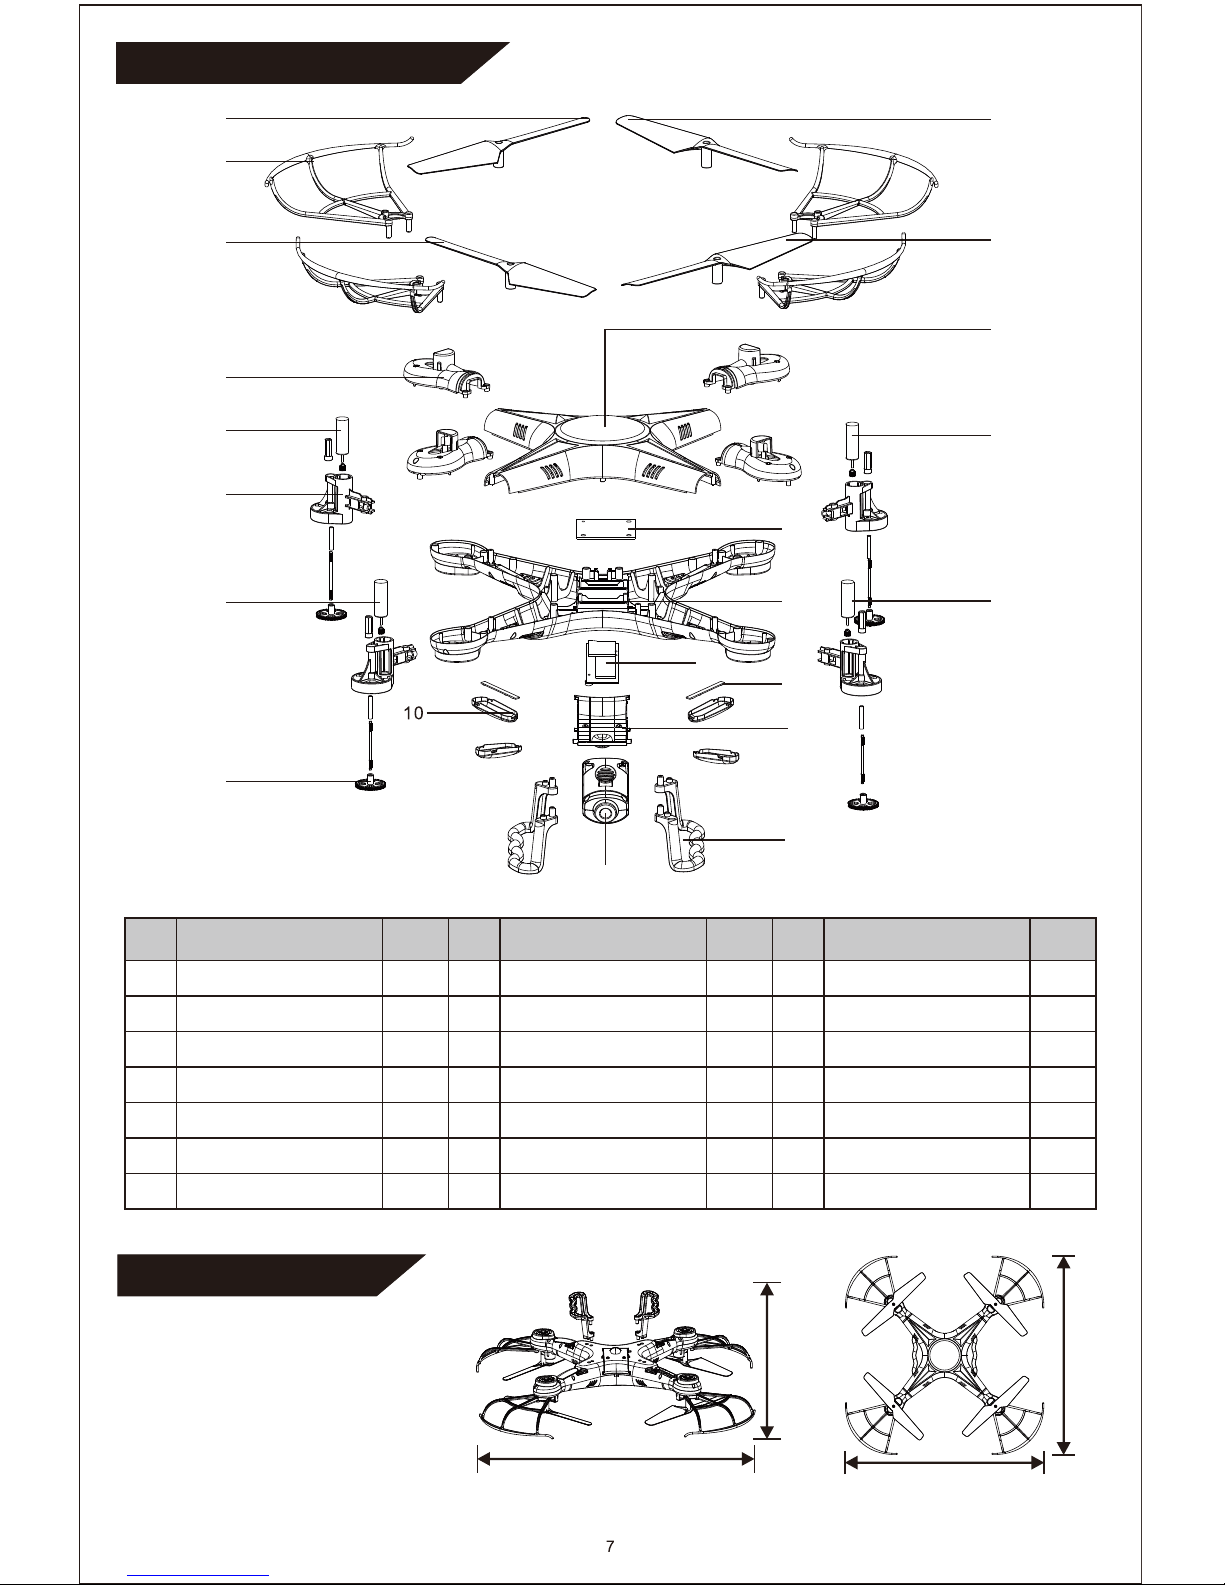
The materials and specifications mentioned in this manual or the parts in this package are for reference only.
Key features of quadrone
INSTRUCTION MANUAL
4CH 2.4G REMOTE CONTROL QUADCOPTER
AWW INDUSTRIES™ is an innovative division of DGL Group, Ltd.
Other trademarks and trade names are those of their respective owners.
AWW INDUSTRIES,
195 Raritan Center Parkway, Edison, NJ 08837.
Specifications, colors and contents may vary from illustrations.
WARNING: This product may
contain a chemical known to
the State of California to cause
cancer, or birth defects, or
other reproductive harm.
PROP 65 WARNING
Manufactured in China.
Batch Ref: XXXX
Model Number: XXXX
Conforms to safety requirements of ASTM, FCC, & CPSIA.
WARNING:
CHOKING HAZARD-Small parts.
Not for children under 3 years.
Tested to comply with FCC standards.
FOR HOME OR OFFICE USE.
This device complies with part 15 of the FCC
Rules. Operation is subject to the following two
conditions:
(1) This device may not cause harmful
interference and
(2) This device must accept any interference
received, including interference that may cause
undesired operation.
BATTERY WARNING:
• Do no mix alkaline, standard (carbon zinc), rechargeable (nickel hydride) batteries.
• Do not mix old and new batteries.
• Non-rechargeable batteries should not be recharged.
• Rechargeable batteries should be removed from the appliance before being charged.
• Rechargeable batteries should be charged under adult supervision only.
• Exhausted batteries should be removed.
• The supply terminals should not be short-circuited.
• Only batteries of the same or equivalent type are recommended to be used.
• Batteries should be inserted with the correct polarity.

IMPORTANT INSTRUCTIONS
1. This product is precise equipment that integrates mechanics and electronics with expertise in aerodynamics and high-frequency
transmitting. It is required for the quadcopter to be correctly assembled and debugged to prevent an accident from occurring. The owner of
this product should control the quadcopter safely and carefully. Please keep in mind we are not responsible for this product being used
improperly. This may result in severe injury or loss of property and we cannot control the operating process once the user assembles or uses
this product.
2. This product is suitable for ages 14 years and up and people who have operating experience in flying a model.
3. Please fly quadcopter in open areas such as a local field and areas that allow remote control flying.
4. Once you are the owner of this product, you are responsible for your actions.
5. If there are any problems while using this product, such as operating or repairing, please reach our sales agent for details. The sales agent
will provide you with the technical support and after-sale service.
Headless Mode: Press the Headless Mode button and you will hear two beeps and enter Headless Mode. No matter what
direction the quadcopter faces, it will respond according to the direction pushed on the remote. (Forward on the remote
will make the quadcopter fly forward.) This makes flying simpler and more convenient for beginner pilots. To exit Headless
Mode, press the button and listen for a single beep to indicate you are back in Normal Mode.
One Key Return: As long as you are in controllable range, press the One Key Return button on the remote. You will hear a
single beep and the quadcopter will automatically return to the pilot. Press the button again or push the control lever to
exit One Key Return.
REMOTE CONTROLLER DIAGRAM
1. Use a screwdriver to remove screw on the back of
the transmitter, then open the battery cover (Figure 1)
2. Install 4 “AA” batteries (not included) into the back
of the transmitter then replace the battery cover and
reinstall the screw (Figure 2).
1. Install batteries with correct polarity.
2. Do not mix old and new batteries.
3. Do not mix different types of batteries.
Flip mode
Headless mode
Photo and video
One key return
Decorative
button

1. Sideways fine-tuning (Turn left/right fine-tuning in Mode 2)
2. Forward/backward fine-tuning
3. Turn left/right fine-tuning (Sideways fine-tuning in Mode 2)
4. Throttle power
5. Forward speed
6. Backwards speed
7. Right sideways speed
8. Left sideways speed
9. Left turning speed (The higher the level, the faster it will turn)
10. Right turning speed (The higher the level, the faster it will turn)
11. High/Low speed: Hold the “A” button to switch between high speed mode and low speed mode. “H” means high
speed and “L” means low speed.
12. Power indicator: Shows the remotes battery life
13. Mode indicator: Mode 1 is the default mode when powered on. To change to Mode 2, hold the “B” button, then
re-turn on the remote. The Mode on the LCD display will now be changed.
14. Signal power
Step 1: Switch the On/Off switch to ON. Step 2: Open the battery cover and insert
the battery into the power port.
Step 4: Push the throttle lever to the
highest position, then push it to its lowest.
There will be a beep from the remote,
indicating the quadcopter is in pre-flight
mode.
Step 3: Close the battery cover and turn on
the quadcopter.
Step 1: Push the On/Off switch of the
quadcopter to the OFF position and then
open the battery cover.
Step 2: Pull the battery wire out of the
power port.
Step 3: Insert the battery power port to the USB
charging cable. A light will turn on to indicate it
is charging.
GETTING READY TO FLY
CHARGING YOUR BATTERY
REMOTE CONTROL KEYPAD AND LCD SCREEN

CAUTIONS WHEN CHARGING
1. Please keep this product in a dry, ventilated area away from any heat source or explosive product.
2. Please remove the battery from the quadcopter. Only charge under the supervision of an adult.
3. After flying, do not charge the battery until the battery has cooled down in order to avoid a swollen battery and
a fire hazard.
4. Please use the provided USB charging cable to avoid damaging the battery.
5. When not used for a long time, a battery can lose its charge. Avoid charging too often to maximize battery life.
1. Install the landing skids to the bottom of the quadcopter, then lock screws (Figure 1).
2. Install the blade protecting frame to every corner, then lock screws (Figure 2).
The remote features two built in modes, Mode 1 and
Mode 2. To change modes, flip the “B” button and
then restart the remote.
Operation Instructions
Push the throttle up or down to make the
quadcopter fly up or down
Push the direction lever up or down to make the
quadcopter fly forward or backward.
Push the throttle left or right to make the
quadcopter turn left or right.
Push the direction lever left or right to make the
quadcopter fly to the left side or the right side.
Charging time:90-100 minutes, Playing time 5.5-6.5 minutes
INSTALLING LANDING SKIDS AND PROTECTIVE FRAMES
CONTROLLER MODES
Sideward flying
Forward and backward
Turn left and right
Hover up and down

Operation Instructions
Push the throttle up or down to make the
quadcopter fly up or down
When the quadcopter unintentionally flies
forward/backward, press the fine tuning
button up or down until the problem is
corrected.
When the quadcopter unintentionally flies to
the left/right side, press the fine tuning
button left or right until the problem is
corrected.
When the quadcopter unintentionally turns
to the left/right side, press the fine tuning
button left or right until the problem is
corrected.
Push the direction lever up or down to make the
quadcopter fly forward or backward.
Push the throttle left or right to make the
quadcopter turn left or right.
Push the direction lever left or right to make the
quadcopter fly to the left side or the right side.
Fine Tune Trimming
Fine Tune Trimming
Sideward flying
Forward and backward
Turn left and right
Hover up and down
Forward/backward fine-tuning Sideward fine-tuning Turn left/right fine-tuning
Table of contents
Other Quadrone Quadcopter manuals