HITCHFIRE FORGE 15 User manual
FORGE 15
OWNER’S MANUAL
Read this manual carefully before assembly, using, or servicing this grill.
FOR OUTDOOR USE ONLY
PATENT PENDING
®

2
TABLE OF CONTENTS
OPERATING INSTRUCTIONS
PARTS LIST
ASSEMBLY & ATTACHING THE GRILL
DEPLOYING THE GRILL
ATTACHING PROPANE
LIGHTING
OPERATING INSTRUCTIONS
CLEANING
ANNUAL MAINTENANCE
WARRANTY
4
7
8
10
12
14
16
18
19
20

3

4
THIS GAS APPLIANCE IS DESIGNED FOR
OUTDOOR USE ONLY.
This barbecue has been tested to, and complies with
ANSI Z21.89-2017 • CSA 1.18-2017, STANDARDS FOR OUTDOOR COOKING
SPECIALTY GAS APPLIANCES.
If you have questions or need advice regarding your grill or its operation,
please visit us on the web at Hitchfire.com. These instructions will give you
the minimum requirements for assembling your grill.
Please read the instructions carefully before using your grill. Improper
assembly can be dangerous.
If you smell gas:
1. Shut o gas to the appliance.
2. Extinguish any open flames.
3. Open lid.
4. If odor continues, keep canister away from the appliance and
immediately call your gas supplier or your fire department.
Leaking gas may cause a fire or explosion, which can cause
serious bodily injury or death, or damage to property.
1. Do not store spare liquid propane cylinder within 10 feet (3m) of
this appliance.
2. Do not store or use gasoline, lighter fluid, kerosene, paint
thinner or other flammable liquids or vapors within 25 feet (8m)
of this appliance.
DANGER
WARNING
OPERATING INSTRUCTIONS
5
SAFETY INFORMATION
CAUTION
If the unit is dropped or sustains any impact, perform a thorough leak
check to ensure no damage to the fuel connections.
WARNINGS
This gas appliance is designed for outdoor use only. Do not use in a
garage, building, breezeway or any other enclosed area. Your Forge 15
should NEVER be placed under any combustible construction or materials.
Do not use the grill within 24 inches of combustible materials, top, bottom,
back or sides of the grill.
Follow all gas leak checking procedures in this manual, prior to operation.
Combustion byproducts produced when using this product contains
chemicals known to the state of California to cause cancer, birth defects, or
other reproductive harm. For more information, go to www.P65Warnings.
ca.gov
Follow all leak-check procedures in this manual carefully prior to
grill operation. Do this even if the grill was dealer assembled.
Do not try to light this appliance without reading the lighting
instructions section of this manual.
Failure to follow the DANGERS, WARNINGS, and CAUTIONS
contained in this owner’s manual may result in serious bodily injury
or death, or in a fire or an explosion causing damage to property.
WARNING
WARNING
DANGERS

6
DO NOT ATTEMPT TO DISCONNECT THE GAS OR ANY GAS FITTING
WHILE THIS APPLIANCE IS IN OPERATION.
While this appliance is not in use, the gas must be turned o at the gas
supply, and the liquid propane tank removed from the appliance.
Liquid propane tanks must be stored outdoors, out of the reach of children
and must not be stored in any building, garage, or other enclosed structure.
NEVER leave the barbecue unattended while in operation.
NEVER allow children to operate this barbecue.
NEVER lean over an open BBQ, or place hands or fingers on the top of the
cooking basin.
Use heat-resistant BBQ mitts or gloves when operating this barbecue.
Should a grease fire occur, turn o all burners, and stay away from the
barbecue until the fire is out.
DO NOT use charcoal briquettes, lava rocks or other lighter fluid in this grill.
While this appliance is not in use, place under a cover to protect it from the
weather and other adverse elements.
Storage of this appliance indoors is permissible only if the propane cylinder
tank is disconnected and removed from the appliance. Never move units
with propane tank installed.
This grill is not intended for and should never be used as a heater.
The use of alcohol, prescription or non-prescription drugs may impair the
consumer’s ability to properly assemble or safely operate the appliance.
Minimum back clearance to combustible material: 10 inches.
7
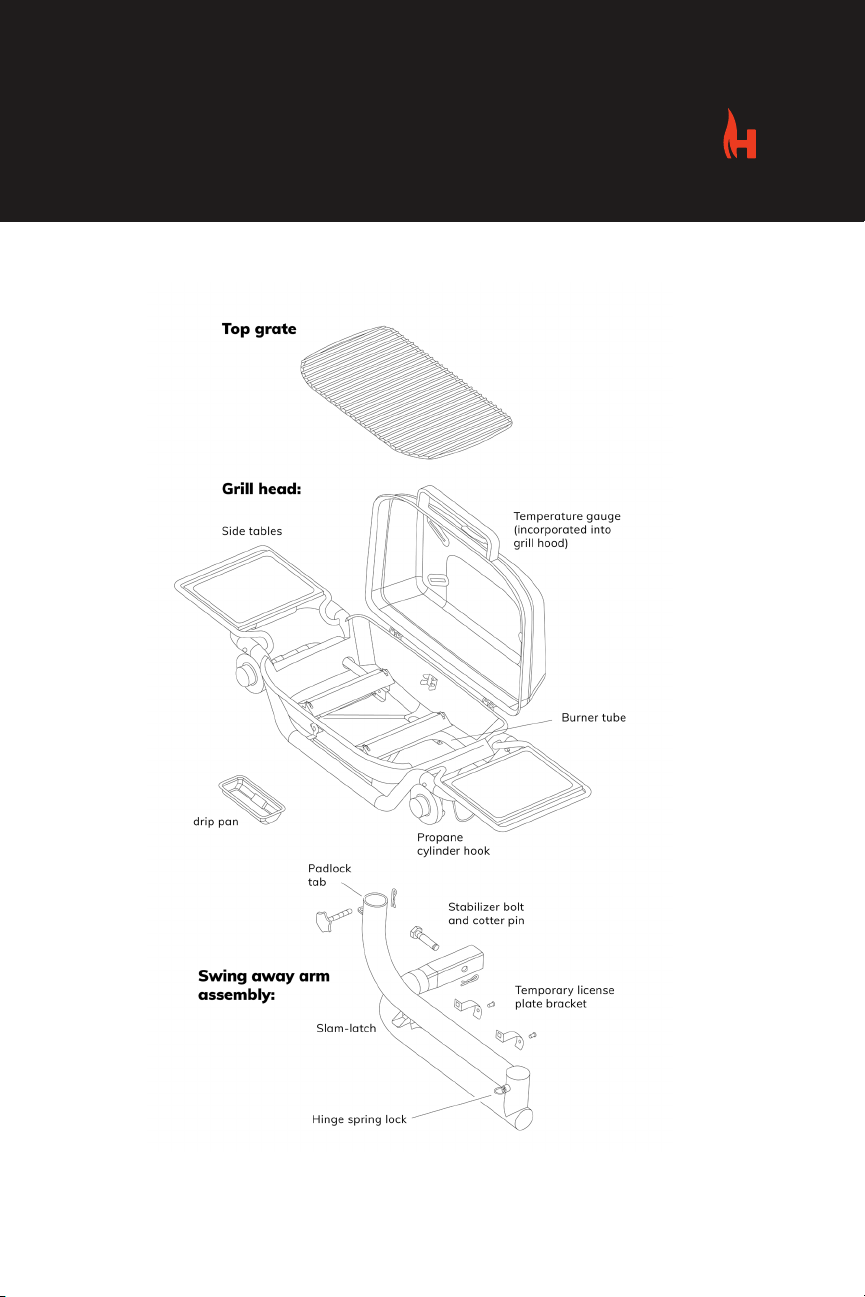
PARTS LIST

8
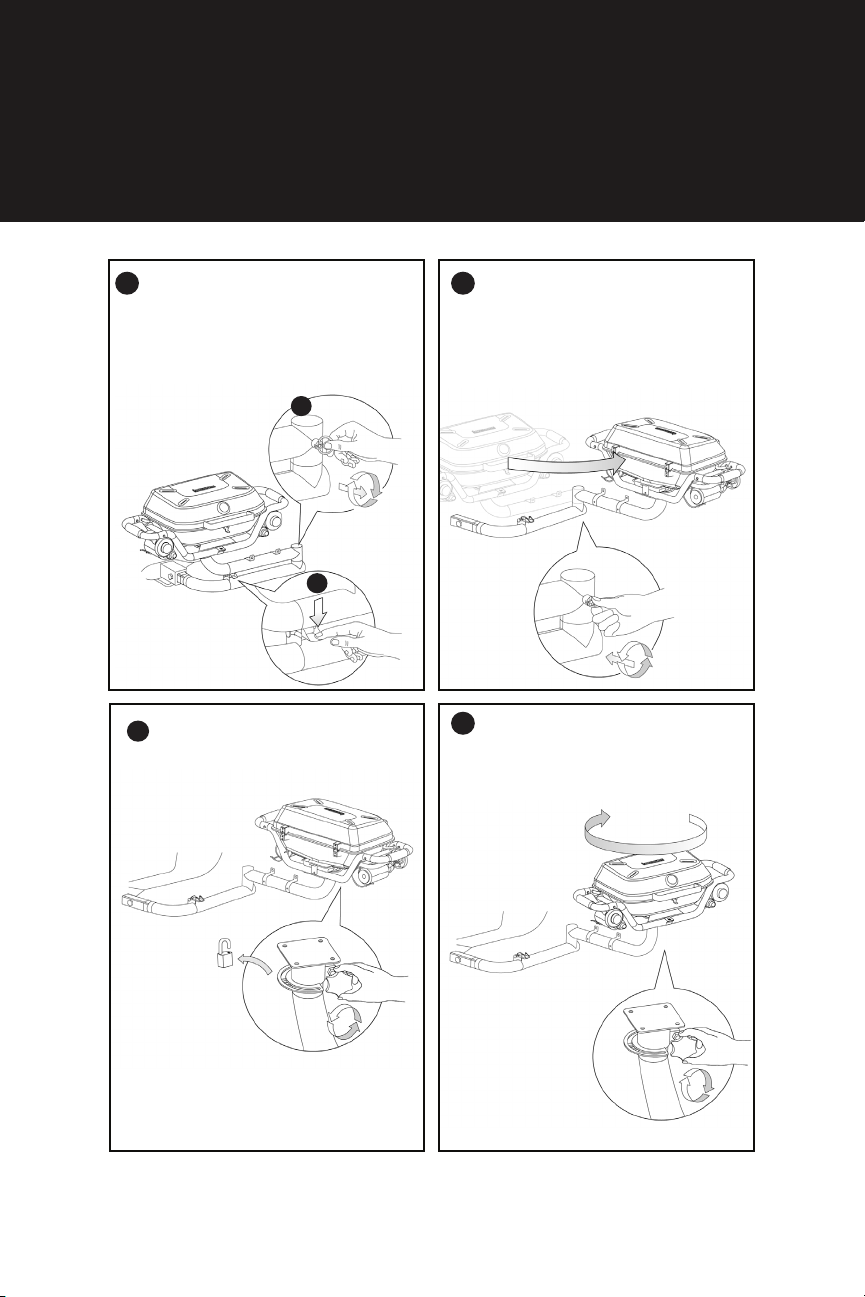
ASSEMBLY - ATTACHING THE GRILL
Slide the swing away arm assembly
into your hitch and secure it with
the hitch stabilizer bolt.
A.Pull out and twist the hinge spring lock.
B.Release the slam-latch by pressing
down on the lever.
Swing the arm away from the vehicle and
lock at the 90 degree position for stability.
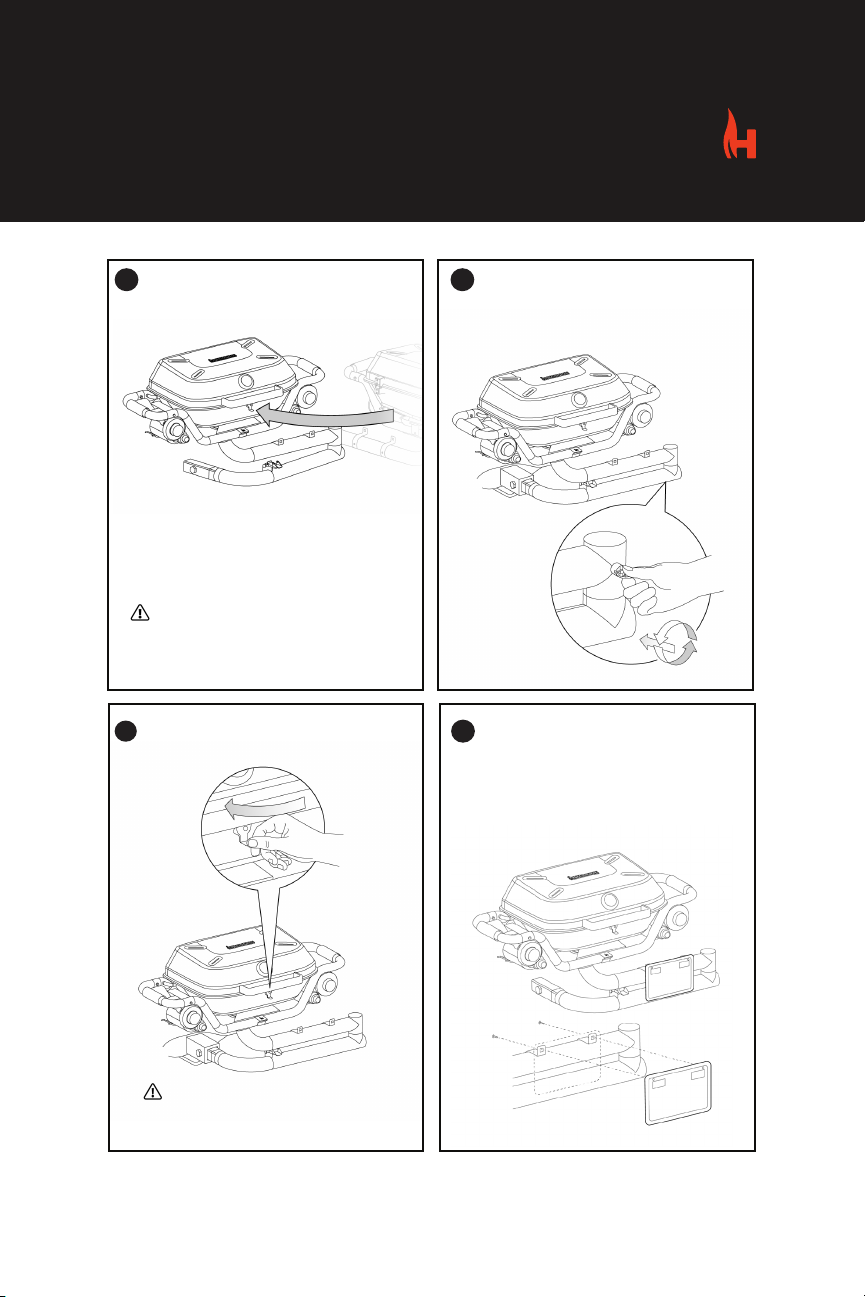
Place the grill head onto the arm.
Thread the knob into the arm collar clamp.
Do not over-tighten. Slide the cotter pin
through the hole at the end of the bolt.
Tighten the arm collar. Lock the grill head
onto the arm with a padlock. (Not included.)
Tighten the bolt using
a wrench, make sure
to tighten the bolt all
the way through to
the other side of the
hitch, slide the cotter
pin into the bolt.
DO NOT MOVE VEHICLE UNLESS THE
SWING AWAY ARM ASSEMBLY IS
SECURELY BOLTED ONTO THE HITCH.
DO NOT MOVE VEHICLE UNLESS THE
GRILL HEAD IS LOCKED IN PLACE.
1 2
3
4
5
A
B
9
Rotate the hinge spring lock to
engage the plunger.
Swing the arm closed, pushing towards the
vehicle until the slam-latch is fully engaged.
Make sure that the side tables are folded
securely under the grill hood.
Close the hood latch, hinge
spring lock and slam-latch.
DO NOT DRIVE WITH A PROPANE
CYLINDER INSTALLED ON THE GRILL.
DO NOT MOVE VEHICLE UNLESS THE
HOOD LATCH, HINGE SPRING LOCK &
SLAM-LATCH ARE SECURE.
6 7
8If the Forge 15 blocks the visibility of your
vehicle’s license plate, remove the license
plate and mount it on the temporary license
plate bracket on the upper swing arm as
shown. Be sure to replace the license plate
when you remove the Forge 15 from your
vehicle.
9
10
DEPLOYING THE GRILL
A. Pull out and twist the hinge spring lock.
B. Release the slam-latch by pressing down
on the lever.
Swing the swing-away arm and grill away
from the vehicle.
Rotate the hinge spring lock to lock the
arm’s position at either 90 or 180 degrees.
Remove the padlock (not included) that
locks the collar to the arm. Loosen the
rotation knob on the arm collar.
Rotate the grill head to the desired position
and tighten rotation knob on the arm collar.
Follow the cooking instructions on the next
page.
1 2
4
3
A
B
11
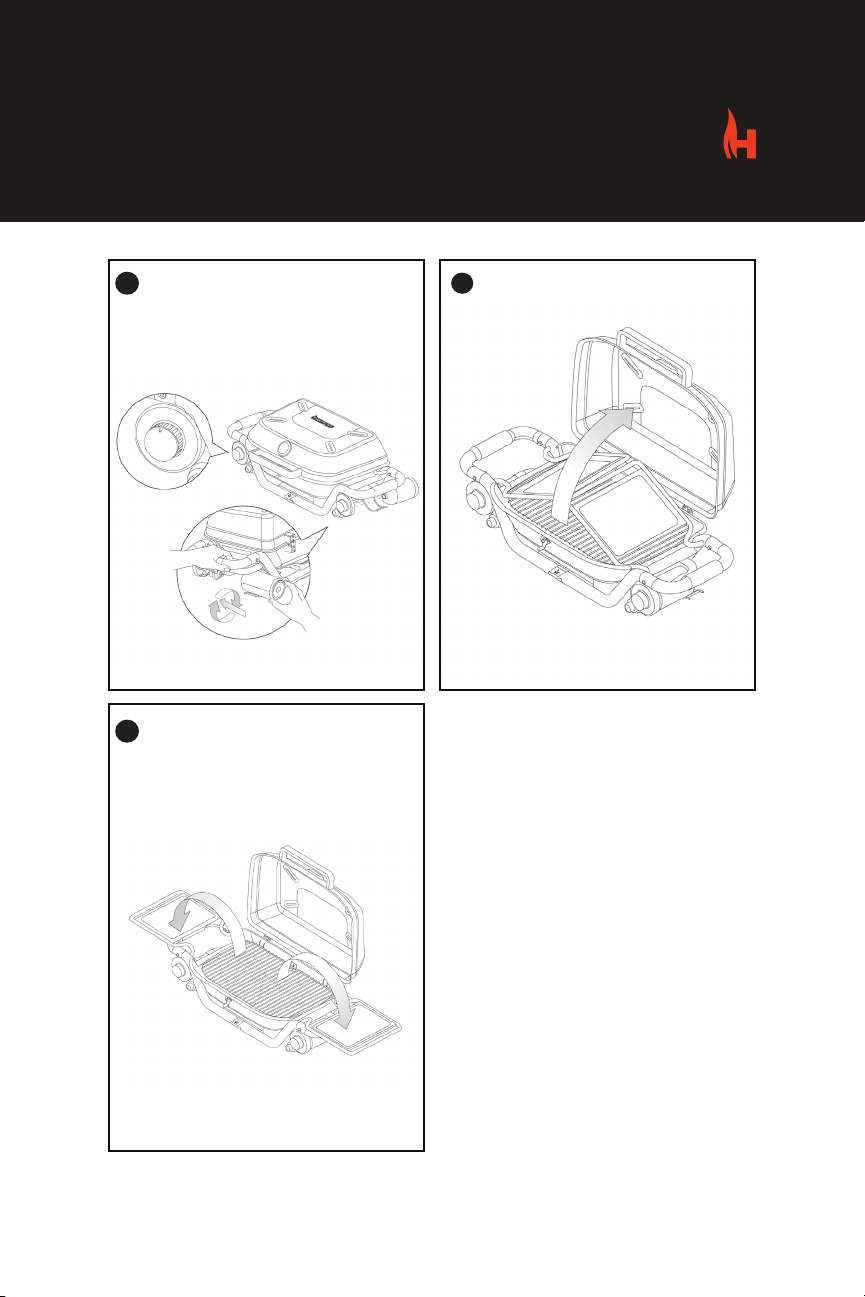
Make sure that the burner control knob
is in the OFF position. Attach 2 16oz.
propane cylinder. See instructions listed in
this manual under “Attaching the Propane
Cylinder.”
Unlatch the hood latch and
open the grill hood.
Fold out both side tables.
5
7
6

12
ATTACHING THE
PROPANE CYLINDER
CAUTION:
Use 16oz. cylinders that are marked “propane fuel” only. Prior to
installing the cylinder, check to make sure its fitting is not damaged
or bent. If the propane cylinder is damaged, DO NOT install it on your
HitchFire Grill.
DO NOT IGNITE THE BURNER WHILE CHECKING FOR LEAKS.
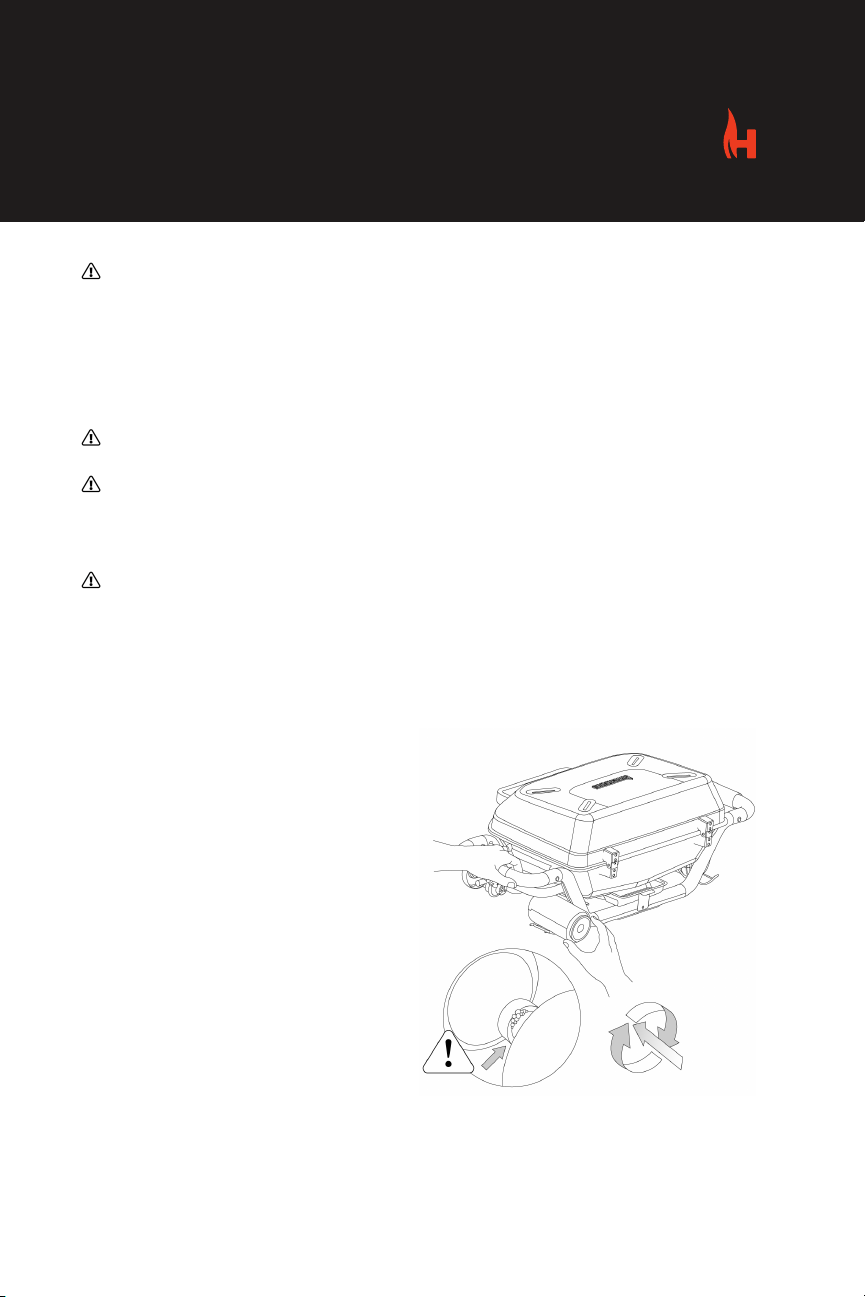
When installing the cylinder, be sure that it screws in securely in a smooth
and straight manner. DO NOT CROSS THREAD.
Slide propane cylinder through cylinder hook, while holding carrying
handle closest to propane cylinder with one hand, push propane cylinder
into regulator and turn clockwise until tight.
WARNING: Do not use a wrench to tighten the connection. Using a
wrench could damage the regulator coupling and could cause a leak.
WARNING:
You should check for gas leaks every time you disconnect and reconnect a
gas fitting.
CHECK CONNECTIONS:
1. Regulator to propane cylinder connection.
2. Valve-to-regulator connections.
Check for gas leaks by wetting the connections with a soap and water
solution and watch for bubbles. If bubbles form or if a bubble grows, there
is a leak. Note: all connections should be rinsed with clean water after
checking for leaks.
WARNING:
If there is a leak at the connection, remove propane cylinder. Do not
operate grill. Use a dierent propane cylinder and recheck for leaks with
soap and water solution. If a leak persists after re-tightening the propane
cylinder, turn OFF the gas. DO NOT OPERATE THE GRILL.
13
WARNING:
If there is a leak at the valve-to-regulator connection, turn OFF the gas. DO
NOT OPERATE THE GRILL.
When leak checks are complete, turn gas supply OFF at the source and
rinse connections with water.
DANGER! Do not use an open flame to check for gas leaks.
DANGER! Be sure there are no sparks or open flames in the area while
you check for leaks. Sparks or flames may result in a fire or explosions,
which can cause serious bodily injury or death, and damage to property.
DANGER! Do not store a spare LP-gas cylinder under or near this
appliance. If the instructions are not followed exactly, a fire causing death
or serious injury may occur.
Note: All factory-made connections
have been thoroughly checked for
gas leaks. The burners have been
flame tested. As a safety precaution,
check all fittings for leaks before
using your HitchFire Grill. Shipping
and handling may have loosened or
damaged a gas fitting.
Perform these leak checks even if
your grill has been pre-assembled.

14
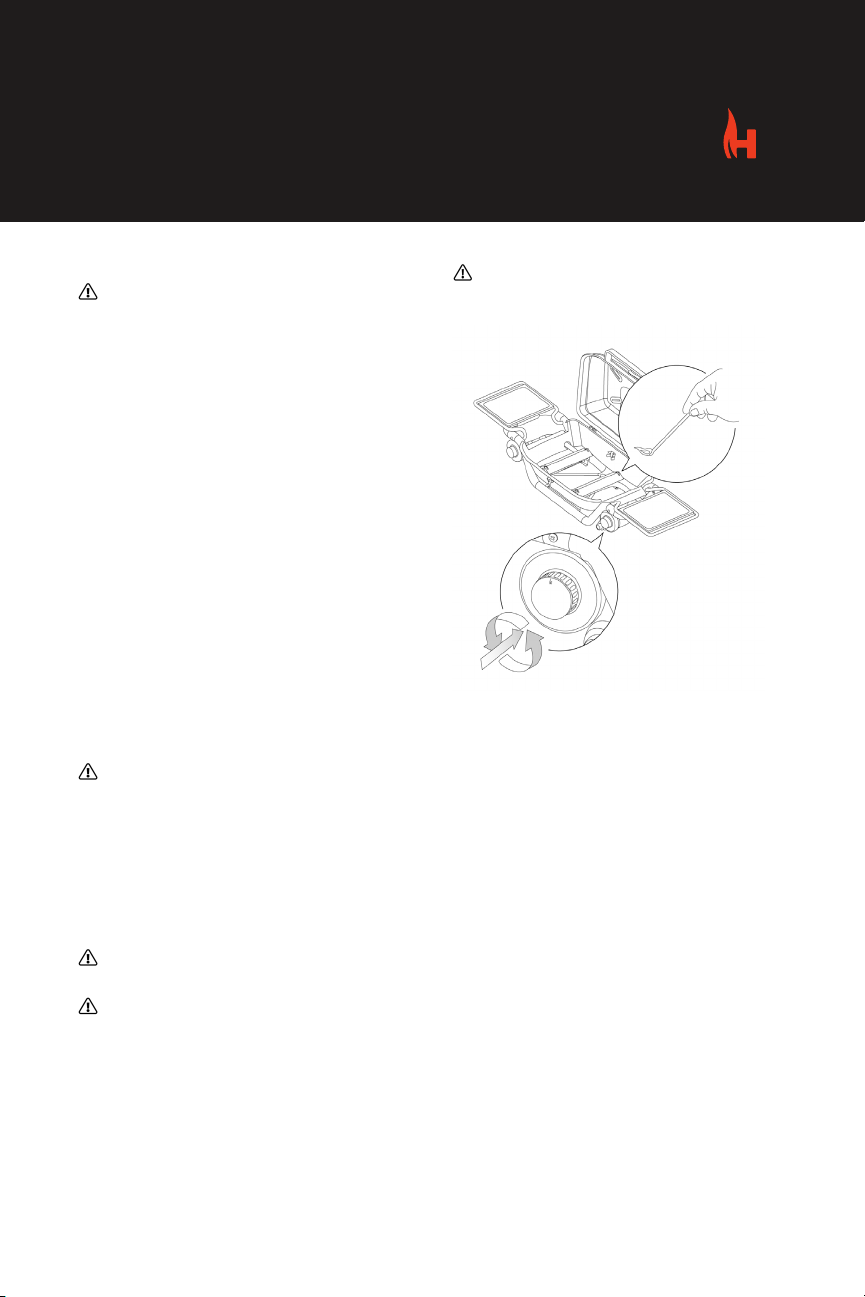
A summary of the lighting instructions is printed on the control panel.
1. Open the lid.
2. Unfold side tables.
3. Make sure the burner control knob is turned OFF. (Push control knob
in and turn clockwise to ensure that it is in the OFF position.)
WARNING: Do not lean over the open grill. Keep your face and body
at least one foot away from the grate when lighting the grill.
4. Push control knob in and turn counter clockwise to START/HI.
(Figure below)
5. Push control knob in and turn counter clockwise until you here the
click of the igniter.
6. Check that the burner is lit by looking down through the cooking grate
from a safe distance. You should see a flame.
WARNING: If the burner does not light, turn the burner control knob to
OFF and wait 5 minutes to let the gas clear before you try again, or try
to light manually.
LIGHTING
15
TO EXTINGUISH:
Push in and turn burner control knob clockwise to the OFF position.
CAUTION: Do not fold in side tables until grill is cold.
WARNING: Do not lean over the open grill. Keep your face and body at
least one foot away from the grate when lighting the grill.
MANUAL LIGHTING:
DANGER! Failure to open the lid
while igniting the grill’s burner, or
not waiting 5 minutes to allow the
gas to clear if the grill does not light,
may result in an explosive flame-up,
which can cause serious bodily injury
or death.
1. Open lid.
2. Unfold side tables.
3. Make sure the burner control knob
is turned OFF.
4. Strike a long match and put the
flame into the lower grill basin next
to the burner you wish to light.
5. Push burner control knob in for
side you wish to light and turn to
START/HI.
6. Check that the burner is lit by looking down through the cooking grate
from a safe distance. You should see a flame.
WARNING: If the burner does not light, turn the burner control knob to
OFF and wait 5 minutes to let the gas clear before you try attempting to
re-light.
WARNING: DO NOT LEAN OVER THE
OPEN GRILL. KEEP YOUR FACE AND
BODY AT LEAST ONE FOOT AWAY FROM
THE GRATE WHEN LIGHTING THE GRILL.

16
To light the grill:
Refer to the lighting instructions in the owner’s manual and printed on the
control panel of your grill. Never light the grill without first folding out the
side tables.
To preheat the grill:
Always light the HitchFire grill according to the lighting instructions in the
owner’s manual.
After successfully lightning the grill, close the lid and turn the burner control
knob to start / hi. Preheat the grill for 5-10 minutes (depending on the
conditions such as air temperature and wind.) Once a grill is preheated to
approximately 300° F, set the burner control knob to the settings specified
in the recipe.
Note: Wind and weather may require adjustment of the burner control knob
to obtain the correct cooking temperature. If the burner goes out during
cooking, open the lid, turn o the burner, and wait five minutes before
relighting.
Drippings and Grease: Excess drippings and grease will collect in the drip
pan. (Located on the underside of the grill.) Clean before each use.
WARNINGS:
Check the drip pan and the bottom of the grill for grease build-up
before each use. Remove excess grease to avoid a fire in the bottom of
the grill.
Do not move the grill when operating or while the grill is hot.
Wait for the grill to cool before folding up the fold-out side tables.
Wait for the grill to cool before closing the arm assembly.
Grill must be locked in the 90 or 180 degree position and at least 24
inches from the vehicle before lighting the grill. Damage may occur if
operated within 24 inches of vehicle.
OPERATING INSTRUCTIONS
17
Main Burner Flame Pattern:
The HitchFire grill’s burner has been factory set for the correct air and gas
mixture. If the flames do not appear to be uniform throughout the burner
tube, follow the instructions listed in this manual under “Main Burner
Cleaning Procedure.”
Air Mixture Adjustment:
The air mixer sleeve for the burner has been preset at the factory for gas
conditions at sea level. However, if the burner flame is too yellow (this may
occur at higher altitudes) open the air mix sleeve slightly until the flame
turns blue.

18
CLEANING
WARNING: Turn your HitchFire grill OFF and wait for it to cool before
cleaning.
For availability of replacement cooking grate, go to Hitchfire.com
Outside Surfaces:
Use a warm soapy water solution to clean, then rinse with water.
Cooking Grate:
Clean with a soft brass bristle brush. As needed, remove from grill and
wash with warm soapy water then rinse with water.
Drip Pan:
To clean the tray, wash with warm soapy water, then rinse.
Inside Grill Basin:
Wash inside of grill basin with warm soapy water and water rinse.
Inside Lid:
Wash inside of grill basin with warm soapy water and water rinse.
Fold Out Side Tables:
Wash with a soft cloth, and a soap and water solution. Do not use cleaners
that contain acid or mineral spirits. Rinse well after cleaning.
Fold out side tables are not to be used as cutting boards.
CAUTION: Do not enlarge the burner ports when cleaning.

19
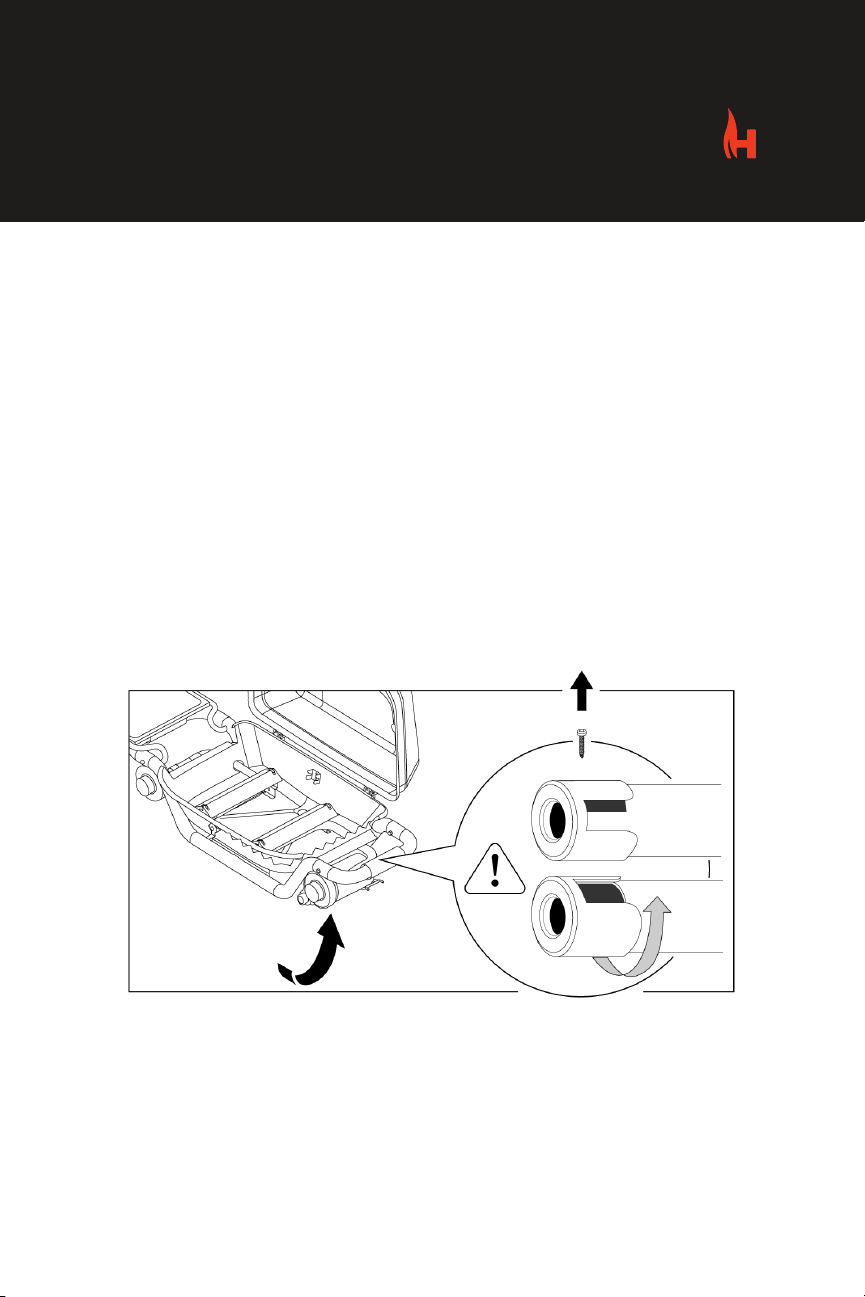
ANNUAL MAINTENANCE
After a period of non-use, we recommend that you perform the following
maintenance procedures for your safety. Inspect and clean the burner tube.
Inspect the burner for correct flame pattern. Clean if necessary. Check all
gas fittings for leaks following the instructions listed under “Check for Gas
Leaks”
CAUTION: Do not clean the burner tube with hard or sharp tools.
Lightly tap the burner tube to get debris and dirt out. Once the burner tube
is clean, replace it in the grill. If the burner tube becomes damaged or
cannot be cleaned, go to HitchFire.com for replacement parts.
Do not use grill and contact customer service if:
1. The smell of gas in conjunction with the burner flames appearing
yellow and lazy.
2. Grill does not reach temperature.
3. Grill heats unevenly.
4. Burner does not ignite.
DANGER: Failure to correct the above mentioned symptoms may result
in a fire, which can cause serious bodily injury or death, and cause
damage to property.
INSPECTION AND CLEANING
OF BURNER TUBE:
Your HitchFire grill, as well
as any other outdoor gas
appliance is a target for spiders
and other insects. They can
nest in the venturi section of
the burner tube. This blocks
the normal gas flow, and can
cause the gas to flow back out
of the air shutter. This could
result in a fire in and around
the air shutter, causing serious
damage to your grill.

20
LIMITED WARRANTY
What Is Covered
HitchFire, producer of Forge 15 grill, warrants to the original purchaser
that its products listed below are free from defects in material and
workmanship, for the term described, except as qualified below. The life of
the product is determined from the date of purchase until such time as the
product is no longer serviceable due to normal wear and tear.
Steel & Aluminum Castings
Cooking Grates
Burners
Spark Igniters
All Remaining Parts
When Assembled and operated in accordance with the accompanying
printed instructions.
What Is Not Covered
HitchFire shall not be responsible for the natural breakdown of materials
that occurs inevitably with extended use (e.g., Ultra Violet (UV) light
damage on grill, or defects caused by accident, abuse, alteration, animal
attack, storm damage, misuse or improper care, vandalism, improper
installation improper maintenance or service, failure to perform normal
and routine maintenance, including but not limited to, damage caused by
insects within the burner tubes, as set out in this owner’s manual warranty
section.
Deterioration or damage due to severe weather conditions such as hail,
hurricanes, earthquakes, or tornadoes including rust, discoloration due to
exposure to chemicals (including salt) either directly or in the atmosphere,
or very high humidity, is not covered by this limited Warranty.
THERE ARE NO OTHER EXPRESS WARRANTIES BEYOND THE TERMS OF
THIS LIMITED WARRANTY. IN NO EVENT SHALL HitchFire BE LIABLE FOR
INCIDENTAL OR CONSEQUENTIAL DAMAGES.
Some states do not allow the exclusion or limitation of incidental or
consequential damages, so the above limitation or exclusion may not apply
to you.
Table of contents
Popular Automobile Accessories manuals by other brands


ULTIMATE SPEED
ULTIMATE SPEED 279746 Assembly and Safety Advice

SSV Works
SSV Works DF-F65 manual

ULTIMATE SPEED
ULTIMATE SPEED CARBON Assembly and Safety Advice

Witter
Witter F174 Fitting instructions

WeatherTech
WeatherTech No-Drill installation instructions

TAUBENREUTHER
TAUBENREUTHER 1-336050 Installation instruction