Hive Storion-SMILE-B3 User manual
OWNERS MANUAL
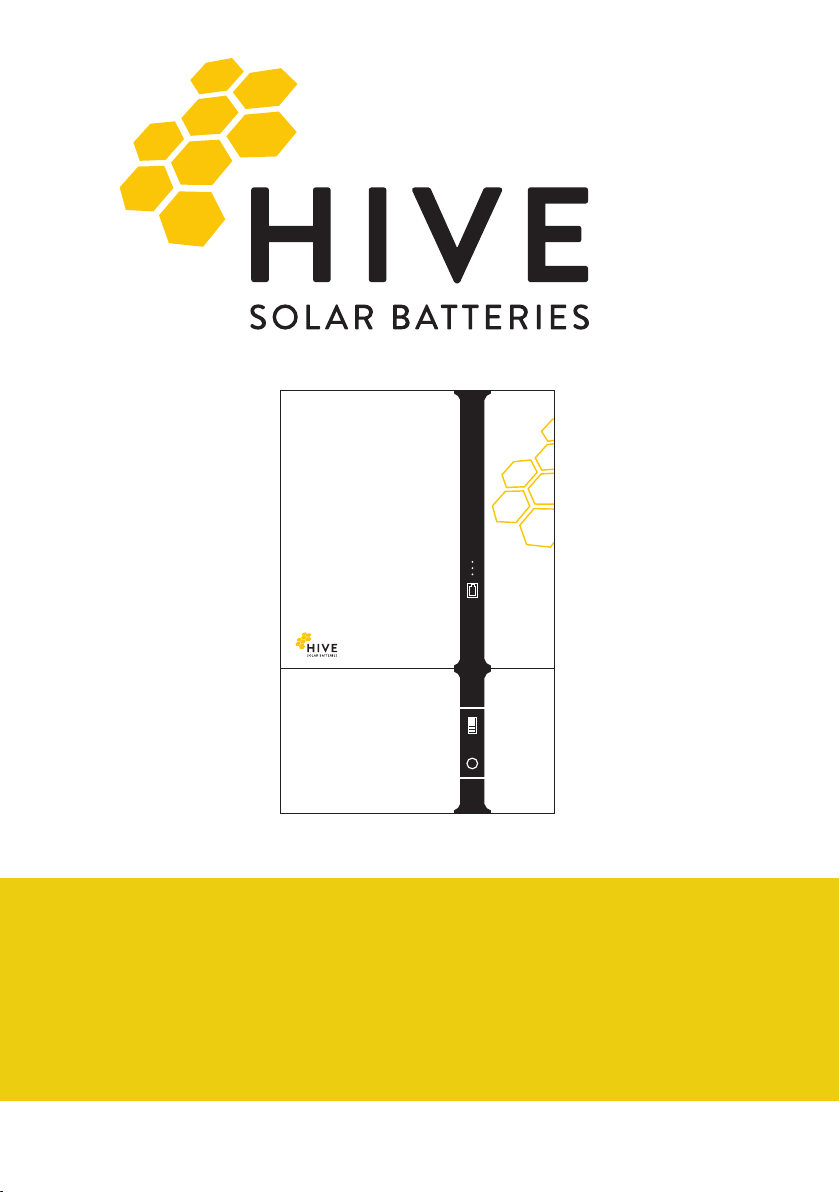
Primary Unit (Storion-SMILE-B3)
Secondary Unit (M4856-P)
www.hivesolar.com.au

Australia
Alpha ESS Australia Pty. Ltd.
Tel: +61 1300 968 933
E-mail: [email protected]
Website: www.alpha-ess.com.au
Add: Suite 1, Level 1, 530 Botany Road, Alexandria, NSW
China
Alpha ESS Co., Ltd.
Tel: +86 (0) 513 806 868 91
E-mail: [email protected]
Website: www.alpha-ess.com
Add: Jiu Hua Road 888, High-Tech Industrial Development Zone, Nantong City,
226300, Jiangsu Province
1.1 Copyright Declaration
The copyright of this manual is owned by HIVE Solar Batteries and all rights
are reserved.
• Please keep the manual within the vicinity of the HIVE Solar Battery.
• Please operate the HIVE Solar Battery strictly according to the safety and
operation instructions described in this manual.
• Do not operate the system before reading this manual.
1.2 Version Information
Version Date Contents
VO1 21.01.2020 HIVE Solar Batteries - Owner’s Manual (Rev 1)

OWNERS MANUAL
Take the sting out of your energy bills
Installation & Commissioning Checklist (for installers only)
Induction requirements (for installers only)
Important Safety Precautions
HIVE Solar Batteries
Technical Specications
Operating Principal
System Operation
System Operation Status
Maintenance
Function Checks
System Faults/Errors
System Monitoring
Wi-Fi Conguration
System Registration
HIVE Solar App Features
Emergency Situations
Emergency Handling Plan
Fire
Leaking Batteries
Wet Batteries
Damaged / Decommissioning Battery
Warranty Conditions
Safety Data Sheets
Contents
1
1.1
2
3
3.1
3.2
3.3
3.4
4
4.1
4.2
5
5.1
5.2
5.3
6
6.1
6.2
6.3
6.4
6.5
7
8
1
1
3
5
6
7
7
8
10
10
10
11
11
13
14
20
20
20
20
21
21
21
28

1www.hivesolar.com.au
2
Following the Installation of the HIVE Solar Battery, please ensure the below checklist
is completed and a record of the same is shared with your system provider. It is also
recommended that installers retain records of the equipment installed.
Installation & Commissioning Checklist
(For Installers Only)
No. Items Description
1System Provider (Contact details)
2Primary Batteries Model No – Storion-SMILE-B3 (2.9 kWh)
S/N –
3Secondary Batteries
Model No – M4856-P (2.9kWh)
No. of batteries –
S/N –
S/N –
S/N –
S/N –
S/N –
4Energy Meters Model No – ACR10R
No. of Meters –
5Total Battery Storage Capacity (kWh)
6UN Number UN 3480 / UN 3481
7Date of Installation & Commissioning
8
Firmware Versions
Inverter
EMS
BMS
9Initial System Settings As prescribed by Manufacturer
(Alpha ESS)
10
Verication – Normal System Operation N/A
Is the Battery Charging? (Y/N)
Is the Battery Discharging (Y/N)
11
If Backup/UPS is Connected, does the
battery discharge towards connected loads
with Utility grid is turned off? (Y/N)
12
DC Connections – Is there any high
resistance at the junction of the DC
cables & battery terminals? (Y/N)
CHAPTER 1

2
OWNERS MANUAL
Take the sting out of your energy bills
Following the Installation of the HIVE Solar Battery, please ensure that the system
owner or nominated representative is provided the following information.
• Demonstration of the System shut-down & Start-up procedures.
• Introduction to the system manual.
• Explanation of the Alarm/Faults that may arise with the system (Section 2.3).
• Contact details of Manufacturer/ system provider.
• Basic System Operation & design principals.
Further, ensure that a copy of the below customer acknowledgement is provided to the
system provider for installation records.
Customer Acknowledgement
I, ……………………………………………….......…………………(Customer)
acknowledge that …………………………………………………...(System Provider)
have attended my property and conducted the requested work. I conrm that
the installer attending my property has completed the installation based on his/
her recommendation for the most efcient energy production, provided me all the
information as per the induction requirements (Section 1.1) and I conrm that I have
agreed to this install location.
Customer’s Signature: Installer’s Signature:
Date: Date:
1.1 Induction requirements (For Installers Only)
3www.hivesolar.com.au
3
The HIVE Solar Battery is an energy storage system (BESS) used to store electrical
energy. Improper use of this system poses a risk of injury or death to the user or third
party, as well as damage to the product. The storage system must always be operated
as per the recommendations within this Owner’s Manual.
Danger
Danger to life due to high voltages of battery and electric shock:
• Only qualied personnel who are equipped with the suitable specialist
training, knowledge and experience are permitted to install and debug the system.
Before performing any work on the inverter or battery pack, please disconnect the
inverter from all voltage sources as described in this document.
• The Electrician should always wear the right Personal Protective Equipment
(PPE – Level 1) while operating the Energy Storage system.
• Do not touch any uninsulated DC cables, as this may result in electrical shock
or injury.
• Do not open the inverter and battery or modify any of the protective devices.
• Do not dispose of batteries in re as the batteries may explode.
• Only use the battery system in its original state, without any unauthorised
modications and when it’s in proper working order.
• Incorrect operation puts you and others at risk and could cause material damage
and potential injuries.
• Do not use the battery system in potential explosive environments.
• Never block, modify or alter any electrical protective devices such as AC Circuit
breakers, isolators or electrical cabling.
• Never attempt to repair the system yourself or using the services of a third-party
electrician as this may result in injury or may void the product warranty.
Important Safety Precautions
CHAPTER 2

4
OWNERS MANUAL
Take the sting out of your energy bills
• Ensure that all relevant local and national regulations are observed, and authorized
electrician is responsible for adhering to these regulations.
Warning
Risks of chemical burn electrolyte or toxic gases:
The battery modules installed in the BESS are protected by multiple electrical
protection devices and can be operated safely during standard operation. However,
there is a potential for the electrolyte leakage from the battery pack as well as from
toxic gases if damaged mechanically or break down. Therefore, it is recommended to
proceed as follows;
• Do not install the system in extreme low/high temperatures or humidity exceeding
the permitted range.
• Do not place heavy objects on top of the system or mechanically damage the
batteries (by piercing, puncturing or deforming it).
• Do not short circuit the battery module or allow them to come in contact with metal.
• Do not continue to use the battery module after a short-circuit.
• Do not install the battery pack in the vicinity of any equipment containing ammable
gases or liquids.
• If moisture penetrates the system (e.g. due to casing damage), please do not
operate the system. Contact Alpha ESS immediately for further troubleshooting.
• If you come into contact with the electrolyte, please wash affected area with water
immediately, and consult a doctor immediately.
Risk of injury by hoisting or falling system:
• Inverters and batteries are heavy and can cause personal injury if the inverter or
battery is improperly lifted or dropped during transport or when attached or removed
from walls.
• Lifting and transporting Storion-SMILE-B3/M4856-P must be conducted by more
than 1 person.

5www.hivesolar.com.au
4
The HIVE Solar battery is a modular battery solution intended for residential solar
storage and is capable of being expanded from 2.9 kWh to 17.4kWh. It has an all-
in-one design that is popular with installers and homeowners, as it has been pre-
engineered to minimise installation time and designed with the end-consumer’s
convenience in mind.
It is an AC coupled all-in-one battery energy storage system (BESS), designed to
achieve the optimal usage of renewable energy. It utilises excess Solar PV generation
to intelligently charge and discharge the battery, and can operate under automatic,
manual and time-of-use (ToU) modes. Under the automatic mode, the HIVE Solar
battery will store surplus energy into the battery and discharge towards connected
loads to avert consumption from the Utility Grid. It is equipped with three LEDs and is
designed to be easy to interact, stable, safe, and reliable.
In addition, it allows the consumer the exibility to add on more battery units in the
future, based on their energy needs. The simple plug-and-play installation allows the
installer to connect the additional storage units in quick succession and reduce overall
time spent on-site.
The HIVE Solar Batteries use the safest battery chemistry available on the market –
Lithium Iron Phosphate (LFP). As an additional safeguard, software integration is used
to monitor and protect the battery from any potential damage.
The Hive Solar Battery has two separate components,
• Primary Unit (Storion-SMILE-B3) – Battery pack with an Integrated Inverter.
• Secondary Unit (M4856-P) – Battery pack only (optional)
Primary Unit (Storion-SMILE-B3)
• AC-Coupled
• 2.9 kWh battery with integrated
3 kW inverter
• Modular design
• Easy install and low maintenance
• 24/7 monitoring
• Blackout protection (UPS)
– Optional Add on
HIVE Solar Batteries
Fig 1.1 Primary Unit (Storion-SMILE-B3)
CHAPTER 3
Battery Display
Com
Fault
Normal

6
OWNERS MANUAL
Take the sting out of your energy bills
Secondary Unit
(M4856-P Expansion pack)
• 2.9 kWh battery only
• Modular design
• Easy install & low maintenance
**Cycle Life/Performance dependent on temperature conditions, expected to be limited when temperature drops
below 0°C or above 40°C.
Inverted Technical Specications
Max AC Output Power 3000 W
Max AC Input Power 3000 W
Operating Temperature Range -10 °C ~ 50 °C, 0 °C ~ 40 °C (1C)
Warranty 5-year Product Warranty, 10 Year Battery
Warranty
Max AC Input Current 13 A
Nominal AC Input Voltage 230 V
Battery Voltage Range 40 ~ 58 V
Max Charging/Discharging Current 60 A
Max Charging/Discharging Power 3000 W
Phase Single – Phase
Nominal AC Output Voltage 230 V
Grid Voltage Range 180 ~ 270 V
Rated Frequency 50 / 60 Hz
Backup UPS
Dimensions (Storion SMILE B3) 610 mm x 236 mm x 625 mm
Weight 45 kg
Battery Technical Specications
Cell Technology Lithium Iron Phosphate (LFP)
Module Capacity 2.9 kWh
Usable Capacity 2.8 kWh
Depth of Discharge (DoD) 96%
Module Nominal Voltage 51.2 V
Max Short -circuit Current 200 A
Cycle Life 10 000**
Max Charging/Discharging Current 56 A (1C)
3.1 Technical Specications
Fig 1.2 Secondary Unit (M4856-P)
State
LED Ring
7www.hivesolar.com.au
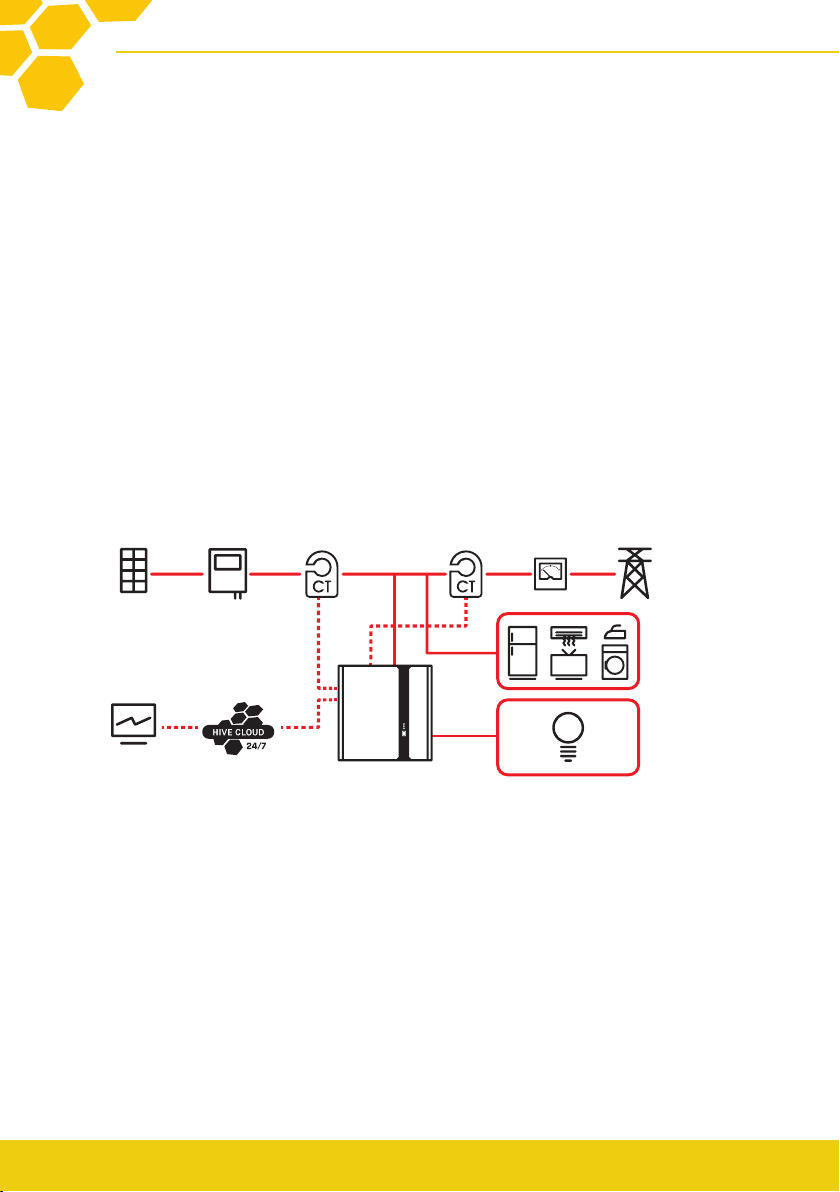
The system is designed to operate based on the data measured by the Grid and PV
CTs. The former constantly measures the Electricity consumption of the house and the
latter measures the power generated by the Solar PV system.
When the Solar production > House Loads, the surplus power is stored within the
batteries. When the batteries reach their peak capacity, the surplus is exported to the
Utility grid. For example, if Solar production is 5 kW and the house loads are 3.5 kW,
then the battery is charged at 1.5 kW.
When the House Loads > Solar Production, the battery discharges to cover the decit
between the two. For example, When the Solar Production is 3 kW and the House
loads are 4 kW, then the Battery will discharge 1 kW.
The system must be turned On/Off in the correct sequence to avoid any damage.
Switching on:
• Turn on the Main Switch – Energy Storage (C20, Battery) within the switchboard.
• Turn on the Solar PV Inverter Main Switch within the switchboard.
• If AC Isolator is connected on Grid side, switch it on.
• Short press the Power button on the Primary Unit until the normal LED turns on.
• If a Secondary Unit is/are installed, short press the Power button on all Secondary
Units until the LED indicators light up.
3.2 Operating Principle
3.3 System Operation
Fig 1.3 Storion-SMILE-B3 System
Monitoring
Device
PV
Panels
PV
Inverter
PV
CT
Grid
CT
Utility
Meter
Grid
Normal Loads
Critical Loads
HIVE
Cloud
HIVE
Battery
8
OWNERS MANUAL
Take the sting out of your energy bills
3.4 System Operating Status
• Turn on the 80A Battery Isolator located on the left-hand side of the Primary unit.
• Note – If Backup Loads are connected, Switch on the Backup Main Switch (C20)
and any connected RCBOs (UPS – dedicated circuits) within the Switchboard.
Switching Off
Note – If Backup Loads are connected, Switch off the Backup Main Switch (C20)
and any connected RCBOs (UPS – dedicated circuits) within the Switchboard.
• Turn off the 80A Battery Isolator located on the left-hand side of the Primary Unit.
• Long press the Power button on the Primary Unit until the battery LED light turns off.
• If a Secondary Unit is/are installed, hold down the Power button on all Secondary
Units until the LED indicators turn off.
• Turn off any AC Isolators located on either the Grid or Backup side.
• Turn off the Main Switch – Energy Storage (C20, Battery) within the switchboard.
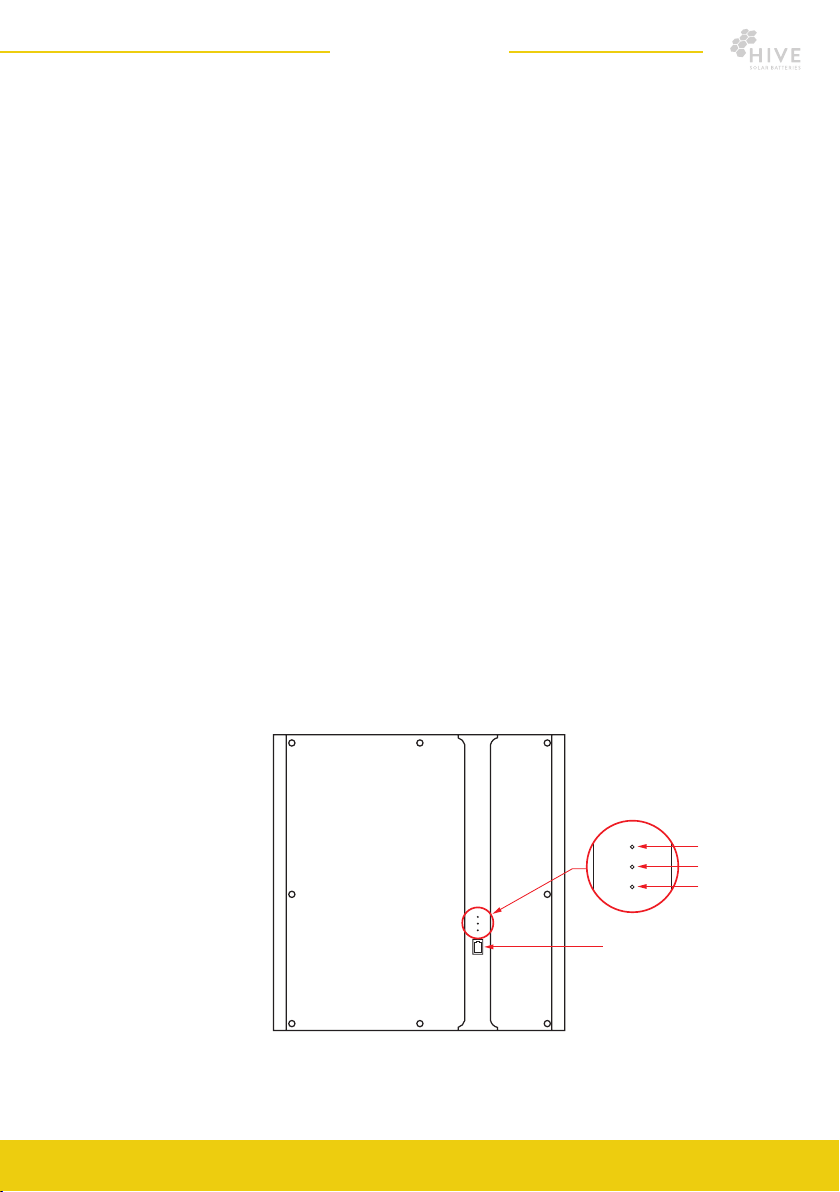
On the Primary Unit (Storion-SMILE-B3), there are three LEDs indicating the status
of system parameters, viz. Normal operation, System Fault and Communication. The
table on the following page describes the different LED states and their description.
Fig 1.4 Operating Status Indicators
(Storion-SMILE-B3)
Battery Display
Com
Fault
Normal

9www.hivesolar.com.au
In addition to the Operating Status Indicators, both the Primary and Secondary Units
have an additional LED Battery State Indicator located on their front covers, that have
a range of functions. They indicate the Battery State of Charge (or SoC) as follows:
LED Status Description
Normal
Solid Green – Normal system operation
Single icker – System standby or self-inspection
Off – Switched off (or Out of order)
Fault
Off – Normal Operation (or Fault-free)
Solid Red – System Fault (or Out of order)
Com
Solid Green – Normal Network Connection
Single icker – Connecting to HIVE Cloud
Off – Switched off (or No network availability)
Table 1.1 Operating Status
(Storion-SMILE-B3)
Table 1.2 LED Battery State Indicator
LED Ring SOC Description
Standyby:
Green light ickering 1s
Work:
Green light ickering 10s
SOC<5%
5%=<SOC<25%
25%=<SOC<50%
50%=<SOC<75%
75%=<SOC<95%
SOC>95%

10
OWNERS MANUAL
Take the sting out of your energy bills
It is recommended that regular function-checks and cleaning is carried out on the HIVE
Solar Battery for an ideal, fault-free and long-lasting operation. The battery modules
contained within the enclosures do not require any maintenance.
If the system displays an Error Code (as shown above), please contact your installer or
manufacturer immediately to conduct further troubleshooting. Do not attempt to resolve
this by yourself or with the help of an unauthorised (or non-Alpha ESS) technician, as
this may void the Warranty of the product.
It is recommended to periodically (fortnightly) check if the system is operating correctly,
and ensure that it hasn’t gone into fault mode. In addition, it’s healthy to understand the
basic operating principle of the system, where the Battery is expected to charge up to
100% on most days and discharge to a considerable extent overnight. If you observe
any unusual behaviour, please contact your system provider or manufacturer for
further troubleshooting.
Maintenance
4.1 Function Checks
The Battery alerts the user to operational status using a wide range of Error and
Protection codes (as described below). Please note that the system is capable of self/
remote diagnosis whilst operating in Protection mode and is expected to return to
normal operation thereafter. Please contact your system provider or Alpha ESS if the
protection code persists for an extended period.
4.2 System Faults/Errors
Table 1.3 Protection Codes
CHAPTER 4
LED Ring Protection Code LED Display Description
Green light
ickering
every 3
seconds.
1 Temperature difference
3 High temperature
4 Low-temperature discharge
5 Over-current charge
6 Over-current discharge
8 Cell overvoltage
9 Cell under voltage
11 Low-temperature charge

11 www.hivesolar.com.au
6
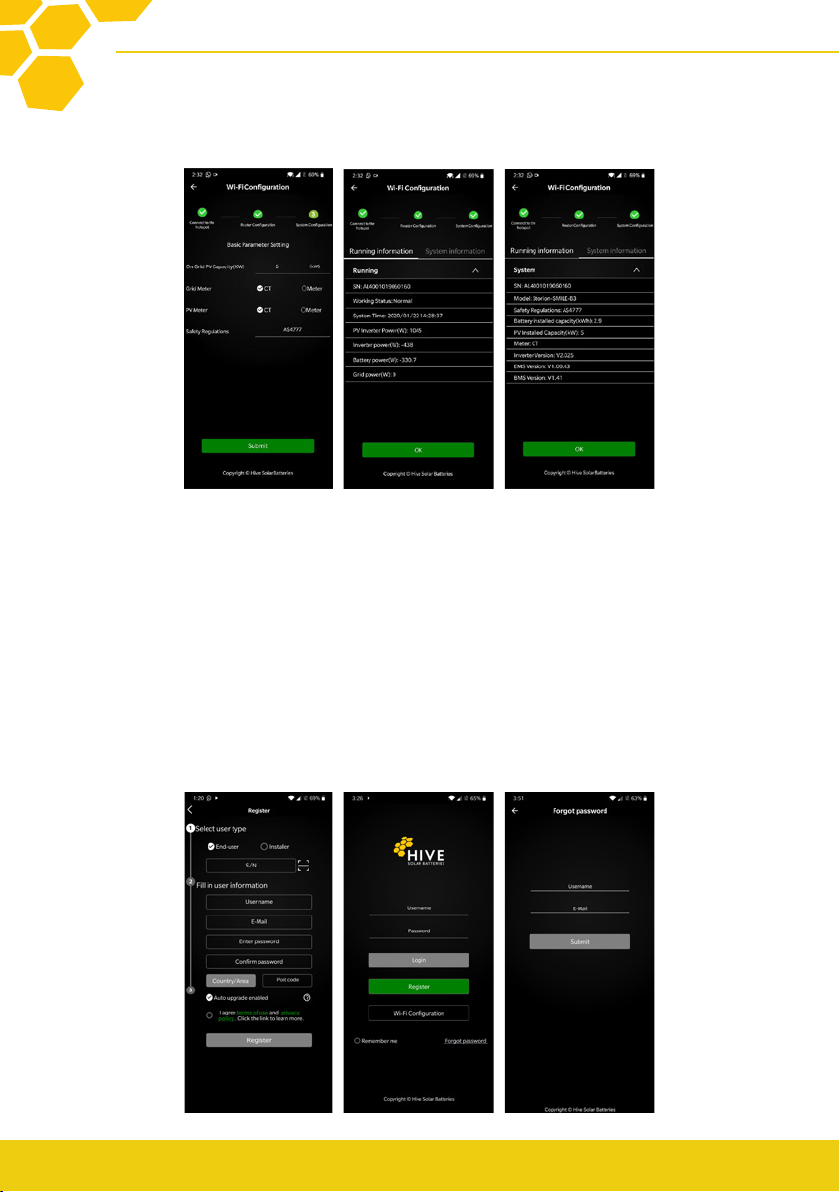
• Open the HIVE Solar App, click the “Wi-Fi conguration” button and enter the Wi-Fi
conguration interface.
• Follow the prompts within the App, to connect the HIVE Wi-Fi module (named after
the product S/N format AL-xxxxx) to your home Wi-Fi network. The network may
prompt you to input a password, please enter – 12345678 and select ‘Connect’.
• After establishing a successful connection, please return to the Hive Solar APP and
click “Next”. The app shall display a list of Wi-Fi networks available in the region.
Find the Wi-Fi network to connect to, enter the Username and Password and press
“Submit”. Following a successful Wi-Fi connection, the app displays a “Successfully
Congured” message window and the Green LED / coms on the Primary unit shall
come on (Flashing followed by Solid).
Download and install the HIVE Solar App, from the below URLs–
• iOS – https://apps.apple.com/au/app/hive-solar-batteries/id1471491926
• Android – https://play.google.com/store/apps/details?id=com.hive.monitor&hl=en_AU
System Monitoring
5.1 Wi-Fi Conguration
CHAPTER 5

12
OWNERS MANUAL
Take the sting out of your energy bills
• Set the basic parameters, including the PV capacity (kW) of the existing Solar PV
system on-site and select either CT or Meter, depending on equipment used and
select “Submit” to complete the process (If systems are wired using Grid CT and
PV CT – select CT, alternatively if they are wired using ACR-10R Meters
– select Meter).
Note – The Basic Parameters are usually completed by the Battery Installer at the
time of installation. If you are unsure, please retain the default values or contact your
system provider.
13 www.hivesolar.com.au
Contact your system provider for assistance with your Product Registration, as they
may have a customised process. If your system provider asks you to register the
system yourself, follow the below steps:
• Open the Hive Solar APP, click the “register” button and select user type as
“End-User”
• Enter the Product S/N (AL-xxxxx), which is generally located on the side of the
Primary Unit.
• Fill in the User information – Username, E-mail, Password, Country/Area
and Postcode.
• Check Auto upgrade enabled and agree to the terms and conditions of the app.
• Select Register to complete the registration process.
5.2 System Registration
14
OWNERS MANUAL
Take the sting out of your energy bills
Forgot Password:
If you have forgotten your password, you can click Forgot Password on the login page.
After submitting the required information, an email to retrieve your password will be
sent to your mailbox. Follow the prompts within the Email to create a new password.
Following the registration, Login to the HIVE Solar App using your Username/
Password, to access your System details.
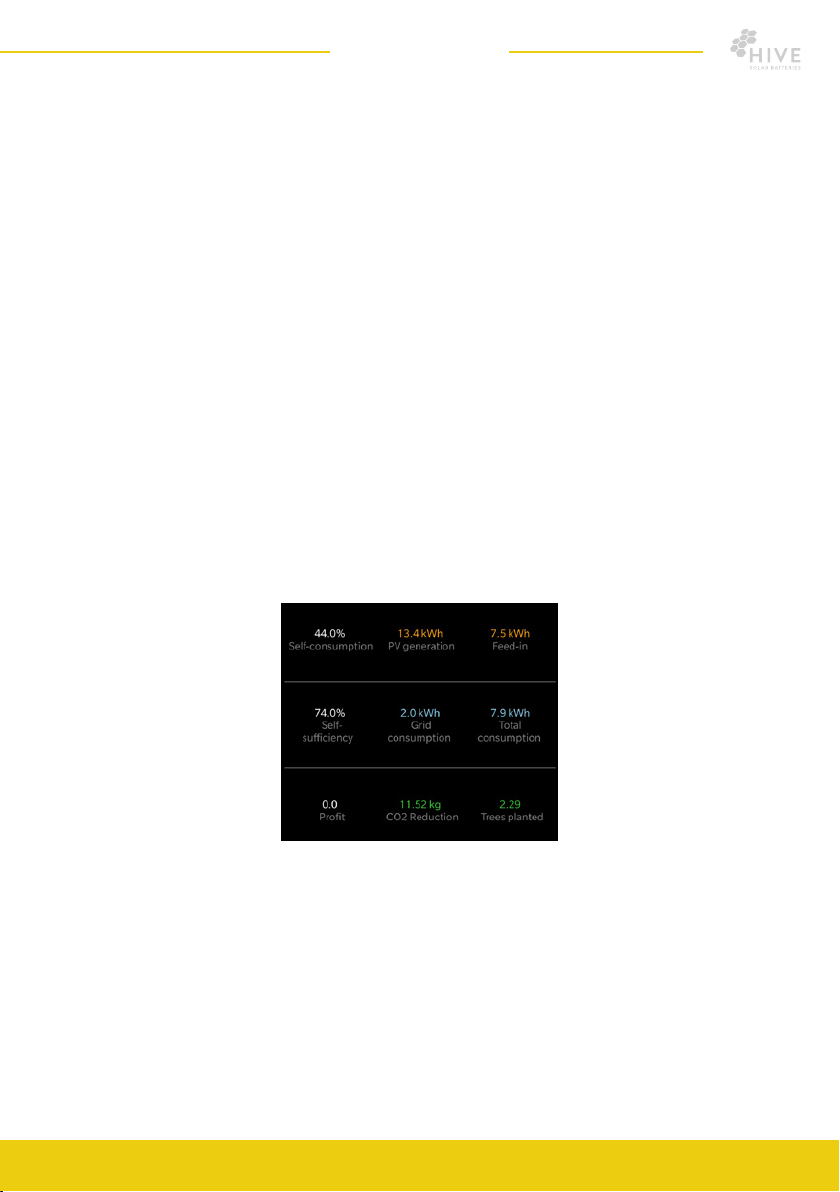
Homepage:
The homepage shows an overall breakdown of the user’s energy usage (in
kWh), including Solar PV generation, Feed-in/Export, Grid consumption and Total
consumption. This helps identify the user’s Self-consumption and Self-sufciency
ratios. Finally, the user can access details of system energy conservation and
environmental protection (equivalent trees planted).
Denitions:
• PV generation: the total amount of generated electricity on that day.
• Prot: the income from feed-in electricity, self-consumption as well as peak-load
shifting in a day.
• Self-consumption ratio: (PV total generation-total electricity sold / PV
total generation.
• Self-sufciency ratio: (Load total consumption – total grid consumption)
/ Load total consumption.
• System energy conservation and environmental protection data: Carbon
dioxide emission reduction data and its equivalence to the number of trees planted.
5.3 HIVE Solar App Features
15 www.hivesolar.com.au
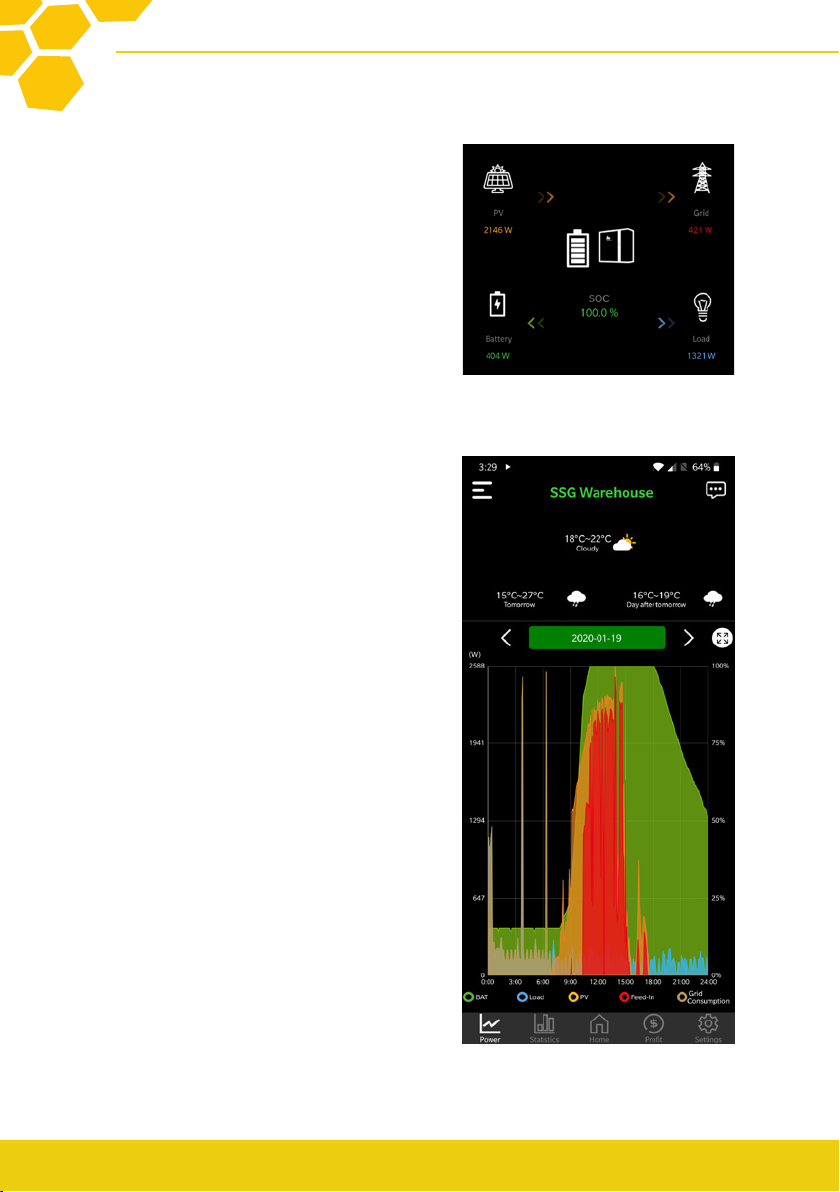
Power Diagram:
Click Power on the home page, to view the
power map for a specic time period as
shown in the below gure. All values are
in Watts (W).
Description:
• Orange: (PV): PV generated
electricity power.
• Blue: (LOAD): Overall House Load power.
• Green :(BATTERY): SoC % (battery
capacity).
• Red: (FEED-IN): Grid feed-in power.
• Brown: (Grid Consumption): Actual con
sumption from the grid.
Users can choose the date above the graph
to query the power data of a certain day.
The diagram of a certain period can be
zoomed in.
Real-time Power Diagram (Homepage):
Select the Homepage to view the Real-time
power diagram. The gure shows the real-
time power diagram for a demo system. All
values are displayed in Watts (W).
Description:
• PV: Real-time Solar generation.
• Grid: Real-time feed-in (arrow facing
towards grid) or grid-consumption (arrow
facing towards loads).
• Battery: Real-time Battery charge
and discharge.
• Load: Real-time Overall house Load
• SoC: Real-time battery capacity (%.)

16
OWNERS MANUAL
Take the sting out of your energy bills
Statistical Diagram:
Click Statistics on the home page to view
the Statistical Diagram. Select the energy
graph or specic range of dates to view your
historical data corresponding to that period.
Users can toggle between Day, Month, Year
and since Installation to view energy data,
as shown.
Description:
All values are displayed in kWh.
• Orange: (PV Generation): Total PV
generation.
• Red: (Feed-in): Total grid feed-in
electricity.
• Blue: (Loads): Total load consumption.
• Brown: (Grid Consumption): Actual
consumption from the grid.

17 www.hivesolar.com.au
Prot Diagram:
Click on Prot on the homepage to view the Prot Diagram. Select the graph or
specic range of dates to view your historical data corresponding to that period. Users
can toggle between Day, Month, Year and since Installation to view appropriate prot
data, as shown below.
The app also displays the Total Income and Total Investment depending on the Values
set by the user/installer.
Description:
All values are calculated in $, as set by the
customer/installer.
• Feed-in: Income from grid feed-in (as per
applicable feed-in tariff).
• Self-consumption: Income from Solar
PV-generation.
• Load shifting: For Time-of-Use tariff
users, this value corresponds to the
Income generated from charging the
battery during Off-peak hours (at low
electricity price) and discharging towards
the loads during Peak / Shoulder hours (at
high electricity price)
Electricity Prices Settings:
Within the Prot diagram page, users can
select their Electricity Price Settings by
clicking the Settings (Scroll Wheel) icon on
the top-right hand side corner of the page.
This manual suits for next models
1
Table of contents


