HiWeigh POS58 User manual
P58
Thermal Printer POS58 -

ValueEachGram

POS-58
Receipt Printer
User Manual
All specifications are subjected to change without notice

POS-58 User Manual
- 1 -
1 INTRODUCTION ....................................................................................................................... - 2 -
1.1 POS-58 Receipt Printer ...................................................................................................... - 2 -
1.2 Feature .............................................................................................................................. - 2 -
1.3 Outline .............................................................................................................................. - 2 -
1.4 Caution ............................................................................................................................. - 2 -
2 SETTING UP THE PRINTER ...................................................................................................... - 3 -
2.1 Unpacking ......................................................................................................................... - 3 -
2.2. Main frame ....................................................................................................................... - 3 -
2.3. Connecting the printer ....................................................................................................... - 3 -
2.3.1 RS232 INTERFACE ................................................................................................ - 4 -
2.3.2 PARALLEL INTERFACE ....................................................................................... - 4 -
2.3.3 USB INTERFACE ................................................................................................... - 5 -
2.3.4 ETHERNET INTERFACE ....................................................................................... - 5 -
2.4 Connect the cash drawer ..................................................................................................... - 6 -
3 USING THE PRINTER ................................................................................................................ - 7 -
3.1 Control Panel ..................................................................................................................... - 7 -
3.2 Online and Offtline ............................................................................................................ - 7 -
3.3 Feed paper ......................................................................................................................... - 7 -
3.4 Setting the baudrate ........................................................................................................... - 7 -
3.5 Enter the test mode ............................................................................................................ - 7 -
3.6 Enter the debug mode ......................................................................................................... - 7 -
3.7 Install the paper roll ........................................................................................................... - 8 -
3.8 Tear off paper .................................................................................................................... - 8 -
3.9 Cleaning printing machine .................................................................................................. - 8 -
4 TROUBLE REMOVAL ................................................................................................................ - 9 -
5 ESC/POS PRINTING COMMAND SET .................................................................................... - 10 -
5.1 Set of Command .............................................................................................................. - 10 -
5.2 Command detail ............................................................................................................... - 11 -
5.2.1 Print Commands .................................................................................................... - 11 -
5.2.2 Line spacing setting command ............................................................................. - 11 -
5.2.3 Character command ............................................................................................ - 12 -
5.2.4 Bit Image Command .............................................................................................. - 14 -
5.2.5 Cash drawer control command ................................................................................ - 15 -
5.2.6 Key control command ............................................................................................ - 16 -
5.2.7 Init command ........................................................................................................ - 16 -
5.2.8 Status Command .................................................................................................... - 16 -
5.2.9 Bar Code Command ............................................................................................... - 17 -
5.2.10 Print Posiiton and Page Command ........................................................................ - 19 -
6. Sample Programming ................................................................................................................ - 21 -
APPENDIXA :CODE PAGE ....................................................................................................... - 21 -
APPENDIXB :International characters ......................................................................................... - 23 -
APPENDIXC :Persian characters ................................................................................................. - 24 -

- 2 -
POS-58 User Manual
Notice
Notice
Notice
Notice :
This manual has been prepared for various models with same body that have built at
Our Company. So some content of this manual may not use on your device.
1
1
1
1 INTRODUCTION
INTRODUCTION
INTRODUCTION
INTRODUCTION
1.1 POS-58 Receipt Printer
POS-58
is
designed for use for use with electronic instruments such as ECR,POS,banking
equipment,computer peripheral equipment,etc.
1.2 Feature
High Speed printing: 90mm per second
Low noise thermal printing.
Interface: RS-232(POS-58S),Parallel(POS-58P),USB(POS-58U)
12V or 24V cash drawer interface.
Barcode printing
is
possible by using a barcode command.
Different print densities can be selected by PC S/W
1.3 Outline
Printing Method: Thermal
Paper Width: 57.5mm
Paper Diameter: 55mm
Resolution: 203DPI
Printing Speed: Up to 90mm/s
Barcode Supported: I25,UPC-A,UPC-E,EAN-8, EAN-13,Codebar,Code39,
Code93,Code128,Code11,MSI
Font: ASCII(12x24),(8x16))
Graphic printing: Direct bitmap printing
Page mode printing
Paper Sensor: Photo-sensor
Head tempeture detection: Thermistor
Communication Interface: RS232,PARALLEL,USB,ETHERNET optional
Cash drawer interace: Support 12V/24V cash drawer
Power supply:
9V,3A
Power <1W(Idle)
45W(printing)
Head Life: 50km
Printing width: 48mm
Operation condition: 5 ~ 45 ℃ , 20 ~ 90%RH ( 40 ℃)
Storage condition: -40~60 ℃ , 20 ~ 9 3 %RH ( 40 ℃)
Dimension: 168x108x81
Weight: 0.370kg
1.4 Caution
Some semiconductor devices are easily damaged by static electricity.
You
should turn the printer
POS-58 User Manual
- 3 -
“ OFF ”
,
before you connect or remove the cables on the rear side, in order to guard the printer
against the static electricity. If the printer
is
damaged by the static electricity, you should turn the
printer “ OFF ” .
This Apparatus complies with class
“
A ” limits for radio interference
2
2
2
2 SETTING
SETTING
SETTING
SETTING UP
UP
UP
UP THE
THE
THE
THE PRINTER
PRINTER
PRINTER
PRINTER
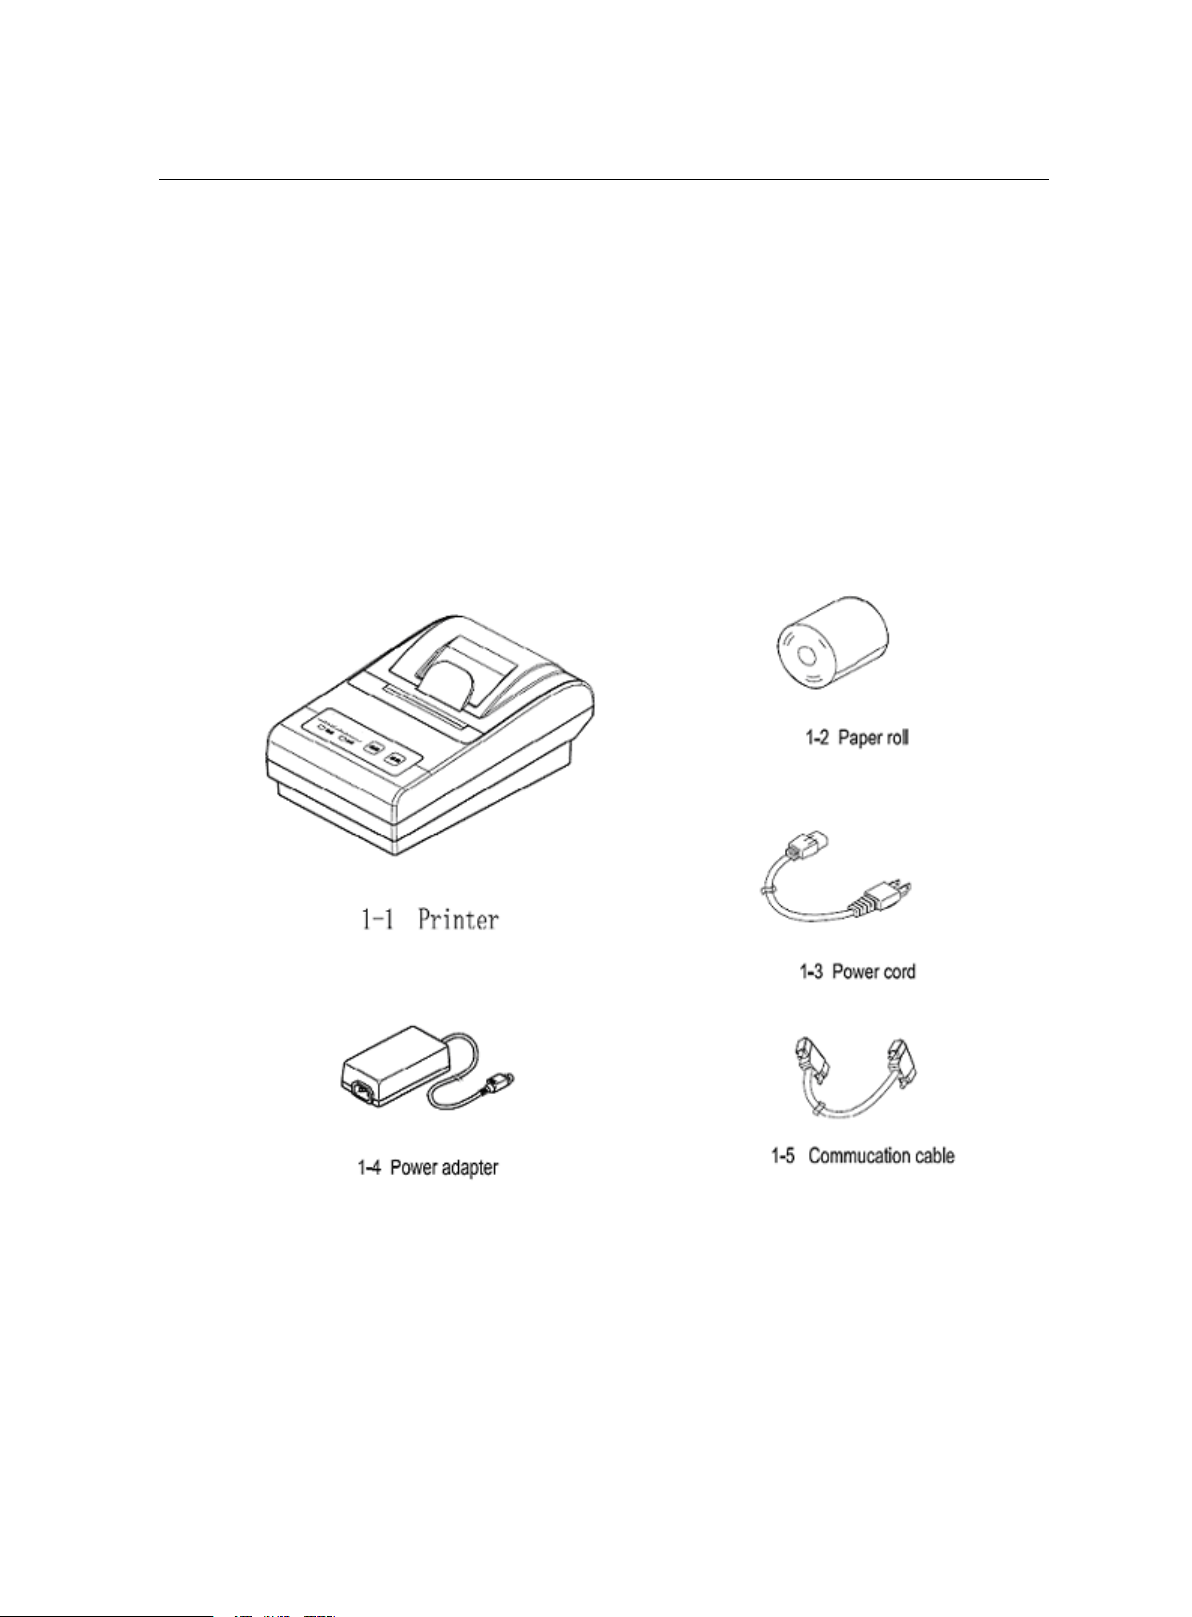
2.1 Unpacking
Your printer box should include these items. If any items are damaged or missed,please
contack your dealer for assistance.
2.2. Main frame
2.3. Connecting the printer
According to the printer type, connect the correct communication cable to the printer.
POS-58-S RS232
POS-58-L PARALLEL
POS-58-U USB
POS-58-E ETHERNET
You can connect up the three cable to the printer. They all connect to the connector panel on

- 4 -
POS-58 User Manual
the back of the printer:
Commucation cable
Cash drawer cable
Power supply connector
Note: Before connecting any of the cable, make sure that both the printer and the host are
turned off.
2.3.1 RS232 INTERFACE
POS-58S use RS232 intreface to connect the printer and host computer. It use DB9
RS232 interface, support RTS/CTS ,DSR/DTR ,XON/XOFF flow control protocol.
Connect the printer as following picture:
RS232 PIN definition :
PIN SIGNAL IO DEFINITION
1 DCD NC
2 RxD OUT Send the printer status to PC
3 TxD IN Receive command and data from PC
4 DTR NC
5 GND --- GND
6 DSR OUT
ON: Paper
is
ready
OFF: No Paper or No power
7 RTS NC
8 CTS OUT Clear to send
9 RI NC
2.3.2 PARALLEL INTERFACE
POS-58 use 8 bit standard parallelinterface. It use DB25 male socket.
To computer

POS-58 User Manual
- 5 -
Parallel pin definition:
PIN SIGNAL IO DEFINITION
1 /STB IN
Latch strobe pulse. The printer will latch the
data at the position edge.
2 D1 IN
DATA
BIT0 ( LSB )
3 D2 IN
DATA
BIT1
4 D3 IN
DATA
BIT2
5 D4 IN
DATA
BIT3
6 D5 IN
DATA
BIT4
7 D6 IN
DATA
BIT5
8 D7 IN
DATA
BIT6
9 D8 IN
DATA
BIT7 (MSB)
10 /ACK OUT
The printer acknology, indicate that the printer
has fineshed one byte data reading.
11 BUSY OUT
The printer busy signal ,When
it
is
high, the
printer can not receive data from PC
12 PE OUT
Paper error signal, When it
is
high, indication
that the printer
is
out of paper.
13 SEL OUT Connect to 5V by a 47K resistor
14 NC -
15 ERR OUT
ERROR, When it
is
low, the printer
is
in
errorstatus.
It
can be caused by out of paper or
the printer head tempreture
16 -17 NC ---
18-25 GND ---
2.3.3 USB INTERFACE
POS-58U use the B-Type USB interface as the followed picture.
In order to use the USB type, please install the USB driver first. When the driver
is
installed, the
computer will add one virtual COM port, such COM3, COM4 etc.
It
can be used the samle as RS232. The printer and computer must select the same RS232 COM
parametres.
2.3.4 ETHERNET INTERFACE
POS-58E use RJ45 socket. The communication cable
is
not provided by the printer.
The IP address of the printer can be setted up be PC S/W.

- 6 -
POS-58 User Manual
2.4 Connect the cash drawer
The printer use RJ-11 6line socket., support most 12V/24V cash drawer. Connecting the cash
drawer as the followed picture:
Cash drawer socket definiction:
PIN DEFINITION IO
1 GND
2 Cash drawer open control IN
3
4 +24V POWER
5 Cash drawer open control IN
6
NOTE:
NOTE:
NOTE:
NOTE:
Use a drawer the matches the printer specification. Using an improper drawer may
damage the drawer as well as the printer.Must not connect the telegphone line to the cash drawer.
C onnect cash
To computer

POS-58 User Manual
- 7 -
3
3
3
3 USING
USING
USING
USING THE
THE
THE
THE PRINTER
PRINTER
PRINTER
PRINTER
3.1 Control Panel
3.2 Online and OfftlineThe “ LINE ” buttons will toggle the printer with on “ online ” , “ offline ” mode.
NOTE:
NOTE:
NOTE:
NOTE:
When powered up, the printer will stay in the “ online ” mode.
When in
“
online ” mode, the printer receive and handle the data and command send by PC.
When in “ offline ” mode, the printer receive and handle the command send by PC, discard the send
by PC.
When the printer
is
out of paper, the printer will enter
“
offline ” .
3.3 Feed paperPressing the “ FEED ” button, the printer will feed the paper by 20mm.
NOTE:
NOTE:
NOTE:
NOTE:
When the printer
is
out of paper, the printer will not feed the paper.
3.4 Setting the baudrateBaudrate setting
is
only effective with POS-58S and POS-58U.
1. Install the paper roll. Power down.
2. Press the
“
LINK ” button. Don ’ t release it.
3. Power on POS-58
4. Release the “ LINK ” button after POS-58 starting printing.
5. Press the “ FEED ” to toggle the baudrate. POS-58 support the follows baudrate:
4800,9600,19200,38400,57600,115200
6. Repower up the POS-58.
Note:
The default value
is
9600.
3.5 Enter the test modeThe test mode use to test the printer printing function.
1. Power down.
2. Install the paper roll.
3. Press the
“
feed ” button. Don ’ t release it.
4. Power up.
POS-58 will print the printing test page.
3.6 Enter the debug modeDebug mode allow experienced users to see exactly what data
is
coming to the printer. This can
useful in finding software problems. When you turn on the debug mode, the printer prints all
commands and data in hexadecimal format along widht a guide section to help you find specific
command.
1. Remove the paper roll. Power down
2. Press the
“
feed ” button, Don ’ t release it.
3. Power up POS-58
4. Release the “ feed ” button.
5. Install the paper roll.
- 8 -
POS-58 User Manual
In debug mode, POS-58 will prints all commands and datas
in
hexadecimal format as follows:
1B21 001B 2602 4040 .!..&.@@
4040 020D 1B44 0A14 @@...D..
1E28 2828 0001 0A41 .(((...A
0D42 0A43 4343 4445 .B.CCCDE
Note:
In debug mode, POS-58S, POS-58U will change the baudrate with “ online ” key. Make sure the
baudreate
is
your want please.
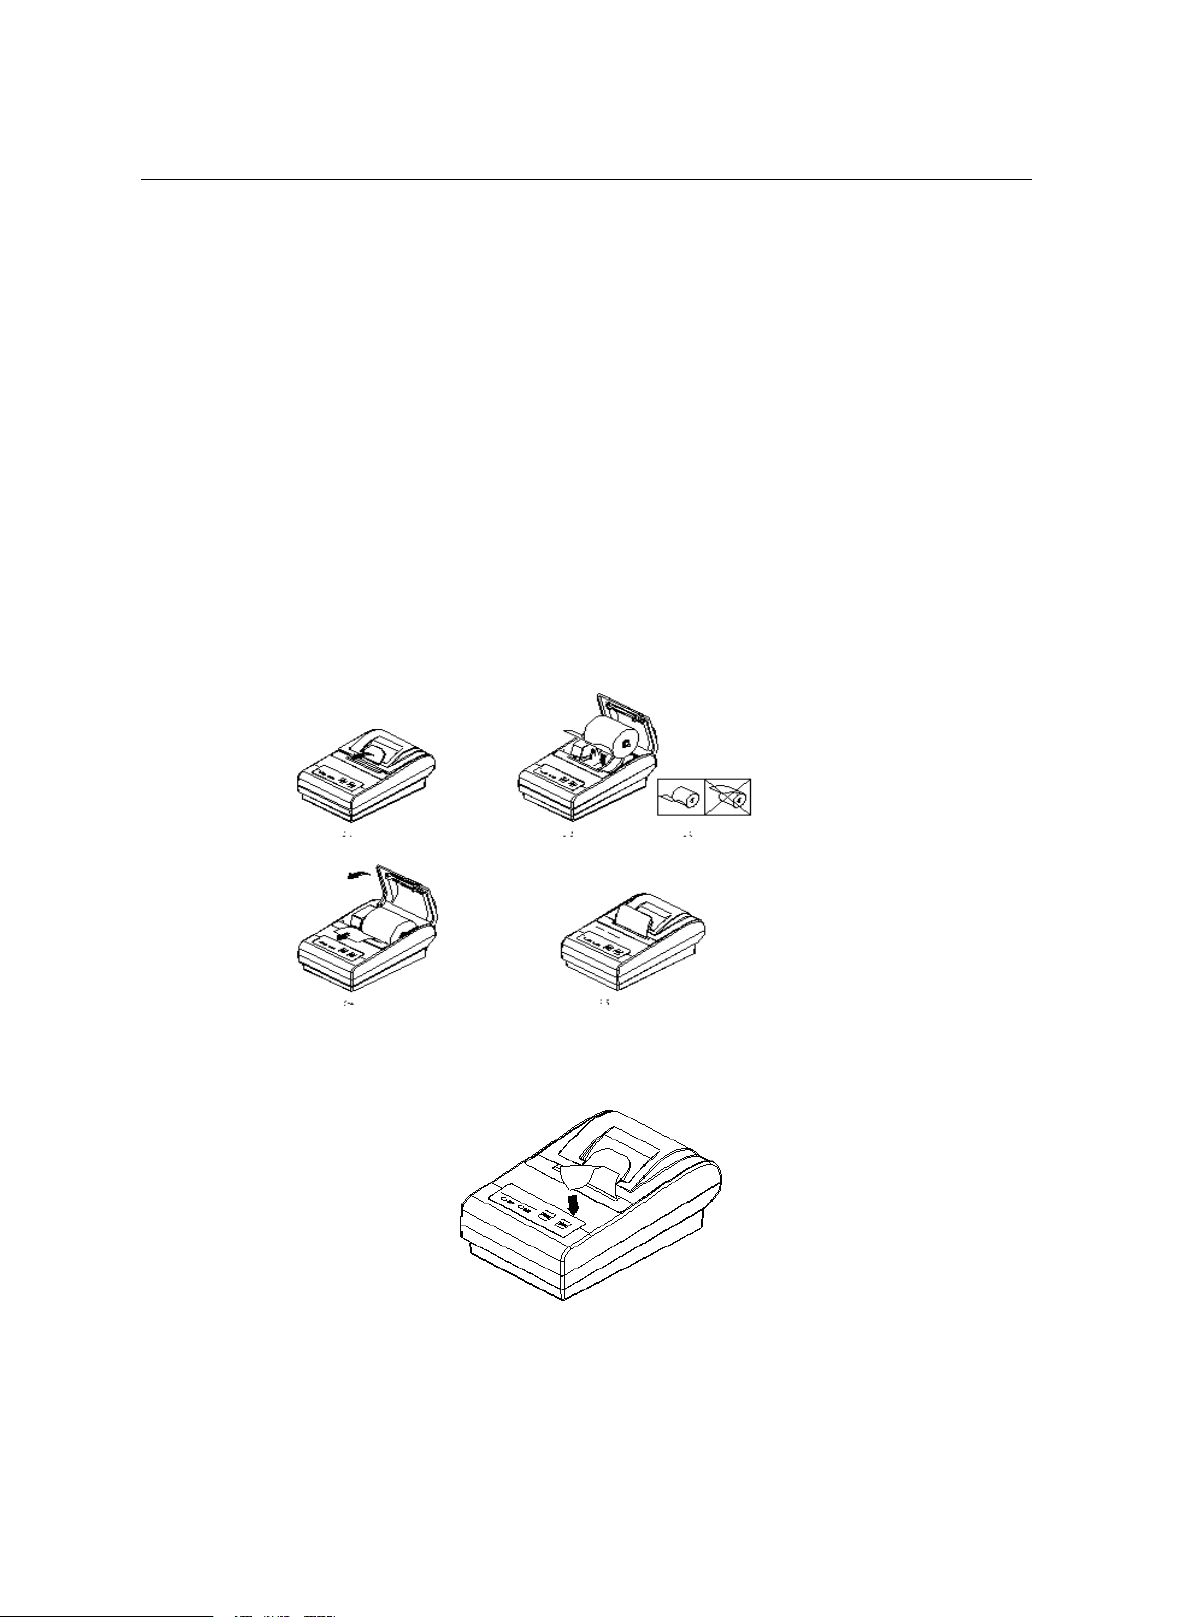
3.7 Install the paper rollPOS-58 has easy-loading paper mechanism. Installing or Replacing the paper roll as follows:
1. Open the paper roll cover by pulling up the fastener. see fig2-1
2. Remove the used paper roll core if there
is
one.
3. Insert the paper roll as shown 2-3, 2-2.
4. Be sure to note the correct direction that the paper comes off the roll.
5. Pull out a small amount of paper, as shown 2-4, Then close the cover.
6. Install OK. as shown 2-5.
3.8
Tear
off paperTear off the paper as shown
3.9 Cleaning printing machineWhen Thermal printing paper be added to thermal printing machine, some material in the
paper will be residual
in
the machine. Residual degree is related to the printing density
stetted and paper .The residual will affect the printing effect and the life of the machine.
Please clean the printing machine regularly as follows:

POS-58 User Manual
- 9 -
1. open the cover
2. stick a little pure alcohol by cotton bud
3. Use the cotton bud to scrub the surface of thermal printing scale smoothly
4. be sure that the alcohol is volatilized before you use the machine again
4
4
4
4 TROUBLE
TROUBLE
TROUBLE
TROUBLE REMOVAL
REMOVAL
REMOVAL
REMOVAL
1.Trouble: the printing word isn't clear
.Handle method: a.clean the print head
b. re-set the print density for the Thermal printing paper in bad quality
2.Trouble: print blank
.Handle method: a. make sure it
is
thermal printing paper and the paper
is
in right direction
b. make sure the thermal print head
is
in good condition
3Trouble: the self check
is
ok, but can't print
Handle method: a..be sure the printer in good connection and in printing state
b.be sure the PC software in correct setting
c.be sure the baud rate
is
right
4.Trouble: the self check
is
ok, but print disorderly
Handle method: adjust setting parameter for the serial port of printer isn't match with computer"s
5.Trouble: the vertical parts can't be print correctly
Handle method: a.make sure there isn't any dirty thing
in
the thermal printing machine
b. make sure there isn't any damage
in
the thermal printing machine
c. make sure there isn't stoppage in motherboard and thermal printing machine
6.Trouble: the printer can't work
Handle method:a. it doesn't connect with power supply or the battery
is
in bad condition
b.the power supply for the printer
is
error
7Trouble : the printer can start up normally, but can't print
Handle method: a.make sure the thermal printing head
is in
good manner
b. make sure the voltage of power supply
is
correct
c. make sure the thermal printing paper install

- 10 -
POS-58 User Manual
5
5
5
5 ESC/POS
ESC/POS
ESC/POS
ESC/POS PRINTING
PRINTING
PRINTING
PRINTING COMMAND
COMMAND
COMMAND
COMMAND SET
SET
SET
SET
5.1 Set of Command
Type Command Name
Print Command
LF Print and line feed
ESC J Print and Feed n dots paper
Line spacing
Command
ESC 2 Select default line spacing
ESC 3 n Set line spacing
ESC a n Select justification
Character
Command
ESC ! n Select print mode(s)
ESC SO Turn double width on
ESC DC4 Turn double width off
ESC { n Turn upside-down printing mode on/off
ESC B n Turn inverting printing mode on/off
ESC % n Select/Cancel user-defined characters
ESC & Define user-defined characters
ESC ? Cancle user-defined characters
ESC R n Select and internation character set
ESC t n Select character code table
Bit Image Command
ESC * Select bit-image mode
GS * Define downloaded bit image
GS / Print downloaded bit image
Cash drawer
command
ESC p Generate cash drawer control pulse
Key Control
Command
ESC c 5 Enable/disable panel buttons
Init Command ESC @ Initialize printer
Status Command
ESC v n Transmit paper sensor status
ESC u Transmit peripheral device status
GS a Enable/Disable AutomaticStatus Back(ASB)
ECS = n Set printer online status
Status Command
ESC v Transmit paper sensor status
ESC u Transmit peripheral device status
GS a Enable/Disable AutomaticStatus Back(ASB)
Bar Code Command
GS H
Select printing position of human readable
characters
GS h Set bar code height
GS w Set bar code width
GS k Print bar code
Print Posiiton
and Page Command
ESC L Setlect page mode
FF Print and return to standard mode(in page mode)
ESC FF Print data in page mode
CAN Cancel print data in page mode

POS-58 User Manual
- 11 -
ESC W …Set printing area in page mode
ESC $ nL nH Set absolute print X position
GS $ nL nH Set absolute print Y position
ESC \ nL nH Set relative print X position
GS \ nL nH Set relative print Y position
GS L nL nH Set left margin
GS W nL nH Set printing area width
5.2 Command detail
POS-58 printer use ESC/POS command set.
The printing command is descripted as followed format:
CMD Function
Format ASCII List by ASCII characters
Decimal List by decimal characters
Hexadecimal List by hexadecimal characters
Description Command function description
Example Command use example
5.2.1 Print Commands
LF Print and line feed
Format ASCII LF
Decimal 10
Hexadecimal 0A
Description LF prints the data in the print buffer and feeds one line.
When the print buffer is empty, LF feeds one line.
ESC J n Print and feed paper
Format ASCII ESC J n
Decimal 27 74 n
Hexadecimal 1B 4A n
Description n = 0-255 。
ESC J prints the data in the print buffer and feeds n dots.
The command will not change the setting set by command ESC 2 , ESC 3.
5.2.2 Line spacing setting command
ESC 2 Select default line spacing
Format ASCII ESC 2
Decimal 27 50
Hexadecimal 1B 32
Description ESC 2 sets the line space to default value (30dots)

- 12 -
POS-58 User Manual
ESC 3 n Set line spacing
Format ASCII ESC 3 n
Decimal 27 51 n
Hexadecimal 1B 33 n
Description n = 0-255
ESC 3 n sets the line spacing to n dots.
The default value is 30
ESC a n Select align mode
Format ASCII ESC a n
Decimal 27 97 n
Hexadecimal 1B 61 n
Description The command is only used in the standard mode.
0 ≤ m ≤ 2 or 48 ≤ m ≤ 50
Align left: n=0,48
Align middle: n=1,49
Align right: n=2,50
5.2.3 Character command
ESC ! n Select print mode
Format ASCII ESC ! n
Decimal 27 33 n
Hexadecimal 1B 21 n
Description
The default value is 0. This command is effective for all characters.
BIT0: 0:Character font 12x24 selected
1:Character font 8x16 selected
BIT1:
BIT2:
BIT3: 1:Emphasized mode selected
0:Emphasized mode not selected
BIT4: 1:Double Height mode selected
0:Double Height mode not selected
BIT5: 1:Double Width mode selected
0:Double Width mode not selected
BIT6:
BIT7: 1:Underline mode selected
0:Underline mode not selected
ESC SO Select Double Width mode
Format ASCII ESC SO
Decimal 27 14
Hexadecimal 1B 0E
Description Select Double Width mode
To turn double width off, use LF or DC4 command.

POS-58 User Manual
- 13 -
ESC DC4 Disable Double Width mode
Format ASCII ESC DC4
Decimal 27 20
Hexadecimal 1B 14
Description Disable Double Width mode
ESC { n Set/Cancel Character Updown mode
Format ASCII ESC { n
Decimal 27 123 n
Hexadecimal 1B 7B n
Description n=1:Enable Updown mode
n=0:Disable Updown Mode
Default value is 0
ESC B n Turn white/black reverse printing mode on/off
Format ASCII ESC B n
Decimal 27 66 n
Hexadecimal 1B 42 n
Description n=1:Enable white/black reverse mode
n=0:Disable white/black reverse mode
Default value is 0
ESC % n Enable/Disable User-defined Characters
Format ASCII ESC % n
Decimal 27 37 n
Hexadecimal 1B 25 n
Description n=1:Enable User-defined character
n=0:Disable User-defined character
ESC & s n m w Define User-defined characters
Format ASCII ESC & s n m w d1 d2 …dx
Decimal 27 38 s n w m d1 d2 …dx
Hexadecimal 1B 26 s n w m d1 d2 …dx
Description
The command is used to define user-defined character.
s=2 or 3,32 ≤ n ≤ m < 127
s: Character height bytes, =2(16dots); =3(24dots)
w: Character width 0 ~ 8(s=2) , 0 ~ 12(s=3)
n: User-defined character starting code
m: User-defined characters ending code
dx:data , x=s*w
s=3 dx format:
d1 d4 d7
d2 d5 d8
d3 d6 d9 d36
s=2
d1 d3 d5
dx
BIT 7
BIT 6
BIT 5
BIT 4
BIT 3
BIT 2
BIT 1
BIT 0

- 14 -
POS-58 User Manual
d2 d4 d6 d16
ESC ? n Disable user-defined character
Format ASCII ESC ? n
Decimal 27 37 n
Hexadecimal 1B 25 n
Description
ESC ? n disable user-defined characters, printer will use the interal character.
ESC R n Select an internal character set
Format ASCII ESC R n
Decimal 27 82 n
Hexadecimal 1B 52 n
Description
Select an internal character set n as follows:
0:USA 5:Sweden 10:Denmark II
1:France 6:Italy 11:Spain II
2:Germany 7:Spain1 12:Latin America
3:U.K. 8:Japan 13:Korea
4:Denmark 1 9:Norway
ESC t n Select character code table
Format ASCII ESC t n
Decimal 27 116 n
Hexadecimal 1B 74 n
Description
Select a page n from the character code table as follows: :
0:437 4:860 8:862
1:850 5:861 254.Persian
2:852 6:863 255.Chinese
3:857 7:858
POS-58 Support only 0, 1, 256
5.2.4 Bit Image Command
ESC * m nL nH d1 d2 …dk Select bit-image mode
Format ASCII ESC * m nL nH d1 d2 …dk
Decimal 27 42 m nL nH d1 d2 …dk
Hexadecimal 1B 2A m nL nH d1 d2 …dk
Description
This command selects a bit image mode using m for the number of dots specifed by
(nL+nH*256)
m =0,1,32,33 。
nL=0-255
nH=0-3
POS-58 User Manual
- 15 -
dx=0-255
k = nL+256*nH (m=0,1)
k = (nL+256*nH)*3 (m=32,33)
The modes selected by m are as follows:
0 : 8dots single density , 102dpi
1: 8dots double density , 203dpi
31:24 dots single density,102dpi
32:24 dots double density,203dpi
The bit image format
is
the same as user-defined character.
GS / n Print downloaded bit image
Format ASCII GS / n
Decimal 29 47 n
Hexadecimal 1D 2F n
Description
This command prints a downloaded bit image using the mode specified by n as
specified in the chart.In standard mode, this command is effective only when there is
no data in the print buffer. This command is ignored if a downloaded bit image has not
been defined.
n=0-3 、 48-51: Specify bit image mode
n Bit Image Mode Vertical DPI Horizontal DPI
0,48 Normal 203DPI 203DPI
1,49 Double width 203DPI 101DPI
2,50 Double height 101DPI 203DPI
3,51 Quadruple 101DPI 101DPI
n=65-68: Print logo 1-4
GS * x y d1 …dk D efine downloaded bit image
Format ASCII GS * x y d1 …dk
Decimal 29 42 x y d1 …dk
Hexadecimal 1D 2A x y d1 …dk
Description This command defineds a downloaded bit image by using x*8 dots in the
horizontal direction and y*8 dots in the vertical direction. Once a
downloaded bit image has been define, it is avaiable until
A nother definition is made
ESC & or ESC @ is executed
T he power is turned off
T he printer is reset
x=1 ~ 48(width) , y = 1 ~ 255(height) , x × y < 2304, k=x × y × 8
5.2.5 Cash drawer control command
ESC p m n1 n2 Generate pulse
Format ASCII ESC p m n1 n2
Decimal 27 112 m n1 n2

- 16 -
POS-58 User Manual
Hexadecimal 1B 70 m n1 n2
Description
Send a pulse to the specified connector pin. It is used to open the cash
drawer.
m : special the pin the pulse is send to. 0:pin2, 1:pin5
n1,n2:pulse on & off time. (unit:2ms)
5.2.6 Key control command
ESC c 5 n Enable/Disable the panel key
Format ASCII ESC c 5 n
Decimal 27 99 53 n
Hexadecimal 1B 63 35 n
Description n=1 , Disable the panel key
n=0 , Enable the panel key(Default)
5.2.7 Init command
ESC @ Initialize the printer
Format ASCII ESC @
Decimal 27 64
Hexadecimal 1B 40
Description Initializes the printer.
The print buffer is cleared.
Reset the param to default value.
return to standard mode
Delete user-defined characters
5.2.8 Status Command
ESC v Transmit paper sensor status
Format ASCII ESC v n
Decimal 27 118 n
Hexadecimal 1B 76 n
Description Transmits the status of the paper sensor as 1 byte of data.
POS-58P not supports this command. Only in serial type printer effective.
The status byte definition(n=1):
Bit Function Value
0
1
2 NO PAPER 1
3 MECHANISM ERROR 1
4 0 0
5
6 PRINTER TEMPERAUTRE OVER 1
7
POS-58 User Manual
- 17 -
GS a n Enable/Disable Automatic Status Back(ASB)
Format ASCII GS a n
Decimal 29 97 n
Hexadecimal 1D 61 n
Description POS-58P don ’t support this command , Only in serial type printer effective.
n definition as follows:
Bit Function
Value
0 1
0 0
1
2 Disable/Enable ASB Disable Enable
3-4
5
Disable/Enable set busy
when in ERROR status
RTS=BUSY
Disable Enable
6-7
When ASB is enabled, the printer will send the changed status to PC
automatically.
ESC u T ransmit peripheral devices status
Format ASCII ESC u
Decimal 27 117
Hexadecimal 1B 75
Description POS-58P don ’t support this command , Only in serial type printer effective. .
R eturn status bytes definetion:
bit0: Drawer status.
bit4: 0
POS-58 always return 0 back.
ESC = n T ransmit peripheral devices status
Format ASCII ESC = n
Decimal 27 61 n
Hexadecimal 1B 3D n
Description n=0, offline; n=1, online
5.2.9 Bar Code Command
GS H n Select printing position of human readable characters
Format ASCII GS H n
Decimal 29 72 n
Hexadecimal 1D 48 n
This manual suits for next models
1
Table of contents
Other HiWeigh Printer manuals


