manuals.online logo
Brands
  1. Home
  2. •
  3. Brands
  4. •
  5. Hobbico
  6. •
  7. Toy
  8. •
  9. Hobbico FlyZone Electric Free-Flight Star Blazer User manual

Hobbico FlyZone Electric Free-Flight Star Blazer User manual

ASSEMBLY OFYOUR ELECTRIC FREE-FLIGHT STAR BLAZER
WARNING: Read instructions carefully! Improper use of this product may result in personal injury or damage to the public.
WARNING: Choking hazard–Small parts. Do not allow children under age 3 to play with the Star Blazer.This model contains small
parts which could accidentally be swallowed and cause suffocation. Use with adult supervision.
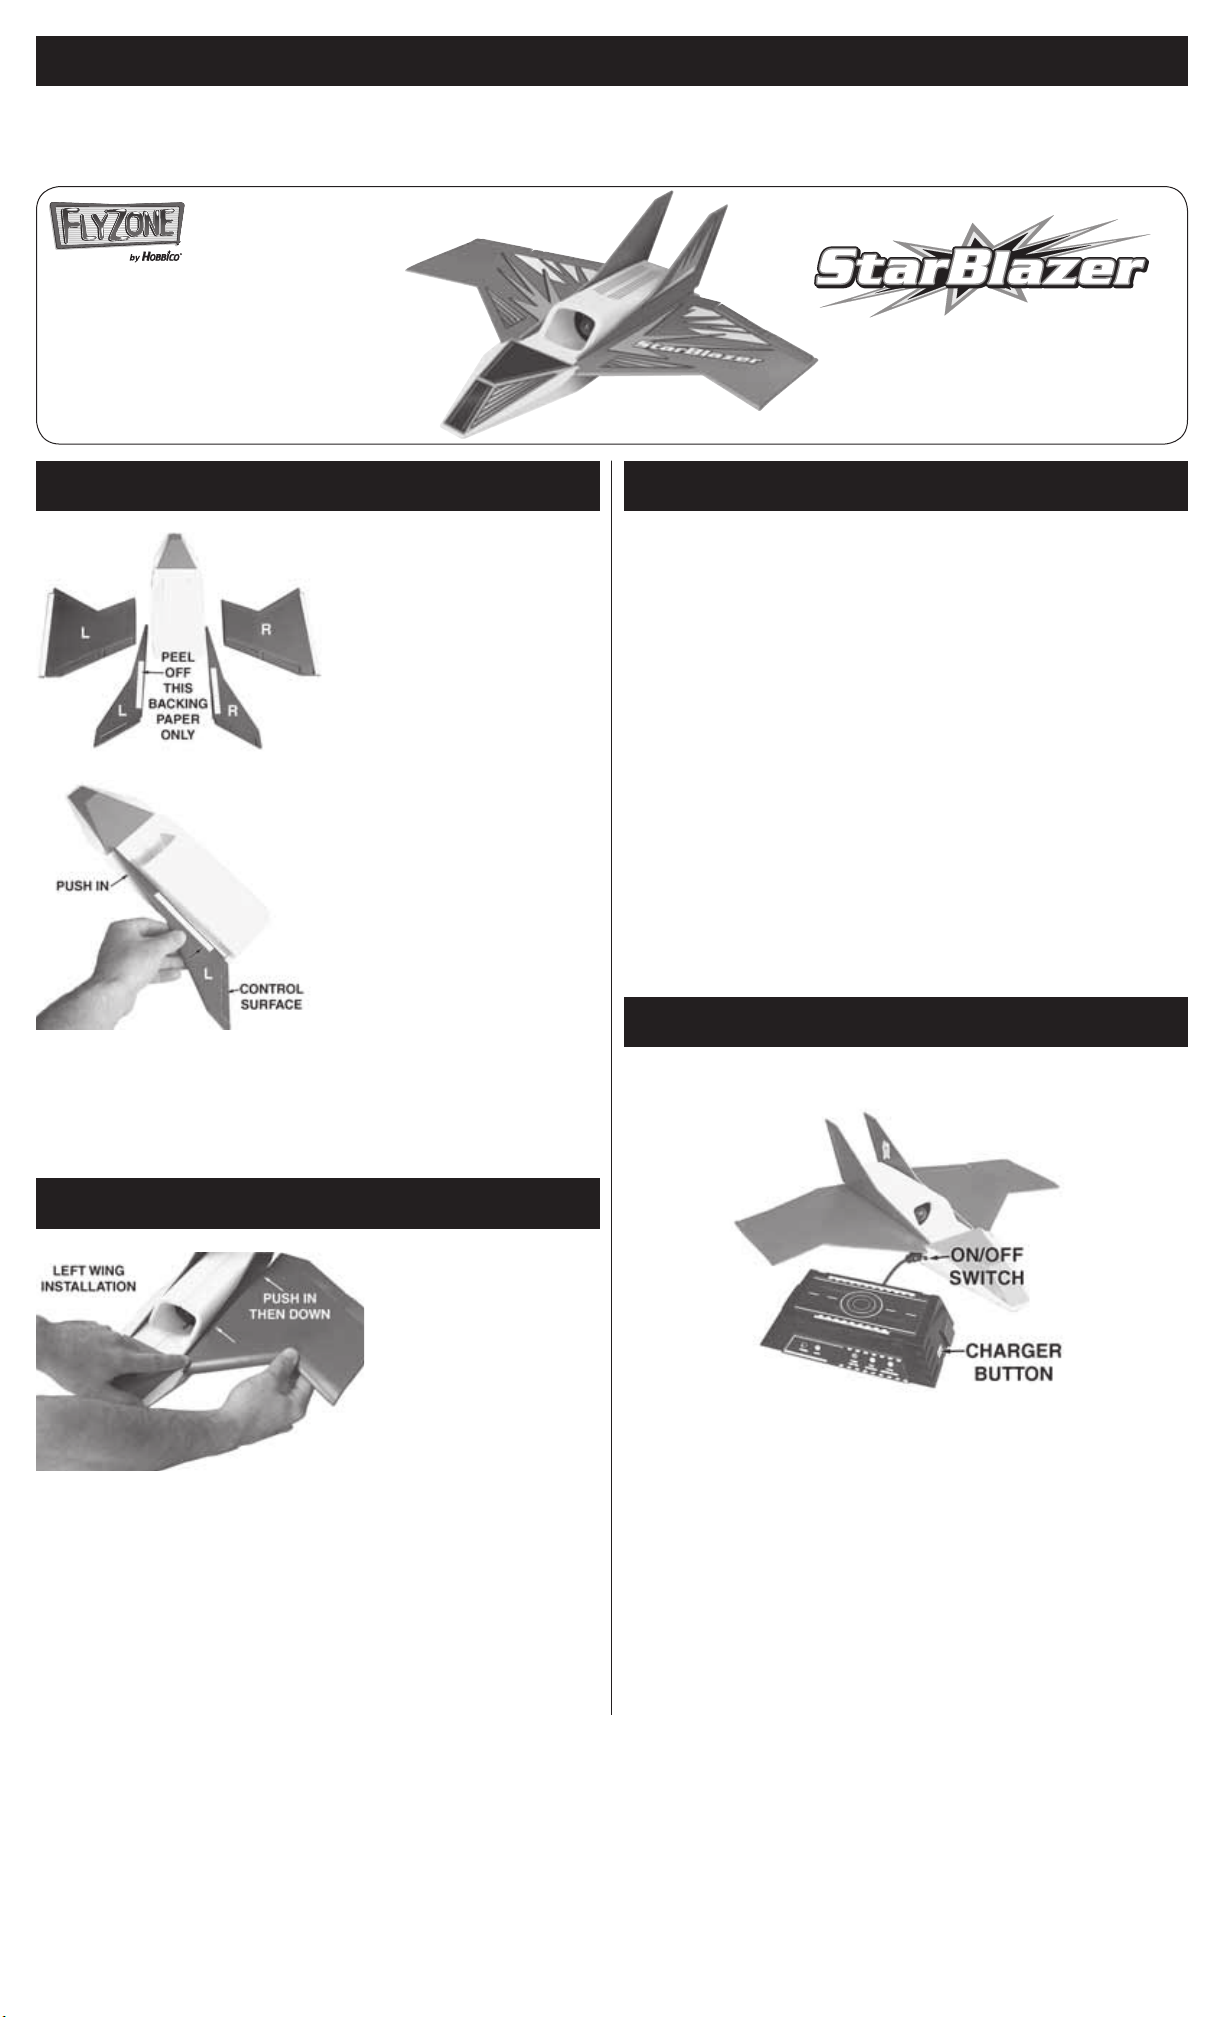
1INSTALLTHE RUDDERS
Requires 6 “C”
Alkaline batteries
(Not included)
WARRANTY
Hobbico, Inc. guarantees this kit to be free of defects in both material and workmanship at the date of purchase.This warranty does
not cover any component parts damaged by use or modification. In no case shall Hobbico’s liability exceed the original cost of the
purchased kit.Further, Hobbico reserves the right to change or modify this warranty without notice. In that Hobbico has no control over
the final assembly, no liability shall be assumed nor accepted for any damage resulting from the use of the final user-assembled product.
By the act of using the user-assembled product, the user accepts all resulting liability. If the buyer is not prepared to accept the liability
associated with the use of this product, the buyer is advised to return this kit in new and unused condition to the place of purchase.
Please inspect all parts carefully before starting assembly! If any parts are missing, broken, or defective, or if you have any questions
regarding assembly or flying of this airplane, please call us at (217) 398-8970, and we’ll be glad to help.
Entire Contents © Copyright 2007 HCAZ3171 for HCAA0371
HCAA0371
2INSTALLTHEWINGS
• Use the photo to help you identify
thecorrectwingandrudderpanels.
Carefully remove the backing
paper from the double-sided tape
on the left rudder only.
• With the control surface to the
back of the plane, match the
bottom edge of the left rudder
cut out to the slot in the fuselage.
Push the rudder into the slot and
fold it up until it is vertical.
• Carefully peel the backing
paper off of both the left
wing and the fuselage.
• With the control surfaces
toward the rear of the plane,
join the left wing to the
fuselage.Make sure that the
wing’s edge sits tightly in the
fuselage cutout.
• Repeat the previous two steps to install the right wing.
• Use the photos on the box to apply the decals to your Star Blazer and
the charger.
• Repeat the previous steps to install the right rudder.
• Without pressing too hard, press the rudders into the fuselage to help
the tape stick.(Builder’sTip:You know you are pressing too hard if the
foam begins to dent under your finger.)
3PREPARETHE CHARGING UNIT
• Using a Phillips screwdriver, remove the five battery door screws on
the bottom and gently slide the cover out of the way.Note: The door is
held to the charger unit by the cord.
• Install 6 fresh “C” sized Alkaline batteries into the charger. Make sure
that the positive (+) and the negative (-) poles of the batteries match up
correctly with the diagram molded inside the battery compartment.
• Replace the battery door on the charger.You may need to gently pull
the charger cord out as you put the door back on. Re-install the five
screws and tighten them.
Note: Do not use rechargeable (Nickel-Cadmium or NiMH) batteries
Do not mix old and new batteries.
Do not mix Alkaline, standard (carbon zinc), or rechargeable
(Nickel-Cadmium or NiMH) batteries.
Only batteries of the same or equivalent type as recommended
are to be used.
Batteries are to be inserted with the correct polarity.
Exhausted batteries are to be removed from the airplane.
The supply terminals are not to be short-circuited.
4CHARGING INSTRUCTIONS
Before charging your Star Blazer, be sure that
the ON/OFF switch is in the“OFF”position!
• Insertthechargerplugintothechargesocketonthesideofthefuselage
next to the ON/OFF switch.The charging unit will fit only one way, so
match the tab on the charger with the notch on the charge socket.
• Press and hold the button on the side of the charger to charge the
airplane.On the initial charge, charge your Star Blazer for 30 seconds.
For longer flights, you may increase the charge time up to 60 seconds.
Release the button to stop charging.
• When charging is complete, remove the charger from your Star Blazer.
Note: Never charge your Star Blazer for more than 60 seconds!
Charging for more than 60 seconds may result in damage to the plane’s
internal battery pack or to the charging unit.
Printed in China
Retain these instructions
for future reference
ADJUSTINGTHE FLIGHT CHARACTERISTICS OFYOUR STAR BLAZER. (MUST BE DONE BEFORE FLYING.)
FLYINGYOUR ELECTRIC FREE-FLIGHT STAR BLAZER
SAFETY RULES
• Always launch the airplane away
from people and obstacles.
• Never point the airplane at
anyone or anything.
• Always launch skyward.
• Do not launch indoors.
1. Choose an open field that is free of
trees, power lines, and other obstacles.
Grasp the fuselage of the Star Blazer
firmly and turn the power switch to “ON”.
IMPORTANT:Thejetfanwillstartspinning
as soon as the switch is turned “ON”! Be
certain that the jet fan is unobstructed;
failure to do so will damage the fan and
may cause injury.
2. Launch the Star Blazer in an overhand
motion into the wind, keeping the
wings level.
3. The Star Blazer should climb gently and
turn gradually.If itstallsandcrashesordoes
not turn, adjust the elevators and rudders.
Referto“AdjustingtheFlightCharacteristics
of your Star Blazer” for details.
IMPORTANTTHINGSTO REMEMBER
WHEN FLYINGYOUR STAR BLAZER
• Do not fly the Star Blazer in close
proximity to houses, streets, trees, or
overhead wires.
• Closely inspect your Star Blazer after
everyflight.Makesurethatthewingsare
not broken and are securely attached to
the fuselage.
• Make sure that the tail parts are not
cracked or broken.
• Always throw the Star Blazer into the
wind. Do not fly the Star Blazer if it is
too windy.
• Never charge the Star Blazer for more
than 60 seconds.It may cause damage
to either the charger or the airplane’s
internal battery.
REPAIR: If the fuselage, wings or tail are
cracked or damaged, glue them together
using white glue and reinforce them with
clear cellophane tape. Allow them to dry
completely before attempting to fly. DO NOT
USE super glue as it will damage the foam.
ATTENTION: The Star
Blazer is powered by a
rechargeable battery. At
the end of the battery’s
useful life, under various
state and local laws, it
may be illegal to disposeof the batteryinto
the municipal waste system. Check with
your local solid waste officials for details
in your area regarding recycling options or
proper disposal.
WARNING: This product contains a
chemical known to the state of California to
cause cancer.
Hobbico
Champaign, IL 61826
Before attempting to fly the FlyZone Star Blazer, it will be necessary to make adjustments or “trim the flight characteristics.The most important thing
that determines how well your Star Blazer flies is how well you have trimmed it.
• With the motor off, grasp the sides of the forward fuselage and gently toss your Star Blazer into the wind. It should glide straight ahead and settle
gently to the ground.
• If it stalls (noses up and then dives down) or just dives down, adjust the elevators as shown in the diagram.
• If it turns, adjust the rudders as shown.
A= If the model dives, equally bend both
elevators up slightly.
B= If the model stalls, bend the elevators
down slightly.
C= The correct flight path.
C Correct
A Dive
B Stall
DE
D= If the model turns left, equally bend both rudders
slightly to the right.
E= If the model turns right, equally bend both rudders
slightly to the left.
A DIVE
ELEVATOR
UP
B STALL
E RIGHTTURN
D LEFTTURN
RUDDER
RUDDER
RIGHT
RIGHT
ELEVATOR
UP
ELEVATOR
DOWN
ELEVATOR
DOWN
RUDDER
RUDDER
LEFT
LEFT

This manual suits for next models

1

Other Hobbico Toy manuals

Hobbico Superstar 40 ARF User manual

Hobbico

Hobbico Superstar 40 ARF User manual

Hobbico Flyzone Cessna 182 SKYLANE User manual

Hobbico

Hobbico Flyzone Cessna 182 SKYLANE User manual

Hobbico AQUACRAFT U-18 MISS VEGAS Installation and operating instructions

Hobbico

Hobbico AQUACRAFT U-18 MISS VEGAS Installation and operating instructions

Hobbico Husky ARF User manual

Hobbico

Hobbico Husky ARF User manual

Hobbico Sky Pilot User manual

Hobbico

Hobbico Sky Pilot User manual

Hobbico Sturdy Birdy II User manual

Hobbico

Hobbico Sturdy Birdy II User manual

Hobbico AirVista User manual

Hobbico

Hobbico AirVista User manual

Hobbico Diabolo 40 User manual

Hobbico

Hobbico Diabolo 40 User manual

Hobbico Concept 60 User manual

Hobbico

Hobbico Concept 60 User manual

Hobbico Battling Tank Ser User manual

Hobbico

Hobbico Battling Tank Ser User manual

Hobbico Hobbistar 60 MKII User manual

Hobbico

Hobbico Hobbistar 60 MKII User manual

Hobbico FLYZONE SWARM JR. User manual

Hobbico

Hobbico FLYZONE SWARM JR. User manual

Hobbico AquaCraft V24 One-Design Installation and operating instructions

Hobbico

Hobbico AquaCraft V24 One-Design Installation and operating instructions

Hobbico Ventura User manual

Hobbico

Hobbico Ventura User manual

Hobbico SWARM User manual

Hobbico

Hobbico SWARM User manual

Hobbico Bristol Bay Installation and operating instructions

Hobbico

Hobbico Bristol Bay Installation and operating instructions

Hobbico FLWA4100 User manual

Hobbico

Hobbico FLWA4100 User manual

Hobbico Ominus User manual

Hobbico

Hobbico Ominus User manual

Hobbico Revell TORNADO GR. Mk.1 RAF User manual

Hobbico

Hobbico Revell TORNADO GR. Mk.1 RAF User manual

Hobbico Hobbistar 60 Select User manual

Hobbico

Hobbico Hobbistar 60 Select User manual

Hobbico FlyZone SkySailer User manual

Hobbico

Hobbico FlyZone SkySailer User manual

Hobbico Sun Pilot Action Series User manual

Hobbico

Hobbico Sun Pilot Action Series User manual

Hobbico FLITEWORK T28-Mini User manual

Hobbico

Hobbico FLITEWORK T28-Mini User manual

Hobbico Spectrum User manual

Hobbico

Hobbico Spectrum User manual

Popular Toy manuals by other brands

FUTABA GY470 instruction manual

FUTABA

FUTABA GY470 instruction manual

LEGO 41116 manual

LEGO

LEGO 41116 manual

Fisher-Price ColorMe Flowerz Bouquet Maker P9692 instruction sheet

Fisher-Price

Fisher-Price ColorMe Flowerz Bouquet Maker P9692 instruction sheet

Little Tikes LITTLE HANDIWORKER 0920 Assembly instructions

Little Tikes

Little Tikes LITTLE HANDIWORKER 0920 Assembly instructions

Eduard EF-2000 Two-seater exterior Assembly instructions

Eduard

Eduard EF-2000 Two-seater exterior Assembly instructions

USA Trains EXTENDED VISION CABOOSE instructions

USA Trains

USA Trains EXTENDED VISION CABOOSE instructions

Modellbau Laffont Z1601 Assembly instructions

Modellbau Laffont

Modellbau Laffont Z1601 Assembly instructions

NOCH 12905 instruction manual

NOCH

NOCH 12905 instruction manual

Eduard Ki-61-Id quick start guide

Eduard

Eduard Ki-61-Id quick start guide

Viessmann Vollmer 45616 Mounting instruction

Viessmann

Viessmann Vollmer 45616 Mounting instruction

Vollmer 42004 Mounting instruction

Vollmer

Vollmer 42004 Mounting instruction

Phoenix Model CLASSIC-EP instruction manual

Phoenix Model

Phoenix Model CLASSIC-EP instruction manual

H-KING Sopwith Camel British WW1 Fighter instruction manual

H-KING

H-KING Sopwith Camel British WW1 Fighter instruction manual

MODSTER Predator 4x4 Crawler user manual

MODSTER

MODSTER Predator 4x4 Crawler user manual

DHK Hobby 8136 User instruction manual

DHK Hobby

DHK Hobby 8136 User instruction manual

THUNDER TIGER Raptor 50 V2 kit manual

THUNDER TIGER

THUNDER TIGER Raptor 50 V2 kit manual

Timberkits Skateboarder instructions

Timberkits

Timberkits Skateboarder instructions

Hangar 9 Funtana 125 Assembly manual

Hangar 9

Hangar 9 Funtana 125 Assembly manual

manuals.online logo
manuals.online logoBrands
  • About & Mission
  • Contact us
  • Privacy Policy
  • Terms and Conditions

Copyright 2025 Manuals.Online. All Rights Reserved.