Hobby Biotherm eco User manual

2
Table of content
1. Introduction ...................................................................................... 3
1.1 Display
1.2 Safety instructions
1.3 Assembly advice
2. Description of the Basic Functions .................................................. 4
2.1 Function monitoring of external devices
2.2 Safety shutdown during programming
2.3 Safeguard function
2.4 Return function
2.5 Malfunction displaying
3. Description of the Programmable Functions ................................. 5
3.1 Clock programming
3.2 Choice of HEAT / COOL mode
3.3 Temperature Programming
3.4 Nocturnal temperature programming
3.5 Temperature alarm setting
4. Quick Start Guide to Programming ................................................ 6
5. Programming Instructions ............................................................... 7
5.1 Clock programming
5.2 Choice of HEAT / COOL mode
5.3 Temperature programming
5.4 Nocturnal temperature programming
5.5 Temperature alarm setting
6. Reset ................................................................................................ 10
7. Factory Presetting ............................................................................ 11
8. Source of Fault ................................................................................. 11
9. Technical Specifications ................................................................... 11
10. EC Declaration of Conformity ....................................................... 12

3
1. Introduction
1.1 Display
= Numeric display
= Time in hours
= The time in minutes
= Temperature
= Night programming active
= Temperature alarm
= Activation or deactivation of functions
= HEAT mode
= COOL mode
= CLOCK (displayed, when starting the real time programming)
= HEAT /COOL (displayed, when choosing the temperature
operation mode)
= Temperature (displayed, when starting the temperature
programming)
=
Night (displayed, when starting the night off function programming)
1.2 Safety instructions
The HOBBY Biotherm eco is only designed for use in enclosed rooms. Should
the product be damaged, please return to your dealer to let it be repaired.
Continued operation of the device may cause fatal injury due to electric shock.
Ensure that the HOBBY Biotherm eco can not come into contact with water.
Technical products must only be operated as supplied. Electronic components
must not be modified in any way, and cables must not be shortened. Covers
or housings must not be opened. The product must not be used if damaged
or must be shut down immediately by pulling the mains plug if damage
is detected.

4
1.3 Assembly advice
Position the temperature sensor at a sufficient distance away from any sources
of heat to avoid incorrect measurement and control values.
2. Basic Functions
2.1 Function monitoring of external devices
The housing is fitted with LED. In operating mode this indicates the active
control of the external device.
2.2 Safety shutdown during programming
When entering into programming mode, the slot is deactivated for safety
reasons.
2.3 Safeguard function
To protect electronic components, a delay of 60 seconds is set between
2 switching states before the slot becomes active again.
2.4 Return function
The HOBBY Biotherm eco basic automatically returns to operating mode when
no button is pressed for a period of 90 seconds while in programming mode.
2.5 Malfunction displaying
If a sensor fault or short circuit is detected in the temperature sensor, this is
indicated by on the display. For safety reasons, the heater is deactivated
in such an even to prevent overheating the aquarium or terrarium. Despite
this safety measure, it is still advisable to use only submersion tube heaters
with integrated thermostat and safety cut-out function.

5
3. Programmable Functions
In programming mode, the functions can be configured in the following
sequence.
3.1 Clock programming
The factory presets the time at . The time setting is not cleared during a
reset however.
3.2 Choice of HEAT / COOL mode
A convenient inversion function makes it possible to switch from HEAT to
COOL. This permits connection to an external cooling device instead of a
heater to counteract an increase in temperature.
3.3 Temperature Programming
The temperature is regulated with a precision of 0.1 °C. The temperature can
be set within the range 10 °C – 60 °C.
3.4 Nocturnal temperature programming
It is possible to program two turn-on/turn-off times (allows day and night
difference) to simulate the drop in temperature at night.
3.5 Temperature alarm setting
A visual alarm is displayed when the temperature exceeds or drops below the
programmed desired value. An alarm window between +/- 0.1 °C and 10 °C
can be set. The factory setting is the value 00 (no alarm).
Example: Temperature 25 °C, alarm window +/- 3 °C means that an
alarm is triggered below 22 °C and above 28 °C.

6
4. Quick Start Guide to Programming
Single mode (manufacturer presetting): Optionally either temperature or
current time are displayed continuously.
Toggle mode: Temperature and current time are displayed alternately in a 2
second rhythm.
Changing between toggle and single mode: Press the
button.
Switching to programming mode: A) Pressing the button enters the
main programming menu.
Moving within the menu structure: B) It is possible to scroll through the
menu items with the and
buttons
Modifying programming: C) Pressing enables the modification of
programmed values, the changeable value flashes. D) Increase or decrease
required values with the and
buttons. E) Acknowledge by activating the
button.
Quitting the programming mode: F) Quitting the programming mode
and accessing the operational mode is done automatically after 90 seconds
of inactivity or by holding down the button for 3 seconds. All changed
values will be saved.
Cancelation of programming: By pressing the and
button simulta-
neously it is possible to quit the programming mode at any time without
saving.
Manual activation/deactivation: The slot can be turned on and off manu-
ally. To activate hold , then press . Press these buttons a second time
to deactivate. If you press a third time, program mode is reactivated.

7
Please note: You will find a graphical quick start
guide here: www.dohse-aquaristik.de/pdf/gebrauchs-
anweisungen/10893-10894_Biotherm_eco_Kurzan-
leitung_GB_02.pdf
5. Programming Instructions
To start the programming mode press button.
5.1 Clock programming
Entering the programming mode, flashes.
Press the button, the hours digits flashes.
Use the and
buttons to set the hours between 0 and 23.
Press the button, the minutes digits flashes.
Use the and
buttons to set the minutes between 0 and 59.
Acknowledge with the button.
When finished, will flash again. Scroll to the next main menu item with
the
button, then press the button.
Please note: Once the clock has been set, you can use
to directly
access the other settings.
Attention: The HOBBY Biotherm eco does not automatically switch
between summer time and winter time. This change must be entered
manually.

8
5.2 Choice of HEAT / COOL mode
When flashing was acknowledged with , is flashing. Confirm the
heating operation mode with or use or
until is displayed to
select the cooling operation mode.
When finished, will flash again. Scroll to the next main menu item with
the
button.
5.3 Temperature programming
When flashing was acknowledged with , or your last set value
flashes.
Use the and
buttons to set the desired temperature value between
10 °C and 60 °C. Acknowledge with button.
When finished, will flash again. Scroll to the next main menu item with
the
button, then press the button.
Please note: When no night time is programmed the temperature is
maintained over 24 hours.

9
5.4 Nocturnal temperature programming
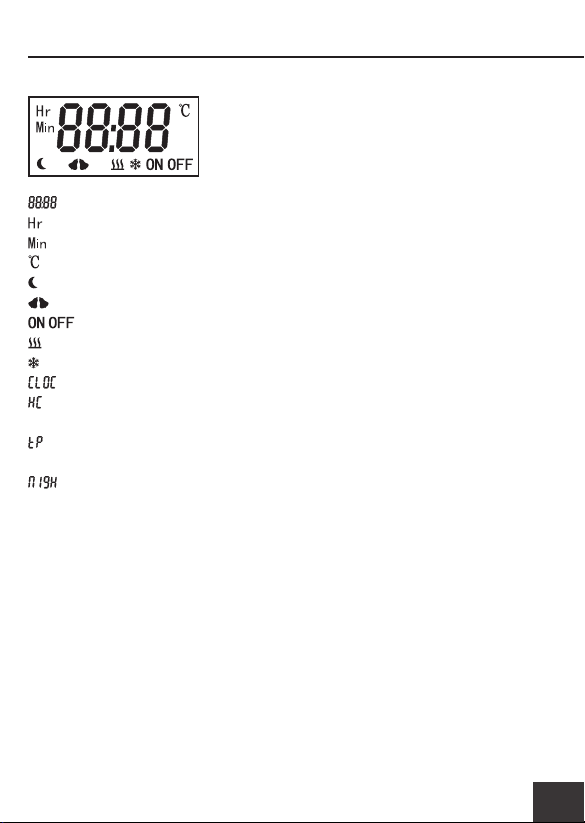
When and is flashing and you want to keep having the same tem-
perature at day and night press
button to go to the next setting.
When you wish to have a different night temperature, press . is
displayed and flashes. Use the and buttons switch the night
function from to
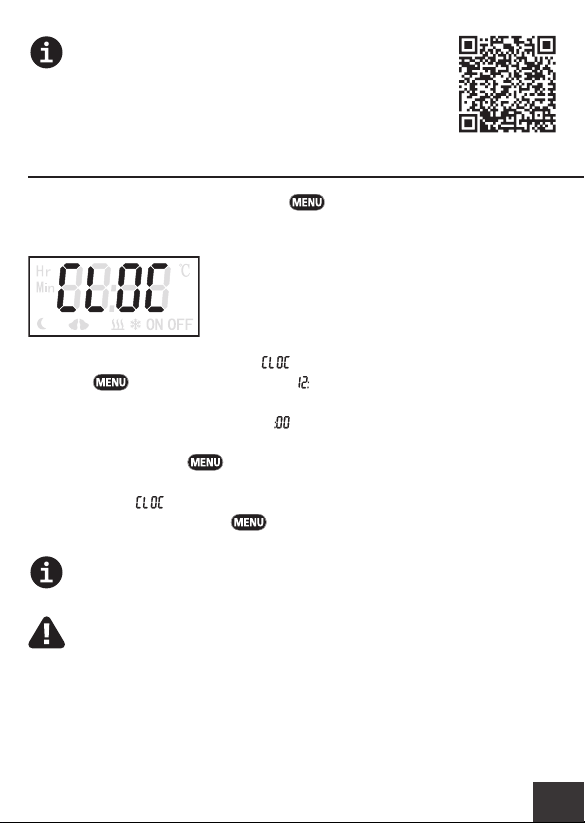
If was set and acknowledged with , the presetting value or your
last programmed value flashes in the display ( is displayed on the left, at
the right below site). Set the desired start of night time in hours with the
or
button, then acknowledge with .
Presetting value or your last programmed value flashes in the display. ( is
displayed on the left, at the right below site)Set the desired start of night
time in minutes with the or
button, then acknowledge with .
Presetting value or your last programmed value flashes in the display (
is displayed on the left, at the right below site). Set the desired end of
night time in hours with the or
button, then acknowledge with .
Presetting value or your last programmed value flashes in the display. (
is displayed on the left, at the right below site). Set the desired end of
night time in minutes with the or button, then acknowledge with .
Presetting temperature or your last programmed value flashes in the
display ( is displayed on the left, at the top right site). Set the desired
night temperature with the or
button, then acknowledge with .
Please note: When the night beginning time is reached the display
shows the measured temperature and left below.

10
When finished, will flash. Scroll to the next main menu item with the
button, then press the button.
Please note: In the same manner you can change from to as
well.
5.5 Temperature alarm setting
When flashing and was acknowledged with , or your last
set alarm temperature value flashes.
Use the and
buttons to set the +/- alarm between 0.1 °C and 10 °C.
Acknowledge with button.
Advice: means that no alarm is set.
When finished, and will flash again. To finish programming, press and
hold for 3 seconds until the display returns to operating mode.
6. Reset
Should your HOBBY Biotherm eco not function correctly, please perform a
reset:
1. Unplug from mains
2. Plug the mains plug back in while keeping the button pressed
3. Release the button
Attention: All programmed settings, except those for the clock, are
lost. The HOBBY Biotherm eco will regulate with factory’s presettings.

11
7. Factory Presetting
After the event of a power failure, the HOBBY Biotherm eco starts with the
factory presetting again.
clock setting: 12:00
single/toggle mode: single mode
temperature: 25 °C
night temperature: OFF
temperature Alarm: off
8. Source of Fault
In the case of a problem, first reset to the factory settings. If this does not
solve the problem, please search for the fault in the following table:
In the event of a warranty or repair issue, please please return to where
purchased.
9. Technical Specifications
Operating voltage: 230 V, 50 Hz
Load capacity: Max. 2,000 W (ohmic load)
Temperature display range: -9.9 °C – 99.9 °C
Temperature control range: 10 °C – 60 °C
Temperature alarm range: +/- 0.1 °C – 10 °C
(00 means ‘no alarm’)
Temperature display accuracy: 0.1 °C
Error Possible cause Solution
is displayed sensor fault or short circuit
in the temperature sensor
repair required

12
Temperature control accuracy: +/- 0.1 °C
Sensor tolerance: +/- 0.5 °C
Sensor cable length: 3 m
10. EC Declaration of Conformity
The manufacturer declares that the devices comply with the requirements of
the relevant EMC and LVD standards and are therefore in conformity with EC
directives 2004/108/EC and 2006/95/EC.

13
A trademake of Dohse Aquaristik
Aqua Cooler V2 (V4)
Cools aquaria of up to 120 l (300 l)
down by up to 4 °C. Ventilators can
be separately tilted by up to 55°.
Suitable for marine water. Inclusive
of a low voltage safety transformer.
Item nr. 10902 (10903)
Aqua Cooler Adapter
Accessory for HOBBY Aqua Cooler.
For glass panels and aquarium covers
up to 22 mm in width. Made of
marine water resistant V4A steel.
Item nr. 10904
Dohse Aquaristik GmbH & Co. KG · www.dohse-aquaristik.com

14
Elstein Radiator
Ceramic infrared dark radiator for
keeping reptiles and insects. Excep-
tionally long life of more than 8,000
operating hours. Permanently high
radiation efficiency. Insensitive to
water splashes.
60 W / 100 W / 150 W / 250 W
Item nr. 37080 / 37085 / 37090 / 37095
Thermica Premium
Heating Mat for Terraria. For ideal
ground warmth for snakes, lizards
and tortoises. With integrated safety
cut-off function. With protective
earthing and safety plug. Splash
water protected (IPX4), not for use
under water.
15 x 25 cm / 20 x 35 cm / 30 x 50 cm
Item nr. 37120 / 37121 / 37122

15Dohse Aquaristik GmbH & Co. KG · www.dohse-terraristik.com
Terra-Thermo
Waterproof heating cable for terraria
with double silicone sheath. Ideal
terrarium bed heat, e.g. for reptiles
and amphibians. Usable as daytime
heating for ground living and
nocturnal heating for tree living
species. VDE and CE tested. With
150 cm nonheatable cable. Including
suction cups.
15 W / 25 W / 50 W / 80 W
Item nr. 10925 / 10930 / 10935 / 10940
A trademake of Dohse Aquaristik
This manual suits for next models
2
Table of contents