manuals.online logo
Brands
  1. Home
  2. •
  3. Brands
  4. •
  5. Hoffrichter
  6. •
  7. Respiratory Product
  8. •
  9. Hoffrichter point 2 CPAP Reference guide

Hoffrichter point 2 CPAP Reference guide

1 Therapy tube connection
2 Humidier lock
3 Selection keys
4 Enter key
5 Display
6 ON/OFF key
7 Contact socket for humidier
(optional equipment variant)
8 Control panel for humidier
(optional equipment variant)
9 Rating plate
10 SD card slot
11 Filter or connection port for
the filtersystempoint 2
12 Air inlet for baro sensor
13 RS232 interface
14 DC power connection
HOFFRICHTER GmbH
Mettenheimer Straße 12/14
19061 Schwerin
Germany
Telephone: +49 385 39925 - 0
Fax: +49 385 39925 - 25
Email: info@hoffrichter.de
www.hoffrichter.de
point 2 kurz ENG_2019-08-09_6.0
CHANGING THE FILTER
Pull out the lter on the back of the device and replace it with a
new or cleaned one.
Always use the device with the lter element inserted and
clean the lter element regularly. If the lter element is heav-
ily soiled or not inserted, this may damage the device and
result in unpleasant odors. Removing the lter
JAB122020
Brief instructions
JAB122020
as of device software 3.400
50000519
point 2 CPAP • point 2 AUTOCPAP •
point 2 BILEVEL S20 • point 2 BILEVEL ST20 •
point 2 BILEVEL ST25 • aquapoint 2 •
powerpackpoint 2
CLEANING
Cleaning the lter
1. Pull out the lter on the back of the device.
2. Clean the lter with mild soapy water (do not use any other agents), rinse the lter thor-
oughly with clear water and let the lter dry completely.
Cleaning the mask daily
1. Disconnect the mask with the exhalation valve from the therapy tube.
2. Use mild soapy water for cleaning (do not use any other agents), rinse thoroughly with
clear water and let the mask dry completely, protected from direct sunlight.
Cleaning the therapy tube weekly
1. Disconnect the therapy tube from the device and the mask.
2.
Use mild soapy water for cleaning, rinse the tube thoroughly with clear water and let
the vertically suspended therapy tube dry completely.
Cleaning the device weekly
1. Unplug the mains plug.
2. Wipe the device with a cloth slightly moistened with soapy water and then rub dry.
Cleaning the headgear
If necessary, the headgear must be cleaned as follows:
1. Remove the headgear from the mask.
2.
Clean the headgear in accordance with the information in the headgear manufactur-
er‘s user‘s manual.
ACCESSORIES (OPTIONAL)
Therapy air humidier
aquapoint 2
Filter system
filtersystempoint 2
Battery pack
powerpackpoint 2
JAB122020
Please refer to the respective user‘s manual for further information.
TECHNICAL DATA
power supply
Main power 100 … 240 V AC, 50 ... 60 Hz/ max. 1,0 A
DC power 24 V DC / max. 2.01 A
JAB122020
COMMISSIONING
1.
Position the device according to the installation instructions
(see user‘s manual).
2. Connect the power supply to the device.
3.
Connect the mains cable to the power supply and plug into
a power socket.
4.
The device starts up and displays a welcome text, device type
and software version as well as the current number of therapy
hours and then switches to the date and time display (standby).
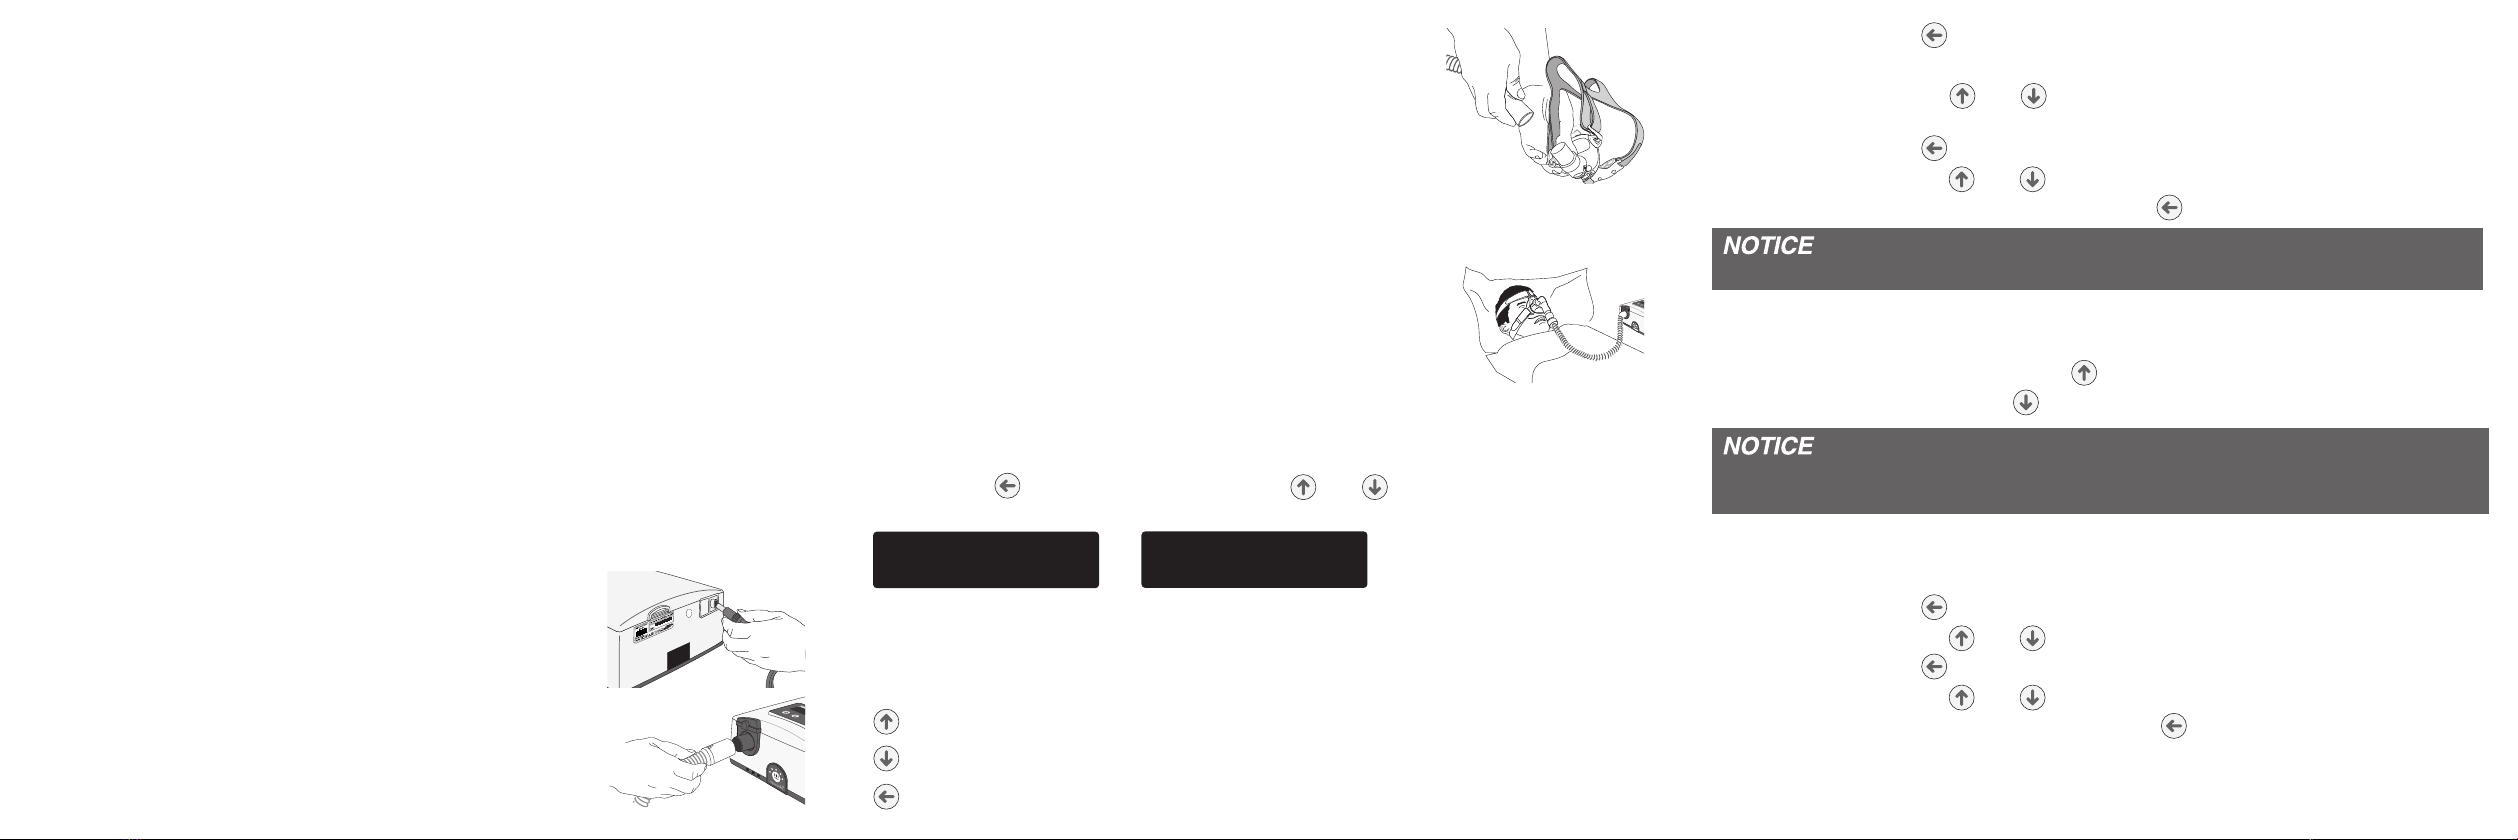
5. Connect the therapy tube
MENUS
The point 2 has a standard and a complete menu. To switch between the menus press
the enter key . Then hold the selection keys and down at the same time for a
few moments. The display shows one of the following messages:
or

 
SETTING PARAMETERS
The following 3 keys are available to set the parameters on the device:
= Selection key
= Selection key
= Enter key

 
2
5a
5b
8 + 9
1. Press the enter key for approx. 1 second.
2. If necessary, select the standard or the complete menu.
3.
Use the selection keys and to switch to the next parameter. A triangular sym-
bol> in front of a display row means that this row has been selected.
4. Press the enter key to change a selected parameter.
5. Use the selection keys and to set the desired value.
6. Conrm your setting by pressing the enter key .
Some parameters are PIN code secured and may only be changed by the physician.
SWITCHING THE WAKE UP ALARM ON AND OFF
• To activate the wake up alarm, press . A bell symbol appears on the display.
• To deactivate the alarm, press . The bell symbol disappears.
Ex factory, the alarm clock function is not enabled. But it can be unlocked by the
physician or dealer with TRENDset PC software.
SETTING THE WAKE UP TIME
1. Press the enter key for 1 second.
2. Use the selection keys and to select Wake Time.
3. Press the enter key .
4. Use the selection keys and to set the time.
5. Conrm each setting by pressing the enter key .
a) to the air outlet and
b) to the mask.
6.
Calibrate the device as described in the user‘s manual in
the chapter „Calibration“.
7. Put the mask on. If automatic mode has been selected,
the device is turned on by the patient breathing. In man-
ual mode, press the ON/OFF key to start the device.
8.
The device rst of all runs (for the time selected by
you for the mask test) at the prescribed pressure. You
should now ensure the mask‘s correct positioning to
avoid potential leakages.
9. Place the tube in such a way that it does not exert any
strain on the mask when you lie down.
10. Now breath deeply and calmly, just through your nose.
INSTALLATION REQUIREMENTS AND TRANSPORT
• Place the device near the bed on a rm, level surface.
•
Ensure that the device is in a horizontal position, especially if it is connected to a
humidier.
• Never put the device on a cupboard shelf or under the bed.
• The device and accessories must not be exposed to direct sunlight.
• No objects must be placed on the device.
•
When used as a mobile unit, it must be placed on a level, rm surface that has a raised
edge so that the device cannot fall.
•
The system with battery pack must never be stored or transported at ambient tem-
peratures under -20°C or over +45°C (up to 3 months).
•
The system without battery pack must never be stored or transported at ambient
temperatures under -25°C or over +70°C .
•
Due to electromagnetic interference, the respiratory therapy device must not be set
up in the immediate vicinity of other devices whose emissions are not CE-compliant or
where limit values are exceeded. If this is unavoidable, the respiratory therapy device
must be monitored with respect to error-free and proper operation.

This manual suits for next models

6

Other Hoffrichter Respiratory Product manuals

Hoffrichter point 2 User manual

Hoffrichter

Hoffrichter point 2 User manual

Hoffrichter CPAP User manual

Hoffrichter

Hoffrichter CPAP User manual

Hoffrichter VECTOR et Bilevel User manual

Hoffrichter

Hoffrichter VECTOR et Bilevel User manual

Hoffrichter CPAP User manual

Hoffrichter

Hoffrichter CPAP User manual

Hoffrichter Trend 300 User manual

Hoffrichter

Hoffrichter Trend 300 User manual

Popular Respiratory Product manuals by other brands

Sundstrom SR 507 User instruction

Sundstrom

Sundstrom SR 507 User instruction

MSA FIREHAWK M7 ULTRA ELITE 10084690 Maintenance and Repair

MSA

MSA FIREHAWK M7 ULTRA ELITE 10084690 Maintenance and Repair

Oxyline Oxyline X8 quick start guide

Oxyline

Oxyline Oxyline X8 quick start guide

Pari O-PEP System Instructions for use

Pari

Pari O-PEP System Instructions for use

BMC F2 user manual

BMC

BMC F2 user manual

NIOSH REX-340 User instructions

NIOSH

NIOSH REX-340 User instructions

Plusmed pM-N04 instruction manual

Plusmed

Plusmed pM-N04 instruction manual

Sundstrom SR 500 Operating	 instruction

Sundstrom

Sundstrom SR 500 Operating instruction

3M 9310 quick start guide

3M

3M 9310 quick start guide

ResMed Full Face Mask Mirage Liberty user guide

ResMed

ResMed Full Face Mask Mirage Liberty user guide

Omron NE-C801KD instruction manual

Omron

Omron NE-C801KD instruction manual

TREND AIR Original instructions

TREND

TREND AIR Original instructions

Protector Phantom PPR2000 Operating and maintenance instructions

Protector

Protector Phantom PPR2000 Operating and maintenance instructions

Pari KINDERMASKE SOFT quick start guide

Pari

Pari KINDERMASKE SOFT quick start guide

ResMed AirFit F20 user guide

ResMed

ResMed AirFit F20 user guide

Respironics Inspiration Elite instructions

Respironics

Respironics Inspiration Elite instructions

Pulmodyne BiTrac MaxShield Select 313-9524 manual

Pulmodyne

Pulmodyne BiTrac MaxShield Select 313-9524 manual

Safer 59726 instruction manual

Safer

Safer 59726 instruction manual

manuals.online logo
manuals.online logoBrands
  • About & Mission
  • Contact us
  • Privacy Policy
  • Terms and Conditions

Copyright 2025 Manuals.Online. All Rights Reserved.