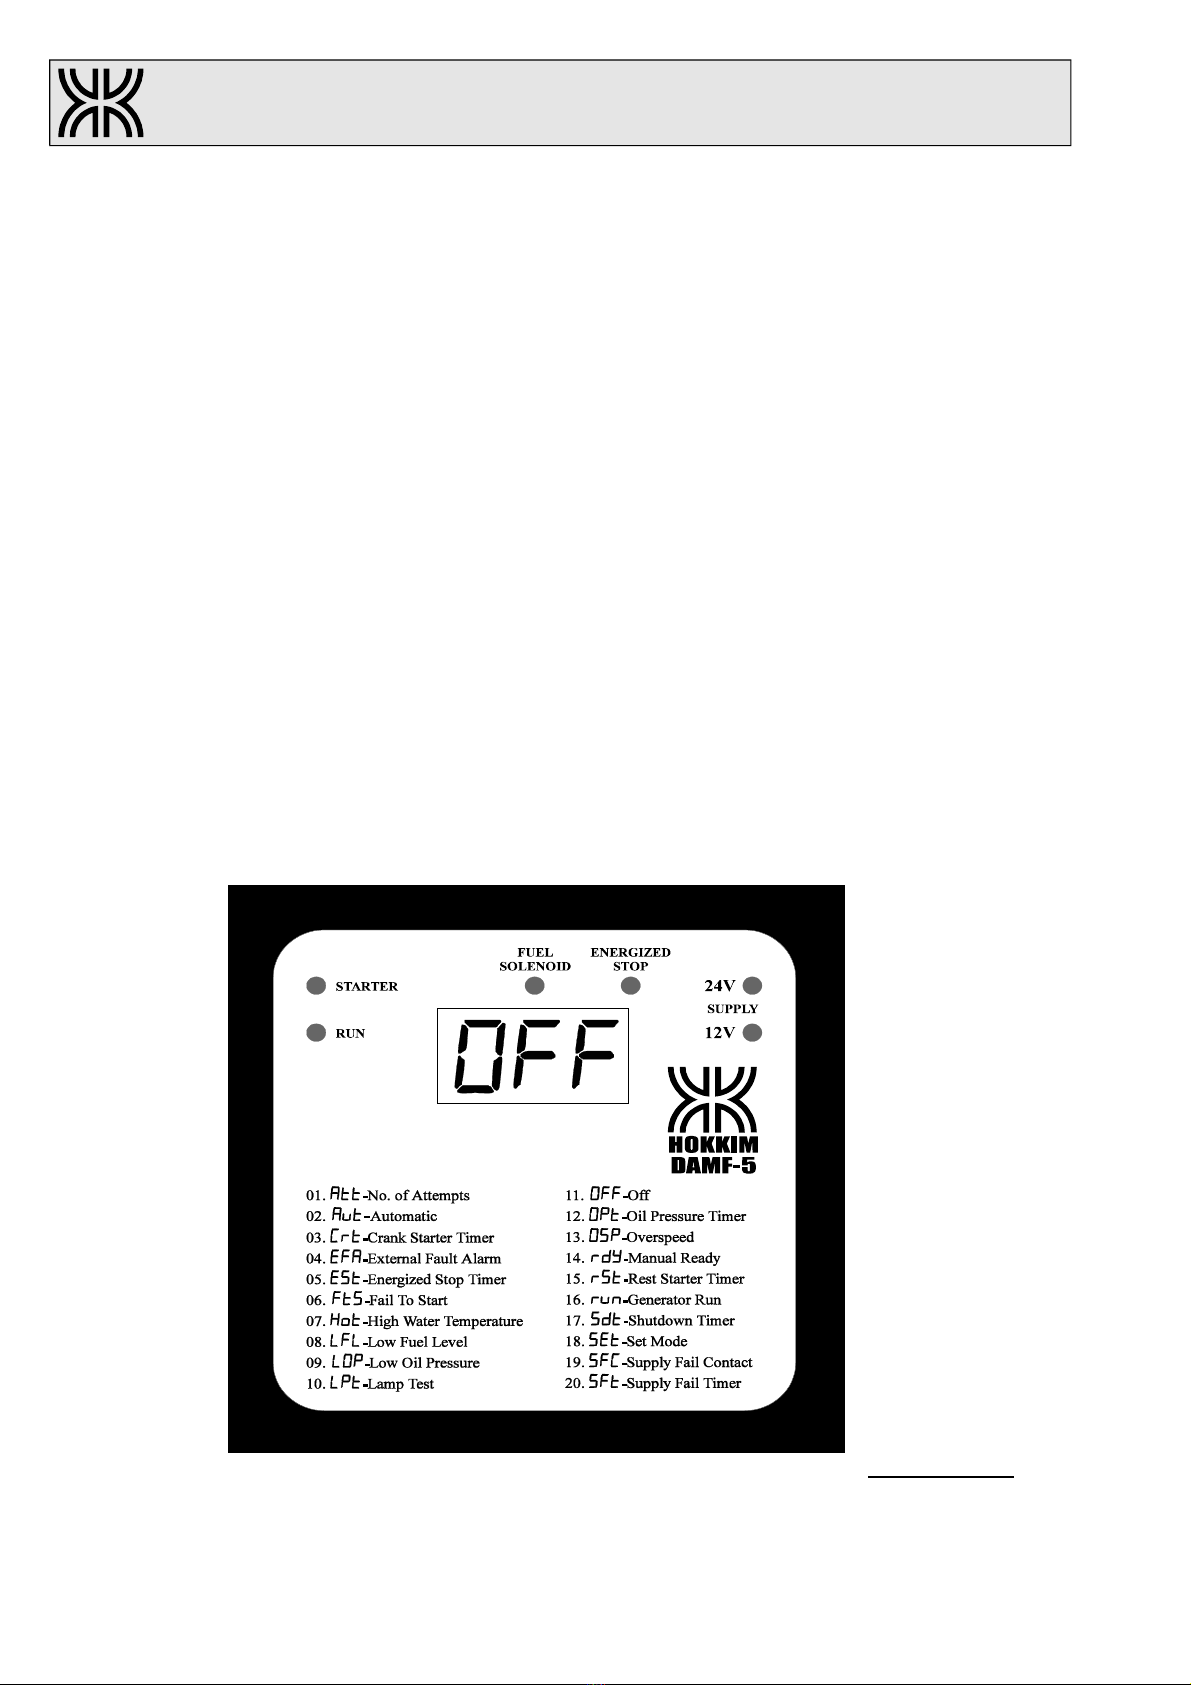
7) Fault Stimulation
Remain in the Automatic mode. Using a short wire with both ends strip of insulation, connect one
end to negative terminal T01. Touch the other end to Low Fuel Level alarm input T16. If the LFL
parameter is set to ‘0’, then the display remain at Aut but alarm bell sounds and Low Fuel Level
fault lamp flashes. If the LFL parameter is set to ‘1’, then the display flashes LFL, alarm bell
sounds and Low Fuel Level fault lamp flashes. Press and release the MFB button once to accept
the alarm. Bell is silenced and Low Fuel Level fault lamp remain lighted.
Next, touch the Over Speed alarm input T15. Notice how the display shows LFL but flashes the
OSP, the same with the fault lamps. Alarm bell sounds again. The DAMF-5 can differentiate a new
fault once the old fault was accepted. Press and release the MFB button once to accept the alarm.
Now, touch the High ater Temperature alarm input T14 follow by External Fault Alarm alarm
input T12. Notice again how the display shows LFL follow by OSP but flashes HWT and EFA,
the same with the fault lamps. HWT and EFA are treated as new faults.
Note; EFA does not have fault indicating lamp. Its fault lamp or lamps is located at the external
alarm annunciator unit which is added when the local fault indication in the DAMF-5 is
insufficient. Press and release the MFB button twice to accept and reset the alarm. The display
reverts back to Aut.
To stimulate Fail To Start, you have to prepare a jumper wire from SFC input T04 to negative.
This jumper connection can be done at the Termination Connectors side. If this test is done at site
where the gen-set is connected and ready to start, remember to switch off the Starter Control MCB.
Assuming that all parameter are set at default, to begin Fail To Start test, connect the jumper wire
to negative. The display shows the SFt count down follow by the Crt count down and rSt count
down. The Crt count down and rSt count down is repeated 6 times before Fail To Start alarm is
triggered. Notice the followings before the alarm is triggered, the Fuel Solenoid LED is lighted,
FSR relay is energized, when Crt count down begins, the Starter LED is lighted and STR relay
energizes, when rSt count down begins, the Starter LED is off and STR relay de-energizes. Once
the alarm is triggered, the display flashes FtS, alarm bell sounds and Fail To Start fault lamp
flashes. Press and release the MFB button twice to accept and reset the alarm The display reverts
back to Aut. At this stage the LOP fault cannot be tested because the gen-set did not start. LOP
fault test is only done after Automatic Run. Do not remove the SFC input T04 jumper wire.
8) Automatic Run
Remain in the Automatic mode. To stimulate Generator Run, you have to prepare another jumper
wire from GRR input T05 to negative. To begin, connect the SFC input T04 jumper to negative.
The display shows the SFt count down follow by the Crt count down. During the Crt count down,
connect the GRR input T05 to negative. The display shows the OPt count down follow by run
with the moving _. _. _. Note, the Fuel Solenoid LED is lighted. At this stage the LOP fault can be
tested. Use the negative T01 wire and touch the LOP alarm input T13. The display shows the ESt
count down, Fuel Solenoid LED off, Energize Stop LED lighted and LOP fault lamp flashes. After
count down, the Energize Stop LED is off and the display flashes LOP. Disconnect the SFC input
T04 and GRR input T05 jumper wires from negative. Press and release the MFB button twice to
accept and reset the alarm. During the ESt count down, the alarm cannot be accept or reset.
9) Automatic Shutdown
Remain in the Automatic mode. Repeat the Automatic Run until the display shows run. To begin,
disconnect the SFC input T04 jumper from negative. The display shows the Sdt count down follow
by the ESt count down. Notice, when ESt count down starts, Fuel Solenoid LED off, Energize
Page 9 of 12
HOKKIM
giving you control Control & Protection Relays