Hollyland HOLLYVIEW LARK 150 User manual

LARK 150
User Manual
V1.2.0


User Manual
ユーザーマニュアル
Manual de Usuário
Руководство пользователя
Benutzerhandbuch
Manuel d'utilisation
CONTENTS
1
14
27
40
53
66

1
Thank you for purchasing Hollyland LARK 150 wireless microphone. Please read this
instruction carefully before using the product. Wish you have a pleasant experience.
5ms Latency with up to 100m Range
2 TX & 1 RX Combo1TX & 1RX (or 2TX & 1RX) Combo Supported
2.4GHz Digital Wireless Transmission with Clear Sound Under Any Conditions
Mini Size with Lightweight, 2 Colors Options
Professional-Grade Sound Quality
Built-In Lithium Batteries, with an Ultra Long Run Time
21-Stage Digital Gain Adjustment
Contact Charging Case
In-Built Mic and LavMic Switching Automatically
Multiple Systems Using in One Location
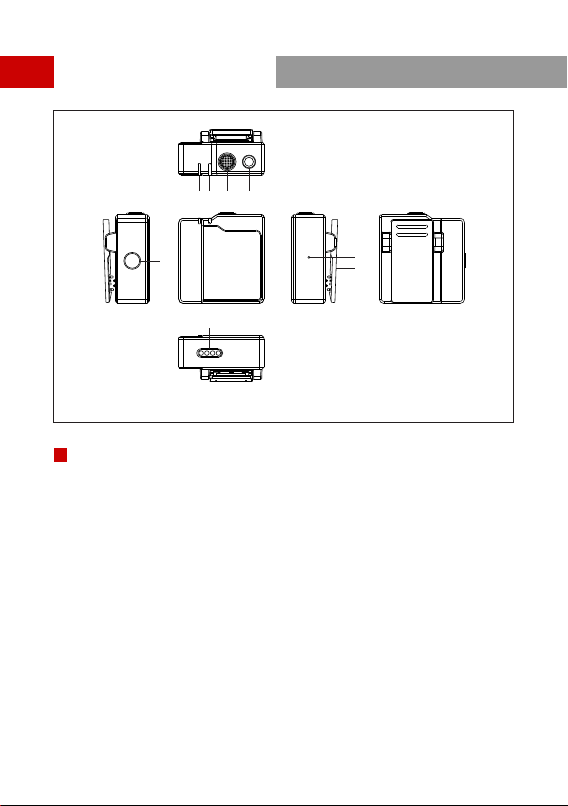
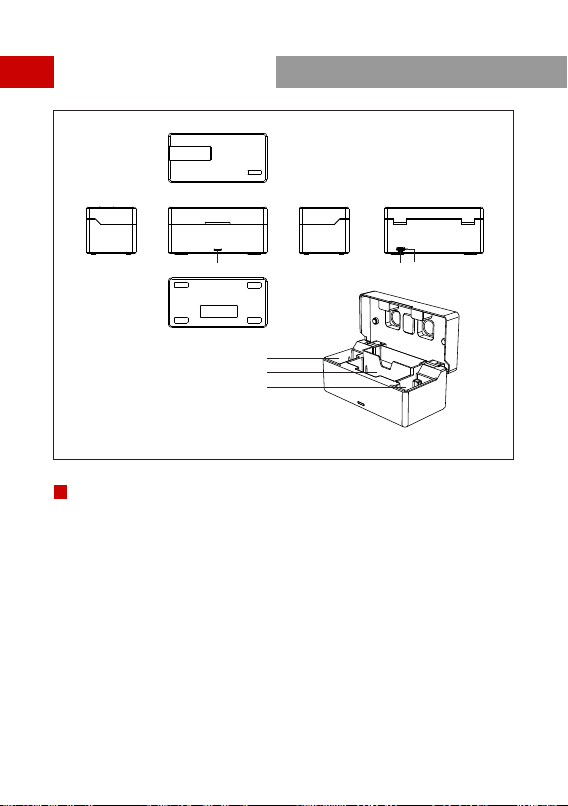
FOREWORD
KEY FEATURES

2
PACKING LIST
⑤
① ② ③
④ ⑥
⑩
⑧ ⑨⑦

3
Charging Case x1
①
Transmitter x2
②
Receiver x1
③
x2
④
3.5mm TRS Patch Cable
⑤
Furry Windshield
x1
PACKING LIST
PACKING LIST OF TWO TRANSMITTERS AND ONE RECEIVER
3.5mm TRS to TRRS Patch Cable x1
⑥
* The quantity and color depend on the exact item.
USB Type-A to Type-C Cable x1
⑦
x2
⑧
User Guide
⑨
Lavalier Microphone
x1
Storage Bag
⑩x1
Charging Case x1
①
Transmitter x1
②
Receiver x1
③
x1
④
3.5mm TRS Patch Cable
⑤
Furry Windshield
x1
PACKING LIST OF ONE TRANSMITTERS AND ONE RECEIVER
(LARK 150 SOLO)
3.5mm TRS to TRRS Patch Cable x1
⑥
USB Type-A to Type-C Cable x1
⑦
x1
⑧
User Guide
⑨
Lavalier Microphone
x1
Storage Bag
⑩x1

4
PRODUCT INTERFACES
①② ③ ④
⑤⑦
⑧
A
⑥
Power Indicator (Red: Low Battery, Green: Safe Battery Status, Orange: Charging)
①
Link Indicator (Blue/Cyan Flashing: Disconnected, Blue/Cyan: Connected,
Orange: MIC Mute)
②
In-built Microphone
③
④
Power Button (Press for 3s to Switch On/Off, Click to Mute)
⑤
3.5mm Audio Input Port
TRANSMITTER
Reset Button
⑥
⑦
Charging/Upgrade Contact
⑧
Installed Belt Clip
A

5
PRODUCT INTERFACES
B
⑦
③① ②
④ ⑤
⑥
⑩
⑨
⑪
⑧
Link Indicator (Left Channel)
①
Display Screen
②
Link Indicator (Right Channel)
③
④
Volume Knob (Right Channel): Adjust the Volume of the Right TX
/Recording Mode Switch Button: Press to Switch the Recording Mode
/Right TX Mute Button: Click to Mute the Right TX
⑤
Volume Knob(Left Channel):Adjust the Volume of the Left TX
/Recording Mode Switch Button: Press to Switch the Recording Mode
/Left TX Mute Button: Click to Mute the Left TX
RECEIVER
Power Button (Press for 3s to Switch On/Off)
⑥
⑦
Reset Button
⑧
3.5mm Headphone Monitoring Port
B
Belt Clip
⑨
⑩
Charging/Upgrade Contact
⑪
3.5mm Audio Output Port

PRODUCT INTERFACES
C
① ②
④
⑤
⑥
③
Power Indicator (Red: Low Battery,Green: Safe Battery Status,Orange: Charging)
①
USB Type-C Port for Charging
②
Reset Button
③
④
RX Charging Slot
⑤
TX Charging Slot
CHARGING CASE
TX Charging Slot
⑥
C
6

7
PRODUCT INSTALLATION
①
② ④
③
Press Power Button of TX/RX for 3s to switch on.
①
Install TX as Figure2.
②
Install RX on the Camera.
③
④Connect the 3.5mm Audio output port of RX with 3.5mm Audio input port of the
camera by 3.5mm TRS cable.
⑤Set camera’s recording volume to minimum and RX’s output volume level in middle
to ensure the best recording effect.

①Current Recording Mode of RX
②RX Battery Status
③
④Cyan TX Battery Status
Cyan TX Signal Strength Status
⑤Cyan TX Input Volume Status
⑥Blue TX Battery Status
⑦Blue TX Signal Strength Status
⑧Blue TX Input Volume Status
The TX color displayed on main display screen of RX relates to the channel switch
and recording mode, the indicators of RX represents the corresponding TX
①Identification of Charging Case
②Charging Case Battery Status (Orange: Charging, Green: Full-Charged)
③
④RX Battery Status (Orange: Charging, Green: Full-Charged)
Left TX Battery Status (Orange: Charging, Green: Full-Charged)
⑤Right TX Battery Status (Orange: Charging, Green: Full-Charged)
8
DISPLAY INTRODUCTION
A
B
DISPLAY OF RX
DISPLAY OF RX CHARGING CASE
A B
① ②
④
⑤
⑦
⑧
Stereo CASE
TX TXRX
③ ⑥
① ②
④ ⑤③

9
1.Put TX and RX into the charging case at the same time, the unpaired devices will be
paired automatically.
2.Display “√” when pair successfully.
3.Display “X”when pair failed.
OPERATING GUIDENCE
①
①PAIRING

OPERATING GUIDENCE
1.It means low battery when the power indicator or the battery icon of RX display
screen is red.
2.TX and RX will be charged when placed into charging case.
3.The indicator of TX will display orange when charging and go out after 15s. After
placed into the charging case, TX, RX and charging case's current battery status will
be displayed on the screen of RX.
4.When TX and RX are fully charged, the devices will automatically enter sleep mode.
5.When taking out or putting in TX or TX, the device will automatically wake up and
start up.
6.The indicator of charging case will display red and stop charging TX or RX when the
battery energy is less than 10%.
②CHARGING
10
②
TX TXRX
CASE
③ ④ ⑤
Stereo
Mono ST -6dB

OPERATING GUIDENCE
1.After taking out, start up and successfully paired TX and RX.
2.Long press left button for 3s to recording mode. Switch successful when the screen
displayed “Mono”.
3.At this time RX switched to mono mode, both left and right channel outputs two
audios of TX.
4.Volume of TX corresponds the indicator could be adjustable at this time by knob.
③Mono Mode
1.After taking out, start up and successfully paired TX and RX.
2.Long press left button for 3s to recording mode. Switch successful when the screen
displayed “ST”.
3.At this time RX switched to ST mode, both left and right channels output two audios
of TX, but the sound of right channel is 6dB less than left channel, in order to make
sure one of the channels is in the safe output volume.
4.Volume of TX corresponds the indicator could be adjustable at this time by the knob.
④Safety Track Mode
1.After taking out, start up and successfully paired TX and RX.
2.Long press left button/right button for 3s to recording mode. Switch successful when
the screen displayed “Stereo”.
3.At this time RX switched to Stereo mode. Left side of display screen corresponds to
left channel output, right side of display screen corresponds to right channel output.
4.Left knob controls output volume of left TX which corresponds left channel, right
knob controls output volume of right TX which corresponds right channel.
⑤Stereo Mode(Supported by 2 TX and 1 RX Set)
11
If TX and RX are not placed in the charging case and not connected, TX/RX will
automatically enter low-power consumption sleep mode after 5 minutes without any
action. Press the power button to awake and power on.
⑥Auto Sleep Mode

12
PARAMETERS
Interfaces
Wireless Mode
Built-In Mic
Lavalier Mic
Reference Audio Input Level
Polar Pattern: Omnidirectional
Frequency Response: 20Hz~20KHz
-65 dBV
Dynamic Range
Omnidirectional
Polar Pattern
21-State: 45dB
Audio Output Level Change Range
Maximum Input Sound Pressure Level 100dB SPL (1KHz@1m)
TX: 3.5mm Audio Input Port
Charging/Upgrading Contacts
RX: 3.5 mm TRS Output Interface
3.5mm Headset Interface
Charging/Upgrading Contacts
Charging Case: USB Type-C Interface
Frequency :2.4GHz AFH
Power: 10dBm MAX
Modulation: GFSK
100 dBA
Transmission Latency
Battery Mode TX: 200mAh (0.76Wh)
RX: 530mAh (1.96Wh)
Charging Case: 3350mAh (12.16Wh)
5ms
Battery Life
TX: 4h
RX: 7.5h
Charging Case: About 2.5 times (Charge 2 TX and 1 RX
at the Same Time in Full Charged States)
Charging Time@25℃
TX: 45mins
RX: 65mins
Charging Case: 2.5h
(Charge TX/RX first, then charge the charging case)
Firmware Upgrade Method PC
Dimensions
TX: (L*W*H) 37*37*17.5mm
RX: (L*W*H) 67*41*20.5mm
Charging Case: (L*W*H) 121*61*43.5mm
Weight
TX: 20.5g
RX: 51g
Charging Case: 227.5g
Polar Pattern: Omnidirectional
Frequency Response: 20Hz~20KHz

14
はじめに
製品の特徴
ワイヤレスマイク⾳声送信デバイスをご購⼊いただき、ありがとうございます。製品を
ご使⽤になる前に、この説明書をよくお読みください。ご体験をお楽しみください。
伝送距離:100メートル
5msの伝送遅延
⼀対⼀と⼆対⼀の接続パターンがサポートする
新しい2.4 GHzデジタルワイヤレストランス伝送により、あらゆる状況でクリーンな
⾳声を伝送
体積はコンパクトで、軽く、黒・⽩カラーオプション
プロフェッショナルのワイヤレス⾳声伝送指標
内蔵リチウム電池で⻑時間の使⽤が可能
カメラまたはレコーダーへの最適出⼒に対応する21の出⼒ギア
収納ケースを配置して収納、充電を簡単にする
内蔵⻨と外付け⻨の切り替えに対応
同じ環境で複数のデバイスを使⽤可能

15
内容リスト
⑤
① ② ③
④ ⑥
⑩
⑧ ⑨⑦

16
内容リスト
TX送信機
x1
①
RX受信機
x2
②
収納箱
x1
③
x2
④
3.5TRS-3.5TRS⾳声ウェア
⑤
防⾵カバー
x1
x1
⑥3.5 TRSをTRRSに転換するオディオンケーブル
* 数量と⾊は正確なアイテムによって異なります。
1対2包装明細書
x1
⑦
全指向性の襟元マイクロ
⑧
USB Type-A-Type-C接続ウェア
x2
取扱説明書
⑨x1
収納袋
⑩x1
TX送信機
x1
①
RX受信機
x1
②
収納箱
x1
③
x1
④
3.5TRS-3.5TRS⾳声ウェア
⑤
防⾵カバー
x1
x1
⑥3.5 TRSをTRRSに転換するオディオンケーブル
⼀つ配送⼀つ受取包装リスト(Lark 150 Solo)
x1
⑦
全指向性の襟元マイクロ
⑧
USB Type-A-Type-C接続ウェア
x1
取扱説明書
⑨x1
収納袋
⑩x1

各部の名称
17
①② ③ ④
⑤⑦
⑧
A
⑥
①電源LED(⾚:低電⼒、緑:安全、オレンジ:充電)
②デバイス接続LED(⻘/グリーン点滅:未接続、⻘/グリーン点灯:接続済み、オレンジ常
時点灯:MICミュート)
③
④3.5mm⾳声輸⼊インターフェース
内蔵マイク
送信機
A
⑤電源スイッチ(3秒間⻑押ししてオン/オフ;クリックしてミュート)
⑥リセットキー
⑦取り付けのバッククリップ
⑧充電/アップグレード接点
Other manuals for HOLLYVIEW LARK 150
6
Table of contents
Languages:
Other Hollyland Microphone manuals
Popular Microphone manuals by other brands

Revolabs
Revolabs REVOLABS SOLO 02-DSKSYS Installation and operation manual

AKG
AKG C 1000 S - PPC 1000 & PB 1000 User instructions

Shure
Shure KSM9HS user manual

Neumann.Berlin
Neumann.Berlin M 147 Tube operating instructions

Electro-Voice
Electro-Voice 205C Specification sheet

Sterling
Sterling PERFORMANCE Series owner's manual