Hollyland HOLLYVIEW LARK 150 User manual

LARK 150
Quick Start Guide
V1.0.0

Contents
LARK 150 ................................................................. 1
Quick Start Guide ...................................................... 1
INTRODUCTION ........................................................... 3
KEY FEATURES ........................................................... 3
PACKING LIST ........................................................... 3
PRODUCT INTERFACES ..................................................... 5
PRODUCT INSTALLATION ................................................... 7
DISPLAY INTRODUCTION ................................................... 8
OPERATING GUIDENCE ..................................................... 9
PARAMETERS ............................................................ 11
FAQ ................................................................... 13
WARNING ............................................................... 14
SUPPORT ............................................................... 14

INTRODUCTION
Thank you for purchasing Hollyland LARK 150 wireless microphone. LARK 150
is the original dual-transmitters wireless microphone system made perfectly
for 2-person mode content creation applications. Building on its wireless
video transmission and intercom systems expertise, the LARK 150 is
Hollyland's first 2.4 GHz digital wireless microphone system. Featuring an
ultra-compact, clip-on design system, it offers an ever-reliable,
professional sound quality that's ideal for vlogging, YouTube
presentations, commercials, live streaming, and other video content.
KEY FEATURES
5ms Latency with up to 100m Range
2 TX & 1 RX Combo(or 1TX & 1RX Combo) Supported
2.4GHz Digital Wireless Transmission with Clear Sound Under Any
Conditions
Mini Size with Lightweight, 2 Colors Options
Professional-Grade Sound Quality
Built-In Lithium Batteries, with an Ultra Long Run Time
21-Stage Digital Gain Adjustment
Contact Charging Case
In-Built Mic and LavMic Switching Automatically
Multiple Systems Using in One Location
PACKING LIST

PACKING LIST OF TWO TRANSMITTERS AND ONE RECEIVER
①Charging Case X1
②Transmitter X2
③Receiver X1
④Furry Windshield X2
⑤3.5mm TRS Patch Cable X1
⑥3.5mm TRS to TRRS Patch Cable X1
⑦Lavalier Microphone X2
⑧USB Type-A to Type-C Cable X1
⑨User Guide X1
⑩Storage Bag X1

PACKING LIST OF ONE TRANSMITTER AND ONE RECEIVER(Lark 150 Solo)
①Charging Case X1
②Transmitter X1
③Receiver X1
④Furry Windshield X1
⑤3.5mm TRS Patch Cable X1
⑥3.5mm TRS to TRRS Patch Cable X1
⑦Lavalier Microphone X1
⑧USB Type-A to Type-C Cable X1
⑨User Guide X1
⑩Storage Bag X1
PRODUCT INTERFACES
A:TRANSMITTER
①Power Indicator(Red: Low Battery, Green: Safe Battery Status, Orange:
Charging)
②Link Indicator(Blue/Cyan Flashing: Disconnected, Blue/Cyan: Connected,
Orange: MIC Mute)
③In-built Microphone
④3.5mm Audio Input Port
⑤Power Button (Press for 3s to Switch On/Off, Click to Mute)
⑥Reset Button
⑦Installed Belt Clip

⑧Charging/Upgrade Contact
B:RECEIVER
①Link Indicator (Left Channel)
②Display Screen
③Link Indicator(Right Channel)
④Volume Knob(Left Channel):Adjust the Volume of the Left TX
/Recording Mode Switch Button: Press to Switch the Recording Mode
/Left TX Mute Button: Click to Mute the Left TX
⑤Volume Knob (Right Channel): Adjust the Volume of the Right TX
/Recording Mode Switch Button: Press to Switch the Recording Mode
/Right TX Mute Button: Click to Mute the Right TX
⑥Power Button (Press for 3s to Switch On/Off)
⑦3.5mm Headphone Monitoring Port
⑧Reset Button
⑨Belt Clip
⑩3.5mm Audio Output Port
⑪Charging/Upgrade Contact

C:CHARGING CASE
①Power Indicator(Red: Low Battery, Green: Safe Battery Status, Orange:
Charging)
②USB Type-C Port for Charging
③Reset Button
④TX Charging Slot
⑤RX Charging Slot
⑥TX Charging Slot
PRODUCT INSTALLATION

①Press Power Button of TX/RX for 3s to switch on.
②Install TX as Figure2.
③Install RX on the Camera.
④Connect the 3.5mm Audio output port of RX with 3.5mm Audio input port
of the camera by 3.5mm TRS cable.
⑤Set camera’s recording volume to minimum and RX’s output volume level
in middle to ensure the best recording effect.
DISPLAY INTRODUCTION
A:Display of RX
①Current Recording Mode of RX
②RX Battery Status

③Cyan TX Signal Strength Status
④Cyan TX Battery Status
⑤Cyan TX Input Volume Status
⑥Blue TX Battery Status
⑦Blue TX Signal Strength Status
⑧Blue TX Input Volume Status
The TX color displayed on main display screen of RX relates to the channel
switch and recording mode, the indicators of RX represents the
corresponding TX
B:DISPLAY OF RX CHARGING CASE
①Identification of Charging Case
②Charging Case Battery Status (Orange: Charging, Green: Full-Charged)
③Left TX Battery Status (Orange: Charging, Green: Full-Charged)
④RX Battery Status (Orange: Charging, Green: Full-Charged)
⑤Right TX Battery Status (Orange: Charging, Green: Full-Charged)
OPERATING GUIDENCE
① PAIRING

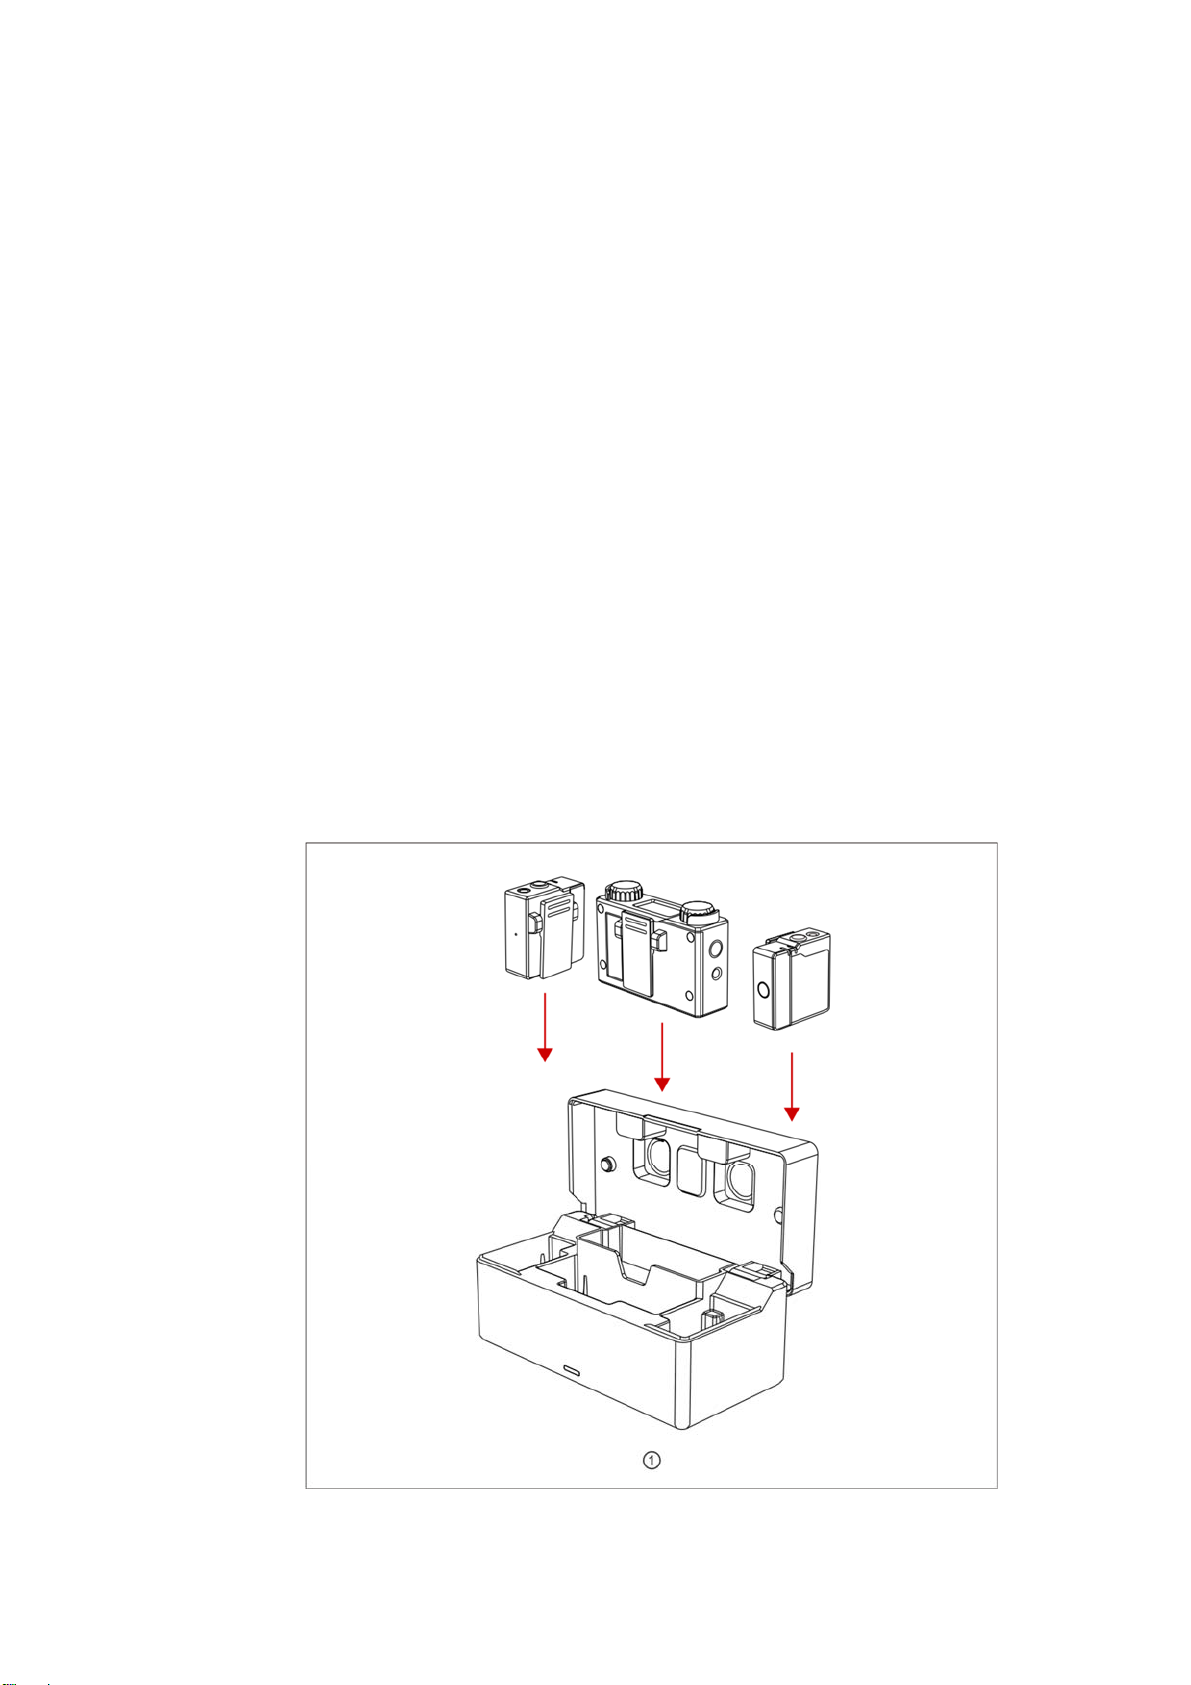
1. Put TX and RX into the charging case at the same time, the
unpaired devices will be paired automatically.
2. Display “√” when pair successfully.
3. Display “X” when pair failed.
② CHARGING
1. It means low battery when the power indicator or the battery
icon of RX display screen is red.
2. TX and RX will be charged when placed into charging case.
3. The indicator of TX will display orange when charging and go
out after 15s. After placed into the charging case, TX, RX
and charging case’s current battery status will be
displayed on the screen of RX.
4. When TX and RX are fully charged, the devices will
automatically enter sleep mode.
5. When taking out or putting in TX or TX, the device will
automatically wake up and start up.
6. The indicator of charging case will display red and stop
charging TX or RX when the battery energy is less than 10%.
③ Mono Mode
1. After taking out, start up and successfully paired TX and
RX.
2. Long press left button/right button for 3s to recording
mode. Switch successful when the screen displayed “Mono”.
3. At this time RX switched to mono mode, both left and right
channel outputs two audios of TX.

4. Volume of TX corresponds the indicator could be adjustable
at this time by knob.
④ Safety Track Mode
1. After taking out, start up and successfully paired TX and
RX.
2. Long press left button/right button for 3s to recording
mode. Switch successful when the screen displayed “ST”.
3. At this time RX switched to ST mode, both left and right
channels output two audios of TX, but the sound of right
channel is 6dB less than left channel, in order to make sure
one of the channels is in the safe output volume.
4. Volume of TX corresponds the indicator could be adjustable
at this time by the knob.
⑤ Stereo Mode (Supported by 2 TX and 1 RX Set)
1. After taking out, start up and successfully paired TX and
RX.
2. Long press left button/right button for 3s to recording
mode. Switch successful when the screen displayed
“Stereo”.
3. At this time RX switched to Stereo mode. Left side of
display screen corresponds to left channel output, right
side of display screen corresponds to right channel output.
4. Left knob controls output volume of left TX which
corresponds left channel, right knob controls output volume
of right TX which corresponds right channel.
⑥ Auto Sleep Mode
If TX and RX are not placed in the charging case and not
connected, TX/RX will automatically enter low-power consumption
sleep mode after 5 minutes without any action. Press the power
button to awake and power on.
PARAMETERS
Interfaces TX: 3.5mm Audio Input Port

Charging/Upgrading Contacts
RX:3.5 mm TRS Output Interface
3.5mm Headset Interface
Charging/Upgrading Contacts
Charging Case:USB Type-C Interface
Wireless Mode Frequency :2.4GHz AFH
Power: 10dBm MAX
Modulation: GFSK
Built-In Mic Polar Pattern: Omnidirectional
Frequency Response: 20Hz~20KHz
Lavalier Mic Polar Pattern: Omnidirectional
Frequency Response: 20Hz~20KHz
Reference Audio Input Level -65 dBV
Maximum Input Sound Pressure Level 100dB SPL(1KHz@1m)
Dynamic Range 100 dBA
Polar Pattern Omnidirectional
Audio Output Level Change Range 21-State: 45dB
Transmission Latency 5ms
Battery Mode TX: 200mAh(0.76Wh)
RX: 530mAh(1.96Wh)
Charging Case: 3350mAh(12.16Wh)
Battery Life TX: 4h
RX: 7.5h
Charging Case: About 2.5 times
(Charge 2 TX and 1 RX at the Same Time in Full Charged
States)
Charging Time@25℃ TX: 45mins
RX: 65mins
Charging Case: 2.5h
(Charge TX/RX first, then charge the charging case)
Firmware Upgrade Method PC
Dimensions TX: (L*W*H)37*37*17.5mm
RX: (L*W*H)67*41*20.5mm
Charging Case: (L*W*H)121*61*43.5mm
Weight TX: 20.5g
RX: 51g
Charging Case: 227.5g
Life Time 3 Years

FAQ
1. What are the different of three mode?
Mono mode: The audio output in RX has not relation with the right/left channel,
the sound is a mixture of TX1 and TX2.
Stereo Mode: The audio output in RX is stereo, TX1 output left channel, TX2
output right channel, The sound in both channel is different.
Safe Audio Track Mode: For the audio output in RX, in the left channel, the
audio is mix up of TX1 and TX2, in the right channel is TX2 minus 6dB add TX1.
2. What is the safe audio track mode function?
In the different cameras, the volume of the microphone input is different, if the
volume exceeding a level, that will cause the audio broken, and the audio material
can not be used (In the Post editing software, the low volume has a chance to turn
up, but if the audio is broken, we have no way to repair it). The safe audio track mode
provides a reliable guarantee, we can use the audio in the right channel to replace
the damaged part of audio in the left channel by the post-editing software.
3. How long does the wireless microphone with full power can be used? How
long will it take for the device to be fully charged?
TX: working time 4.5h, Fully charged for 1.2h
RX: working time 7.5h, Fully charged for 1.5h
Storage Box: charge 2.5 times for 2 TX add 1RX, Fully charged around 2.5h
The two transmitters can be used in turn, the device starts charging when you push it
into the storage box.
4. How to check the surplus power on the charge box?
The RX and TX will turn off and charge automatically when you push them
into storage box.
Pressing the knob of receiver, the surplus power of TX1/TX2/RX and storage
box will display on the screen.
5. How to pair wireless microphone?
First, confirming the RX and TX are on, then the device will be pair automatically
when you push both of them into the storage box.
6. How to upgrade wireless microphone?
Push both of RX and TX into storage box, then using Type-C cable to connect the
device and computer.

WARNING
Do not place the devices in the accessories or inside of Heating Equipment, Cooking
equipment, High-Pressure Containers, etc. (Such as Microwave Ovens, Induction
Cookers, Electric Ovens, Electric Heaters, Pressure Cookers, Water Heaters, Gas
Stoves, etc.) to prevent the battery from overheating and exploding. The Charger,
data cable and battery of the original matching model must be used. Using chargers,
data Cables, and batteries that are not certified by the manufacturer or of non-
matching models may cause Electric Shock, Fire, Explosion, or Other Dangers.
SUPPORT
If encounter any problems in using the product or need any help, please help these
ways to get more technical support:
Other manuals for HOLLYVIEW LARK 150
6
This manual suits for next models
2
Table of contents
Other Hollyland Receiver manuals