Hollyland LARK MAX User manual

LARK MAX
User Manual
V1.0.0


EN-3
Introduction
Thank you for purchasing Hollyland LARK MAX wireless microphone system.
Please read this User Manual carefully before using the product.

EN-4
●Extremely compact, portable design
●2 TX + 1 RX and 1 TX + 1 RX modes
●Multiple LARK MAX systems working together in the same environment with
frequency hopping technology
●Built-in lithium battery with ultra-long operating time
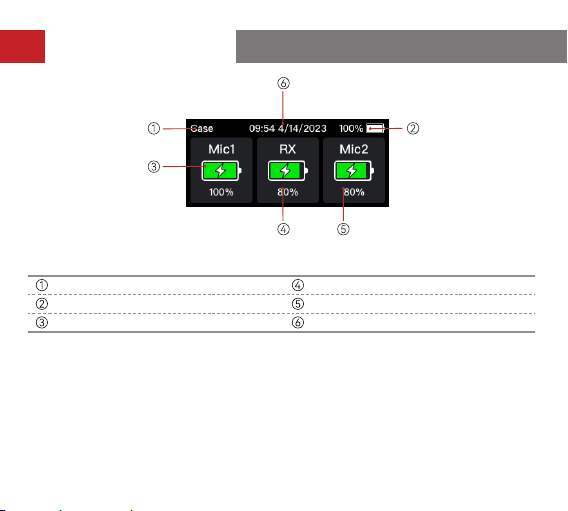
●Charging case for storage and charging
●Automatic switch to the external microphone
●Professional-level wireless audio specifications
●Environmental Noise Cancellation (ENC) technology on the transmitter to
eliminate environmental noise
●2.4GHz digital wireless transmission to deliver crystal-clear sound
●Transmitter capability of working as a standalone recorder, with 8GB of built-in
storage
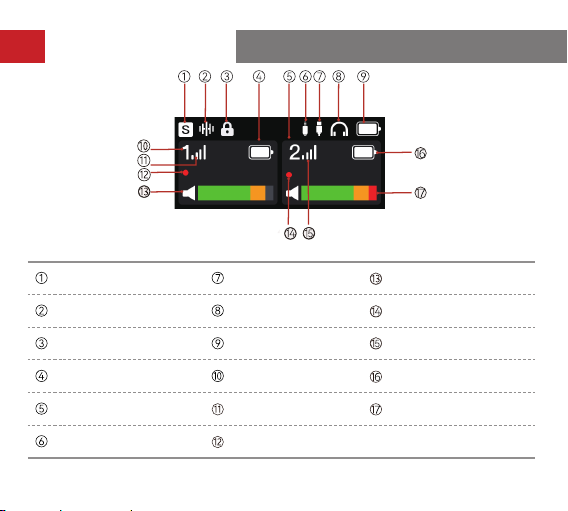
●AMOLED touchscreen on the receiver to display recording status, wireless
information, and more
Key Features

EN-5
A: Transmitter
①
④
⑤
⑦
⑧
⑥
⑦
⑧
⑨
⑩
⑥
②
③
Built-in Microphone
REC Button
REC Indicator
Back Clip
Status Indicator
3.5mm Audio Input
Interface
Power Button
Pairing/Noise
Cancellation Button
USB-C Interface
Contacts
Interface Description

EN-6
②
③
④⑦
⑧
⑨
⑥
①
⑤
B: Receiver
On-Screen Home Button
AMOLED Touchscreen
Control Knob
3.5mm TRS Headphone
Interface
USB-C Interface
Back Clip
Power/Screen Lock
Button
3.5mm TRS Audio Output
Interface
Contacts
Interface Description

EN-7
Charging Case Battery
Level Indicator
USB-C Interface
Transmitter 1 Charging/
Storage Slot
Receiver Charging/
Storage Slot
Transmitter 2 Charging/
Storage Slot
Transmitter 1 Charging
Indicator
Receiver Charging
Indicator
Transmitter 2 Charging
Indicator
C: Charging Case
Interface Description

EN-8
A: Receiver Main Interface (Outside the Charging Case)
Recording Mode USB Connection Transmitter 1 Input
Volume
Noise Cancellation
Status
Headphone
Connection Transmitter 2 Recording
Screen Lock Status Receiver Battery
Level
Transmitter 2 Signal
Strength
Transmitter 1 Battery
Level
Transmitter 1
Identifier
Transmitter 2 Battery
Level
Transmitter 2 Identifier Transmitter 1 Signal
Strength
Transmitter 2 Input
Volume
3.5mm Audio Output
Connection
Transmitter 1
Recording
Display Description

EN-9
Display Description
B: Receiver Main Interface (in the Charging Case)
The Receiver Is in the Charging Case Receiver Battery Level
Charging Case Battery Level Transmitter 2 Battery Level
Transmitter 1 Battery Level Date & Time

EN-10
Display Description
C: Receiver Output Volume Interface
Output Volume on the Left
Channel
Output Volume on the Right
Channel
Left Channel in Stereo Mode Output Volume Bar on the Right
Channel
Output Volume Bar on the Left
Channel Right Channel in Stereo Mode
Settings: To enter the receiver output volume interface from the main interface,
simply rotate the control knob. You can adjust the output volume on the left or right
channel by rotating the control knob or tapping on the touchscreen.

EN-11
Display Description
D: Receiver Quick Settings Interface
Quick Settings Interface for
Transmitter 1 Mute Switch
ENC Switch Recording Switch
Settings: To enter the quick settings interface for transmitter 1 from the main
interface, simply tap the on-screen home button. You can switch between the
functions on the quick settings interface by rotating the control knob or tapping
the function icons. To enter the quick settings interface for transmitter 2, simply
rotate the control knob to the right. To return to the main interface, simply tap the
on-screen home button again.

EN-12
Display Description
E: Receiver Menu Interface
Settings: Press the control knob to enter the menu interface from the main
interface. Rotate the control knob or tap on the touchscreen to select a menu,
and then press the control knob or tap the menu to enter its sub-menu interface.
To return to the previous interface, simply tap the on-screen home button.

EN-13
Transmitter Status Indicator
Pattern Description
Blue light flashing quickly Pairing
Blue light flashing slowly Disconnected from the receiver
Steady blue light Connected to the receiver
Steady green light ENC ON & Connected to the receiver
Green light flashing slowly ENC ON & Disconnected from the receiver
Steady pink light Upgrading
Red and blue lights flashing quickly
and alternately Malfunctioning
Steady red light Mute ON
Breathing red light flashing Low battery
Breathing orange light, returning to
the previous state after 5 seconds Power ON & Charging
Breathing orange light Power OFF & Charging
Steady orange light Power OFF & Fully charged
Indicator Description

EN-14
Indicator Description
Transmitter REC Indicator
Pattern Description
Steady red light Recording
Light OFF Not recording
Charging Case Indicator
Pattern Description
One light outside the charging case
flashing when the charging case is
connected via USB
Charging case in charging mode
Four steady lights outside the charging
case Charging case fully charged
Breathing light inside the charging case Transmitter/Receiver in charging
mode
Steady light inside the charging case Transmitter/Receiver fully charged

EN-15
Pattern Battery Level
One LED ON, flashing red
Low battery. The transmitter and the
receiver cannot be charged using the
charging case.
One LED ON 25%
Two LEDs ON 50%
Three LEDs ON 75%
Four LEDs ON 100%
Indicator Description

EN-16
Receiver Menu Description
Press the control knob to enter the menu interface from the main interface.
The menu operations are as follows:
1. Select REC Mode to set the receiver output mode.
a. Stereo
b. Mono
c. Safety Track
2. Select Mic Settings to set the transmitter parameters.
a. Mic Gain: Press the control knob or tap to adjust the transmitter input gain.
b. Auto Record: The default value is OFF. If Auto Record is set to ON, the
transmitter will automatically start internal recording when it is turned on.

EN-17
c. Auto OFF: The default value is 15min, indicating that the transmitter will
automatically turn off when it is not paired with the receiver and there
is no operation of it within 15 minutes. If Auto OFF is set to Never, the
transmitter will not turn off automatically.
d. LED Brightness: The default value is Normal. It allows you to set the
brightness of the transmitter status indicator light. You can set it to Low as
required.
e. Storage: Press the control knob or tap to view the remaining recording
time of the transmitter and format the transmitter storage (when the
storage is full, the earliest recording file will be automatically deleted).
3. Select Phone Speaker to set whether audio can be played on the phone
speaker without unplugging the receiver from the mobile phone.
a. OFF: Audio play on the phone speaker is disabled.
b. ON: Audio can be played on the phone speaker without unplugging the
receiver from the mobile phone.
4. Select EQ to configure audio settings.
a. Hi-Fi: Select this mode to ensure Hi-Fi audio pickup with high restoration.
b. Low Cut: Select this mode to filter low-frequency sound.
c. Vocal Boost: Select this mode to increase voice intelligibility.
Receiver Menu Description

EN-18
5. Select System Settings to configure system settings.
a. Pairing: Press the control knob or tap to set the receiver to pairing mode.
b. Brightness: Press the co.ntrol knob or tap to adjust the brightness of the
receiver touchscreen.
c. Upgrade Mode: Press the control knob or tap to activate the device
upgrade process.
d. Date: Press the control knob or tap to set the date for the receiver.
The settings will be synchronized to the connected transmitter.
e. Time: Press the control knob or tap to set the time for the receiver.
The settings will be synchronized to the connected transmitter.
f. Language: Press the control knob or tap to set the device language to
English or Chinese.
g. Factory Reset: Press the control knob or tap to reset the device to the
default settings.
h. Version Info: Press the control knob or tap to check the receiver firmware
version, connected transmitter firmware version, and SN.
Receiver Menu Description

EN-19
Operation Instructions
The preferred position for attaching the transmitter is the collar near the speaker's neck
area. If the speaker's voice is louder, position the transmitter in the upper chest area.
The transmitter can be attached via its back clip or the clip magnet.
Note: Placement of the transmitter in different positions will result in recorded sound
volume fluctuations. Avoid any obstructions of the transmitter during recording. It is
recommended to use the furry windshield to prevent audio interference when using the
transmitter outdoors.

EN-20
Connecting the Receiver to an iPhone
1. Connect the receiver to an iPhone using a USB-C to Lightning cable.
2. A USB connection icon will be displayed on the receiver touchscreen.
3. Open the recorder or camera app on the mobile phone to start recording.
Operation Instructions
Other manuals for LARK MAX
2
Table of contents
Languages:
Other Hollyland Receiver manuals