Holux GPSPORT 260 PRO User manual

GPSport 260 Pro Quick Guide
1. Unit Overview
Buttons
Name Icon unction
Power button
Press to pause logging when the
device is turned on; press to resume
logging when the device is paused.
Press for 3 seconds to turn on/off
the unit.
Backlight
Exit
Press for 3 seconds to turn on/off
the backlight.
Exit to previous level of menu
5 Direction
OK
Use Left, Up, Right, and Down to
select an option.
Press the OK button to confirm
input.
2. Installing Bike Mount
(1)
Attach the bracket to the bracket holder.
(2)
Thread the two cable ties through the slots of the bracket holder.
(3)
Place the rubber pad under the bike mount and attach the bike mount securely to the bike stem
using the two cable ties.
(4)
Slide in the GPS on top of the bike mount until it snaps into place
3. Initial Setup
Users will be prompted with the Initial Setup for the first time use of GPSport 260 Pro. Use the 5 direction
button to select your preference for LCD contrast, language, unit, and time zone.
If the GPSport 260 Pro is reset, the Initial Setup will automatically prompt when users turn on the device.
4. Basic Operation/ Sport Mode
Once the device is turned on, the main menu appears. Select Sport Mode and the default first page for
Sport Mode appears Speed Meter. You are now on the Sport Page and the device is ready for use with the
basic function.
Main Menu Sport Mode Sport Page
The Sport Mode displays sport information including analog speed meter, speed, grade, barometer/GPS
altitude, clock, trip time, distance, calories consumed, CO2 reduced, tree (reserved), odometer, pace, total
ascend/descend, coordinate and heading. Press the 5 way button left and right to switch among
different sub pages for different sport information. For detail, please refer to the user manual saved in the
Tool CD that came with this device.
5. Auto-Start Logging
The GPSport 260 Pro is set to automatically log your track once it is
turned on and when GPS fix is acquired. To pause logging during
activity, just press the Power button. The icon “ ” will be
replaced by pause icon “ ”.
6. Quick Menu
Press and concurrently, the quick menu appears for fast
setup including: enter Main Menu, Save POI, Pause Log, Save &
Clear (log), and QR Code, Lock Keys and Activate 2.4G.
NOTES
1. Barometer calibration is set to automatically perform by default. Users can perform the barometer
calibration manually. Please refer to the section titled “Altimeter Calibration” in the user manual for
details on setting.
2. Do not charge the device at high temperature otherwise the charging may not be performed or the
lithium battery cannot be fully charged.
1.5’’ LCD screen
OK/ Up/ Down/ Right/ Left button
Backlight
Exit
Power/
Start/Pause
Speed Meter Abbreviation List
ALT = Altitude
ASC = Ascending
AVG = Average
= Barometer
BAR = Barometer
BMI = Body Measurement Index
Bpm = Bit per minute
CAD = Cadence
CAL = Calorie
DES = Descending
DST = Distance
ETA = Estimated time of Arrival
= GPS
GDE = Grade
HRM = Heart Rate Monitor
KM = Kilometer
KMH = Kilometer per hour
MAX = Max speed
MPH = Mile per hour
ODA = Odometer A
ODB = Odometer B
Rpm = Rotation per minute
SPD = Speed
SSR = Speed sensor
TIM = Time
TOD = Today
TOD CAL = Today’s Calorie
TOT = Total
UTC = Coordinated Universal
Time
VAR
=
Variation

GPSport 260 Pro Schnellanleitung
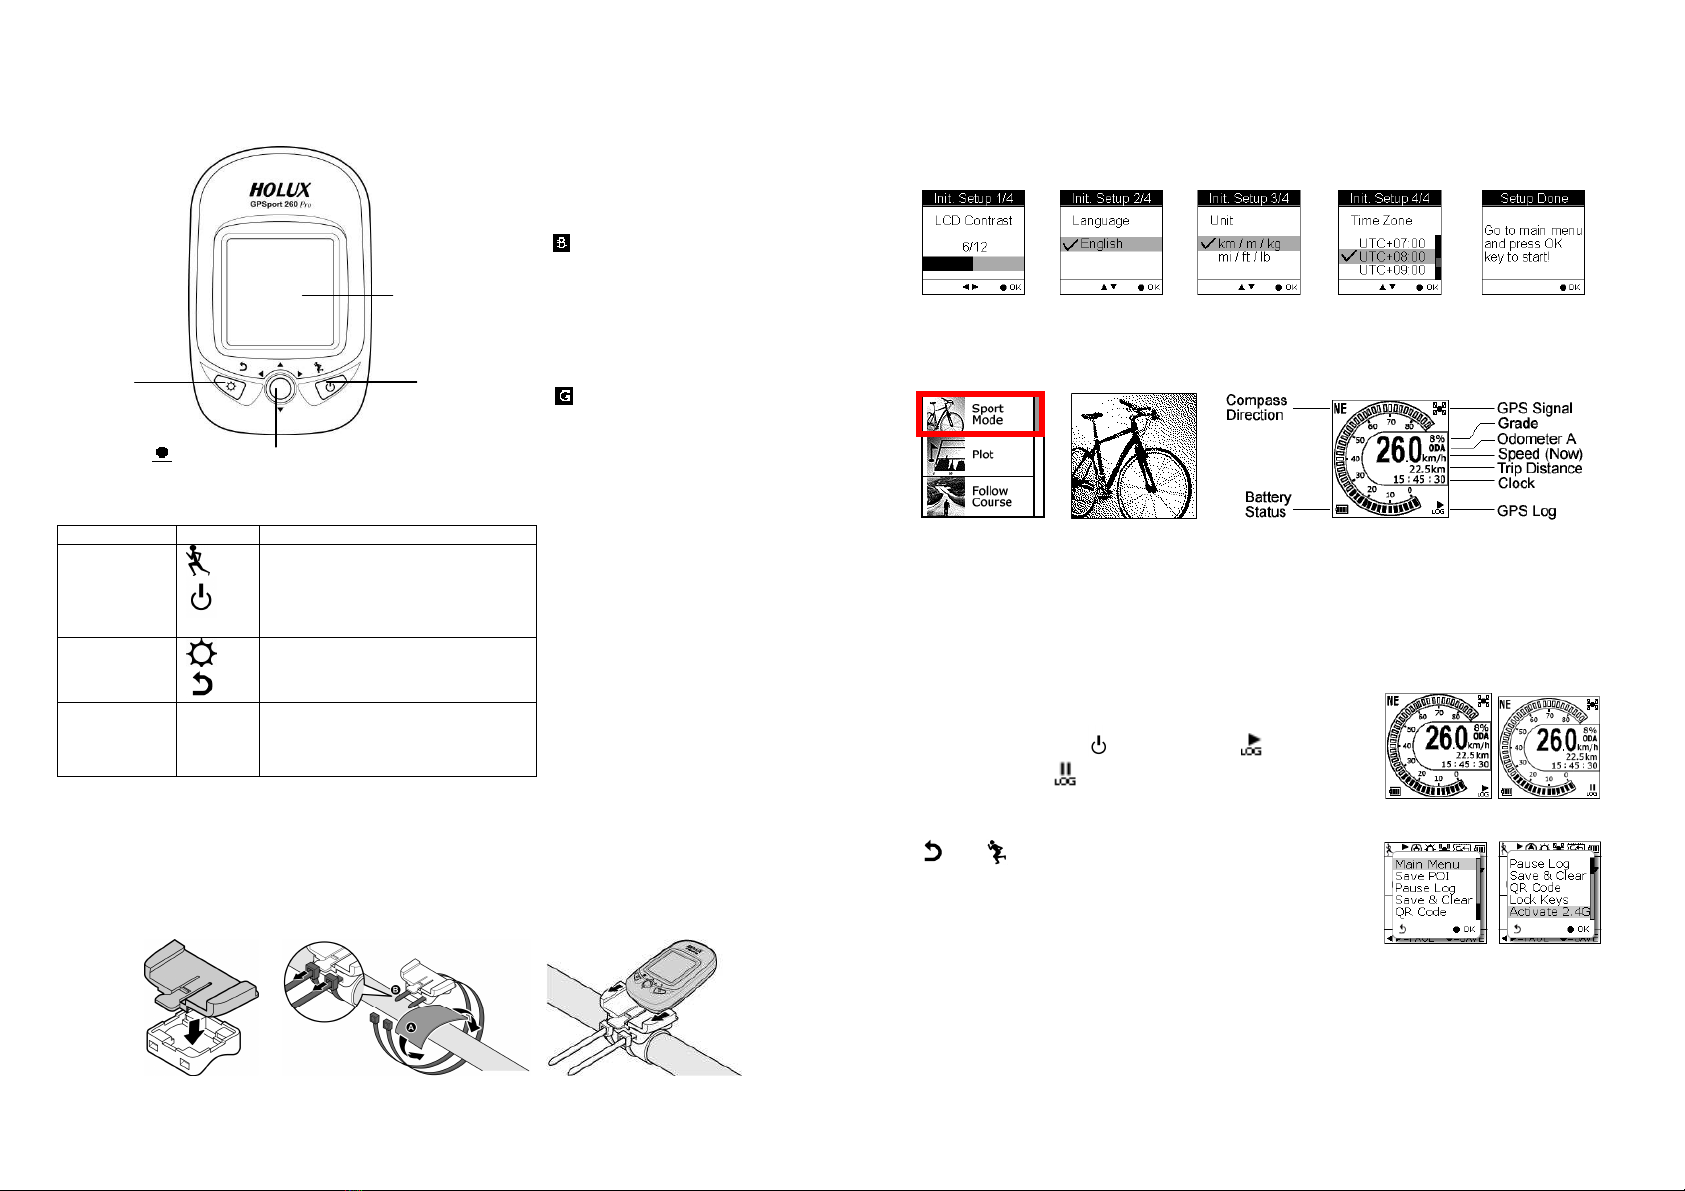
1. Übersicht über das Gerät
Tasten
Bezeichnung Symbol
unktion
Ein /Austaste
Zum Unterbrechen der
Protokollierung drücken, wenn das
Gerät eingeschaltet ist; zum
Fortsetzen der Protokollierung
drücken, wenn diese unterbrochen
ist.
Zum Ein /Ausschalten des Gerätes
drei Sekunden lang gedrückt halten.
Hintergrundbel
euchtung
Verlassen
Zum Ein /Ausschalten der
Hintergrundbeleuchtung drei
Sekunden lang gedrückt halten.
Zum Zurückkehren zur vorherigen
Menüebene drücken.
Navigationstast
en
OK
Mit Links , Aufwärts , Abwärts ,
Rechtstaste eine Option auswählen.
Mit OK Taste Auswahl bestätigen.
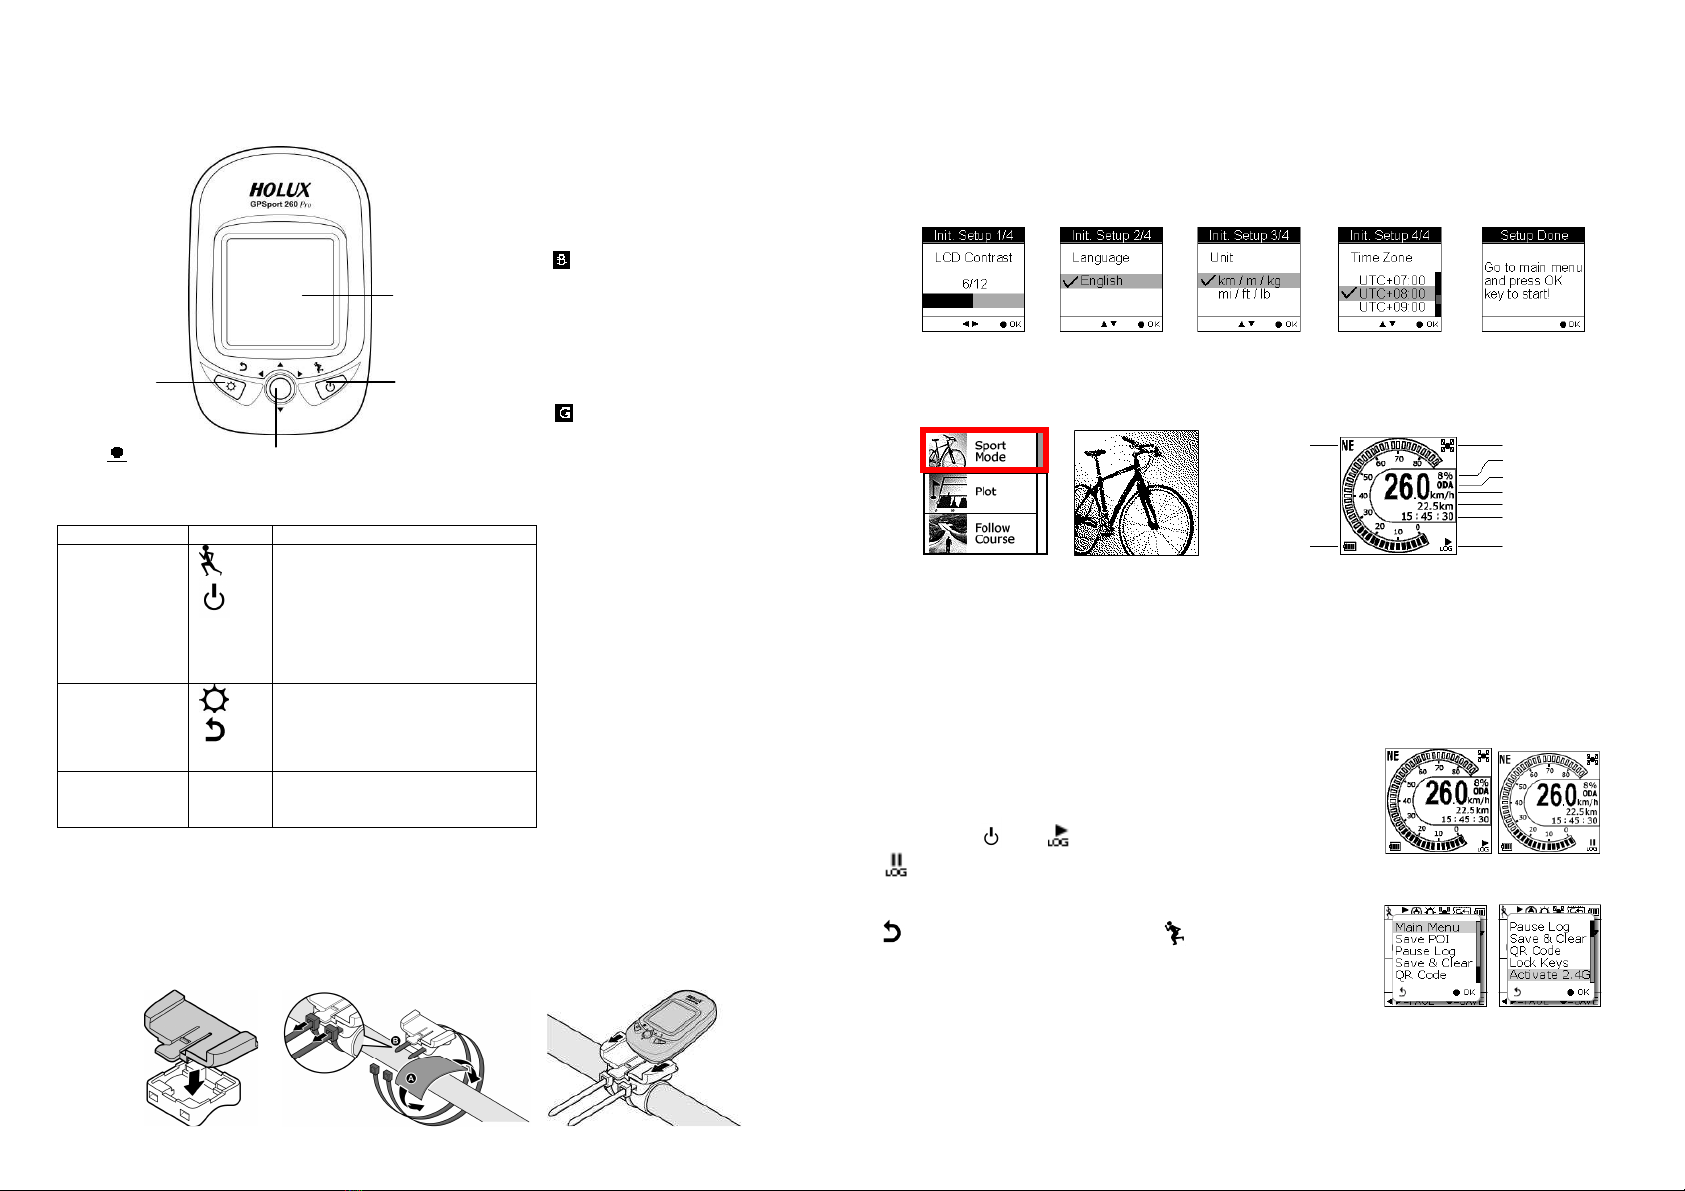
2. Installation der ahrradhalterung
(1)
Befestigen Sie die Auflage an der Auflagenhalterung.
(2)
Fädeln Sie die beiden Kabelbinder durch die Schlitze an der Auflagenhalterung.
(3)
Platzieren Sie die Gummiauflage unter der Fahrradhalterung und befestigen Sie die
Fahrradhalterung mit Hilfe der beiden Kabelbinder sicher am Lenkervorbau.
(4)
Schieben Sie das GPS auf die Fahrradhalterung, bis sie einrastet.
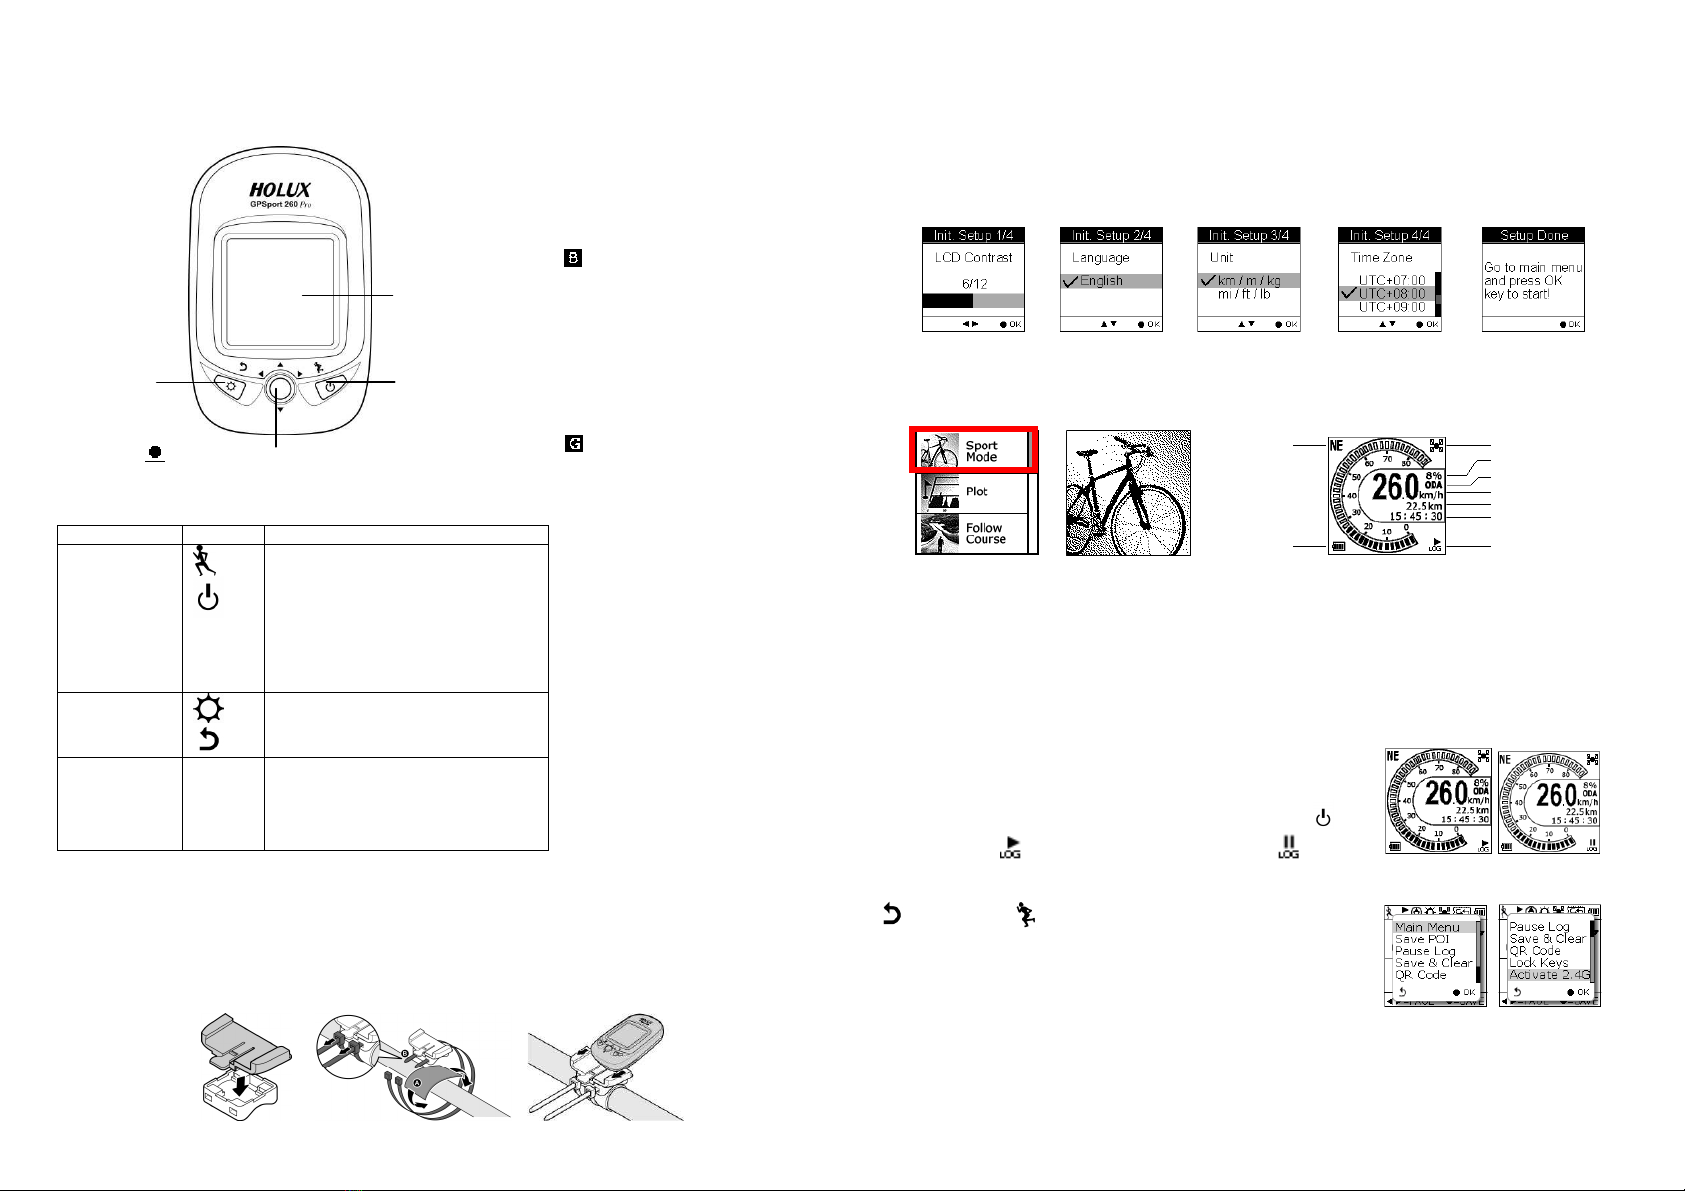
3. Ersteinrichtung
Bei der ersten Inbetriebnahme des GPSport 260 Pro werden Sie aufgefordert, die Ersteinrichtung
durchzuführen. Passen Sie mit den Navigations und der OK Taste LCD Kontrast, Sprache, Einheit und
Zeitzone wie gewünscht an.
Wenn der GPSport 260 Pro zurückgesetzt wird, wird der Benutzer beim Einschalten des Gerätes
automatisch zur Ersteinrichtung aufgefordert.
4. Grundlegende Bedienung /Sportmodus
Sobald das Gerät eingeschaltet wird, erscheint das Hauptmenü. Wählen Sie Sport- modus; daraufhin
erscheint die standardmäßig erste Seite des Sportmodus: Geschwindigkeitsmesser. Nun befinden Sie
sich auf der Sportseite und das Gerät ist zum Einsatz der Grundfunktionen bereit:
Hauptmenü Sport- modus Sportseite
Im Sportmodus werden Trainingsinformationen angezeigt: Analoger Geschwindigkeitsmesser,
Geschwindigkeit (Radfahren), Neigung, Barometer/GPS Höhe, Uhr, Streckenzeit, Entfernung,
Kalorienverbrauch, CO2 Reduktion, Baum (geschont), Hodometer, Geschwindigkeit (Laufen),
Gesamtanstieg/ gefälle, Koordinate und Farhtrichtung. Drücken Sie zum Umschalten zwischen den
verschiedenen Subseiten mit unterschiedlichen Informationen die Links oder Rechtstaste .
Einzelheiten entnehmen Sie bitte der Bedienungsanleitung auf der mit dem Gerät gelieferten
Hilfswerkzeuge CD.
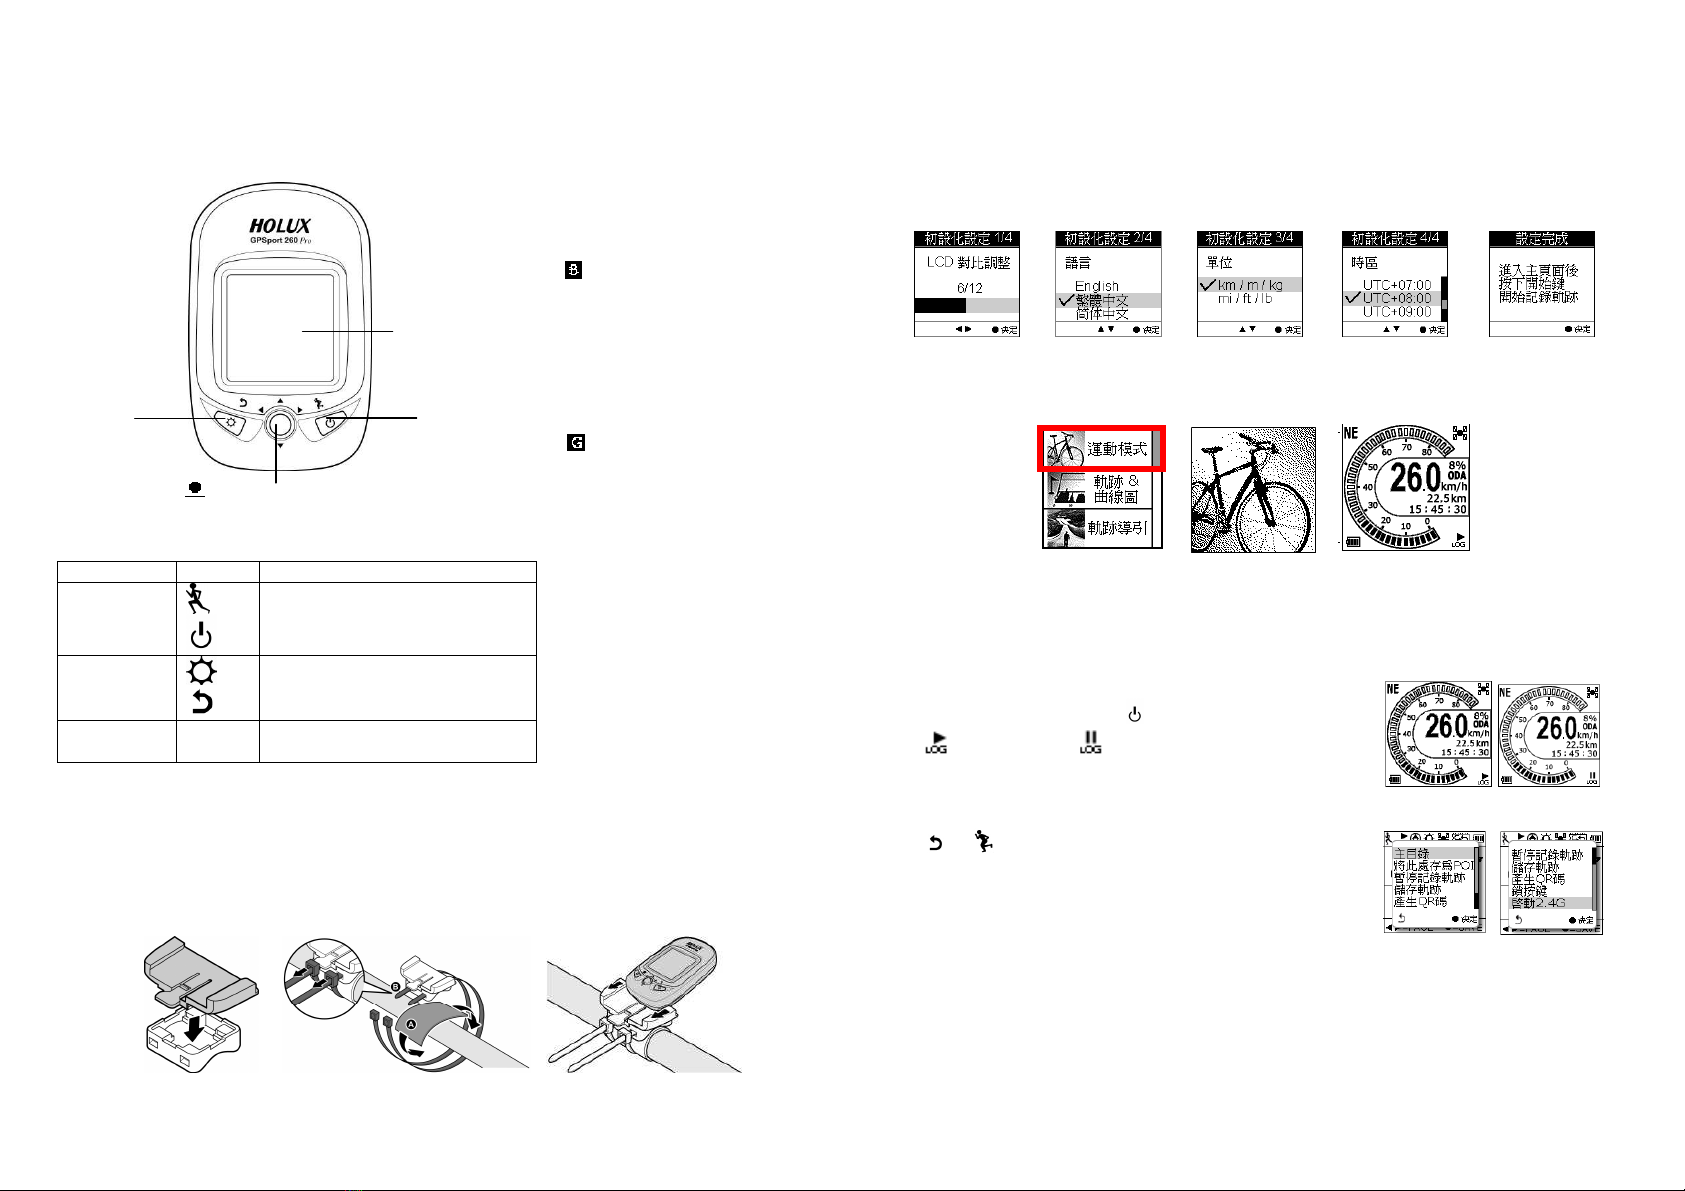
5. Automatische Protokollierung
Das GPSport 260 Pro ist so eingestellt, dass es Ihre Strecke
automatisch protokolliert, sobald das Gerät eingeschaltet ist und
einen GPS Fixpunkt bezogen hat. Zum Unterbrechen der
Protokollierung während der Aktivität betätigen Sie einfach die
Ein /Austaste . Das „ “ Symbol wird durch das Pause Symbol
„ “ ersetzt.
6. Schnellmenü
Durch gleichzeitiges Drücken von und erscheint das
Schnellmenü zur Schnelleinrichtung u. a. von: Hauptmenü aufrufen,
OVI speichern, Log unterbrechen, Speichern & Leeren (Protokoll),
QR Code, Tasten sperren und 2,4 G aktivieren
Hinweise
1. Die Barometer alibrierung wird standardmäßig automatisch durchgeführt. Sie önnen die
Barometer alibrierung jedoch auch manuell vornehmen. Einzelheiten zu dieser Einstellung entnehmen
Sie bitte dem Abschnitt „Altimeter-Kalibrierung“ in der Bedienungsanleitung.
2. Laden Sie das Gerät nicht bei hohen Temperaturen auf; andernfalls treten Fehler beim Ladevorgang
auf bzw. der Lithium-A u ann nicht vollständig geladen werden.
1,5 Zoll
-
LCD-Bildschirm
OK- / Aufwärts- / Abwärts- / Rechts- / Linkstaste
Hintergrundb
-eleuchtung
Verlassen
Ein
-
/Austaste
/
Start/Pause
Liste der Abkürzungen des
Geschwindigkeitsmessers
ALT = Höhe
ASC = Anstieg
AVG = Durchschnitt
= Barometer
BAR = Barometer
BMI = Body Mass Index
Bpm = Schläge pro Minute
CAD = Kadenz
CAL = Kalorie
DES = Gefälle
DST = Entfernung
ETA = Geschätzte Ankunftszeit
= GPS
GDE = Neigung
HRM = Herzfrequenzmessgerät
KM = Kilometer
KMH = Stundenkilometer
MAX = Max. Geschwindigkeit
MPH = Meilen pro Stunde
ODA = Hodometer A
ODB = Hodometer B
Rpm = Umdrehungen pro Minute
SPD = Geschwindigkeit
SSR = Geschwindigkeitssensor
TIM = Zeit
TOD = Heute
TOD CAL = Kalorienverbrauch heute
TOT = Gesamt
UTC = Koordinierte Weltzeit
VAR = Variation
Kompassausri
chtung
Akkustatus
GPS-Signal
Neigung
Hodometer A
Geschwindigkeit (aktuell)
Streckendistanz
Uhr
GPS-Protokoll

Guía Rápida del GPSport 260
1. Información general de la unidad
Botones
Nombre Icono unción
Botón de
encendido/
apagado
Presione este botón para pausar el
registro cuando el dispositivo está
encendido; presiónelo para reanudar
el registro cuando el dispositivo está
en pausa.
Presione este botón durante 3
segundos para encender o apagar la
unidad.
Luz de fondo
Salir
Presione este botón durante 3
segundos para encender o apagar la
luz de fondo.
Presione este botón para ir al nivel de
menú anterior.
5 direcciones
ACEPTAR
Use izquierda, arriba, derecha y abajo
para seleccionar una opción
Presione el botón ACEPTAR para
confirmar la selección.
2. Cómo instalar la montura de la bicicleta
(1)
Acople el soporte al portasoporte.
(2)
Pase las dos bridas a través de las ranuras del portasoporte.
(3)
Coloque la almohadilla de goma debajo de la montura de la bicicleta y anexe la montura de la
bicicleta firmemente al poste de a bicicleta usando las dos amarraduras de cable.
(4)
Deslice el GPS encima del soporte para la bicicleta hasta que encaje en su lugar.
3. Configuración inicial
La configuración inicial aparecerá la primera vez que el usuario utilice el dispositivo GPSport 260 Pro.
Utilice el botón de 5 direcciones para seleccionar sus preferencias para el contraste de la pantalla LCD, el
idioma, las unidades y la zona horaria.
Si el dispositivo GPSport 260 Pro se restablece, la configuración inicial aparece automáticamente cuando
el usuario enciende el dispositivo.
4. Operación básica/modo Deportivo
Cuando el dispositivo se enciende, aparece el menú principal. Seleccione Modo Deportes y se muestra
la primera página predeterminada de Modo Deportes denominada Velocímetro. Ahora se encontrará en
la página de deportes y el dispositivo estará listo para utilizarse con la función básica.
Menú principal Modo Deportes Página de deportes
El Modo Deportes muestra información deportiva como por ejemplo velocímetro analógico, velocidad,
pendiente, altitud barométrica y de GPS, reloj, tiempo de viaje, distancia, calorías consumidas, CO2
reducido, árbol (conservado), odómetro, ritmo, ascenso y descenso total, coordenadas y encabezamiento.
Presione el botón de 5 direcciones hacia la izquierda y hacia la derecha para cambiar entre páginas
diferentes para acceder a información deportiva distinta. Para obtener más detalles, consulte el manual
del usuario guardado en el CD de herramientas incluido con este dispositivo.
5. Registro de información automático
El dispositivo GPSport 260 Pro se establece para que registre
automáticamente la ruta cuando se enciende y cuando la posición
GPS se adquiere. Para pausar el registro durante la actividad,
simplemente presione el botón de encendido y apagado . El icono
“ ” se reemplazará por un icono de pausa “ ”.
6. Menú rápido
Presione y simultáneamente y el menú rápido aparecerá
para mostrar la configuración rápida: Menú principal, Guardar PDI,
Pausar registro, Guardar y borrar (registro), Código QR, Bloquear
botones y Activar 2.4G.
NOTAS
1. La calibración del barómetro se ha configurado para realizarse de manera predeterminada. Los
usuarios pueden realizar la calibración del barómetro manualmente. Consulte la sección denominada
“Calibración del altímetro” del manual del usuario para obtener detalles sobre la configuración.
2. No cargue el dispositivo mientras haya una alta temperatura, ya que la batería de litio podría no
cargarse o no cargarse completamente.
Pantalla LCD de
1,5’’
Botón ACEPTAR/Arriba/ Abajo/ Derecha/ Izquierda
Luz de
fondo
Salir
Encendido/A
pagado/
Inicio/Pausa
Lista de abreviaturas del velocímetro
ALT = Altitud
ASC = Ascenso
AVG = Promedio
= Barómetro
BAR = Barómetro
BMI = Índice de Masa Corporal
Bpm = Bit por minuto
CAD = Cadencia
CAL = Caloría
DES = Descenso
DST = Distancia
ETA = Hora estimada de
llegada
= GPS
GDE = Pendiente
HRM = Monitor de ritmo
cardíaco
KM = Kilómetro
KMH = Kilómetro por hora
MAX = Velocidad máxima
MPH = Milla por hora
ODA = Odómetro A
ODB = Odómetro B
Rpm = Rotación por minuto
SPD = Velocidad
SSR = Sensor de velocidad
TIM = Hora
TOD = Hoy
TOD CAL = Calorías de hoy
TOT = Total
UTC = Hora Universal
Coordinada
VAR = Variación
Dirección de la
brújula
Estado de la
batería
Señal GPS
Pendiente
Odómetro A
Velocidad (ahora)
Distancia del viaje
Reloj
Registro GPS

Guide rapide GPSport 260 Pro
1. Vue d'ensemble de l'appareil
Boutons
Nom Icône onction
Bouton
Marche
Appuyez sur ce bouton pour mettre
l'enregistrement sur pause lorsque
l'appareil est sous tension ; appuyez
sur ce bouton pour reprendre
l'enregistrement lorsque l'appareil est
mis sur pause.
Appuyez pendant 3 secondes pour
allumer/éteindre l'appareil.
Rétroéclairage
Quitter
Appuyez pendant 3 secondes pour
allumer/éteindre le rétroéclairage.
Quitter le niveau précédent du menu
5 directions
OK
Utilisez les boutons Gauche, Haut,
Droite et Bas pour sélectionner une
option.
Appuyez sur le bouton OK pour
confirmer la sélection.
2. Installation sur un vélo
(1)
Attachez l’adaptateur sur le support d’adaptateur.
(2)
Faites passer deux attaches de câble dans les fentes du support d’adaptateur.
(3)
Mettez le coussin en caoutchouc sous le support de vélo et attachez le support de vélo à la barre du
vélo en utilisant les deux attache câbles.
(4)
Faites glisser le GPS sur le support de vélo, jusqu'à ce qu'il s'enclenche en place.
3. Premier réglages
Les utilisateurs seront invités à effectuer le Premier réglage lorsqu'ils utiliseront le GPSport 260 Pro la
première fois. Utilisez le bouton à 5 directions pour sélectionner votre préférence pour le contraste LCD, la
langue, l'unité et le fuseau horaire.
Si le GPSport 260 Pro est réinitialisé, le Premier réglage sera automatiquement lancé lorsque l'utilisateur
rallume l'appareil.
4. Opération basique/Mode Sport
Une fois l'appareil mis sous tension, le menu principal apparaît. Sélectionnez le Mode Sport. La première
page par défaut du Mode Sport apparaît Compteur de vitesse. Vous êtes maintenant sur la Page Sport.
L'appareil est prêt à être utilisé avec les fonctions de base.
Menu principal Mode Sport Page Sport
Le Mode Sport affiche les informations relatives au sport, dont le compteur de vitesse analogique, la
vitesse, le grade, le baromètre/l'altitude GPS, l'horloge, la durée du voyage, la distance, les calories
consommées, l'économie de CO2, l'arbre (réservé), l'odomètre, la cadence, les ascensions/descentes
totales, les coordonnées et la direction. Appuyez sur la gauche du bouton à 5 directions et sur la droite
pour changer entre les pages des diverses informations relatives au sport. Pour plus de détails, veuillez
vous référer au manuel de l'utilisateur enregistré dans le CD Outil, joint à l'appareil.
5. Commencer auto l’enregistement
Le GPSport 260 Pro est paramétré pour enregistrer
automatiquement votre parcours une fois mis sous tension, et
lorsque l'acquisition GPS est assurée. Pour mettre l'enregistrement
sur pause en cours d'activité, il suffit d'appuyer sur le bouton
Marche. L'icône “ ” sera remplacée par l'icône pause “ ”.
6. Menu rapide
Appuyez sur c et en même temps. Le menu rapide
apparaît et permet un réglage rapide. Il permet : d'accéder au Menu
principal, d'enregistrer un POI (centre d'intérêt), d'enregistrer et
d'effacer (le journal), de gérer le code QR, de verrouiller les touches
et d'activer le 2.4G.
NOTES
1. Le calibrage du baromètre a été réglé pour se faire automatiquement par défaut. Les utilisateur
peuvent effectuer un calibrage manuel du baromètre. Veuillez vous référer à la section “Calibrage de
l'altimètre” du manuel de l'utilisateur pour plus de détails sur le réglage.
2. Ne chargez pas l'appareil dans des endroits chauds autrement la batterie au lithium ne pourra pas se
charger complètement.
Écran LCD 1,5"
Bouton OK/ Haut/ Bas/ Droit/ Gauche
Rétroéclairage
Quitter
Alimentation
/
Démarrer/
Pause
Liste des abréviations du compteur
de vitesse
ALT = Altitude
ASC = Montée
AVG = Moyenne
= Baromètre
BAR = Baromètre
BMI = Index de la masse
corporelle
Bpm = Pulsation par minute
CAD = Cadence
CAL = Calorie
DES = Descente
DST = Distance
ETA = Estimation de l’heure
d’arrivée
= GPS
GDE = Grade
HRM = Dispositif de
surveillance de la
fréquence cardiaque
KM = Kilomètre
KMH = Kilomètre par heure
MAX = Vitesse max
MPH = Mile par heure
ODA = Odomètre A
ODB = Odomètre B
Rpm = Tour par minute
SPD = Vitesse
SSR = Capteur de vitesse
TIM = Heure
TOD = Aujourd’hui
TOD CAL = Calorie aujourd'hui
TOT = Total
UTC = Temps universel
coordonnée
VAR = Variation
Sens de la
boussole
É
tat de la
batterie
Signal GPS
Grade
Odomètre A
Vitesse (Maintenant)
Distance du parcours
Horloge
Journal GPS

GPSport 260 Pro 快速導引手冊
快速導引手冊快速導引手冊
快速導引手冊
1. 外觀
外觀外觀
外觀
按鍵功能表
按鍵功能表按鍵功能表
按鍵功能表
名稱
名稱名稱
名稱 圖示
圖示圖示
圖示 功能
功能功能
功能
電源按鍵
當本裝置開啟時,可暫停/ 重新開始
記錄
按壓 3 秒,將本裝置開機與關機
退出
背光
退出回到主選單
按壓 3 秒,開啟或關閉背光
五向鍵
OK 鍵
使用上下左右鍵選擇項目
中間 Enter 鍵為確認輸入
2. 安裝腳踏車座架
安裝腳踏車座架安裝腳踏車座架
安裝腳踏車座架
(1)
將座架裝上座架固定器。
(2)
將兩條紮線帶穿過座架固定器的插槽。
(3)
將橡皮墊置於腳踏車座架之下,並使用兩條紮線帶將腳踏車座架穩固地安裝於腳踏車龍頭上。
(4)
將 GPS 插入腳踏車座架,直到卡入定位。※ 紮線帶可重複使用
3. 初始設定
初始設定初始設定
初始設定
在第一次使用 GPSport 260 Pro,使用者會被導引完成初始安裝程序。使用 5向鍵去選擇您所使用的 LCD
對比調整、語言、單位、和時區。如果 GPSport 260 Pro 被重置,當使用者開啟裝置時,初始安裝程序會
自動執行。
4. 基本操作
基本操作基本操作
基本操作/ 運動模式
運動模式運動模式
運動模式
當 GPSport 260 Pro 開啟時,會出現下列主選單。選擇運動模式後,會自動出現時速表頁面。當看到此頁
面,您就可以準備開始使用 GPSport 260 Pro 的基本功能。
主選單
主選單主選單
主選單 運動模式
運動模式運動模式
運動模式 時速表頁面
時速表頁面時速表頁面
時速表頁面
使用 5 向鍵的 左右 鍵切換不同運動資訊功能的畫面。時速表頁面可變更顯示為您所想要的運動數
值。有關功能的詳細使用說明,請參閱隨附光碟片內的使用手冊。
5. 開始
開始開始
開始/ 停止記錄
停止記錄停止記錄
停止記錄
當 GPSport 260 Pro 開啟時,會自動開始記錄軌跡。
如您要停止或暫停記錄,只要按下 開關鍵即可;頁面右方的記錄
圖示 “ ”會變成暫停圖示 “ ”,如右圖所示。
6. 快速選單
快速選單快速選單
快速選單
同時按 和 兩個鍵, 快速選單會出現讓你選擇進入主目錄, 儲
存興趣點、啟動 2.4G 等功能, 如右圖所示。
註
註註
註:
::
:
1.
氣壓高度計校正預設值是自動執行校正功能,使用者可自行更改為手動校正;詳細的校正設定使用說明
請參閱隨附光碟片內的使用手冊。
2.
在高溫下,可能無法執行充電或鋰電池無法完全充電。
1.5’’ LCD 螢幕
螢幕螢幕
螢幕
確認
確認確認
確認/ 上
上上
上/ 下
下下
下/ 左
左左
左/ 右鍵
右鍵右鍵
右鍵
背光
背光背光
背光/
退出
退出退出
退出
開
開開
開/關機
關機關機
關機/
開始
開始開始
開始/暫停
暫停暫停
暫停
縮寫表
縮寫表縮寫表
縮寫表
ALT = 海拔
ASC = 上升
AVG = 平均
= 氣壓高度
BAR = 氣壓高度
BMI = 身體質量指數
Bpm = 每分鐘心跳數
CAD = 踏頻
CAL = 卡路里
DES = 下降
DST = 距離
ETA = 預估到達時間
= GPS
GDE = 坡度
HRM = 心跳速率
KM = 公里
KMH = 每分鐘公里數
MAX = 最大速度
MPH = 每小時英哩數
ODA = 里程數 A
ODB = 里程數 B
Rpm = 每小時轉圈數
SPD = 速度
SSR = 速度感測器
TIM = 時間
TOD = 今日
TOD CAL = 今日卡路里
TOT = 全部
UTC = 世界標準時間
VAR = 變化值

GPSport 260 Pro 快速导引手册
快速导引手册快速导引手册
快速导引手册
1. 外观
外观外观
外观
按键菜单
按键菜单按键菜单
按键菜单
名称
名称名称
名称 图示
图示图示
图示 功能
功能功能
功能
电源按键
当本装置开启时,可暂停/ 重新开始
记录
按压 3 秒,将本装置开机与关机
退出
背光
退出回到主选单
按压 3 秒,开启或关闭背光
五向键
OK 键
使用上下左右键选择项目
中间 Enter 键为确认输入
2. 安装脚踏车座架
安装脚踏车座架安装脚踏车座架
安装脚踏车座架
(1)
将座架装上座架固定器。
(2)
将两条扎线带穿过座架固定器的插槽。
(3)
将橡皮垫置于脚踏车座架之下,并使用两条扎线带将脚踏车座架稳固地安装于脚踏车龙头上。
(4)
将 GPS 插入脚踏车座架,直到卡入定位。※ 扎线带可重复使用
3. 初始设定
初始设定初始设定
初始设定
在第一次使用 GPSport 260pro,使用者会被导引完成初始安装程序。使用 5向键去选择您所使用的 LCD 对
比调整、语言、单位、和时区。如果 GPSport 260 pro 被重置,当使用者开启装置时,初始安装程序会自动
执行。
4. 基本操作
基本操作基本操作
基本操作/ 运动
运动运动
运动模式
模式模式
模式
当 GPSport 260pro 开启时,会出现下列主选单。选择运动模式后,会自动出现时速表页面。当看到此页面,
您就可以准备开始使用 GPSport 260 pro 的基本功能。
主选单
主选单主选单
主选单 运动模式
运动模式运动模式
运动模式 时速表页面
时速表页面时速表页面
时速表页面
使用 5 向键的 左右 键切换不同运动信息功能的画面。时速表页面可变更显示为您所想要的运动数值。
有关功能的详细使用说明,请参阅随附光盘片内的使用手册。
5. 开始
开始开始
开始/ 停止记录
停止记录停止记录
停止记录
当 GPSport 260pro 开启时,会自动开始记录轨迹。
如您要停止或暂停记录,只要按下 开关键即可;页面右方的记录
图标 “ ”会变成暂停图示 “ ”,如右图所示。
6. 快速选单
同时按 和 两个键, 快速选单会出现让你选择进入主目录, 储
存兴趣点、启动 2.4G 等功能, 如右图所示。
注
注注
注:
::
:
1.
气压高度计校正默认值是自动执行校正功能,使用者可自行更改为手动校正;详细的校正设定使用说明
请参阅随附光盘片内的使用手册。
2.
在高温下,可能无法执行充电或锂电池无法完全充电。
81214 50N
1.5’’ LCD 屏幕
屏幕屏幕
屏幕
确认
确认确认
确认/ 上
上上
上/ 下
下下
下/ 左
左左
左/ 右键
右键右键
右键
背光
背光背光
背光/
退出
退出退出
退出
开
开开
开/关机
关机关机
关机/
开始
开始开始
开始/暂停
暂停暂停
暂停
缩写表
缩写表缩写表
缩写表
ALT = 海拔
ASC = 上升
AVG = 平均
= 气压高度
BAR = 气压高度
BMI = 身体质量指数
Bpm = 每分钟心跳数
CAD = 踏频
CAL = 卡路里
DES = 下降
DST = 距离
ETA = 预估到达时间
= GPS
GDE = 坡度
HRM = 心跳速率
KM = 公里
KMH = 每分钟公里数
MAX = 最大速度
MPH = 每小时英哩数
ODA = 里程数 A
ODB = 里程数 B
Rpm = 每小时转圈数
SPD = 速度
SSR = 速度传感器
TIM = 时间
TOD = 今日
TOD CAL = 今日卡路里
TOT = 全部
UTC = 世界标准时间
VAR = 变化值
Other manuals for GPSPORT 260 PRO
4
This manual suits for next models
1
Table of contents
Languages:
Other Holux Bicycle Accessories manuals

Holux
Holux GPSport 260 User manual

Holux
Holux GPSPORT 260 PRO User manual

Holux
Holux GPSport 260 User manual

Holux
Holux FUNTREK 130 PRO User manual

Holux
Holux GPS EZTOUR - VERSION 1.1 User manual

Holux
Holux GPS EZTOUR - VERSION 1.0 User manual

Holux
Holux GPSPORT 260 PRO User manual

Holux
Holux GPS EZTOUR - V1.0 User manual