manuals.online logo
Brands
  1. Home
  2. •
  3. Brands
  4. •
  5. Holux
  6. •
  7. Bicycle Accessories
  8. •
  9. Holux GPS EZTOUR - VERSION 1.0 User manual

Holux GPS EZTOUR - VERSION 1.0 User manual

GPS ezTour
User’s Manual
Version: 1.0
April 2009
1
Contents
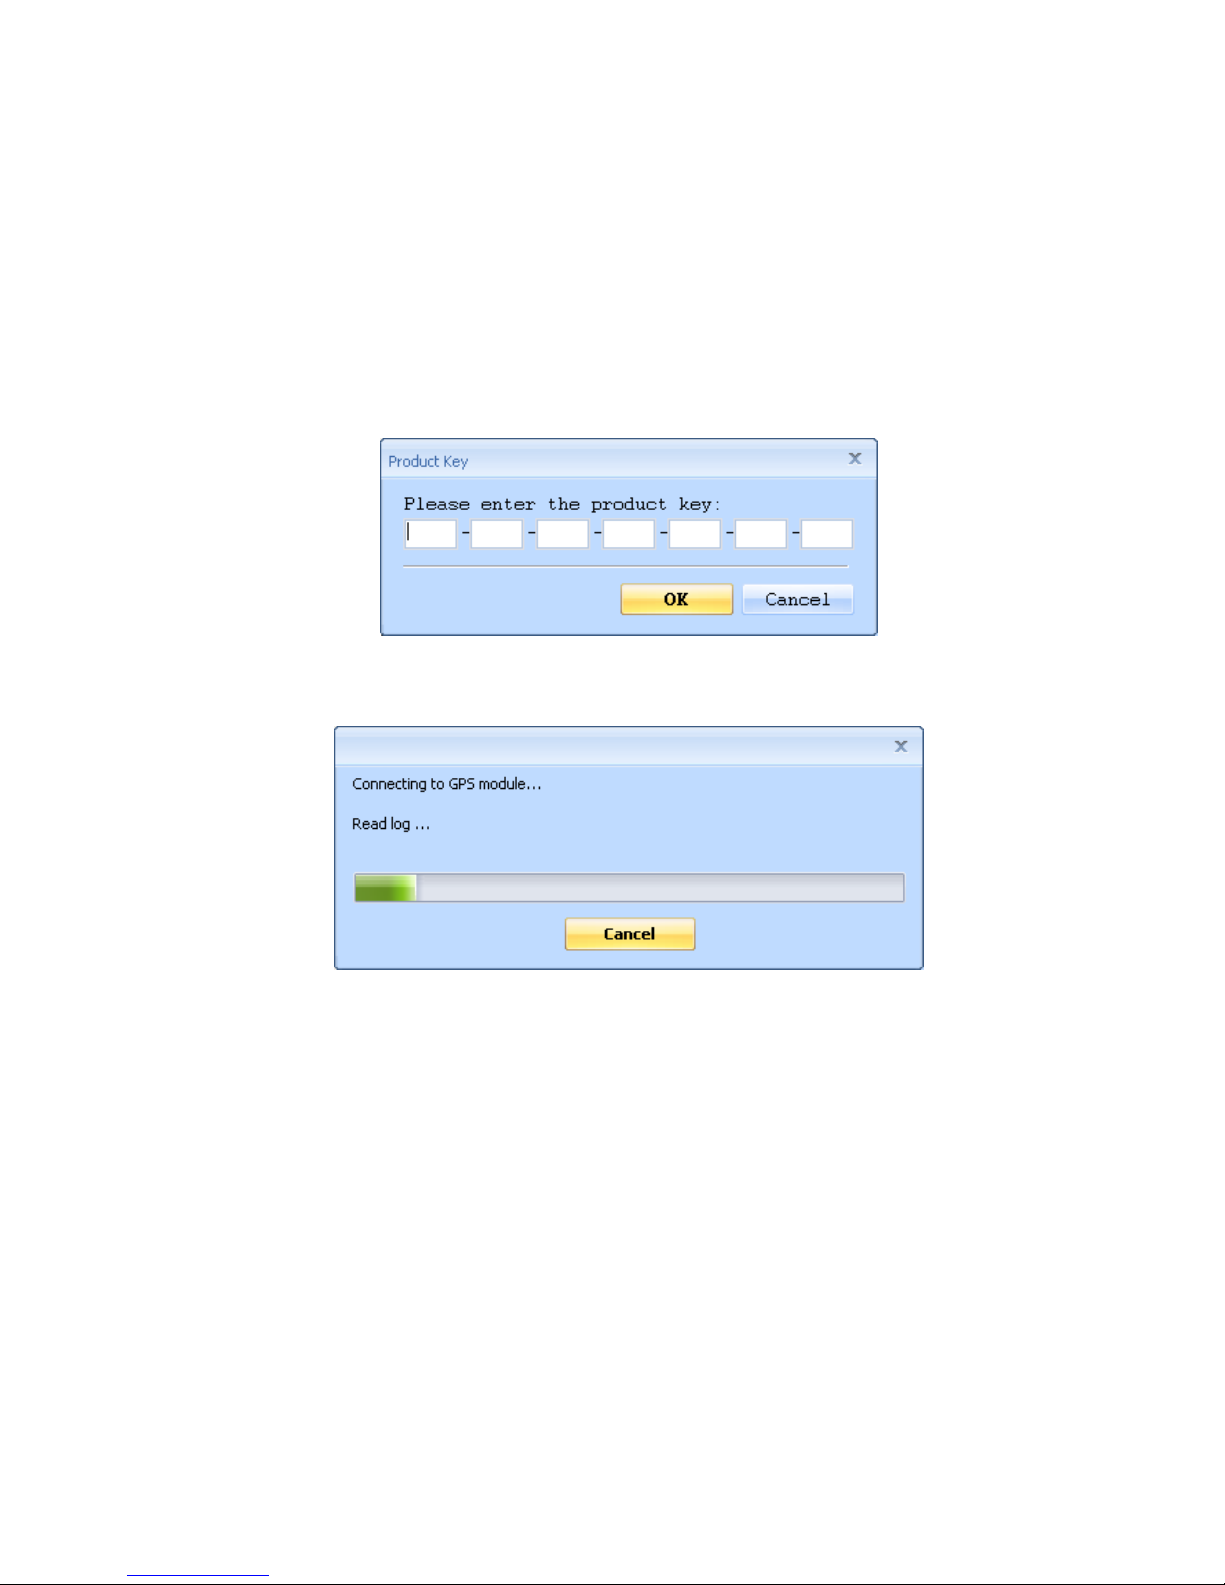
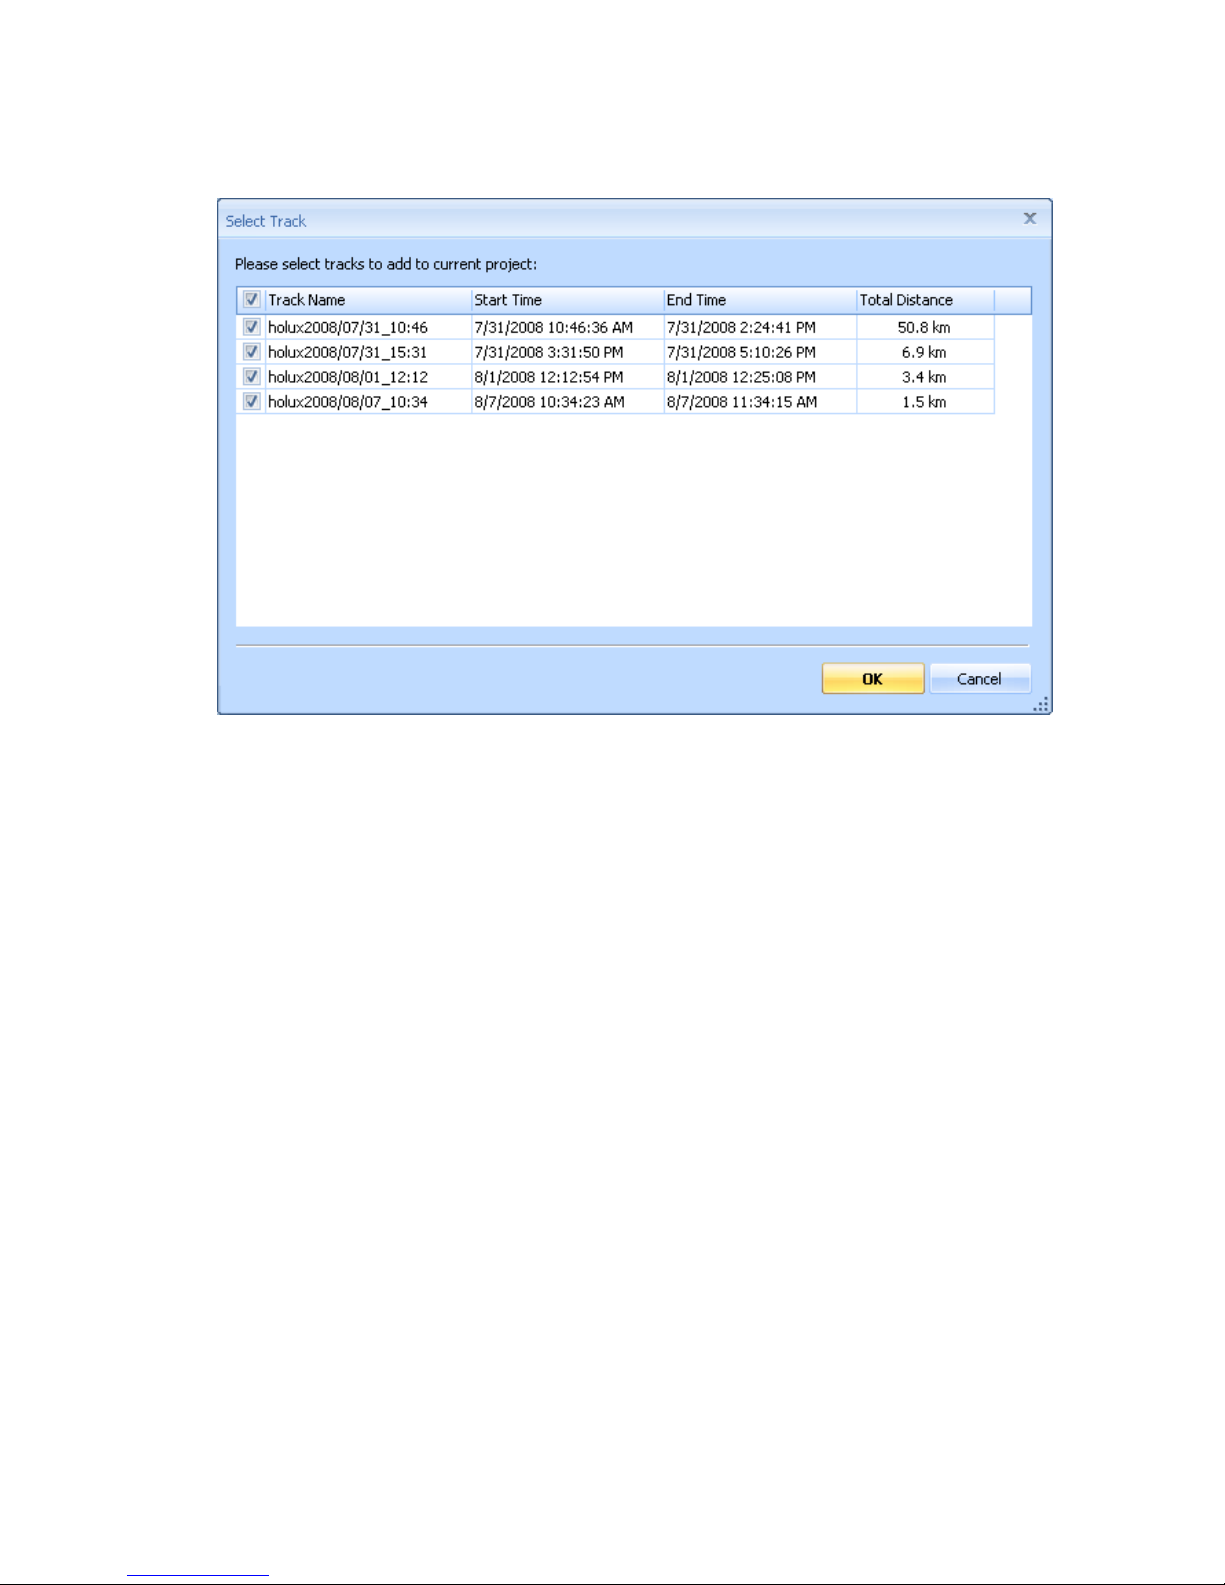
Read GPS Log From Device........................................................................................... 2
Clear Data Logger Memory ............................................................................................. 4
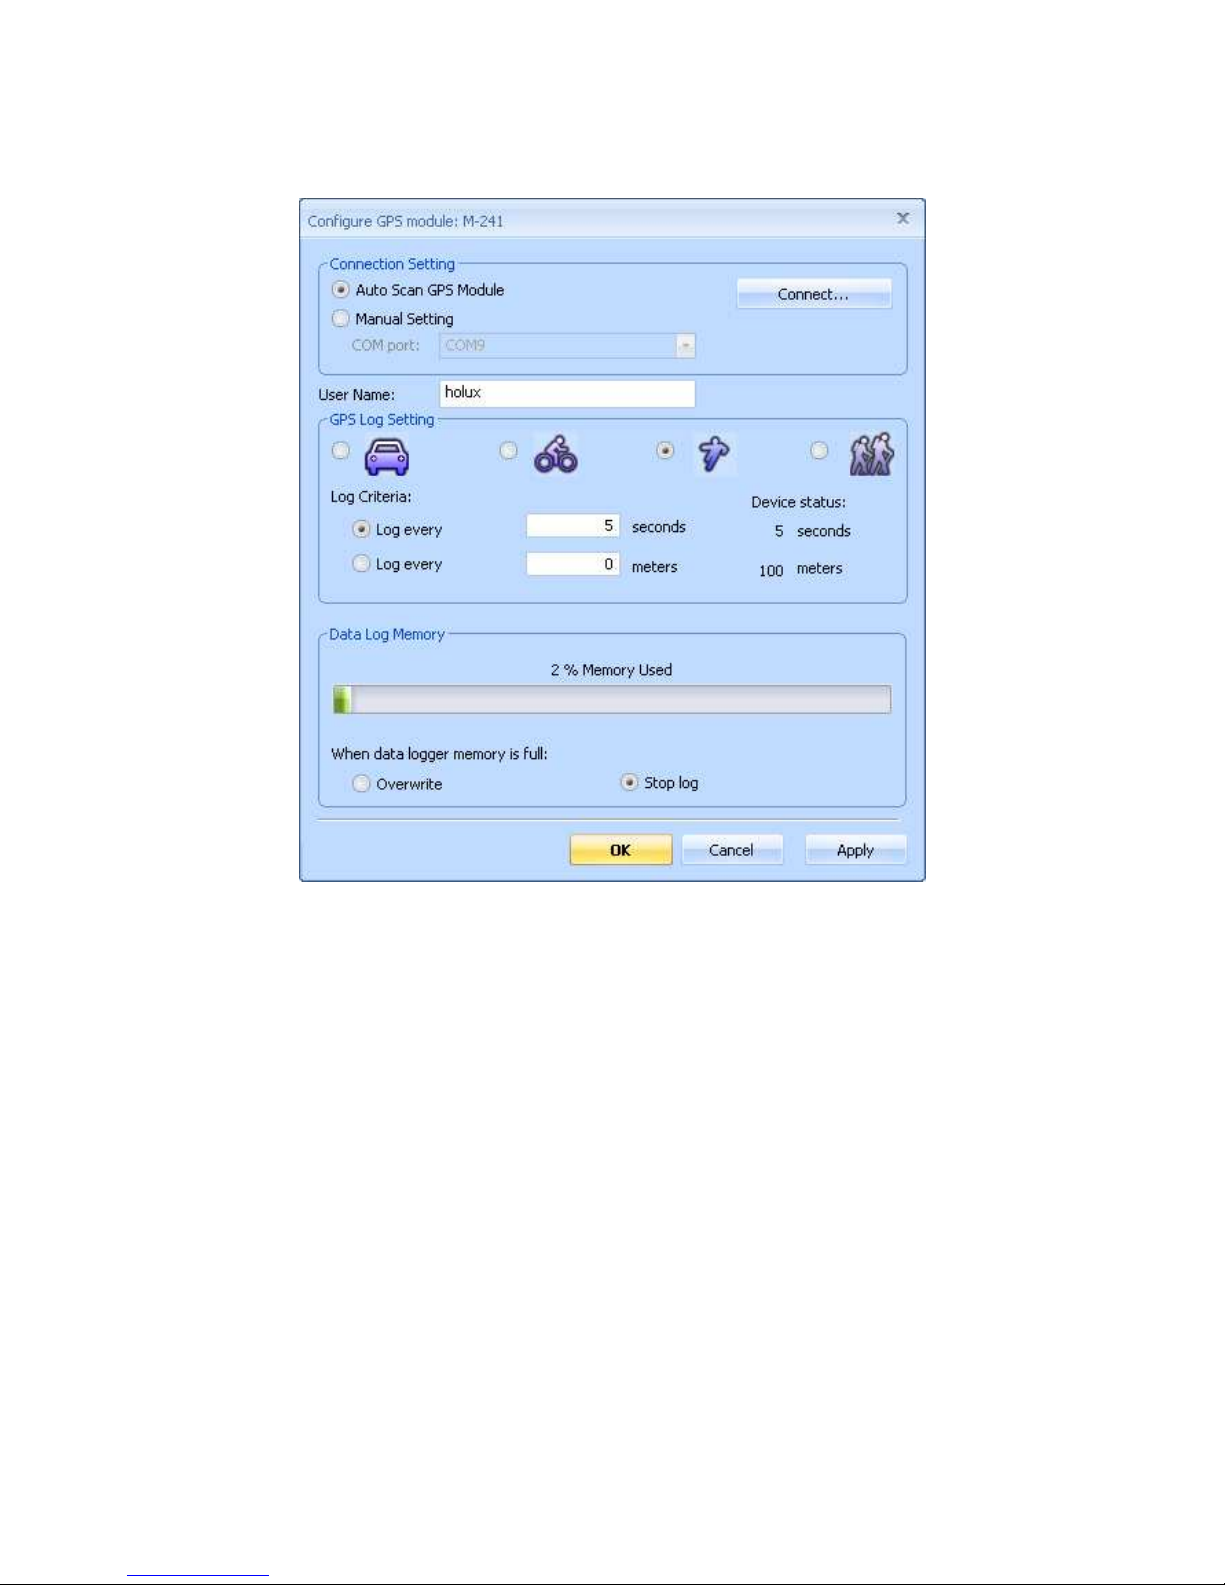
Data Logger Con iguration .............................................................................................. 4
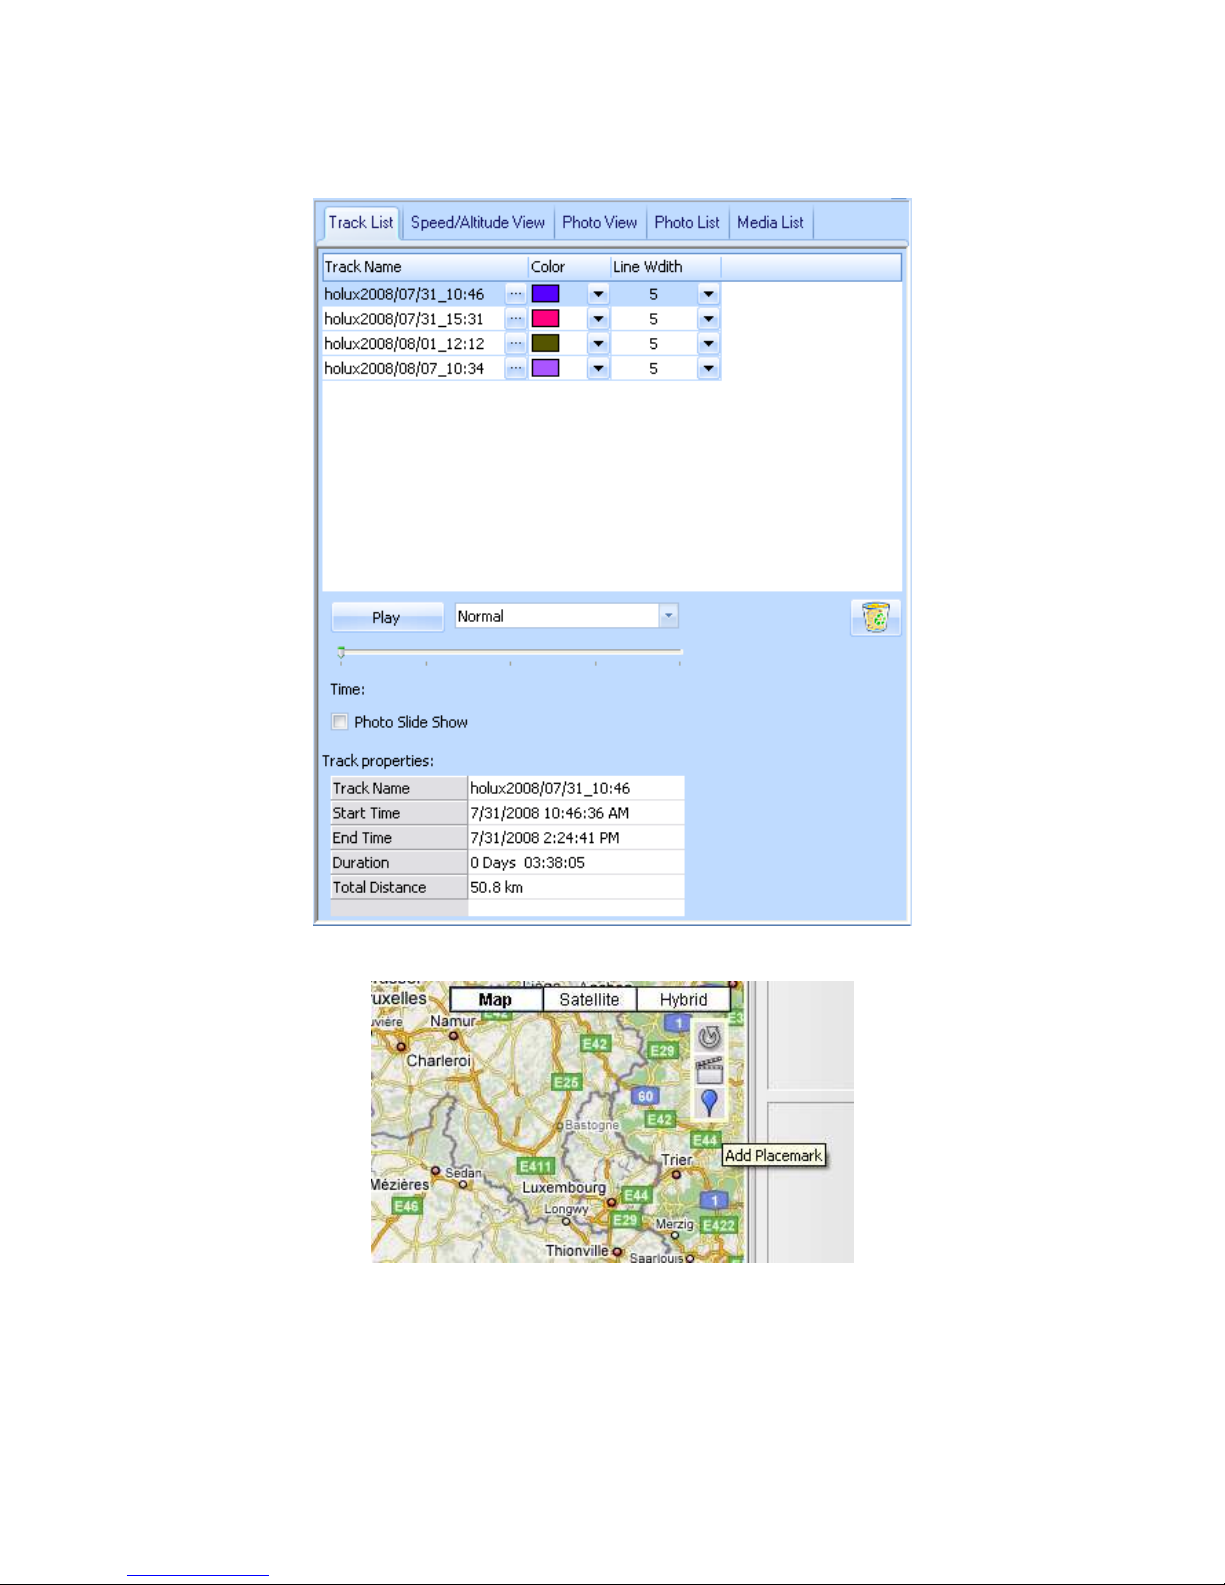
Track List Window........................................................................................................... 6
Add Place Mark............................................................................................................... 7
Add Photos...................................................................................................................... 8
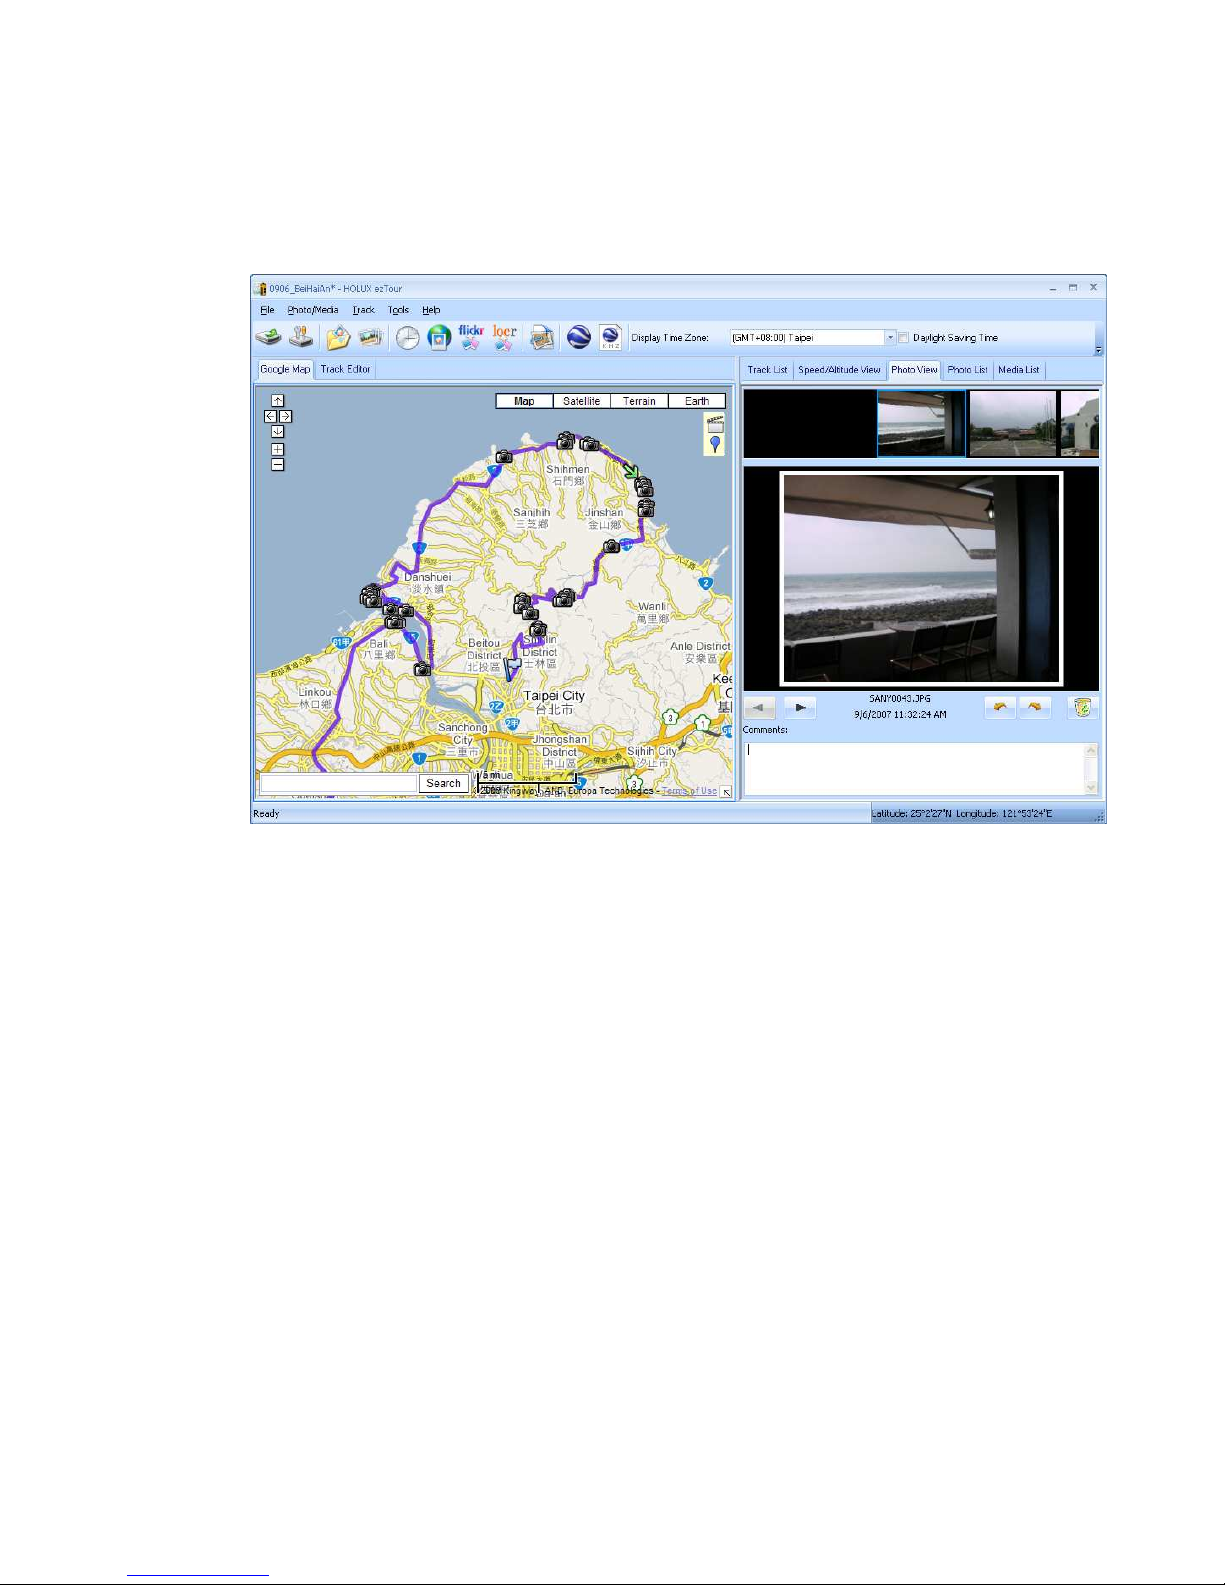
Browse photos ................................................................................................................ 9
GeoTag – Save GPS In ormation into Photos............................................................... 10
Photo List Window......................................................................................................... 10
Upload Photos to Flickr/Locr ......................................................................................... 11
Shi t Photo Time............................................................................................................ 12
Photo Comments .......................................................................................................... 13
Media List View ............................................................................................................. 13
Google Earth Viewing.................................................................................................... 13
Save As KMZ File.......................................................................................................... 13
Export As Html…........................................................................................................... 14
Speed/Altitude View ...................................................................................................... 14
Track Editing ................................................................................................................. 15
Save and Open Project ................................................................................................. 18
Time Zone Setting and Daylight Saving Time ............................................................... 18
Options.......................................................................................................................... 19
System Requirement..................................................................................................... 21
2
Read GPS Log From evice
Step 1 – Connect Data Logger to PC USB port. Please make sure the Data Logger
power is turn on.
Step 2 – Menu command “File” -> “Read log…” Users have to input product key at
the irst time. The product key is on the cover o installation CD.
GPS Photo Tagger will automatically detect the port and baud rate and read in the
GPS tracks.
A track list window will be popped up. Select the tracks to import.
3
Tracks will be shown on the Google Map window.
4
Clear ata Logger Memory
Menu command “File” -> “Clear Device log” will clear the data stored in device, so
the device memory are enough or next usage.
ata Logger Configuration
Connect Data Logger to PC. Menu command “File” -> “Con ig GPS…” I Data Logger is
not connected, the GPS Log Setting area will be disabled. Please make sure the Data
Logger power switch is turn on when connect.
5
Connection Setting:
Auto Scan GPS Module (Recommended)
The program will automatically detect the com port and the baud rate. It is
recommended to set to auto scan.
Manual Setting
Users can also manually set the port and baud rate. Although it can speed up the
initial connect time, but it is not recommended unless users understand the valid
port and baud rate.
GPS Log Setting
There are 4 log modes: General mode, vehicle mode, cycling mode, and hiking
mode. Users can also change the de ault setting o these 4 modes.
Log every () seconds:
6
Speci y the log period. For example, i speci y 3 seconds, the GPS device
will log every 3 seconds.
Log every () meters:
Speci y the log distance. For example, i speci y 10 meters, the GPS
device will log every 10 meters.
Data Log Memory
A bar show how many percentage o memory is used in the Data Logger device.
Users can use “Clear Log” to clear all the memory.
When data logger memory is ull
Overwrite: Overwrite the earliest logged data.
Stop Log: Stop data logging.
Track List Window
Tracks are list on the top. Users can change the colors and line widths o tracks.
Press “Play” button, Google map window will animate the whole trip by moving the current
position.
Check “Photo Slide Show” will show photo while animate trips.
7
Add Place Mark
To add a new place mark, please click on the blue balloon icon, and then click on
the position o new place marker. The “Place Mark Property” dialog will be pop
up or editing.
8
Users can manually add photos to the place mark, or delete photos rom the
place mark.
Add Photos
Users can add photo rom a ile older, or selected iles.
Add photo rom a older: Menu command “Photo” -> “Add Photo…” -> “From
Folder”. Select a older to add photo.
Add photo rom selected iles: Menu command “Photo” -> “Add Photo…” ->
“From Files”. Use Ctrl-Click, or Shi t-Click to select multiple iles.
9
The photo will show on the Photo View window. Users can add comments to
each photo. Users can also rotate, delete photo.
When photos are added, GPS Photo Tagger will automatically match photo and
GPS logged waypoints by time. Place marks will be created as a placeholder or
photos.
Browse photos
Click on the “next photo” and “prev photo” buttons to browse the photos.
Current photo and current place mark will be synchronized.
10
GeoTag – Save GPS Information into Photos
Menu command “Photo” -> “Write GPS in o into photos” will save the latitude,
longitude, and altitude into photo.
A progress window will show the writing progress.
Photo List Window
Photo list window will show the attributes o photos. The in ormation includes “ ile
name”, “date”, “place mark”, “latitude”, “longitude”, and “Geotagged lag”.
Synchronized
11
Upload Photos to Flickr/Locr
Menu command “Photo” > “Upload Photos to Flickr…” will invoke upload wizard.
Users can set “Title”, “description”, “Tag”, “Public or Private”, and “Upload photo
size”.
Menu command “Photo”>”Upload Photos to Locr…” will invoke upload wizard or
Locr. Please type in the user name and password.
12
I you want to upload geotagged photos directly on Flickr web site:
You have to turn on the ollowing option. "Your Account">"Privacy &
Permissions">"Import EXIF location data: Yes"
A ter the option is turned on, the uploaded photo will be put on map.
Go to Flickr > “You” > “Your map”, you can browse your photos on the map.
Shift Photo Time
Menu command “Photo” -> “Shi t photo time…” will invoke the shi t photo time
window. All the photo will be added (or subtracted) the speci ied time. The dates are
saved in the Exit parts o Jpeg or Ti ile. A ter the shi t, GPS Photo Tagger will
automatically match the photo and track waypoints again. User can put more than
365 in days.
13
Photo Comments
Support multi-language comments. The comments will be uploaded to Flickr, packed
in the kml ile.
Media List View
Users can import not only photos. All other media iles are allowed to be imported
and tagged to tracks according to the ile create times.
Google Earth Viewing
Command “File” -> “View in Google Earth” will invoke Google Earth to view the
tracks and photos. Users have to install the Google earth.
http://earth.google.com/
Save As KMZ File
Menu command “File” -> “Export as Kmz…” to save the tracks and photos in kmz ile.
You can import kmz ile to Google Earth. You can also send kmz ile to riends to
14
share their trips with riends as long as they have installed Google Earth on their
computers.
The picture size packed in the kmz ile can be set in the options dialog. Menu
command “Tools” -> “Options” > “Google Earth” > “Photo size in KMZ”.
Export As Html…
Command “File” > “Export Html File…” will invoke a preview dialog.
Users can save it as html ile or mht ile and share with riends.
Speed/Altitude View
Show speed graph, altitude graph, or both at the same time. The waypoints with photos
on it will be marked with square. Moving cursor on red square will display the photo.
You can pan le t, pan right, zoom in, zoom out in the altitude graph.
15
Track Editing
Switch to older “Track Editor” on the le t window. Move the cursor on the track will
show the preselected waypoint time. Click on track to select the whole track.
16
- Shi t-Click multiple selections
Select one waypoint, and then shi t-click on another waypoints. The
waypoints between these two waypoints will all be selected.
- Ctrl-Click multiple selections
Ctrl-Click on waypoints will toggle the waypoints selections.
- Area selection
Click on “Area Selection” button, drag an rectangle area. All the waypoints
and place marks in the rectangle area will be selected.
- Delete waypoints
Click on “Remove” button to remove the selected objects.
-
Split tracks
Click on a waypoint, and click right mouse button. Select command “Split
Track”.
17
- Merge tracks
Command “Track” > “Merge Tracks”.
Select the tracks. Press OK button.
- Undo/Redo
press “undo” “redo” buttons to undo/redo the edit actions. Multiple layers o
18
undo/redo are supported.
Save and Open Project
Menu command “File” -> “Save project” will save the tracks and photo as a project
ile.
Menu command “File” -> “Open project…” will open the saved project. The project,
photos, and photo comments will be restored a ter the project opened.
Time Zone Setting and aylight Saving Time
There are two time zone settings in “GPS Photo Tagger”. One is “Photo time zone”,
the other is “Display time zone”. “Photo time zone” is set to the same time zone o
your digital camera. The “Display time zone” is set or displaying purpose. For
example, I you are an Englishman and you travel to United State. The “Photo time
zone” should be set to “England” because your digital camera time zone is in
England, and the display time zone should be set to “United State”.
The “Photo time zone” by de ault is set to the PC de ault value. In most o the case
the de ault value is correct.
Menu command “Tools” -> “Options” will invoke the options dialog. You can set
“Photo Time Zone” in the dialog.
The “display time zone” setting is in the status bar. I it is daylight saving time, please
check the checkbox “Daylight Saving Time”.
19
Options
Menu command “Tools” > “Options…”
Distance unit:
Metric: Kilometer / meters will be used or displaying.
Imperial: Miles / eet will be used or displaying.
Lat/Long:
Degrees, minutes, seconds: Latitude and longitude will be display like 23°12’20”
Degrees: Latitude and longitude will be display like 23.22152°
Photo Time Zone:
The time zone o your digital camera time setting
Max photo/track di time:

This manual suits for next models

1

Other Holux Bicycle Accessories manuals

Holux FUNTREK 130 PRO User manual

Holux

Holux FUNTREK 130 PRO User manual

Holux GPS EZTOUR - VERSION 1.1 User manual

Holux

Holux GPS EZTOUR - VERSION 1.1 User manual

Holux GPSport 260 User manual

Holux

Holux GPSport 260 User manual

Holux GPSPORT 260 PRO User manual

Holux

Holux GPSPORT 260 PRO User manual

Holux GPS EZTOUR - V1.0 User manual

Holux

Holux GPS EZTOUR - V1.0 User manual

Holux GPSPORT 260 PRO User manual

Holux

Holux GPSPORT 260 PRO User manual

Holux GPSport 260 User manual

Holux

Holux GPSport 260 User manual

Holux GPSPORT 260 PRO User manual

Holux

Holux GPSPORT 260 PRO User manual

Popular Bicycle Accessories manuals by other brands

Giant CONTINUUM manual

Giant

Giant CONTINUUM manual

Acewell ACE-31xx series user manual

Acewell

Acewell ACE-31xx series user manual

Ituo Wiz20 user manual

Ituo

Ituo Wiz20 user manual

Marzocchi TENNECO 9001387 manual

Marzocchi

Marzocchi TENNECO 9001387 manual

AlzaPower APW-PHFCPB01B user manual

AlzaPower

AlzaPower APW-PHFCPB01B user manual

NiteRider Solas 250 user guide

NiteRider

NiteRider Solas 250 user guide

Aevon STD 100 user guide

Aevon

Aevon STD 100 user guide

Profile Design AERIA ULTIMATE RACE manual

Profile Design

Profile Design AERIA ULTIMATE RACE manual

Rock Shox Duke SL Air Service guide

Rock Shox

Rock Shox Duke SL Air Service guide

Ca Go Mounting Set for ISOFIX Compliant Child... Assembly instructions

Ca Go

Ca Go Mounting Set for ISOFIX Compliant Child... Assembly instructions

Pet Gear PG1400 instruction manual

Pet Gear

Pet Gear PG1400 instruction manual

i-joy FLAIR user manual

i-joy

i-joy FLAIR user manual

SUPER NOVA M99 Tail Light 45 manual

SUPER NOVA

SUPER NOVA M99 Tail Light 45 manual

foc.us RAVEN + JAM CARBON instructions

foc.us

foc.us RAVEN + JAM CARBON instructions

Bikefun T6 Setup manual

Bikefun

Bikefun T6 Setup manual

CARFACE DO CF19591-3EFA instruction manual

CARFACE

CARFACE DO CF19591-3EFA instruction manual

SUPER NOVA E3 PURE 3 manual

SUPER NOVA

SUPER NOVA E3 PURE 3 manual

SUPER NOVA E3 PURE 3 manual

SUPER NOVA

SUPER NOVA E3 PURE 3 manual

manuals.online logo
manuals.online logoBrands
  • About & Mission
  • Contact us
  • Privacy Policy
  • Terms and Conditions

Copyright 2025 Manuals.Online. All Rights Reserved.